4 Composite Applications
While individual Java EE applications can be managed using Enterprise Manager, your business needs may require that these applications be managed as a group. This logical application group is called a composite application.
To access composite applications in Enterprise Manager, select Composite Applications from the Targets menu. From the Composite Applications page you can view existing composite applications or create new ones. (For a demonstration of Composite Applications, see Composite Application Management.)
This chapter explains how to use composite applications in Enterprise Manager.
4.1 Viewing the Composite Application Dashboard
Each instance of Composite Application can have a different home page.
You can modify this page by adding and dropping regions using the Personalize Page icon located at the top-right of the page. In turn, you can customize each region by adding content and changing the configurable properties of the region.
The Target Navigation tree, located at the left, shows the direct members of the composite application. These are the members you selected when creating the composite application. The navigation tree also includes the related members that were selected during the creation process.
Each direct target lists its related members. The following lists the possible direct targets and their related members:
-
Application Deployments
Contains Application Deployments, as well as clustered Application Deployments
-
Databases
Contains only databases related to the targets in this composite application
-
Fusion Applications
Contains Fusion Applications, as well as Fusion Application clusters
-
Hosts
Contains associated host targets
-
Others
Contains other targets that do not have their own folder, for example, Oracle Homes, Oracle Management Agent, and so on
-
Service Oriented Architecture (SOA)
Contains OSBs, SOA Composites, and SOA Infrastructure
-
WebLogic Domains
Contains all participating domains
The overall summary page provides additional details for the composite application (see Figure 4-1):
-
Status
Availability of all the members
-
Oracle WebLogic Server Load
Includes Requests (per minute) and Work Manager Requests (per minute)
-
Request Processing Time and Cache Statements Used (%)
-
Overview of Incidents and Problems
Click the number of incidents to view a table listing the reported incidents.
-
Java Virtual Machine Realtime
-
Services
-
SLA Status
Figure 4-1 Composite Application Dashboard
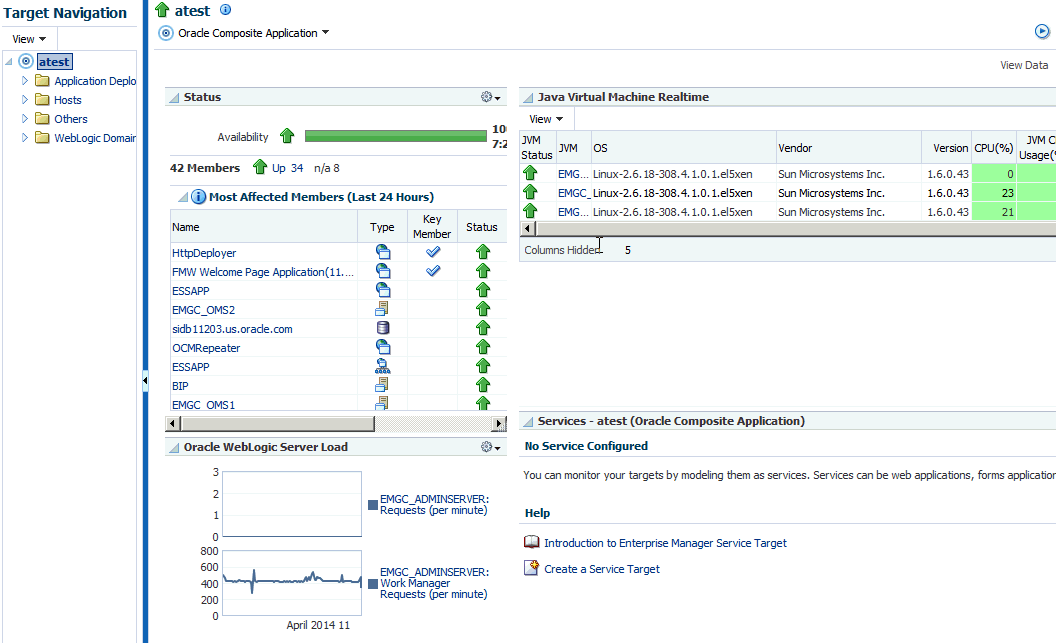
Description of "Figure 4-1 Composite Application Dashboard"
4.2 Creating a Composite Application
To create composite applications, perform the following steps.
-
From the Targets menu, select Composite Applications.
-
On the Composite Applications page, click Create. The first page of the Create Composite Application wizard appears.
Figure 4-2 First Page of the Create Composite Application Wizard
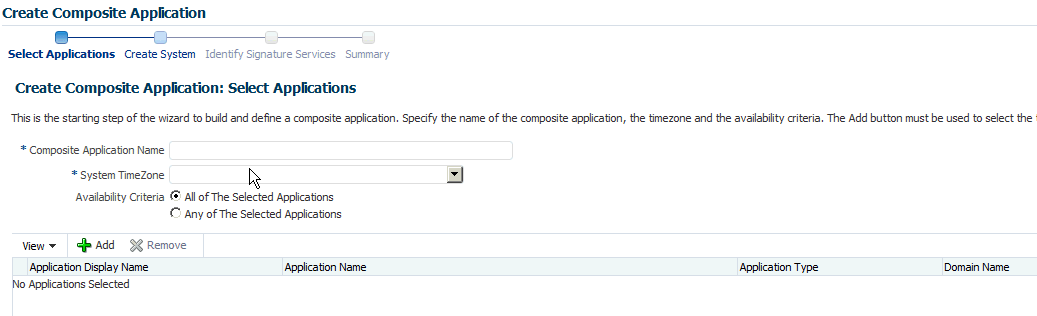
Description of "Figure 4-2 First Page of the Create Composite Application Wizard"
-
On the Select Applications page:
-
Enter the composite application name.
-
Specify a time zone.
-
Specify the Availability Criteria. Select either All of the Selected Applications or Any of the Select Applications. When you select 'All of the Selected Applications' option, the availability of the composite application is shown as Up when all the members of the composite application are up.
When you select 'Any of the Selected Applications' option, the availability of the composite application is shown as Up if any of the members of the composite application are up.
-
Click Add. The Search and Select: Targets dialog appears.
-
Filter the application list (optional). You can filter the list by Target Type, Target Name, or Host on which the application(s) reside. Specify the desired filter parameters and click Go.
-
Select the applications to be added. Use the Shift or Control key to select multiple applications.
-
Click Select. The selected applications now appear in the Select Applications page table.
-
Click Next.
Note: You can remove applications that you do not want to be part of the composite application. Select the target and click Remove.
-
-
On the Create System page:
Applications previously selected on the Select Applications page are displayed in the Selected Members table. Based on these applications, related targets are displayed in the Related Members table. In the Related Members table, you can edit the system membership to add additional components or remove existing components.
-
From the Related Members table, click Add. The Select Targets dialog appears.
-
Filter the application list (optional). You can filter the list by Target Type, Target Name, or Host on which the applications reside. Specify the desired filter parameters and click Search.
-
Select the applications to be added. Use the Shift or Control key to select multiple targets.
-
Click Select. The Related Members table automatically refreshes with the newly added targets.
-
Click Next.
Note: You can remove targets that you do not want to be part of the composite application. Select the target and click Remove.
-
-
On the Identify Signature Services page:
Optionally, you can model the key entry points of the composite application by defining them as Enterprise Manager services, thus identifying them as signature services for the composite application. The Services List table lists all Web services exposed by the applications you selected in the first step of the wizard.
To identify signature services:
-
Select the desired Web services from the Services List table.
-
Click Edit. The Configure Service dialog appears.
-
Enter the EM System Name. Note that you cannot change the name of the system if it is already defined within Enterprise Manager.
-
Click OK on the Configure Service dialog.
-
Click Next.
-
-
On the Summary page:
Review all selections you have made for the composite application. You can go back to any previous step of the wizard to make modifications. When ready, click Submit to create the composite application.
4.3 Editing a Composite Application
You can edit a composite application in two ways.
-
From the Targets menu, select Composite Applications. Highlight a composite application and click Edit.
-
If you are on the Composite Application home page, select Target Setup from the Oracle Composite Application menu, then select Edit Composite Application.
On the Edit Composite Application page, follow the steps. See Creating a Composite Application for information on how to fill out each step.
Note: Ensure to click Save and Exit when you have finished making changes. Any changes made will be applied for only this target.
4.4 Editing a Composite Application Home Page
You can change the layout of the composite application home page, add content, and edit and remove regions.
You can edit a composite application home page in two ways:
-
On the Composite Applications home page, select a composite application and click Edit Homepage.
-
On the Composite Application home page, click the Personalize button located adjacent to the Page Refreshed field.
When you choose to Add Content, you are adding regions to the page. When you edit a region, you change the properties of the region.
Note: Ensure to click Close when you have finished making changes. Any changes made will be applied for only this target.
4.5 Using Composite Applications
Using the Composite Applications page, you can view the status and statistics of the various components. In addition, using the target navigation tree enables you to access all related targets in the composite application.
Study the following regions to determine if the applications are running at optimal performance and if not, resolve the issues.
-
Status
Provides the availability of the applications.
-
Up (green) arrow means that at least one application is up or all applications are up.
-
Down (red) arrow means that at least one application is down.
-
n/a (not applicable) means that the target does not have a status.
If an application is down, determine if that is a scheduled down time.
-
-
Oracle WebLogic Server Load
Analyze the Requests (per minute) and Work Manager Requests (per minute) metrics. By clicking the metric associated with an application, you can see problem analysis for the metric.
-
Request Processing Time (ms) and Cached Statements Used (%)
By clicking the metric for the application, analyze the statistics for that metric.
-
Overview of Incidents and Problems
Click the number associated with either an incident or a problem. For example, if a problem is reported for a particular application, the Incident Manager page summarizes the severity, what target is exhibiting the problem, and so on. The detailed information provides you the opportunity to acknowledge the problem, see other notifications that have been sent regarding the problem, resolve the problem using the guided resolutions, and so on.
-
Java Virtual Machine Realtime
-
Services
Provides the overall health of the services, how long the service has been up, and so on.
-
SLA Status
Provides data regarding service level objectives. This section reports when a service has been breached.