3 Discovery of the IBM DB2 Database Target
This chapter describes how to add an IBM DB2 Database target to Enterprise Manager Cloud Control.
The following sections are provided:
3.1 Adding Instances for Monitoring
After successfully deploying the plug-in, follow these steps to add the plug-in target to Cloud Control for central monitoring and management:
-
From the Setup menu, select Add Target and then Add Targets Manually.
-
In the Add Targets Manually page, select Add Targets Declaratively by Specifying Target Monitoring Properties, select Target Type as IBM DB2 Database, select a Monitoring Agent and click Add Manually.
-
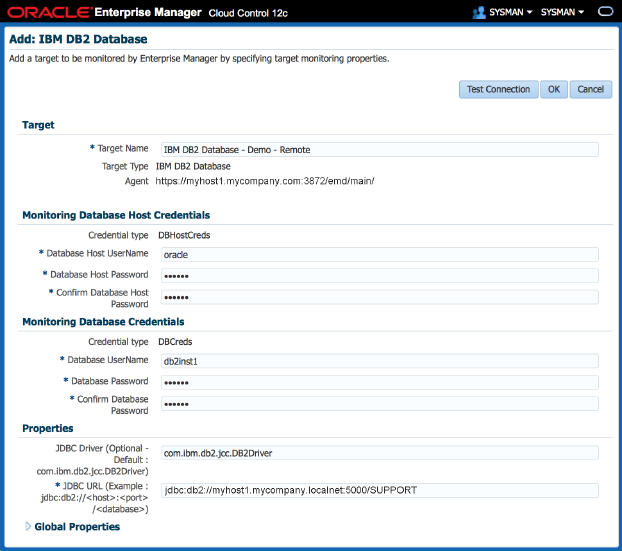
In the Add IBM DB2 Database page (Figure 3-1), provide the following information for the properties:
-
Target Name: Unique target name across all the Cloud Control targets, such as
DB2_Hostname. This is the display name in Cloud Control. -
Monitoring Database Host Credentials
-
Database Host User Name: Operating System account for the DB2 Database Host.
-
Database Host Password: Corresponding password for the Database Host User Name.
-
Confirm Database Host Password: Confirm the Database Host Password.
-
-
Monitoring Database Credentials
-
Database User Name: Valid User Name for the Database.
-
Database Password: Password for the Database User Name.
-
Confirm Database Password: Confirm the Database Password.
-
-
Properties
-
JDBC Driver: (Optional) Name of the DB2 Universal JDBC Driver. For example:
com.ibm.db2.jcc.DB2Driver
-
JDBC URL: URL name for the IBM DB2 JDBC Driver connectivity. For example:
jdbc:db2://<server>:<port>/<database>
The JDBC URL argument represents a data source. Parameter definitions are shown in Table 3-1:
Table 3-1 JDBC URL Parameter Definitions
JDBC URL Parameter Definition jdbc:db2
Indicates that the connection is to a DB2 UDB server.
server
Fully qualified host name or IP address of the database server.
port
TCP/IP server port number assigned to the database server, which is an integer between 0 and 65535. The default port for IBM DB2 Database is 50000.
database
Database alias, which refers to the DB2 database catalog entry on the DB2 client.
The database argument is the database name defined during DB2 UDB (LUW) installation.
-
-
-
Click Test Connection to make sure the parameters you entered are correct.
Note:
After you deploy and configure the plug-in to monitor one or more targets in the environment, you can customize the monitoring settings of the plug-in. This alters the collection intervals and threshold settings of the metrics to meet the particular needs of your environment. If you decide to disable one or more metric collections, this could impact the reports that the metric is a part of.3.2 Verifying and Validating the Plug-in
After waiting a few minutes for the plug-in to start collecting data, follow these steps to verify and validate that Enterprise Manager is properly monitoring the plug-in target:
-
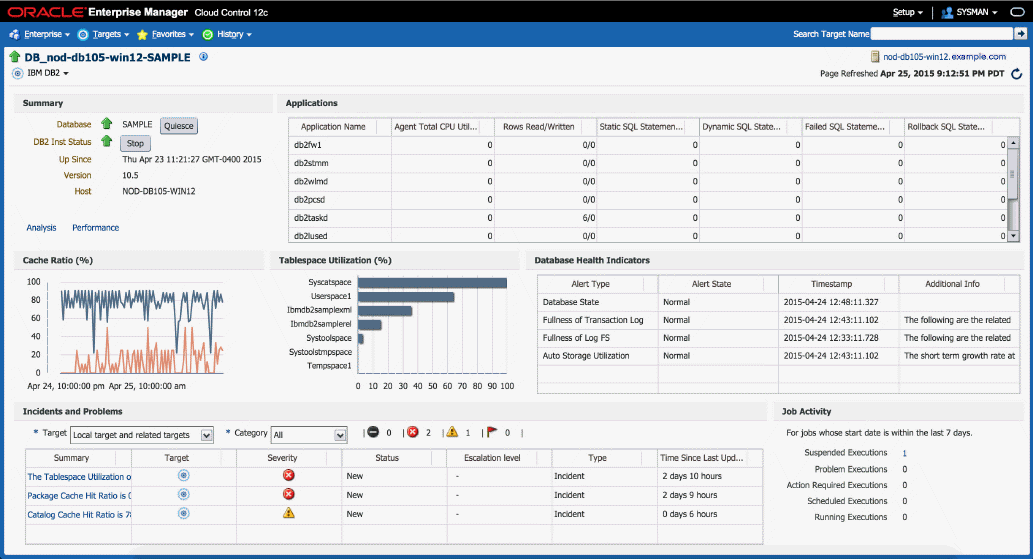
Click the IBM DB2 Database target link from the All Targets page.
The IBM DB2 Database home page appears as shown in Figure 3-2:
-
Verify that no metric collection errors are reported by clicking Monitoring and then Metric Collection Errors from the Target menu.
-
Ensure that reports can be seen and no errors are reported by clicking Information Publisher Reports in the Target menu and viewing reports for the IBM DB2 Database target type.
-
Ensure that configuration data can be seen by clicking Configuration and then Last Collected in the Target menu. If configuration data does not immediately appear, click Refresh in the Latest Configuration page.
-
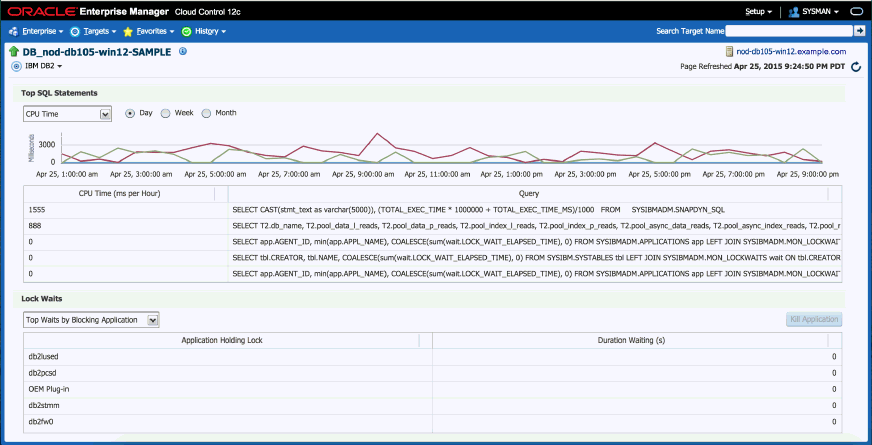
Ensure that the Analysis page can be viewed by clicking Analysis in the Target menu. The IBM DB2 Database Analysis page appears as shown in Figure 3-3:
-
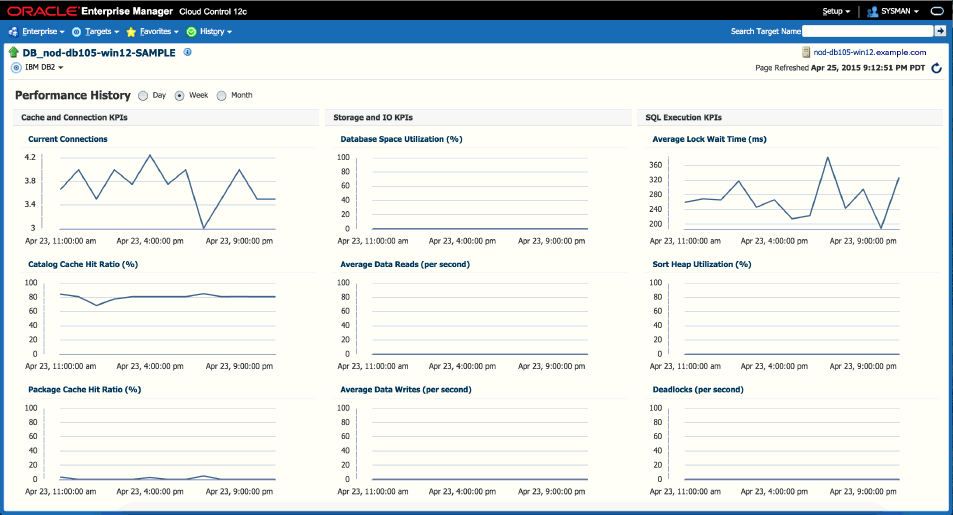
Ensure that the Performance page can be viewed by clicking Performance in the Target menu. The IBM DB2 Database Performance page appears as shown in Figure 3-4: