3 Configuring the Connector
This chapter explains how to perform tasks directly or indirectly related to configuring the connector, and also discusses the post-configuration task of navigating between the Enterprise Manager and HP Service Manager consoles. The following topics are discussed:
3.1 Creating a Connector Instance
To create a connector instance:
-
From the Setup menu of the Enterprise Manager console, select Extensibility, then Management Connectors.
-
Select a connector type of HP Service Manager 9 Connector from the Create Connector drop-down list, then click Go.
-
Enter the connector name and description on the next page, then click OK.
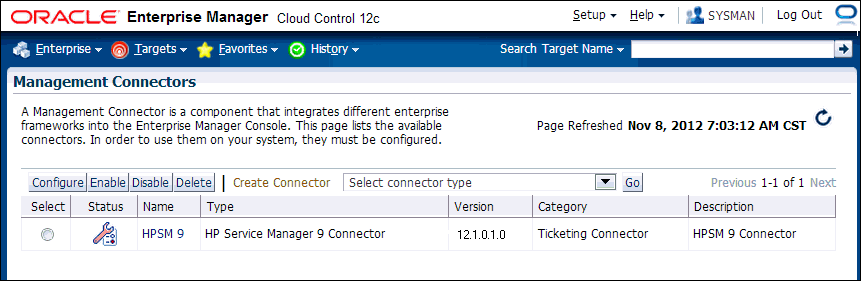
The connector instance appears as unconfigured in the Management Connectors page, as shown in Figure 3-1.
3.2 Configuring the Connector
To configure the connector:
-
Click on the name of the HP Service Manager Connector.
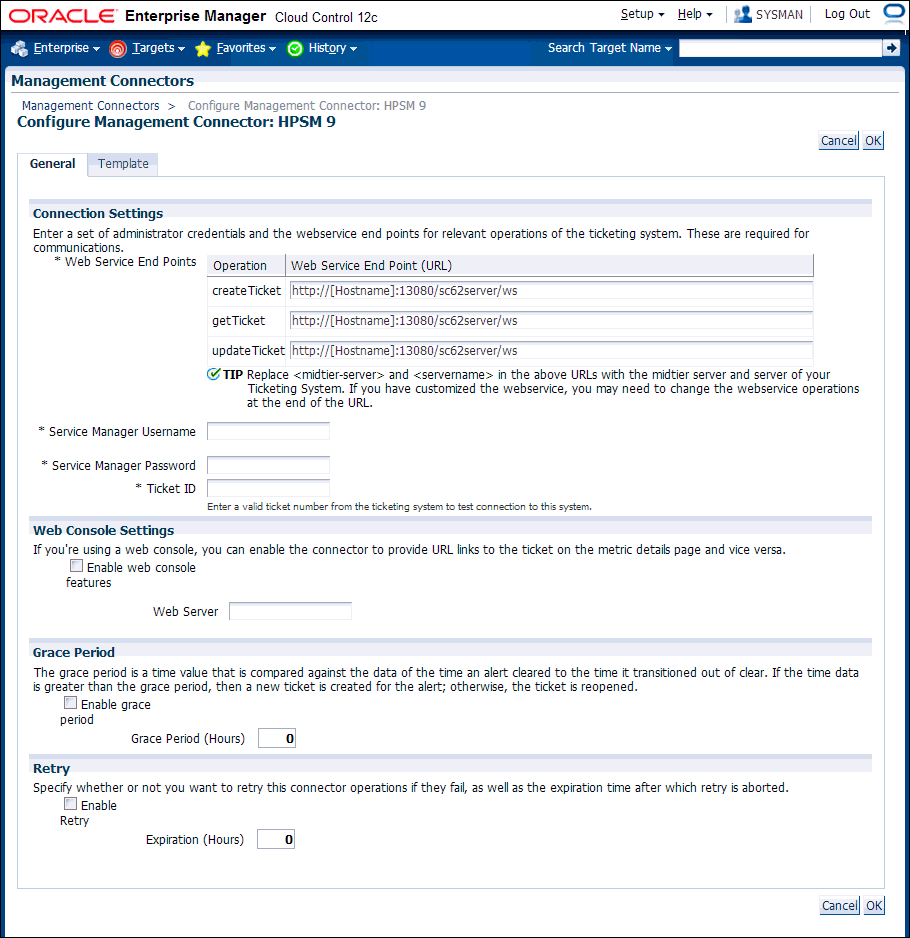
The General tab of the Configure Management Connector page appears, as shown in Figure 3-2.
-
Provide the required settings. See Section 3.4, "Providing General Settings" for details.
-
Click OK.
The Management Connectors page reappears. The row for the HP Service Manager Connector should have a check mark in the Configured column.
-
Optionally, you can click the configure icon again to check for the available ticket templates.
-
Click the Ticket Templates tab.
All out-of-box ticket templates should appear in the table.
If you choose HTTPS as the protocol to establish a connection between HP Service Manager and Enterprise Manager, see "Importing the Adapter Certificate into Enterprise Manager" in Appendix A.
3.3 Enabling or Disabling the Connector
You can enable or disable a connector from the Management Connectors page by selecting the connector and clicking either Enable or Disable. After a connector is disabled, a red cross icon appears under the status column. By default, the connector instance is enabled as soon as it is configured.
Note:
Only enabled connectors are available for ticketing operations.3.4 Providing General Settings
The following sections explain how to provide various configuration details.
3.4.1 Connection Settings
The HP Service Manager Connector communicates with the Service Manager server through a web service provided through the Service Manager web tier. All fields are mandatory.
-
Web Service End Points - URL of the web service end-point to call for the createTicket, updateTicket, and getTicket operations.The Service Manager web service URL is formatted as shown below:
http://[Hostname]:13080/sc62server/wsIn most cases, you will just need to replace [Hostname] with the host name or IP address of the server where the web tier is located. The port number defaults to 13080, so you only need to change the port number if you have changed the port used by the web tier. The only other change you might make is the protocol. If you want to use SSL, you need to change the protocol from http to https.
Note:
If you want to use SSL to encrypt communications between Enterprise Manager and Service Manager, see "Importing the Adapter Certificate into Enterprise Manager" in Appendix A. -
Service Manager Username - Specify the user name for HTTP basic authentication supported by the HP Service Manager web services. This user name must have the appropriate privileges/roles in HP Service Manager to create, update, and query tickets in the HP Service Manager. All tickets created through the connector are generated with this user account.
-
Service Manager Password - Specify the password associated with the user specified in the Service Manager Username field.
-
Ticket Number - Enter a valid ticket number to test the connection when you save the configuration.
-
If you specify the correct Web service end-points and enter a valid ticket number, the following message appears on the Management Connectors page after you click OK:
Connection test succeeded. The configuration was saved.
-
If you have not previously saved the connector configuration and enter incorrect Web service endpoints or an invalid ticket number, the following message appears on the Management Connectors page after you click OK:
Connection test failed. The configuration was saved.
-
If you have previously saved the connector configuration and enter incorrect Web service endpoints or an invalid ticket number, the following message appears on the Management Connectors page after you click OK:
Connection test failed. The configuration was not saved.
-
3.4.2 Web Console Settings
Web Console settings are required if you want the Connector to provide links to HP Service Manager tickets created by Enterprise Manager in the context of an incident. This feature requires configuration changes in HP Service Manager. See Section 3.6, "Configuring the HP Service Manager Web Console" for details.
To enable this functionality, provide the following Web console settings:
-
Enable web console - Check this box to enable launching of the HP Service Manager ticket page within context from Enterprise Manager.
-
Web Server - Specifies Web server information the connector uses to connect to the web tier when accessing incidents in HP Service Manager. Set the value using the following format:
<hostname>:<port>/<tier>
Where <hostname> is the hostname or IP address of the web tier server machine, <port> is the port that the web tier is configured to support, and <tier> is the name of the web services tier. The default value for the port is 8080, and the default name of the web tier is sm7.
A sample value for the field is as follows:
10.2.1.110:8080/sm7
3.4.3 Grace Period
You can enable and disable the grace period and configure its value. By default, the grace period is disabled. See Section 1.4, "Grace Period" for details. This setting applies to all incidents the HP Service Manager Connector processes.
3.4.4 Retry
You can enable and disable the Retry option and configure its interval value. By default, the Retry is disabled. See Section 1.5, "Retry" for details. This setting applies to all incidents the HP Service Manager Connector processes.
3.5 Working with Ticket Templates
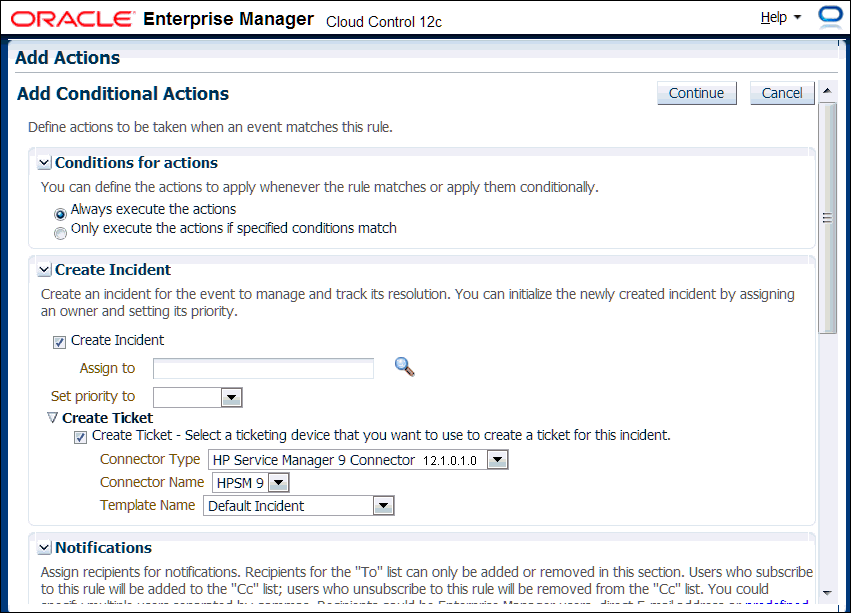
When a connector instance is created in Enterprise Manager, all associated templates are available for ticket create/update operations. For Auto Ticketing, a notification method is created based on the ticket template selected while creating an incident rule. For manual ticketing, you select a ticket template while creating a ticket from the Enterprise Manager console, as shown in Figure 3-3.
There are two default templates for each of the HP Service Manager Connectors. The default templates for the HP Service Manager 9 connector are:
-
ServiceManager_9_Default_Incident_AutoClose.xsl
-
ServiceManager_9_Default_Incident.xsl
Tip:
See Section 5.1, "Out-of-Box HP Service Manager Templates" for detailed information about these templates.3.5.1 Adding Ticket Templates
If you want to create a custom template, you need to add ticket templates before they are recognized in Enterprise Manager. For each new custom template, run the following emctl register_template connector command as a user with execute privilege on emctl and the ability to read the ticket template:
$ORACLE_HOME/bin/emctl register_template connector
-t <template.xsl> -repos_pwd <reposPassword>
-cname <connectorName> -iname <internalName>
-tname <templateName> -ttype 2 [-d <description>]
Where —
<template.xsl> is the full path name of the template file.
<reposPassword> is the Enterprise Manager root (SYSMAN) password.
<connectorName> is the name of the connector instance installed in step 3 of Section 3.1, "Creating a Connector Instance".
<internalName> is the internal name to use for the template.
<templateName> is the name to display for the template.
<description> is the description of the template.
For example, the following command adds a new outbound template (newTemplate.xsl) for the connector instance with the HP Service Manager 9 Connector Instance:
emctl register_template connector
-t /home/oracle/custom_templates/template.xml
-repos_pwd sysmanpass
-cname "HPSM 9"
-iname "newTemplate"
-tname "New Template"
-ttype 2
-d "Demo template"
3.5.2 Viewing Template Code
To view template code, do the following:
-
Select the connector instance and go to the Configure Management Connector page.
-
Select the Template tab.
-
Click a template name or click View to view the XSLT code for the template.
The ticket templates are in XSLT format. A basic knowledge of XSLT is required to understand the code.
3.5.3 Removing a Template
To remove a template, do the following:
-
Select the connector instance and go to the Configure Management Connector page.
-
Select the Template tab.
-
Select the template and click Delete.
-
Click Yes to confirm the delete operation.
Important:
If the template you delete has an incident rule associated with it, ticketing will not function for this particular incident rule after the deletion.3.5.4 Editing Templates
Note:
The Edit Template feature is available in Oracle Enterprise Manager Release 12.1.0.2 and later.To edit an existing ticket template for Release 12.1.0.2 and later, do the following:
-
Select the connector instance and go to the Configure Management Connector page.
-
Select the Template tab.
-
Select the template and click Edit.
-
Edit the Description and Template Contents fields as needed, then click Save.
The ticket template is automatically registered. Saving the registered template updates it in the repository.
3.5.5 Restoring Templates
After you edit or customize a template, you can restore it to its previous default contents if needed by performing the following steps.
Note:
The Restore feature is available in Oracle Enterprise Manager Release 12.1.0.2 and later.You can restore out-of-box templates that you have may edited or customized to their default values. You cannot restore new templates that you have created (using the emctl register_template command).
-
Select the connector instance and go to the Configure Management Connector page.
-
Select the Template tab.
-
Select the template and click Restore.
-
Click Yes in the confirmation page that appears in order to restore.
3.6 Configuring the HP Service Manager Web Console
The web console provides an alternative view for HP Service Manager. You can either use the HP Service Manager Client (which is a standalone application) or use the web application to manage incidents. Connector integration is possible for both of these methodologies.
If you want to have links to HP Service Manager tickets within Enterprise Manager, configuration changes are required in HP Service Manager.
To configure the HP Service Manager web console:
-
Locate the web.xml file under the following path and verify its configuration:
webtier-9.20\WEB-INF\web.xml
-
Make sure the serverHost parameter value is changed from local host to the fully-qualified name of the web tier server.
-
Make sure the querySecurity parameter is set to false as follows:
<init-param>
<param-name>querySecurity</param-name>
<param-value>false</param-value>
-
If any changes were made to the configuration file, you must restart the web application server for the changes to take effect.
Tip:
See the "Generating Web Tier URL Queries" section in the Service Manager client help contents for additional information.Note:
The ticket URL generated requires parameters, such as the ticket ID, that need to be part of the URL string. This requires that the URL security be turned off. Your security team may need to evaluate if the risks outweigh the need to access the HP Service Manager ticket directly from Enterprise Manager using the ticket URL. HP Service Manager still requires user authentication when accessing the ticket through the URL.3.7 Navigating Between Enterprise Manager and HP Service Manager
After you have configured the connector, you will want to access incidents from the Enterprise Manager and HP Service Manager consoles. The following sections explain how to switch from one console to the other.
3.7.1 Navigating from Enterprise Manager to HP Service Manager
To navigate from Enterprise Manager to HP Service Manager:
-
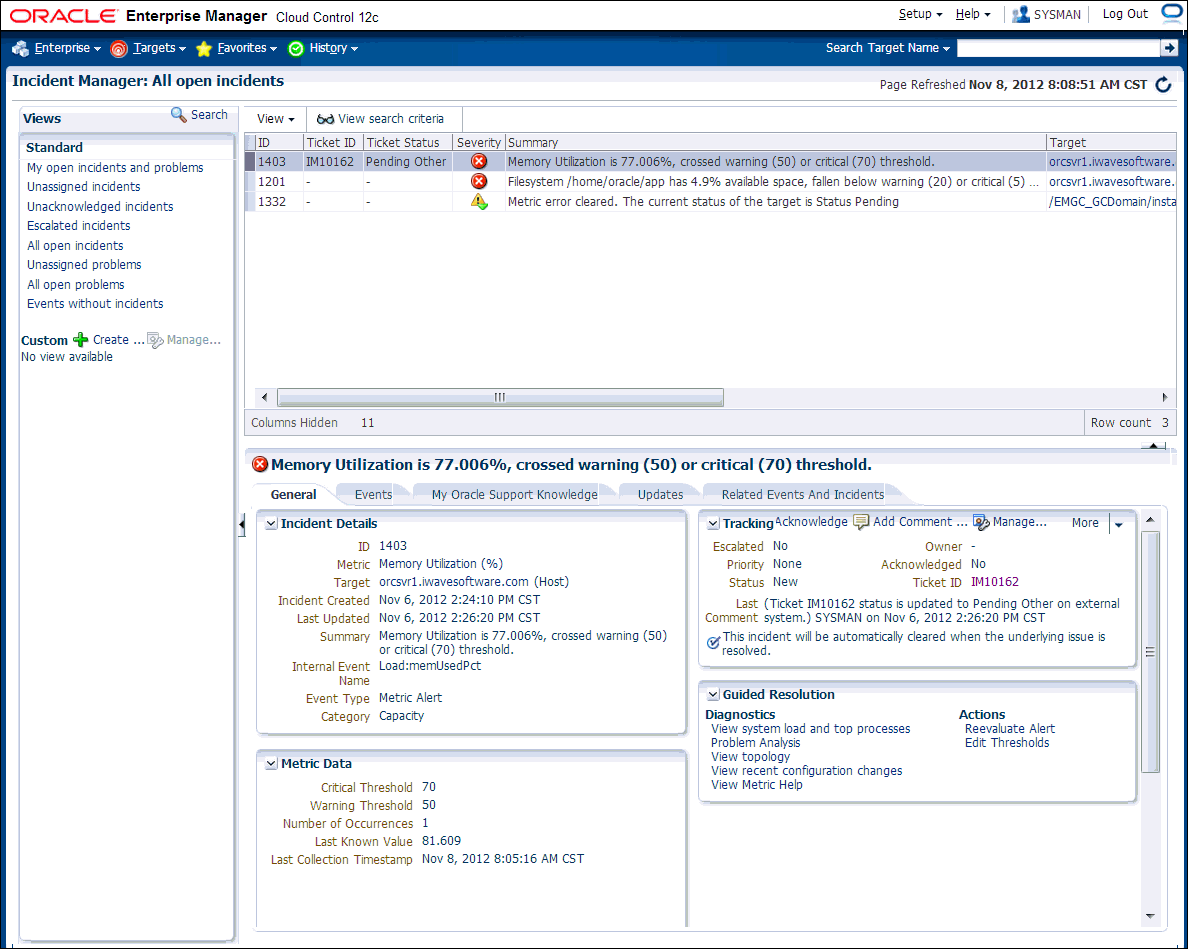
From the Enterprise Manager console Enterprise menu, select Monitoring, then Incident Manager.
The open incidents appear.
-
Click on the desired incident to display information for the incident.
-
Click on the ticket identifier listed to the right of the Ticket ID label in the Tracking section as shown in Figure 3-4.
You will be forwarded to the HP Service Manager Web console login page.
-
Provide valid HP Service Manager account details.
The HP Service Manager incident details associated with this incident are displayed through the HP Service Manager web console as shown in Figure 3-5.
Note:
If you do not use the HP Service Manager Web console, uncheck the "Enable web console features" option discussed in Section 3.4.2, "Web Console Settings" so that the ticket ID is shown in plain text. Otherwise, it is displayed as a link that does not function.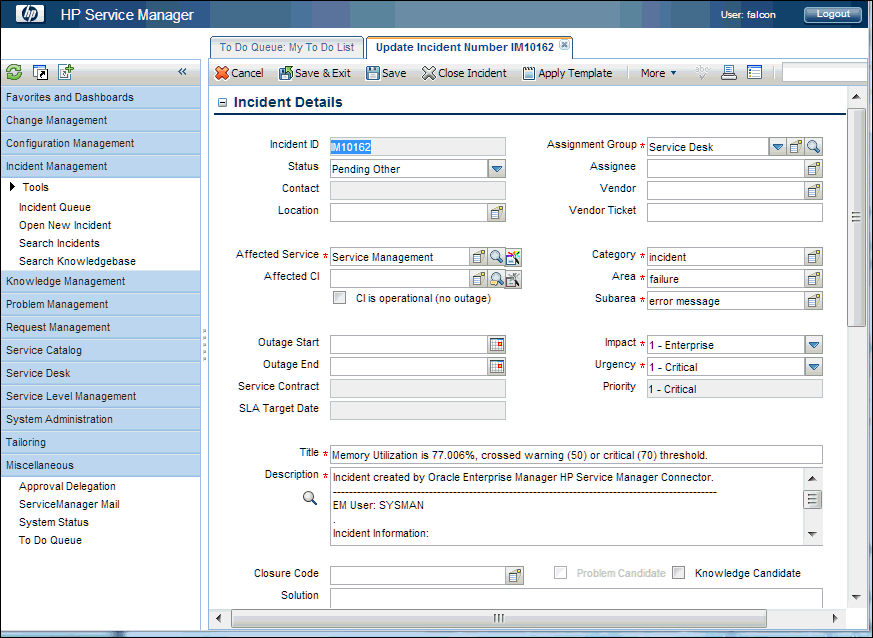
3.7.2 Navigating from HP Service Manager to Enterprise Manager
To navigate from HP Service Manager to Enterprise Manager:
-
At the HP Service Manager client, open an incident from Enterprise Manager as shown in Figure 3-6.
-
Scroll down in the Description field to the URL: field and click on the URL listed.
This forwards you to the Enterprise Manager console login page. After you provide the Enterprise Manager user name and password, you are forwarded to the incident related to this ticket.
Note:
-
The Enterprise Manager user whose name you specify should at least have
Viewprivileges on the target on which the alert was raised. -
On the HP Service Manager console, if the URL appears as text, you need to cut and paste the URL into the browser.
