| Oracle Advanced Monitoring and Resolution User's Guide, Release 3.0.0.0 for all platforms Part Number E24680-02 |
|
|
PDF · Mobi · ePub |
| Oracle Advanced Monitoring and Resolution User's Guide, Release 3.0.0.0 for all platforms Part Number E24680-02 |
|
|
PDF · Mobi · ePub |
The Configuration Item Dashboard provides Oracle Advanced Monitoring and Resolution users with the ability to view and administer their CIs.
This section describes the following tasks:
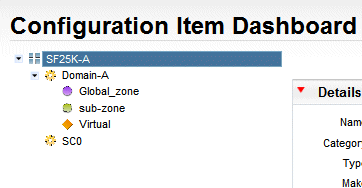
The Configuration Item Dashboard displays the CIs for the selected system in a hierarchal tree in the upper left of the page as shown in Figure 3-2.
The Physical Element is a top-level CI, and Computer Systems, Operating System, Application Systems, and Services are the subordinates.
When you select a CI from the CI tree, Oracle Advanced Monitoring and Resolution displays the information about that CI in the Details area of the Configuration Item Dashboard page. In this area, you can view both mandatory and optional CI attributes, such as name, category, and status.
Use the Production Readiness area to check if the selected CI is ready for production. It uses the following icons to provide status information:
| The specified requirement is met and is ready for production. | |
| The specified requirement is not met and must be completed successfully before production. |
Use the Tickets area to view any Incident tickets or Change Management (CM) tickets associated with the selected CI.
Use the IP Addresses area to view IP Addresses for a Computer System CI. The IP Address is associated with a Computer System and is the same for all its subordinate CIs.
Use the Type of Service area to view the Type of Service (TOS) and Level of Service (LOS) assigned to the selected CI.
Use the Properties area to view and manage additional properties for the selected CI. Oracle Advanced Monitoring and Resolution contains a predefined list of properties for a service delivery organization. For each property, Oracle Advanced Monitoring and Resolution indicates whether the property is visible to service delivery users only or to all users.
Use the Location area to view the facility assigned to the selected CI. From the Select Facility ... list, you can change the location of the CI.
Use the Vendor Support Contracts area to view the vendor support contracts associated with the selected CI. Click Create Vendor Support Contract to add a vendor support contract to the list.
Use the Protocol Services area to view the protocols assigned to a CI. A CI can have one or more assigned protocols depending on the actions that a user can perform in the JumpGate application, or the level of security required for this CI.
Use the CI Groups area to view the list of CI Groups to which the selected CI is assigned. You can create a static group or add an existing group to the list.
Use the Attachments area to view and download files associated with the selected CI. Click Add Attachment to attach a file to the selected CI.
Use the Parent area to view a parent of the selected CI. You can change the parent for your Physical Element CIs and Computer System CIs. From the Select Parent ... list, select a new parent, then click Set. For other CIs, Oracle Advanced Monitoring and Resolution creates the parent automatically and it cannot be changed.
Note:
You can remove a CI as a parent, that is, unparent a CI by selecting an empty entry from the Select Parent ... list.Note:
Only Physical Elements can be parents. Physical Elements can have other Physical Elements as Parents.
|
Copyright © 2006, 2011, Oracle and/or its affiliates. All rights reserved. Legal Notices |
|