5 Understanding CSS Portlets
This chapter contains the following topics:
5.1 Using CSS Portlets
This section discusses Customer Self Service portlets and portal access. This section of the guide should be used in conjunction with the JD Edwards EnterpriseOne Customer Self-Service Implementation Guide
5.1.1 Customer Self Service Portlets
Customer Self Service portlets enable you access JD Edwards EnterpriseOne applications, Web-based content, and other resources in order to utilize cases, solution advisor, equipment, service contracts, and service work orders:
| Functional Area | Portlet Functions |
|---|---|
| Cases |
|
| Solution Advisor | Troubleshoot case or service order issues. |
| Equipment |
|
| Service Work Order |
|
| Service Contracts |
|
| Sales Orders |
|
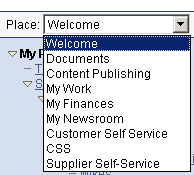
Portlets are grouped by type, which means that portlet applications for service and support appear in two different places. After you sign in to the Customer Self Service portal you then specify a place. Portlet applications are grouped in the CSS for Service or CSS for Support places. Here are the portlet applications for each place:
5.1.2 Portal Access
Portals are Web-based, so you access the Customer Self Service portal by opening a window in a Web browser such as Microsoft Internet Explorer. The implementation team that installed and configured the JD Edwards EnterpriseOne Customer Self Service application software should have provided you with a URL (Universal Resource Locator) to access the portal.
After launching the Web browser, enter the URL in the browser's Address field. (Alternatively, the implementation team might have added a shortcut to the portal in your Favorites.) The portal Welcome page appears.
5.1.3 Additional Information
Because portlets contain a subset of the functionality contained in the JD Edwards EnterpriseOne applications, features and tasks are not fully described in this section. For example, this section does not describe how to add a new service order because that information is described in another guide.
See also JD Edwards EnterpriseOne Applications Service Management Implementation Guide and JD Edwards EnterpriseOne Applications Customer Relationship Management for Support Implementation Guide.
5.2 Accessing Portal Application Portlets
This section discusses how to access portal application portlets.
5.2.1 Accessing Portal Application Portlets
Access the portal Welcome page.
-
Click the Sign In link in the upper right corner.
-
On the standard JD Edwards EnterpriseOne sign-in form, enter your user ID and password to enter the portal.
-
At the Place menu, select CSS for Service or CSS for Support. After you select one of these portal places, the application portlet windows for that place appear.
5.3 Understanding CSS Portlets
JD Edwards EnterpriseOne Customer Self Service portlets enables customers access to their information, provides them with timely and accurate information, and allows them to:
-
Perform administrative tasks.
-
Search for orders, invoices, shipments.
-
Perform CSS tasks.
-
Review account balance.
-
Review receivables status.
-
Review account aging.
5.4 Using the CSS for Sales Portlets
This section discusses the portlets available for sales tasks.
5.4.1 Shipment Status Tracking (P42S02)
The Shipment Status Tracking portlet enables customers to:
-
Review Shipment Status
-
Track Shipment With Carrier
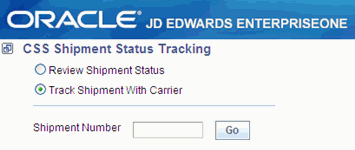
Figure 5-3 Shipment Status Tracking Portlet
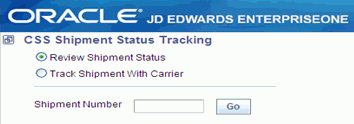
Description of "Figure 5-3 Shipment Status Tracking Portlet"
Selecting the Personalize icon will enable the radio button selections to be pre-selected.
| Value | Selection |
|---|---|
| Blank | Review Shipment Status |
| 1 | Track Shipment With Carrier |
In this example we will pre-select Track Shipment With Carrier by entering a 1 in the Please Select Default Shipment Status Tracking Type field.
Figure 5-4 Shipment Status Tracking Portlet Personalization Preferences
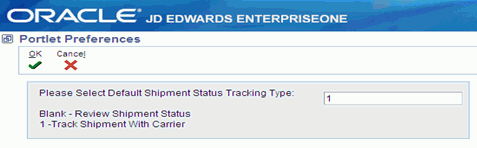
Description of "Figure 5-4 Shipment Status Tracking Portlet Personalization Preferences"
This will result in the CSS Shipment Status Tracking portlet being presented with the Track Shipment With Carrier radio button already selected by default.
Figure 5-5 Shipment Status Tracking Portlet Example
Description of "Figure 5-5 Shipment Status Tracking Portlet Example"
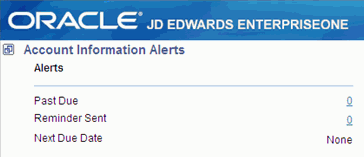
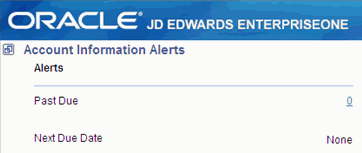
5.4.2 Receivables Status (P42S03)
The Receivables Status portlet enables customers to monitor account information alerts for:
-
Accounts past due.
-
Accounts where a past due reminder has been sent.
-
Next Due Date.
Selecting the Personalize icon will enable the alert selections to be pre-selected.
| Selection | Value | Result |
|---|---|---|
| Hide Past Due | Blank | Display |
| Hide Past Due | 1 | Hide |
| Hide Reminder Sent | Blank | Display |
| Hide Reminder Sent | 1 | Hide |
| Hide Next due Date | Blank | Display |
| Hide Next due Date | 1 | Hide |
In this example we will pre-select Reminder Sent by entering a 1 in the Hide Reminder Sent field.
Figure 5-7 Receivables Status Portlet Personalization Preferences
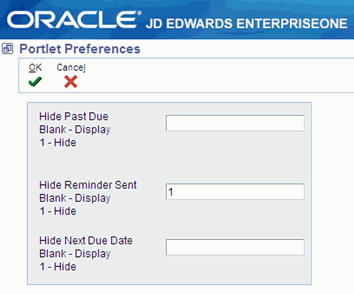
Description of "Figure 5-7 Receivables Status Portlet Personalization Preferences"
This will result in the Receivables Status portlet being presented with Past Due displayed, Reminder Sent hidden, and Next Due Date as the default display.
Figure 5-8 Receivables Status Portlet Example
Description of "Figure 5-8 Receivables Status Portlet Example"
5.4.3 Shipment Delivery Information (P42S04)
The Shipment Delivery Information portlet enables customers to monitor account information and alerts for:
-
As of date.
-
Deliveries Due.
-
Deliveries Past Due.
-
Deliveries Pending.
-
Change Date.
Figure 5-9 Shipment Delivery Information Portlet

Description of "Figure 5-9 Shipment Delivery Information Portlet"
Selecting the Personalize icon will enable the As of date to be pre-selected.
| Selection | Value | Result |
|---|---|---|
| Shipment Delivery settings | Enter a number to set the number of default days from today. | This will display the number of days. |
In this example we set the Shipment Delivery Settings by entering 30 days as the default date setting.
Figure 5-10 Shipment Delivery Information Portlet Personalization Preferences
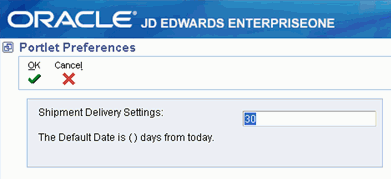
Description of "Figure 5-10 Shipment Delivery Information Portlet Personalization Preferences"
This will result with the Shipment Delivery Settings being presented with the As of presented as 30 days from today's date.
Figure 5-11 Shipment Delivery Information Portlet Example
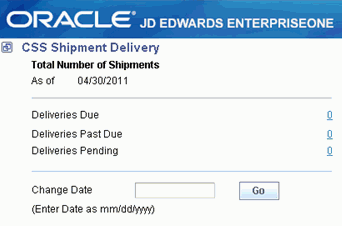
Description of "Figure 5-11 Shipment Delivery Information Portlet Example"
5.4.4 Customer Order Status (P42S05)
The Customer Order Status portlet enables customers to monitor alerts for:
-
Held Orders.
-
Items Shipped (Past x number of Days)
Figure 5-12 Customer Order Status Portlet
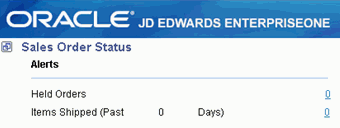
Description of "Figure 5-12 Customer Order Status Portlet"
Selecting the Personalize icon will enable the alert selections to be pre-selected.
| Selection | Value | Result |
|---|---|---|
| View Items Shipped in Past ( ) Days | Number | Displays items shipped in last x days. |
| Default Sort Order for Header | 01 | Sets default sort order for header. |
| Default Sort Order for Detail | 01 | Sets default sort order for detail. |
In this example we will pre-select View Items Shipped in Past ( ) Days and enter 10 to display items shipped in last 10 days. In the Default Sort Order for Header field we will enter 01. In the Default Sort Order for Detail field we will also enter 01.
Figure 5-13 Customer Order Status Portlet Personalization Preferences
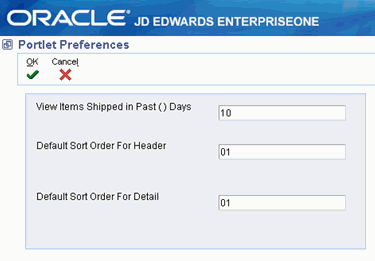
Description of "Figure 5-13 Customer Order Status Portlet Personalization Preferences"
This will result with the Items Shipped being calculated based on activity in the last 10 days.
Figure 5-14 Customer Order Status Portlet Example
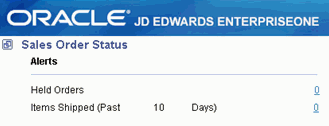
Description of "Figure 5-14 Customer Order Status Portlet Example"
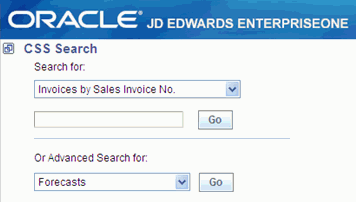
5.4.5 CSS Search - (P42S06)
The CSS Search portlet enables customers to do searches based on various criteria. There is a default and advanced search type.
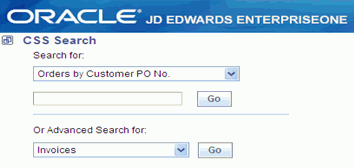
Selecting the Personalize icon will enable the default and advanced search type to be pre-selected.
This table shows the pre-selected options for the default search type:
| Value | Selection |
|---|---|
| Blank | Orders by Customer PO No. |
| 1 | Orders by Sales Order No. |
| 2 | Invoices by Sales Invoice No. |
| 3 | Invoices by Sales Order No. |
| 4 | Shipments by Shipment No. |
| 5 | Accounts by Invoice No. |
| 6 | Forecasts by Item No. |
| 7 | Customer Item by Customer Item No. |
| 8 | Customer Item by Supplier Item No. |
This table shows the pre-selected options for the advanced search type:
| Value | Selection |
|---|---|
| Blank | Orders |
| 1 | Invoices |
| 2 | Inventory |
| 3 | Shipments |
| 4 | Account Information |
| 5 | Forecasts |
| 6 | Customer Item No. |
In this example we will pre-select the Default Search Type and enter 3. We will pre-select the Advanced Search Type and enter 5.
Figure 5-16 CSS Search Portlet Personalization Preferences

Description of "Figure 5-16 CSS Search Portlet Personalization Preferences"
This will result with the Default Search Type displaying Invoices by Sales invoice No. by default and the Advanced Search Type displaying Forecasts by default.
An error message will be issued if the search type is chosen to be hidden in the Processing Option.
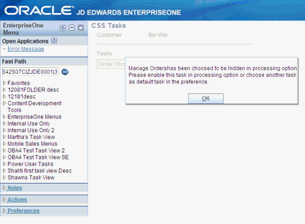
5.4.6 CSS Tasks - (P42S07)
The CSS Tasks portlet enables customers to display tasks.
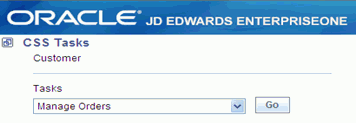
Selecting the Personalize icon will enable a default task to be pre-selected.
This table shows the pre-selected options for the default task:
| Value | Selection |
|---|---|
| Blank | Manage Orders |
| 1 | Order Through Product Catalog |
| 2 | Order Through Templates |
| 3 | View Shopping Cart |
| 4 | Add to Shopping Cart by Item |
| 5 | Add Recurring Orders |
| 6 | Manage Recurring Orders |
| 7 | Release Blanket Orders |
| 8 | View Invoices via Orders |
| 9 | View Inventory Availability |
| 10 | Track Shipments |
| 11 | View account Information |
| 12 | Manage Forecasts |
| 13 | Manage Customer Information |
| 14 | Add Customer Item Numbers |
| 15 | Manage Customer Item Numbers |
| 16 | Search Problem Analysis |
| 17 | Manage Consensus Forecast |
In this example we will pre-select the Order Through Templates default selection and enter 2.
Figure 5-20 CSS Tasks Portlet Personalization Preferences
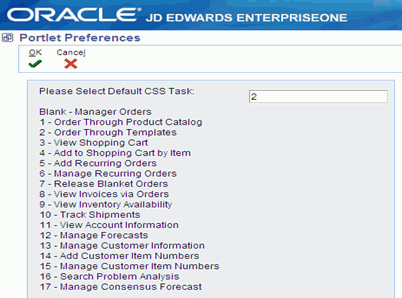
Description of "Figure 5-20 CSS Tasks Portlet Personalization Preferences"
This will result with Order Through Templates being displayed as the default task.
Note:
An error message will be issued if the search type is chosen to be hidden in the Processing Option.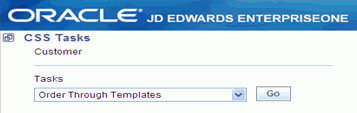
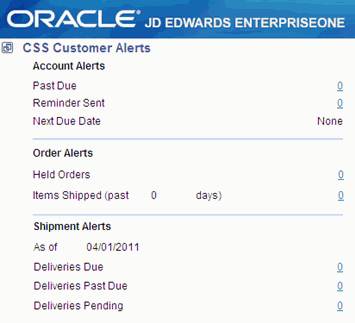
5.4.7 Customer Alerts - (P42S08)
The Customer Alerts portlet enables account, order, and shipment alerts to be displayed.
Account alerts contain:
-
Past due
-
Reminder sent
-
Next Due Date
Order alerts contain:
-
Held Orders
-
Items Shipped (past x days)
Shipment alerts contain:
-
As of date
-
Deliveries Due
-
Deliveries Past Due
-
Deliveries Pending
Selecting the Personalize icon will enable default alerts to be pre-selected.
This table shows the pre-selected options for the default task:
| Selection | Value/Result |
|---|---|
| Hide Account Alerts | Blank = Display, 1 = Hide |
| Hide Past Due | Blank = Display, 1 = Hide |
| Hide Reminder Sent | Blank = Display, 1 = Hide |
| Hide Next due Date | Blank = Display, 1 = Hide |
| Hide Order Alerts | Blank = Display, 1 = Hide |
| Hide Held Orders | Blank = Display, 1 = Hide |
| Hide Items Shipped | Blank = Display, 1 = Hide |
| View Items Shipped in Past | Blank = Display, 1 = Hide |
| Hide Shipment Alerts | Blank = Display, 1 = Hide |
| Hide Deliveries Due | Blank = Display, 1 = Hide |
| The Default day is ( ) days from today | Blank = Display, 1 = Hide |
| Hide Deliveries Past Due | Blank = Display, 1 = Hide |
| Hide Deliveries Pending | Blank = Display, 1 = Hide |
In this example we will pre-select Hide Reminder Sent and Hide Items Shipped and hide both by using a value of 1. Since the others selections will be left blank, they will all display.
Figure 5-23 Customer Alerts Portlet Personalization Preferences
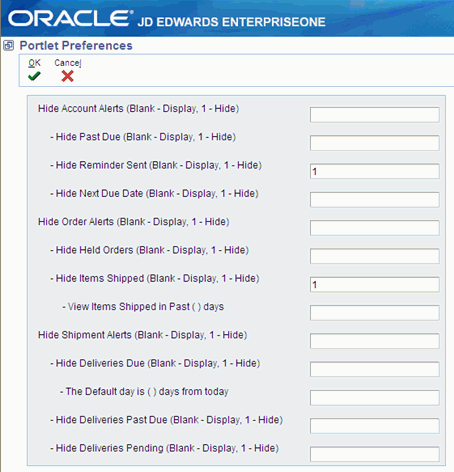
Description of "Figure 5-23 Customer Alerts Portlet Personalization Preferences"
This will result in Hide Reminder Sent and Hide Items Shipped being hidden by default when this portlet displays.
Figure 5-24 Customer Alerts Portlet Example

Description of "Figure 5-24 Customer Alerts Portlet Example"
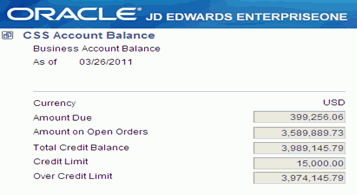
5.4.8 Account Balance (P42S09)
The CSS Account Balance portlet will display account balance information based on an As of date.
The fields that display are:
-
Currency
-
Amount Due
-
Amount on Open Orders
-
Total Credit Balance
-
Credit Limit
-
Credit Available
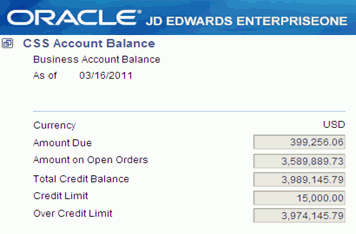
Selecting the Personalize icon will enable the CSS Account Balance Setting to be pre-entered. This setting is for the number of days from today that will be used to establish the As of date based on the number of days entered. This will determine the default As of date.
Figure 5-26 Account Balance Portlet Personalization Preferences
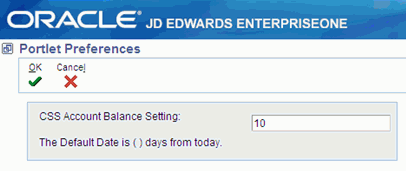
Description of "Figure 5-26 Account Balance Portlet Personalization Preferences"
The calculations for all of the fields will be based on the As of date.
Figure 5-27 Account Balance Portlet Example
Description of "Figure 5-27 Account Balance Portlet Example"
5.4.9 Account Payment Status (P42S10)
The Account Payment Status portlet will display account balance information based on an As of date.
The fields that display are:
-
Currency
-
Average Days Late
-
% of Amount Paid Late
-
Date of First Invoice
-
Date of Last Invoice
-
Date Last Paid
-
Amount Invoiced This Year
-
Amount Invoiced Prior Year
-
Last Applied Amount
Figure 5-28 Account Payment Status Portlet
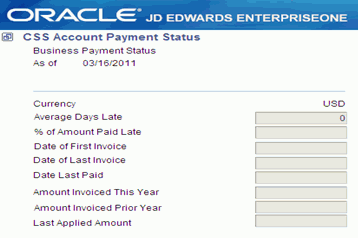
Description of "Figure 5-28 Account Payment Status Portlet"
Selecting the Personalize icon will enable the CSS Account Payment Balance Setting to be pre-entered. This setting is for the number of days from today that will be used to establish the As of date based on the number of days entered. This will determine the default As of date.
In this example, 5 is entered into the CSS Account Payment Balance Setting field. The default As of date will now be the current date plus 5 days.
Figure 5-29 Account Payment Status Portlet Personalization Preferences
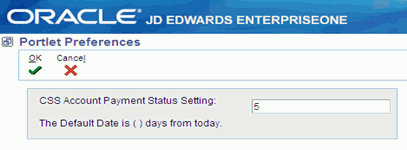
Description of "Figure 5-29 Account Payment Status Portlet Personalization Preferences"
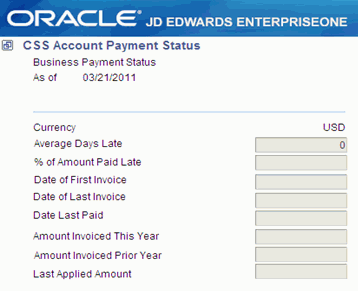
Whereas the previous As of date was 3/16/2011, the new As of date is now 3/21/2011 since we have used the Personalize option to change the default day by adding five days to the date.
Figure 5-30 Account Payment Status Portlet Example
Description of "Figure 5-30 Account Payment Status Portlet Example"
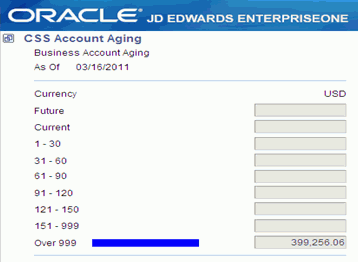
5.4.10 Account Aging (P42S11)
The Account Aging portlet will display aging information based on an As of date.
The fields that display are:
-
Currency
-
Future
-
Current
-
1 - 30
-
31 - 60
-
61 - 90
-
91 - 120
-
121 - 150
-
151 - 999
-
Over 999
Selecting the Personalize icon will enable the CSS Account Aging Setting to be pre-entered. This setting is for the number of days from today that will be used to establish the As of date based on the number of days entered. This will determine the default As of date.
In this example, 6 is entered into the CSS Account Aging Setting field. The default As of date will now be the current date plus 6 days.
Figure 5-32 Account Aging Portlet Personalization Preferences
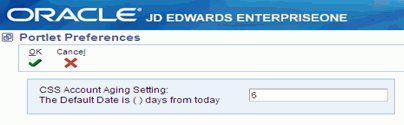
Description of "Figure 5-32 Account Aging Portlet Personalization Preferences"
Whereas the previous As of date was 3/16/2011, the new As of date is now 3/22/2011 since we have used the Personalize option to change the default day by adding six days to the date.
Figure 5-33 Account Aging Portlet Example

Description of "Figure 5-33 Account Aging Portlet Example"
5.5 Using the CSS for Service Portlets
This section discusses how to:
-
Add equipment through the Service Tasks portlet.
-
View equipment through the Service Tasks portlet.
-
View work orders through the Service Tasks portlet.
-
View contracts and entitlements through the Service Tasks portlet.
-
Use the Service Search portlet.
5.5.1 Forms Used by the CSS for Service Portlets
| Form Name | FormID | Navigation | Usage |
|---|---|---|---|
| Add Equipment | W90CD920A | Select CSS for Service from the portal's Place menu. Click Add Equipment in the Service Tasks window. | Add a new equipment record. |
| View Equipment | W90CD920C | Select CSS for Service from the portal's Place menu. Click View Equipment in the Service Tasks window.
Alternatively, select one of the equipment search options in the Service Search window's Search For menu, and then click Go. |
View existing equipment record information. |
| View Service Work Orders | W90CD910C | Select CSS for Service from the portal's Place menu. Click View Service Work Orders in the Service Tasks window.
Alternatively, select one of the work order search options in the Service Search window's Search For menu, and then click Go. |
View service work order information. |
| View Service Contracts and Entitlements | W90CD900A | Select CSS for Service from the portal's Place menu. Click View Contracts in the Service Tasks window.
Alternatively, select one of the contract search options in the Service Search window's Search For menu, and then click Go. |
View service contract information. |
5.5.2 Adding Equipment Through the Service Tasks Portlet
Access the Add Equipment form.
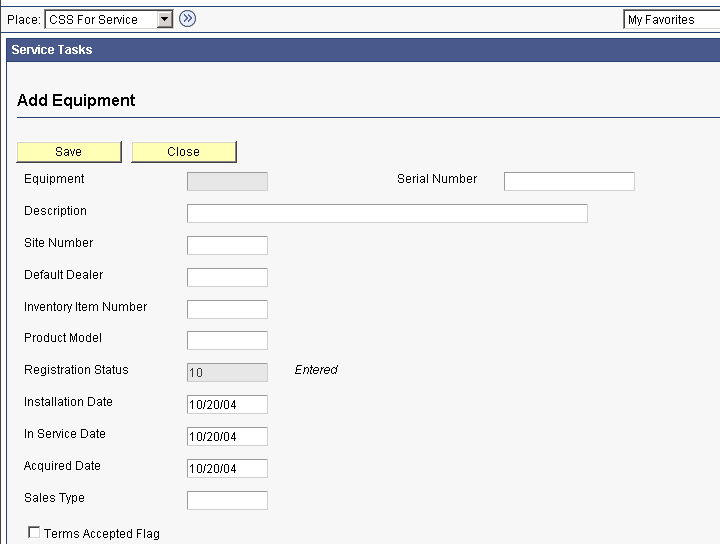
- Description
-
Enter a brief description for the equipment.
- Site Number
-
Enter the address book number that corresponds to the site where the equipment will reside.
- Default Dealer
-
Enter the address book number that corresponds to the dealer who is the default equipment provider.
- Inventory Item Number
-
Enter the system-assigned item number.
- Product Model
-
Enter the code that classifies an inventory item into a model for customer service.
- Installation Date
-
Enter the date on which the contract for the equipment asset was put into effect.
- In Service Date
-
Enter the date on which the equipment was placed into service.
- Acquired Date
-
Enter the date on which the equipment asset was acquired. This date is typically the start depreciation date, but you can specify a different start depreciation date on the Depreciation Information form. If you are using the half-year convention, you must manually adjust the start depreciation date.
- Sales Type
-
Enter the user defined code (system SY, type 17) that indicates the sales type for the equipment.
- Terms Accepted Flag
-
Enter the code that indicates whether the owner of the equipment has agreed to the terms and conditions presented regarding the equipment ownership.
5.5.3 Viewing Equipment Through the Service Tasks Portlet
Access the View Equipment form.
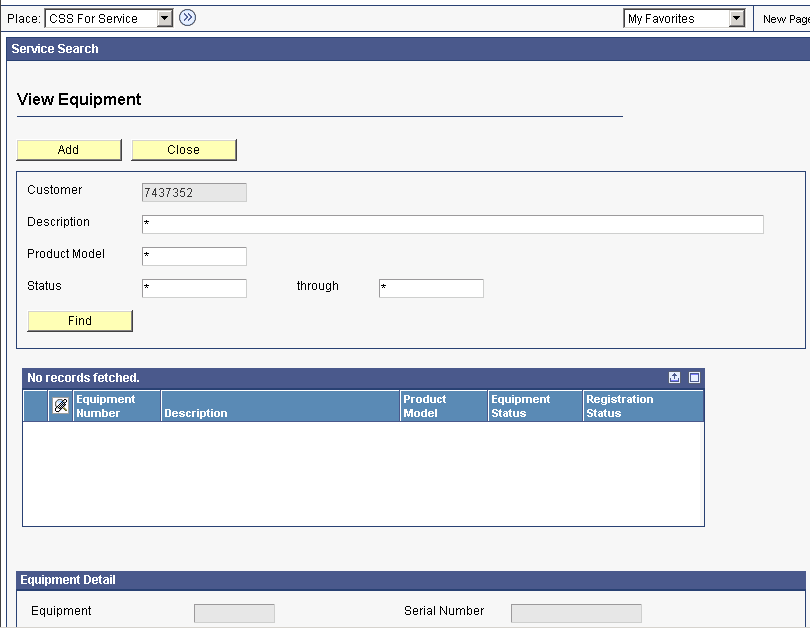
- Description
-
Enter a brief description for the equipment.
- Product Model
-
Enter the code that classifies an inventory item into a model for customer service.
- Status
-
Enter the user defined code (system ES, type 12) that identifies the equipment's current status, such as available, down, or disposed.
5.5.4 Viewing Work Orders Through the Service Tasks Portlet
Access the View Service Work Orders form.
Figure 5-36 View Service Work Orders form
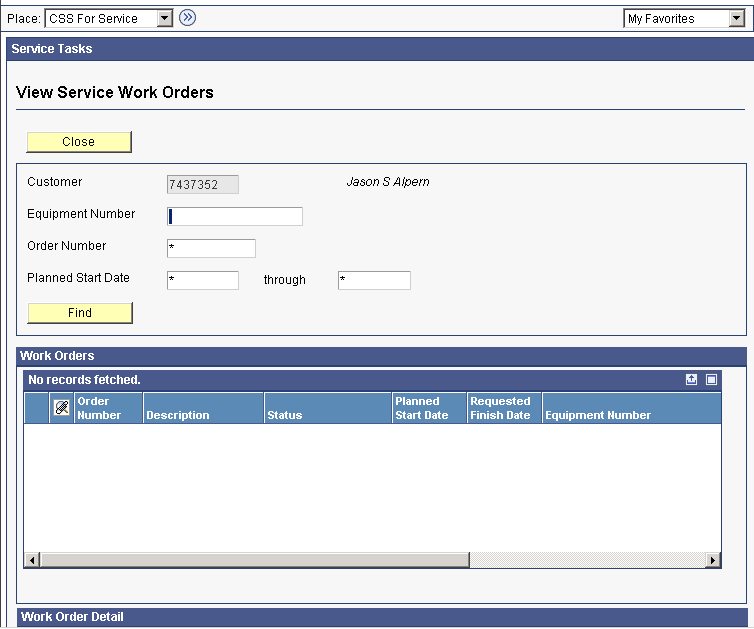
Description of "Figure 5-36 View Service Work Orders form"
- Equipment Number
-
Enter the identification code for the equipment asset. You enter the identification code in one of these formats:
1: Asset number (a computer-assigned, 8-digit, numeric control number)
2: Unit number (a 12-character alphanumeric field)
3: Serial number (a 25-character alphanumeric field)
- Order Number
-
Enter the number that identifies the sales order.
- Planned Start Date
-
Enter the tentative starting date for the order. You can enter this date manually, or have the system calculate it using a back scheduling routine. The routine starts with the required date and offsets the total lead time to calculate the appropriate start date.
5.5.5 Viewing Contracts and Entitlements Through the Service Tasks Portlet
Access the Viewing Service Contracts and Entitlements form.
Figure 5-37 View Service Contracts and Entitlements form
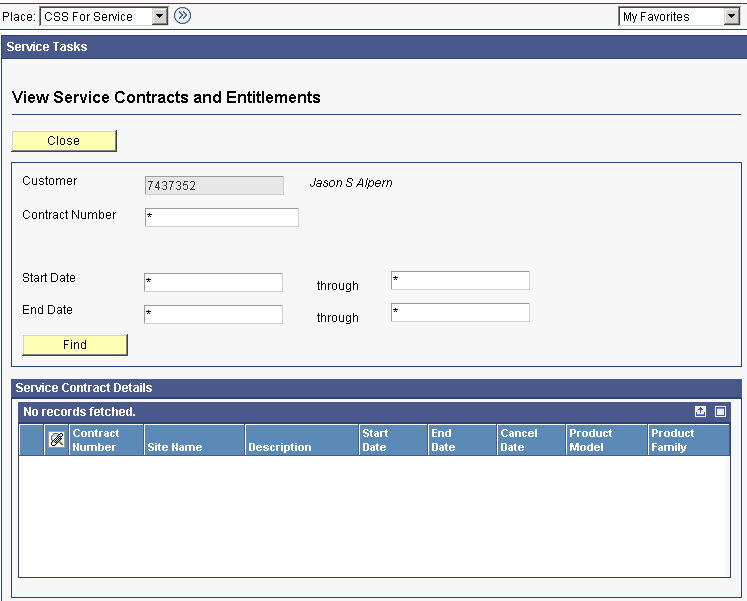
Description of "Figure 5-37 View Service Contracts and Entitlements form"
- Contract Number
-
Enter the number that identifies the contract.
- Start Date
-
Enter the date on which you actually start work on the contract.
- End Date
-
Enter the date on which you actually complete work on the contract.
5.5.6 Using the Service Search Portlet (P90CA972)
The Service Search portlet provides a default or an advanced search for service related information. The type of search and the subject that is searched will determine if additional information needs to be entered.
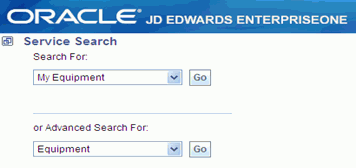
Selecting the Personalize icon will enable defaults to be selected for the default and advanced search.
The options available for the Default Service Search Type are:
| Value | Selection |
|---|---|
| Blank | My Equipment |
| 1 | Equipment By Description |
| 2 | Equipment By Prod. Model |
| 3 | Expired Contracts |
| 4 | Future Contracts |
| 5 | My Contracts |
| 6 | My Service Orders |
| 7 | Work Orders - Last 30 Days |
| 8 | Work Orders - Last 60 Days |
The options available for the Default Advanced Search Type are:
| Value | Selection |
|---|---|
| Blank | Equipment |
| 1 | Contract |
| 2 | Work Orders |
In this example we will select 2 -Equipment by Prod. Model for the Default Service Search Type and 2 - Work Orders for the Default Advanced Search Type.
Figure 5-39 Service Search Portlet Personalization Preferences
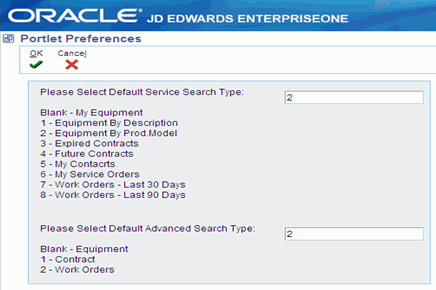
Description of "Figure 5-39 Service Search Portlet Personalization Preferences"
These values will now become the default when the portlet is displayed.
Figure 5-40 Service Search Portlet Example
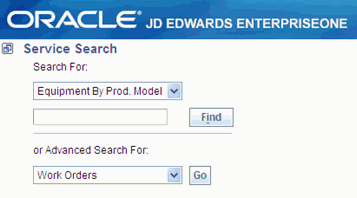
Description of "Figure 5-40 Service Search Portlet Example"
5.6 Using the CSS for Support Portlets
This section discusses how to:
-
View cases through the Support Tasks portlet.
-
Add new cases through the Support Tasks portlet.
-
Use the Support Search portlet.
-
Use the Support Alerts portlet.
-
Use the Solution Advisor portlet.
5.6.1 Forms Used by the CSS for Support Portlets
| Form Name | FormID | Navigation | Usage |
|---|---|---|---|
| Case Inquiry | W90CG900C | Select CSS for Support from the portal's Place menu. Click View Cases in the Support Tasks window.
Alternatively, in the Support Search window's Search For menu, select the search type and click Go. |
View existing case information. |
| Case Entry and Update | W90CG900B | Select CSS for Support from the portal's Place menu. Click Add New Case in the Support Tasks.
Alternatively, click Add on the Case Inquiry form. |
Add a new case. |
| Support Search | W90CG900C | Select CSS for Support from the portal's Place menu. In the Support Search window, select one of the contract search options in the Search For menu, and then click Go. | Search for cases. |
| Support Alerts | W90CG900C | Select CSS for Support from the portal's Place menu. Click the numeral for either Critical Cases or Cases Pending Action in the Support Alerts window. | View alerts for critical cases or cases that are pending action. |
| Solution Advisor Solution Search | W90CE100C | Select CSS for Support from the portal's Place menu. In the Solution Advisor window, enter a description of the problem and select the search parameters, and then click Find. | Search for solutions in the Solution Advisor. |
5.6.2 Viewing Cases Through the Support Tasks Portlet
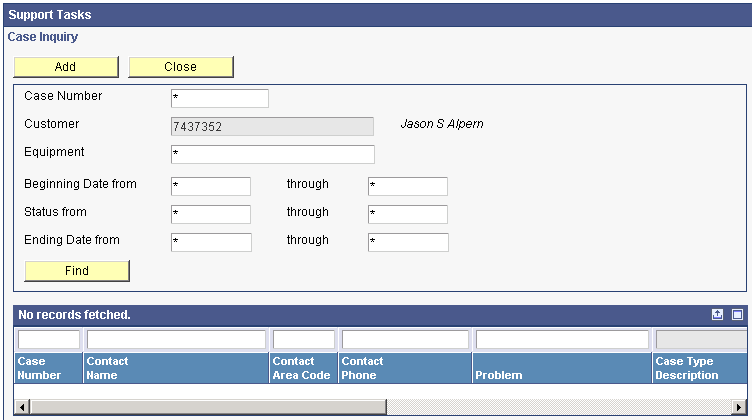
- Case Number
-
Enter the number that identifies the case.
- Equipment
-
Enter the identification code for the equipment asset. You enter the identification code in one of these formats:
1: Asset number (a computer-assigned, 8-digit, numeric control number)
2: Unit number (a 12-character alphanumeric field)
3: Serial number (a 25-character alphanumeric field)
- Beginning Date From
-
Enter the date on which the case first becomes active.
- Through
-
Enter the last date on which the case becomes active.
- Status From and Through
-
Enter the code that specifies the status of a case.
- Ending Date From and Through
-
Enter the first date or the last date on which the case was closed.
5.6.3 Adding New Cases Through the Support Tasks Portlet
Access the Case Entry and Update form.
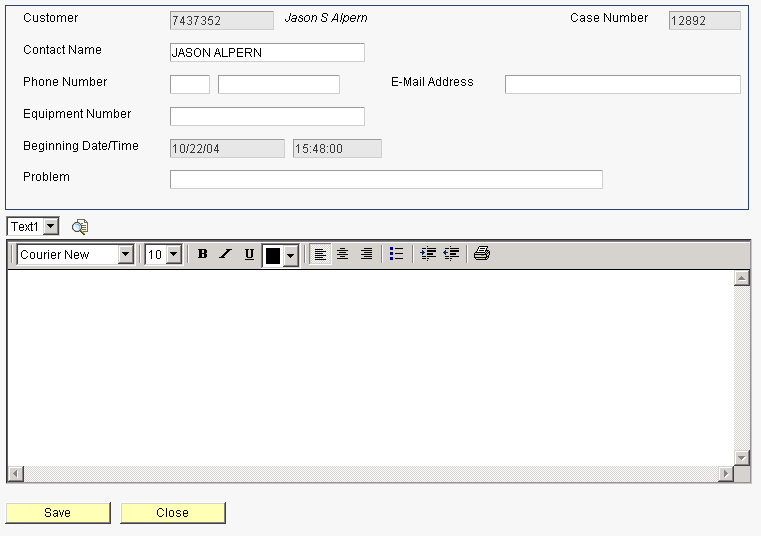
- Contact Name
-
Enter the name of the contact for the case.
- Phone Number
-
Enter the telephone number prefix (such as area code) and the telephone number for the contact.
- Email Address
-
Enter the case contact's email address.
- Equipment Number
-
Enter the identification code for the equipment asset. You enter the identification code in one of these formats:
1: Asset number (a computer-assigned, 8-digit, numeric control number)
2: Unit number (a 12-character alphanumeric field)
3: Serial number (a 25-character alphanumeric field)
- Problem
-
Enter a brief description of the customer issue.
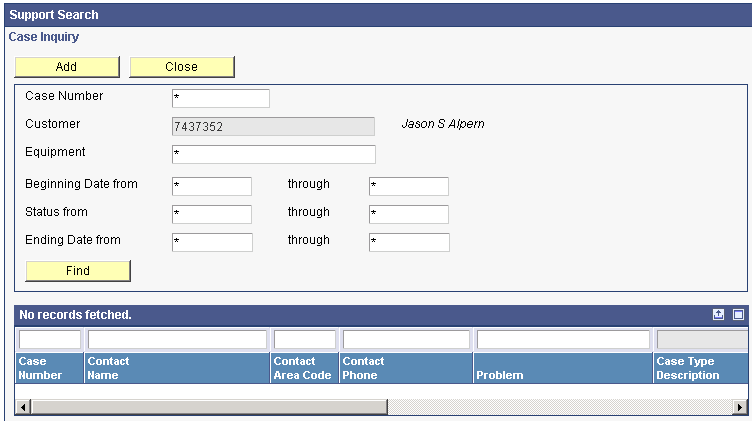
5.6.4 Using the Support Search Portlet
Access the Support Search form.
-
At the Search For field, select from the menu the type of support-related record for which you want to search.
-
On the search form for the search type you selected, locate the support-related record.
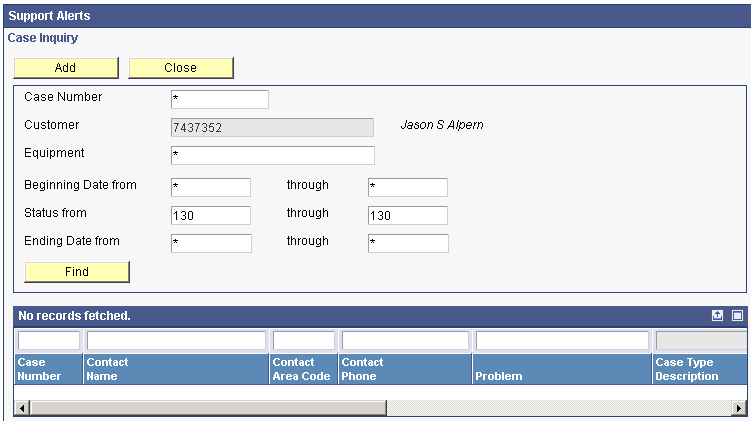
5.6.5 Using the Support Alerts Portlet
Access the Support Alerts form to view any critical cases and cases pending action
5.6.6 Using the Solution Advisor Portlet (P90CA971)
The Solution Advisor portlet provides search capabilities to search for solutions. A Problem Description field is available to enter a brief description of the problem with different options on the level of matching used in the search.
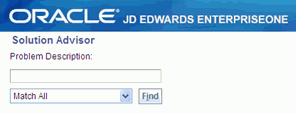
Selecting the Personalize icon will enable defaults to be selected for the Default Solution Search Type for matching.
The options available for the Default Solution Search Type are:
| Value | Selection |
|---|---|
| Blank | Match All |
| 1 | Match |
| 2 | Match Exact |
In this example we will select 1 for Match for the Default Solution Search Type.
Figure 5-46 Solution Advisor Portlet Personalization Preferences
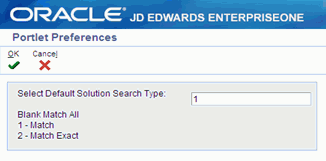
Description of "Figure 5-46 Solution Advisor Portlet Personalization Preferences"
Match will now become the default and will be displayed as Match Any when the portlet is displayed.
Figure 5-47 Solution Advisor Portlet Example
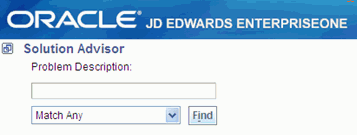
Description of "Figure 5-47 Solution Advisor Portlet Example"
5.6.7 Using the Solution Advisor Form
Access Solution Advisor window.
-
In the Problem Description field, enter a brief summary of the problem for which you want to find a solution.
-
Specify the search parameters (such as Match All) in the menu.
-
Click Find to search for and display results matching the problem description and search parameters.
Figure 5-48 Solution Advisor Solution Search form
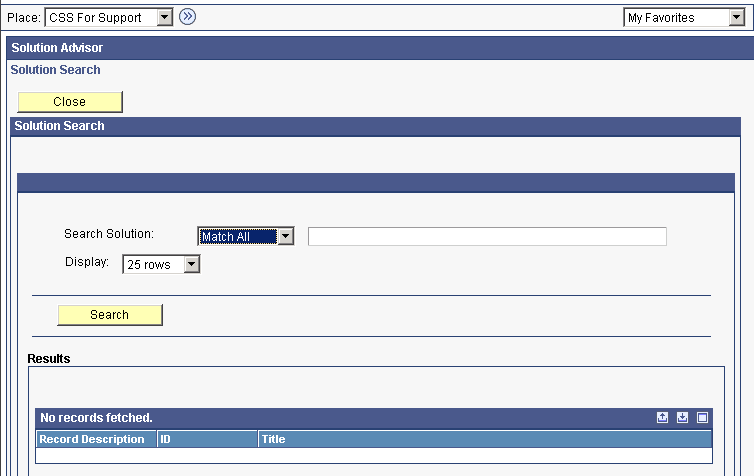
Description of "Figure 5-48 Solution Advisor Solution Search form"