8 Creating Oracle BI Publisher Reports with JD Edwards Data Access Driver
This chapter contains the following topics:
-
Section 8.1, "JD Edwards Data Access Reporting with Oracle BI Publisher 11g Overview"
-
Section 8.3, "Installing the JD Edwards EnterpriseOne Data Access Driver"
-
Section 8.4, "Registering the JD Edwards EnterpriseOne Data Access Driver"
-
Section 8.5, "Configuring the JD Edwards EnterpriseOne Data Access Driver"
8.1 JD Edwards Data Access Reporting with Oracle BI Publisher 11g Overview
JD Edwards EnterpriseOne Data Access Driver enables you to use Oracle Business Intelligence (BI) Publisher Enterprise (OBIEE-BIP) to produce BI Publisher reports using JD Edwards data.
This chapter provides an overview of installing and configuring Oracle Business Intelligence (BI) Publisher 11g and JD Edwards Data Access Driver. The process to implement JD Edwards EnterpriseOne reporting using the Data Access Driver is as follows:
-
Install Oracle BI Publisher.
-
Install the JD Edwards EnterpriseOne Data Access Driver.
Note:
The Data Access Driver can be downloaded from the JD Edwards EnterpriseOne and World Update Center on My Oracle Support. -
Configure a JDBC Driver in Oracle BI Publisher.
8.2 Installing Oracle BI Publisher
To use the Data Access Driver with Oracle BI Publisher you only need to install Oracle BI Publisher. You do not need to install Oracle Business Intelligence Enterprise Edition or Oracle Real-Time Decisions.
Because BI Publisher installs WebLogic, you do not need to install it beforehand. The default domain in WebLogic functions for BI Publisher, so you do not need to create an additional domain unless you prefer to keep the domains separate.
8.2.1 Prerequisites
Before you complete the tasks in this section, you must:
-
Install and configure a supported database.
For the latest information about supported databases, visit the Oracle Fusion Middleware Certification document at:
http://www.oracle.com/technetwork/middleware/ias/downloads/fusion-certification-100350.htmlLook for product area "Oracle Fusion Middleware 11g Release 1 Certifications" and then access "System Requirements and Supported Platforms for Oracle Business Intelligence Suite Enterprise Edition 11gR1 (11.1.1.3.0-11.1.1.6.0) (xls).
-
Download the Oracle Repository Utility (RCU) from Oracle Technology Network (OTN), Oracle Business Intelligence (11.1.1.x) Downloads page:
The RCU version must match the BI Publisher version.
-
Download Oracle BI Publisher from the Oracle Software Delivery Cloud:
https://www.edelivery.oracle.com
Select Oracle Business Intelligence for the Product Pack field and choose the appropriate platform.
-
Install JD Edwards EnterpriseOne Applications Release 9.1.
8.2.2 Installing Oracle BI Publisher
If you do not plan to change any of the default settings, such as ports and security logins, then follow the Quick Installation Guide for Oracle Business Intelligence to perform the installation. If you do plan to change some of the default settings, then follow the Installation Guide for Oracle Business Intelligence. Please note that although the Oracle BI installation package includes the following products, with all the technology required to install, configure, and run them, you only need to install Oracle Business Intelligence Publisher:
-
Oracle Business Intelligence Publisher
-
Oracle Business Intelligence Enterprise Edition (Oracle BI Answers, Oracle BI Interactive Dashboards, Oracle BI Delivers, Oracle BI Administration Tool, Oracle BI Add-in for Microsoft Office, and Oracle BI Publisher) (optional)
-
Oracle Real-Time Decisions (optional)
-
Essbase Suite (optional)
Oracle BI Publisher 11g (11.1.1.7) is packaged with WebLogic Server 10.3.5.0 and Oracle JDK 1.6.0_35.
IMPORTANT!:
For BI Publisher reporting using the Data Access Driver, you only need to install Oracle BI Publisher.The following steps provide brief guidance for the installation. Review these steps first and then use the Quick Installation Guide for Oracle Business Intelligence, or if you plan to change some of the default settings, refer to the Installation Guide for Oracle Business Intelligence for more detailed steps.
Note:
A new installation of BI Publisher 11.1.1.7 is recommended even if you are currently on a prior release. This allows you to do some parallel testing before switching to the latest release.To install Oracle BI Publisher:
-
Launch the Oracle Repository Utility (RCU) and create the BI Publisher Schemas. (BIPLATFORM and MDS).
For more information, see the Quick Installation Guide for Oracle Business Intelligence guide.
-
Launch the Oracle Business Intelligence Installer after the schemas are created.
Caution:
-
Do not install the software using a user ID that contains a special character.
-
BI Publisher and the HTML server must be within the same firewall in order to have two-way web service and http communication.
-
If you have anti-virus software running on your installing machine, the installation process may take longer.
-
-
Select the appropriate installation type:
-
"Simple Install" installs Oracle Business Intelligence components with the default settings on a single computer in the minimum number of steps. The Managed Server is not installed. This installation is targeted for demonstration, evaluation and proof of concept use cases.
-
"Enterprise Install" installs Oracle Business Intelligence components that you select and associates them with the Middleware, Oracle data source, and WebLogic Server homes that you specify. The enterprise installation type creates a separate Managed Server, bi_server1, along with the Admin Server. You should also use this installation type if you have a previous version of BI Publisher installed.
This installation type is recommended for a production environment.
-
"Software Only Install" installs software binary files in an existing Middleware home for later configuration.
-
-
When the Oracle Business Intelligence Component Installation screen appears, select only the Business Intelligence Publisher option:
Figure 8-1 Business Intelligence Publisher Installation Screen
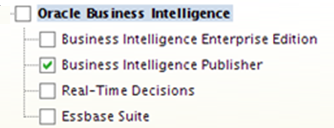
Description of "Figure 8-1 Business Intelligence Publisher Installation Screen"
Note:
For detailed instructions on how to install Oracle BI Publisher, see the Quick Installation Guide for Oracle Business Intelligence. -
When the installation and configuration finish, sign onto the WebLogic Admin Console and BI Server to make sure the servers are up and running by using the following URLs:
http://host:port/console (WebLogic Admin Console)
http://host:9704/xmlpserver (BI Publisher login page, port 9704 is the default port for "Enterprise Install" type)
-
Review the Certifications for any updates or additional requirements.
8.3 Installing the JD Edwards EnterpriseOne Data Access Driver
The Data Access Driver can be downloaded from the JD Edwards EnterpriseOne and World Update Center on My Oracle Support.
To install the JD Edwards EnterpriseOne Data Access Driver:
-
Unzip the tools-specific Data Access Driver par file archive (for example, 9.1.n.n-Data-Access-Driver_06_70.par). Extract all files from the DADriver_EAR.jar file.
-
On the server where OBIEE-BIP is installed, locate the home directory for OBIEE.
-
To install the Data Access Driver, copy ALL of the files from the extracted DADriver_EAR.jar into the <OBIEE_BIP_home>/user_projects/domains/<bifoundation_domain>/lib folder:
-
avalon-framework-cvs-20020806.jar
-
castor.jar
-
commons-codec.jar
-
commons-codec-2.6.jar
-
commons-logging.jar
-
e1dadriver.jar
-
fop.jar
-
httpclient.jar
-
httpcore.jar
-
httpmime.jar
-
images.jar
-
j2ee.jar
-
jmxremote.jar
-
jmxremote_optional.jar
-
jmxri.jar
-
OWResource.jar
-
rtf2fo.jar
-
xalan.jar
-
xerces.jar
-
xmlparserv2.jar
-
8.3.1 Replacing the Delivered xerces.jar and xalan.jar Files
The following steps must be performed for Oracle BI Publisher installations that use the Sun Java HotSpot(TM) 64-Bit Server VM. The combination of the JD Edwards delivered xerces.jar and xalan.jar combined with Sun Java HotSpot(TM) 64-Bit Server VM results in a failed Oracle WebLogic Enterprise Manager (EM) service if the xerces.jar and xalan.jar files are not replaced.
To manually replace the xerces.jar file:
-
Locate the Oracle 11g WebLogic xercesImpl-2.9.1.jar common file (for example, <orcl_BI>/oracle/Middleware/oracle_common/modules/oracle.owasp_11.1.1/).
-
Copy the xercesImpl-2.9.1.jar file into the <orcl_BI>/user_projects/domains/<bifoundation_domain>/lib directory.
-
Delete the xalan.jar and xerces.jar files found in the <orcl_BI>/user_projects/domains/<bifoundation_domain>/lib directory.
-
Restart the WebLogic Administrative Console BIP services.
8.3.2 Updating the Oracle WebLogic PRE_CLASSPATH
For Oracle BI Publisher 11g 64-bit installations, you must update the Oracle WebLogic PRE_CLASSPATH as described in the My Oracle Support Document ID 1327145.1.
Review the document, and then follow steps 2 through 4 in the document to update the PRE_CLASSPATH with the location of the Server Manager Agent folder containing the DAD instance configuration files (for example, Z:\JDE_HOME\targets\DENPBDS2_DAD\config).
8.3.3 Migrating WebLogic Users to a New Version of Oracle BI Publisher
If you are upgrading your version of Oracle BI Publisher from a previous version (for example, moving from Oracle BI Publisher 11.1.1.5 to 11.1.1.7), after the installation, you must migrate the WebLogic users from an existing version to the new server.
To migrate users to a new version of Oracle BI Publisher:
-
Export the user information from the existing BI Server.
-
Log on to the BI Publisher WebLogic Admin Console.
-
Select Security Realm.
-
Select Export from the Migration tab.
-
Enter the location for the exported files.
-
Click Save.
-
-
Import the user information to the new server.
-
Log on to the BI Publisher WebLogic Admin Console.
-
Select Security Realm.
-
Select Import from the Migration tab.
-
Enter the location of the exported files.
-
Click Save.
-
8.4 Registering the JD Edwards EnterpriseOne Data Access Driver
Use Server Manager to register OBIEE and configure the JAS.INI, JDBJ.INI, and JDELOG.PROPERTIES files.
Note:
Server Manager registering is for all OBIEE releases.To register the JD Edwards Data Access Driver:
-
Log in to Server Manager.
-
On the Managed Instance home page, click the Create New Managed Instance button.
-
On the Create/Register A Managed Instance page, select EnterpriseOne Data Access Driver, and then click Continue.
-
In the Usage Type field, select the 11g BI Publisher option from the drop-down list.
Note:
The Software Component box will not display when the Usage Type selected is 11g BI Publisher. -
On the Create/Register a Managed Instance form, complete these fields:
-
Install Name.
-
Install Location.
Ensure that you modify the Install Location to match the machine where OBIEE-BIP is installed.
Important!:
Ensure that the path to the BI Publisher installation is correct. If the path is not correct, the registration will fail.The default value is:
<WLS_HOME>\user_projects\domains\<BIPDOMAIN>\servers\<BIPMANAGEDSERVER>
The modified value might be similar to the following: /slot/ems7332/oracle/BIP11g/user_projects/domains/bifoundation_domain/servers/bi_server1
-
-
Click Continue to proceed.
The following example shows the configuration that enables the data access driver to work within OBIEE-BIP.
Figure 8-2 Server Manager configuration for data access driver
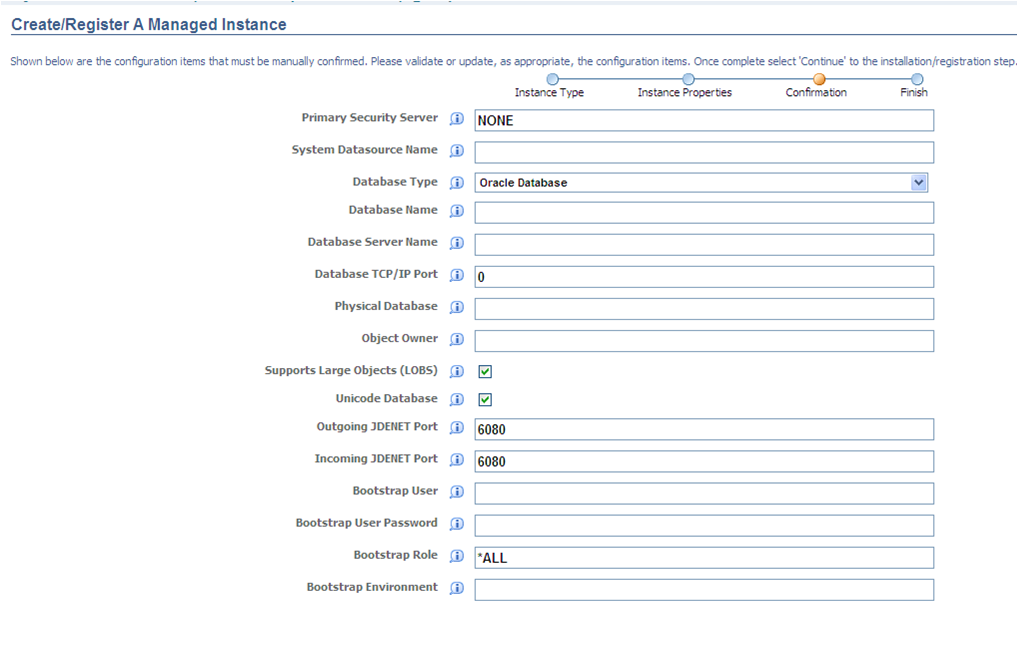
Description of "Figure 8-2 Server Manager configuration for data access driver"
-
Click the Create Instance button to complete the Data Access Driver registration.
-
After you complete the registration, the browser is redirected to the EnterpriseOne Data Access Driver home page.
8.5 Configuring the JD Edwards EnterpriseOne Data Access Driver
After the JD Edwards EnterpriseOne Data Access Driver has been registered in Server Manager, you must configure the driver in OBIEE-BIP 11g.
8.5.1 Understanding JD Edwards EnterpriseOne Data Access
Creating JD Edwards interactive reports with Oracle BI Publisher Enterprise requires access to JD Edwards EnterpriseOne data. After Oracle BI Publisher Enterprise and the Data Access Driver have been installed, you configure BI Publisher to use a JDBC driver to access the JD Edwards EnterpriseOne database.
8.5.1.1 JDBC Connection String
Setting up JD Edwards EnterpriseOne data access is accomplished by defining a JDBC driver connection string in Oracle BI Publisher. The connection string has a predefined format, but you can append information to enable these additional features:
-
Specify the JD Edwards EnterpriseOne role when connecting to the database.
-
Retrieve table descriptions along with table IDs.
-
Retrieve column descriptions from the data dictionary.
-
Retrieve the associated user defined code (UDC) description for data fields with associated UDCs.
Providing table descriptions, column descriptions, and UDC descriptions simplifies the process of building queries in BI Publisher. Without these descriptions, a report developer must understand JD Edwards EnterpriseOne table schema when designing reports.
The following example shows how table descriptions and column descriptions appear when you use the BI Publisher Query Builder.
Figure 8-3 Table descriptions and column descriptions in Query Builder
Description of "Figure 8-3 Table descriptions and column descriptions in Query Builder"
8.5.1.1.1 Specifying the JD Edwards EnterpriseOne Role
You can add information to the end of the connection string that defines the JD Edwards EnterpriseOne role that will be used when connecting to the database; for example, enterpriseone.role=SYSADMIN. If the role is not specified in the connection string, the *ALL role will be used.
8.5.1.1.2 Retrieving Table Descriptions
You can add information to the end of the connection string that enables the JDBC driver to retrieve table descriptions in addition to table names. To display table descriptions, add TDSC=1 to the connection string. If the value is 0 or the TDSC tag is not in the connection string, table descriptions will not be retrieved from the database.
8.5.1.1.3 Retrieving Column Descriptions
You can add information to the end of the connection string that enables the JDBC driver to retrieve column descriptions in addition to column names. The column description is the long column name from the data dictionary. Additionally, the column description is retrieved in the language of the user who is building the query in BI Publisher.
To display the column description, add CDSC=1 to the connection string. If the CDSC value is 0 or the CDSC tag is not in the connection string, column descriptions will not be retrieved from the database.
8.5.1.1.4 Retrieving UDC Descriptions
You can add information to the end of the connection string that enables the JDBC driver to retrieve the UDC description for table columns that have an associated UDC. (Each table column is based on a data dictionary item, which could have a UDC assigned to it.)
The UDC description is retrieved in the language of the user who is building the query in BI Publisher. Without the UDC description, the report developer must know which table columns have UDCs associated with them. The report developer can override the column name while designing the report.
To display UDC descriptions, add UDSC=1 to the connection string. If the value is 0 or the UDSC tag is not in the connection string, UDC descriptions will not be retrieved from the database.
Note:
Use a semi-colon between tags when appending them to the connection string. For example, the following connection string shows the appended information for retrieving the table description, column description, and UDC description: jdbc:oracle:enterpriseone://JDV911;TDSC=1;CDSC=1;UDSC=1;8.5.1.2 Oracle BI Publisher and JD Edwards EnterpriseOne Security
To create an interactive BI Publisher report, a user must be able to sign on to both Oracle BI Publisher and to the JD Edwards EnterpriseOne database. The connection string for the data source, along with the JD Edwards EnterpriseOne JDBC Driver configuration, specifies the database that BI Publisher will access when creating and running interactive reports.
At the time that the JDBC driver is configured, it is highly recommended that you select the Use Proxy Authentication option for the data source. Using proxy authentication assumes that the user IDs in Oracle BI Publisher and JD Edwards EnterpriseOne are the same, either by duplication or by using Lightweight Directory Access Protocol (LDAP).
With proxy authentication, JD Edwards EnterpriseOne authentication security is enforced against the user name and password in the data source, not the BI Publisher user name that is using the data source. The BI Publisher user name is automatically appended to the database connection string and passed in when the data source is selected. Because the JD Edwards user ID and the BI Publisher user name must be the same, all row and column security assigned to the JD Edwards EnterpriseOne user or its roles is applied to this appended user when connecting to the database using the database connection string. It should also be noted that in this configuration, the user name and password of the JDBC data source in BI Publisher must match the Bootstrap user and password of the JD Edwards EnterpriseOne JDBC driver.
Without proxy authentication, the BI Publisher and JD Edwards user IDs can be different. In this configuration, EnterpriseOne authentication, row, and column security is enforced against the data source user ID and password, not the BI Publisher user that is using the data source. Consequently, any BI Publisher user could have access to the JD Edwards EnterpriseOne database, limited only by the security applied to the data source user ID. Restricting data access would require that BI Publisher users have separate data sources with unique user names and passwords. The data sources would need to be configured with different levels of access to the database, and each BI Publisher user would be required to use the appropriate data source when connecting to the database. In this configuration, the user name and password of the JDBC data source in BI Publisher does not need to match the Bootstrap user and password of the JD Edwards EnterpriseOne JDBC driver.
In summary, the Use Proxy Authentication option is recommended when configuring the BI Publisher JDBC Connection because it enforces database security without having to create multiple data sources.
8.5.2 Configuring the JDBC Driver in Oracle Business Intelligence Publisher
To configure the JDBC Driver in Oracle BI Publisher:
-
Start the Oracle BI Publisher server.
-
Sign in to Oracle BI Publisher Enterprise Console.
-
Click the Administration tab.
-
Under the Data Sources section, select JDBC Connection.
The Data Sources form appears, with the JDBC tab selected.
-
Click Add Data Source.
-
Enter the following values on the Add Data Source form:
Note:
When configuring the JDBC Driver with the Use Proxy Authentication option, it is required that you use the EnterpriseOne bootstrap user and password (as found in the jdbj.ini) for the BI data-source user.Field Value Data Source Name <user defined> Example: E1_DAD
Driver Type Other Database Driver Class com.jdedwards.jdbc.driver.JDBCDriver Connection String jdbc:oracle:enterpriseone://<JD Edwards environment>; Example: jdbc: oracle:enterpriseone://JDV911;
Note: You can append information to the end of the connection string that defines the JD Edwards EnterpriseOne role that will be used when connecting to the database, for example: enterpriseone.role = *ALL. If the role is not defined in the connection string, the role that is defined as the Bootstrap Role will be used. Locate the Bootstrap Role by using Server Manager.
Note: You can append information to the end of the connection string to display table, column, or UDC descriptions if desired. TDSC=1 displays the table name description, CDSC=1 displays the column description, and UDSC=1 displays the UDC description.
Example of connection string without display options:
jdbc:oracle:enterpriseone://JDV911;
Example of connection string with display options:
jdbc:oracle:enterpriseone://JDV911;TDSC=1;CDSC=1;UDSC=1;
User Name Enter the JD Edwards EnterpriseOne user ID that you will connect to the database with. Note: The user name is case-sensitive.
Password Enter the password for the user ID. Note: The password is case-sensitive.
Use Proxy Authentication Selected or Cleared Note:
Using proxy authentication assumes that the user IDs in Oracle BI Publisher and JD Edwards EnterpriseOne are the same, either by duplication or by using Lightweight Directory Access Protocol (LDAP).This example shows the completed form:
Figure 8-4 Adding the JDBC Driver as an Oracle BI Publisher data source
Description of "Figure 8-4 Adding the JDBC Driver as an Oracle BI Publisher data source"
-
Click Apply.
-
The new JDBC data source should appear in the Data Sources list.
This example shows the completed form:
Figure 8-5 Data Sources list displays newly added data source
Description of "Figure 8-5 Data Sources list displays newly added data source"
8.5.3 Testing the JDBC Driver Connection
After configuring the JDBC Driver, it is recommended that you test the data source to verify that it is able to communicate and authenticate with the driver. Testing the data source requires that the Enterprise Server/Security Server services are up and running. Additionally, ensure that Oracle BI Publisher is up and running.
To test the JDBC Driver connection:
-
Start the Oracle BI Publisher server.
-
Sign in to Oracle BI Publisher Console using an administrative account.
-
Click the Administration tab.
-
Under the Data Sources section, select JDBC Connection.
-
Select the data source that you want to test.
-
Click the Test Connection button to initiate the test.
-
If the data source is able to communicate and authenticate with the Data Access Driver, the "Connection established successfully" message appears.
Note:
It is also possible to test the connection when adding the data source.