14 Using Guaranteed Events
This chapter contains the following topics:
14.1 Understanding Guaranteed Events
Oracle JD Edwards EnterpriseOne event functionality provides an infrastructure that can capture JD Edwards EnterpriseOne transactions in various ways and provide real-time notification to third-party software, end users, and other Oracle systems, such as Customer Relationship Management (CRM).
JD Edwards EnterpriseOne notifications are called events. The JD Edwards EnterpriseOne event system implements a publish and subscribe model. Events are delivered to subscribers in XML documents that contain detailed information about the event. For example, when a sales order is entered into the system, the sales order information can be automatically sent to a CRM or supply chain management (SCM) application for further processing. If your system is IBM, you can use the WebSphere MQ messaging system to receive events. If your system is Microsoft, you can use the MSMQ messaging system to receive events. WebSphere MQ and MSMQ provide a point-to-point interface with JD Edwards EnterpriseOne.
JD Edwards EnterpriseOne supports these three kinds of events:
| Event Category | Purpose | Generation Mechanism | Response Capability |
|---|---|---|---|
| Real-Time Event | Provides requested notification to third-party software, end-users, and other Oracle systems when certain transactions occur. | System calls | No |
| XAPI Event | Provides requested notification to third-party software, end-users, and other Oracle systems when certain transactions occur and provides a response. | System calls | Yes |
| Z Event | Provides requested notification to third-party software, end-users, and other Oracle systems when certain transactions occur. | Interface tables and system calls | No |
14.2 Processing Guaranteed Events
This section provides an overview of the architecture for processing events and discusses:
-
Aggregating events
-
Logging events
-
Configuring the transaction server
14.2.1 Understanding Guaranteed Events Processing
This diagram provides an overview of the JD Edwards EnterpriseOne events architecture:
Figure 14-1 Guaranteed Events architecture overview
Description of "Figure 14-1 Guaranteed Events architecture overview"
In summary, this is the general sequence that happens for an event to be published:
-
An HTML client user executes a business function request that is sent to the JD Edwards EnterpriseOne Web server.
-
The request is forwarded to a CallObject kernel on the JD Edwards EnterpriseOne server.
-
The CallObject kernel executes the business function, which calls the Event API to send the event data to the F90710 table.
If the event is a Z event, the data sent to the F90710 table is in its final XML format.
-
A trigger message is sent to the JD Edwards EnterpriseOne Transaction server that indicates that a new event is in the F90710 table.
-
The transaction server retrieves the event data from the F90710 table and, for real-time and XAPI events, converts the event data to an XML document in the appropriate format.
-
The transaction server routes the event to the subscriber queues and subscriber topics for each subscriber that has established an active subscription for that event.
-
When a subscriber connects to the transaction server, the subscriber receives all the events that exist in its subscription queue and subscription topic at that time.
Note:
XAPI and Z events require additional information for event processing, which is discussed in the respective XAPI and Z event chapters.14.2.2 Aggregating Events
Events are classified as either a single event or a container event. A single event can contain a single data structure. A container event can contain one or more single events or one or more data structures. You cannot define a container event using both single events and data structures for that specific container event. For example, RTSOHDR and RTSODTL are usually defined as single real-time events that represent the data structures in the header and detail areas of a sales order. RTSOOUT is usually defined as a container real-time event that contains both RTSOHDR and RTSODTL.
14.2.3 Logging Events
Real-time and XAPI events do not exist in their XML form until they are processed by the transaction server. Therefore, it is not possible to log the XML event on the JD Edwards EnterpriseOne server. However, if debugging is selected, the debug log file for the CallObject kernel that generates the event displays jdeIEO_EventFinalize called for XX, where XX is an integer that represents the number of times that jdeIEO_EventFinalize has been called in that kernel.
If you select debug logging for the transaction server, the transaction server debug log file displays this message, Sending event:, followed by the event data, including the full XML content of the event when the transaction server processes an event. There is one of these messages for every active subscriber that has an active subscription to the event.
Caution:
When logging is selected for the transaction server, be sure to remove global read access rights for the logging directory to ensure data privacy.If you use the dynamic Java connector graphical subscription application, you have the capability of sending the XML content of all received events to a specified directory.
See "Understanding Java Connector Events" in the JD Edwards EnterpriseOne Tools Connectors Guide.
14.2.4 Configuring the Transaction Server
The transaction server uses Java Message Service (JMS) queues and topics to guarantee event delivery. When an event occurs in JD Edwards EnterpriseOne, the transaction server retrieves the event information and routes the information to subscriber JMS queues and topics for each subscriber that has established an active subscription for that event.
You configure the Object Configuration Manager (OCM) so that the transaction server can find the event system. You access OCM from the Interoperability Event Definition program (P90701A).
Note:
The ptf.log file contains transaction server version information. The ptf.log file is located in EventProcessor_WAR.war and JDENETServer_WAR.war.14.3 Setting Up OCM for Guaranteed Events
This section provides an overview of setting up OCM for guaranteed events and discusses how to set up OCM.
14.3.1 Understanding OCM Setup for Guaranteed Event Delivery
You define the transaction server and transaction server port settings in OCM so that the transaction server can find the event system. You access OCM from the Interoperability Event Definition program (P90701A). Once you access OCM from the Interoperability Event Definition program, you select the appropriate machine name and data source combination. This information should already be set up. If it is not, check with your System Administrator or refer to the Configurable Network Computing Implementation Guide for information about setting up OCM.
14.3.2 Forms Used to Set Up OCM for Guaranteed Event Delivery
| Form Name | FormID | Navigation | Usage |
|---|---|---|---|
| Event Definition Workbench | W90701AA | Enter P90701A in the Fast Path Command Line. | Configure the OCM so the transaction server can find the event system. |
| Machine Search and Select | W986110D | From the Form menu on Event Definition Workbench, select Configure Servers. | Select the appropriate machine name and data source combination. |
| Work with Service Configurations | W986110J | On Machine Search and Select, select the machine name and data source combination and then click Select. | Find and select an existing configuration for the transaction server and server port or to access the Work with Service Configurations form to add a new configuration record for your transaction server. |
| Service Configuration Revisions | W986110K | On Work with Service Configurations, click Add. | Configure the OCM with the J2EE Transaction server and port. |
14.3.3 Setting Up the OCM for Guaranteed Event Delivery
Access the Service Configuration Revisions form.
Figure 14-2 Service Configuration Revisions
Description of "Figure 14-2 Service Configuration Revisions"
- Environment Name
-
A name that uniquely identifies the environment.
- Service Name
-
A name that identifies the type of server. For example, RTE identifies the transaction server.
- User / Role
-
A profile that classifies users into groups for system security purposes. Use group profiles to give the members of a group access to specific programs.
- Server
-
The name of the transaction server.
- Port
-
The port number of the transaction server. This is the JDENET listening port.
14.4 Defining Events
This section provides an overview of defining events in the F90701 table and discusses how to add single and container events.
14.4.1 Understanding Events Definition
You use the Interoperability Event Definition program (P90701A) to define each real-time and XAPI event in JD Edwards EnterpriseOne. You use a separate process to define Z events, which is documented in the Guaranteed Z Events chapter.
Every real-time or XAPI event that you use in your system must have an associated record in the F90705 table. The F90705 table enables each event to be activated or deactivated for each environment in your system. When you create a new event, select the Create Activation Record option. When you add a new environment to your system, you must run the Populate Event Activation Status Table UBE (R90705) to create event activation records for existing events. The Populate Event Activation Status Table UBE is described in the JD Edwards EnterpriseOne Server Installation Guide.
After you define a new event, you must refresh the cache of active events on the transaction server. You can refresh the active events cache while the transaction server is running. If the transaction server is not running when this operation is performed, it automatically refreshes its cache when it is brought back to operational status.
See Also:
14.4.2 Forms Used to Enter Events
| Form Name | FormID | Navigation | Usage |
|---|---|---|---|
| Event Definition Workbench | W90701AA | Type P90701A on the Fast Path. | Locate and review existing single and container events. |
| Event Entry | W90701AD | On Event Definition Workbench, click Add. | Add or change a single or container event. |
| Event Definition Detail | W90701AC | Automatically appears when you click OK on the Event Entry form if you entered Container in the Event Category field for a real-time event or if you entered XAPI in the Event Type field. | Link single events or data structures to a container event. |
| Event Activation by Environment | W90701AG | On Event Definition Workbench, select Event Activation from the Form menu. | Locate and review existing environments and event types. |
| Add Event Activation by Environment | W90701AH | On Event Activation by Environment, click Add. | To activate an event on a specific environment. |
14.4.3 Adding a Single or Container Event
- Event Type
-
The name of the event (for example RTSOOUT, which is the typical event type for a real-time sales order event.)
- Create Activation Records
-
An option that causes newly defined events to have an associated record in the F90705 table, which enables each event to be activated or deactivated for each environment in your system. You must select this option for every event that you intend to use in your system.
- Event Description
-
The description of an event.
- Event Category
-
A value that represents the name of the event type. Use RTE for real-time events or XAPI for XAPI events.
- Event Aggregate
-
Indicates whether an event is a single event or a container event.
- Product Code
-
An optional field that indicates to which JD Edwards EnterpriseOne system the event is associated.
- Data Structure
-
The name of the data structure that passes event information.
This field disappears if Container is the value of the Event Aggregate field; however, when you click OK, the Event Definition Detail form automatically appears for you to enter data structure information.
14.4.3.1 Event Definition Detail
Access the Event Definition Detail form.

- Event Data
-
An option that enables you to define single individual events for a container event.
- Data Structure Data
-
An option that enables you to define aggregate events for the container event. For XAPI events, you must select the Data Structure Data option.
14.4.3.2 Activating an Event
Access the Add Event Activation by Environment form
- Environment
-
Your operating environment, such as Microsoft Windows, UNIX, IBM i, and so on.
14.4.3.3 Refreshing the Transaction Server Cache of Active Events
Access the Event Definition Workbench form.
To refresh the cache of active events with the transaction server running, select Refresh Event Cache from the Form menu.
14.5 Establishing Subscriber and Subscription Information
This section provides an overview of subscriber and subscription information and discusses how to:
-
Set up processing options for adding JMS Queue as a subscriber.
-
Add a subscriber.
-
Add a subscription.
-
Associate a subscription with subscribed events.
-
Associate a subscription with subscribed environments.
14.5.1 Understanding Subscribers and Subscriptions
You use the Interoperability Event Subscription program (P90702A) to establish subscribers and to add subscriptions. After you add a subscriber, you must activate it. If your subscriber is inactive, you will not receive any events even if you have active subscriptions. You activate subscribers on the Event Subscribers form by selecting the subscriber, and then selecting Change Status from the Row menu.
Each subscriber can have one or more subscriptions. Each subscription can be associated with one or more subscribed events and subscribed environments. Each subscription that you want to use must be activated. You activate subscriptions on the Event Subscriptions form by selecting the subscription, and then selecting Change Status from the Row menu.
Any time you make a change to a subscriber, including the associated subscriptions, you must refresh the subscriber cache on the JD Edwards EnterpriseOne and the Transaction servers for the changes to become effective. You can refresh your running system from the Event Subscribers form by selecting Refresh Sub Cache from the Form menu.
Oracle Service Bus (OSB) is a subscriber that uses the JMS Queue transport. You can set up processing options for Enterprise Service Bus (ESB) (WebSphere) and OSB (WebLogic) so that when you add JMS Queue as a new subscriber, the value for the Initial Context Factory and Provider URL fields are entered by the system.
14.5.2 Forms Used to Add a Subscriber and Subscription Information
| Form Name | FormID | Navigation | Usage |
|---|---|---|---|
| Event Subscribers | W90702AA | Type P90702A in the Fast Path. | Locate and review existing subscribers. |
| Add Event Subscriber | W90702AB | On Event Subscribers, click Add. | Add or change a subscriber. |
| Event Subscriptions | W90702AD | Select a subscriber in the detail area of the Event Subscribers form, and then select Event Subscriptions from the Row menu. | Locate and review existing subscriptions for a subscriber. |
| Add Event Subscription | W90702AE | On Event Subscriptions, click Add. | Add new subscription information. |
| Subscribed Events | W90702AG | On the Event Subscriptions form, select the subscription information in the detail area, and then select Subscribed Events from the Row menu. | Associate a subscription with an event. |
| Subscribed Environments | W90702AF | On the Event Subscriptions form, select the subscription information in the detail area, and then select Subscribed Env from the Row menu. | Associate a subscription with an environment. |
14.5.3 Setting Up Processing Options for Adding JMS Queue as a Subscriber
Access the Interactive Versions form on JD Edwards EnterpriseOne by typing IV in the Fast path. Use these processing options to define values for adding JMS Queue as a subscriber.
- WebSphere Initial Context Factory
-
Use this processing option to specify the value for the Initial Context Factory field that appears on the Add Event Subscriber form. The value you enter in this processing option appears in the Add Event Subscriber form when the Application Server is defined as WebSphere. The default value is com.ibm.websphere.naming.WsnInitialContextFactory.
- WebSphere Local Provider URL
-
Use this processing option to specify the value for the Provider URL field that appears on the Add Event Subscriber form. The value you enter in this processing option appears in the Add Event Subscriber form when the Application Server is defined as WebSphere and the Queue Location is defined as Local. The default value is corbaloc:iiop:localhost:2809.
- WebSphere Remote Provider URL
-
Use this processing option to specify the value for the Provider URL field that appears on the Add Event Subscriber form. The value you enter in this processing option appears in the Add Event Subscriber form when the Application Server is defined as WebSphere and the Queue Location is defined as Remote. The default value is corbaloc:remote-machine-name:2809.
- WebLogic Initial Context Factory
-
Use this processing option to specify the value for the Initial Context Factory field that appears on the Add Event Subscriber form. The value you enter in this processing option appears in the Add Event Subscriber form when the Application Server is defined as WebLogic. The default value is weblogic.jndi.WLInitialContextFactory.
- WebLogic Local Provider URL
-
Use this processing option to specify the value for the Provider URL field that appears on the Add Event Subscriber form. The value you enter in this processing option appears in the Add Event Subscriber form when the Application Server is defined as WebLogic and the Queue Location is defined as Local. the default value is t3://localhost:7001.
- WebLogic Remote Provider URL
-
Use this processing option to specify the value for the Provider URL field that appears on the Add Event Subscriber form. The value you enter in this processing option appears in the Add Event Subscriber form when the Application Server is defined as WebLogic and the Queue Location is defined as Remote. The default value is t3://remote-machine-name:7001.
14.5.4 Adding a Subscriber
Access the Add Event Subscriber form.
- Subscriber
-
The JD Edwards EnterpriseOne user ID for the user who is to receive the subscribed events.
- Subscriber Description
-
A description of the subscriber.
- Transport Type
-
Describes through which mechanism the subscriber receives events. Valid transport types are:
-
COMCONN: COM Connector
-
JAVACONN: Java Connector
-
JDENET: For XAPI requests
Additional fields appear on the Add Event Subscriber form. In the Host Name field, enter the name of the server that processes events for the subscriber. In the Port Number field, enter the port where the subscriber service is running. In the Connection Timeout field, enter the time in milliseconds after which the event connection is considered timed out.
-
JMSTOPIC: JMS Topic
Additional fields appear on the Add Event Subscriber form. In the Connection Factory JNDI field, enter the JMS Topic Connection Factory JNDI name. In the JMS Topic field, enter the JMS Topic name for your subscriber.
Important:
The values that you enter in the Connection Factory JNDI Name field and the Topic Name field must be the same values that you configured on the WebSphere Application ServerSee JD Edwards EnterpriseOne Tools Transaction Server Reference Guide for your platform.
http://docs.oracle.com/cd/E24902_01/nav/reference.htm -
JMSQUEUE: JMS Queue
Additional fields appear on the Add Subscriber Event form. In the Connection Factory JNDI field, select the JMS Queue Connection Factory JNDI name from the drop-down list. In the Queue Name field, select JMSQUEUE from the drop-down list. Verify the value in the Message Format field is correct. Verify the value in the Application Server field is correct--this entry affects the value that the system enters in the Initial Context Factory field and the Provider URL field. In the Queue Location field, select the appropriate value from the drop-down list. Use Local if the queue and the transaction server are on the same application server. Use Remote if the queue and the transaction server are on different applications servers. After you enter the value in the Queue Location field, the system updates the Initial Context Factory field and Provider URL field. You can change these values.
Important:
The value that you enter in the Connection Factory JNDI Name field must be the same value that you configured on the WebLogic Application Server or WebSphere Application Server.See JD Edwards EnterpriseOne Tools Transaction Server Reference Guide for your platform.
http://docs.oracle.com/cd/E24902_01/nav/reference.htm -
MQSQ: IBM WebSphere MQ
Additional fields appear on the Add Subscriber Event form. In the Connection Factory JNDI field, enter the WebSphere MQ Connection Factory JNDI name. In the Queue Name field, enter the WebSphere MQ queue name for your subscriber
-
MSMQ: Microsoft Message Queue
Additional fields appear on the Add Subscriber Event form. In the Queue Label field, enter the MSMQ Queue Label. In the Queue Name field, enter the MSMQ Queue Name
-
14.5.5 Adding a Subscription
Access the Add Event Subscription form.
- Subscriber
-
The JD Edwards EnterpriseOne user ID for the user who is to receive the subscribed events.
- Subscription Name
-
A unique name for the subscription.
- Subscription Description
-
A description of the subscription.
14.5.6 Associating a Subscription with Subscribed Events
Access the Subscribed Events form.
- Event Type
-
The name of the event.
14.6 Creating MSMQ Queues
This section provides an overview about MSMQ and discusses how to:
-
Create an MSMQ real-time event queue.
-
Verify event delivery.
14.6.1 Prerequisites
Install MSMQ on your system.
14.6.2 Understanding MSMQ
You can use Microsoft message queueing to subscribe to and receive events. After you create the events queue for MSMQ, you must add the queue name as a subscriber, using the Interoperability Event Subscription program (P90702A). The queue name must be in MSMQ direct format, which includes your machine name or IP address, depending on which protocol you use. Naming conventions for MSMQ direct format queue names are discussed on Microsoft's web page.
After you create the queue and set up the subscriber information, you should verify event delivery. MSMQ RTEII, a server-only feature, is an extension of COMConnector.
14.6.3 Creating an MSMQ Real-Time Event Queue
Use these steps to configure MSMQ:
-
From the Control Panel, select Administrative Tools, and then select Computer Manage.
-
On the Computer Management Console, navigate to Services and Applications, and then open Message Queuing.
-
Open Private Queue, right-click the Private Queue folder, select New, and then Private Queue.
Note:
You can create the events queue under Public Queue if you prefer. -
In Queue Name, select a meaningful queue name, for example, RTE-TEST.
-
If the events queue is used in a transactional environment, select the Transactional option, and then click OK.
Note:
If you are creating an event queue in a transactional environment, you must use a private (remote) queue. -
Right-click your newly created events queue and select properties.
-
In the Label field, enter a meaningful queue label name; for example, E1Outbound, and then click OK.
14.6.4 Verifying Event Delivery
Use these steps to verify event delivery:
-
Start the COMConnector on your enterprise server.
Note:
Do not start the COMConnector on your client machine. -
On your enterprise server, in MSMQ Computer Management, select the queue that you configured to receive JD Edwards EnterpriseOne events.
-
To see if any events are in the queue, click the queue messages under queue name and select Action then Refresh in the Computer Management menu.
-
Double-click any messages that are in the queue.
A menu displays the message content up to the first 256 bytes.
14.7 Creating WebSphere MQ Queues
This section provides an overview about WebSphere MQ and discusses:
-
Creating a WebSphere MQ real-time event queue.
-
Configuring WebSphere.
-
Verifying event delivery.
14.7.1 Prerequisites
Before you complete this task:
-
WebSphere MQ is installed on your system with PTF CSD06.
-
WebSphere is installed on your system.
14.7.2 Understanding WebSphere MQ
You can use IBM's message queueing to subscribe to and receive events. After you create the events queue for WebSphere MQ, you must add the queue name as a subscriber, using the Interoperability Event Subscription program (P90702A).
After you create the queue and set up the subscriber information, you should verify event delivery.
14.7.3 Creating a WebSphere MQ Real-Time Event Queue
Use these steps to configure WebSphere MQ:
-
Open the WebSphere MQ Explorer and navigate to the Queue Manager.
The default queue manager is typically named QM_<hostname>, where <hostname> is the machine name where WebSphere MQ is installed.
Note:
If the QM_<hostname> queue is not created, then manually create the queue. Right-click Queue Managers, select New, and then select Queue Manager. Complete the data fields on each successive screen. -
Under Queue Manager, select the Queues folder.
This shows any existing queues hosted by this queue manager.
-
To create the queue for delivery of JD Edwards EnterpriseOne events, select New then Local Queue from the Action menu on the WebSphere MQ Explorer.
Note:
On Create Local Queue, enter a meaningful queue name, for example, RTE_TEST_QUEUE. -
To make the queue persistent, select the Persistent option for the Default Persistence field.
The default settings should be sufficient for the remaining configuration values.
Important:
When entering queue names for IBM WebSphere MQ, the queue name must be all upper case.14.7.4 Configuring WebSphere
Use these steps to configure WebSphere:
-
Log on to the WebSphere Administration Console.
-
Create a Queue Connection Factory by selecting WebSphere MQ JMS Provider under Resources.
Enter a meaningful connection factory name along with a JNDI name; for example, jms/mq/rte/QueueConnectionFactory.
Note:
When you add a WebSphere MQ subscriber in JD Edwards EnterpriseOne, enter this name in the Connection Factory JNDI field. -
Create a queue destination by selecting WebSphere MQ JMS Provider under Resources.
-
In the Name and Base Queue Name field, enter the same queue name that you used when you created the queue in the WebSphere MQ Explorer; for example RTE_TEST_QUEUE.
-
Enter a meaningful JNDI name; for example, jms/mq/rte/TestQueue01.
Note:
When you add a WebSphere MQ subscriber in JD Edwards EnterpriseOne, enter this name in the Queue Name field. -
Enter the Queue Manager name; for example, QM_DENNF13.
-
-
Save these changes in the WebSphere console.
14.7.5 Verifying Event Delivery
Use these steps to verify event delivery:
-
In the WebSphere MQ Explorer, select the queue you configured to receive JD Edwards EnterpriseOne events.
Note:
To see if any events are in the queue, click the refresh button on the Explorer window. The Current Depth column shows the number of messages in the queue. You might have to scroll right in the explorer window to see this column. -
If there are messages in the queue, right-click the queue.
-
To see the messages in the queue, select Browse Messages in the pop-up menu.
Note:
JD Edwards EnterpriseOne sends the event XML to an WebSphere MQ queue, not the serialized object sent to subscriber queues serviced by the Java connector.
14.8 Creating WebLogic Message Queues
This section provides an overview about WelbLogic messaging queues and discusses:
-
Creating a JMS server in the WebLogic server.
-
Creating a JMS module in the WebLogic server.
-
Creating a connection factory.
-
Creating a destination (queue).
-
Verifying event delivery.
14.8.1 Prerequisites
Install the WebLogic server on your system.
14.8.2 Understanding WebLogic Message Queue
You can use Oracle Business Service (OSB) message queue to subscribe to and receive events. After you create the events queue for WebLogic, you must add the queue name as a subscriber, using the Interoperability Event Subscription program (P90702A).
After you create the queue and set up the subscriber information, you should verify event delivery.
14.8.3 Creating a JMS Server in the WebLogic Server
Use these steps to create a JMS server in the WebLogic server:
-
In the WebLogic admin console, go to Home > Summary of Services: JMS > Summary of JMS Servers.
-
Click Lock & Edit.
-
Click New.
-
On Create a New JMS Server, enter a name for your JMS server in the Name field.
-
Click the Create New Store button.
-
Click Next.
14.8.4 Creating a JMS Module in the WebLogic Server
Use these steps to create a JMS module in the WebLogic server:
-
In the WebLogic admin console, go to Home >Summary of Services: JMS > JMS Modules.
-
To create a new module, type the module name in the Name field.
-
Accept the default values for the Descriptor File Name and Location In Domain fields.
-
Click Next.
14.8.5 Creating a Connection Factory
Use these steps to create a Connection Factory in WebLogic:
-
From the WebLogic Admin Console, go to Home >JMS Modules > jmsModule.
-
To create a new connection factory, enter a meaningful connection factory name in the Connection Factory field.
-
Set the JNDI name to OSBSubscriberQCF.
-
Click Next.
14.8.6 Creating a Destination
Use these steps to create a destination (queue):
-
From the WebLogic Admin Console, go to Home > JMS Modules > jmsModule.
-
To create a new queue, enter the queue name in the Create a New Queue field.
-
Set the JNDI name to OSBSubscriber Queue.
-
Click Next.
-
Enter a meaningful name in the Subdeployments field.
-
Click Next.
14.8.7 Verifying Event Delivery
Use these steps to verify event delivery:
-
In the WebLogic message queue, select the queue you configured to receive JD Edwards EnterpriseOne events.
Note:
To see if any events are in the queue, click the Refresh button on the Explorer window. The Current Depth column shows the number of messages in the queue. You might have to scroll right in the explorer window to see this column. -
If there are messages in the queue, right-click the queue.
-
To see the messages in the queue, select Browse Messages in the pop-up menu.
Note:
JD Edwards EnterpriseOne sends the event XML to a WebLogic message queue, not the serialized object sent to subscriber queues serviced by the Java connector.
14.9 Creating Custom Real-Time Events
This section discusses how to create a real-time event.
14.9.1 Creating a Custom Real-Time Event
JD Edwards EnterpriseOne provides predefined real-time events that capture certain JD Edwards EnterpriseOne transactions and notify subscribers about the transaction. If you have requirements that are not satisfied by the predefined real-time events, you can create a custom real-time event. Chapter 14, Using Real-time Events – Guaranteed, of the Interoperability Guide provides conceptual information about real-time events, identifies APIs for creating real-time events, and provides sample code.
Before you create a custom real-time event, you should review the existing real-time events to determine if there is one that you can use as a model for creating your custom real-time event. Detail information about each real-time event can be found in the Application Real-Time Events Implementation Guide.
See "JD Edwards EnterpriseOne Application Real-Time Events Overview" in the JD Edwards EnterpriseOne Applications Business Interfaces Implementation Guide.
Use the following steps to create a custom real-time event. Each step includes a reference to documentation that provides more information about that step.
-
Determine the type of real-time event (single, aggregate, or composite).
-
Create a new data structure or modify an existing data structure to pass data.
See "Creating Data Structures" in the JD Edwards EnterpriseOne Tools Data Structure Design Guide.
-
Create a new event definition.
See Defining Events.
-
Create a new business function or modify an existing business function to call the API that generates the event.
See Using Business Function Calls.
See JD Edwards EnterpriseOne Tools API Reference Guide.
https://support.oracle.com/rs?type=doc&id=705446.1 -
Build and promote the business function.
See "Understanding Package Management" in the JD Edwards EnterpriseOne Tools Package Management Guide.
-
Add the subscriber, associate the event to the subscriber, and enable the subscription.
-
Configure Object Configuration Manager (OCM) for Guaranteed Event Delivery.
-
Configure and start your servers (transaction, integration, and enterprise) and test the real-time event.
See Understanding Guaranteed Events Processing.
See JD Edwards EnterpriseOne Server Manager Guide.
http://docs.oracle.com/cd/E24902_01/nav/installation.htmSee JD Edwards EnterpriseOne Deployment Server Reference Guide for your platform.
http://docs.oracle.com/cd/E24902_01/nav/reference.htmSee JD Edwards EnterpriseOne Transaction Server Reference Guide for your platform and application server.
http://docs.oracle.com/cd/E24902_01/nav/reference.htm
14.10 Generating Schemas for Event XML Documents
This section provides an overview of the Schema Generation Utility and discusses how to:
-
Configure the Schema Generation Utility.
-
Use the Schema Generation Utility.
-
Troubleshoot the Schema Generation Utility.
14.10.1 Understanding the Schema Generation Utility
The Schema Generation Utility creates XML schemas from event definitions. The purpose of this utility is to facilitate orchestration developers who use orchestration systems such as Oracle's Enterprise Service BUS (ESB) or Business Process Execution Language Process Manager (BPEL-PM) to process real-time events, XAPI events, and Z events.
The Schema Generation Utility enables you to generate and save the schemas. The Schema Generation Utility generates schemas for these events:
-
Single event: You can select a single event of a particular event category to generate schema.
-
Multiple events: You can select multiple events of a particular event category to generate schemas.
-
All events: You can generate schemas for all JD Edwards EnterpriseOne events of a particular event category.
In addition, the Schema Generation Utility can generate XML schema for a generic header representing all events. This schema can be used in orchestration systems for content-based routing.
This diagram provides an overview of the Schema Generation utility.

14.10.1.1 Prerequisite
Before you configure the Schema Generation Utility, you must install the Java Runtime Environment (JRE) version on your local machine.
14.10.2 Configuring the Schema Generation Utility
The Schema Generation Utility is delivered in a zip file in the system\classes folder. You must download the zip file to your local machine and set up certain files. You use these settings in Step 4.
| Section | Setting | Value |
|---|---|---|
| [EVENTS] | initialContextFactory | For WebLogic Server, the default value is: weblogic.jndi.WLInitialContextFactory
For WebSphere Application Server, the default value is: com.ibm.websphere.naming.WsnInitialContextFactory |
| [EVENTS] | jndiProviderURL | For the Transaction Server running on a WebLogic Server, the value is: jndiProviderURL=t3://machine_name:machine_port
For the Transaction Server running on a WebSphere Application Server, the value is: jndiProviderURL=corbaloc::Machine_name:Port/NameServiceServerRoo Note: Machine_name in this setting is the name of the machine where the Transaction Server is installed Port in this setting is the Bootstrap Address port of the Transaction Server. Generally the port is 9810. |
| [EVENTS] | eventServiceURL | The value is: http://machine_name:port/e1events/EventClientService
Note: Machine_name in this setting is the name of the machine where the Transaction Server is installed, up, and running. Verify the hostport property in the jas.ini file of the Transaction Server for port information and to find the exact port for the URL. |
| [SECURITY] | SecurityServer | Provide the name of the user's EnterpriseOne Security Server. |
| [JDENET] | serviceNameConnect | Provide the port that you are connecting on to the user's EnterpriseOne Security Server. |
| [INTEROP] | enterpriseServer | Provide the name of the user's EnterpriseOne Server. |
| [INTEROP] | port | EnterpriseOne Server port. |
To configure the Schema Generation Utility:
-
Navigate to the system\classes folder and unzip the SchemaGenUtil.zip file to the C:\SchemaGenUtil directory in your machine.
Ensure to unzip the file with the full path information for each file in the zip file.
-
Configure the files in your C:\SchemaGenUtil\config directory.
Ensure that the configured files have the .templ file extension removed from them. The proper filenames for that directory are jdbj.ini, jdeinterop.ini, and jdelog.properties.
-
Configure jdbj.ini and jdelog.properties files according to the environment.
The simplest solution for the jdbj.ini file is to use the same file that has been configured on the Transaction Server.
Note:
See your JD Edwards EnterpriseOne systems administrator if you do not know the appropriate values for these files. -
Configure the jdeinterop.ini file sections and settings that are identified in the preceding table.
-
Edit the C:\SchemaGenUtil\runSchemaGenUtilityDriver.bat file, pointing it to the location of the installed JRE.
14.10.3 Using the Schema Generation Utility
You use your JD Edwards EnterpriseOne user credentials to log into the Schema Generation Utility. Upon successfully logging in, the Event Schema Generator screen appears. This screen has two panels, Event Operations and Exception. You use the Event Operations panel to generate and display schemas for events. The Exception panel informs you of errors.
14.10.3.1 Prerequisites
Before you use the Event Schema Generator, ensure that:
-
The event for which you want to generate a schema is active in the environment that you are using.
-
The database driver file is in the classpath—if not, copy the database driver files to the following directory:
C:\SchemaGenUtil\lib
14.10.3.2 Logging In to the Schema Generation Utility
To log in to the Schema Generation Utility:
-
On your local machine, navigate to the C:\SchemaGenUtil directory and double-click the runSchemaGenUtilityDriver.bat file.
The Event Schema Generator sign-on window appears.
-
Enter your JD Edwards EnterpriseOne user credentials for these fields:
-
User Name
-
Password
-
Environment
Events must be active in this environment.
-
Role
-
-
Select the Remember Sign On Info option if you want the system to remember your sign-on information, and then click OK.
Note:
You can ignore the following warning message:Unable to initialize the management agent. Server Manager capability will be unavailable
14.10.3.3 Event Schema Generator Screen
After you successfully log in, the Event Schema Generator screen appears. This example shows the two panels on the Event Schema Generator screen:
You use the Event Operations panel to provide information about the event or events for which you want schema generated. The utility provides the three event categories (real-time, XAPI, and Z events) from which you select and you must identify the environment. All events for which you want to generate a schema must be active in the environment that you indicate. When you select an event category and environment, the utility provides a list of events that are available.
You can perform the following tasks from the Event Operations panel:
-
Display an event schema.
-
Generate event schema for single and multiple events.
-
Generate event schema for all the events of a selected event category.
-
Generate header schema.
Click the Clear Selection button to clear the selection in the Event List panel. After the utility generates the schema, the schema is displayed in the Event Schema field.
If an error occurs during schema generation, the utility displays an error message in the Error Messages field of the Exception panel. You remove a message by clicking the Clear Error Message button.
If no events are available in the given environment, the Schema Generation Utility displays an error message, such as No event available for RTE in DEMOENV in the Error Message panel.
You terminate the Schema Generation Utility by clicking Close at the right top of the main frame.
14.10.3.4 Displaying Event Schema
You can display event schema. This example shows how the utility displays a schema:
Figure 14-8 Event Schema Generator displaying event schema
Description of "Figure 14-8 Event Schema Generator displaying event schema"
To display event schema:
-
In the Event Operations panel of the Event Schema Generator screen, select the type of event from the Event Category field.
-
In the Environment field, enter the name of the environment that has the active event.
-
In the Event List field, select an event.
Select only one event. If you select multiple events, the utility displays an error message in the Error Messages field of the Exception panel. The error message for selecting multiple events indicates invalid input. Click the Clear Selection button to clear a selection from the Event List.
-
Click Display Schema.
The utility displays the generated schema in the Event Schema field.
14.10.3.5 Generating Event Schema for Single and Multiple Events
You can generate schema for a single event and save the schema to a file. The utility saves generated schemas with a file extension of .xsd. After you complete the selection criteria and click Generate Schema(s) on the Event Schema Generator screen, a file chooser dialog screen appears. You indicate the file path and enter the file name.
You can save the generated schema for a single event. This example is the file chooser dialog screen for saving a single event:
Figure 14-9 Save screen for a single event
Description of "Figure 14-9 Save screen for a single event"
You can generate schemas for multiple events and save the schemas to a directory. To select multiple events from the Event List field, press the Ctrl key and select the event. After you complete the selection criteria and click Generate Schema(s) on the Event Schema Generator screen, a Select Directory dialog screen appears. You enter the full path name where the directory is located. The utility saves each schema file as E1_EventType.xsd, for example, E1_RTSOOUT.xsd.
Figure 14-10 Select Directory screen for multiple events
Description of "Figure 14-10 Select Directory screen for multiple events"
To generate event schema for single and multiple events:
-
In the Event Operations panel of the Event Schema Generator screen, select the type of event from the Event Category field.
-
In the Environment field, enter the name of the environment.
If you select multiple events, all events must be active in that environment.
-
Perform one of the following actions:
-
Select a single event from the Event List field and click Generate Schema(s).
A file chooser dialog screen appears. To save the generated schema, navigate to the appropriate directory, enter a name for the generated schema in the File Name field, and click Save. If you do not want to save the generated schema, click Cancel.
-
Select two or more events from the Event List field, and click Generate Schema(s).
A Select Directory screen appears. To save the schemas for all of the events, indicate the directory path (use the full path name, for example, C:\ConnectorEventsClient\Schemas), and click Save. The utility saves the schema file for each selected event as E1_EventType.xsd, for example, E1_RTSOOUT.xsd. If you do not want to save the generated schemas, click Cancel.
-
14.10.3.6 Generating Event Schema for All the Events of a Selected Event Category
You can generate schemas for all of the events within an event category. The events must be active in the environment. On the Event Schema Generator screen, you select the event category and then click Generate All Schemas. A dialog screen named Select Directory appears. You indicate the full path name of the directory where you want to store the schema. The utility saves each schema file as E1_EventType.xsd, for example, E1_RTSOOUT.xsd.
This screen is the Select Directory dialog screen for saving all of the events in a category:
Figure 14-11 Select Directory screen for all events within a category.
Description of "Figure 14-11 Select Directory screen for all events within a category."
14.10.4 Troubleshooting the Schema Generation Utility
This table provides resolutions for problems that might occur:
| Problem | Resolution |
|---|---|
| An error message appears after sign-on. | Ensure that all the given credentials (user name, password, environment, and role) are correct. |
| C:\SchemaGenUtil\logs directory is getting full of files. Can some of the .log and/or .xml files in that directory be deleted? | Delete any files in that directory at any time. If the Schema Generation Utility application is running, some of the files may be locked. |
| An error message that you do not understand appears in the Error Messages field. | Look at C:\SchemaGenUtil\logs directory for the jasdebug_date.log file that corresponds to the appropriate date. Often a more explanatory error message can be found in this log file. |
| Specification not found error is displayed in the Error Messages field. | Verify that the selected event is active and available in the environment that you indicated.
This type of error message will read similar to this: Spec not found for requested template: EventCategory: EventType |
14.11 Versioning Real-Time Events
This section is intended for software development engineers who customize existing JD Edwards EnterpriseOne real-time events.
This section provides an overview about why you would create a version of a real-time event and discusses how to:
-
Determine if a version is required
-
Name a real-time event version
14.11.1 Understanding Why a Version Is Required
JD Edwards EnterpriseOne ships pre-built real-time events to which you can subscribe. You can use the pre-built real-time events out of the box, you can customize an existing JD Edwards EnterpriseOne real-time event, or you can create a new real-time event that is specific for your enterprise.
See Also:
If you find it necessary to change an existing real-time event and the change affects the interface, Oracle recommends that you create a version of the original real-time event and change the version as necessary. This recommendation takes into consideration JD Edwards EnterpriseOne updates and upgrades. During an update or upgrade, any modifications that you made to an existing JD Edwards EnterpriseOne real-time event will be overwritten by the new JD Edwards EnterpriseOne code. A real-time event version helps to minimize merge complications when your system is upgraded.
Note:
The conventions discussed in this section are standards that Oracle JD Edwards EnterpriseOne uses. You can use these standards as a model for creating your own standards so that your versions will not be overwritten.14.11.2 Determining if a Version is Required
If you make a change to an existing event and that change affects the interface, you need to create a new version of the event.
The interface is affected when you:
-
Change the event type.
-
Change the event data.
14.11.2.1 Changing the Event Type
An event can be either a single event or a container event. Each single event consists of a data structure. A container event consists of multiple single events.
When you are working with a single event, and you determine that you need to add another single event that is associated with the existing single event, you must create a new container event that contains both the original single event and the added single event. A container event is named differently than a single event. For example, if the original single event is named RTSOHDR, and you want to add another single event named RTSODTL, you create a new container event called RTSOOUT that contains the two single events, RTSOHDR and RTSODTL.
A container event contains more than one single event, and if it becomes necessary to add another single event, you create a version of the existing container event and add the desired single event.
Oracle recommends that you not remove any single events from the system. If you want to remove a single event from an existing container event, this can be achieved through the subscription process when you associate your subscription with the events to which you want to subscribe. See Establishing Subscriber and Subscription Information in this chapter.
The following diagram can help you decide if you should create a version of the original real-time event because you have changed the event type:
Figure 14-12 Determine if a change affects the event type.
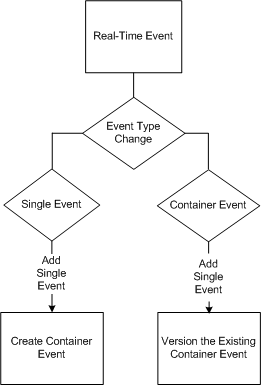
Description of "Figure 14-12 Determine if a change affects the event type."
14.11.2.2 Changing the Event Data
A single event uses one data structure to pass information to other applications. Because a container event is composed of multiple single events, the container event uses multiple data structures to pass information to other applications. A data structure is a collection of data items. The event will not behave as expected or you will receive an error if you change the data type or data size fields within the data item. Oracle recommends that you not change the data type or data size.
Changes to the event structure, such as the structure name, data type, and data size affect the interface. If you make a change that affects the event interface, you must create a version of the event and make the necessary changes in the version.
The event interface could change because you:
-
Change the data structure member name.
-
Change the data type.
-
Change the data size.
-
Add a new field.
-
Remove a field.
-
Populate an existing field that previously was not populated.
-
Discontinue populating an existing field that previously was populated.
-
Change the source of the data; for example, the data is retrieved from a different table.
If you make any of the above changes, you must create a version of the event, and you must make a change to the business function that initiates the event.
Important:
Changing when an event is initiated cannot be accommodated by creating a version of an existing event.14.11.3 Naming Conventions for Real-Time Event Versions
This section discusses the standards that Oracle uses for naming real-time events. If you determine that an existing real-time event should be changed, you should make a copy of the original event and update the copy. The copy becomes a version. When you change an existing real-time event, the name must clearly indicate that it is a version of an original real-time event. This enables users of real-time events to choose the appropriate version.
Oracle uses the following naming convention for real-time events:
RTXXYYY
where XX is the product area (for example, AB, PO, or SO) and YYY is the type (for example, OUT, HDR, DTL). An example event name is RTSOHDR.
When Oracle creates a new version of an existing real-time event, the naming convention is:
RTXXYYYN
Where N is the next sequence number for the version, with the first version starting with 2. For example, the original real-time event is named RTSOHDR. The first time you create a version of an event, the name is RTSOHDR2. The next time you create a version of the same event, the name is RTSOHDR3.
Note:
These examples for naming events are standards that Oracle uses. If you modify an existing JD Edwards EnterpriseOne real-time event for your enterprise, ensure that you use a naming convention that will not be overridden when your system is upgraded.14.11.4 References to Other Documentation
Additional detailed technical information about real-time events is available in the Oracle Technical Catalog, that can be found by clicking the Resources tab on the JD Edwards Upgrade Resources Web page:
For more information about existing real-time events, see the JD Edwards EnterpriseOne Applications Business Interfaces Implementation Guide.