16 Setting Up Media Objects, Imaging and Help
This chapter contains the following topics:
16.1 Understanding Media Object Processing
To use media objects, JD Edwards EnterpriseOne requires a set of event rules to process the media objects. This processing includes:
-
Tracking where the media object files are stored.
-
Tracking which media objects are attached to which objects (rows, forms, and reports).
-
Indicating which objects have attachments.
-
Creating or viewing attachments.
You can set up JD Edwards EnterpriseOne to use standard processing for media objects, which enables you to bypass all event rules that are required to implement media objects. All of the required information is gathered from a form in Form Design Aid and does not require you to define any event rules. Standard processing provides these benefits:
-
Standardizes the usage of media objects across forms.
-
For any detail area, places a paper clip button on the row header if a media object is defined for that row.
-
For a form, places a button in the status bar if a media object is defined for the form.
-
Enables you to attach documents to the form or to a row in the detail area.
-
Enables you to double-click the paper clip in a row to view media objects for that row.
-
Enables you to click the paper clip in the status bar to view media objects for the form.
If you choose not to use standard processing for a form, you can still develop a system for handling media objects by using existing event rules or event rules that you develop.
JD Edwards EnterpriseOne uses the F00165 table to store link records for media objects and imaging. You must define the media object data structure by using a unique key structure so that the F00165 table can store data correctly. The layout of this table is as follows:
GTxxx || F4211Keys || The media object text
Where:
GT (generic text) xxx is the naming convention used when defining a media object data structure.
F4211Keys is what the system uses to access the unique media object attachment for that particular record. The keys typically match what the unique key would be in the F4211 table for each detail line.
The media object text is the actual text attachment that stores information typed in by the user.
In addition to the media object categories provided by JD Edwards EnterpriseOne, you can define as many as 40 more. Users can associate these categories with a media object to group certain media objects and to enable other users to search for specific media objects. User defined categories reside in the F00166 table and are referenced using each object's unique key. The default titles for these categories are Category Codes 1-30, Dates 1-5, and Numeric 1-5.
16.1.1 Prerequisite
To enable users to see the media object paper clip column on a form, clear the Hide Row Headers option on the grid properties for the form.
16.1.2 Enabling JD Edwards EnterpriseOne to Use Media Objects
In JD Edwards EnterpriseOne OMW, access an application on which you want to enable media objects and open it in Form Design Aid.
-
In Form Design Aid, select Media Objects Setup from the Form menu.
-
On Media Objects Setup, select the Enable Automatic Media Object Functionality option.
Selecting this option enables imaging and activates the other fields on the form.
-
On Media Objects Setup, select one of these options:
-
Media Objects Only
Select this option if you do not want to interface with third-party products that include imaging. If you choose this option, you will only be able to use media objects that are defined for and supported from within JD Edwards EnterpriseOne.
-
Document Handling Only
Select this option if you are developing a form that is enabled for media objects using functionality in event rules and you want to bypass standard processing.
-
Media Objects & Document Handling
Select this option if you want to enable standard processing later. You must delete all of the event rules for media objects when you choose this option.
-
-
Click Edit mode or Display mode.
Edit mode allows the user to make changes; display mode is read-only.
-
Click Define Form Key.
The System Functions form appears. This form is identical to the parameter definition form used to define system functions in event rules, except that it includes only the Media Object header.
-
On the Function Selection tab, double-click the Media Object Structures folder.
A list of all currently defined data structures for Media Objects appears.
-
Select the appropriate structure and define it on the Parameter Mapping tab.
16.1.3 Adding a Language-Specific Media Object Attachment
Open the application to which you want to add a language-specific media object attachment.
-
On the application that you want to use, type a language in the filter field.
-
Click Add.
-
Add multiple records if you want the attachment for multiple languages or base.
16.2 Setting Up Media Object Queues
This section discusses how to:
-
Add a media object queue.
-
Define the location of a media object queue.
-
Delete a media object queue.
16.2.1 Forms Used to Set Up Media Object Queues
16.2.2 Adding a Media Object Queue
Access the Work With Media Object Queues form.
-
Click Add.
-
On the Media Object Queue Revisions form, in the Queue Name field, define the media object queue name where images may be found. The queue name is a symbolic reference only. The media object queue name is one-half of a properly defined media object queue. The other half is the media object path. complete these fields:
-
Queue Name
-
Queue Path On-Line
-
Queue Path Off-line
-
On-Line Access Type
-
Off-Line Access Type
-
-
In the Queue Path On-Line field, enter a path that points to the location of OLE objects, images, or URLs. The queue path is the second half of a properly defined queue for a media object. The first half is the name of the media object. A valid queue path for a network location might be
\\server1\share3\images\financial. To set the queue for a CD ROM, usecd:in the pathname; the system automatically substitutes the appropriate drive letter when it resolves the path. -
In the Queue Path Off-line field, enter a local path that points to the location of OLE objects, images, or URLs. The queue path is the second half of a properly defined queue for a media object. The first half is the name of the media object. A valid queue path when working off-line might be
d:\data\media\images.
16.2.3 Defining the Location of a Media Object Queue
Access the Work With Media Object Queues form.
-
If an OLE queue does not exist, click Add.
-
On the Media Objects Queue Revisions form, complete these fields:
-
Queue Name
-
Queue Path On-Line
-
Queue Path Off-line
-
Type
-
On-Line Access Type
-
Off-Line Access Type
-
-
Click OK.
-
If you want to change an existing media object queue, on the Work With Media Object Queues form, click Find to display a list of queue names and their paths.
-
Select the queue name that you want to modify and click Select.
-
On the Media Object Queue Revisions form, change the information in the Queue Path On-Line field to reflect the new location, and then click OK.
16.3 Setting Up Imaging
This section contains an overview of imaging and the flow for imaging systems and discusses how to enable imaging in media objects.
16.3.1 Understanding Imaging
One way to attach images to JD Edwards EnterpriseOne forms and grid rows is to use the Image function of the Media Objects feature; however, this solution is not designed for use with sophisticated document handling systems. See My Oracle Support for a complete list of imaging vendors partnered with JD Edwards EnterpriseOne.
The software uses the OLE client/server model to interface with third-party document handling systems, including the OLE client interface and the OLE server. For the currently supported imaging systems, JD Edwards EnterpriseOne meets these minimum design goal tasks:
-
Search
The search mechanism locates a document stored in the indexing system of a document handling system. The search mechanism navigates the storage structures of the document handling system so that the user can find a particular document or set of documents easily.
-
Link
Upon a successful search operation, the link mechanism returns the unique document identifier to JD Edwards EnterpriseOne. This identifier is stored with the transaction.
-
View
The view mechanism passes the unique document identifier to a document viewing mechanism so that the user can view the document.
Customers with requirements for third-party imaging systems other than those that the software currently supports can design custom OLE automation servers for interfacing purposes. The OLE server can be written in any OLE-compliant language. JD Edwards EnterpriseOne has a published set of APIs to enable you to develop compatible middleware applications. The published APIs are described in a Windows help file that is installed with the software.
16.3.1.1 Understanding Flow for Imaging Systems
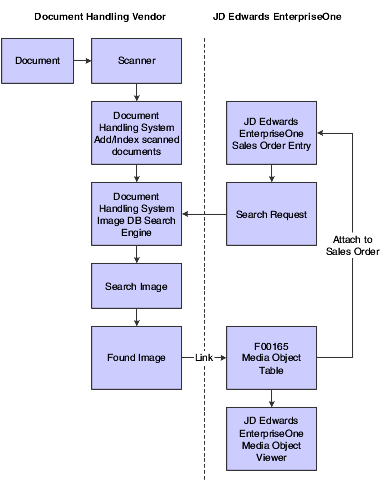
You can use imaging with a document handling system. The imaging system enables you to automatically scan and catalog documents. The system indexes the images so that you can recall them, based on certain sets of criteria. For example, you might index images according to type, department, and date. You can recall, view, and analyze an image at any given time. For example, in a transaction entry scenario, you might scan a paper-based file when the document enters the mailroom so that a data entry clerk can retrieve the image to use as a source document.
JD Edwards EnterpriseOne can retrieve and view documents based on selection criteria that are defined by the user. A linking system associates the JD Edwards EnterpriseOne transaction to the document for later retrieval and reference. You can attach a transaction identifier with the scanned image in the document handling system to enable a user to access an application directly from the image.
You set up imaging by enabling the imaging at the system level. For an imaging system to be enabled, it must have a registration record in the F98101 table.
This illustration explains how the software supports third-party imaging products through a middleware OLE server layer. Customers also can create their own OLE servers to support additional imaging systems:
Figure 16-1 JD Edwards EnterpriseOne imaging architecture
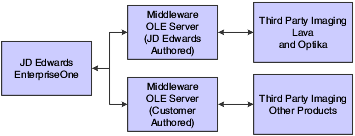
Description of "Figure 16-1 JD Edwards EnterpriseOne imaging architecture"
This diagram is a typical imaging scenario:
16.3.2 Forms Used to Set Up Imaging
16.3.3 Enabling Imaging in Media Objects
Access the Work With Media Object Queues.
-
From the Form menu, select Imaging.
-
On the Imaging Constants Revisions form, in the Imaging System Vendor field, enter the name of the imaging system vendor that you are using on the system.
-
In the Imaging Vendor Description field, enter a description of the imaging system vendor.
-
If the image type is an OLE, in the Image Program ID/DLL field, enter the program ID that uniquely identifies the imaging system in the system registry. If the image type is a DLL, enter the imaging system DLL name.
-
Select the Imaging Active option to indicate that an imaging system is currently active for the system.
-
Select the OLE option to indicate the type of interface used by the imaging system.
16.4 Setting up the HTML Editor
JD Edwards EnterpriseOne supports the media object ActiveX rich text editor only in Internet Explorer. JD Edwards EnterpriseOne 8.98.3 provides an alternative to the media object ActiveX rich text editor. The HTML editor creates browser independency and users will be able to add, view, modify, and delete the media object rich text attachments using the HTML editor in Internet Explorer and Fire Fox.
Note:
The value of the attachment is saved in XHTML format. Once the data is converted and saved to the database in XHTML it cannot be returned to the ActiveX RTF format.JD Edwards EnterpriseOne 8.98.3 default media object editor is the ActiveX rich text editor. The ActiveX rich text editor can be replaced with the HTML rich text editor through Server Manager.
To configure JD Edwards EnterpriseOne 8.98.3 to utilize the HTML editor
Navigate to the HTML server in Server Manager
-
Access the Web Runtime properties.
-
Scroll down and remove the check mark from Use ActiveX Controls.
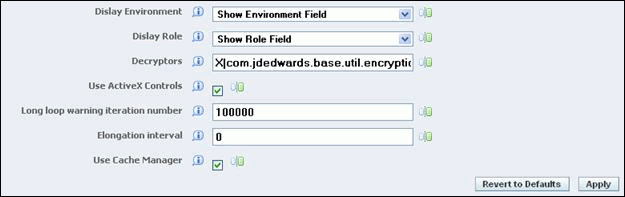
This action modifies the property SupportActiveXIE=TRUE in the jas.ini under [OWWEB] section on the HTML server to FALSE. Users are able to work with only one type of editor at a time either the ActiveX or HTML rich text editor.
This ini setting specifies whether JD Edwards supplied ActiveX controls are supported within the IE browser. Since this is an ini setting the behavior will be for all users of the HTML server.
When this ini setting is set to false it will override the settings in the users IE browser and will not load or run JD Edwards ActiveX controls. The user will not see prompting for installing of the JD Edwards ActiveX controls.
When this ini setting is set to true or is not found in the jas.ini, the application will try to load the ActiveX control. If the control is not loaded, then a flag will be set for the user session that ActiveX controls are not supported and all JD Edwards ActiveX controls will be unavailable for that user session. This will occur for the user that has disabled ActiveX control installation and running in the IE browser. For the first ActiveX control within a user session that we attempt to load and it fails, the user will see the download prompt. If they have previously allowed for all downloads from Oracle, by checking the checkbox on the options on the download prompt, they will not see the prompt. After the first control load fails we will no longer prompt the user for installing the ActiveX control. If the load of the ActiveX control does not fail, then the user will experience the same behavior as before this change. All JD Edwards ActiveX controls will be available for the user.
16.5 Setting Up Help
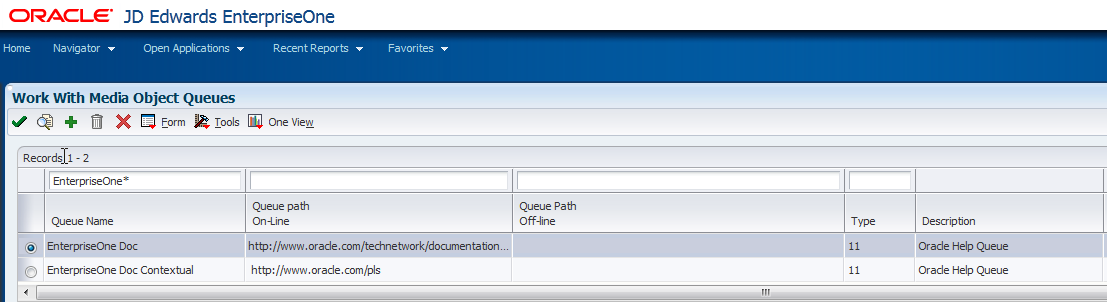
The JD Edwards EnterpriseOne application P98MOQUE, Media Object Queue Revisions, is used to setup and modify JD Edwards EnterpriseOne queues including help. The examples below represent the default Help setup.
16.5.1 Setting up Help for the JD Edwards EnterpriseOne Web Client (Release 9.1 Update 4)
The EnterpriseOne Doc queue is associated with the web client and works in conjunction with the Help icon outside of the applications to direct a user to the JD Edwards EnterpriseOne online documentation libraries. The EnterpriseOne Doc Contextual queue is also associated with the web client and works in conjunction with the Help icon and the Help toolbar hyperlink within JD Edwards EnterpriseOne applications to direct a user to the JD Edwards EnterpriseOne online documentation specific to the application.
Help setup can be done in either the web or development client. The examples in this section will use the web client for setup.
To set up Help for the JD Edwards EnterpriseOne web client:
-
In the JD Edwards EnterpriseOne web client, enter P98MOQUE into the Fast Path and navigate to the Work with Media Object Queues application.
-
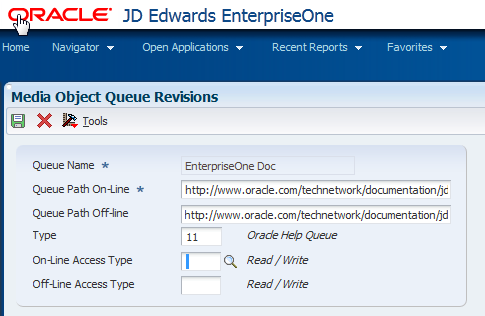
Perform a find on EnterpriseOne*. Select the EnterpriseOne Doc queue and then click the checkmark on the toolbar.
-
Enter 11 into the Type field.
-
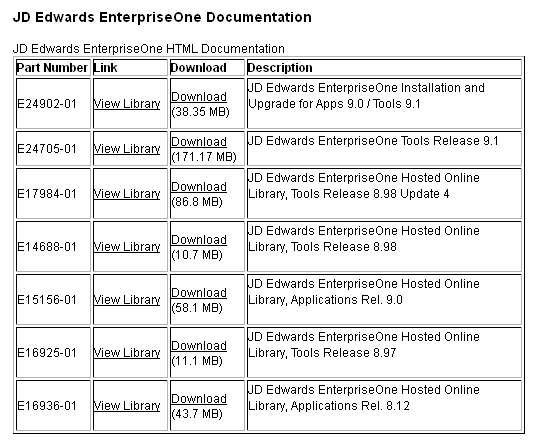
Enter the URL path for the external documentation libraries into the Queue Path On-Line field. The URL to access the JD Edwards EnterpriseOne online documentation libraries is:
http://www.oracle.com/technetwork/documentation/jdedent-098169.html
-
Select Save.
This record is used when a user selects Help outside of an application.
-
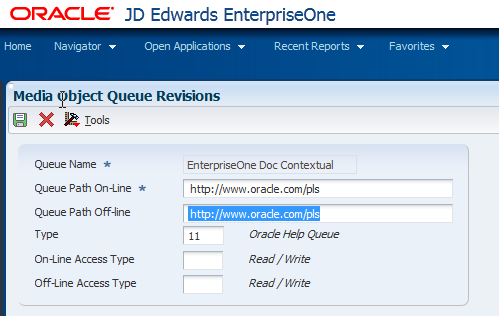
On the Work with Media Object Queues form, select the EnterpriseOne Doc Contextual queue and then click the checkmark on the toolbar.
-
Enter 11 into the Type field.
-
Enter the URL path for the external documentation into the Queue Path On-Line field. The URL to access the JD Edwards EnterpriseOne online documentation is:
http://www.oracle.com/pls
This record is used when accessing help from within an application. The application information is used to search the appropriate documentation library and display relevant documentation links.
-
Save and exit the application.
The Help icon and the Help toolbar hyperlink within JD Edwards EnterpriseOne applications are now enabled within the web client to direct a user to the JD Edwards EnterpriseOne online documentation.
Note:
If you are using JD Edwards EnterpriseOne Applications Release 9.1 with JD Edwards EnterpriseOne Tools Release 9.1 Update 4, context sensitive help is available for both tools and applications programs.If you are using JD Edwards EnterpriseOne Applications Release 9.0 with JD Edwards EnterpriseOne Tools Release 9.1 Update 4, context sensitive help is available for Tools programs only.
16.5.2 Setting up Help for the JD Edwards EnterpriseOne Development Client
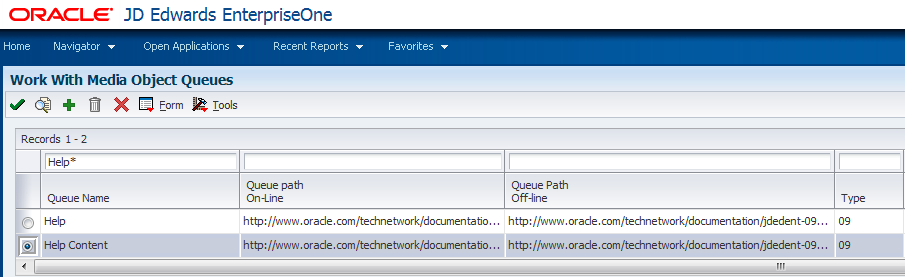
The Help Content queue is associated with the development client and works in conjunction with the Help toolbar hyperlink within JD Edwards EnterpriseOne applications to direct a user to the JD Edwards EnterpriseOne online documentation.
To set up Help for the JD Edwards EnterpriseOne development client:
-
In the JD Edwards EnterpriseOne web client, enter P98MOQUE into Fast Path and navigate to the Work with Media Object Queues application.
-
Do a find on Help*. Select the Help Content queue and then click the checkmark on the toolbar.
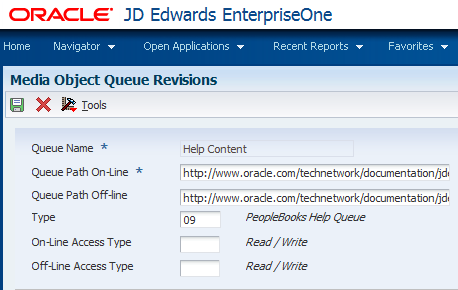
-
Enter 09 in the Type field.
-
Enter the URL path for the external documentation into the Queue Path On-Line field. The URL to access the JD Edwards EnterpriseOne online documentation is:
http://www.oracle.com/technetwork/documentation/jdedent-098169.html
-
Save and exit the application.
The Help toolbar hyperlink within JD Edwards EnterpriseOne applications is now enabled within the development client to direct a user to the JD Edwards EnterpriseOne online documentation.