7 Configuring the Microsoft Active Directory for Portal
This chapter contains the following topics:
-
Section 7.1, "Installing Microsoft Active Directory for Microsoft Windows 200x"
-
Section 7.3, "Configuring LDAP Server for Dynamic Group Queries"
-
Section 7.6, "Configuring an External HTTP Server for WebSphere Portal v7.0"
-
Section 7.7, "Installing the JD Edwards Collaborative Portal"
7.1 Installing Microsoft Active Directory for Microsoft Windows 200x
If you plan to use Active Directory as an LDAP user registry, you must install and set up the server so that it will communicate with IBM® WebSphere® Portal.
7.1.1 Preparing Active Directory
Perform the following steps to install and configure Active Directory:
-
Install required Service Packs.
-
Perform the following steps to install Internet Information Services (IIS), which is required to export server certificates and must be installed before installing Certificate Services:
-
Open the Control Panel and select Add/Remove Programs.
-
Choose Add/Remove Windows Components.
-
Choose the Internet Information Services (IIS) component and then click Next.
-
Follow the instruction of the Windows Components Wizard. The Windows Server CD is needed.
-
-
Use the following steps to install Certificate Services if you plan on using Active Directory over SSL:
-
Open the Control Panel and select Add/Remove Programs.
-
Choose Add/Remove Windows Components.
-
Select Certificate Services and then click Next.
-
Select Stand-alone root CA and then click Next. You can also choose other options depends on you needs.
-
Fill in CA identifying information and then click Next.
-
Follow the instruction of the Windows Components Wizard. The Windows Server CD is needed.
-
Perform the following steps as a guide to create the WebSphere Portal administrative user:
-
Create a new user with the Windows administrative tools.
Note:
There is a 20 character limitation for the user account name. -
Set the password for the new user.
-
Activate the new user with the Windows administrative tools. Set the msDS-UserAccountDisabled attribute to false.
Perform the following steps to enable SSL for Active Directory; this step is required to set passwords during sign up and user creation:
-
Install an Enterprise Certificate Authority on a Windows 2000 Domain Controller, which installs a certificate on a server or install a third-party certificate on the Domain Controller.
-
Click Start -> All Programs -> Administrative Tools -> Active Directory Users and Computer.
-
In the Active Directory Users and Computers window, right-click on your domain name and select Properties.
-
In the Domain Properties dialog box, select the Group Policy tab.
-
Select the Default Domain Policy group policy and then click Edit.
-
Select Windows Settings under Computer Configuration.
-
Select Security Settings and then select Public Key Policies.
-
Select Automatic Certificate Request Settings.
-
Use the wizard to add a policy for Domain Controllers.
Note:
When these requirements are complete, all domain controllers request a certificate and support LDAP over SSL using port 636.7.1.2 LDAP User Registry without SSL
Configure IBM® WebSphere® Portal to use a standalone LDAP user registry to store all user account information for authorization.
If you need to rerun the wp-modify-ldap-security task to change the LDAP repositories or because the task failed, you must choose a new name for the realm using the standalone.ldap.realm parameter or you can set ignoreDuplicateIDs=true in the wklpc.properties file, before rerunning the task.
Perform the following steps to configure a standalone LDAP user registry:
Note:
Use the wp_security_xxx.properties helper file, located in the wp_profile_root/ConfigEngine/config/helpersdirectory, when performing this task to ensure the correct properties are entered. In the instructions below, when the step refers to thewkplc.properties file, you will use your wp_security_xxx.properties helper file.-
Use a text editor to open the wkplc.properties file, located in the wp_profile_root\\ConfigEngine\\properties directory.
-
Required: Enter a value for the following required parameters in the wkplc.properties file under the Stand-alone security heading:
Note:
See the properties file for specific information about the required parameters and for advanced parameters.standalone.ldap.id
standalone.ldap.host
standalone.ldap.port
standalone.ldap.bindDN
standalone.ldap.bindPassword
standalone.ldap.ldapServerType
standalone.ldap.userIdMap
standalone.ldap.groupIdMap
standalone.ldap.groupMemberIdMap
standalone.ldap.userFilter
standalone.ldap.groupFilter
standalone.ldap.serverId
standalone.ldap.serverPassword
standalone.ldap.realm
standalone.ldap.primaryAdminId
standalone.ldap.primaryAdminPassword
standalone.ldap.primaryPortalAdminId
standalone.ldap.primaryPortalAdminPassword
standalone.ldap.primaryPortalAdminGroup
standalone.ldap.baseDN
-
Required: Enter a value for the following required entity types parameters in the wkplc.properties file under the LDAP entity types heading:
Note:
See the properties file for specific information about the required parameters and for advanced parameters.standalone.ldap.et.group.objectClasses
standalone.ldap.et.group.objectClassesForCreate
standalone.ldap.et.group.searchBases
standalone.ldap.et.personaccount.objectClasses
standalone.ldap.et.personaccount.objectClassesForCreate
standalone.ldap.et.personaccount.searchBase
-
Required: Enter a value for the following required group member parameters in the wkplc.properties file under the Group member attributes heading:
Note:
See the properties file for specific information about the required parameters and for advanced parameters.standalone.ldap.gm.groupMemberName
standalone.ldap.gm.objectClass
standalone.ldap.gm.scope
standalone.ldap.gm.dummyMember
-
Required: Enter a value for the following required relative distinguished name (RDN®) parameters in the wkplc.propertiesfile under the Default parent, RDN attribute heading:
Note:
See the properties file for specific information about the required parameters and for advanced parameters.standalone.ldap.personAccountParent
standalone.ldap.groupParent
standalone.ldap.personAccountRdnProperties
standalone.ldap.groupRdnProperties
-
Save your changes to the wkplc.properties file.
-
Run the ./ConfigEngine.sh validate-standalone-ldap -DWasPassword=password task to validate your LDAP server settings.
Attention:
If you have not deleted the default file repository, WasPassword is the value entered during installation and not a value found in your LDAP user registry.Note:
During the validation task, you may receive the following prompt: Add signer to the trust store now? Press y and Enter. -
Run the ./ConfigEngine.sh wp-modify-ldap-security -DWasPassword=password task, from thewp_profile_root\\ConfigEngine directory, to set the stand-alone LDAP user registry.
-
Stop and restart the appropriate servers to propagate the changes. For specific instructions, see the following link under Related tasks: Starting and stopping servers, deployment managers, and node agents.
-
Run the ./ConfigEngine.sh wp-validate-standalone-ldap-attribute-config -DWasPassword=password task, from the wp_profile_root\\ConfigEngine directory, to check that all defined attributes are available in the configured LDAP user registry.
Important:
When you finish configuring your LDAP user registry, see "Adapting the attribute configuration" for information about adding and mapping attributes to ensure proper communication between WebSphere Portal and the LDAP server. -
Optional: Run the Member Fixer task to update the member names used by Web Content Management with the corresponding members in the LDAP directory. This step ensures that access to the Web content libraries for the Intranet and Internet Site Templates for the contentAuthors group is correctly mapped to the appropriate group in the LDAP directory.
Note:
This step is only needed if you have installed the product with Web Content Management and intend to use the Intranet and Internet Site Templates that were optionally installed with the product by running the configure-express task.-
Edit the wp_profile_root\\PortalServer\\wcm\\shared\\app\\config\\wcmservices\\MemberFixerModule.properties file.
-
Add the following lines to the file:
uid=xyzadmin,o=defaultWIMFileBasedRealm -> portal_admin_DNcn=contentauthors,o=defaultWIMFileBasedRealm -> content_authors_group_DNWhere portal_admin_DN is the distinguished name of the portal administrator and content_authors_group_DN is the distinguished name of the content authors group used during LDAP configuration.
Important:
-
Ensure the portal administrator you specify for portal_admin_DN is a member of the group you specify forcontent_authors_group_DN, otherwise the portal administrator cannot access the Web content libraries for the Intranet and Internet Site Templates.
-
If you plan to run the express-memberfixer task in an environment with multiple realms, remove thecn=contentauthors,o=defaultWIMFileBasedRealm group if it exists. If this group exists in an environment with multiple realms, the Member Fixer task does not have any effect.
-
-
Save your changes and close the file.
-
Run the ./ConfigEngine.sh express-memberfixer -DmemberfixerRealm=realm_name -DPortalAdminPwd=password-DWasPassword=password task, located in the wp_profile_root\\ConfigEngine directory.
Note:
Choose the appropriate value to enter for realm_name depending on the type of LDAP user registry you configured:The following table contains the value for realm_name when running the Member Fixer task to update the member names used by Web Content Management:
Type of LDAP Value Standalone LDAP The value specified for realm_name should match the value forstandalone.ldap.realm in the wkplc.properties file. Federated LDAP The value specified for realm_name should match the value forfederated.realm in the wkplc.properties file. If the value forfederated.realm is empty, use defaultWIMFileBasedRealmas the default value.
-
-
Optional: Assign access to the Web content libraries.
-
Log in as a portal administrator.
-
Navigate to Administration -> Portal Content -> Web Content Libraries.
-
Click the Set permissions icon for the Web library.
-
Click the Edit Role icon for Editor.
-
Add the group you specified for content_authors_group_DN as an Editor for the Intranet and Internet libraries.
-
Click Apply then Done.
-
If you have created any additional Web Content Management libraries, run the Web content member fixer task to update the member names used by the libraries.
-
7.1.3 LDAP User Registry over SSL
Configure IBM® WebSphere® Portal to use a standalone LDAP user registry over SSL to store all user account information for secure authorization.
Perform the following steps to configure a standalone LDAP user registry over SSL:
Note:
Use the wp_security_xxx.properties helper file, located in the wp_profile_root/ConfigEngine/config/helpersdirectory, when performing this task to ensure the correct properties are entered. In the instructions below, when the step refers to thewkplc.properties file, you will use your wp_security_xxx.properties helper file.-
Choose one of the following options to specify the LDAP server's SSL certificate in either the server trust store or the default client trust store:
-
Choose one of the following to add the certificate to the server trust store:
The following table contains the options for adding the SSL certificate to the server trust store:
Option Steps Add the certificate to the server trust store - Log in to the WebSphere Application Server Administrative Console.
-
Navigate to Security, SSL certificate and key management, SSL configurations.
-
Click the appropriate SSL configuration from the list. For example,
Stand-alone environments:NodeDefaultSSLSettings
Clustered environments: CellDefaultSSLSettings
-
Click Key stores and certificates.
-
Click the appropriate trust store from the list. For example,
Stand-alone environments: NodeDefaultTrustStore
Clustered environments: CellDefaultTrustStore
-
Click Signer certificates, click Add, and then enter the following information:
Type the Alias the key store uses for the signer certificate.
Type the File name where the signer certificate is located.
-
Click OK and then click Save to save the changes to the master configuration.
Retrieve the certificate from the port - Log in to the WebSphere Application Server Administrative Console.
-
Navigate to Security, SSL certificate and key management, SSL configurations.
-
Click the appropriate SSL configuration from the list. For example,
Stand-alone environments:NodeDefaultSSLSettings
Clustered environments: CellDefaultSSLSettings
-
Click Key stores and certificates.
-
Click the appropriate trust store from the list. For example,
Stand-alone environments: NodeDefaultTrustStore
Clustered environments: CellDefaultTrustStore
-
Click Signer certificates, click Retrieve from port, and then enter the following information:
Type the Host name used when attempting to retrieve the signer certificate from the SSL port.
Type the SSL Port used when attempting to retrieve the signer certificate.
Type the Alias the key store uses for the signer certificate. Clustered environments: Ensure the setting for SSL configuration for outbound connection matches your SSL settings.
-
Click Retrieve signer information to retrieve the certificate from the port.
-
Click OK and then click Save to save the changes to the master configuration.
-
Add the certificate to the client trust store:
-
See Secure installation for client signer retrieval.
-
Run the retrieveSigners task from the wp_profile_root/bin directory; see retrieveSigners command for information. In a deployed environment, you will need to run the retrieveSigners task, for any federated node, against the Deployment Manager.
Note:
This task might report an error, but it does successfully update the trust store. You can ignore the error message. Example task: Stand-alone environmentsExample task:
For stand-alone environments:
retrieveSigners.bat NodeDefaultTrustStore ClientDefaultTrustStore -autoAcceptBootstrapSigner -conntype SOAP -port port_numberFor clustered environments
retrieveSigners.bat CellDefaultTrustStore ClientDefaultTrustStore -autoAcceptBootstrapSigner -conntype SOAP -port port_numberWhen prompted, enter the following:
Realm/Cell Name: name
Username: user_ID
Password: password
The following message displays:
CWPKI0308I: Adding signer alias "alias_name" to local keystore "ClientDefaultTrustStore" with the following SHA digest: ssl_certificate_fingerprint
-
Update the trust store properties file.
-
-
-
Use a text editor to open the wkplc.properties file, located in the wp_profile_root\\ConfigEngine\\properties directory.
-
Required: Enter a value for the following required parameters in the wkplc.properties file under the VMM Stand-alone LDAP configuration heading:
Note:
See the properties file for specific information about the required parameters and for advanced parameters.standalone.ldap.id
standalone.ldap.host
standalone.ldap.port
standalone.ldap.bindDN
standalone.ldap.bindPassword
standalone.ldap.ldapServerType
standalone.ldap.userIdMap
standalone.ldap.groupIdMap
standalone.ldap.groupMemberIdMap
standalone.ldap.userFilter
standalone.ldap.groupFilter
standalone.ldap.serverId
standalone.ldap.serverPassword
standalone.ldap.realm
standalone.ldap.primaryAdminId
standalone.ldap.primaryAdminPassword
standalone.ldap.primaryPortalAdminId
standalone.ldap.primaryPortalAdminPassword
standalone.ldap.primaryPortalAdminGroup
standalone.ldap.baseDN
-
Required: Enter a value for the following required entity types parameters in the wkplc.properties file under the LDAP entity types heading:
Note:
See the properties file for specific information about the required parameters and for advanced parameters.standalone.ldap.et.group.objectClasses
standalone.ldap.et.group.objectClassesForCreate
standalone.ldap.et.group.searchBases
standalone.ldap.et.personaccount.objectClasses
standalone.ldap.et.personaccount.objectClassesForCreate
standalone.ldap.et.personaccount.searchBases
-
Required: Enter a value for the following required group member parameters in the wkplc.properties file under the Group member attributes heading:
Note:
See the properties file for specific information about the required parameters and for advanced parameters.standalone.ldap.gm.groupMemberName
standalone.ldap.gm.objectClass
standalone.ldap.gm.scope
standalone.ldap.gm.dummyMember
-
Required: Enter a value for the following required relative distinguished name (RDN®) parameters in the wkplc.properties file under the Default parent, RDN attribute heading:
Note:
See the properties file for specific information about the required parameters and for advanced parameters.standalone.ldap.personAccountParent
standalone.ldap.groupParent
standalone.ldap.personAccountRdnProperties
standalone.ldap.groupRdnProperties
-
Enter a value for the following parameters to enable Secure Socket Layers (SSL):
Note:
See the properties file for specific information about the required parameters and for advanced parameters.Required parameters:
standalone.ldap.sslEnabled
standalone.ldap.sslConfiguration
Optional parameters:
standalone.ldap.certificateMapMode
standalone.ldap.certificateFilter
-
Save your changes to the wkplc.properties file.
-
Run the ./ConfigEngine.sh validate-standalone-ldap -DWasPassword=password task to validate your LDAP server settings.
Attention:
If you have not deleted the default file repository, WasPassword is the value entered during installation and not a value found in your LDAP user registry.Note:
During the validation task, you may receive the following prompt: Add signer to the trust store now? Press y and then Enter. -
Run the ./ConfigEngine.sh wp-modify-ldap-security -DWasPassword=password task, from thewp_profile_root\\ConfigEngine directory, to set the stand-alone LDAP user registry.
-
Stop and restart the appropriate servers to propagate the changes. For specific instructions, see the following link under Related tasks: Starting and stopping servers, deployment managers, and node agents.
-
Run the ./ConfigEngine.sh wp-validate-standalone-ldap-attribute-config -DWasPassword=password task, from the wp_profile_root\\ConfigEngine directory, to check that all defined attributes are available in the configured LDAP user registry.
Important:
When you finish configuring your LDAP user registry, see "Adapting the attribute configuration" for information about adding and mapping attributes to ensure proper communication between WebSphere Portal and the LDAP server.
7.2 Working with LDAP Attributes
This section describes how to:
-
Perform a query on attributes.
-
Add new attributes to your user registry.
-
Map attributes between WebSphere Portal and your LDAP server.
-
Remove attributes from your database.
After installing IBM® WebSphere® Portal and configuring your LDAP user registries, you can query the defined attributes to see what attributes are flagged as unsupported or if the attribute is mapped to a different LDAP attribute.
To perform a query:
Run the ./ConfigEngine.sh wp-query-attribute-config -DWasPassword=password task, from thewp_profile_root/ConfigEngine directory, any time during the configuration process or at runtime to query an overview of the currently defined attributes.
This task creates the availableAttributes.html report, located in the wp_profile_root/ConfigEngine/logdirectory. The report contains one table that lists the available attributes for Users (PersonAccount) and one table that lists the available attributes for Groups. For each configured repository, there is a column that indicates if the attribute is flagged as unsupported or if the attribute is mapped to a different LDAP attribute.
Note:
This task does not validate the existence of attributes in the LDAP schema.The VMM is configured with a default attribute schema that might not be compatible with your LDAP server. If this is the case, extend the VMM attribute schema by adding new attributes that you can map between IBM® WebSphere® Portal and your user registry.
Perform the following steps to add new attributes to your user registry:
-
Install the required Enterprise Archive (.ear) file on WebSphere Application Server.
-
Open a command prompt.
-
Navigate to the wp_profile_root\\ConfigEngine directory.
-
Run the ./ConfigEngine.sh wp-la-install-ear -DWasPassword=password task.
-
-
Stop and restart the appropriate servers to propagate the changes. For specific instructions, see the following link under Related tasks: Starting and stopping servers, deployment managers, and node agents.
-
Use a text editor to open the wkplc.properties file, located in the wp_profile_root\\ConfigEngine\\properties directory.
-
Enter a value for the following required parameters in the wkplc.properties file under the VMM Property Extension Properties heading:
Note:
See the properties file for specific information about the required parameters and for advanced parameters.la.providerURL
la.propertyName
la.entityTypes
la.dataType
la.multiValued
-
Save your changes to the wkplc.properties file.
-
Run the ConfigEngine.sh wp-add-property -DWasPassword=password task to add the attribute to the user registry.
Note:
This task performs an EJB call to WebSphere Application Server, which must authenticate against WebSphere Application Server. Depending on the configuration in the sas.client.props file, you may receive a popup window or a command line prompt asking for user identity and password. Enter the WebSphere Application Server user ID and password.Remember:
If you have multiple properties to add, repeat all steps, except for the wp-la-install-ear task, until all new attributes are added. -
Stop and restart the appropriate servers to propagate the changes.
After you install and configure your LDAP user registry and after you query the defined attributes, you can map the attributes so they match the configured LDAP servers and your business needs.
Perform the following steps to map attributes between WebSphere Portal and your LDAP server; if you have multiple LDAP servers, you will need to perform these steps for each LDAP server:
-
Use a text editor to open the wkplc.properties file, located in the wp_profile_root\\ConfigEngine\\properties directory.
-
For a stand-alone repository, enter a value for the following sets of parameters in the wkplc.properties file to identify your LDAP server. The parameters are found under the LDAP attribute configuration heading:
Note:
Make sure you use the same values you used to configure your LDAP server.standalone.ldap.id
standalone.ldap.host
standalone.ldap.port
standalone.ldap.sslEnabled
standalone.ldap.bindDN
standalone.ldap.bindPassword
standalone.ldap.baseDN
Note:
See the properties file for specific information about the required parameters and for advanced parameters. -
For a stand-alone repository, run the following task from the wp_profile_root\\ConfigEngine directory. This task checks that all defined attributes are available in the configured LDAP user registry:
ConfigEngine.sh wp-validate-standalone-ldap-attribute-config -DWasPassword=password -
Open the ConfigTrace.log file, located in the wp_profile_root\\ConfigEngine\\log directory, to review the following output for the PersonAccount and Group entity type:
The following attributes are defined in WebSphere Portal but not in the LDAP server
This list contains all attributes that are defined in WebSphere Portal but not available in the LDAP. Flag attributes that you do not plan to use in WebSphere Portal as unsupported. Map the attributes that you plan to use to the attributes that exist in the LDAP; you must also map the uid, cn, firstName, sn, preferredLanguage, and ibm-primaryEmail attributes if they are contained in the list.
The following attributes are flagged as required in the LDAP server but not in WebSphere Portal
This list contains all attributes that are defined as "MUST" in the LDAP server but not as required in WebSphere Portal. You should flag these attributes as required within WebSphere Portal; see the step below about flagging an attribute as either unsupported or required.
The following attributes have a different type in WebSphere Portal and in the LDAP server
This list contains all attributes that WebSphere Portal might ignore because the data type within WebSphere Portal and within the LDAP server do not match.
-
Use a text editor to open the wkplc.properties file, located in the wp_profile_root\\ConfigEngine\\properties directory.
-
For a stand-alone repository, enter a value for the following sets of parameters in the wkplc.properties file to correct any issues found in the config trace file. The following parameters are found under the LDAP attribute configuration heading:
Note:
See the properties file for specific information about the required parameters and for advanced parameters.standalone.ldap.id
standalone.ldap.attributes.nonSupported
standalone.ldap.attributes.nonSupported.delete
standalone.ldap.attributes.mapping.ldapName
standalone.ldap.attributes.mapping.portalName
standalone.ldap.attributes.mapping.entityTypes
For example, the following values will flag certificate and members as unsupported attributes and will map ibm-primaryEmail to mail and ibm-jobTitle to title for both the PersonAccount and Group entityTypes:
standalone.ldap.attributes.nonSupported=certificate, members
standalone.ldap.attributes.nonSupported.delete=
standalone.ldap.attributes.mapping.ldapName=mail, title
standalone.ldap.attributes.mapping.portalName=ibm-primaryEmail, ibm-jobTitle
standalone.ldap.attributes.mapping.entityTypes=PersonAccount, Group
-
Save your changes to the wkplc.properties file.
-
For a stand-alone repository, run the following task from the wp_profile_root\\ConfigEngine directory. This tasks updates the LDAP user registry configuration with the list of unsupported attributes and the proper mapping between WebSphere Portal and the LDAP user registry:
./ConfigEngine.sh wp-update-standalone-ldap-attribute-config -DWasPassword=password -
Stop and restart the appropriate servers to propagate the changes. For specific instructions, see the following link under Related tasks: Starting and stopping servers, deployment managers, and node agents.
-
Optional: Perform the following steps to flag an attribute as either unsupported or required for the entire WebSphere Portal environment instead of just for the specified LDAP:
-
Enter a value for the following required parameters in the wkplc.properties file:
Note:
See the properties file for specific information about the required parameters and for advanced parameters.user.attributes.required
user.attributes.nonsupported
-
Save your changes to the wkplc.properties file.
-
Run the following task from the wp_profile_root\\ConfigEngine directory:
./ConfigEngine.sh wp-update-attribute-config -DWasPassword=password -
Stop and restart all necessary servers to propagate your changes.
-
Due to a Virtual Member Manager (VMM) limitation, there is currently no task to update an attribute. Therefore, if you added an attribute to your property extension database or when adapting attributes to match your LDAP server that were spelled incorrectly or already added due to migration, you must remove the attribute from the database. Use caution when performing these steps.
Perform the following steps to remove an attribute from your database:
Important:
Do not remove attributes that have already been populated with user values because this can cause database inconsistencies.Cluster Note:
In a clustered environment, perform the following steps on the deployment manager and then resynch the nodes.-
Open the tool you use to edit your database.
-
Verify that your attribute name is available in the LAPROP table.
-
Delete the required attributes from the LAPROP table.
-
Open the wimxmlextension.xml file, located in the wp_profile_root/config/cells/cellname/wim/model directory.
-
Locate and delete the propertySchema definition for the attributes that you deleted from the LAPROP table; for example:
<wim:propertySchema nsURI="http://www.ibm.com/websphere/wim" dataType="String" multiValued="true" propertyName="attribute_name"> <wim:applicableEntityTypeNames>PersonAccount</wim:applicableEntityTypeNames> </wim:propertySchema> -
Save your changes to the wimxmlextension.xml file.
-
Open the wimconfig.xml file, located in the wp_profile_root/config/cells/cellname/wim/config directory.
-
Locate and delete the propertiesNotSupported definitions for the attributes that you deleted from the LAPROP table; for example:
<config:propertiesNotSupported name="attribute_name"> -
Save your changes to the wimconfig.xml file.
-
Stop and restart the server1 and WebSphere_Portal servers from the wp_profile_root/bin directory.
7.3 Configuring LDAP Server for Dynamic Group Queries
By default, WebSphere Portal is enabled for static groups. However, the Virtual Member Manager (VMM) allows users to be members of either static or dynamic groups. Static groups are those where a persistent binding exists between a group and its members. Dynamic groups are those where a search query is defined to retrieve the members of a group. If you have your LDAP server configured to use dynamic groups, complete the steps in this task for WebSphere Portal to use dynamic group queries when you setup your LDAP server.
Perform the required tasks to configure either a stand-alone or federated LDAP server security.
The steps in this task use groupOfURLs as the object class for dynamic groups and memberURL as the dynamic membership attribute. The actual values for object classes and dynamic membership attributes can vary depending on your LDAP server. For this reason, you should export an LDIF file to verify the object classes and dynamic membership attributes. Either refer to your LDAP documentation or ask your LDAP administrator for instructions on exporting an LDIF file.
Clustered environments:
Perform the following steps on the Deployment Manager then synchronize the nodes.To configure WebSphere Portal to use dynamic groups, do the following:
-
For stand-alone LDAP server or federated LDAP server(s), perform these steps :
-
Navigate to the following directory: wp_profile_root/cells/cell_name/wim/config.
-
Locate and open wimconfig.xml with any text editor.
-
Add the following line to the <config:groupConfiguration> tag:
<config:dynamicMemberAttributes name="memberurl" objectClass="groupofurls"/> -
Save and close wimconfig.xml.
-
-
Stop and restart the appropriate servers to propagate the changes.
7.4 Configuring a Portal to Use LDAP Referrals
Referrals redirect object requests from one LDAP server to another when objects do not exist or cannot be located in a particular directory tree. You should enable referrals if your environment has more than one user registry existing on multiple servers or domains.
To configure your portal to use LDAP referrals, do the following:
-
Use any text editor to open the wkplc.properties file in the following directory: wp_profile_root/ConfigEngine/properties.
-
Specify values for the following parameters:
-
et.ldap.id=ID_of_your_LDAP_server
-
et.ldap.host=hostname_of_your_LDAP_server
-
et.ldap.referral=follow
-
-
Save and close wkplc.properties.
-
Run the following task from the wp_profile_root/ConfigEngine directory to create an LDAP entity type:
./ConfigEngine.bat wp-update-et-ldap -DWasPassword=password
Windows: ./ConfigEngine.sh wp-update-et-ldap -DWasPassword=password
i: ./ConfigEngine.sh wp-update-et-ldap -DWasPassword=password
-
Stop and restart the appropriate servers to propagate the changes.
7.5 Enabling Security with the LDAP Directory
Once you have enabled security with your LDAP directory, you must provide the user ID and password required for security authentication on WebSphere Application Server when you perform certain administrative tasks with WebSphere Application Server.
For example, to stop the WebSphere Portal application server, you would issue this command:
stopServer WebSphere_Portal -user admin_userid -password admin_password
7.6 Configuring an External HTTP Server for WebSphere Portal v7.0
By default, the installation configures the WebSphere Portal v7.0 to use the internal HTTP transport within the WebSphere Application Server to handle requests (port 10030). Portal also supports the use of an external Web server which is the recommended configuration for production Portals.
This section explains how you can configure an external web server port to communicate with the WebSphere Portal, which includes these tasks:
-
Creating a webserver definition for the wp_profile
-
Remapping the WebSphere portal to the external web server
-
Modifying the wpconfig.properties file
-
Adding the external port
-
Generating the webserver plugin for the wp_profile
-
Propagating webserver plugin
7.6.1 Creating a Webserver Definition
When WebSphere Application Server was initially installed, a webserver definition was created for the WebSphere Application Server profile, known as the default profile. The installation of the WebSphere Portal Server creates a new profile, wp_profile. This profile is a non-default profile. Non-default profiles do not have web server definitions or plugin files created for them at the time of install. To use an external http server with portal, a second webserver definition and its corresponding plugin-cfg.xml file must be created manually for the wp_profile.
To create the new definition:
-
Log in to the server1 admin console of the wp_profile, navigate to servers, webservers, and then click New.
Description of the illustration image066.png
-
Provide the Server name and Host name and the platform, and click Next.
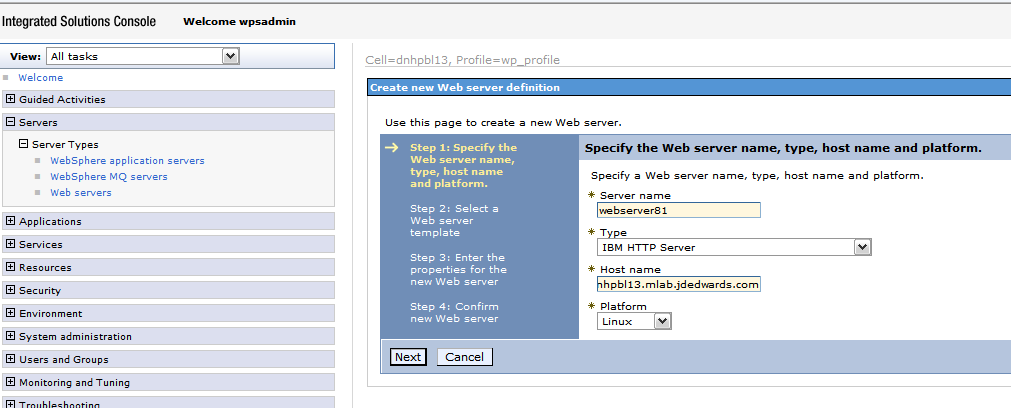
Description of the illustration image068.png
-
Select the IHS Template and proceed by clicking Next.
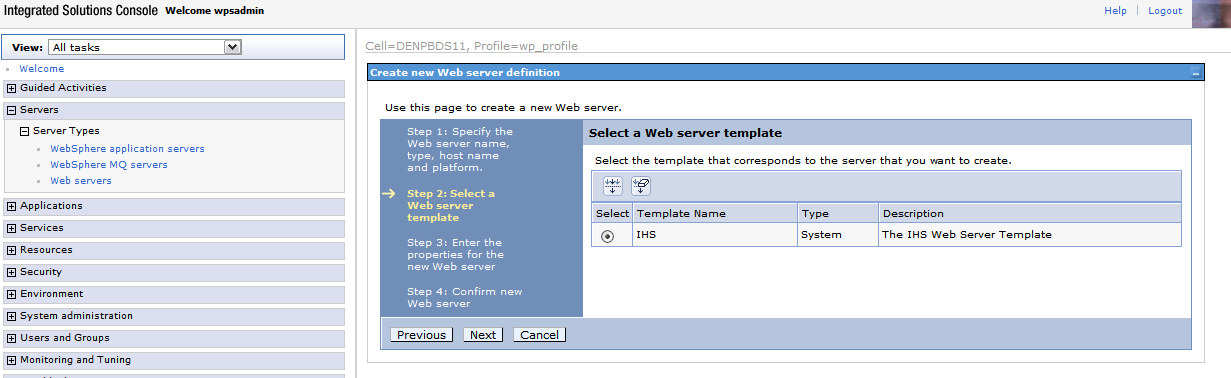
Description of the illustration image070.png
-
Enter details in the following screen to refer to the installation paths, and then click Next.
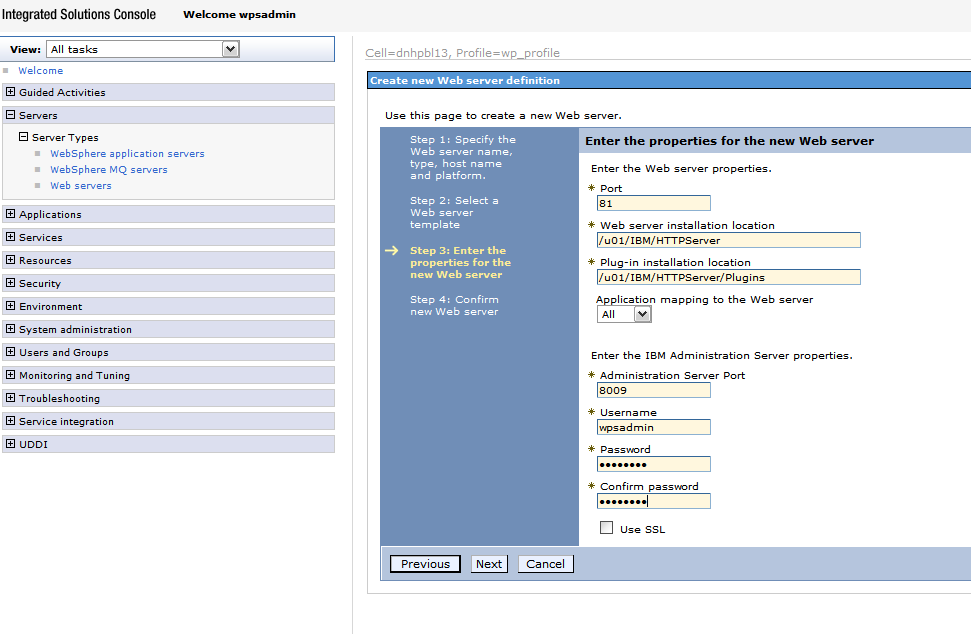
Description of the illustration image072.png
-
Review the information and click Finish.
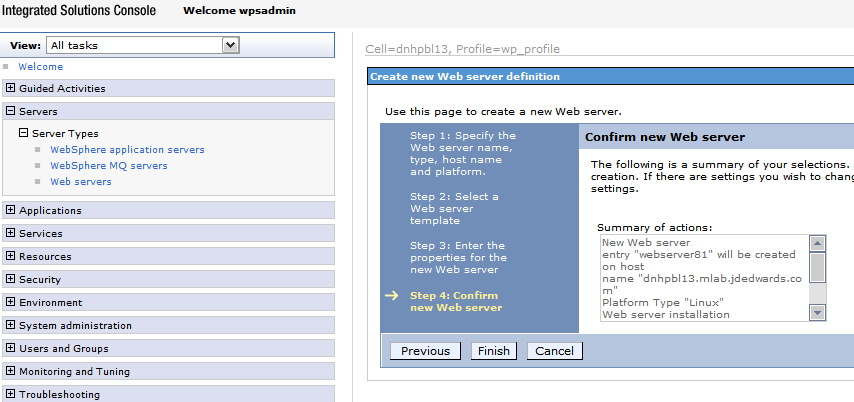
Description of the illustration image074.png
-
In the Web servers page click Save option. After which the following screen appears.
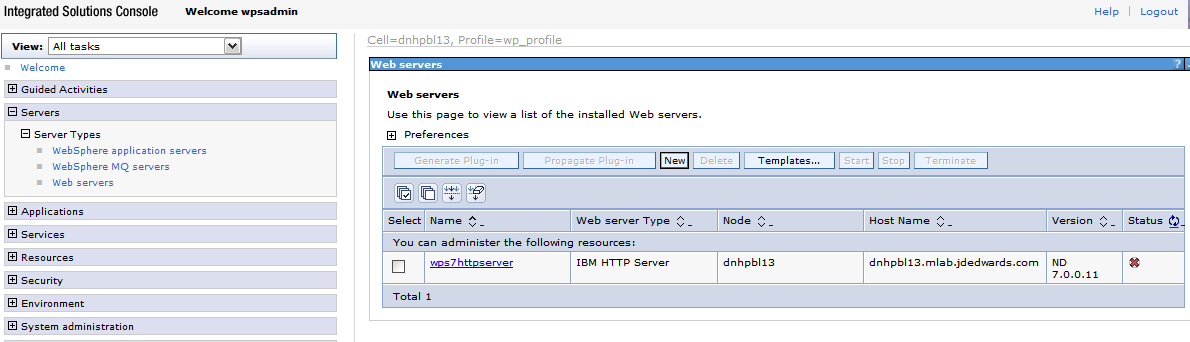
Description of the illustration image076.png
7.6.2 Adding a Virtual Host Definition
If you want to access WebSphere Portal using a host name and port different from your Web server default (i.e port 80), add the required virtual host definition using the WebSphere Application Server administrative console.
-
Select Environment, Virtual Hosts.
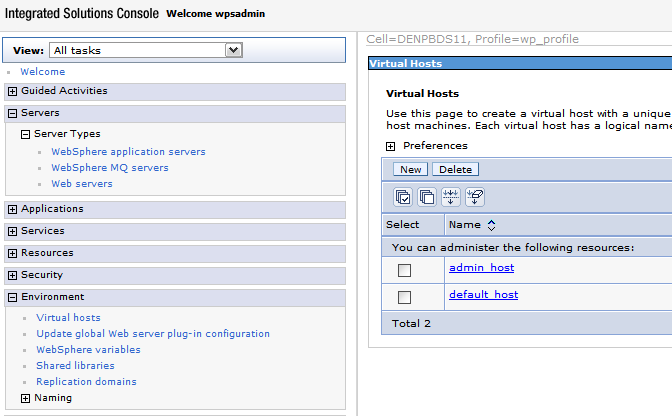
Description of the illustration image078.png
-
Select the default_host entry or the entry for the virtual host that is being used to access the WebSphere Portal application.
-
Select Host Aliases, and verify whether there is a host name and port entry corresponding to the values used to access WebSphere Portal (for example, *:10039). Select New, and enter the information for the host name and port you want to use. (In the example below port 81 was added.)
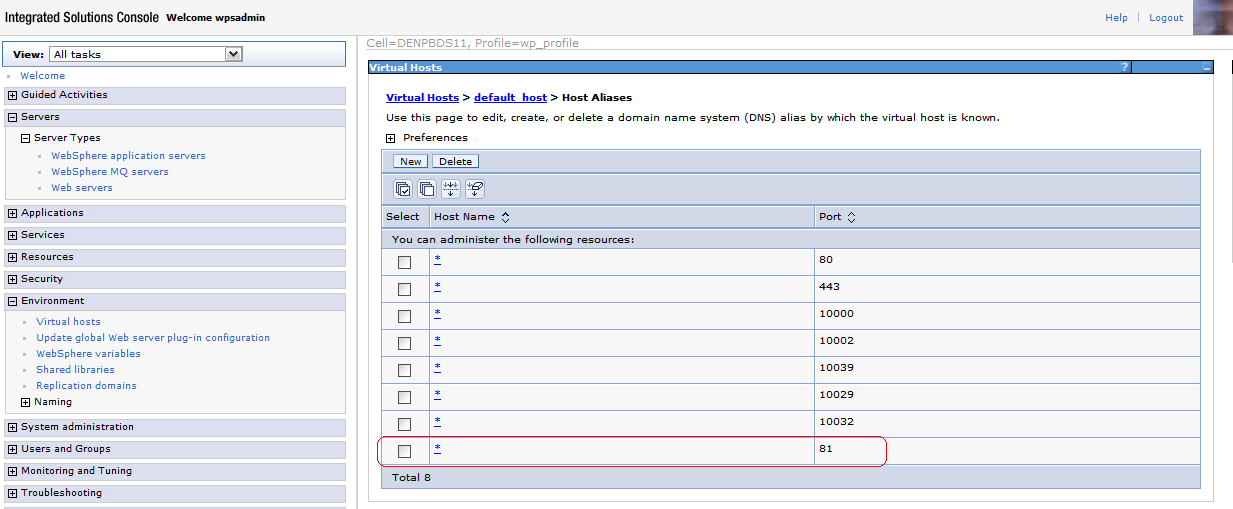
Description of the illustration image080.png
-
Save your changes.
7.6.3 Generate the Web Server Plug-in for wp_profile
To use an external http port to access the portal, you must generate the plugin file with the new changes.
-
From the portal administration console select Servers, Web servers. Select webserver81 which we just created above and click the generate plugin button.
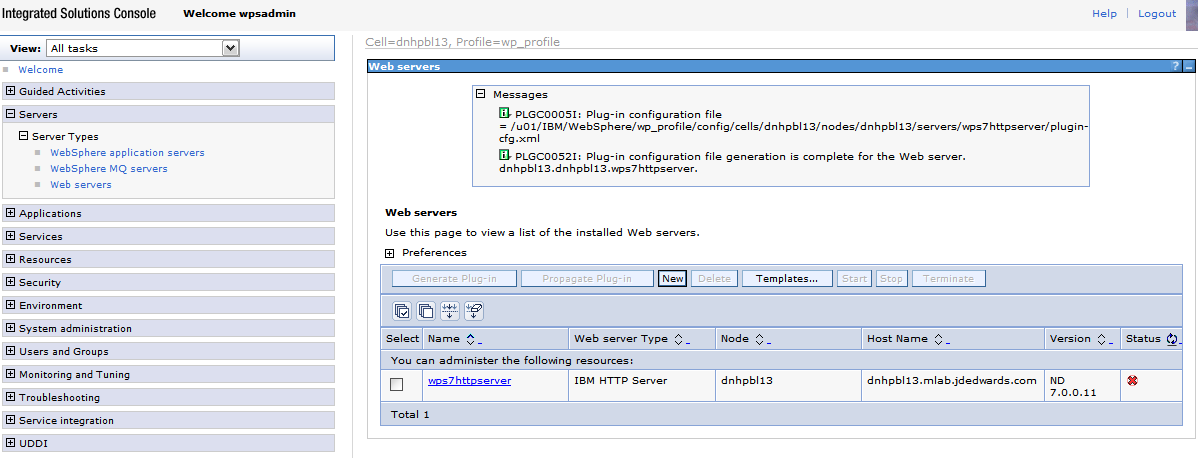
Description of the illustration image082.png
-
From the portal administration console select Servers -> Web servers. Select webserver81 which we just created above and click the propagate plugin button. Note the location of the new plugin that is displayed in the messages section when the generation and propagation completes.
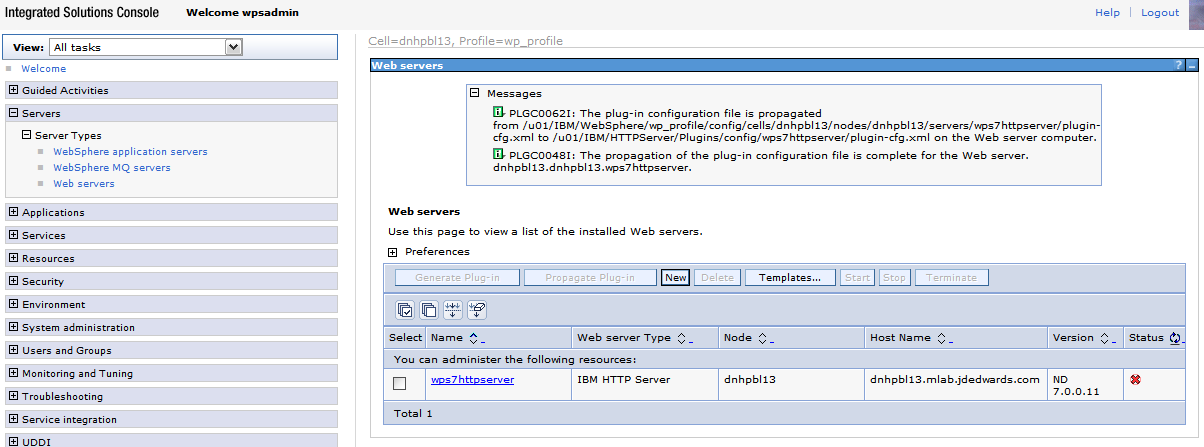
Description of the illustration image084.png
-
Open the httpd.conf file for editing.
-
Add a line for a Listen directive for the external port selected above. For example: Listen 81
-
Locate the entry in the httpd.conf file with the path to the plugin-cfg.xml file. Verify that the path points to the location of the file generated above. If not, change the path to match the file location.
WebSpherePluginConfig "/u01/IBM/HTTPServer/Plugins/config/wps7httpserver/plugin-cfg.xml"
-
Restart both the Web server (i.e webserver81) and the WebSphere_Portal servers.
7.7 Installing the JD Edwards Collaborative Portal
Once the Portal Server is running, you must install the Collaborative Portal, which provides the JD Edwards EnterpriseOne Interface and Portlet Deployment Structure.
Refer to the JD Edwards EnterpriseOne Tools IBM WebSphere Portal Reference Guide