| 跳过导航链接 | |
| 退出打印视图 | |

|
Oracle Solaris 10 8/11 安装指南:基本安装 Oracle Solaris 10 8/11 Information Library (简体中文) |
| 跳过导航链接 | |
| 退出打印视图 | |

|
Oracle Solaris 10 8/11 安装指南:基本安装 Oracle Solaris 10 8/11 Information Library (简体中文) |
1. 计划使用 CD 或 DVD 介质执行 Solaris 安装(任务)
2. 使用适用于 UFS 文件系统的 Solaris 安装程序进行安装(任务)
3. 针对 ZFS 根池使用 Solaris 交互式文本安装程序进行安装(规划和任务)
Oracle Solaris 10 8/11 发行版中的新增功能
Oracle Solaris 10 10/09 发行版中的新增功能
x86: 针对 ZFS 使用 Solaris 交互式文本安装程序执行初始安装
本过程说明如何从 CD 或 DVD 介质安装独立的基于 SPARC 的系统。
开始之前
如果要在没有直接连接 DVD-ROM 或 CD-ROM 驱动器的计算机或域上安装 Oracle Solaris OS,可以使用已连接到其他计算机上的驱动器。有关详细说明,请参阅《Oracle Solaris 10 8/11 安装指南:基于网络的安装》中的附录 B "远程安装或升级(任务)"。
确保您有所需的介质。
对于 DVD 安装,需要 Oracle Solaris Operating System for SPARC Platforms DVD。
对于 CD 安装:
需要以下介质:
Oracle Solaris Software CD。
Solaris Languages for SPARC Platforms CD-如有必要,安装程序会提示您插入这些 CD,以支持特定地理区域的语言。
注 - 从 Oracle Solaris 10 8/11 发行版开始,只提供 DVD。 不再提供 Oracle Solaris Software CD。
如果想保留任何现有数据或应用程序,请备份系统。
有关备份 UFS 文件系统的信息,请参见《系统管理指南:设备和文件系统》中的第 24 章 "备份和恢复文件系统(概述)"
有关备份 ZFS 根池的信息,请参见《Oracle Solaris ZFS 管理指南》中的"发送和接收 ZFS 数据"
将显示 ok 提示符。
ok boot cdrom - text
指定在桌面会话中运行文本安装程序。使用此选项可改写缺省的 GUI 安装程序。
如果操作系统无法定位自识别键盘,下一个屏幕将显示键盘布局选择。
注 - PS/2 键盘不是自识别键盘。在安装期间将会要求您选择键盘布局。
Configure Keyboard Layout
+---------------------------------------------------------------------------+
|   Please specify the keyboard layout from the list below.                 |
|                                                                           |
|   To make a selection, use the arrow keys to highlight the option and     |
|   press Return to mark it [X].                                            |
|                                                                           |
|            Keyboard  Layout                                               |
|            -----------------------                                        |
|       [  ] Serbia-And Montenegro                                          |
|       [  ] Slovenian                                                      |
|       [  ] Slovakian                                                      |
|       [  ] Spanish                                                        |
|       [  ] Swedish                                                        |
|       [  ] Swiss-French                                                   |
|       [  ] Swiss-German                                                   |
|       [  ] Taiwanese                                                      |
|       [  ] TurkishQ                                                       |
|       [  ] TurkishF                                                       |
|       [  ] UK-English                                                     |
|       [ X] US-English                                                     |
|                                                                           |
|                                                                           |
|                                                                           |
|    F2_Continue      F6_Help                                               |
+---------------------------------------------------------------------------+
系统会配置设备和接口,并搜索配置文件。可能会显示语言选项列表。如果未显示此屏幕,请跳至步骤 6。
Select a Language
+---------------------------------------------------------------------------+
|   Please specify the the language from the list below.                    |
|                                                                           |
|   To make a selection, use the arrow keys to highlight the option and     |
|   press Return to mark it [X].                                            |
|                                                                           |
|       [  ] English                                                        |
|       [  ] French                                                         |
|       [  ] German                                                         |
|       [  ] Italian                                                        |
|       [  ] Japanese                                                       |
|       [  ] Korean                                                         |
|       [  ] Simplified Chinese                                             |
|       [  ] Spanish                                                        |
|       [  ] Swedish                                                        |
|       [  ] Traditional Chinese                                            |
|       [  ] UK-English                                                     |
|                                                                           |
|    F2_Continue      F6_Help                                               |
+---------------------------------------------------------------------------+
回答出现的任何配置提示。
预配置系统信息。
根据下面所列情况,选择其中之一:
如果您已预配置了所有的系统信息,则安装程序不会提示您键入任何配置信息。有关更多信息,请参见《Oracle Solaris 10 8/11 安装指南:基于网络的安装》中的第 2 章 "预配置系统配置信息(任务)"。
如果您没有预配置所有的系统信息,安装程序会在多个屏幕中提示您输入此信息。使用安装核对表可帮助您回答配置问题。
网络配置。
一个配置问题会询问您是否要启用网络服务以供远程客户机使用。缺省响应为 "Yes, I would like to enable network services for use by remote clients."(是,我要启用网络服务以供远程客户机使用。)
选择 "No"(否)可提供较安全的配置,在该配置下,安全 Shell 是向远程客户机提供的唯一网络服务。选择 "Yes"(是)会像以前的 Solaris 发行版一样,将启用为数较多的一组服务。您可以放心地选择 "No"(否),因为在安装后可启用所有程序。有关这些选项的详细信息,请参见《Oracle Solaris 10 8/11 安装指南:规划安装和升级》中的"规划网络安全性"。
可以在安装后,使用 netservices open 命令,或通过使用 SMF 命令启用各个服务来启用网络服务。请参见《Oracle Solaris 10 8/11 安装指南:规划安装和升级》中的"在安装后修改安全性设置"。
在回答配置问题并设置超级用户口令之后,将显示 "Solaris Interactive Installation" 屏幕。
Solaris Interactive Installation
+----------------------------------------------------------------------------+
|On the following screens, you can accept the defaults or you can customize  |
| how Solaris software will be installed by:                                 |
|                                                                            |
|  - Selecting the type of Solaris software to install                       |
|  - Selecting disks to hold the software you've selected                    |
|  - Selecting unbundled products to be installed with Solaris               |
|  - Specifying how file systems are laid out on the disks                   |
|                                                                            |
|After completing these tasks, a summary of your selections                  |
|(called a profile) will be displayed.                                       |
|                                                                            |
|There are two ways to install your Solaris software:                        |
|                                                                            |
|  - 'Standard' installs your system from a standard Solaris Distribution.   |
|      Selecting 'standard' allows you to choose between initial install     |
|      and upgrade, if your system is upgradeable.                           |
|                                                                            |
|  - 'Flash' installs your system from one or more Flash Archives.           |
|                                                                            |
|    F2_Standard    F4_Flash    F5_Exit     F6_Help                          |
+----------------------------------------------------------------------------+
要安装 ZFS Flash 归档文件,请按 F4 键。有关安装 ZFS Flash 归档文件的逐步说明,请参见《Oracle Solaris ZFS 管理指南》。
要执行 ZFS 根文件系统的初始安装,请按 F2 键。
重要:如果要在安装之后且重新引导之前禁用自动注册,请取消选定自动重新引导。
如果系统中已经有 ZFS 存储池,则可通过以下消息确认它们,但它们会保持不变,除非您选择现有池中的磁盘来创建新的存储池。
There are existing ZFS pools available on this system.  However, they can only be upgraded
using the Live Upgrade tools.  The following screens will only allow you to install a ZFS root system,
not upgrade one.
显示系统中已经有 ZFS 存储池的消息时,按 F2 键继续。
会出现 "License"(许可证)屏幕。
此时将显示 "Select Upgrade or Initial install"(选择“升级安装”或“初始安装”)屏幕。如果您具有可以升级的 UFS 文件系统,则会显示此屏幕。如果没有显示此屏幕,请跳至步骤 10。
将显示用于选择地理区域、语言环境和其他产品的各个屏幕。
此时将显示 "Choose a Filesystem Type"(选择文件系统类型)屏幕。
Choose a Filesystem Type
+---------------------------------------------------------------------------+
|   Select the filesystem to use for your Solaris installation              |
|                                                                           |
|           [ ] UFS                                                         |
|           [X] ZFS                                                         |
|                                                                           |
|    F2_Continue      F6_Help                                               |
+---------------------------------------------------------------------------+
此时将显示 "Select Software"(选择软件)屏幕。
要执行缺省安装,请接受所提供的缺省值。要执行定制安装,请在文本安装程序屏幕中编辑值。在本示例屏幕中,为安装选中了缺省值 "Entire Distribution Software Group"(完整发行版软件组)。
有关软件组的更多信息,请参见软件组的磁盘空间建议。
Select Software
+---------------------------------------------------------------------------+
|Select the Solaris software to install on the system                       |
|                                                                           |
|Note: After selecting a software group, you can add or remove              |
|software by customizing it. However this requires understanding of         |
|software dependencies and how Solaris software is packaged.                |
|                                                                           |
|  [ ] Entire Distribution plus OEM support ......8575.00 MB                |
|  [X] Entire Distribution........................8529.00 MB                |
|  [ ] Developer System Support...................8336.00 MB                |
|  [ ] End User System Support....................7074.00 MB                |
|  [ ] Core System Support........................3093.00 MB                |
|  [ ] Reduced Networking Core System Support.....3035.00 MB                |
|                                                                           |
|    F2_Continue      F6_Help                                               |
+---------------------------------------------------------------------------+
此时将显示 "Select Disks"(选择磁盘)屏幕。
For ZFS, multiple disks will be configured as mirrors, so the disk you choose,
or the slice within the disk must exceed the Suggested Minimum value.
您可以选择要用于 ZFS 根池的一个或多个磁盘。
如果您选择了一个磁盘并希望稍后配置镜像,请参见《Oracle Solaris ZFS 管理指南》中的"管理 ZFS 存储池中的设备"中的 zpool attach 命令。
如果选择两个磁盘,则会为根池设置镜像双磁盘配置。镜像的双磁盘或三磁盘池是最优配置。
如果您有八个磁盘并选择了全部八个磁盘,则这八个磁盘将作为一个大的镜像用于根池。这不是最优配置。
不支持对根池的 RAID-Z 池配置。有关配置 ZFS 存储池的更多信息,请参见《Oracle Solaris ZFS 管理指南》中的"ZFS 存储池的复制功能"。
Select Disks
+---------------------------------------------------------------------------+
|On this screen you must select the disks for installing Solaris            |
|software. Start by looking at the Suggested Minimum Field;                 |
|this value is the approximate space needed to install the software         |
|you've selected. For ZFS, multiple disks will be configured as mirrors,    |
|so the disk you choose on the slice within the disk must exceed            |
|the Suggested Minimum Value.                                               |
|                                                                           |
|  Note: ** denotes the current boot disk                                   |
|                                                                           |
|Disk Device                                        Available Space         |
|========================================================================== |
|                                                                           |
|[X]** c0t0d0                                        69994 MB (F4 to edit)  |
|[X]   c0t1d0                                        69994 MB               |
|[-]   c0t2d0                                            0 MB               |
|[-]   c0t3d0                                            0 MB               |
|                                                                           |
|                                 Maximum Root Size: 69994 MB               |
|                                 Suggested Minimum: 8529 MB                |
|                                                                           |
|    F2_Continue    F3_Go Back    F4_Edit     F5_Exit    F6_Help            |
+---------------------------------------------------------------------------+
此时将显示 "Preserve Data"(保留数据)屏幕。
如果您选择用于安装软件的磁盘中包含文件系统或具有要保存的未命名片,则可以立即保存这些文件系统或未命名片。
Preserve Data?
+---------------------------------------------------------------------------+
|Do you want to preserve existing data? At least one of the disks you've    |
|selected for installing Solaris software has file systems or unnamed slices|
|that you may want to save                                                  |
|                                                                           |
|    F2_Continue      F4_Preserve    F6_Help                                |
+---------------------------------------------------------------------------+
如果按了 F4 键来保存数据,则会显示用于保存数据的屏幕。
为了管理 ZFS 根文件系统,需提供分片中整个磁盘的大小。例如,提供分片 0 的大小。不同的根文件系统共享同一磁盘会导致难以管理。
要将数据从用于安装根文件系统的磁盘中复制出来,可退出安装程序,然后备份要保留在此磁盘上的数据,之后重新启动安装程序。
# install-solaris
此时将显示用于配置 ZFS 设置的屏幕。
Configure ZFS Settings
+-------------------------------------------------------------------------- -+
|Specify the name of the pool to be created from the disk(s) you have chosen.|
|Also specify the name of the dataset to be created within the pool that is  |
|to be used as the root directory for the filesystem.                        |
|                                                                            |
|                                                                            |
|              ZFS Pool Name: rpool                                          |
|      ZFS Root Dataset Name: s10zfsBE                                       |
|          ZFS Pool Size in (MB): 69995                                      |
|          Size of swap area in (MB): 2048                                   |
|          Size of dump area in (MB): 1024                                   |
|        (Pool size must be between 6481 MB and 69995 MB)                    |
|                                                                            |
|                         [X] Keep / and /var combined                       |
|                         [ ] Put /var on a separate dataset                 |
|                                                                            |
|    F2_Continue     F3_Go Back     F5_Exit     F6_Help                      |
+------------------------------------------------------------------------- --+
此时将显示用于挂载远程文件系统的屏幕。
Mount Remote File System
+-------------------------------------------------------------------------- -+
|Do you want to mount a software from a remote file server? This may         |
|be necessary if you had to remove software because of disk space problems.  |
|                                                                            |
|                                                                            |
|    F2_Continue      F6_Help                                                |
+------------------------------------------------------------------------- --+
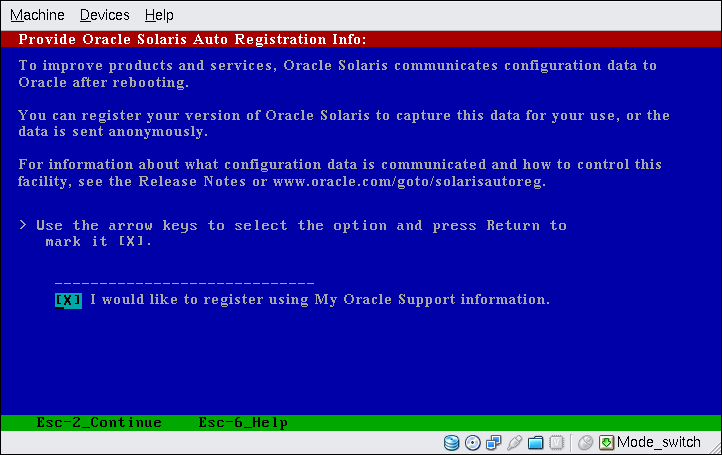
注 - 如果要在安装或升级结束时禁用自动注册,可以按这些自动注册屏幕继续进行,而无需输入任何信息。
图 3-1 文本自动注册屏幕

在此屏幕中,使用方向键导航至选项框。按回车键标记选项框,以选择使用支持凭证注册。按 Esc_2 键继续。
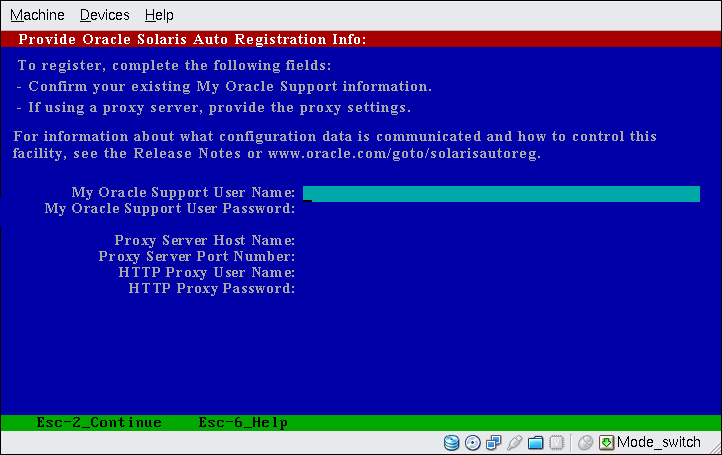
如果已选择在之前的屏幕中注册,则会提示您提供 My Oracle Support 用户名和口令。如果使用代理服务器,可以提供服务器主机名和端口号,以及代理服务器用户名和口令。
如果在之前的屏幕中选择匿名注册,此屏幕只会要求输入代理服务器信息。
图 3-2 文本自动注册数据输入屏幕

在此屏幕中,使用方向键在各行之间移动。键入支持凭证和可选代理服务器条目。按 Esc_2 键继续。
此时将显示 "Profile"(配置文件)屏幕。
Profile
+-------------------------------------------------------------------------- -+
|The information shown below is your profile for installing Solaris software.|
|It reflects the choices you've made on previous screens.                    |
|                                                                            |
|============================================================================|
|                                                                            |
|                Installation Option: Initial                                |
|                        Boot Device: c0t0d0                                 |
|              Root File System Type: ZFS                                    |
|                    Client Services: None                                   |
|                      System Locale: C ( C )                                |
|                                                                            |
|                           Software: Solaris 10, Entire Distribution        |
|                          Pool Name: rpool                                  |
|              Boot Environment Name: s10zfsBE                               |
|                          Pool Size: 69995 MB                               |
|                    Devices in Pool: c0t0d0                                 |
|                                     c0t1d0                                 |
|                                                                            |
|    F2_Begin Installation    F4_Change     F5_Exit     F6_Help              |
+------------------------------------------------------------------------- --+
当 Solaris 交互式文本程序完成 Solaris 软件的安装后,系统会自动重新引导或提示您手动重新引导。
如果要安装其他产品,系统会提示您插入这些产品的 DVD 或 CD。关于安装过程,请参阅相应的安装文档。
安装完成后,安装日志会保存在一个文件中。您可以在 /var/sadm/system/logs 和 /var/sadm/install/logs 目录中找到安装日志。
安装完成。如果在安装后取消选定自动重新引导,继续步骤 21。
# reboot
 | 注意 - 要使用以下过程禁用自动注册,必须在较早出现的安装屏幕中取消选定自动重新引导。 如果系统自动重新引导,则无法使用下列步骤禁用自动注册。相反,在自动重新引导之后,可以通过使用 regadm 命令禁用自动注册。请参见《系统管理指南:基本管理》中的第 17 章 "使用 Oracle Solaris 自动注册的 regadm 命令(任务)"。 |
# reboot
您的系统将引导至您安装的 ZFS 根池。
您可以使用带 -L 选项的 boot 命令来显示可用引导环境的列表。有关基于 SPARC 的引导的更多信息,请参见《系统管理指南:基本管理》中的"在基于 SPARC 的系统上从指定的 ZFS 根文件系统引导"。
zpool status 和 zfs list 样例输出标识了根池组件。
# zpool status
  pool: rpool
 state: ONLINE
 scan: none requested
config:

        NAME        STATE     READ WRITE CKSUM
        rpool       ONLINE       0     0     0
         mirror-0  ONLINE        0     0     0
          c0t0d0s0 ONLINE        0     0     0
          c0t1d0s0 ONLINE        0     0     0

errors: No known data errors
# zfs list
NAME                     USED  AVAIL  REFER  MOUNTPOINT
rpool                   7.15G  59.4G    106K  /rpool
rpool/ROOT              4.45G  59.4G     31K  legacy
rpool/ROOT/s10zfsBE     4.45G  59.4G   4.45G  /
rpool/dump              1.00G  59.4G   1.00G  -
rpool/export              63K  59.4G     32K  /export
rpool/export/home         31K  59.4G     31K  /export/home
rpool/swap              2.06G  61.5G     16K  -
如果您最初使用一个磁盘创建了 ZFS 存储池,您可以在安装之后将此磁盘转换为镜像 ZFS 配置。有关添加或附加磁盘的更多信息,请参见《Oracle Solaris ZFS 管理指南》中的"管理 ZFS 存储池中的设备"。
故障排除
如果您在安装过程中遇到任何问题,请参见《Oracle Solaris 10 8/11 安装指南:定制 JumpStart 和高级安装》中的附录 A "故障排除(任务)"。