D Working
With SnapShot on the Deployment Server (Base Release of Tools Release 9.1)
Note:
Tools Release 9.1 Update 2. This appendix is applicable to the version of SnapShot that was included with the base release of JD Edwards EnterpriseOne Tools Release 9.1.This section discusses these topics:
D.1 Understanding SnapShot
The SnapShot program manages multiple instances of JD Edwards EnterpriseOne Deployment Servers or Development Clients on the same machine. Using this program you can save and restore copies of an installed Deployment Server or Development Client. For instructions on using SnapShot with the Development Client, refer to the JD Edwards EnterpriseOne Development Client Installation Guide.
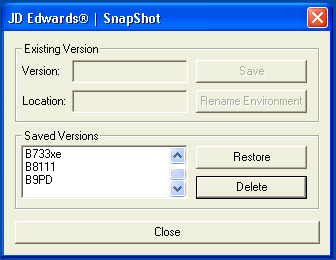
Below is an example of SnapShot managing multiple tools releases including Xe, 8.11 SP1, and 9.0 (B9PD).

D.2 Prerequisites
This is a list of general considerations for using SnapShot:
-
Make sure that you do not have a
JDE.INIfile open when you save or restore SnapShot. -
Make sure that you do not have the ODBC Data Source Administrator open when restoring a SnapShot.
-
Make sure before installing a new Deployment Server into a new Oracle Home, you do not have any previous versions in the Existing Version field of SnapShot. All versions must be saved and should appear in the Saved Versions field.
-
When saving a SnapShot of the Deployment Server, it is required that the New Folder Name field be identical to the existing location due to the sharing of the folder on the Deployment Server. This also allows the proper use of the Previous Planner ODBC during the upgrade process. The ODBC points to the jdeplan.mdb folder from the previous JD Edwards EnterpriseOne application release (for example, Xe or ERP8.0). Therefore, the folder name must NOT be changed. If the snapshot folder is not correct, the upgrade would fail to access the previous release database.
D.3 Using Snapshot on the Deployment Server
Caution:
Before using SnapShot on the Deployment Server, ensure that JDeveloper is not running.To use SnapShot with multiple releases of the JD Edwards EnterpriseOne applications, you must use the most current version of SnapShot when switching between different releases of JD Edwards EnterpriseOne. For example, if you install the foundation code for both JD Edwards EnterpriseOne Applications Release 9.1 and Applications Release 8.12, you must use the version of SnapShot corresponding to the most current JD Edwards EnterpriseOne tools release, in this case, Tools Release 9.1.
This section describes these tasks:
D.3.1 Starting SnapShot
Caution:
Be sure to follow the guidelines in the preceding sections of this guide entitled:The SnapShot utility is delivered with the installation of both the JD Edwards EnterpriseOne Deployment Server and the Development Client workstations. It is located in this directory:
<JDE_dep_server_or_dev_client_installation_directory>\System\Bin32
To run the most current version of SnapShot for multiple releases, you must copy the SnapShot.exe program to a directory outside the Deployment Server installation directory. For example, the installation directory might be c:\E910. If you attempt to run SnapShot from within the Deployment Server installation directory (for example, c:\E910) the application will display an error message.
Tip:
You can create a shortcut toSnapShot.exe, but you still must copy SnapShot.exe to a location outside the original installation directory where it was delivered.D.3.2 Saving a SnapShot
To save a SnapShot:

-
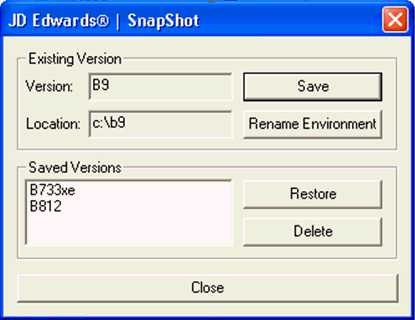
On JD Edwards | SnapShot, click the Save button.

-
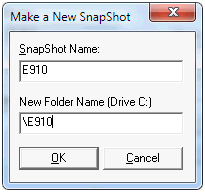
On Make a New SnapShot, complete these fields:
-
SnapShot Name
Enter a name for the SnapShot that will be saved. You may choose any name, but a recommended scheme is to make it release specific, for example, Xe, B9, or E910.
-
New Folder Name
SnapShot does not rename or move the installed directory on the Deployment Server; therefore, do not change this value.
-
-
Click the OK button.
SnapShot saves a snapshot of the Deployment Server.
D.3.3 Restoring a SnapShot
To restore a SnapShot:

-
On JD Edwards | SnapShot, in the Saved Versions section, highlight the saved instance you want to restore.
-
Click the Restore button.
SnapShot makes the selected instance active.
D.3.4 Deleting a SnapShot
To delete a SnapShot:

-
On JD Edwards | SnapShot, in the Saved Versions section, highlight the instance you want to delete.
-
Click the Delete button.
SnapShot completely removes the instance from the Deployment Server.
D.4 Manually Backing Up Files and Settings
Once you have saved a SnapShot for the Deployment Server, it is a good idea to manually backup the files to ensure that your settings for that Deployment Server are secure.
The files that need to be backed up are found in the root folder of each saved snapshot. You should backup these files only while the SnapShot.exe program is not active. These files contain the information necessary to restore registry values and settings for each SnapShot.
The files to backup are listed below:
-
jde.ini -
regkeys*.dat -
package.inf
D.5 Set Logging for SnapShot Using the Registry
Logging is controlled by adjusting registry settings that control SnapShot.
Caution:
Changes made to the Microsoft Windows registry happen immediately, and no backup is automatically made. Do not edit the Windows registry unless you are confident about doing so.Microsoft has issued the following warning with respect to the Registry Editor:
"Using Registry Editor incorrectly can cause serious, system-wide problems that may require you to re-install Windows to correct them. Microsoft cannot guarantee that any problems resulting from the use of Registry Editor can be solved. Use this tool at your own risk."
To set the logging for SnapShot using the registry:
-
Open the Registry by navigating to Run > Regedit.
-
Navigate to this node:
\HKEY_LOCAL_MACHINE\Software\Wow6432Node\JDEdwards\Snapshot -
To enable logging, change the LoggingEnabled key value to 1 (where a value of 0 is off). If this key does not exist, create it as a REG_SZ type.
-
Change the LoggingLevel to a value between 1 and 5, where 1 provides the least amount and 5 provides the most amount of logging details. If this key does not exist, create it as a REG_SZ type.
-
Save the changes and exit the Registry.
Logs will be located in the directory from which the
SnapShot.exeprogram is being executed.