5 Installing and Configuring Oracle WebLogic 10.3.6.0
This chapter includes these tasks:
-
Section 5.2, "Downloading Oracle WebLogic 10.3.6.0 from the Oracle Software Delivery Cloud"
-
Section 5.6, "Using QuickStart to Configure Oracle WebLogic 10.3.6.0"
5.1 Overview
This document provides instructions for installing and running the Oracle installer for the Oracle WebLogic 10.3.6.0.
Additional information regarding the Oracle WebLogic 10.3.6.0 is available at this link:
5.2 Downloading Oracle WebLogic 10.3.6.0 from the Oracle Software Delivery Cloud
This section describes how to download Oracle WebLogic 10.3.6.0 from the Oracle Software Delivery Cloud located at this link:
5.3 Before You Begin
This section describes these topics:
-
64-Bit Support - General
-
64-Bit - JDK
-
System Requirements
-
Installation Considerations
5.3.1 64-Bit Support - General
Per the Minimum Technical Requirements for JD Edwards, Oracle WebLogic 10.3.6.0 is supported with 64-bit JDKs on 64-bit platforms. You should always review the JD Edwards EnterpriseOne MTRs for the supported platforms as described in Chapter 1, "Accessing the Minimum Technical Requirements".
5.3.2 64-Bit - JDK
The installation of Oracle WebLogic 10.3.6.0 for 64-bit platforms does not include the 64-bit JDK. Therefore, prior to installing Oracle WebLogic 10.3.6.0 for 64-bit platforms, you must manually download and install the requisite JDK. For the latest information about the specifically supported JDK, refer to the Oracle Fusion Middleware Certification document at this link:
Additionally, JD Edwards EnterpriseOne requires that a 64-bit JDK be installed so that the \bin directory of the JDK is located at the beginning of the PATH variable definition.
5.3.3 System Requirements
Refer to the JD Edwards EnterpriseOne MTRs (Chapter 1, "Accessing the Minimum Technical Requirements") for Oracle WebLogic 10.3.6.0 for specific system requirements including minimum processor and memory.
5.3.4 Installation Considerations
Oracle recommends the following:
-
Do not exceed a maximum of 12 characters when naming your home directory. If the name of this directory has more than 12 characters and if there are spaces in the directory name, the CLASSPATH may not be resolved properly.
-
You can install only one instance of each version of an Oracle WebLogic product in a single home directory
-
If you launch the installation from the command line or from a script, you can specify the -log option to generate a verbose installation log. The installation log stores messages (informational, warning, error, and fatal) about events that occur during the installation process.
5.4 Installing and Verifying the JDK Version
Starting with Oracle WebLogic 10.3.6.0, the JD Edwards EnterpriseOne HTML Server only supports the Oracle JDK 7+.
Note:
JRockit and HotSpot are merged into a single JVM starting with Oracle JDK 7. There is not a version called JRockit 7. The WebLogic Server does not ship with JDK 7. You can download Oracle JDK 7 from the following link:http://www.oracle.com/technetwork/java/javase/downloads/index.html
(A plus sign '+' in the version number indicates that this and its subsequent versions are supported)
To verify your version of an installed JDK, use this command from the command prompt:
>java -version
>java -d64 -version
The system returns results as shown in the example:
For Oracle JDK 7+:
Note:
Verify the returned result indicates that a 64-bit version of the JDK is installed.JD Edwards EnterpriseOne requires that a 64-bit JDK be installed so that the \bin directory of the JDK is located at the beginning of the PATH variable definition.
Caution:
In order for the JDK 7 to function properly with the JD Edwards EnterpriseOne HTML Server, after you have installed WebLogic Server, you must manually copy JDK specific.jar files. Refer to the section of this chapter entitled: Section 5.7, "Post Installation and Configuration".5.5 Installing Oracle WebLogic 10.3.6.0
This section describes running the Oracle Universal Installer (OUI) to install Oracle WebLogic 10.3.6.0.
-
Run the Oracle WebLogic 10.3.6.0 installer from the image that you downloaded from the Oracle Software Delivery Cloud.
The item name of the installer is (V29856-01). The filename of the installer is:
wls1036_generic.jarUpon execution, the installer starts preparing the OUI install program.
-
Open a Command window with Run as Administrator option and run this command from the prompt:
>java -jar wls1036_generic.jar
Note:
You must have a valid value for the Java_Home in your system path. -
On Welcome, click the Next button.
-
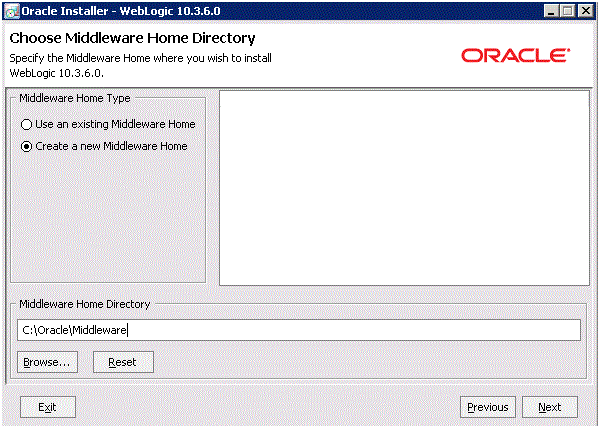
On Choose Middleware Home Directory, click this radio button:
Create a new Middleware Home
For example, your Middleware Home Directory might be:
C:\Oracle\MiddlewareTip:
The location you enter here will be yourMW_HOMEvalue. -
Click the Next button.
-
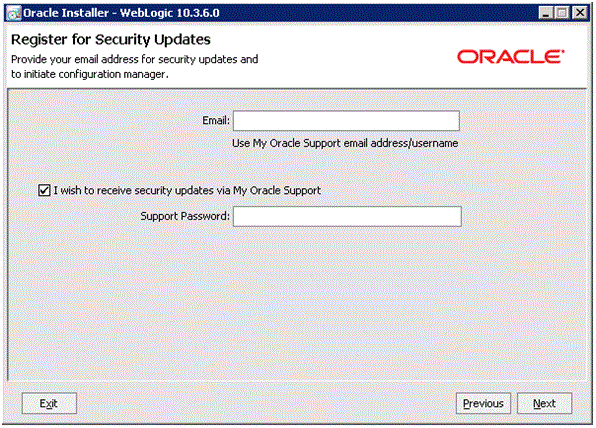
On Register for Security Updates, Oracle strongly recommends you complete the Email address and/or the My Oracle Support Password fields to register your installation of Oracle WebLogic 10.3.6.0. This registration will enable you to be informed of security issues.
-
Click the Next button.
-
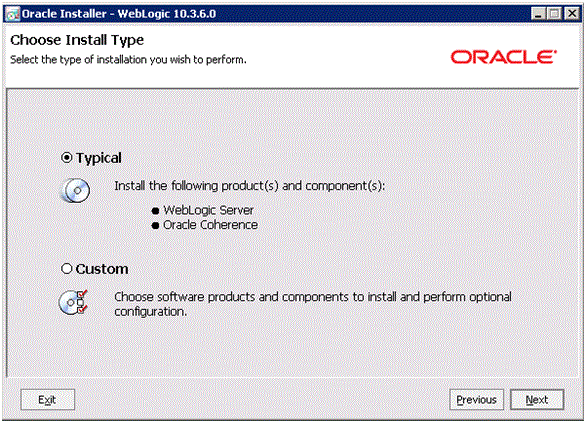
On Choose Install Type, select the type of installation you wish to perform.
In this guide, it is assumed you select the Typical installation type, which installs the Oracle WebLogic 10.3.6.0 and the Oracle Coherence Server.
Note:
The Typical selection automatically includes the Oracle Coherence server, which is part of Oracle WebLogic 10.3.6.0. This new server is a stand-alone cache server that enables dedicated JVM instances responsible for maintaining and managing cached data. As of the initial publication of this guide, the JD Edwards EnterpriseOne HTML Server has not been certified with the Oracle Coherence Server.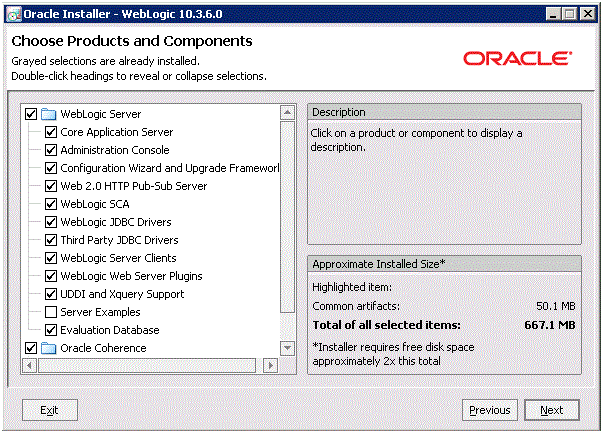
-
Click the Next button.

-
On JDK Selection, click the check box for the JDK you wish to use and install with this product installation.
-
Click the Next button.
-
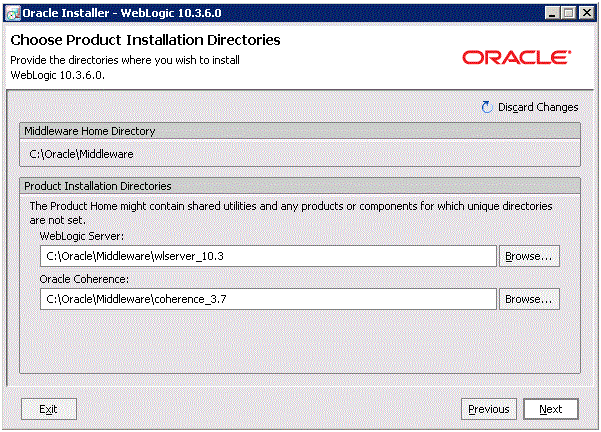
On Choose Product Installation Directories, complete these fields:
-
WebLogic Server
Enter or browse to a location where you wish to install an Oracle WebLogic 10.3.6.0.
For example:
c:\Oracle\Middleware\wlserver_10.3 -
Oracle Coherence
Enter or browse to a location where you wish to install the Oracle Coherence Server.
For example:
c:\Oracle\Middleware\coherence_3.7
-
-
Click the Next button.
Note:
If you are not running the installer as an Administrator, the following screen will not display.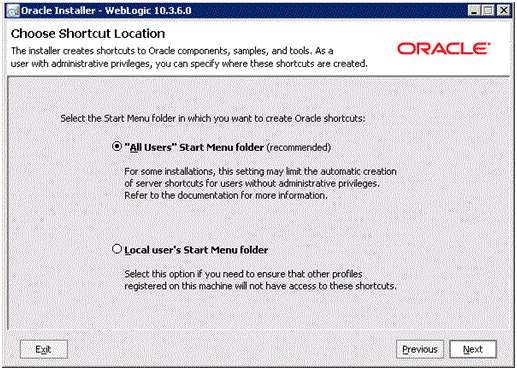
-
If the above screen does display (because you are not running the installer as an Administrator), on Choose Shortcut Location, click this radio button:
"All Users" Start Menu folder (recommended)
-
Click the Next button.
-
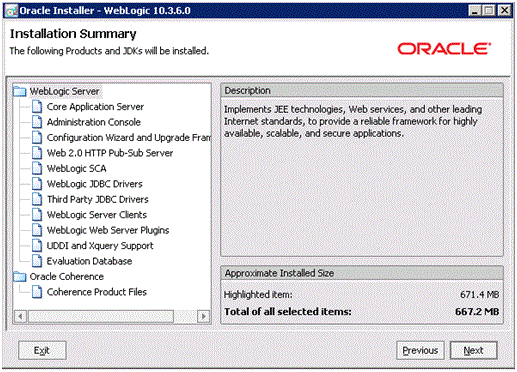
On Installation Summary, review the products that will be installed.
-
Click the Next button.
-
The installer starts copying files.
A progress bar is displayed in the lower right-hand portion of the screen.
As the installer progresses it displays the new features of the Oracle WebLogic 10.3.6.0.

-
On Installation Complete, ensure the Run Quickstart check box is selected in order to launch to the Quickstart menu so that you can create your Domain.
-
Click the Done button.
The QuickStart menu is displayed. Refer to the next section in this guide entitled: Section 5.6, "Using QuickStart to Configure Oracle WebLogic 10.3.6.0".
5.6 Using QuickStart to Configure Oracle WebLogic 10.3.6.0
You can use QuickStart to create a starter domain using the Configuration Wizard. These instructions guide you in the creation of a domain for JD Edwards EnterpriseOne.
If you selected the Run Quickstart check box on the Installation Complete menu of the installer, QuickStart is automatically launched.
To manually launch the QuickStart configuration wizard, run this executable:
<MW_HOME>\utils\quickstart\quickstart.cmd
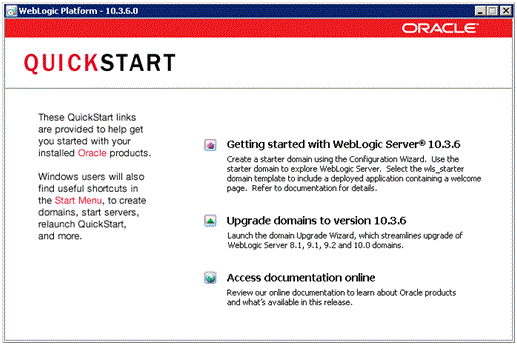
-
On the QuickStart links panel, select this link:
Getting started with WebLogic Server 10.3.6
A Configuration Wizard is launched.
-
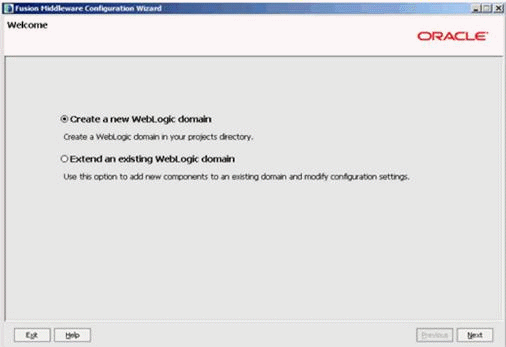
On Welcome, click this radio button to create an Oracle WebLogic 10.3.6.0 domain in your projects directory.
Create a new WebLogic domain
-
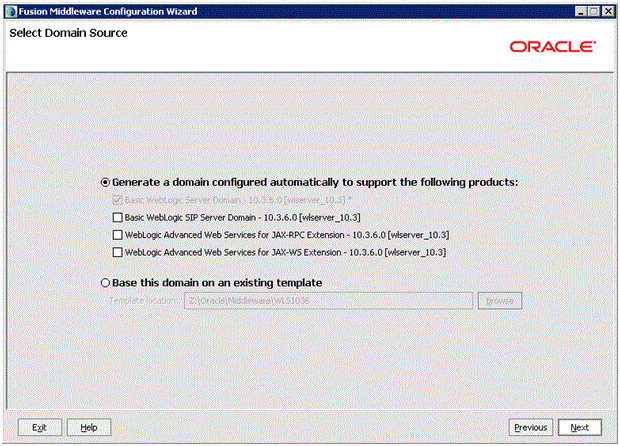
On Select Domain Source, click this radio button:
Generate a domain configured automatically to support the following products
In this section, ensure this default check box is also selected:
Basic WebLogic Server Domain - 10.3.6.0 [wlserver_10.3]*
Tip:
For operation with JD Edwards EnterpriseOne, you do not need to select any other check boxes in this section. -
Click the Next button.
-
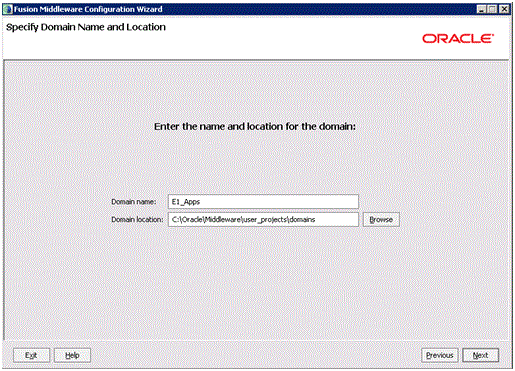
On Specify Domain Name and Location, complete these fields:
-
Domain name: (the default is base_domain)
The default value is base_domain. You should enter a domain name for JD Edwards EnterpriseOne. For example:
E1_Apps
-
Domain location:
Enter or browse to your domain location. For example:
C:\Oracle\Middleware\user_projects\domainsTip:
The typical default domain location is:<MW_HOME>\user_projects\domains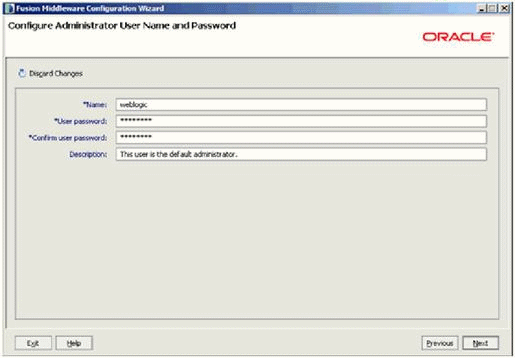
-
-
On Configure Administrator User Name and Password, complete the fields for user name and password for the default user that will start the domain.
Tip:
The default user is:
weblogic
The default password is:
welcome1
-
Click the Next button.
-
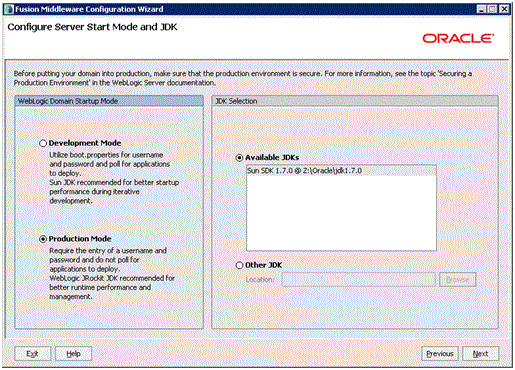
On Configure Server Start Mode and JDK, in the left-hand pane entitled: WebLogic Domain Startup Mode, for use with JD Edwards EnterpriseOne you must select this radio button:
Production Mode
In the right-hand pane, ensure the radio button for Available JDKs button is selected and your installed JDK is highlighted.
-
Click the Next button.
-
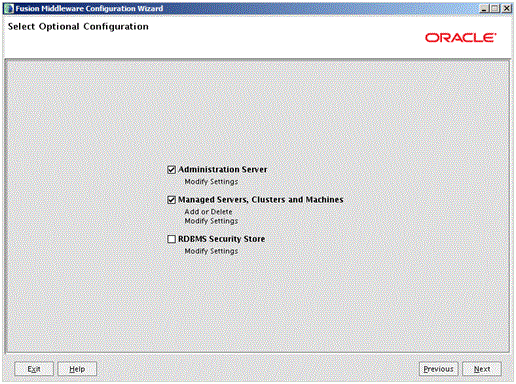
On Select Optional Configuration, select these check boxes to modify the server settings:
-
Administration Server
-
Managed Servers, Clusters and Machines
-
-
Click the Next button.
-
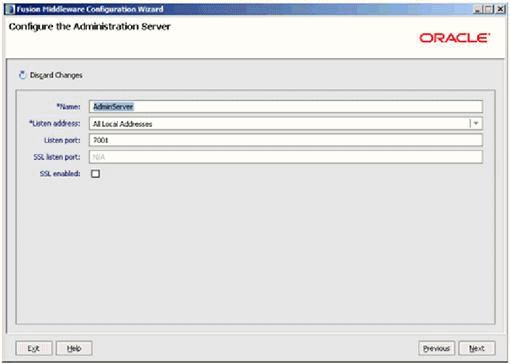
On Configure the Administration Server, complete these fields:
-
Name
Enter a name for the Administration Server. For example:
AdminServer
-
Listen address
You can accept the default selection, which is:
All Local Addresses
-
Listen Port
Tip:
The default port value is 7001.You can override the default value if desired.
You must specify this same port number in the URL that starts the Admin Console.
-
-
Click the Next button.
-
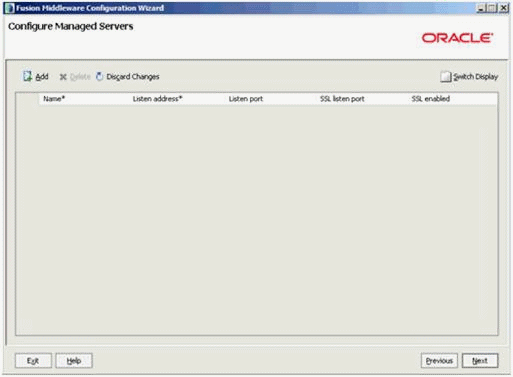
Because the Oracle WebLogic 10.3.6.0 implementation with JD Edwards EnterpriseOne uses EnterpriseOne Server Manager for this functionality, on Configure Managed Servers, click the Next button to skip this step.
-
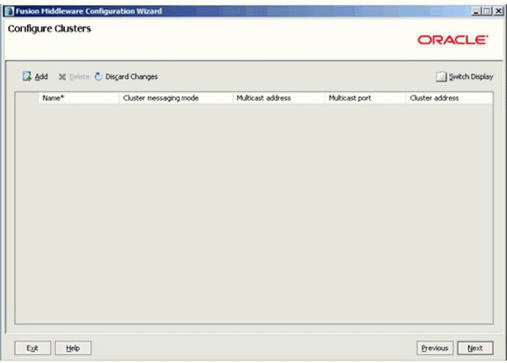
On Configure Clusters, click the Next button to skip this step.
Note:
Clustering is not part of the basic Oracle WebLogic 10.3.6.0 License. You must upgrade to an Oracle Enterprise WebLogic Server License in order to use the Clustering feature.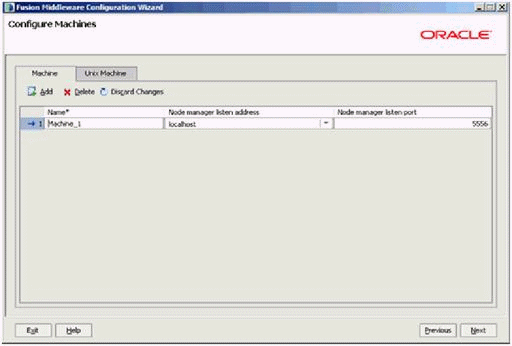
-
On Configure Machines, click the Machine tab and then click the Add button to define a machine name.
You also can define the Machine from the Oracle WebLogic 10.3.6.0 Administration Console after the configuration.
-
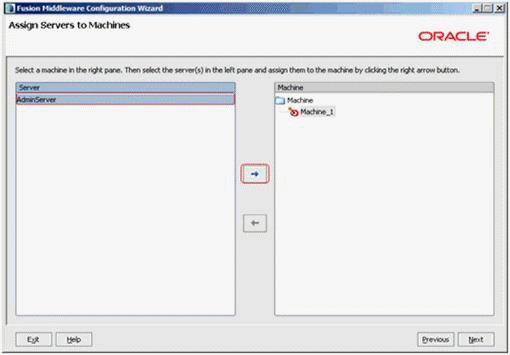
On Assign Servers to Machines, in the left pane highlight available servers and use the right arrow button to assign the available server(s) to the newly defined machine.
-
Click the Next button.
-
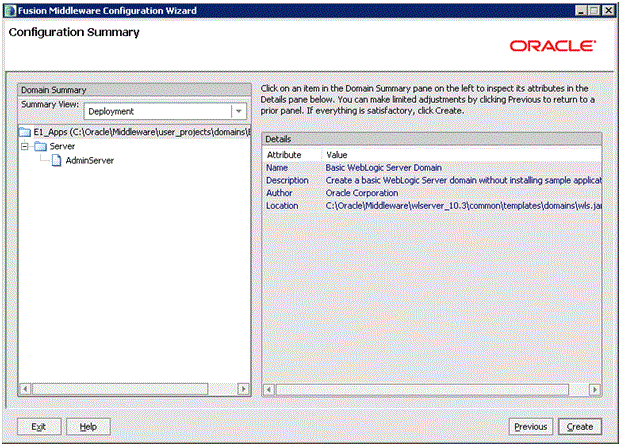
On Configuration Summary, review your selections.
-
Click the Create button.

-
On Creating Domain, when the Progress bar indicates the process is 100% complete, click the Done button to exit the wizard.
5.7 Post Installation and Configuration
After installing WebLogic Server, copy these files:
-
javax.annotation_1.0.0.0_1-0.jar -
javax.xml.bind_2.1.1.jar -
javax.xml.ws_2.1.1.jar
from:
MW_HOME\modules
where MW_HOME is the WebLogic Server installation home directory
to:
JAVA_HOME\jre\endorsed
Note:
You will need to create theendorsed folder.