7 Preparing the WebLogic Server for JD Edwards EnterpriseOne HTML Server Installation
This section describes these tasks:
7.1 Start the WebLogic Administration Console
To start the WebLogic Admin Console:
-
Sign on as WebLogic Server user.
-
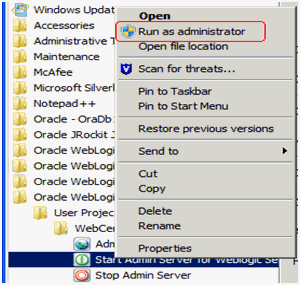
Open a command window with Run as Administrator option.
-
Change directory to:
<weblogic_server_install_location>\user_projects\domains\<yourdomain>\bin -
Start the WebLogic Admin Console by executing this script from the command prompt:
> startWebLogic.cmd -
At the prompts, enter the Admin user and password for the WebLogic Admin Console.

As indicated at the bottom of the above screen sample, when the console completes normally, the WebLogic Admin Console can be accessed after this message is displayed:
<Server Started in RUNNING mode>Caution:
The Admin Server Console will shut down if this process is closed. -
To access the WebLogic Admin Console, enter this URL into a browser such as Firefox or Internet Explorer:
http://<host>:<port>/console
For example:
http://your_machine_name:7001/console
The WebLogic Admin Console is displayed.

Alternatively, you also can start the WebLogic Admin Console from Windows Start > All Programs Menu.
-
Select your domain from this directory:
MW_HOME\user_projects\<your_domain>\ -
Locate the WebLogic Admin Console and execute it with Run as Administrator option.
A sample screen is shown below:
Optionally you also can add the Start WebLogic Admin Console process to the Windows Services. There is an install script called installSvc.cmd that is available for this task. However, you need to modify the script to create a parameter list.
The remainder of this section contains these optional tasks:
-
Section 7.1.1, "Creating a boot.properties File for User and Password"
-
Section 7.1.2, "Adding WebLogic Admin Server or Managed Server Process to Windows Services"
-
Section 7.1.3, "Creating a Process to Remove the WebLogic Admin Console from the Windows Services"
7.1.1 Creating a boot.properties File for User and Password
In order to start the WebLogic Admin Console without prompting for user and password, you need to enter the admin user and password in a boot.properties file. As a result, the start up process uses the user and password from this file instead of prompting for it.
-
If existing, edit the
boot.propertiesfile (see directory location below). If this file does not exist, it must be created in this directory:<MW_HOME>/user_projects/domains/<your_domain>/servers/<server_name>/securityCaution:
You might need to create the security directory if it does not already exist. Also beware of the file type. Theboot.propertiesfile should be a Properties File type, and the filename should not have an extension. If you save the file as "boot.properties.txt", then the startup process will not recognize this file. A correctly formedboot.propertiesfile will have a PROPERTIES type as shown in this example:
-
Edit the
boot.propertiesfile to complete these parameters:Caution:
You must enter these two parameters in lower case.-
username=weblogic
The default value for username is weblogic. You should change this value in this file to a valid value for your WebLogic Admin Server.
-
password=welcome1
The default value for username is welcome1. You should change this value in this file to a valid value for your WebLogic Admin Server.
Caution:
The information entered in this file is encrypted after the first access.
-
7.1.2 Adding WebLogic Admin Server or Managed Server Process to Windows Services
To add the WebLogic Admin Console process to Windows Services:
-
Change the directory to:
<MW_HOME>\wlserver_10.3\server\bin -
Create a CreateWLSSvc.cmd file and add the following lines, where you should add your own values for the bolded values:
SETLOCAL
set DOMAIN_NAME=E1_Apps
set USERDOMAIN_HOME=C:\Oracle\Middleware\user_projects\domains\E1_Apps
set SERVER_NAME=[AdminServer or Managed Server Name]
set PRODUCTION_MODE=true
set JAVA_VENDOR=Oracle or Sun
set JAVA_HOME=C:\Oracle\JDK_1.7
set JAVA_OPTIONS=-XX:MaxPermSize=350m -Xms32m -Xmx1024m -Djava.xml.rpc.ServiceFactory=oracle.j2ee.ws.client.ServiceFactoryImpl
call "%USERDOMAIN_HOME%\bin\setDomainEnv.cmd"
call "C:\Oracle\Middleware\wlserver_10.3\server\bin\installSvc.cmd"
ENDLOCAL
Note:
The JD Edwards EnterpriseOne One View reporting functionality requires that the JAVA_OPTIONS be set. -
Save the file, ensuring that it has no extension (such as
.txt). -
Adjust the service name in the
installSvc.cmdfile as described in these steps:-
Open the
installSvc.cmdfile and scroll to the bottom to locate this Comment line:rem *** Install the service -
In the section following the above line, change the bolded values as shown in this example:
"%WL_HOME%\server\bin\beasvc" -install -svcname:"Oracle WebLogic %DOMAIN_NAME%_%SERVER_NAME%" -javahome:"%JAVA_HOME%" -execdir:"%USERDOMAIN_HOME%" -maxconnectretries:"%MAX_CONNECT_RETRIES%" -host:"%HOST%" -port:"%PORT%" -extrapath:"%EXTRAPATH%" -password:"%WLS_PW%" -cmdline:%CMDLINE%In the above example, the default service name is changed to
Oracle WebLogic <domain><server>.Note:
The default service name is:beasvc <domain><server>
-
-
Execute your
CreateWLSSvc.cmdscript as Administrator and check the Windows Services window. For example:
-
The uninstall service script is located in the same directory:
<MW_HOME>\wlserver_10.3\server\bin
7.1.3 Creating a Process to Remove the WebLogic Admin Console from the Windows Services
Use this procedure to create a process that will remove the WebLogic Admin Console Process from Windows Services.
-
Create a
RemoveWLSSvc.cmdfile with these lines:echo off SETLOCAL set DOMAIN_NAME=E1_Apps set SERVER_NAME=AdminServer call "C:\Oracle\Middleware\wlserver_10.3\server\bin\uninstallSvc.cmd" ENDLOCAL
-
Edit this section of the
uninstallSvc.cmdto have the exact service name you have used before. For example, using the example in this guide the lines would be:rem *** Uninstall the service "%WL_HOME%\server\bin\beasvc" -remove -svcname:"Oracle WebLogic %DO-MAIN_NAME%_%SERVER_NAME%"
7.2 Start the Node Manager Manually
Note:
The JD Edwards EnterpriseOne Server Manager requires that Node Manager is running in order to start and stop managed servers. You can start Node Manager as a background process.To start the Node Manager:
-
Open a command window with the Run as Administrator option.
-
Change directory to:
Oracle WebLogic 12c
<weblogic_server_install_location>\user_projects\domains\<domain_name>\binOracle WebLogic 10.3.5 and 10.3.6
<weblogic_server_install_location>\wlserver_10.3\server\bin -
Start the Node Manager by executing this script from the command prompt:
> startNodeManager.cmd
7.3 Enable Node Manager as a Windows Service
When running on Microsoft Windows, Oracle recommends that you configure Node Manager to run as a Windows service as described in the following procedure.
-
Open a command window with Run as Administrator option.
Note:
If you do not execute this command as an Administrator, you cannot install the service. -
Change directory to:
Oracle WebLogic 12c
<weblogic_ server_install_location>\user_projects\domains\<domain_name>\binOracle WebLogic 10.3.5 and 10.3.6
<MW_HOME>\wlserver_10.3\server\bin -
Execute this command to install Node Manager
> installNodeMgrSvc.cmd -
Open the Windows Services and verify this service is installed:
Oracle WebLogic NodeManager
If the service is successfully installed, now you can start and stop Node Manager from Services.
Note:
By default the Node Manager is set to listen on port 5556. You can change the default port in thenodemanager.propertiesfile that is located in this directory:Oracle WebLogic 12c
<MW_HOME>\user_projects\domains\<domain_name>\nodemanagerOracle WebLogic 10.3.5 and 10.3.6
<MW_HOME>/wlserver_10.3/common/nodemanagerIf you need to change the default port value, you must verify the listen port matches your new value. Use this procedure to verify that your port value matches your new value:
-
Open the WebLogic Server Administration Console.
-
Go to this section:
Domain - Environment - Machines
-
Double click on your machine name.
Click the Node Manager tab and verify the Listen Port.
-
You also need to edit these scripts to match your new listen port:
installNodeMgrSvc.cmduninstallNodeMgrSvc.cmd
-
7.4 Create the Machine Definition
Caution:
JD Edwards EnterpriseOne Server Manager requires a Machine to be defined prior to creating a J2EE Server.Note:
You can skip this step if you have created the machine definition during the installation.To create the machine definition:
-
Open a supported web browser.
-
Open the Oracle WebLogic Admin Console using this URL syntax:
http://host:port/console -
At the prompts, enter the Admin user and password.
-
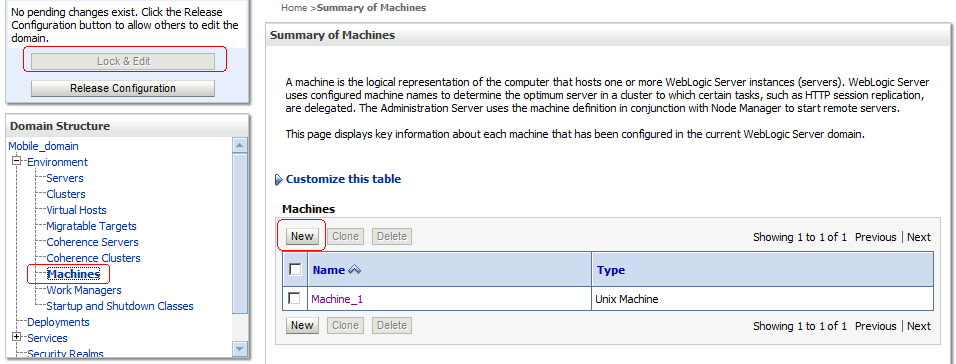
From the Domain Structure, navigate to Environment > Machines.
-
In the top-left Change Center pane, click the Lock & Edit button.
-
In the Summary of Machines pane, click the New button.
-
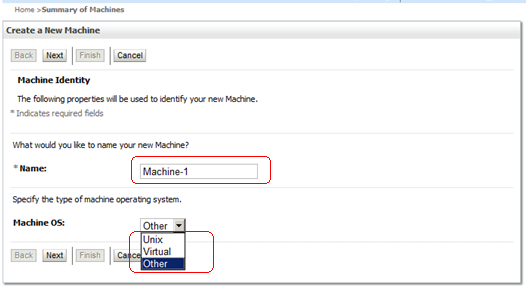
On Create a New Machine, enter the machine name in the Name field.
-
In the Machine OS drop-down menu, select the machine OS type. Use Other for Windows and other non-UNIX operating systems.
-
Click Next.
-
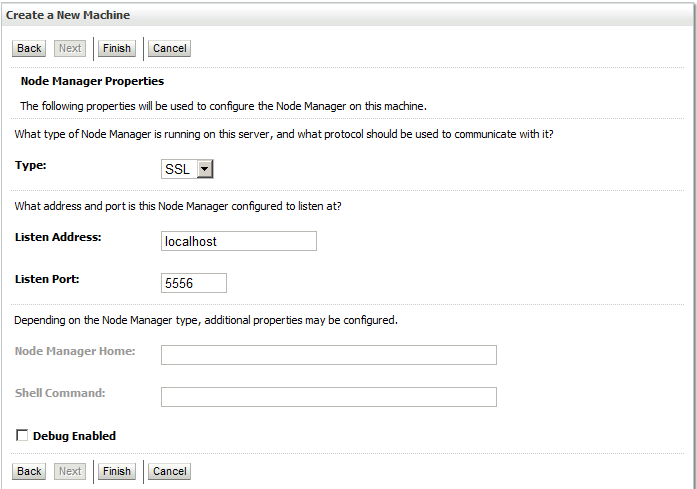
Accept the following default values for the Node Manager Properties:
-
(Protocol) Type = SSL
-
Listen Port = 5556
-
-
Click Finish.
-
In the Change Center pane, click the Activate Changes button.