2 Before You Begin the Installation
You should complete the tasks in this chapter before you begin the actual installation process.
This chapter discusses:
2.1 Verifying Software and Hardware Requirements
Certain minimum hardware and software requirements must be met to run Release 9.1 on various operating systems and servers. Verify that the Deployment Server, Enterprise Servers, and workstations meet the hardware and software requirements.
Because the software and hardware requirements change rapidly as manufacturers constantly update their products, requirements are not provided in this documentation. Refer to Section 1.3.1, "Accessing Minimum Technical Requirements (Certifications)".
Note:
Make sure that you have taken and installed the latest Planner Update ESU from the Oracle JD Edwards Update Center. Failing to do so may prevent proper installation of the software.Additionally, a new compiler requirement is added for Release 9.1. Before you run the Deployment Server or Platform Pack installer, you should install a Microsoft Visual C++ compiler on any machine on which the installer will be run. The MTRs list supported C++ compilers on Microsoft Windows-based machines. Refer to Section 1.3.1, "Accessing Minimum Technical Requirements (Certifications)"
2.1.1 Adding a New Entry to the QAQQINI File
Once you have put the latest PTFs onto the IBM i, you need to enable the new LOB locator functionality. If you do not do this, Specifications Merge and Package Build will fail.
-
Open the
QAQQINIfile on the Enterprise Server using this command:WRKOBJ QUSRSYS\QAQQINI *FILE -
If the
QAQQINIfile does not exist, add it using this command:CRTDUPOBJ QAQQINI QSYS *FILE QUSRSYS DATA(*YES) -
Start IBM i Navigator.
-
Navigate the Databases node and then expand to show your machine name.
-
Right click on your machine name and select Run SQL Scripts.
-
Run these SQL commands:
SELECT * FROM QUSRSYS.QAQQINIIn the results, you should search for this entry:
LOB_LOCATOR_THRESHOLDIf the
LOB_LOCATOR_THRESHOLDentry does not exist, you should insert it by running this command:INSERT INTO QUSRSYS.QAQQINI VALUES('LOB_LOCATOR_THRESHOLD','10000', default)If the
LOB_LOCATOR THRESHOLDentry does exist, you should ensure that the value forQQVALis set to10000. If theQQVALvalue is set to anything other than10000(for example,*DEFAULT), you must change it using this command:Tip:
If you haveSTRSQL, you can also run this command directly from that program.UPDATE QUSRSYS.QAQQINI SET QQVAL='10000' WHERE QQPARM='LOB_LOCATOR_THRESHOLD'
-
Sign out of the IBM i Navigator and make sure the
QZDASOINITjob is terminated. This is required because a new database connection must be started with the new values forQZDASOINIT.
2.1.2 Setting up Your IBM i
This section contains these tasks:
2.1.2.1 Setting Up AS\400 TCP\IP Services
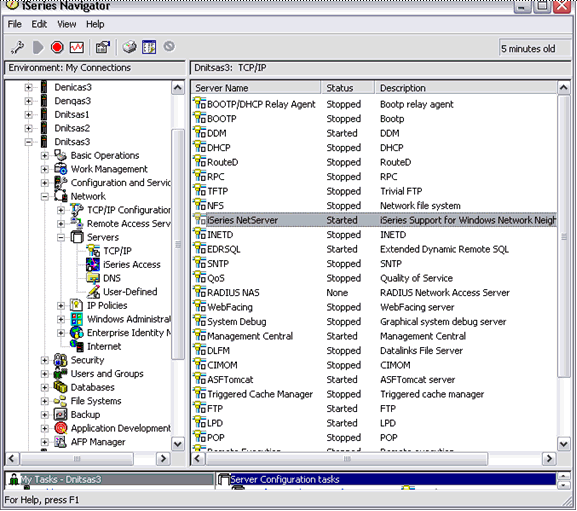
Use this procedure to set up the TCP\IP services on your IBM i.
-
In IBM i Navigator, open the node for your IBM i machine and drill down to Network | Servers | TCP\IP and right click on IBM i NetServer, and select Properties.
-
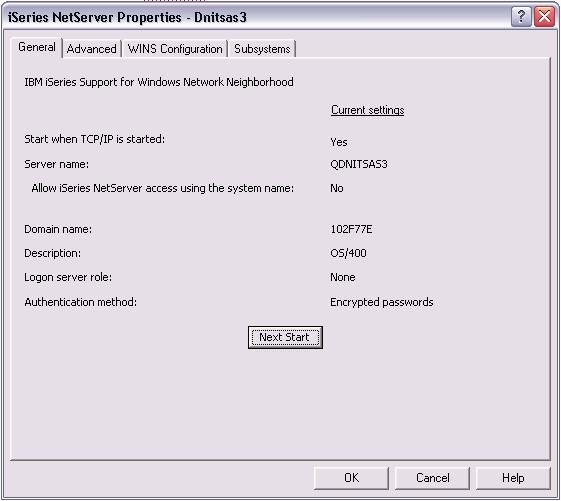
On IBM i NetServer File Share Properties - <machine_name>, click the Next Start button.
-
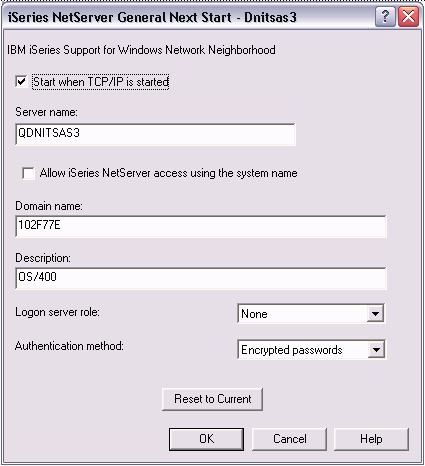
On IBM i NetServer General Next Start - <machine_name>, click to enable the checkbox for this setting:
Start when TCP\IP is started -
Click OK to close the General Next Start dialog, and then click OK again to close the NetServer Properties dialog.
2.1.2.2 Setting Up a Network Share for IBM i Root
Use this procedure to set up a network share on your IBM i root.
-
Start IBM i Navigator
-
Expand your machine in the tree.
-
Drill down into the Network node.
-
Drill down into the Servers node.
-
Highlight TCP\IP.
-
In the right hand panel find IBM i NetServer.
If it has a status of Stopped, right click and start it.
-
Double click on the started IBM i NetServer.
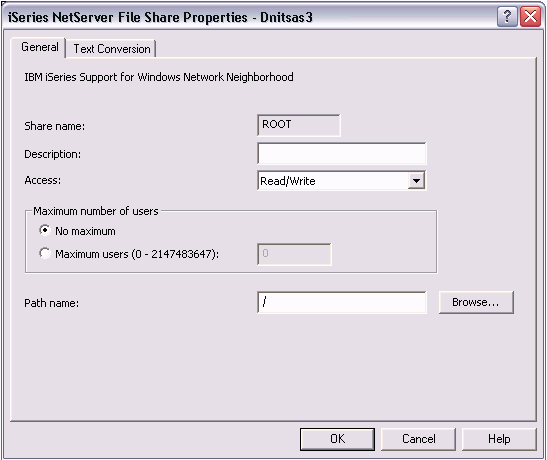
-
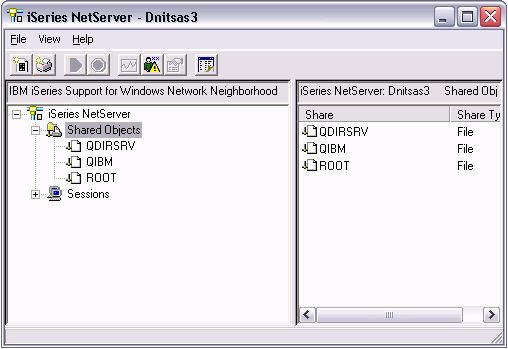
Navigate from File | New | File and complete these fields:
-
Share Name
Enter this value: ROOT
-
Description
Enter the Root directory in IFS.
-
Access
Use the pulldown to choose Read\Write.
-
-
On IBM i NetServer - File Share Properties <machine_name>, click OK.
-
On IBM i NetServer File Share Properties, right click on Root and go to properties and make sure that Access is set to Read\Write.
Note:
The default value is Read only. -
Click OK to save the Read\Write setting.
2.1.2.3 Starting the EDRSQL Service
Tip:
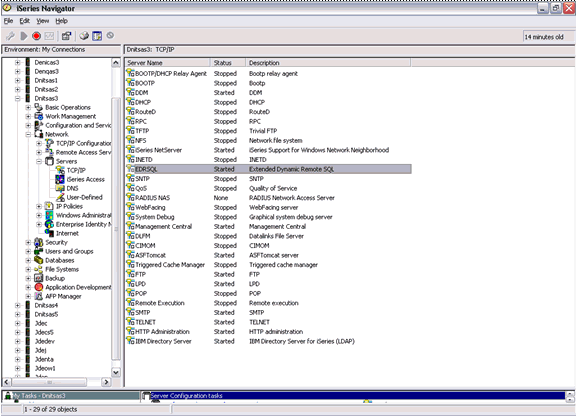
Alternatively, instead of using IBM i Navigator as detailed in this procedure, you can logon to a TN5250 session as QSECOFR and invoke this command:STRTCPSVR SERVER(*EDRSQL)
-
On IBM i Navigator, while still on Network | Servers | TCP\IP, right click on EDRSQL, choose Properties.
-
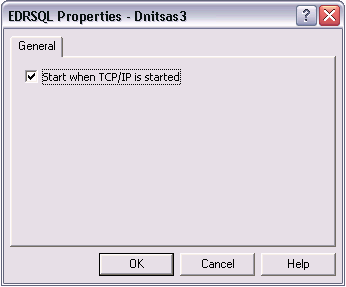
On Setting Up AS\400 TCP\IP ServicesEDRSQL Properties, click in the checkbox to enable this setting:
Start when TCP\IP is started
2.2 Verifying the Disk Space Requirements
The amount of disk space you need for Release 9.1 software on the Deployment Server and Enterprise Server depends on many variables according to platform and database. For the Deployment Server, all disk space must be available on one drive except if you use the Remote Share option. With the Remote Share option, there must be enough room on one remote share for all the path codes. For Enterprise Server installation, multiple foundations during the install are not supported. There must be enough space on one disk drive for all logic components.
During the install you cannot choose to have Printqueue and build areas installed onto another location. Additionally you must have sufficient disk space on either the Enterprise Server or a separate Database Server for the scripts and the database components.
After you have completed an installation, you can manually relocate some components of the Enterprise Server on different drives, such as printqueue location, build areas, package location, and BI-Publisher storage. Additionally, when using multiple foundations it is possible to use different drives for each set of JD Edwards EnterpriseOne pathcodes. However, it is important to note that for purposes of the initial installation, having the correct amount of space available, but not on a single drive, is not adequate. Up-to-date disk space requirements are listed in the Release 9.1 Minimum Technical Requirements. Refer to Section 1.3.1, "Accessing Minimum Technical Requirements (Certifications)".
Note:
While the disk space tables accurately represent the disk space requirements, the actual requirements for an installation will be greater due to the requirement for temporary space.