11 Performing Post Upgrade Tasks
This section contains these tasks:
-
Section 11.1, "Setting Up Microsoft Windows Security on Release 9.1 Directories"
-
Section 11.4, "Configuring JD Edwards EnterpriseOne for Use with Vertex Quantum Tax Applications"
11.1 Setting Up Microsoft Windows Security on Release 9.1 Directories
To set up Microsoft Windows security on the Release 9.1 directories and files on your Deployment Server. Use these charts to determine what permissions are required for the various types of Release 9.1 users and perform these tasks to set permissions on the Security tab:
-
Section 11.1.1, "Setting Security on the Pathcode Directory"
-
Section 11.1.2, "Setting Security on the Database Directory"
-
Section 11.1.3, "Setting Security on the Data Dictionary Directory"
-
Section 11.1.5, "Setting Security on the Media Object Directory"
-
Section 11.1.7, "Setting Security on the Print Queue Directory"
Note:
Not all directories are available. The directory names listed in the table below are subdirectories of the\JDEdwards\E910 directory structure. You can apply the indicated permissions to all subdirectories and files except where noted.11.1.1 Setting Security on the Pathcode Directory
This table lists the settings to set security on the pathcode directory:
| User Type | Permissions |
|---|---|
| JDE
(all subdirectories except \pathcode and \package) |
Change
Change |
| Production users
(all subdirectories except \pathcode and \package) |
Read Only
Change |
| Development users
(all subdirectories except \pathcode and \package) |
Change
Change |
| CNC administrators and application leads
(all subdirectories except \pathcode and \package) |
Change
Change |
11.1.2 Setting Security on the Database Directory
This table lists the settings to set security on the database directory:
| User Type | Permissions |
|---|---|
| JDE | Change |
| Production users | No Access |
| Development users | No Access |
| CNC administrators and application leads | No Access |
11.1.3 Setting Security on the Data Dictionary Directory
This table lists the settings to set security on the data dictionary directory:
| User Type | Permissions |
|---|---|
| JDE | Change |
| Production users | No Access |
| Development users | No Access |
| CNC administrators and application leads | Change |
11.1.4 Setting Security on the Helps Directory
This table lists the settings to set security on the Helps directory:
| User Type | Permissions |
|---|---|
| JDE | Change |
| Production users | Read Only |
| Development users | Read Only |
| CNC administrators and application leads | Read Only |
11.1.5 Setting Security on the Media Object Directory
This table lists the settings to set security on the media object (literal name is mediaobj) directory:
| User Type | Permissions |
|---|---|
| JDE | Change |
| Production users | Read Only |
| Development users | Read Only |
| CNC administrators and application leads | Change |
11.1.6 Setting Security on the Planner Directory
This table lists the settings to set security on the planner directory:
| User Type | Permissions |
|---|---|
| JDE | Change |
| Production users | No Access |
| Development users | No Access |
| CNC administrators and application leads | No Access |
11.1.7 Setting Security on the Print Queue Directory
This table lists the settings to set security on the print queue (literal name is printqueue) directory:
| User Type | Permissions |
|---|---|
| JDE | Change |
| Production users | No Access |
| Development users | No Access |
| CNC administrators and application leads | No Access |
11.1.8 Setting Security on the System Directory
This table lists the settings to set security on the system directory:
| User Type | Permissions |
|---|---|
| JDE | Change |
| Production users | Read Only |
| Development users | Read Only |
| CNC administrators and application leads | Change |
11.2 Using the Adobe SVG Viewer on Web Clients
Per the Minimum Technical Requirements (MTRs) for JD Edwards EnterpriseOne web clients (refer to Section 1.3.1, "Accessing Minimum Technical Requirements (Certifications)"), you must have the Adobe Scalable Vector Graphics (SVG) viewer installed on your web clients in order to use specific JD Edwards EnterpriseOne applications, such as Demand Flow Manufacturing.
Within such JD Edwards EnterpriseOne applications, the Graphical Product Synchronization uses the Adobe SVG viewer for displaying the graphics associated with the product synchronization. The JD Edwards EnterpriseOne application automatically detects the Adobe viewer if it is already installed for the browser. If the viewer is not installed for the browser, the system displays a link that you can use to install the viewer from the Adobe web site. The URL for this link is:
http:\\www.adobe.com\svg\viewer\install\main.html
Note:
SVG is a graphics file format and web development language based on XML that enables dynamic creation of high-quality graphics with precise structural and visual control. It is based on standards defined by the World Wide Web Consortium (http:\\www.w3.org\TR\SVG\) .Tip:
The installation of the SVG viewer may require administrator authority on your client machine.11.3 Setting Up Solution Explorer
Solution Explorer is the Microsoft Windows-based interface that provides access to Release 9.1 applications, role-based menus, implementation and configuration options, documentation, and training materials. Solution Explorer is a convenient window into Release 9.1.
Users can access Solution Explorer to search and navigate quickly through Release 9.1 applications. Users also can customize Solution Explorer to create their own tasks and link tasks to other Web-based information.
11.3.1 Setting Up Solution Explorer HTML Documentation Path
When Release 9.1 is installed, the system automatically stores HTML documentation hierarchically in folders located in a common documentation directory. Using Media Object Queues, Solution Explorer locates these files and displays the associated documentation in its own window whenever a user selects a task.
The file path from Solution Explorer to the HTML documentation files is defined in the F98MOQUE table; it must be configured by accessing the corresponding program, called the Work with Media Object Queues (P98MOQUE) program. When JD Edwards EnterpriseOne installs the documentation files, it creates an entry in the Media Object Queue table that associates the Queue Name, called ActivEraData, with a generic path to the documentation. For Solution Explorer to link each HTML file with the correct task, you must open this program and change the server name for the directory path associated with the Queue Name ActivEraData. The directory path has this structure:
\\Server_Name\E910\SolutionExplorder\Data
where Server_Name is the name of your Deployment Server.
When the queue name ActivEraData is correctly mapped to the main HTML documentation directory, Solution Explorer locates and displays the associated documentation when a user accesses a Task Location or Task View Location. For example, if a task named JDE001234 exists, the path to the HTML file of the summary document for the task is:
\\Server_Name\PY910\SolutionExplorer\Data\JDE001234\summary.html
where Server_Name is the name of the Deployment Server
For more information on setting up the documentation path, refer to Section 10.2, "Modifying Media Object Queues".
11.3.2 Setting Up the Home Page for Solution Explorer
The home page is generally the first screen a user sees when logging on to Solution Explorer. This screen can be used to display information that is relevant to end users in the enterprise. It can be an external Web site, an intranet site, or even HTML files stored on any server on the network.
During the installation process, a directory called PortalLite is created when the Deployment Server is installed. This directory resides in this path:
x:\base_installation_directory\SolutionExplorer\PortalLite
where x:\base_installation_directory is the drive and directory where you installed Release 9.1 on your Deployment Server.
The PortalLite directory includes a set of HTML files that make up the default Home Page. Even though this directory is on the Deployment Server by default, the directory could reside anywhere on the network, such as on a HTML Web Server or on a local workstation.
When the Release 9.1 client is installed, the system updates the client JDE.INI to point to the location of the PortaLite directory. For example, if the name of the Deployment Server is DepServer1 and the share name is E910, the [Explorer] section of the JDE.INI is updated as follows:
[Explorer]
ExplorerHomeURL="\\DepServer1\E910\SolutionExplorer\portallite\index.html"
ExplorerStart=INTERNET
You can change the above parameters in the JDE.INI to display any HTML file or URL as the default Home Page. This table describes these parameters:
| [Explorer] Parameter | Description |
|---|---|
| ExplorerHomeURL= | Defines the URL or filename of the Home Page that is displayed when the user logs on. The default value is:
|
| ExplorerStart= | Defines the Explorer start mode. Values are:
|
11.4 Configuring JD Edwards EnterpriseOne for Use with Vertex Quantum Tax Applications
This topic describes how to configure JD Edwards EnterpriseOne to use the Vertex Quantum tax applications. If you do not use these applications with JD Edwards EnterpriseOne, skip this section.
Release 9.1 can be used with the following Vertex Quantum tax applications:
-
Vertex Quantum for Payroll Tax
-
Vertex Quantum for Sales and Use Tax
The Vertex Quantum applications should be installed on your system before starting the configuration tasks.
Note:
The Vertex Quantum applications can be used with the Indexed Sequential Access Method (ISAM) database or Oracle database (for either of the Vertex Quantum applications) or the SQL Server database (for Vertex Quantum for Sales and Use Tax). The ISAM database is installed as part of the Vertex Quantum application installation.See Also
Vertex Quantum for Payroll Tax - Administrator's Guide
Vertex Quantum for Sales and Use Tax - Administrator's Guide
Before configuring Release 9.1 for use with Vertex Quantum applications, install Vertex Quantum for Payroll Tax, Vertex Quantum for Sales and Use Tax, or both on the Enterprise Server. For information about installing the Vertex Quantum applications, refer to the Vertex Quantum administration guides listed above. When installing the Vertex Quantum applications, note the following:
-
Note the directory path on the Enterprise Server for the directory in which the Vertex Quantum applications are stored.
This information is needed when copying the Vertex libraries into the Release 9.1 directory structure.
-
For Vertex Quantum for Sales and Use Tax, you can install the ISAM database version of the Vertex Quantum application, or you can use the SQL Server or Oracle database.
-
For Vertex Quantum for Payroll Tax, you can install the ISAM database version of the Vertex Quantum application, or you can use the Oracle database.
You cannot use SQL Server with Vertex Quantum for Payroll Tax.
-
When using the Vertex ISAM database, note the directory path on the Enterprise Server for the directory or directories in which the Vertex Quantum application databases are created.
This information is needed for establishing Release 9.1 database connectivity.
11.4.1 Adding Vertex Quantum Directory Information to the Microsoft Windows Server Path
To add the Vertex Quantum application directory information to the Microsoft Windows server path:
-
From the Microsoft Windows Enterprise Server, access the Control Panel.
-
On Control Panel, click the System icon.
-
In System, select the Advanced tab.
-
On the Advanced tab, click the Environment Variables button.
-
In the System Variables window, scroll down until the keyword Path appears in the Variable column.
-
Click Edit to display the current path in the Variable Value field.
-
Search the current path (as shown in the Value field) for the Vertex Quantum application directory.
If the directory does not appear, you must add it to the path, as described in the following step. If the directory appears in the path, skip to step 9 in this task.
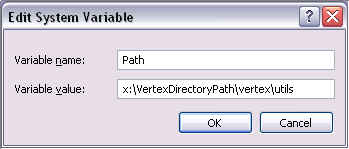
-
Place the cursor in the Value field, and use the right arrow to scroll to the end of the field and enter this path:
x:\vertexDirectoryPath\vertex\utilswhere x:\vertexDirectoryPath is the drive and path for the directory in which the Vertex Quantum applications are stored.
Note:
You might need to include a semicolon to separate this entry from previous entries. -
Click Set.
The new value is saved.
-
After you finish setting the Environment Variables, repeat this task for User Variables, starting from Step 5 in this task.
-
Click OK and reboot the server.
The new path takes effect.
11.4.2 Configuring the Release 9.1 Database Connections for Vertex Quantum Tax Applications
To configure Release 9.1 database connections to use the Vertex Quantum applications:
-
In the Fast Path field, enter G731 to access Vertex Quantum Tax Processing.
The Vertex Quantum Tax Processing panel appears.
-
Highlight and right-click the Database Connections (P7308) program.
A context menu appears.
-
On the context menu, select Prompt for Values.
The Processing Options dialog appears.
-
On Processing Options, click the Quantum tab and enter the following information:
Option #1: Enter which Vertex Quantum applications are installed:
Value Action [blank] Install both Vertex Quantum tax applications. 1 Install the Vertex Quantum for Sales and Use Tax application. 2 Install the Vertex Quantum for Payroll Tax application. Option #2: Enter location information for the databases:
Value Action [blank] Define databases for both Vertex Quantum tax applications in the same location. 1 Define databases for the Vertex Quantum for Payroll Tax and Vertex Quantum for Sales and Use Tax applications in separate locations. 2 Define databases for the Vertex Quantum for Payroll Tax and Vertex Quantum for Sales and Use Tax applications in separate locations, and the four databases for the Vertex Quantum for Sales and Use Tax application in separate locations. Option #3: If processing option #2 is set to 1 or 2 (that is, if the Vertex databases are in separate locations), specify the GeoCode database location information:
Value Action [blank] Define the Vertex Quantum Payroll Tax and Sales and Use Tax applications to use the same GeoCode database. 1 Define each of the Vertex applications to use a separate copy of the GeoCode database, and that the two copies are expected in separate locations. -
Click OK.
The Vertex Quantum Database Connection panel is displayed. The Database Connection panel contains one or more tabs that correspond to the database connections that must be defined. The displayed tabs are determined by the values you entered in the processing options, in Step 4 of this task.
Note:
The GeoCode database is the only Vertex Quantum database that can be shared between the Vertex Quantum Payroll Tax and Sales and Use Tax applications. However, all of the Vertex Quantum databases can be installed in the same location or in different locations.One or more of the following tabs appears on the Database Connection panel:
Tab Description All All Vertex Quantum application databases for both applications are located on the same server and in the same location. GeoCode The same GeoCode database is used by both applications. GeoCode-Sales and Use The GeoCode database used by the Sales and Use Tax application is located on this server and location. A separate copy of the GeoCode database, at another location, is used by the Payroll Tax application. GeoCode-Payroll The GeoCode database used by the Payroll Tax application is located on this server and location. A separate copy of the GeoCode database, at another location, is used by the Sales and Use Tax application. Sales and Use The four databases used by the Sales and Use Tax application are located together, on this server and location. TDM The Test Data Management (TDM) database, used by the Sales and Use Tax application, is located on this server and location. Register The Register database, used by the Sales and Use Tax application, is located on this server and location. Rate The Rate database, used by the Sales and Use Tax application, is located on this server and location. Payroll The databases used by the Payroll Tax application are located on this server and location. -
On the Database Connection panel, select each tab and enter the following information:
-
Data Source
For ISAM, enter the directory path to the specified database. The location you enter should be the location on the server used for the database when the Vertex applications were installed, as previously described in this step.
-
Server
For ISAM, leave this field blank.
-
User ID
For ISAM, leave this field blank.
-
Password
For ISAM, leave this field blank.
-
-
Click OK.
The changes do not take effect until you have logged off of your system and logged back on.
11.4.3 Mapping Objects to the Enterprise Server
Objects that call the Vertex Quantum APIs must execute on the server on which the Vertex Quantum APIs reside. Check that the following Release 9.1 objects are configured in the system OCM to execute on the server. Do not change the mappings.
For Vertex Quantum for Payroll Tax:
-
R07200 (Pre-payroll Driver)
-
B0700058
For Vertex Quantum for Sales and Use Tax:
-
X00TAX.c (Tax Calculator)
-
B7300002 (Validate Quantum GeoCodes)
-
B7300004 (Retrieve Quantum GeoCodes)
-
B7300012 (Validate Quantum Software Information)
-
B0000182
-
B0000183
11.4.4 Testing the Vertex Quantum Connection from Release 9.1
Use the following procedures to test the Vertex Quantum connection from Release 9.1.
To test the Vertex Quantum for Payroll Tax interface:
-
Access the Payroll Workbench menu (G07BUSP11), and select Pay Cycle Workbench.
The Work with Payroll Cycle Workbench panel appears.
-
Specify pre-payroll information and submit the pre-payroll.
For information about the Payroll Workbench and submitting pre-payroll, see Processing Pre-Payroll in the Release 9.1 Payroll Implementation Guide.
-
If no taxes are being calculated, there may be a setup or configuration problem.
Verify the following to make sure setup is correct:
-
UBE R07200 is being executed on the server where the Vertex Quantum for Payroll Tax APIs reside.
-
Correct values are assigned to the
Data Source,Server,User ID, andPasswordfields on the Database Connection panel, as specified in Configuring the Release 9.1 Database Connections for Vertex Quantum Tax Applications.
-
-
For the Vertex Quantum for Sales and Use Tax interface:
In the Fast Path field, enter P73GEO.
The Retrieve GeoCode panel appears.
-
On the Retrieve GeoCode panel, enter CO in the State field and DENVER in the City field, and click Find.
The code 060310140 should appear in the grid.
-
If nothing appears in the grid, a setup or configuration problem might exist.
Verify the following to make sure setup is correct:
-
These values are set in the Work with Quantum Constants Revision table, accessed by the Constants application (P7306) on menu G731:
Quantum Active: Y

Canada Country Code: CA
Note:
Changes to the Work with Quantum Constants Revision table do not take effect until you have logged off of your system and logged back on.-
Required Release 9.1 objects are mapped to the server where the Vertex Quantum for Sales and Use Tax APIs reside.
Also ensure that correct values are assigned to the
Data Source,Server,User ID, andPasswordfields on the Database Connection panel. Instructions for both procedures are specified in this guide in the section entitled Mapping Objects to the Enterprise Server.
-
11.5 Enabling CRM Functionality
To enable CRM functionality after the upgrade is complete, you must perform these procedures on the CRM Enterprise Server and the CRM client:
11.5.1 Enabling CRM on the CRM Mobile Client
To enable CRM functionality in JD Edwards EnterpriseOne and the JD Edwards EnterpriseOne mobile client, make sure that the F99410 table has records that contain the following system codes:
-
SY90CA
-
CRMMSL
-
SY49
On your Enterprise Server, access the P99410 application and complete this procedure to enable CRM functionality:
-
On Work with EnterpriseOne System Control, click Add.
-
On EnterpriseOne System Control Revisions, enter each of these system codes, one at a time, in the Data Item field:
-
90CA
This code enables CRM functionality in JD Edwards EnterpriseOne.
-
MMSL
With SY49, this system code enables CRM functionality in the mobile client.
-
SY49
With CRMMSL, this system code enables CRM functionality in the mobile client.
-
-
Click Yes.
-
Click OK.
-
Repeat these steps to add each system code.
11.5.2 Enabling CRM on the Enterprise Server
Using an ASCII editor, you must modify the JDE.INIjde.ini on your Enterprise Server to add this section and setting:
[MAILMERGE]
FileLocation=location
where location is a temporary location that you specify for the CRM-related mail merge files that are generated on your Enterprise Server, for example:
/u01/temp
11.6 Enabling Verity Enhanced Search Capability
If you are using the enhanced search capabilty with JD Edwards EnterpriseOne, you must download and install the Verity Software from the Oracle Software Cloud Web site at this link: