6 Configuring the IBM HTTP Server
This section includes general instructions for configuring ports on an IBM i IBM HTTP Server for WebSphere 7.0 and 8.5.x, as well as setting up the correct virtual host. Complete these steps only once, then all subsequent installations of JD Edwards HTML Web Server will use the same webserver name that you created using the procedures in this section.
This section describes these tasks:
6.1 Configuring the IBM HTTP Server
To configure the new HTTP Server instance:
-
Open a browser and enter this URL to start the IBM HTTP Server Web Administration console:
http://server_name:2001/HTTPAdmin -
Click the Manage tab.
-
Select the HTTP Server you created in Creating a New HTTP Server Instance, for example HTTPSVR.
-
In the left pane, scroll down and select Tools > Edit Configuration File.
The configuration file includes a port listen command for the port number you specified when you created the HTTP Server port in Creating a New HTTP Server Instance. This port number might not be the same as the port you specified when you installed the HTML Server. For example, if you selected port 81 as the HTTP Server port, the command in the configuration file should be:
Listen *:81 -
When an instance is installed with JD Edwards EnterpriseOne Server Manager an entry is added into the
httpd.conffile to include the contents of thescf_<INSTANCE_NAME>.conffile. You can verify this by checking for the following line in thehttpd.conffile (usually at the end of the file):Include /www/HTTPSVR81/conf/scf_<INSTANCE_NAME>.confWhere <INSTANCE_NAME> is the name of the created JD Edwards HTML Web Server (HTML Server) instance (for example, EA_JS_101 and so on).
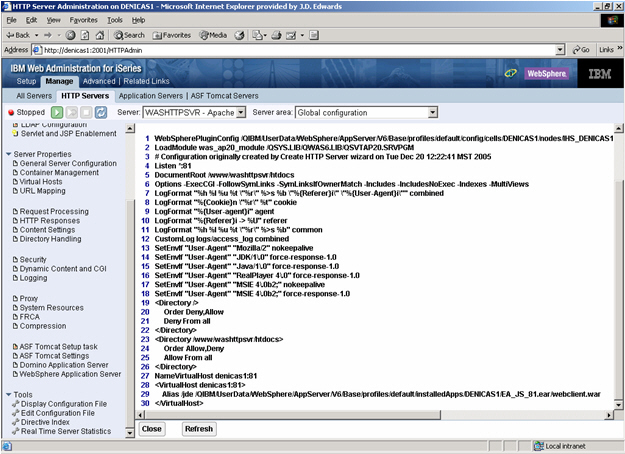
Refer to the sample screenshot below showing the include directive in the
httpd.conffile.
-
Click the Apply button.
-
Click the OK button.
-
In the Configuration file, add this directive to the end of the file:
<Directory "/QIBM/UserData/WebSphere/AppServer/V7/ND/profiles/default/
installedApps/DENPBAS2/EA_JS_202.ear/webclient.war/WEB_INF">
This directive allows access to the
webclient.wardirectory. -
To secure your configuration file, deny access to the
WEB-INFdirectory by adding following to the configuration file, after the above directive.<Directory "/QIBM/UserData/WebSphere/AppServer/V7/ND/profiles/default/ installedApps/DENPBAS2/EA_JS_202.ear/webclient.war/WEB_INF"> Order Deny,Allow Deny from All </Directory>
-
Click the Apply button.
-
Click the OK button.
Tip:
You can click on Display configuration file to look and review the contents of the configuration file. An example screen shot is shown below.Click the Close button.
-
Click the Close button.
6.2 Starting the IBM HTTP Server for the IBM i Instance
The IBM HTTP Server for IBM i runs in the QHTTPSVR subsystem, and each HTTP server instance starts multiple jobs. The WebSphere Application Server code that plugs into IBM HTTP Server for IBM i runs in the HTTP server job that communicates with the administrative server and one or more application servers.
There are two ways to start the IBM HTTP Server for IBM i instance:
6.2.1 Starting the IBM HTTP Server for IBM i Instance from the Command Line
To start the IBM HTTP Server for IBM i Instance from the command line:
-
On the IBM i command line, enter this command:
STRTCPSVR SERVER(*HTTP) HTTPSVR(MYINSTANCE)where MYINSTANCE is the name of your HTTP server instance. The syntax of this name should correspond with the recommended naming conventions specified in this guide. For example:
HTTPSVR -
If you change your HTTP server instance configuration, stop and then start your HTTP server instance.
6.2.2 Starting the IBM HTTP Server for IBM i Instance from the IBM i Configuration and Administration Forms
The Configuration and Administration forms also allow you the option of restarting your HTTP server instance. When restarting, the HTTP server will recognize all configuration changes except for changes to the Basic and Security configuration forms.
-
Start your JavaScript-enabled browser.
-
Enter this URL in the URL location or address window:
http://<server_name>:2001/HTTPAdmin
where <server_name> is the host name of your IBM i system.
-
Press Enter to navigate to the URL.
The IBM i Tasks page appears.
-
Click the link for IBM HTTP Server for IBM i.
The IBM HTTP Server for IBM i page appears.
-
Click the Manage tab.
The Manage page appears.
-
In the right pane, click Manage All Servers.
-
Click the radio button to the left of the server you created.
-
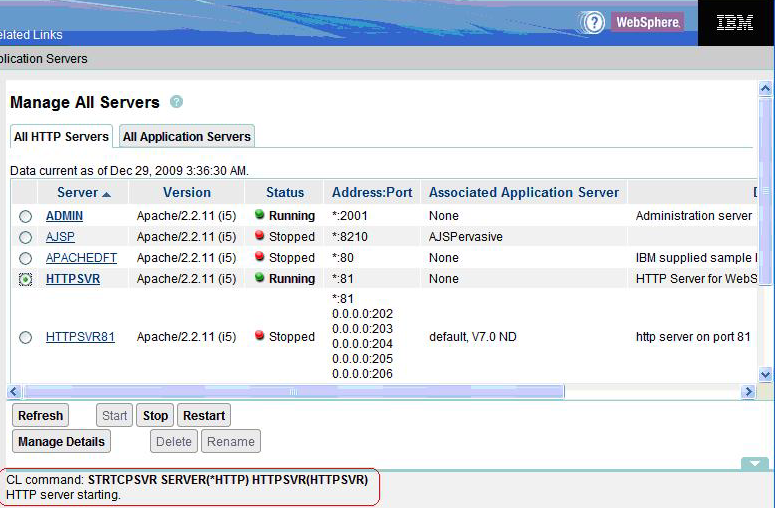
Click the Start button.
This message appears in the Message box at the bottom of the screen:
HTTP server starting.A sample screen shot is provided below.
6.3 Testing the WebSphere Application Server
You can test WebSphere by accessing a default application, but a default application requires that Port 80 be configured with WebSphere. You can configure Port 80 with WebSphere using the previous tasks in this chapter.
To test the WebSphere Application Server:
-
Ensure that the IBM HTTP Server is started (as explained in the above section: Starting the IBM HTTP Server for the IBM i Instance).
-
If it is not already started, start WebSphere default server (server1) using the instructions in the chapter: Starting WebSphere.
-
Access the default snoop servlet using this URL:
http://MachineName/snoop
where MachineName is the name of the server where you installed the HTTP Server.
Tip:
If your Web Server is not on the same machine as WebSphere, you might need to copy the plug-in configuration file from the WebSphere machine to the Web Server machine.
6.4 Stopping the IBM HTTP Server for the IBM i Instance
If you change your HTTP server instance configuration, stop and then start your HTTP server instance.
There are two ways to stop the IBM HTTP Server for the IBM i instance:
6.4.1 Stopping the IBM HTTP Server for IBM i Instance from the Command Line
To stop the IBM HTTP Server for IBM i instance from the command line:
-
Enter this command on the IBM i command line:
ENDTCPSVR SERVER(*HTTP) HTTPSVR(MYINSTANCE)where MYINSTANCE is the of name your HTTP server instance.
6.4.2 Stopping the IBM HTTP Server for IBM i Instance from the IBM i Configuration and Administration Forms
To stop the IBM HTTP Server for IBM i instance from the IBM i configuration and administration forms:
-
Start your JavaScript-enabled browser.
-
Enter this command in the URL location or address window:
http://<server_name>:2001/HTTPAdmin
where <server_name> is the host name of your IBM i system.
-
Press the Enter button.
You are prompted for an IBM i user ID and password; your IBM i user ID must have *ALLOBJ authority.
The IBM i Tasks page appears.
-
Click IBM HTTP Server for IBM i.
The IBM HTTP Server for IBM i page appears.
-
In the top pane, click Administration.
The Administration page appears.
-
Click Manage HTTP Servers in the left-hand frame.
-
Click the radio button to the left of the server you created.
-
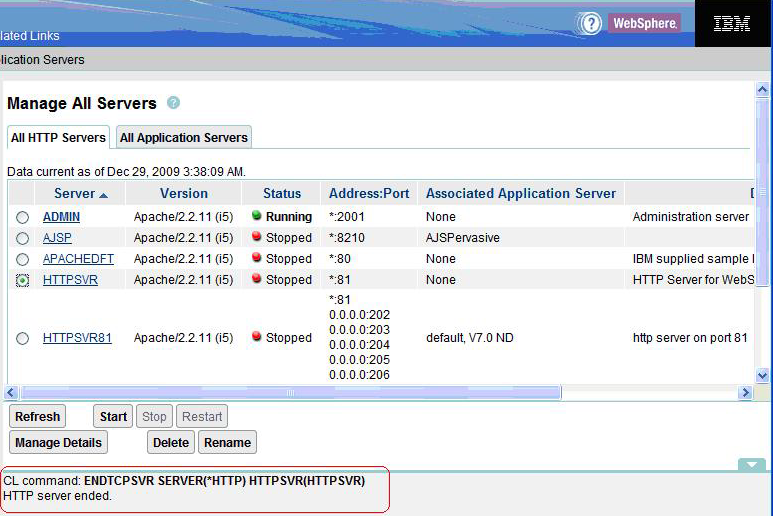
Click the Stop button.
This message appears in the Message box at the bottom of the screen:
HTTP server ended.A sample screen shot is shown below.