2 Configuring Oracle WebLogic Server for an EnterpriseOne Mobile Applications Deployment
This chapter contains the following topics:
-
Section 2.2, "Extending the WebLogic Server Domain For ADF Runtime"
-
Section 2.3, "Creating and Deploying the EnterpriseOne Shared Library on WebLogic Server"
-
Section 2.5, "Configuring Shared Library on WebLogic Server"
2.1 Installing ADF Runtime
An EnterpriseOne mobile applications deployment requires installing ADF runtime on Oracle WebLogic Server. If you have not downloaded ADF runtime, see ADF Runtime in this guide.
Important:
Before installing ADF runtime, create a new domain on Oracle WebLogic Server. See "Creating a WebLogic Domain" in the Oracle Fusion Middleware Installation Guide for Oracle WebLogic Server for more information.If you are deploying 9.1.2 mobile applications, you cannot deploy them in a pre-9.1.2 mobile applications configuration. You must create a new domain for deploying the 9.1.2 mobile applications. See What's New in JD Edwards EnterpriseOne 9.1.2 Mobile Applications before continuing.
To install ADF runtime:
-
Launch the installation wizard for ADF runtime:
On Windows, double-click the Oracle Application Developer setup.exe file. If prompted, enter credentials to run the wizard as an administrator.
On UNIX, run the following commands:
export DISPLAY=IPAddress:0
./runInstaller-jreLocJRELocation
This launches the Oracle Fusion Middleware 11g Application Developer Installer.
-
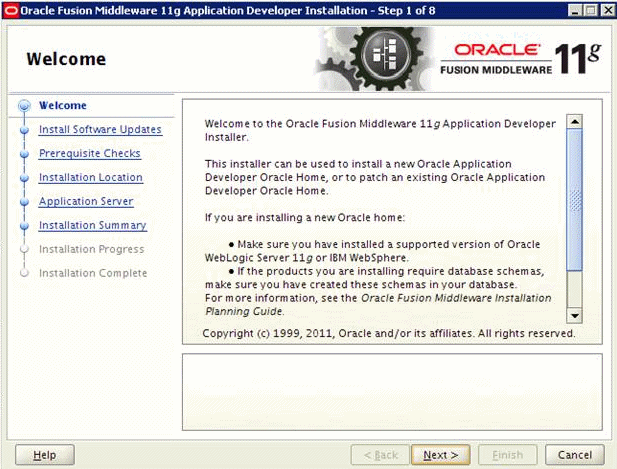
On the Welcome page, click Next.
-
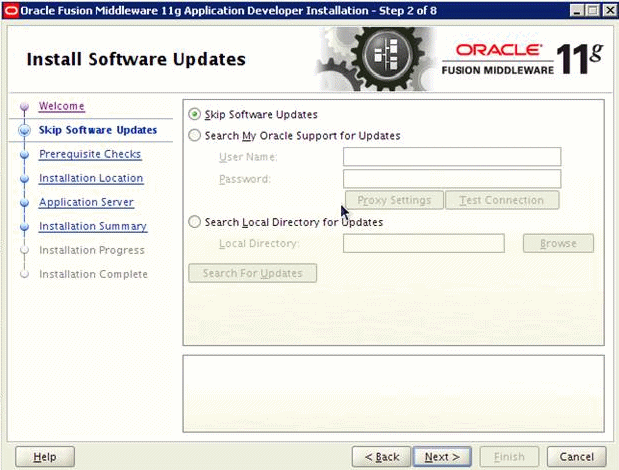
On Install Software Updates, select the "Skip Software Updates" option, and then click Next.
-
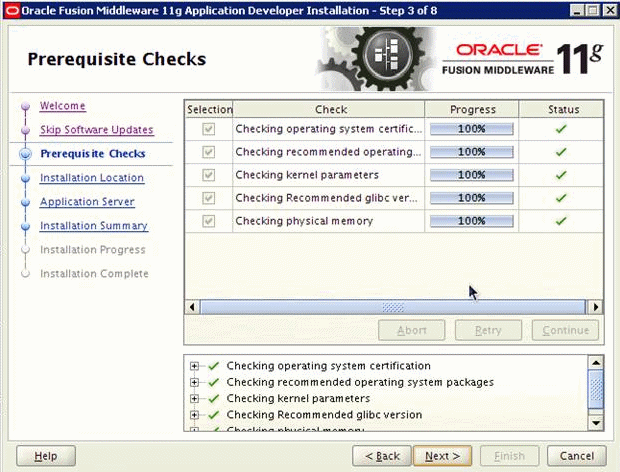
On Prerequisite Checks, click Next.
-
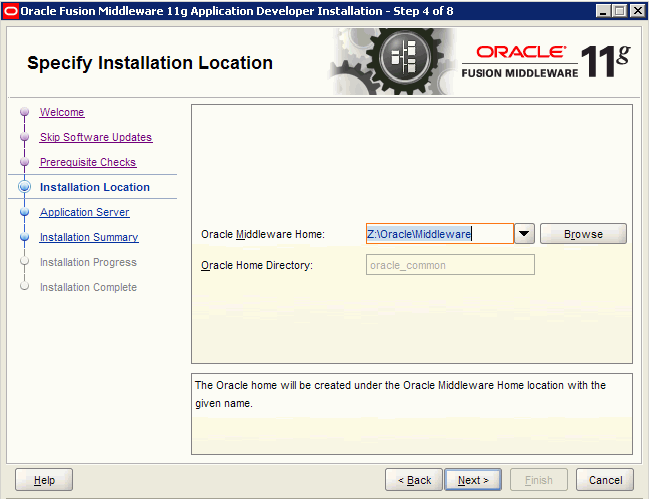
On Specify Installation Location, in the Oracle Middleware Home field, enter your Middleware Home location where Oracle WebLogic Server is installed.
For Windows:
<drive>:\oracle\MiddlewareFor UNIX:
/home/oracle/Oracle/Middleware -
Click Next.
-
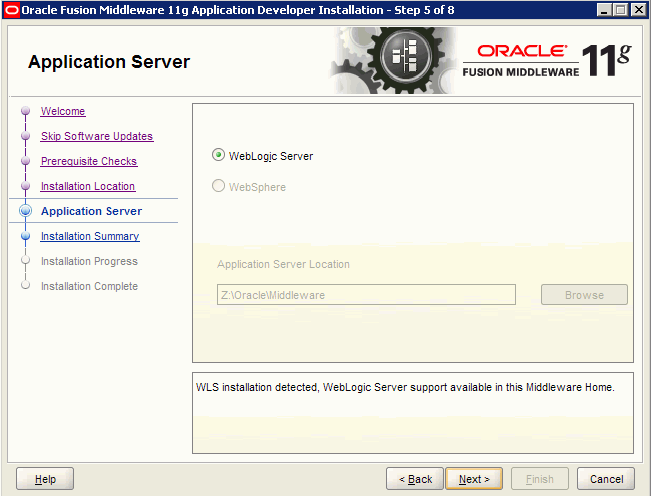
On Application Server, accept the defaults and click Next.
-
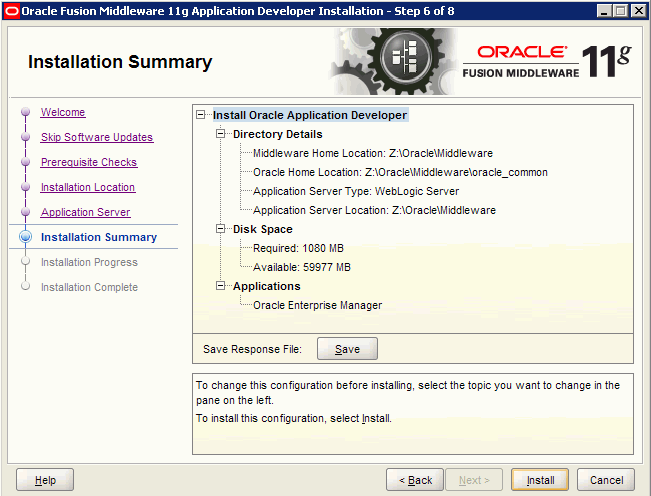
On Installation Summary, review your installation details and then click the Install button.
If you need to make a correction, click the Back button and modify your details.
-
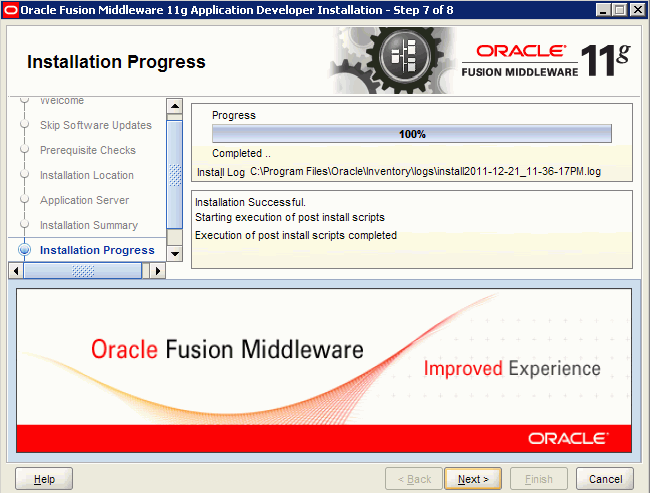
On Installation Progress, after the installation progress reaches 100%, click the Next button.
-
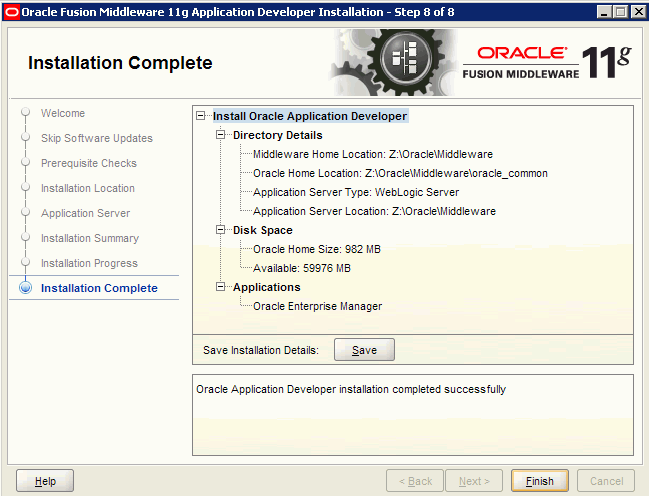
On Installation Complete, click Finish.
2.2 Extending the WebLogic Server Domain For ADF Runtime
After you create a new domain and install ADF runtime on WebLogic Server (as described in the previous section), extend the new domain to make ADF runtime available to other applications on that domain.
Caution:
If the Business Services Server is deployed on the same WebLogic Server, you do NOT need to extend the new domain to the Business Services Server.If the Business Services Server is deployed on a different machine than WebLogic Server with ADF runtime, you must configure WebLogic Server to accept certificates coming from the Business Services Server. See Configuring Web Service Requests Between a WebLogic Server and a Business Services Server Deployed on Separate Machines for more information.
In releases prior to EnterpriseOne mobile applications release 9.1.2, only JAX-RPC based business services are supported by mobile applications; JAX-WS based business services are not supported. Therefore, the Business Services Server in the mobile applications environment must contain a package built with JAX-RPC based business services.
Starting with release 9.1.2 of the mobile applications, JAX-WS based business services are supported with a minimum EnterpriseOne Tools release 9.1.2.4.
This is a one-time task for the domain; you do not need to perform this task again if you install additional mobile applications on the same domain.
-
Use the following command to launch Quickstart:
On Windows:
<Oracle Middleware>/utils/quickstart/quickstart.cmdOn UNIX:
<Oracle Middleware>/utils/quickstart/quickstart.sh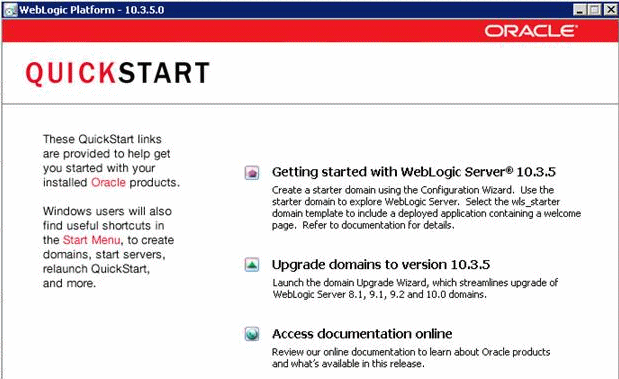
-
On the QuickStart page, click the "Getting Started with WebLogic Server 10.3.5" option to extend the existing Oracle WebLogic domain.
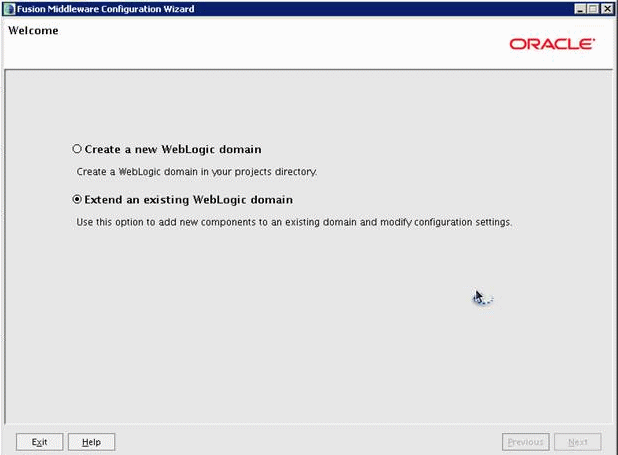
The Fusion Middleware Configuration Wizard - Welcome page appears.
-
On the Welcome page, select the "Extend an existing WebLogic domain" option, and then click Next.
-
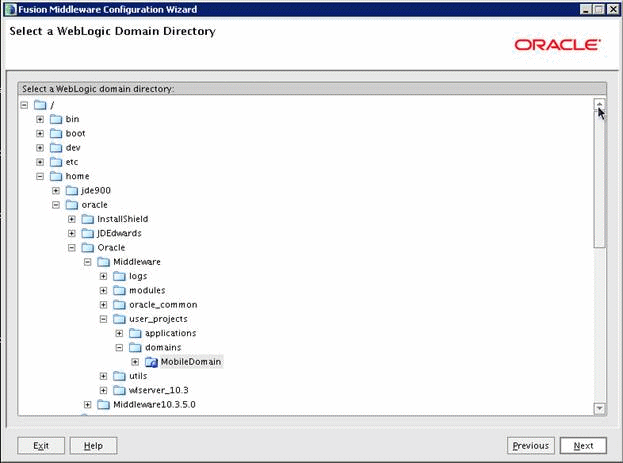
On Select a WebLogic domain directory, navigate to the directory of the newly created domain that you created for the mobile applications deployment.
-
Click Next.

-
On Select Extension Source, select the "Extend my domain automatically to support the following added products" option, and then select the following products:
-
Oracle Enterprise Manager - 11.1.1.0 [oracle_common]
-
Oracle JRF - 11.1.1.0 [oracle_common]
-
-
Click Next.
-
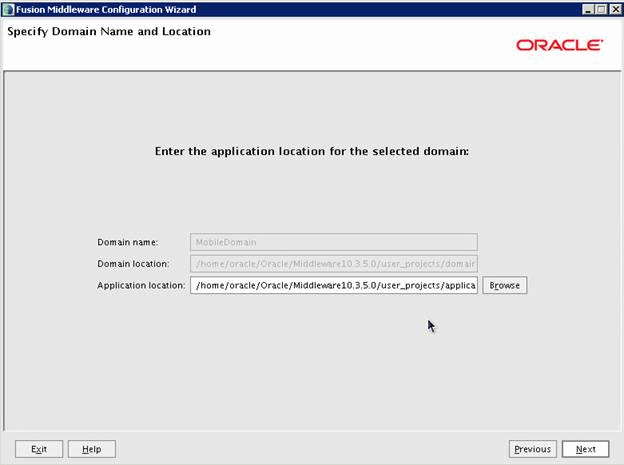
On Specify Domain Name and Location, click Next.
-
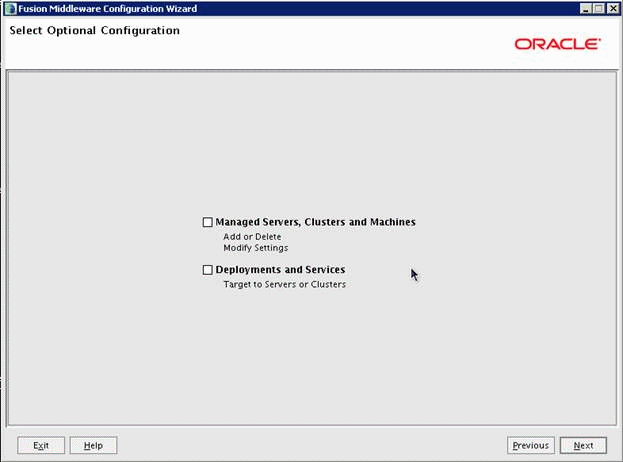
On Select Optional Configuration, no action is required. Click Next.
-
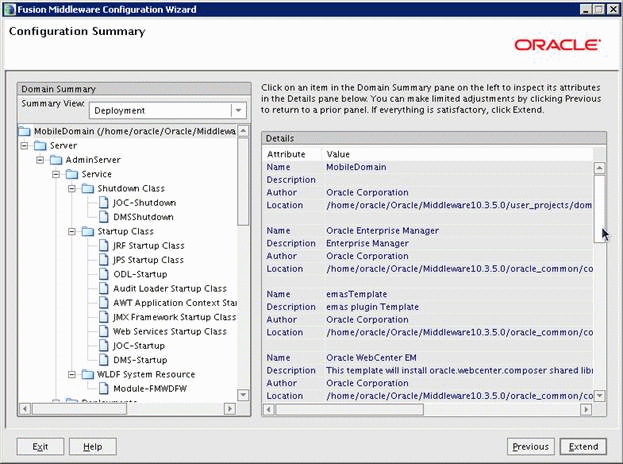
On Configuration Summary, review your configuration details, and then click the Extend button.

-
On Extending Domain, after the progress reaches 100%, click Done.
-
Update the NodeManager.properties file:
-
In a text editor, open the NodeManager.properties file from the following directory:
<wls_home>/wlserver_10.3/common/nodemanager/nodemanager.properties -
Set the StartScriptEnabled parameter to true:
StartScriptEnabled=true -
Save and close the file.
-
Restart nodemanager.
-
-
Start the Administration Server for the WebLogic Server domain by selecting Oracle WebLogic, User Projects, mobile_domain, Start Admin Server for WebLogic Server Domain.
2.3 Creating and Deploying the EnterpriseOne Shared Library on WebLogic Server
The JD Edwards EnterpriseOne Mobile Foundation download contains a shared library with Trinidad and ADF jar files that are required to run EnterpriseOne mobile applications. Follow the steps in this section to deploy the shared library to the newly created domain for the mobile applications deployment.
Important:
If you are deploying 9.1.2 mobile applications, you must use the updated EnterpriseOne Mobile Foundation. It contains an updated Shared Library with an additional jar file to support the EnterpriseOne Mobile Menu application. See Prerequisites - Mobile Application Downloads (Release 9.1.2 Update) in this guide for more information.-
Open the Build.properties file and update the following attributes for your environment.
-
hostEnter the WebLogic Server host name or IP address of the machine where the WebLogic domain is extended for ADF runtime. This is the domain for hosting the mobile applications.
-
portEnter the port number of the port on which the Administration Console is running.
-
-
To run the script that deploys the shared library, open a command prompt and access the directory that contains the shared library script.
-
Enter the following command to configure the WLS_HOME parameter to point to the
middleware\wlserver_10.3\serverdirectory:set WLS_HOME=<drive>:\Oracle\Middleware\wlserver_10.3\server -
Enter the following command to configure the DOMAIN_NAME parameter to point to the domain to which the shared library will be deployed:
set DOMAIN_NAME=<mobile_domain>Note:
Make sure that the domain that you specify is the same domain that you extended in Section 2.2, "Extending the WebLogic Server Domain For ADF Runtime." This is the domain to which you will deploy EnterpriseOne mobile applications. -
Run JDECreateSharedLib.cmd and JDECreateSharedLib.sh on Windows and UNIX platforms respectively.
-
Use the following command to deploy the shared library:
JDECreateSharedLib.cmd -Dmode=D -
If you need to remove the shared library, use the following command:
JDECreateSharedLib.cmd -Dmode=U
-
-
At the prompt, enter the user ID and password for the WebLogic Admin server, and then press Enter.
-
Wait for the Build Successful message to appear.
To confirm that shared library built successfully, log in to the Admin Console and confirm that it is listed on the Deployments page.
2.4 Configuring the Authentication Provider
Important:
Before completing the tasks in this section, you must:-
Make sure that you have downloaded the JD Edwards EnterpriseOne Mobile Foundation, which contains the JDEADFMobileAuthenticationProvider.jar and JDEADFMobileLoginModule.jar files.
-
Install the ESU for the Authentication Business Service before configuring the jar files.
See EnterpriseOne Mobile Foundation in this guide for more information.
This section contains the following topics:
-
Section 2.4.1, "Creating a Managed Server for an EnterpriseOne Mobile Applications Deployment"
-
Section 2.4.2, "Deploying the JDEADFMobileAuthenticationProvider.jar"
-
Section 2.4.3, "Adding the Authentication Provider to the Security Realm"
-
Section 2.4.4, "Configuring and Deploying the JDEADFMobileLoginModule.jar"
2.4.1 Creating a Managed Server for an EnterpriseOne Mobile Applications Deployment
Create a new managed server in the WebLogic Server domain to host the EnterpriseOne mobile applications. After you create the managed server, map the machine within the managed server configuration so that Node Manager can start and stop the managed server.
When you perform the steps in the following sections, you will use this server for the configuration and deployment of the EnterpriseOne mobile components.
To create a managed server:
-
In the Admin Console, click the Environment link, and then Servers.
-
Click the Lock & Edit button.
-
In the Servers area, click the New button.
-
On Create a New Server, complete these fields:
-
Server Name: Enter a unique name.
-
Server Listener Port: Enter a unique port number.
-
-
Click the Next button, and then click Finish.
-
Click the Activate Changes button.
-
To start the server, click the link of the new managed server.
2.4.2 Deploying the JDEADFMobileAuthenticationProvider.jar
Deploying the JDEADFMobileAuthenticationProvider.jar is a one-time task that you perform on the newly created domain for the mobile applications deployment. You do not need to be perform this task again if you install additional mobile applications on the same domain.
Deploy the JDEADFMobileAuthenticationProvider.jar on the same server as ADF runtime and EnterpriseOne mobile applications.
To deploy the JDEADFMobileAuthenticationProvider.jar:
-
Copy JDEADFMobileAuthenticationProvider.jar to the following location:
For UNIX:
/u01/Oracle/Middleware/wlserver_10.3/server/lib/mbeantypesFor Windows:
X:\Oracle\Middleware\wlserver_10.3\server\lib\mbeantypes -
Restart the WebLogic Administration Server and all servers.
2.4.3 Adding the Authentication Provider to the Security Realm
This is a one-time task for the domain; you do not need to perform this task again if you install additional mobile applications on the same domain.
To add the Authentication Provider to the Security Realm:
-
Log in to the Oracle WebLogic Server Administration Console.
-
On the Administration Console, select Security Realms, myrealm, and then select the Providers tab.
-
Click the New button.
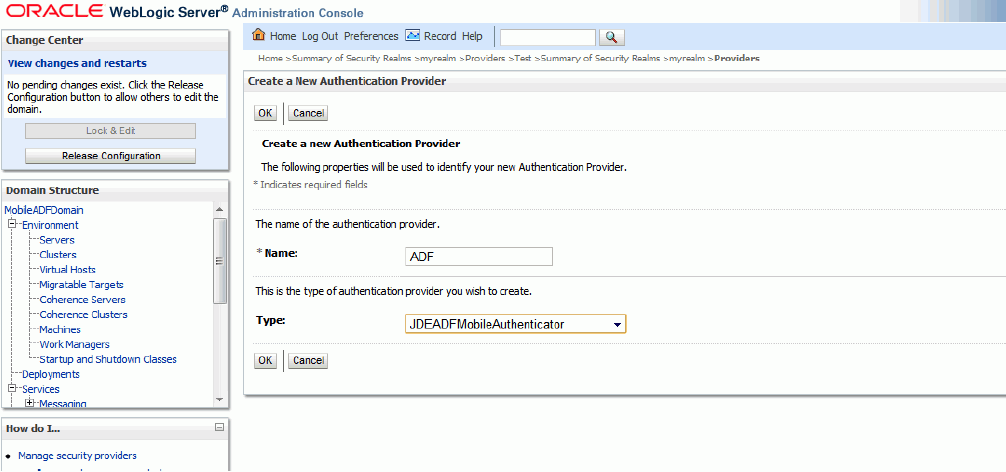
-
In the Name field, enter a name for the Authentication Provider.
-
From the Type drop-down menu, select JDEADFMobileAuthenticator.
-
Click OK to add it.
-
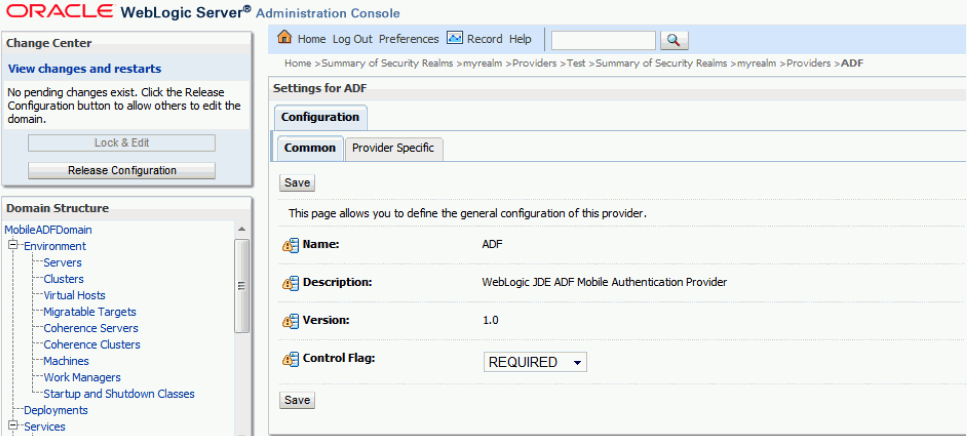
Select the newly added Authentication Provider, and change the Control Flag to REQUIRED.
-
Click the Save button and then return to the Providers tab by clicking Security Realms, myrealm, and then the Providers tab.
-
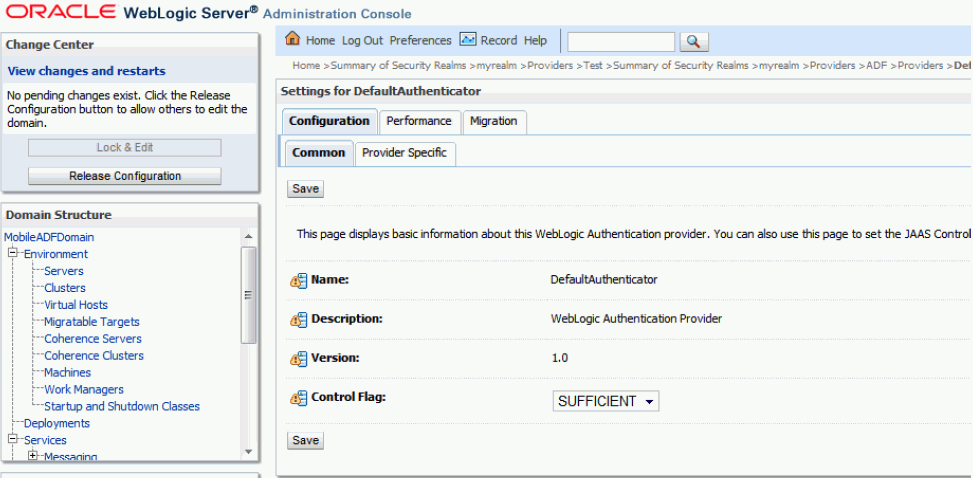
Click the DefaultAuthenticator.
-
Select SUFFICIENT from the Control Flag drop-down menu.
-
Click Save.
-
Click the Activate Changes button.
-
Restart the WebLogic Administration Server and all servers.
Note:
You must restart the servers for the changes to take affect.
2.4.4 Configuring and Deploying the JDEADFMobileLoginModule.jar
The JDEADFMobileLoginModule.jar contains parameters for configuring the login options available to mobile application users. You can determine whether the login screen:
-
Displays the Role and Environment fields so that users have to manually enter a role and environment.
or
-
Hides the Role and Environment fields so that users have to use a preset role and environment.
To configure and deploy the login module:
-
Copy JDEADFMobileLoginModule.jar to a folder on Oracle WebLogic Server.
-
On the Server Start tab of the new managed server, which you created as directed in Section 2.4.1, enter the path to the JDEADFMobileLoginModule.jar file in the Class Path field.
-
In the Arguments field, add the following parameters: (See step 4 for parameters for an EnterpriseOne 9.1.2 mobile applications deployment; see step 5 for an additional parameter for EnterpriseOne Tools Release 9.1 Update 4.)
Parameter Value Description DBSSVSERVER_URL Enter the URL of the Business Services Server used for authentication. DBSSVSERVER_TYPE Enter WLS for WebLogic Server or WAS for WebSphere Application Server. DDEFAULT_ENV Use this parameter only if DDISPLAY_ENV_ROLE is set to false. Enter the name of the EnterpriseOne environment. The environment that you enter will appear by default in the login screen for the mobile applications.
DDEFAULT_ROLE Use only if DDISPLAY_ENV_ROLE is set to false. Enter the role to be used for sign-in. The role that you enter will appear by default in the login screen for the mobile applications.
DDISPLAY_ENV_ROLE Valid values are: -
true
Displays the Role and Environment fields on the login screen so users can manually enter a role and environment for sign-in.
-
false
Hides the Role and Environment fields on the login screen. If you set this parameter to false, then you must add the DDEFAULT_ENV and DDEFAULT_ROLE parameters to the Arguments field.
The following is an example of the Arguments field completed for WebLogic Server:
-DBSSVSERVER_URL=https://servername:port/STAGINGA/AuthenticationManager -DBSSVSERVER_TYPE=WLS -DDEFAULT_ENV=STGAWSC1 -DDEFAULT_ROLE=*ALL -DDISPLAY_ENV_ROLE=true
-
-
For EnterpriseOne 9.1.2 and 9.0.2 mobile applications, enter the following parameters in the Arguments field, which include additional parameters for the EnterpriseOne Mobile Menu application and JAX-WS support:
Parameter Value Description DBSSVSERVER_URL Enter the URL of the Business Services Server used for authentication, for example: https://<BSSV_Server_Name>:<BSSV_Server_Port>/<URI_To_AuthenticationManager_Business_Service>DBSSVSERVER_TYPE Enter WLS for WebLogic Server or WAS for WebSphere Application Server. DBSSVDEPLOY_TYPE Valid values are: -
RPC
Enter this value if the Business Services Server has a JAX-RPC based business services package.
-
WS
Enter this value if the Business Services Server has a JAX-WS based business services package.
DDEFAULT_ENV Use this parameter only if DDISPLAY_ENV_ROLE is set to false. Enter the name of the EnterpriseOne environment. The environment that you enter will appear by default in the login screen for the mobile applications.
DDEFAULT_ROLE Use only if DDISPLAY_ENV_ROLE is set to false. Enter the role to be used for sign-in. The role that you enter will appear by default in the login screen for the mobile applications.
DDISPLAY_ENV_ROLE Valid values are: -
true
Displays the Role and Environment fields on the login screen so users can manually enter a role and environment for sign-in.
-
false
Hides the Role and Environment fields on the login screen. If you set this parameter to false, then you must add the DDEFAULT_ENV and DDEFAULT_ROLE parameters to the Arguments field.
DDEPLOYED_APPS Enter the names of the mobile applications that you are deploying in the order that you want them to appear in the EnterpriseOne Mobile Menu application. See "Using the Mobile Menu" in the JD Edwards EnterpriseOne Applications Functionality for Mobile Devices Implementation Guide for more information. For multiple applications, separate values by commas. Valid values are:
MobileSales, RequisitionSelfServiceApproval, ExpenseManagement, PurchaseOrderApproval, ServiceTimeEntry
DUPLOAD_PATH The file folder location on the ADF server's file system for temporarily storing uploaded images (for Mobile Expense Management) before they are uploaded to EnterpriseOne media object storage. For example, the folder location could be: C:\temp\uploads\or
\u01\temp\uploadsThe ADF server runtime must have read / write access to this folder.
The following is an example of the Arguments field completed for WebLogic Server:
-DBSSVSERVER_URL=https://<server>:<port>/STABLEA/AuthenticationManager -DUPLOAD_PATH=/slot/u01/appmgr/wls1035/Middleware/user_projects/domains/E1_Apps/tmp -DBSSVSERVER_TYPE=WLS -DBSSVDEPLOY_TYPE=WS -DDEFAULT_ENV=STBAWSC1 -DDEFAULT_ROLE=*ALL -DDISPLAY_ENV_ROLE=FALSE -DDEPLOYED_APPS=ExpenseManagement,MobileSales,RequisitionSelfServiceApproval,PurchaseOrderApproval, ServiceTimeEntry
-
-
If your configuration meets the following conditions, perform the steps that follow as appropriate:
-
The Business Services Server is on Oracle WebLogic Server 12.1.2, which is supported beginning with EnterpriseOne Tools release 9.1 Update 4.
-
The Mobile Application Server (ADF Server) is on Oracle WebLogic Server 10.3.5.
-
If a JAX-RPC business services package is deployed on the Business Services Server, append the following text in the Arguments field:
-Dweblogic.wsee.workarea.skipWorkAreaHeader=true -
If you are using SSL with the Business Services Server, click the SSL tab, and then select the "Use JSSE SSL" check box in the Advanced section.
-
-
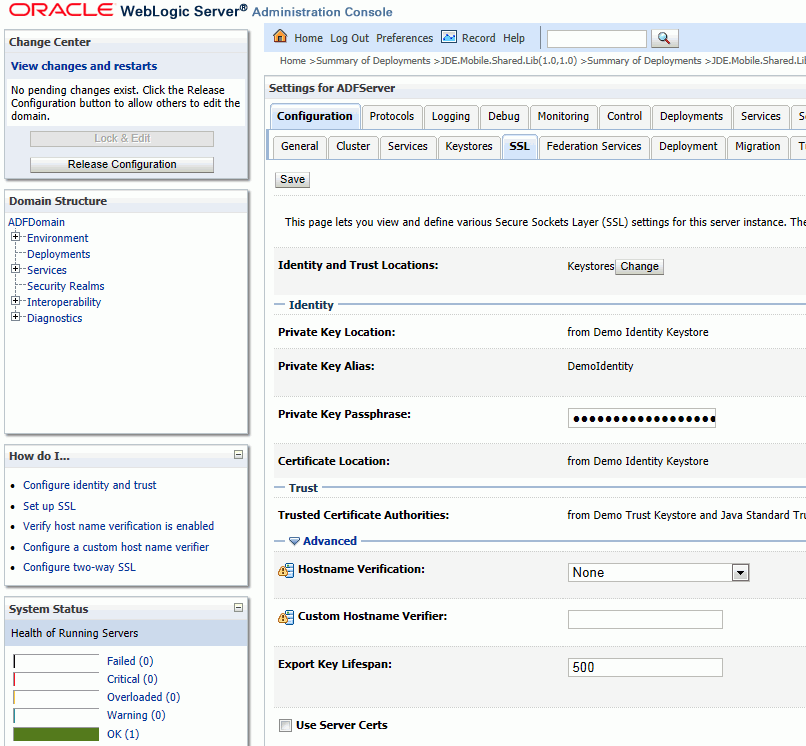
Select the new managed server, which you created as directed in Section 2.4.1, and then on the Configuration tab, select the SSL tab.
-
On the SSL tab, select Advanced.
-
In the Advanced section, select None from the Hostname Verification drop-down menu.
-
Click Save.
-
Click Activate Changes.
-
Restart the managed server.
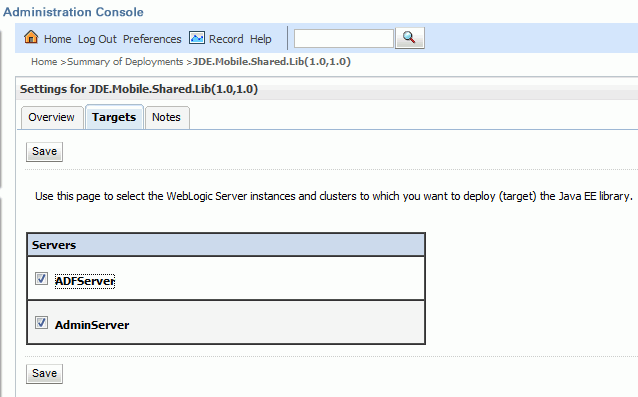
2.5 Configuring Shared Library on WebLogic Server
Configuring the shared library includes specifying the shared library and identifying the server on which the mobile applications will be deployed.
-
Log in to the WebLogic Server Administration Console: http://hostname:port/console
-
Click the Lock & Edit button.
-
In the Domain Structure area on the left side of the screen, click Deployments, and then select JDE.Mobile.Shared.Lib(1.0,1.0).
-
Click the Targets tab.
-
On the Targets tab, click the check box next to the server on which the mobile applications will be deployed.
-
Click the Save button.
-
Click the Activate Changes button.
-
Restart the managed server.
2.6 Configuring Web Service Requests Between a WebLogic Server and a Business Services Server Deployed on Separate Machines
If the Business Services Server is deployed on a different machine than WebLogic Server with ADF runtime (ADF Server), you must configure the ADF Server to accept certificates coming from the Business Services Server. This enables web service requests from the ADF Server to pass through to the Business Services Server.
Important:
In releases prior to EnterpriseOne mobile applications release 9.1.2, only JAX-RPC based business services are supported by mobile applications; JAX-WS based business services are not supported. Therefore, the Business Services Server in the mobile applications environment must contain a package built with JAX-RPC based business services.
Starting with release 9.1.2 of the mobile applications, JAX-WS based business services are supported with a minimum EnterpriseOne Tools release 9.1.2.4.
You must add the Self Signed Certificate issued by the Business Services Server into the keystore of the ADF Server instance, which involves importing the certificate into the ADF Server's DemoIdentity.jks and DemoTrust.jks files.
If the ADF Server is using a custom keystore and truststore, the certificate of the Business Services Server must be imported into the custom keystore and truststore.
The following steps describe how to add the Self Signed Certificate to the ADF Server when using a default keystore and truststore. These steps pertain to Microsoft Internet Explorer, but you can use any browser to add the certificate.
-
Create a back up of the following files located in the
\\Oracle\Middleware\wlserver_10.3\server\lib\directory:-
DemoTrust.jks
-
DemoIdentity.jks
-
-
To install and export the certificate:
-
Open Internet Explorer and enter this URL:
https://BSSVSERVER:PORT/DV900/AuthenticationManager -
Click the ”Continue to this webbiest (not recommended)” link.
The following message appears:
Welcome to the {tap://oracle.e1.bssv.JPH90I01/}AuthenticationManager home pageTest pageWSDL pageIn the address bar, the Certificate Error button appears next to the Refresh button.
-
Click the Certificate Error button and select View Certificate.
-
Click the Install Certificate button.
-
Continue through the wizard until you receive the ”Import was successful” message, and then click Ok.
-
In Internet Explorer, select the Tools menu, Internet Options, Content tab, and then the Certificates button.
-
Click the Intermediate Certification Authorities or Other People tab and look for the Business Services Server machine name in the ”Issue To” column.
-
Click the Export button.
-
Select the ”DER encoded binary X.509 (.CER)” option.
-
Browse to the location you want to export this file and enter this name for the file:
myCertificate.cer
-
-
Enter the following commands to import the myCertificate.cer file created in the preceding step into the DemoIdentity.jks file:
D:\jrockit-jdk1.6.0_24-R28.1.3-4.0.1\bin\keytool.exe -import -keystoreC:\Oracle\Middleware\wlserver_10.3\server\lib\DemoIdentity.jks -alias myCertificate -file C:\myCertificate.cerNote:
The passphrase for the Demo Identity keystore is DemoIdentityKeyStorePassPhrase; if using a custom keystore, the passphrase could be different. -
Enter the following commands to import the myCertificate.cer file created in the preceding step into the DemoTrust.jks file:
D:\jrockit-jdk1.6.0_24-R28.1.3-4.0.1\bin\keytool.exe -import -keystoreC:\Oracle\Middleware\wlserver_10.3\server\lib\DemoTrust.jks -alias myCertificate -file C:\myCertificate.cerNote:
The passphrase for the Demo Identity keystore is DemoTrustKeyStorePassPhrase; if using a custom truststore, the passphrase could be different.After the import operations succeeds, the "Certificate was added to keystore" message is displayed.
-
For the changes to take affect, restart the managed servers and the Admin Server.