C Installing an OVM Database to a Non-Virtualized Database using OUI in GUI Mode
This appendix describes using the Oracle Universal Installer (OUI) for the Platform Pack in GUI mode to install the JD Edwards EnterpriseOne Database Server components on a non-virtualized database server.
Note:
If your non-virtualized database is an Oracle Exadata or ODA machine, you cannot use the OUI in GUI mode. Instead you must install in silent mode as described in the chapter of this guide entitled: Chapter 6, "Working with the Platform Pack in Silent Mode for a Non-Virtualized Database Server".This method assumes you are not installing the VM template for the JD Edwards EnterpriseOne database server, and that the installation of these components on a non-virtualized database server will be used with the Oracle VM templates for JD Edwards EnterpriseOne that utilizes the complementary components described in this guide.
This appendix discusses these topics:
-
Section C.1, "Understanding the Platform Pack in GUI Mode for RAC Database Servers"
-
Section C.2, "Working with the Platform Pack Installer for a Non-Virtualized Database Server"
C.1 Understanding the Platform Pack in GUI Mode for RAC Database Servers
If you are using Oracle Real Application Clusters (RAC) to drive your database, you must set an environment variable ORACLE_SID to the instance on the database machines using this procedure:
-
Determine the name of the instance on the database machines by running this command:
srvctl status database -d ovsorclNote:
When setting up the JD Edwards EnterpriseOne Database Server components on non-virtualized database servers that are to be used with JD Edwards EnterpriseOne Oracle VM templates, the connect string must match across all instances of the templates. The standard value is ovsorcl. If you change this value, you must make the corresponding change when instantiating database connectivity for every OVM template using the JD Edwards OVM Tools described in the section of this document entitled: Section 4.4, "Working with JD Edwards OVM Tools (config.sh Configuration Script)". -
Find your server name on the output of the status command and use that instance name. For example ovsorcl1.
-
Set the environment variable to this instance name. For example:
export ORACLE_SID=ovsorcl1Caution:
Failure to do this will cause the load scripts to fail.
C.2 Working with the Platform Pack Installer for a Non-Virtualized Database Server
This section discusses:
-
Section C.2.1, "Working with the zip File for the Platform Pack Installer"
-
Section C.2.2, "Running the Platform Pack Installer for Non-Virtualized Database Servers"
-
Section C.2.4, "Deinstalling the Platform Pack for Non-Virtualized Database Servers"
C.2.1 Working with the zip File for the Platform Pack Installer
The zip file for the Platform Pack Installer for a non-virtualized database server is included in the Media Pack for JD Edwards EnterpriseOne VM Templates, which is available from the Oracle Software Delivery Cloud:
https://edelivery.oracle.com/
You should unzip the Platform Pack installer on your non-virtualized database server. Then run give ownership to your Oracle account. For example:
chmod -R 775 Exadata
chown -R oracle:oinstall Exadata
C.2.2 Running the Platform Pack Installer for Non-Virtualized Database Servers
To run the Platform Pack installer for non-virtualized database servers in GUI mode (not available for Exadata or ODA):
-
Change directory to the
Exadata/installfolder. -
Run the install using this command
./runInstaller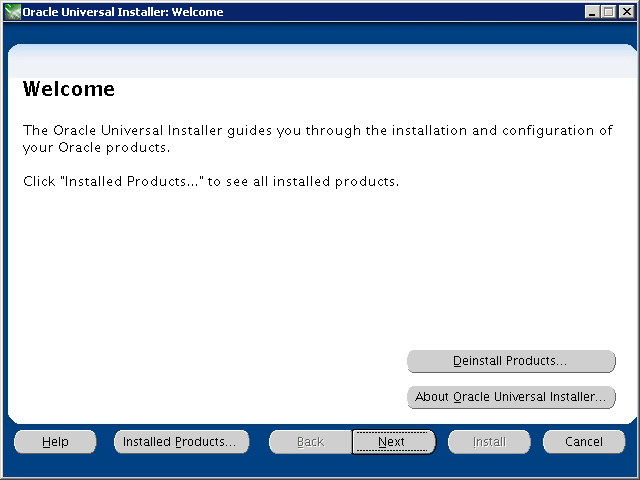
-
On Welcome, click the Next button.
-
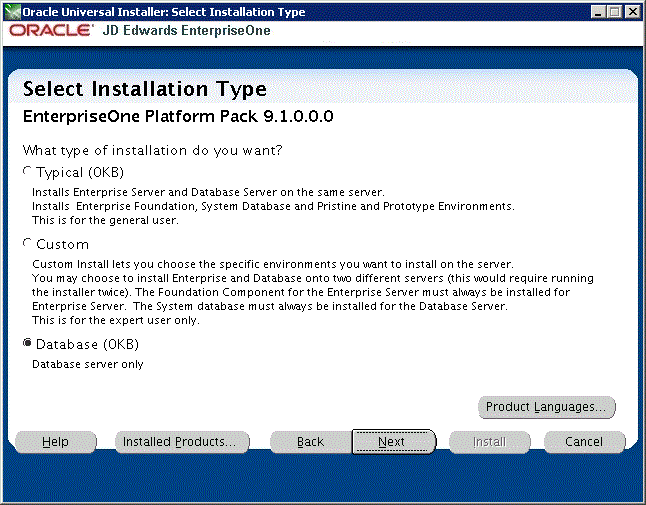
On Select Installation Type, click this radio button:
Database
This selection installs the components that match the OVM Enterprise Server template.
-
Click the Next button.
-
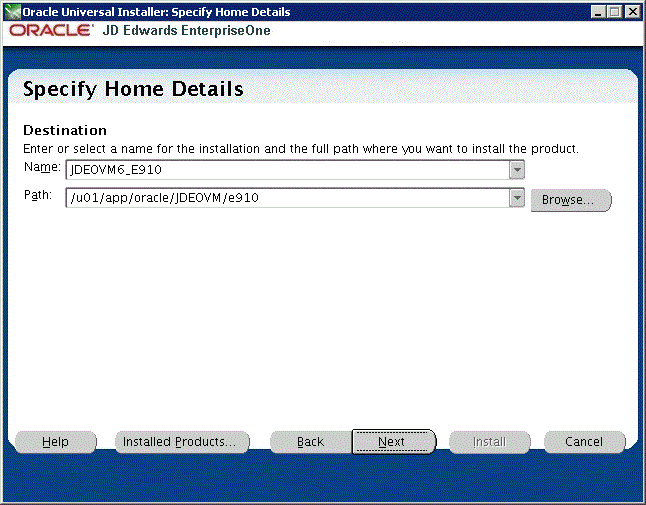
On Specify Home Details, complete these fields:
-
Name
Enter a name for this installation. For example:
JDEOVM6_910 -
Path
Enter the location where you want the installer to place the database dump files and scripts. For example:
/u01/app/oracle/JDEOVM/e910
-
-
Click the Next button.
-
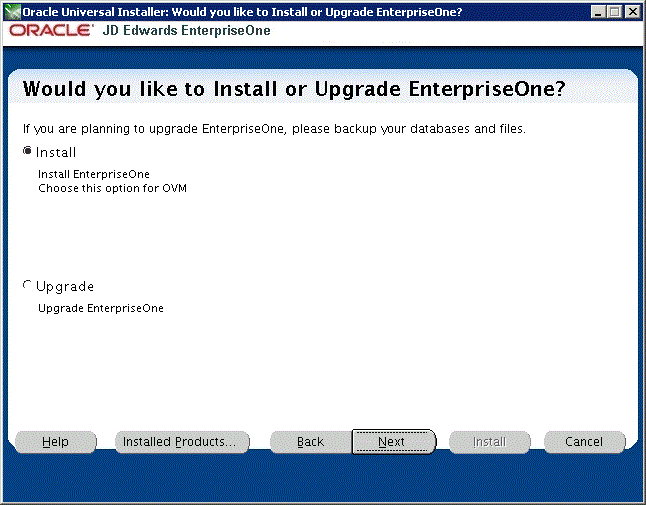
On Would you like to Install or Upgrade EnterpriseOne?, click the first radio button that is entitled:
Install
Install EnterpriseOne
Choose this option for OVM
Caution:
You must choose Install otherwise the Business Data and Control Tables will not get loaded. -
Click the Next button.
-
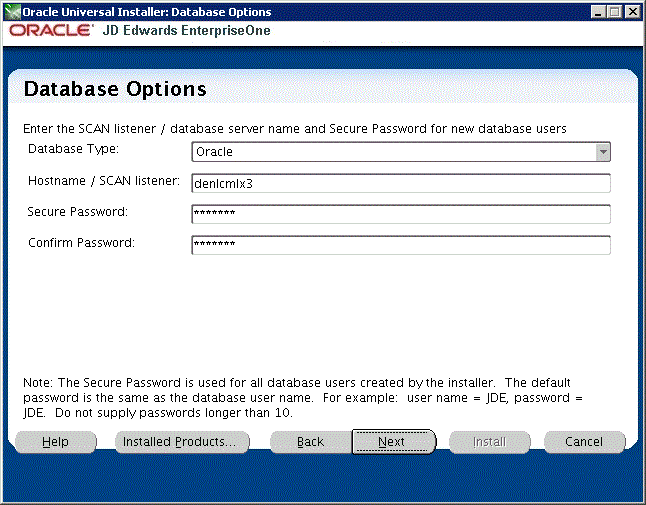
On Database Options, complete these fields:
-
Database Type
You can accept the default value, which is Oracle.
-
Hostname / SCAN listener
Enter the unqualified hostname or Single Client Access Name (SCAN) for the database server. For example, denlcmlx3.
-
Secure Password
For use with Oracle VM Templates, you must accept the DEFAULT value for this field.
Note:
The Secure Password is used for all database users created by the installer. The default password is the same as the database user name. For example, user name = JDE, password = JDE. The value for the password cannot be longer than 10 characters.
-
-
Click the Next button.
-
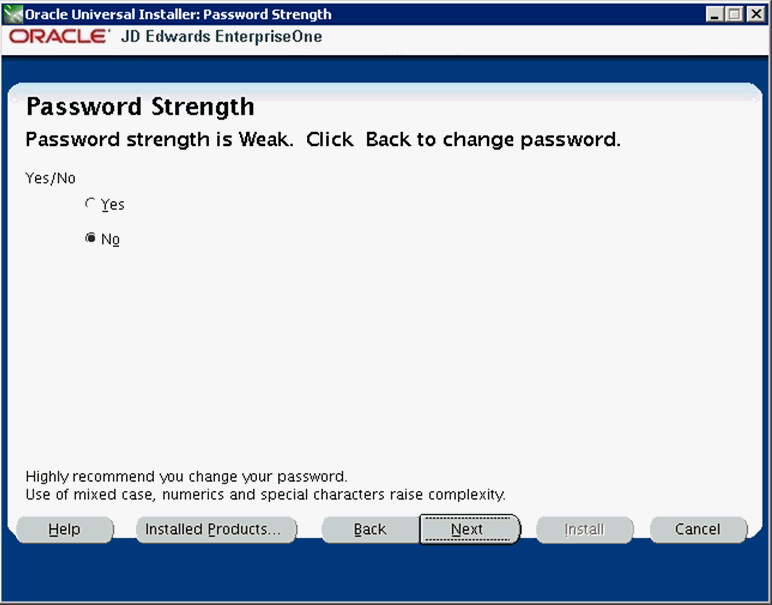
On Password Strength, for use with Oracle VM templates you must use the DEFAULT password; therefore you must accept the default value of No.
Note:
The installer program does not force you to change your password for a Weak value. -
Click the Next button.
-
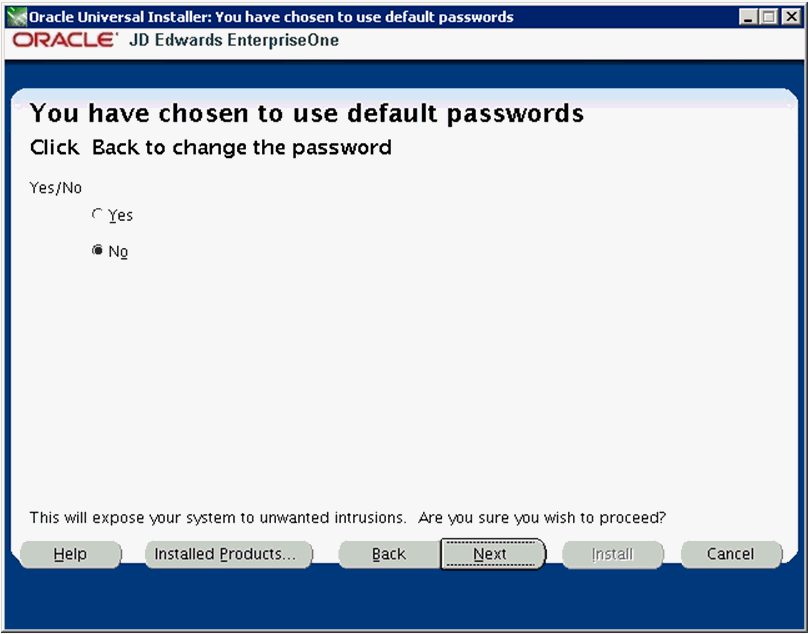
The installer presents the above screen as a security precaution. That is, it is important to note the security implication when you agree to proceed with the installation using the default password values that are required and specified in the preceding screen. These values are only required to complete the installation after which it is strongly recommended that you immediately change these passwords after installation as described in the appendix of this guide entitled: Appendix D, "Security and Demo Data Configuration".
To ensure you understand and agree to these terms, the installer defaults to a No value. In order to proceed and successfuly complete the installation, you must explicitly change the value from No to Yes, as shown below:
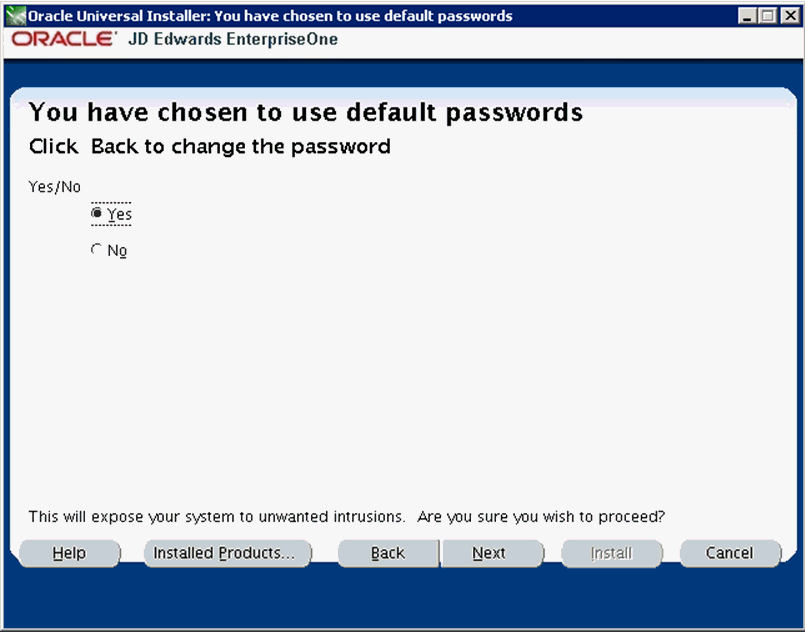
Caution:
As noted on this screen, by choosing Yes you are acknowledging that by accepting the default passwords (which is required to completed the install) you are exposing your system to potential security concerns. As previously noted, after installation you should immediately change the passwords on your installed system as described in the appendix of this guide entitled: Appendix D, "Security and Demo Data Configuration". -
Click the Next button.
-
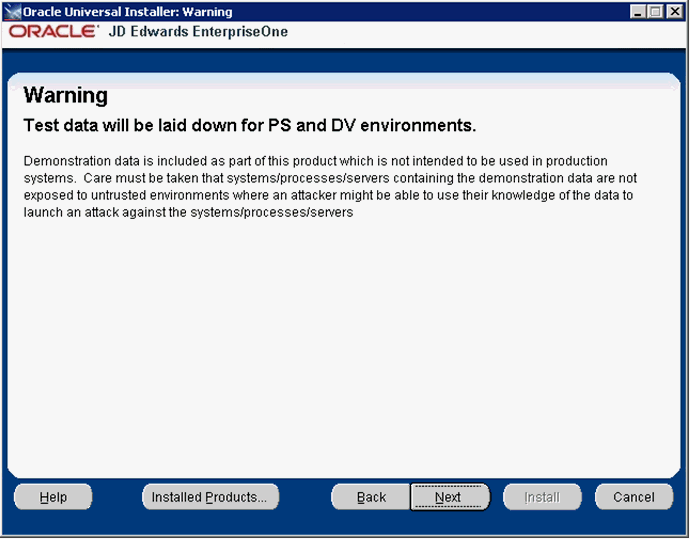
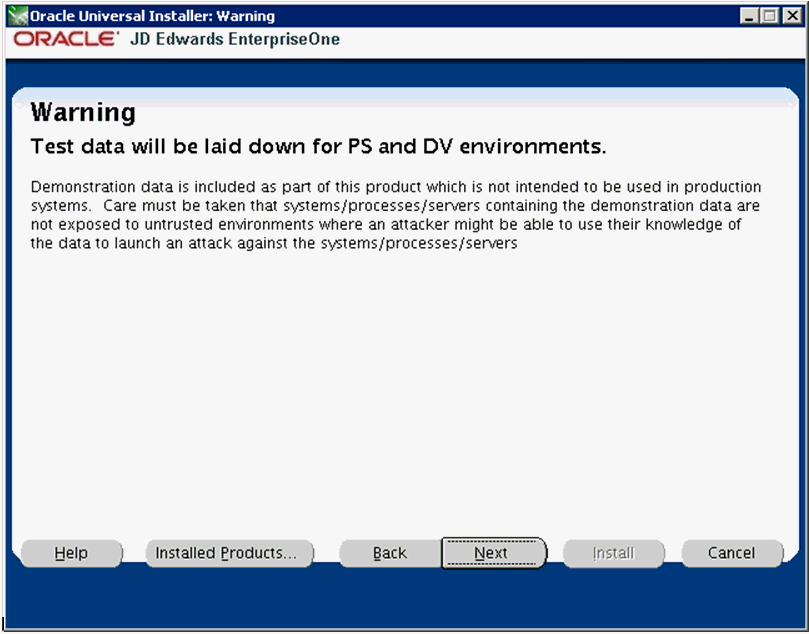
On Warning, Test data will be laid down for PS and DV Environments, the following warning is displayed:
Demonstration data is included as part of this product which is not intended to be used in production systems. Care must be taken that systems/processes/servers containing the demonstration data are not exposed to untrusted environments where an attacker might be able to use their knowledge of the data to launch an attack against the systems/processes/servers.
-
After you have read, understood, and accepted the stated security risk, Click the Next button.

-
On Target Server Names, complete these fields:
-
Deployment Location
Enter the Deployment Location. For example, Corporate.
This value is used for package builds of JD Edwards EnterpriseOne.
-
Deployment Server
Enter the name of the Deployment Server. This name must be all upper case and non-qualified. For example: CUSTVMDEP.
-
HTML Server
Enter the name of the HTML Server. This name must be all lower case and non-qualified. For example: custvmhtml.
-
Enterprise Server
Enter the name of the Enterprise Server. This name must be all lower case and non-qualified. For example: custvment.
-
Are you using Automated Storage Management YES / NO
If you are using Oracle ASM on your database server, enter a value of YES.
-
Create Oracle BIP Server YES or NO
If you want the Platform Pack installer to create an Oracle BI Publisher Server for JD Edwards EnterpriseOne, enter a value of YES.
-
Oracle BI Publisher Server
If you specified YES in the previous field to create an Oracle BI Publisher Server, enter the name of the server. This name must be all lower case and non-qualified. For example: custvmbip.
-
Password for SYS user
Enter the password for your Oracle SYS user on the database server.
-
-
Click the Next button.
-
On Warning Test data ill be laid down for PS and DV Environments, the warning informs you that the installation delivers test data that is not intended to be used in production environments. The primary purpose of this test data is for use by EnterpriseOne support when diagnosing issues you may have with the software. Because this data is not used in any production environment, it should not pose a security threat. Regardless, it is strongly recommended that as a best practice you secure your system as soon as possible after installing by changing your JDE and Database passwords. Refer to as described in the appendix of this guide entitled: Appendix D, "Security and Demo Data Configuration".
-
Click the Next button.
If you choose ASM = YES on the previous Target Server Names screen, refer to: "Oracle Database Information - ASM = YES".
If you choose ASM = NO on the previous screen, refer to: "Oracle Database Information - ASM = NO".
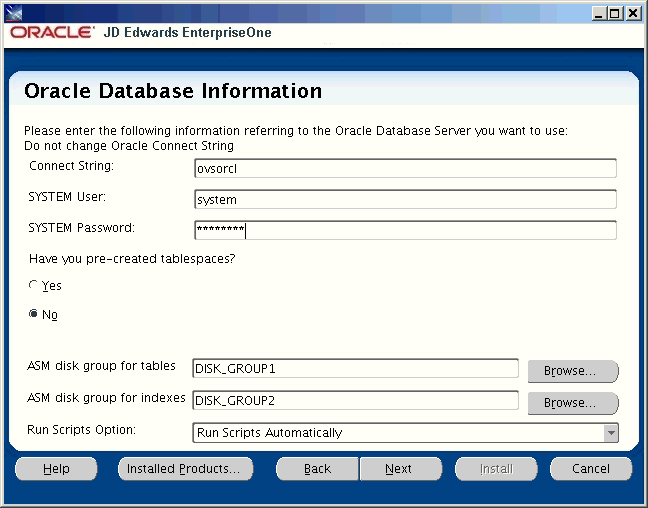
Oracle Database Information - ASM = YES
Note:
The above screen and these steps are applicable if you chose ASM = YES on the Target Server Names screen in Step 18.On Oracle Database Information, complete these fields:
-
Connect String
When setting up the JD Edwards EnterpriseOne Database Server components on non-virtualized database servers that are to be used with JD Edwards EnterpriseOne Oracle VM templates, the connect string must match across all instances of the templates. The standard value is ovsorcl. If you change this value, you must make the corresponding change when instantiating database connectivity for every OVM template using the JD Edwards OVM Tools described in the section of this document entitled: Section 4.4, "Working with JD Edwards OVM Tools (config.sh Configuration Script)".
-
SYSTEM User
You must accept the default values for this field, which is system. Do not specify this value as sys.
-
SYSTEM Password
Enter the password for your SYSTEM user.
-
Have you pre-created tablespaces?
Use the radio buttons to select whether you have pre-created your Oracle tablespaces. If you choose No, the Platform Pack installer will execute scripts to create the tablespaces. If you choose Yes, you must have already created the tablespaces prior to running the Platform Pack installer.
-
ASM disk group for tables
Enter the ASM Disk Group name(s) that will be used for your JD Edwards EnterpriseOne database tables. For example, DISK_GROUP1.
-
ASM disk group for Indexes
Enter the ASM Disk Group name(s) that will be used for your JD Edwards EnterpriseOne database indexes. For example, DISK_GROUP2.
-
Run Scripts Option
Use the pulldown to select when you want the Platform Pack installer to automatically run the database scripts, or whether you want the installer to only deliver the scripts so you can run them manually. By choosing to manually run the scripts you can choose to further edit and/or run them sequentially.
Proceed to the Step 23.
-
-
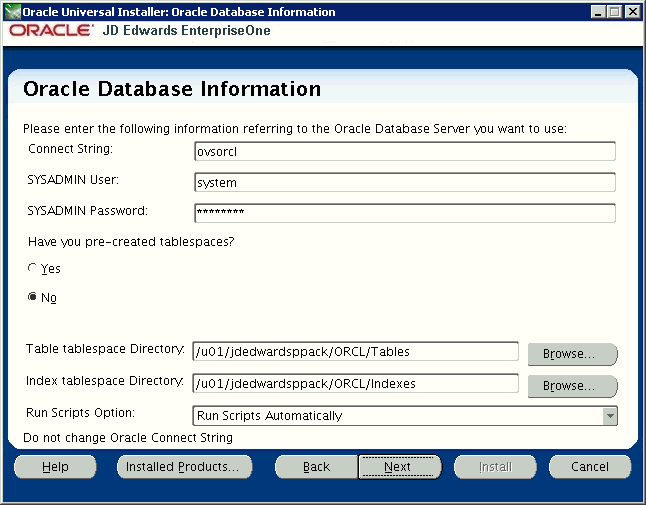
Oracle Database Information - ASM = NO
Note:
The above screen and these steps are applicable if you chose ASM = NO on the Target Server Names screen in Step 18.On Oracle Database Information, complete these fields:
-
Connect String
For purposes of running the Platform Pack installer, the value for this field must be ovsorcl. This is required to match the values specified in JD Edwards EnterpriseOne tables and also in
jde.inifiles on the Enterprise Server. -
SYSTEM User
You must accept the default values for this field, which is system. Do not specify this value as sys.
-
SYSTEM Password
Enter the password for your SYSTEM user.
-
Have you pre-created tablespaces?
Use the radio buttons to select whether you have pre-created your Oracle tablespaces. If you choose No, the Platform Pack installer will execute scripts to create the tablespaces. If you choose Yes, you must have already created the tablespaces prior to running the Platform Pack installer.
-
Table tablespace Directory
Enter the mount point for the tablespaces of your JD Edwards EnterpriseOne database tables. For example:
/u01/jdedwardsppack/ORCL/Tables -
Index tablespace Directory
Enter the mount point for the tablespaces of your JD Edwards EnterpriseOne database indexes. For example:
/u01/jdedwardsppack/ORCL/Indexes -
Run Scripts Option
Use the pulldown to select when you want the Platform Pack installer to automatically run the database scripts, or whether you want the installer to only deliver the scripts so you can run them manually. By choosing to manually run the scripts you can choose to further edit and/or run them sequentially.
-
-
Click the Next button.
-
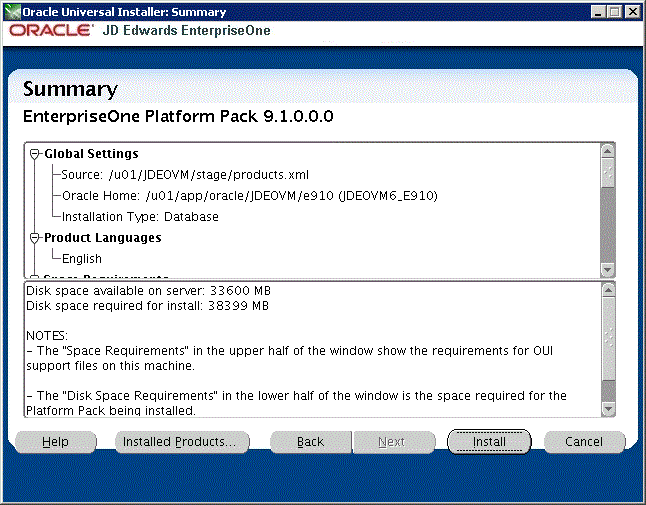
On Summary, review and verify your installation choices.
-
Click the Install button.
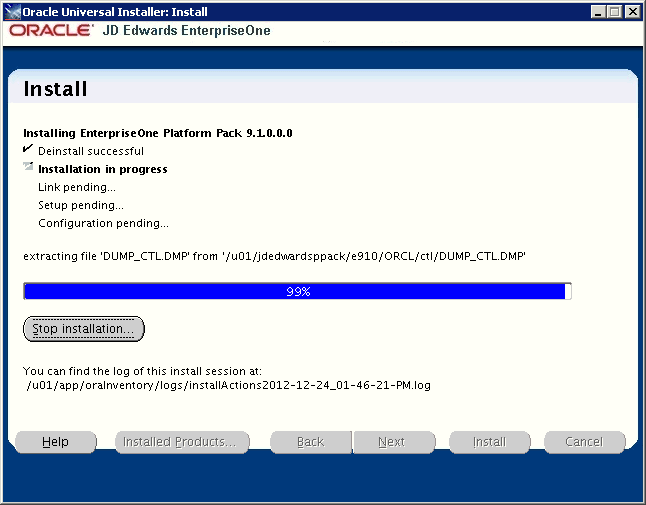
The Platform Pack installer displays a progress screen. Also at the bottom of the screen, a message displays the location of the log file for this installation.
Click the Stop installation ... button if you want to cancel the installation before it completes. Otherwise, the installer displays the following screen when it completes.
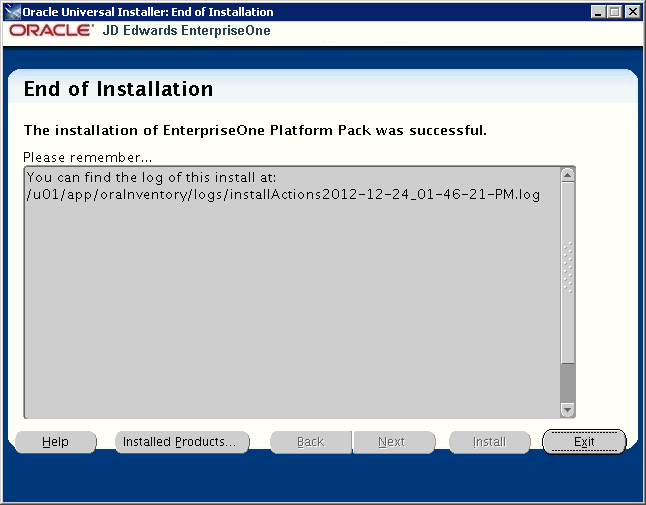
-
On End of Installation, verify the Platform Pack installation was successful. You should verify the OUI log files which are located in the path shown in the Please remember ... section. Also check the Oracle load logs which are located in this directory:
/u01/jdedwardsppack/e910/ORCLTip:
It especially important that you check and verify the Import* logs.Note:
The above location is also where you will find this database script, which can be run manually:InstallOracleDatabase.sh
C.2.3 Working with Installer Log Files
Upon completion, the installer reports success or failure for the Oracle database scripts. To verify the status of the install, you should:
-
Check the logs in your install location in this directory:
ORCL/logs -
Check the logs in the Oracle inventory location, which by default is:
/u01/app/oraInventory/logsThis directory contains these log files:
-
silentInstallxxx.log -
oraInstallxx -
installActionsxxx
-
C.2.4 Deinstalling the Platform Pack for Non-Virtualized Database Servers
Use this procedure to deinstall the Platform Pack for non-virtualized databases servers (such as Oracle Exadata and ODA).
-
Navigate to your install location.
-
Change directory to
ORCL. -
Run this script:
drop_db.sh -
Navigate to the
ouifolder within your install location. -
Change directory to
bin. -
Use this command to run the OUI installer in silent mode to deinstall the Platform Pack for non-virtualized database servers.
.
/runInstaller -deinstall -silent REMOVE_HOMES={"/u01/JDEOVM/e910"} ORACLE_HOME_NAME="JDEOVM_E910"