Release 11g (11.1.1)
Part Number E18861-01
Contents
Previous
Next
| Oracle Fusion Middleware User's Guide for Oracle Business Intelligence Publisher Release 11g (11.1.1) Part Number E18861-01 | Contents | Previous | Next |
| View PDF |
This chapter covers the following topics:
The Report Job History page displays information about running and completed report jobs. You can access this page and then search for the report job history; or, you can access this page from the context of a specific report.
To search for job history, navigate to this page in one of the following ways:
From the Home Page: Under Browse/Manage click Report Job History
On the global header: Click Open, and then click Report Job History
To access this page from the context of a specific report perform one of the following:
From the catalog: Navigate to the report in the catalog and then click Job History
From the report viewer, click Actions and then click Job History
The following figure shows the Report Job History page:
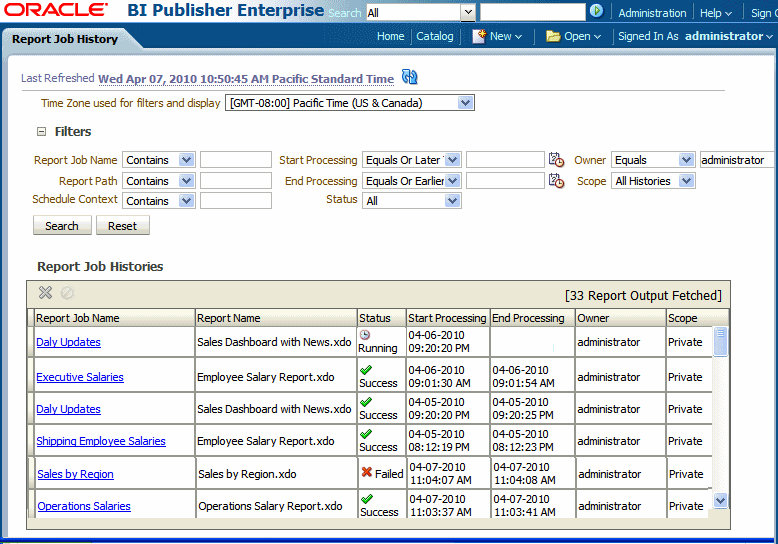
Use the Report Job History page to:
View the status and details of running and completed report jobs
Cancel a running job.
Monitor a running job.
View job submission details
Download or view the XML data produced from the report (if you selected Save Data for the report)
Download or view the report document (if you selected Save output)
Republish the report data using other formats or templates (if you selected Save Data for the report)
Delete report jobs from history
If you navigated to the Report Job History page from the context of a specific report, the jobs for that report will automatically display in the table with the following default filters applied:
Report Path - equals the path to the report from which you launched the Report Jobs History page
Start Processing - equals to or later than one week ago.
Owner - equals your user ID
Scope - equals All Histories (Possible values for scope are: Public and Private job histories)
Status - equals All (Possible values for status are: Success, Failed, Running, Has output errors, Canceled, Cancelling, Has output errors, and Has delivery errors)
Use the following procedure to further filter the results.
Enter values for the Filter criteria to search for a specific job history or group of completed report jobs. You can filter results based on the following:
Report Job Name - the name assigned to the job when it was submitted.
Report Path - the path to the report. If the report resides under Shared Folders, do not include "Shared Folders" in the path. If the report resides under "My Folders," the first node will equal your user name. For example, if you are logged in as Administrator and the report resides under "My Folders/Operational Reports", enter "~Administrator/Operational Reports".
Schedule Context - reserved for future use.
Start Processing - the date and time after which the request started processing.
End Processing - the date and time before which the request ended processing,
Status - can equal one of the following: Success, Failed, Running, Has output errors, Canceled, Cancelling, Has output errors, or Has delivery errors.
Owner - the user ID of the owner of the job
Scope - Public or Private
Click Search. The jobs that meet the filter criteria will be displayed in the Report Job Histories table.
The table initially displays 33 matching records. This number is displayed in the upper right corner of the table. Move the vertical scroll bar down to the lowest point to fetch 33 more records. The number displayed in the upper right corner updates to inform you of the number of records that have been fetched so far. You can continue fetching more records to the table in increments of 33 by moving the scroll bar down.
You can sort the table by a particular column by clicking the column heading and selecting the up arrow or down arrow for ascending or descending.
Click the Report Job Name to view a detail page for the job.
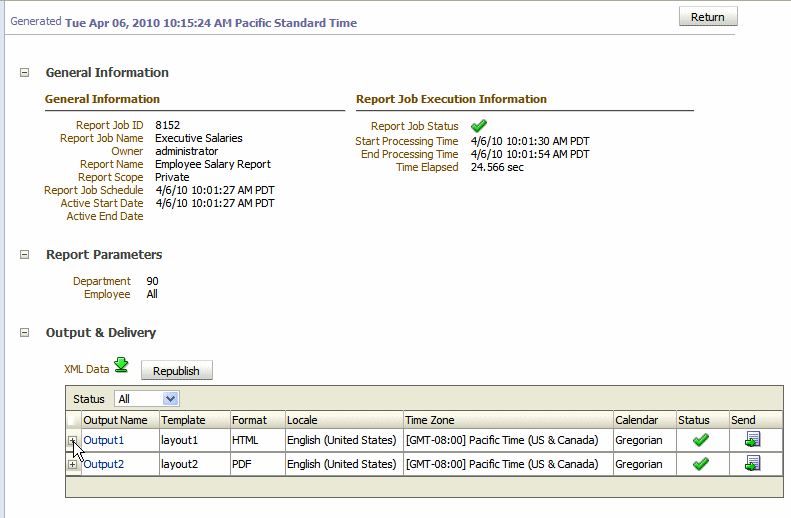
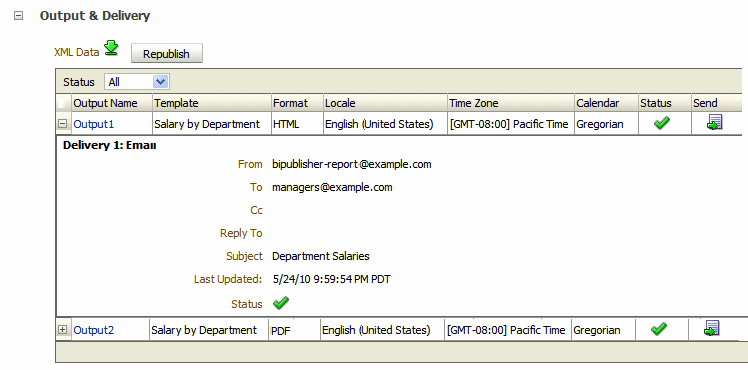
To view delivery information for each output, click the expand icon next to the output name, as shown in the following figure:
Click Return to return to the Report Job History page.
Note that for the data to be available, the Save Data for Republishing option must be enabled when the job is created. (For information on setting this option, see About the Output Settings.)
Click the Report Job Name to view the detail page for the job.
From the Output & Delivery region, click the XML Data download button.
When prompted, select the location to save the file.
Note that for the data to be available, the Save Data for Republishing option must be enabled when the job is created. (For information on setting this option, see About the Output Settings.)
Click the Report Job Name to view the detail page for the job.
From the Output & Delivery region, click Republish. This launches the Report Viewer.
From the Report Viewer you can now apply a new layout, choose a different output type or export the report. Note that because you are using data that has already been retrieved, any parameters are not updateable.
To return to the Report Job History page, click the Actions menu and select Return.
Note that for the output to be available from the history table, the Save Output option must be enabled when the job is created. For information on setting this option, see About the Output Settings.
Note: The send functionality does not create any history nor does it save the delivery status, it simply sends the output to the destination selected.
Click the Report Job Name to view the detail page for the job.
From the Output & Delivery region, locate the output that you wish to send to a new destination and click Send. This launches the Send dialog.
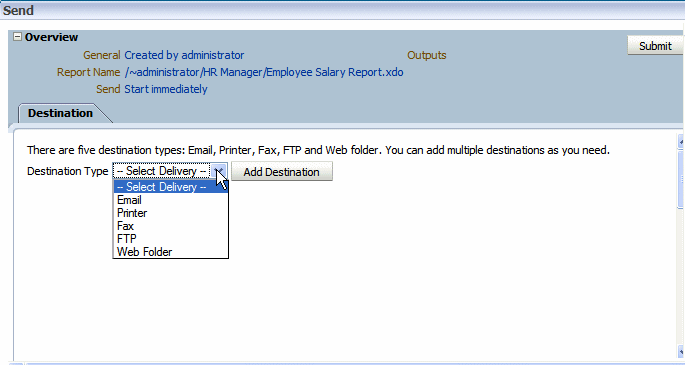
Select the delivery type and click Add Destination. Enter the appropriate fields for your delivery type.
When finished adding destinations, click Submit.
While a job is in running status, you can monitor the stages of the report processing,
To view the status, rest your cursor over the Running status indicator in the results table. The status will display as well as the instance ID of the cluster instance handling the processing. This is shown in the following figure:
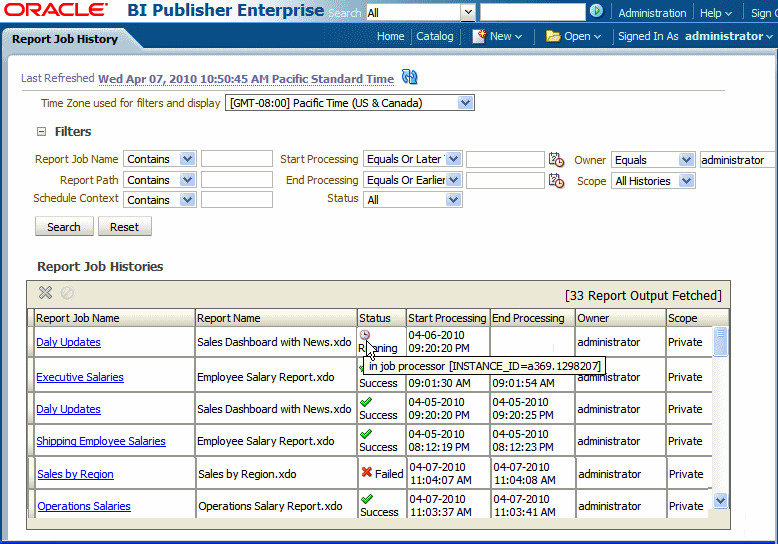
Once the page is loaded, the status will not be updated until you refresh the page.
The following table lists the processing stages of a job:
| Processing Stage | Substages |
|---|---|
| Job Processor | Sending to Job Queue In job queue In job processor Job processor completed Job processor caused exception |
| Data Fetching | Fetching XML Data XML Data Fetched Before calling data model pre-trigger After calling data model pre-trigger Before calling data model post-trigger After calling data model post-trigger |
| Fetching Bursting Control File (for bursting jobs only) | Fetching bursting control XML Bursting control xml fetched |
| Data Processor | In data processor Parsing control file (applies only to bursting jobs) Control file parsed (applies only to bursting jobs) Cutting data based on split key (applies only to bursting jobs) Data cutting completed (applies only to bursting jobs) Total sub-jobs (applies only to bursting jobs) Data processor completed |
| Report Processor Once the job reaches this stage, outputs can be viewed as they are completed by clicking the Report Job Name. | In report processor Rendering report document Report document rendering completed Report processor completed Error rendering report document |
| Delivery Processor The value of <delivery> may be e-mail, fax, File, FTP, Print, or WebDAV, depending on the destinations selected for the report. | In <delivery> processor Delivering to <delivery> processor Document delivered to <delivery> server <Delivery> processor completed |
To cancel a running job:
Click anywhere within the table row for the report job to select it (except the job name link). You can select multiple jobs by pressing Ctrl + Shift and then clicking the additional rows. Deselect a row by clicking it again. Note that a job must be in Running status to cancel it.
Click the Cancel running jobs icon at the top of the table, as shown in the following figure:

Click OK on the confirmation dialog.
If a report job fails or completes with warnings, you can view the message by resting your cursor over the error or warning status indicator in the results table. The message will display as shown in the following figure:
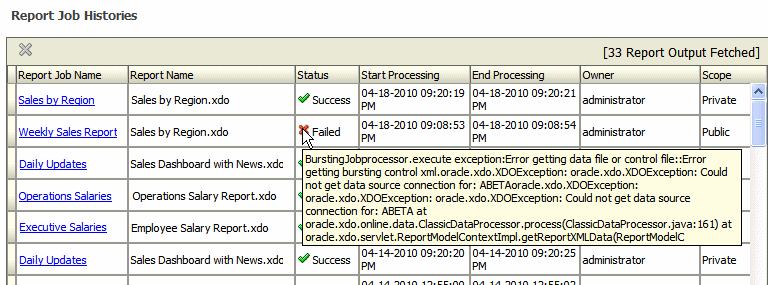
For more complete diagnostic information on errors or warnings, you can view the diagnostic log files for the job in Oracle Fusion Middleware Control.
For details, see Viewing Diagnostics for Report Jobs, Oracle Fusion Middleware Administrator's Guide for Oracle Business Intelligence Publisher.
Click anywhere within the table row for the report job to select it. You can select multiple rows.
Click the delete icon at the top of the table.
Click OK on the confirmation dialog.
To refresh the Report Job History page, click the Refresh button at the top of the page, as shown:

![]()
Copyright © 2010, 2011, Oracle and/or its affiliates. All rights reserved.