11g Release 1 (11.1.2)
Part Number E20373-02
Contents
Previous
Next
|
Oracle® Fusion
Applications Sales Implementation Guide 11g Release 1 (11.1.2) Part Number E20373-02 |
Contents |
Previous |
Next |
This chapter contains the following:
Customizing Oracle Fusion Customer Center Pages Using Oracle Composer: Explained
FAQs for Set Up Customer Center
Manage Customer Center Task Templates
FAQs for Manage Customer Center Task Templates
Manage Customer Center Note Type Mapping
Manage Customer Center Assignment Objects
FAQs for Manage Customer Center Assignment Objects
Manage Customer Center Assessment Templates
FAQs for Manage Customer Center Assessment Templates
Oracle Fusion Customer Center enables the comprehensive management of customer information. Customer Center collects data from various systems and presents them for management in one location.
Following are some of the capabilities of Customer Center:
Create customers and contacts
Update customers and contacts
Maintain customer hierarchies
Maintain competitor information
When working with Customer Center, be aware of the following terminology used through out the application:
Sales prospect
Sales account
Customer
Consumer
Legal entity
Billing account
A sales prospect is a prospective sell-to entity, or person, at an existing or potential customer used to define Leads. A prospect is the lowest level representation of a business entity that your company's marketing processes will track and act upon. The sales prospect does not have a sell-to address. You can create a sales prospect from a party that does not have a sell-to address when you create the first lead for that party. You can also create sales prospects in Customer Center and by importing them in bulk.
You can create leads against sales prospects, but a sales prospect must be qualified and converted to a sales account before you can create opportunities for it. To qualify and convert a sales prospect, a set of business criteria or rules must be satisfied. For example, the prospect may be required to meet the criteria for account assignment.
A sales account is a specific sell-to entity within a given customer. You can create leads and opportunities against sales accounts. A single customer might have a collection of sales accounts. To avoid confusion when assigning territories to the account, each sales account has only one sell-to address. Typically, a sales team manages a sales account. The sales team is comprised of resources assigned to the territories associated with the sales account. Additionally, a profile option determines whether a sales account is a named sales account, an existing sales account, and the account owner. Named sales accounts are typically strategic accounts assigned to dedicated territories. An existing sales account is one where there is an existing financial relationship or had previous installs. You can create sales accounts in Customer Center and by importing them in bulk.
Within Customer Relations Management (CRM), sales accounts and sales prospects are collectively referred to as Customers. Additionally, a Customer also can have representations as a legal entity and a billing account that are expressed as root nodes in a hierarchy to the respective sales accounts for that customer.
View the Customer Hierarchy: A customer's hierarchy represents a holistic view of the customer's structure, showing you the customer type, the parent for the customer, the subsidiaries of the customer, as well as rolled up revenue analysis data.
A consumer is a person who is a qualified paying individual. A consumer can have one or more sales accounts or sales prospects. A consumer is not an organization sales account or sales prospect. A consumer is by definition also a legal entity.
A legal entity is a party that can enter into legal contracts or a business relationship, and be sued if it fails to meet contractual obligations. There are two types of legal entities: internal and external. A customer with a party usage of Legal Entity is considered an internal legal entity and is used for interdivisional selling within your own company. A customer with a party usage of External Legal Entity is any external customer who fits the definition of legal entity. Legal entities may also be used to group multiple sales accounts, sales prospects and other classes of entities or parties.
A billing account is a party that represents the financial account transactional entity for a given Customer.
There are five types of Oracle Fusion Customer Center trees. Each tree displays slightly different nodes, and the information that you are able to view and edit on each node depends upon your security privileges and your membership status on the sales account team
The five types of Customer Center trees are:
Customer
Consumer
Contact
Legal Entity
Account Plan
The customer tree displays nodes for business-to-business entities such as sales account and sales prospect. If you are a member of the sales account team with at least Edit level access or you have the Sales Party Administration duty, you can update information on the following nodes: contacts, organization chart, classifications, assessments, discussion forums, classifications, assessments, notes and, account assessments. Only those users with Sales Party Administration duty or Full level access on the sales account team and profile nodes can update the members of the sales account team
The consumer tree displays nodes for business-to-consumer entities such as sales accounts and sales prospects. All nodes on the consumer tree are visible to all users. Since consumers are individuals rather than organizations, there are fewer nodes displayed in the consumer tree than in the customer tree. For example, you will not see nodes for organization chart, contacts, assessments, or others that are pertinent to organizations.
The contact tree displays nodes for contacts with the contact profile and other related information such as the customer (the organization) to whom the contact belongs, interactions with the contact, notes, and so on. All nodes on the contract tree are visible to all users.
The legal entity tree displays nodes for business-to-business entities that are marked with a party usage of Legal Entity. Because legal entities are typically a parent or root node in a customer hierarchy, legal entity tree has a subsidiaries node. All nodes on the legal entity tree are visible to all users.
An account plan is a plan to sell to a certain set of accounts in a coordinated way. There is a specific set of assigned resources. This tree shows associated contacts, assets, Opportunities and member accounts of the plan.
Customer center tree is a navigation paradigm which enables quick and easy access to various related information in one central place. Seen on the regional area of the page, the tree is made up of object nodes such as Profile or Contacts. These object nodes can be categorized into logical categories. Categories enable you to organize those object nodes to fit your needs, for example, the Sales category or Service category. Each implementation can customize the Customer Center tree by showing or hiding the various nodes as required, and configuring node names and other parameters. When saved, the personalizations for this view of the tree are kept for all users of the application. Individual users will have capability to further personalize the tree as desired.
Set these attributes for each node in the Customer Center Tree:
Name - the name shown in the customer center tree UI.
Visible - indicates whether the node will be visible in the customer center tree.
Important
All tree nodes that render portlets are delivered with the Visible check box unselected. To show the portlet, select the Visible check box.
Default - the node shown when a user drills down into the customer center tree.
Portlet - indicates whether the node is a portlet or a local task flow. A portlet is a non-local task flow residing in another business process. For example, when accessing the Opportunities node in the Lead Management application, the Opportunities node is a portlet because the Opportunities task flow resides in the Sales applications, outside of the local Lead Management application. Each Fusion application using Customer Center is delivered with the appropriate portal information already configured and should not be changed.
Parameters - specify input variables and values for the node. There are only three nodes that require parameters. These nodes are specifically for third-party integration: OneSource Profile, Service Requests, and Snapshot:
OneSource
Profile parameters: token=#{'{OneSource
token}'}
Replace {OneSource token} with your OneSource access token. For
example, if your OneSource token is 'token', set the OneSource Profile parameter as: token=#{'token'}. Or, if you do not require a token to access OneSource, simply replace {OneSource token} with NULL; set the OneSource Profile parameter as: Token=#{''}
Service Requests
parameters: HostName=#{'{Siebel server
path}'};SSLEnabled=#{'[true|false]'};UserName=#{'{username}'};Password=#{'{password}'}
Set host name to be your Siebel server
path, for example, HostName=#{'hostname.siebel.com/
CALLCENTER_enu/start.swe'}
Set SSLEnabled to true or false,
for example, SSLEnabled=#{'false'}.
Set UserName to be your Siebel system
login, for example, UserName=#{'USER'}.
Set Password to be your Siebel system
password, for example, Password=#{'PWD'}.
Example Service Requests parameter: HostName=#{'hostname.siebel.com/CALLCENTER_enu/start.swe'};SSLEnabled=#{'false'};UserName=#{'USER'};Password=#{'PWD'}
Snapshot
node parameter: HostName=#{'{Siebel
server path}'};SSLEnabled=#{'[true|false]'};UserName=#{'{username}'};Password=#{'{password}'}
The Snapshot node parameter is the same as the Service Requests node and thus needs the same parameters as those for the Service Requests node.
There are three types of sales account team memberships known as access levels.
These access levels control the team member's privileges for the sales account:
View Only
Edit
Full
When a resource is initially added to the sales account team, a profile option setting determines the member's default access level. If that member is removed from the sales account resource team, she no longer has access to the sales account, unless she is still a member of a territory that is assigned to the sales account. Resources in the management hierarchy of a newly added team member inherit the same access level of the subordinates.
View Only is the minimum level assigned to a sales account team member. This access level enables the team member to view the contents of the sales account child attributes such as sales account team, snapshot, assessments, discussion forums, notes, interactions, appointments, and tasks. This assumes, however, that the team member also has functional access to view that child attribute. If the team member's resource role does not provide functional access to view a particular child attribute of a sales account, that member cannot view the attribute, regardless of her sales account team access level. A team member with View Only access level for a sales account can view only the opportunities, leads, and revenue lines to which she has relevant data privileges.
Sales account team members with the Edit access level can view and edit all customer-related objects. They can view and edit only the opportunities, leads, and revenue lines to which they have the relevant data privileges. The Edit access level provides a sales account team member with the ability to run the territory reassignment process, but she cannot change the composition of the sales account resource team.
The Full access level allows team members to do everything that the Edit access level allows, with the addition of being able to change the composition of the sales account resource team. A team member with Full access can manually add and remove team members, change a member's access level, and mark the lock assignment setting for team members. When a sales account is created, only the sales account owner and sales administrators are granted the Full access level, but they can grant Full access to other team members.
Access for the Territory owners and members parallels that of the Sales Team members.
These access levels control the internal and partner territories privileges for the sales account:
Internal territory owner: Full access
Internal territory members (non-owner): Edit access
Partner territory owner and members: View-only access
Note
Territory Management must be implemented to utilize this feature.
Oracle Fusion Customer Center is a central location to access a comprehensive and multifaceted view of customer information. It unifies Fusion applications data as well as relevant third-party content.
OneSource and Siebel Service are two third-party integrations readily configured in Customer Center. This topic explains how third-party customer content is mapped to Fusion customer.
OneSource to Fusion Mapping
OneSource, an online source of business and company data, can be accessed directly from the OneSource node in Customer Center.
Customer Center conducts searches for OneSource company data in the following order:
Look up based on mappings defined
in HZ_ORIG_SYS_REFERENCES table where orig_system is ONESOURCE.
Look up based on Fusion customer
stock symbol. This is checked if mapping is not found in HZ_ORG_SYS_REFERENCES.
Look up based on Fusion customer name. This is checked if mapping is not found by stock symbol lookup. If there are multiple OneSource companies match the Fusion customer name, user can choose from the list of matching OneSource companies.
Siebel Service to Fusion Mapping
Mappings for Siebel
accounts to Fusion customers are maintained in the HZ_ORIG_SYS_REFERENCES table, where orig_system is SIEBEL.
Note
Customer Center does not include licenses for OneSource and Siebel applications. Third-party application licenses may be acquired separately. If you want to enable OneSource and you have a web proxy for external HTTP(S) traffic, you must select Enable Web Proxy on the Web Proxy Configuration screen and specify your web proxy configuration.
See Also: "Web Proxy Configuration" in the chapter "Creating a New Provisioning Plan" of the Oracle Fusion Applications Installation Guide
In Oracle Fusion Customer Center, you can customize the Sales Account region on the customer profile page using Oracle Composer. To access Oracle Composer, navigate to the customer profile page and select to customize the page from the Administration menu in the global area. You can also access Oracle Composer by selecting Customization Manager from the Administration menu.
When you select to customize a page from the Administration menu in the global area, you launch Oracle Composer.
The customizations that you make to the customer profile are applied based on your layer selection:
Site
Your customizations are visible to all users.
External or Internal
Depending on your selection, your customizations are visible to either external or internal users.
External users could be your partners or anonymous users. Internal users could be your employees.
Job Role
Your customizations are visible to users who have the selected job role.
If a user has more than one job role, then the sequence in which customizations are applied is alphabetically ordered by job role name.
Oracle Composer provides two views for working with page content: Design View and Source View. Design View provides a WYSIWYG rendering of the page and its content, where controls are directly selectable on each component. Source View provides a combined WYSIWYG and hierarchical rendering of page components, where controls are available on the header of the hierarchical list. Source View provides access to page layout components that are otherwise not exposed on the page, and therefore not available in Design View.
This table lists the types of customizations available for the customer profile page. You can perform most of the basic customizations in either Design View or Source View. Some customizations, however, must be completed only in Source View.
|
Oracle Fusion Customer Center Page |
Customization Task |
|---|---|
|
Customer profile |
Show and hide components on a page:
Tip You might have to scroll down to see the Show Component check box. |
|
Customer profile |
Move components on a page:
|
|
Customer profile |
Make an updateable field read only by selecting the Read Only check box on the Display Options tab in the Component Properties dialog. |
|
Customer profile |
Make a field required by selecting the Show Required check box on the Display Options tab in the Component Properties dialog. |
The customizations that you can make using the Oracle Composer Source View are available to you only if your assigned job role includes the Page Composer Source View Access Duty duty role. Contact your security administrator for details.
Note
Your assigned job role must also include the Administration Link View Duty duty role to access Oracle Composer at all, even if only the Design View. This duty role exposes the Administration menu in the global area.
Internal territories get assigned to sales accounts in the following scenarios.
When sales accounts are created.
When a sell-to address is added to an existing sales party.
When sales accounts are imported in bulk.
When certain attributes on sales accounts that correspond with territory assignment dimensions are updated.
When batch assignment is run.
When you select the Assign Territories menu action on the Sales Account Team node for the sales account
When territories are realigned or when personnel leave the territory or the company.
Note
The following profile options determine whether territory assignment and reassignment is automatic for sales accounts. The default setting for both is YES.
Sales Account Automatic Assignment on Create Enabled
Sales Account Automatic Assignment on Update Enabled
Automatic assignments are always enabled following an import, party merge and territory realignment.
During initial implementation and migration, it is
possible to create sales accounts before territories have been set
up in the system. These sales accounts will not receive any territory
assignment because there are no territories. These accounts need to
be explicitly assigned when territories are configured and activated
in the system. This is one exception which does not have immediate/automatic
assignment. The recommendation is to run a batch assignment to assign
these sales accounts created at the beginning of the implementation
using the view criteria SalesAccountsUpdatedSinceVC.
Partner territories get assigned to sales accounts in the following scenarios.
When a partner-generated lead is approved, all partner territories associated to the partner-generated lead are automatically assigned to the sales account.
Users with the privilege Manage Sales Party Partner Territory can assign partner territories from the sales account team UI.
Note
Territory Management must be implemented to utilize this feature.
A merge request is made when duplicate records
that point to the same customer are found, and you want to consolidate
those records into one. When a merge request is approved, there is
one survivor record. All other duplicate records are considered victims,
and they are marked with the status of Merged. In customer center,
you can mark two or more customer records for merge request from customer
list in the Customer home page or in the customer search result. Merge
requests will be processed by the customer data hub. The customer
data hub must be implemented and the profile option Merge Request
Enabled set to YES for
this feature to be available.
An internal, or deploying company, territory is defined, created, and assigned internal resources.
Examples of two internal territories are:
Sales Representative Territory (SRT) is the jurisdiction of responsibility of a sales representative over a set of sales accounts, leads and opportunities.
Lead Triage Territory (LTT) is the jurisdiction of responsibility of channel manager to triage partner Leads, that is approve leads and route to the right Partner.
A Partner territory is the jurisdiction of the reselling partner and contains partner resources. Specific Partner territories can be assigned to a sales account as needed.
Note
Territory Management must be implemented to utilize this feature.
Assignment Manager (part of Oracle Fusion Work Management) is used to determine matching territories for a given sales account. A sales account can also be assigned to one or more internal and partner territories.
All internal territories, such as Prime, Overlay and Sales Channel Manager territories, which match a given sales account's assignment attributes are assigned to the sales account. Internal territory assignment can be run immediately and automatically whenever sales account assignment or reassignment is required. For example, you can run assignment manager when a sales account is created or updated, or when territories are realigned. Internal territory assignment can also be scheduled to run in a batch, or it can be run on-demand via the Assign Territories action in the sales account team page.
Partner territories are applicable to Partner Relationship Management implementations. When a partner lead is approved, any partner territories associated to the lead are automatically assigned to the lead's sales account. Channel sales manager can also select specific partner territories to assign to a sales account via the Add Partner Territories action in the sales account team page.
Note
Territory Management must be implemented to utilize this feature.
Personalizing the Oracle Fusion Customer Center tree enables you to have a more intuitive navigation experience. The tree, located in the regional area of the page, is made up of object nodes such as Profile or Contacts. To personalize the tree, use the Action menu located directly above the tree or right click on any tree node, and click Manage Customer Tree in the menu popup. The Manage Customer Tree window will pop up. Select the node you wish to modify. You can change the name, whether the node is visible or not and if it should the default node that will display upon opening the tree. When you save, the customization will be associated to your user name.
This example illustrates how to create a task template that represents a business process.
A sales manager wants to create a task template for her department's client product demonstration process.
The client product demonstration process occurs regularly. The sales manager does not want to manually create tasks for this process every time it occurs, so she decides to create a task template that includes the business process activities. Each time she repeats the business process, she can use the task template to automatically generate the appropriate tasks that need to be performed.
The business process consists of the following activities:
Book a conference room.
Create an agenda.
Confirm the date and time with the client.
Make arrangements with presenters.
Deliver product demonstration.
Follow up with client.
Based on the analysis of the business process, the following task template is created:
Task Template Name: Client Product Demonstration
|
Task |
Category |
Lead Days |
Duration Days |
|---|---|---|---|
|
Book conference room |
Preparation |
1 |
1 |
|
Create agenda |
Preparation |
1 |
1 |
|
Confirm date and time with client |
Call |
5 |
1 |
|
Schedule presenters |
Preparation |
5 |
2 |
|
Deliver demonstration |
Demonstration |
7 |
1 |
|
Follow up with client |
Call |
10 |
1 |
A task is a unit of work to be completed by one or more people by a specific completion date. When using tasks in your application, you should consider the following points:
Tasks
Task Templates
A task is defined with a description, due date and category. Each task has an owner, who oversees or is responsible for the task, and one or more assignees who perform the work. The task can be related to a business object, such as an Opportunity, a customer or, one or more external contacts. Tasks may also have Notes for general information, Attachments for tracking e-mail or project documents and Interactions which record customer communications.
Often a set of Tasks are performed repeatedly for a particular process and to support this administrators can define Task Templates, which represent a group of tasks. These task templates can be invoked by users working on a particular business object, for example a lead, campaign, or an opportunity. The user selects the appropriate task template for the goal they want to achieve and this creates the tasks and associates them with the business object being worked on. This saves the user from creating multiple tasks when an Opportunity reaches a particular sales stage, or the same set of tasks each time a marketing campaign is created.
Note
Extensibility features are available on the Task object. For more details refer to the article Extending CRM Applications : How It Works
Create the task template with a subtype of Assessment.
A note is a record attached to a business object that is used to capture nonstandard information received while conducting business. When setting up notes for your application, you should consider the following points:
Note Types
Note Type Mappings
Note types are assigned to notes at creation to categorize them for future reference. During setup you can add new note types, and you can restrict them by business object type through the process of note type mapping.
After note types are added, you must map them to the business objects applicable to your product area. Select a business object other than Default Note Types. You will see the note types only applicable to that object. If the list is empty, note type mapping doesn't exist for that object, and default note types will be used. Select Default Note Types to view the default note types in the system. Modifying default note types will affect all business objects without a note type mapping. For example, you have decided to add a new note type of Analysis for your product area of Sales-Opportunity Management. Use the note type mapping functionality to map Analysis to the Opportunity business object. This will result in the Analysis note type being an available option when you are creating or editing a note for an opportunity. When deciding which note types to map to the business objects in your area, consider the same issues you considered when deciding to add new note types. Decide how you would like users to be able to search for, filter, and report on those notes.
Note
Extensibility features are available on the Note object. For more information refer to the article Extending CRM Applications: how it works.
The work object, candidate object, and attributes are components that fit together to create assignment objects that are used in rule-based and territory-based assignment. Work objects are business objects that require assignment such as leads and opportunities. Candidate objects are business objects such as resources and territories that are assigned to work objects.
When you create candidate objects, you can select attributes for them that are later used in rules or mappings. These candidate objects also become candidates that are available for association when you create work objects. When you create work objects, you can select attributes for them also, as well as associating one or more candidates.

A work object is a business object that requires assignment such as a lead or an opportunity. Creating a work object involves entering its application information, selecting its attributes to use during assignment, and associating one or more candidates.
A candidate object is a business object such as a resource or a territory that is associated with one or more work objects for eventual assignment. Creating a candidate object involves entering its application information and selecting its attributes to use in rules or mappings. A special type of candidate object is a classification object. This type of candidate object does not represent a business object that gets assigned to a work object. It is used only with classification rules and is used primarly to rank or qualify leads.
Note
As candidate objects are created, they become available as candidates that can be associated with one or more work objects as part of the work object creation process.
Attributes are elements in the view object defined for an assignment object. For each assignment object, you can select one or more attributes that you want to use when configuring assignment rules or mappings. For example, for a work object like sales account, you might choose the attributes of Named Account Flag, Customer Size, and Organization Type. When you configure assignment rules for the sales account work object, your chosen attributes are available for your rule conditions. In other words, you could configure a rule for sales account using the Named Account Flag attribute, and set a condition where the assignment engine looks for sales accounts that have their Named Account Flag equal to Yes.
When selecting attributes for a candidate object, you will not only select the attributes you want to use when configuring assignment rules and mappings that involve that candidate object, but you also want to select the attributes for that candidate object that you want to appear in the screen that displays recommended candidates after assignment manager is run. For example, if a candidate object is resource (sales representative), and you want to show sales representatives' first names, last names, and phone numbers when they are recommended during assignment processing, you need to select the attributes for the resource candidate object that correspond to first name, last name, and phone number, and you need to specify the order in which these attributes will appear in the recommended candidates screen.
Note
This feature is not used by any CRM applications at this time.
The Manage Assignment Objects pages enable you to define and edit the Work and Candidate objects as well as define any territory-based mappings. The figure above shows the relationship between the work and candidate objects and the mapping of the matching candidates to work objects.
When you add or edit a work or candidate object there are several key pieces of information that are required in the definition:
Name: a unique name for the object with an optional description.
Code: a unique code used in processing the object.
Work/Candidate Object check boxes: indicates if the object is a work object, candidate object or both.
Application Module: an Oracle Application Development Framework (ADF) business component that encapsulates the business service methods and UI-aware data model for a logical unit of work related to an end-user task. Enter the fully qualified definition name of the consumer application, Application Module. Valid for top level Work and Candidate objects. Child objects automatically inherit this value from its parent.
Application Module configuration: Valid for Top Level Work and Candidate objects except Classification Candidate objects. Child objects will automatically inherit this value from its parent.
View Object Instance: used to define the data model of a view object component when designing an application module, for example, Opportunity. Valid for all levels of Work and Candidate objects except Classification Candidate objects.
View Criteria may be defined to filter the information for the rows of a view object collection. Valid for top level Work and Candidate objects except Classification Candidate objects.
Primary Key Attribute 1: First or only attribute that makes up the object primary key. Valid for top level Work and Candidate objects except Classification Candidate objects.
Refresh Interval: the number of minutes between refreshes of candidate object data. The default setting is 0 minutes. Valid for top level Candidate objects except Classification Candidate objects.
Initial Caches: The initial size of the cache when processing an object. This value will be used the first time the engine processes objects or following a server bounce. The default value is 2, and the maximum value is 20. Only valid for top level Candidate objects except Classification Candidate objects.
Note
All Work Objects that are used for scoring, Lead for example, use the Product Level (MOW_SCORING_INITIAL_CACHES) Initial caches for scoring rules profile option value.
Maximum Caches: The maximum size of the pool/cache when processing the object. The default value is 5, and the maximum value is 25. Only valid for top level Candidate objects.
Note
All Work Objects that are used for scoring, Lead for example, use the Product Level (MOW_SCORING_MAX_CACHES) Maximum caches for scoring rules profile option value.
Score Attribute: The attribute on the object that stores the total calculated score after an assignment request has been processed. Valid for top level Work objects only.
Assignment Date Attribute: The attribute on the object that stores the assignment date after an assignment request has been processed. Valid for top level Work objects.
Exclude Assignment Attribute: The attribute on the object that stores the setting for excluding a work object from assignment. Valid for top level Work objects.
Assignment Manager allows users to specify a set of attributes from the assignment object VO to be used during the assignment evaluation. The assignment engine will load these Assignment Object Attributes for each assignment object VO row, in addition to any primary key or assignment attributes. This is designed to improve performance by not loading those attributes not used for the assignment evaluation.
Assignment Object Attributes should be defined for each work object and any child objects as well as each candidate object to be used by the Assignment Engine.
View Object Attribute: Name of each attribute in the view object defined for the assignment object. Assignment Rules or Mappings can be configured using these attributes. For Candidates Objects, the attributes that appear in the interactive assignment UI should also be selected.
Candidate Information Sequence: The sequence that this attribute is displayed in the Interactive Assignment UI.
The administrator needs to define the association between the work object and candidate object. For example the Lead work object may have an association with both the Territory candidate object and the Resource candidate object. This implies that Assignment Manager can be used to assign Territories and Resources to a lead.
Assignment is the process for selecting a candidate as an object and executing the association to a work object. Assignment consists of two phases. The first phase is the matching phase, where matching rules or mappings are evaluated to find the right assignees from a list of possible candidates. The second phase is the disposition phase, where the disposition, or assignment, of matching candidates is handled. Assignment Manager is the tool used to establish the business objects that require assignment, to set up the resources that can be assigned, and to create the rules and mappings that dictate the selection and assignment of those resources. Candidates are potential assignees for a work object. A work object is a representation of an application business object inside Assignment Manager. A work object captures the attributes of a business object and associated child objects to be used for matching purpose. To best plan the configuration of Assignment Manager, you should consider the following points:
Business objects
Resources
Assignment disposition
Attributes
Mappings and rules
A business object is a data entity or a collection of data treated as a unit, such as a sales account, an opportunity, or a lead. Any business object that requires the assignment of a resource to act upon it is considered a work object by Assignment Manager. The work object is a representation of the business object, and mappings and rules are developed to ensure timely and accurate assignment of candidates (for example, territories or resources) to those work objects. When configuring Assignment Manager, carefully consider which of your business objects require assignment, and create work objects only for those that do.
After you determine the business objects (work objects) that require assignment and the candidate objects that you will assign to them, you must decide how the matching candidate assignment disposition will be carried out. Consider these questions:
Do you want to assign a single resource or multiple resources?
Do you want to automatically assign matching candidates or run custom logic against matching candidates?
Do you want to record the matching candidate score on the work object?
Do you want to retain manually assigned candidates when assignments are processed?
Do you want to replace disqualified candidates when assignments are processed?
To ensure that candidates are properly assigned to work objects, you will create mappings and rules. These mappings and rules employ attributes to determine the best assignments. As you set up work objects and candidate objects in Assignment Manager, you will also select the attributes of those objects that you want to use in your mappings and rules. For example, you might want to assign a resource such as a sales representative to a business object like opportunity based on the product skill of the sales representative. In this case, when you create the opportunity work object and the sales representative candidate object, you will select the attributes of opportunity and sales representative that correspond with product skill. Selecting these attributes makes them available for mappings and for conditions on your rules, so ensure that you select the attributes that reflect the criteria that you want to use for matching business objects to work objects.
Assignment mappings drives territory-based assignment. These mappings identify the dimensions, attributes, and territory filtering used in territory-based assignment processing. A default set of mappings are seeded. This seeding assumes that opportunities, leads, and sales accounts use the same territory hierarchy. Rules are defined for the execution of rule-based assignment. Rules are designed to return candidates based on whether these candidates match a set of criteria, are within a defined scoring range, or are of a specific classification.
You create the mappings and rules using the work objects, candidate objects, and attributes that you already established. When designing your mappings and rules, carefully consider how you want to match candidates to work objects. For example, would you want resources assigned based on their geographic location, or their product knowledge, or their skill level, or a combination of any of these attributes? Do you want to match candidates only, or would you like to match candidates and score them? In a multiple-candidate scenario, do you want to assign all matching candidates or only those who achieve higher than a specific score? Consider these questions before creating mappings and rules.
For territory-based assignment, you create work-object-to-candidate-object mappings during assignment object creation. These mappings are used to make candidate assignments. You can create multiple types of mappings for assignments. The following scenarios illustrate these different mappings:
Creating an attribute mapping
Creating a dimension mapping
Creating a literal mapping
You want to assign territories to a sales lead when the territory program ID is the same as the sales lead program ID. Create a mapping where the work object is sales lead and the candidate object is sales lead territory. Select the territory when the attribute territory program ID is equal to the sales lead attribute program ID.
You want to assign territories to opportunity revenue
lines based on the product associated with the revenue line. Create
a mapping where the work object is opportunity revenue line, and the
candidate object is territory. Select the product dimension as the
mapping type. The candidate object low and high attributes correspond
to the names of the low sequence and high sequence attributes for
product on the territory. The work object low and high attributes
correspond to the names of the low sequence and high sequence attributes
for product on the revenue line. For example, the low sequence attribute
for product on the revenue line might be called ProdSeqLow.
Mapping using alternative attributes:
Using the same scenario of assigning territories to opportunity revenue
lines based on the product associated with the revenue line, you might
encounter a situation where a revenue line does not have a product
assigned to it, but it does have a product group assigned to it. Create
the same mapping that you created for the dimension mapping scenario,
and add the names of the low sequence and high sequence attributes
for product group for the work object alternate low and high attributes.
For example, the alternate low sequence attribute for product group
on the revenue line might be called ProdGrpSeqLow.
Mapping using default values: Using the same scenario of assigning territories to opportunity revenue lines based on the product associated with the revenue line, you might encounter a situation where the low sequence and high sequence attributes for product on a revenue line do not contain values when assignments are processed. Create the same mapping that you created for the dimension mapping scenario, and add low and high default values for the product attribute for revenue lines.
Literal mappings are a way of filtering the matched territories based on specific values of a territory attribute. You want to find only territories that are finalized (for example, territory status equals FINALIZED).
Rule-based assignment requests that identify matching candidates or scores for matching candidates use candidate data such as resources. This candidate data is loaded into a cache and used for each assignment request until the cache is refreshed. Oracle Fusion Assignment Manager supports the ability to refresh the candidate data cache at regular intervals. The Fusion Enterprise Scheduling Service (ESS) process Refresh Cache is used to set an indicator that the candidate data should be refreshed the next time there is an assignment request using that candidate.
Note
This feature affects rule-based assignment using the rule set types of matching candidates or matching candidates with scoring only.
Implementations may schedule this process daily, weekly, and so on, as required by the frequency of changes to the candidates. Consider how often the candidate data will change and how critical it is to have the changes available for use in assignment. For example, resource details may change daily and therefore the resource candidate data cache for Lead Management may need to be updated once per day.
As indicated in the note above, the Refresh Cache process should be defined for each candidate object and application that uses Rules-based Assignment candidate matching or candidate matching with scores. The process has the following parameters:
Owner Module, such as sales, or leadMgmt
Candidate Object Code, for example Resource_Candidate_Object.
For example, there would be one ESS process scheduled
for Lead Management with the parameters: leadMgmt
/ Resource_Candidate_Object_Lead. Sales would need two processes
scheduled: One with parameters sales /Resource_Candidate_Object and the other with the parameters sales/Credit_Allocation_Template_Candidate_Object.
Territory-based assignment is based on intelligent mapping of sales account assignment object attributes and sales territory dimensions. The Sales Account Assignment object is used by Assignment Manager to identify the sales accounts and then determine which territories to assign. The table below lists sales account assignment object attributes and corresponding customer attributes as shown in Customer Center Profile and Classification nodes. See Configuring Assignment Manager: Critical Choices for more information about the assignment process.
|
Sales Account Assignment Object Attribute |
Corresponding Customer Center Attribute |
|---|---|
|
Geography ID |
Sell-to Address |
|
Industry |
Primary Industry: the primary classification code for the classification category defined in profile option Industry Classification Category. |
|
Organization Type |
Primary Organization Type: the primary classification code for the classification category Organization Type defined in profile option Industry Classification Category. |
|
Customer Size |
Customer Size |
|
Named Account Type |
Named Sales Account Indicator |
|
Party ID |
Party ID |
|
Auxiliary Dimension 1 |
the primary classification code for the classification category defined in profile option Industry Classification Category for Auxiliary Dimension 1. |
|
Auxiliary Dimension 2 |
the primary classification code for the classification category defined in profile option Industry Classification Category for Auxiliary Dimension 2. |
|
Auxiliary Dimension 3 |
the primary classification code for the classification category defined in profile option Industry Classification Category for Auxiliary Dimension 3. |
The Sales Account assignments process can be scheduled and run on the Scheduled Process page. You need to have the 'Run Sales Party Batch Assignment' privilege to be able to define and run sales account batch assignment.
To access the Scheduled Process page, start on the Fusion Home page and click Navigator. Under the Tools heading, click Scheduled Processes.
Click Schedule New Process then click type Job. Choose the process named SalesAccountBatchAssignRequest. If needed, use the Search link at the bottom of the Search window.
Enter your process details. The following table shows the view criteria and its description, as well as any bind values that are required.
Work Object code: Sales_Account_Work_Object
Candidate Object Code: SalesAccountTerritory_Candidate_Object
Assignment Mode: Territory
View Criteria Name: (see table below)
View Criteria Bind Values: (see table below)
|
View Criteria Name |
View Criteria Description |
View Criteria Bind Values |
|---|---|---|
|
SalesAccountsUpdatedSinceVC |
Use this view criteria to assign sales accounts which
have not been previously assigned and have |
BindLastUpdateDate=[YYYY-MM-DD HH:MM:SS] |
|
SalesAccountsAssignedBeforeVC |
Use this view criteria to reassign sales accounts
which have been previously assigned and have |
BindLastAssignedDate=[YYYY-MM-DD] |
|
SalesAccountTerritoryBatchReassignmentVC |
Use this view criteria to reassign sales accounts impacted by the specified territory and territory dimensional realignment batch. This view criteria is also used internally to invoke immediate/automatic assignments after territory proposal activation and territory dimension updates. |
BindReassignmentBatchId=[Territory Reassignment Batch ID] |
|
SalesAccountBulkImportVC |
Use this view criteria to assign sales accounts created in a given customer import batch. This view criteria is also used internally to invoke immediate/automatic assignments after customer import. |
BindReassignmentBatchId=[Import Activity ID] |
|
SalesAccountDimsForPartyVC |
Use this view criteria to assign the sales account with the specified sales account ID. |
BindPartyId=[Sales Account ID] |
Define a schedule as needed using the Advanced button on the Process Details page. You can schedule the process to run as soon as possible, or to run at a given frequency and start date.
Submit your job and monitor it using the Scheduled Processes list, refreshing it to view the latest status updates.
When the assignment object inactive box is checked the selected work or candidate assignment object is not available for assignment processing. When the assignment attribute inactive box is checked the selected work or candidate object attribute is not available for assignment processing.
Note
The object or attribute cannot be set to inactive if there is a mapping or rule defined using the object or attribute.
Attribute Mapping: This mapping enables you to compare and match attribute
values between a work object attribute and a candidate object attribute.
When the value of the candidate object attribute matches the work
object attribute the candidate is selected. Attribute mappings should
be used when the work object and candidate object attributes in the
comparison are non-dimensional attributes.For example,
consider a lead work object with a program ID attribute and the territory
object with program ID attribute. The selection criterion is: select Sales Lead Territories where Sales Lead
Territory.ProgramID equals Sales Lead.LeadProgramIDThe assignment
engine will use this mapping data to construct a query on the candidate
object that is equivalent to the selection criteria. When creating
the mapping, use the Function Code field to specify a unique identifier
for the attribute. This identifier will be passed to the translation
function, in case the same function is used for multiple
attributes.
Literal Mapping: Literal Mapping is used almost exclusively to filter the
candidate objects. This form of mapping enables the comparison of
candidate attributes against a specific value chosen by the user.
The assignment engine will compare the mapped candidate object attribute
against the specified literal value. For example: Select the Territory
Candidate object that has the attribute TerrStatusCode that equals
the value FINALIZED.
Dimension Mapping: Dimension mapping should be used when the work object and candidate object attributes in the comparison are dimension attributes, such as Geography, Product, or Account. When creating the mapping, use the Function Code field to specify a unique identifier for the dimension. This identifier will be passed to the translation function, in case the same function is used for multiple dimensions.
Assessment templates let you analyze the health of a business object, such as a lead or an opportunity, and suggest appropriate next steps based on its diagnosis. To best plan and create assessment templates, you should consider the following points:
Ratings
Questions, Question Groups, and Question Weights
Responses and Scores
Associated Task Templates
A rating is a textual qualification such as Excellent. There are three delivered ratings in the assessment template: Excellent, Average, and Poor. Ratings provide a metric other than a numerical score for qualifying the outcome of an assessment. Ratings are created at the beginning of the assessment template creation process. They are later applied to possible responses to questions in the template, which associates each rating with a score. An appropriate feedback will be displayed to you based on the completed assessment score once you submit an assessment. When setting up ratings and applying them to possible responses, it is important to remember that they and their associated feedback text will eventually display as part of the overall assessed health of a business object.
Questions are the main components of an assessment template. They are written such that they aid in systematically determining the health of a business object, and they are grouped into logical collections called Question Groups. Each question in the template is assigned a question weight, expressed as a percentage, which is the relative importance of the question within the template. When an assessment template is used to perform an assessment, a question's weight is multiplied by the normalized response score given for the question to produce a weighted score for that question. When setting up questions, question groups, and question weights, it is important to carefully analyze which factors determine the health of a particular business object (like a lead or an opportunity) in your organization. Use those factors to create your question groups; and then, for example, write three to five questions per group that are weighted according to your analysis. There is no limit to the number of questions that can be in a question group, but each question group must have at least one question.
Responses are attached to questions in the template. Each question should have at least two responses, unless it's a free-form only question. More than one response can be tied to the same rating but, between all of its responses, each question should accommodate at least two ratings, unless it's a free-form only question. For example, if your ratings are Excellent, Average, or Poor you may, for each question, include two responses that correspond to at least one of those ratings, such as average. There must be enough responses to cover at least two of the ratings such as Excellent and Average. You assign a score to each response for a question, and the application normalizes the score based on a standard scoring scale. When an assessment template is used to perform an assessment, a question's weight is multiplied by the normalized score of the response given for the question to produce a weighted score for that response. When adding responses to questions, ensure that the scores and ratings you assign to each response correlate. In other words, the higher the score you assign to the response, the higher the rating should be so that you have a strong quantitative relationship between the two. Also note that you can allow free-form responses for one or more questions in the template, but free-form responses are never scored.
A task template is an instruction to generate a group of related activities. You can associate task templates with an assessment template in order to recommend tasks that should be performed after an assessment has been done for a business object. When you associate task templates with an assessment template, you can indicate a score range for each task template, and based on the total score of any assessment that uses your template, one or more task templates will be recommended as follow-up activities. In order for a task template to be available to associate with an assessment template, it must be assigned to the same business object type as that assigned to the assessment template, and it must have a subtype of Assessment. Ensure that you have set up task templates correctly before attempting to associate them to assessment templates.
Throughout the life of an assessment template, it can be assigned several different status codes.
These status codes control the actions you are allowed to make against an assessment template.
In Progress
Active
Retired
This is the initial status of an assessment template. When an assessment template is at this status, you can edit any part of it. This is the only status at which you can delete a template. If the template is not deleted, it moves to the Active status next.
This is the status assigned when the assessment template has been deployed for general usage. When an assessment template is at this status, you can make only minor textual edits to it, including, but not limited to, template description, question text correction, question sequencing change, response description, and score range feedback. From this status, you can move the template to Retired; you cannot delete it.
When an assessment template is at this status, it is no longer available for general usage. You cannot edit any part of it, and you cannot move it to any other status; however, it can still be copied. Active templates that are deleted revert to this status.
The application calculates the score range for an assessment template using the question weights and the ratings and scores assigned to the possible responses for all the questions in the template. This topic explains when the score range is calculated and the components that are used in the calculation, so that you can make the best decision regarding the feedback text to apply to each score range. In addition to the automatic score range calculation, a manual method for adjusting score range is also available on the administration UI.
In order for the application to calculate the assessment template score range, you must:
Apply weights to all template questions.
Configure ratings and apply them to possible responses for all template questions.
Apply a score to each of the possible responses for all template questions.
The score ranges for each rating in an assessment template are determined using the lowest and the highest weighted response scores for each question. So for each rating score range, the lower end of the range starts where the previous rating range ended, and the higher end of the range is the sum of the highest weighted scores that can be attained for that rating.
This table displays a simple example of the components used in the score range calculation.
|
Question (Weight) |
Response (Normalized Score) |
Weighted Score |
Rating |
|---|---|---|---|
|
What is the customer win? (20%) |
Lower Operating Cost (100) |
20 |
Excellent |
|
Higher Revenues (80) |
16 |
Average |
|
Other (53) |
11 |
Average |
|
Don't Know (27) |
5 |
Poor |
|
What is our win? (80%) |
Reference (60) |
48 |
Average |
|
Resale (50) |
40 |
Poor |
|
Partnership (100) |
80 |
Excellent |
This table displays the score range calculation based on the components from the first table.
|
Rating |
Score Range |
|
|---|---|---|
|
Excellent |
65 - 100 |
|
|
Average |
46 - 64 |
|
|
Poor |
0 - 45 |
|
Note
If a template administrator does not use a particular rating while assigning ratings to possible responses, this could result in improper score range calculations. To counteract this problem, the score range calculation uses a built-in correction algorithm to ensure proper score ranges. The correction algorithm works like this: For a question where a particular rating is skipped, the low score for the skipped rating is calculated to be equal to the high score of the next lower ranked rating. The high score for the skipped rating is calculated to be equal to the low score of the next higher ranked rating.
Using the ratings displayed in the tables above, if the rating Average is not used for a question's possible responses, the score range calculation assigns a low score to Average for that question that is equal to the high score of Poor for that question. It also assigns a high score to Average for that question that is equal to the low score of Excellent for that question. This ensures that the overall template score range for Average is calculated to fall between the score ranges for Poor and Excellent.
The question weight, response score, and response rating are the assessment template components that fit together to calculate and display the overall assessment score, rating, and feedback text.
A question weight is multiplied by a response score to achieve a weighted score for an assessment template response. The weighted scores for all responses are added together to determine the total assessment score. This score will fall within a precalculated score range that is associated with a response rating and feedback text. Therefore, the score range within which the total assessment score falls determines the rating and feedback text to display for a completed assessment.
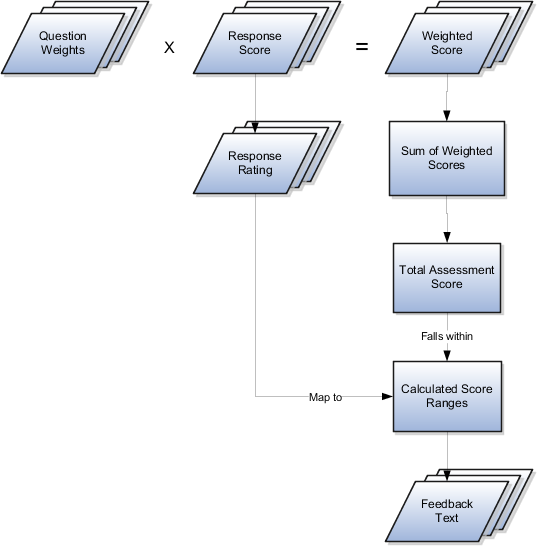
The question weight is the relative importance of a question within an assessment template, and it is expressed as a percentage. All of the question weights within a template must total to exactly 100. When an assessment template is used to perform an assessment, a question's weight is multiplied by the score of the response given for the question to produce a weighted score for that response.
A response score is the score assigned to a possible response to a question in the template. The template administrator sets response scores with no upper or lower bounds, and each score is normalized in order to accurately score an assessment that uses the template. The response scores are normalized by assigning a score of 100 to the highest response score, and then all other responses are assigned a normalized score relative to that highest score.
When an assessment template is used to perform an assessment, the normalized score of the response given for the question is multiplied by the question's weight to produce a weighted score for that response.
A response rating is the rating assigned to a possible response to a question in the template. A rating is a textual qualification like Excellent or Poor that provides a metric other than a numerical score for qualifying the outcome of an assessment. A response rating is directly related to a response score, and this relationship should ensure that a higher score will translate to a higher rating.
Early in the template creation process, the administrator configures ratings to assign to responses. The administrator then assigns scores and ratings to responses, and the system calculates score ranges based on those entries. Each rating is assigned to a score range, and the administrator is given the opportunity to apply feedback text to the rating-score range combination.
When an assessment template is used to perform an assessment, the weighted scores from all responses are added to determine the total assessment score. That score will fall somewhere within the calculated score ranges, which then determines which rating is assigned to the assessment and what feedback text to display. The maximum total assessment score is 100.
One of the steps for creating an assessment template is associating task templates. You would take this step if you want to recommend sets of tasks to be done after an assessment is performed using your template. You associate task templates to ranges of scores in the assessment template, and where the overall assessment score falls within those ranges determines the tasks that are suggested to be performed after the assessment.
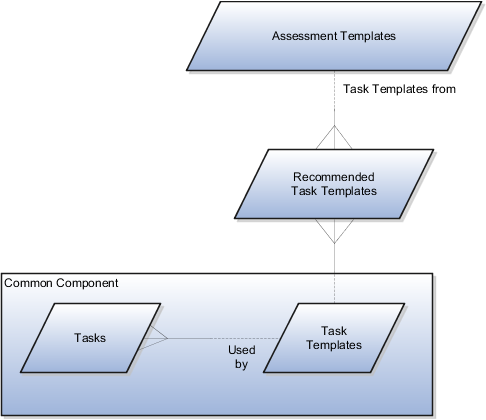
An assessment template is a set of weighted questions and possible responses used to evaluate the health of a business object such as an opportunity or a lead. An assessment template can be associated with one or more task templates that are recommended based on the outcome of an assessment.
A task template is an instruction to generate a group of related activities. By marking a task template with a subtype of Assessment, you make that task template available for association with assessment templates. The task template's business object type should be the same as that assigned to the assessment template. When an assessment is performed using an assessment template that has associated task templates, one or more task templates are recommended based on the total score of that assessment and can be used to generate a list of activities to perform.
For example, you can associate a task template called Engage Business Development Manager with your assessment template called Potential for Win-Win. Associate the task template with the score range of 86 to 100, so if an assessment using the assessment template Potential for Win-Win scores within that range, the application recommends the Engage Business Development Manager task template and a list of follow-up activities based on that template can be generated.
A score of 0 is assigned for free-form responses.
A free-form response option will have no effect on the overall assessment score. The free-form response offers the opportunity to enter a textual response to a question that does not conform to any of the pre-populated responses provided by the assessment template.
A question group is a logical grouping of questions within an assessment template, and it is used strictly as a category header for those questions. Through careful naming of a question group, you can achieve the benefit of providing the user of the template with an approximate idea of the type of questions to expect in each group.
This step lists all of the assessment template questions in one place, and provides you with the opportunity to edit weights as necessary to ensure that the sum of all weights totals 100.
|
Copyright © 2011, Oracle and/or its affiliates. All rights reserved. Legal Notices |
|