11g Release 1 (11.1.2)
Part Number E20380-02
Contents
Previous
Next
|
Oracle® Fusion
Applications Workforce Development Implementation Guide 11g Release 1 (11.1.2) Part Number E20380-02 |
Contents |
Previous |
Next |
This chapter contains the following:
Define Employment Record Values
Schedule Processes for Portrait Gallery
The availability of a worker during a selected time period is automatically determined using:
Absence entries during that period
The work schedule that the worker presently follows
Calendar events
You specify which work schedules assigned to the worker's primary assignment or workforce structures are primary.
The following figure shows how worker availability is determined.
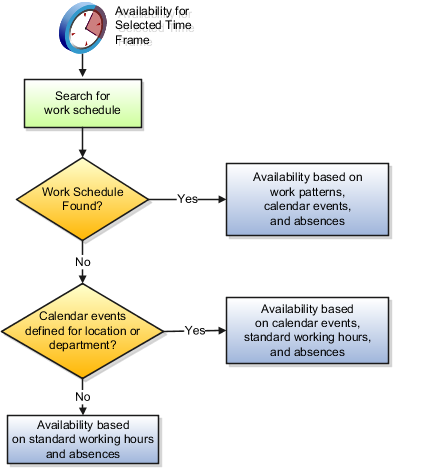
The application searches for primary work schedules that were assigned to these workforce structure levels in the following order:
Primary assignment of the worker
Position
Job
Department
Location
Legal Employer
Enterprise
To determine availability, work schedules that were assigned to lower workforce structure levels take precedence over those defined at higher levels.
For example, you assigned a primary schedule at the enterprise level. However, since workers belonging to a particular department in that enterprise follow different work timings, you assigned a different primary schedule to that department. The department's primary schedule determines worker availability because that schedule takes precedence over the one that was defined at the enterprise level. In the same example, if you assigned a primary schedule to a worker (primary assignment) belonging to the same department, then that schedule determines the worker's availability because a schedule assigned to the primary assignment takes precedence over the ones defined at the department level and the enterprise level. The following diagram illustrates this example:

The work patterns and exceptions that exist in the primary work schedule, and any absence entries during the selected time period, impact worker availability.
If no primary schedule was assigned to any of the workforce structures, then the worker availability is based on absences, calendar events, if created for the worker's location or department, and standard working hours defined for the worker's primary assignment. If no calendar events were created, then the application determines availability only on the basis of the standard working hours and absences.
When you create a calendar event, you determine which set of workers the event must apply to. You must use one of these types of hierarchies to determine coverage:
Organizational
Geographic
You create the organizational or geographical hierarchies using the Manage Trees page. For the hierarchy to be visible when you create a calendar event, you must ensure that the hierarchy is active.
Note
A calendar event, by default, applies to all workers belonging to the hierarchy nodes you included in the coverage. However, if you assign work schedules to workers, the calendar event only applies to them if you add the event as an exception in the work schedule.
Use an organizational hierarchy to apply a calendar event to your workers' assignments on the basis of the department that they belong to. For example, you want the Annual Sales Team Outing calendar event to apply to workers in the Sales department and its subordinate nodes, but not the Research department.
Use a geographic hierarchy to apply a calendar event to your workers' assignments on the basis of the country that they belong to. For example, you may want to apply the Boxing Day calendar event to all workers in the UK, but not those in the US.
When you use a geographic or organizational hierarchy for calendar event coverage, you can select which nodes in the hierarchy to include in or exclude from the coverage. You can also override the calendar event name or its category for a specific node in the hierarchy.
You want to apply the New Phone System Training calendar event to all workers in your enterprise except those working in the Support department. When an event applies to most of a hierarchy, it's efficient to use the Include tool to include the whole hierarchy in the coverage and then use the Exclude tool to leave out the exceptions.
The following diagram shows how to include and exclude calendar event coverage in a sample organization hierarchy.

You have set up public holidays and other calendar events for workers at your India location and France location using a geographic hierarchy. For six months, workers at your Bangalore location will work closely with their counterparts in Paris on a critical project. During this time, you want the Bangalore workers to follow the events you set for France. On the Manage Locations page, edit the location information for Bangalore and set the geographic hierarchy to France.
The following diagram shows a sample geographical hierarchy where employees of a particular location share calendar events of another country.
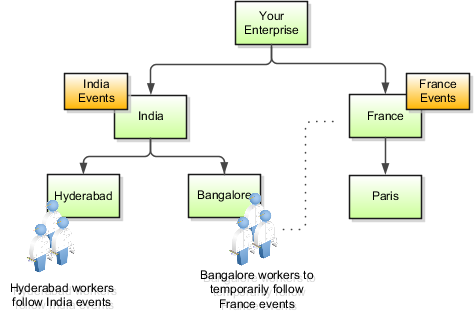
Some workers from your Hyderabad location are closely working on a project with their counterparts at your France location for a year. For that duration, you want to change coverage for these employees so that they follow the calendar events you set up for the France location. For each worker, open the Manage Employment page, and set the Geographic Hierarchy to France.
You have set up the May Day calendar event for all locations in your enterprise. However, you want the event to be referred to as Labour Day for your France location. On the Calendar Event page, select the France location node on your geographical hierarchy and use the Override tool to enter a new name for the event.
You have associated the Good Friday calendar event with the Public Holiday event category and applied the coverage to all departments in your enterprise. However, you want to change the event category to a voluntary holiday instead of a public holiday for your Finance department. On your organization hierarchy, select the Finance node and use the Override tool to select a different category.
This example demonstrates how to create a geographic tree so that calendar events can be associated to employees on the basis of their country.
The following table summarizes key decisions for this scenario.
|
Decisions to Consider |
In This Example |
|---|---|
|
Which countries must be included in the geographic tree? |
Your enterprise has employees working in the US, the UK, India, and Japan. |
|
Between which dates must the geographic tree version be enabled? |
January 1, 2011 to December 31, 2011. |
The following is a summary of tasks that you must perform.
Launch the Manage Geography Trees task.
Create a geographic tree based on HCM Geographic Tree Structure, a predefined tree structure.
On the basis of the tree that you created, create a tree version and add country nodes to it.
Audit the tree version to identify and correct any validation errors that the audit detects. Activate and row-flatten the tree version.
|
Field |
Value |
|---|---|
|
Name |
Enterprise Locations |
|
Code |
ENT_LOC |
|
Tree Structure |
HCM Geographic Hierarchy Tree Structure |
|
Field |
Value |
|---|---|
|
Name |
Enterprise Locations Version 1 |
|
Effective Start Date |
January 1, 2011 |
|
Effective End Date |
December 31, 2011 |
GB United Kingdom
IN India
JP Japan
US United States
You row flatten a tree so that retrieval and display of the tree is faster.
For more information, see Case Study: How to Set Up a Geography Tree and Link to a Calendar Event on My Oracle Support at https://support.oracle.com.
This example demonstrates how to create and assign a work schedule, incorporating shifts, patterns, and calendar events. The work schedule is for a support department in India, working in two shifts, and eligible for all public holidays.
The following table summarizes key decisions in this scenario:
|
Decisions to Consider |
In This Example |
|---|---|
|
Which calendar events must be included in the work schedule? |
All public holidays |
|
Which geographical location must the calendar events apply to? |
India |
|
What shifts must workers follow? |
Day shift (9 a.m. to 5 p.m.). Night shift (5 p.m. to 1 a.m.). |
|
What is the work pattern that workers must follow? |
Day shift from Monday to Wednesday. Night shift on Thursday and Friday. Weekly holiday on Saturday and Sunday. |
|
When must the work schedule start and end? |
Starts on 1 January, 2011. Ends on 31 December, 2011. |
|
Which shift must workers work first when the work schedule starts? |
Day shift |
|
What eligibility criteria must you associate the work schedule with so that line managers can easily find the schedule to assign to workers? |
All employees who belong to the support department |
|
Which department must this schedule be assigned to? |
Support department |
|
What exceptions must be made to the work schedule of Vijay Singh who works in the same department? |
Vijay Singh is scheduled to attend the Advanced Communication Skills training course on 8 February, 2011 during which time, the work schedule must indicate that he is unavailable. |
Create calendar events within the Public Holiday category. Create two shifts (day and night), then create a weekly work pattern that uses these shifts. Create a work schedule using this work pattern, and select the Public Holiday calendar event category as an exception. Then assign this work schedule to the support department. Assign the same schedule to Vijay Singh and add the training course as an exception and indicate that the worker is unavailable during the course.
|
Field |
Value |
|---|---|
|
Name |
Enter the name of the public holiday. |
|
Category |
Public Holiday |
|
Start Date |
Enter the date when the public holiday starts. |
|
End Date |
Enter the date when the public holiday ends. |
|
Short Code |
Enter a code to identify the public holiday. |
|
Hierarchy Type |
Geographic |
|
Hierarchy |
Select the geographic hierarchy that you created for your enterprise. |
|
Field |
Day Shift |
Night Shift |
|---|---|---|
|
Name |
Day Shift |
Night Shift |
|
Start Time |
0900 hrs |
1700 hrs |
|
Duration |
8 hours |
8 hours |
|
Shift Detail Type |
None |
None |
|
Field |
Value |
|---|---|
|
Name |
Weekly Work Pattern |
|
Length in Days |
7 |
|
Field |
Day Shift |
Night Shift |
|---|---|---|
|
Start Day |
1 (Monday) |
4 (Thursday) |
|
End Day |
3 (Wednesday) |
5 (Friday) |
|
Field |
Value |
|---|---|
|
Name |
Work Schedule for Support |
|
Category |
Work |
|
Type |
Time |
|
Effective From Date |
01 January, 2011 |
|
Effective To Date |
31 December, 2011 |
|
Pattern |
Weekly Work Pattern |
|
Exceptions |
Public Holiday event category |
|
Eligibility Profile |
Support_Workers |
|
Field |
Value |
|---|---|
|
Resource Type |
Department |
|
Name |
Support department |
|
Start Date |
01 January, 2011 |
|
End Date |
31 December, 2011 |
|
Starting Shift |
Day Shift |
|
Primary |
Yes |
|
Field |
Value |
|---|---|
|
Name |
Select Work Schedule for Support. In this example, when you search for the schedule in the Search and Select window, select the Filter Using Eligibility checkbox to display all work schedules created for the Support department. |
|
Start Date |
01 January, 2011 |
|
End Date |
31 December, 2011 |
|
Starting Shift |
Day Shift |
|
Primary |
Yes |
|
Field |
Value |
|---|---|
|
Type |
Resource Exception |
|
Name |
Click Create in the choice list to create a resource exception called Advanced Communication Skills that starts on 8 February, 2011 and ends on the same day. |
|
Availability |
Off Period |
In addition to the predefined Public Holiday event category, you can create your own calendar event categories by adding values to the Calendar Event Category lookup type.
When you include that event as an exception in a work schedule and assign it as a primary work schedule to the worker's assignment. However, if no work schedule exists for the worker's assignments, then the calendar events that cover the worker's location or department apply.
When you assign the schedule to a worker using the Manage Work Schedule Assignment page, you can change the exceptions and their impact to that worker's availability. For example, if you added a calendar event as an exception that impacts all workers, but want a particular worker to remain available to handle critical customer queries, you can change the availability for that exception.
On the Manage Trees page, you must create a geographic tree version using the predefined HCM Geographic Hierarchy tree structure and add country nodes. When you create a calendar event, you select that geographic tree version and select countries that you want the calendar event to apply to.
You use person types to identify different groups of people in your enterprise.
For example, for purposes of reporting, you may want to identify contractual workers in your enterprise with the Contingent Worker person type, and regular employees with the Employee person type. You can maintain information for a group of people on the basis of the person type. You can also secure access to information on the basis of the person type.
These are predefined person types that the application uses to identify a group of people. You cannot change, delete, or create additional system person types.
Each system person type contains a user person type that you can configure to your requirements. You can change, remove, or create additional user person types to suit your enterprise requirements. For example, if your enterprise refers to its employees as associates instead of employees, you change the Employee user person type to Associate. In another example, if you want to classify employees further as equity partners, non-equity partners, and associates, you add these user person types under the Employee system person type. There is no limit to the number of user person types that you can add to a system person type.
This topic describes name styles, name formats, and person-name languages.
The structure of a person's name can vary among countries. For this reason, a predefined name style exists for many countries for capturing relevant components of a person's name. The name style determines:
Which name components appear when you create a person record.
For example, one country may display first name, last name, and title while another displays first name, middle name, and last name.
The order in which the name components appear.
Which name components are required and which are optional.
For example, in one country you may be required to enter a title and in another the title may be optional.
When a country-specific name style does not exist, a universal name style (last name, first name, and title) is used.
When you create a person record you select a legal employer, which sets the legislative context for the record. For example, if the legal employer is a Canadian legal entity, the legislative context is Canada and the Canadian name style is used. A person's contacts have the same name style as the person for whom they are contacts.
When a person's name is displayed to users, the format of the name can vary according to the context in which it appears. For example, in an ordered list of names last name may appear before first name, but in other contexts first name appears before last name. A name format is a template for arranging the components of a name, such as first name, last name, and title, in a specified order for a particular purpose. Four name formats are available: display name, list name, full name, and order name.
Name formats can vary among countries; therefore, both global and local versions of names formats can exist.
The profile option HR: Local or Global Name Format controls whether users see local names or global names by default.
Global names use one name format; therefore, they enable users in multinational enterprises to see person names presented consistently, regardless of their countries of origin.
Users who view or manage person records in a single country may prefer to see local names. For example, users who view or manage person records only in Japan may prefer to see Japanese rather than global formats of person names.
Each enterprise identifies a global-name language. Person names appear in this language by default. When you create a person record, you can enter a local name in a different language from the global-name language. Names appear in this language for users whose HR: Local or Global Name Format profile option value matches the local-name language. For example, if the global-name language for the enterprise is American English and you set the local-name language in a person record to Japanese, users whose HR: Local or Global Name Format profile option is set to Japanese see the person's name in Japanese. All other users (those who are viewing global-format names or whose HR: Local or Global Name Format profile option is set to a value other than Japanese) see the person's name in American English.
Note
If you enter no local name in a person record, the local name is the same as the global name by default.
Users can set preferences to select the language in which they see the display-name versions of person names.
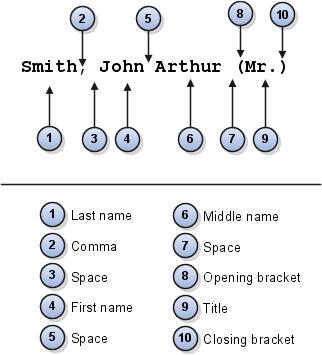
A person name format type determines how a person's name appears across Oracle Fusion Applications.
Each person name format type contains a sequence of name components that represents different parts of a person's name, for example, first name, last name, and punctuation marks. You can change the sequence of, remove, or include additional name components according to your requirements.
The following figure illustrates name components along with punctuation marks that make up a name format.
Oracle Fusion HCM provides the following predefined format types that you can configure.
|
Format Type |
Usage |
Default Structure |
|---|---|---|
|
Full Name |
For names that appear in reports. |
[Last Name], [First Name] [Middle Name] [Title] |
|
Display Name |
For names that appear singly, for example, on the Person Management page header. |
[First Name] [Prefix] [Last Name] |
|
List Name |
For names that appear in lists |
[Prefix] [Last Name], [First Name] |
|
Order Name |
For names that appear in name-ordered lists where the full name alone is not sufficient to sort the list. |
[Last Name] [First Name] |
Note
When you create or edit format types, to avoid creating blank person names, ensure that you include at least one name component that is never blank.
A local format is suitable for users in a single legislation who prefer to see person names in a character set appropriate to their legislation.
A global format is suitable for users in a multinational enterprise who prefer to see person names in a single (typically, Western) character set, so that all names, regardless of origin, have the same representation.
Oracle Fusion HCM includes local and global formats for each format type. When you create a new format on the basis of an existing format type, you identify it as either local or global. For local format types, you must also select the legislation that the format type applies to.
This topic identifies common lookups that are person-related and have user or extensible customization levels. Review these lookups, and update them as appropriate to suit enterprise requirements.
Person information lookups are described in the following table.
|
Lookup Type |
Description |
Customization Level |
|---|---|---|
|
PER_NATIONAL_IDENTIFIER_TYPE |
Type of a person's national identifier, such as social security number, civil registration number, or national insurance number |
Extensible |
|
PERSON_TYPE_STATUS |
Status of a user person type, such as active or inactive |
User |
|
EMAIL_TYPE |
Type of a person's e-mail address, such as home e-mail or work e-mail |
Extensible |
|
ADDRESS_TYPE |
Type of a person's address, such as home address or mailing address |
Extensible |
|
PHONE_TYPE |
Type of a person's phone, such as home phone or mobile phone |
Extensible |
|
PER_CM_MTHD |
Communication methods for a person, such as e-mail or instant messenger |
Extensible |
|
PER_CONTACT_TIMES |
Times of day when a specified phone number can be used, such as evenings or weekends |
Extensible |
|
PER_ETHNICITY |
Person's ethnicity, such as Hispanic, Asian, or American Indian |
Extensible |
|
PER_RELIGION |
Person's religion, such as Christianity, Hinduism, or Islam |
Extensible |
|
PROFESSION |
Person's profession reported on a visa or work permit, such as engineer, nurse, or teacher |
Extensible |
|
TITLE |
Person's title, such as Miss, Doctor, or Professor, forming part of the person's name |
Extensible |
|
HONORS |
Higher qualifications, such as CPA, PhD, or DDS, forming part of the person's name |
Extensible |
|
PER_HIGHEST_EDUCATION_LEVEL |
Person's highest level of academic qualification, such as BSc, Diploma, or MA. |
User |
|
MILITARY_RANK |
Person's military rank, such as private, sergeant, or corporal, forming part of the person's name |
Extensible |
|
BLOOD TYPE |
Person's blood group, such as A rhesus negative or B rhesus positive |
User |
|
CONTACT |
Relationship between a person and the person's contact, such as partner, child, or brother |
Extensible |
|
MAR_STATUS |
Person's marital status, such as single, married, or legally separated |
Extensible |
Document information lookups are described in the following table.
|
Lookup Type |
Description |
Customization Level |
|---|---|---|
|
PER_DRIVERS_LICENSE_TYPE |
Type of a person's driver's license, such as permanent or temporary |
Extensible |
|
PER_CITIZENSHIP_STATUS |
Status of a person's citizenship, such as active or expired |
Extensible |
|
PER_PASSPORT_TYPE |
Type of a person's passport, such as emergency or regular |
Extensible |
|
PER_VISA_PERMIT_TYPE |
Type of a person's visa or work permit, such as temporary worker or residence permit |
Extensible |
|
PER_VISA_PERMIT_STATUS |
Status of a person's visa or work permit, such as pending or active |
Extensible |
Disability information lookups are described in the following table.
|
Lookup Type |
Description |
Customization Level |
|---|---|---|
|
DISABILITY_CATEGORY |
Type of a person's disability, such as hearing loss or visual impairment |
User |
|
DISABILITY_REASON |
Causes of a person's disability, such as accident or illness |
Extensible |
|
DISABILITY_STATUS |
Status of a person's disability registration, such as approved or pending |
User |
The status of a user person type determines whether it is available across Oracle Fusion HCM.
If you inactivate a user person type, there is no impact on worker assignments that are currently associated with that person type. However, starting from the date of inactivation, you can no longer select that person type to associate with worker assignments.
Note
You cannot inactivate a default user person type; you must first select a different user person type as the default.
Each system person type contains a default user person type that the application uses to associate with person records for reporting and display purposes. When you hire a worker and specify assignment information, the application associates the default user person type with that worker assignment. However, if you select a different person type, then the application considers the selected person type as the default one for that worker.
When you run the Update Person Names process. When you update a name format, you run this process so that the application updates the stored names according to the rules of the updated format type. You can run the process for a specific name-format and legislation combination.
You use the HR: Local or Global Name Format profile option. If you select the global name format, then person names appear in the same format across all legislations. If you select a particular legislation, then person names appear in a format specific to that legislation. For example, if you set the profile option to Japan, then Japanese person names appear in the local name format that was created for Japan. However, person names that were stored using formats other than those of the Japanese legislation appear according to the global name format.
Each assignment contains an assignment status. The assignment status contains an HR status, a payroll status , and optionally user statuses. The HR status and payroll status values are linked to the assignment status and are set automatically when the assignment status changes.
This table summarizes the values of the three statuses.
|
Assignment Status |
HR Status |
Payroll Status |
|---|---|---|
|
Active - payroll eligible |
Active |
Process |
|
Active - no payroll |
Active |
Do not process |
|
Suspended - payroll eligible |
Suspended |
Process |
|
Suspended - no payroll |
Suspended |
Do not process |
|
Inactive - payroll eligible |
Inactive |
Process |
|
Inactive - no payroll |
Inactive |
Do not process |
When you create or edit an assignment, you select an action that categorizes the change and determines what are the next steps. Some actions make an automatic change to the assignment status. For example, when you create an assignment, its status is set automatically to Active - payroll eligible. The same action sets the HR status to Active and the payroll status to Process. Otherwise, you must set the assignment status directly.
You can define one or more user names for each assignment status value. If multiple user statuses exist for a HR status, you must designate any one user status as the default status corresponding to the HR status. The default assignment status is attached to an assignment unless you specify a default user status. For example, when you create an assignment, its status is set automatically to the default assignment status corresponding to the HR status Active.
This topic describes the effects of the following employment-related profile options:
PER_ENFORCE_VALID_GRADES
PER_DEFAULT_GRADE_FROM_JOB_POSITION
If you set this site-level profile option to Yes, then users can select a grade for an assignment or set of employment terms only from those grades that are valid for the job or position.
If users select both a job and a position for the assignment or employment terms, then they can select grades that are valid for the position only.
If valid grades are defined for neither the job nor the position, then users can select from all grades.
If you set this profile option to No, which is the default value, then users can select from all grades.
If you set this site-level profile option to Yes, and there is only one valid grade for a job or position, then that grade is used by default in the assignment or employment terms. In addition, if an entry grade is defined for a position, then that grade is used by default when the user creates a new set of employment terms or a new assignment.
If you set this profile option to No, which is the default value, then users can select from all grades.
This topic identifies common lookups that are employment-related and have user or extensible customization levels. Review these lookups, and update them as appropriate to suit enterprise requirements.
Employment contract lookups are described in the following table.
|
Lookup Type |
Description |
Customization Level |
|---|---|---|
|
CONTRACT_TYPE |
Type values, such as fixed-term, full-time, and seasonal |
User |
Employment terms and assignment lookups are described in the following table.
|
Lookup Type |
Description |
Customization Level |
|---|---|---|
|
BUDGET_MEASUREMENT_TYPE |
Work measure values, such as headcount and FTE |
Extensible |
|
EMP_CAT |
Assignment categories, such as full-time regular and part-time temporary |
User |
|
EMPLOYEE_CATG |
Worker type values, such as white collar, blue collar, and civil servant |
User |
|
BARGAINING_UNIT_CODE |
Codes that identify bargaining units, such as health professionals, steel workers, and public service workers |
User |
|
PER_SUPERVISOR_TYPE |
Manager types, such as line manager, project manager, and technical manager |
Extensible |
Terminations lookups are described in the following table.
|
Lookup Type |
Description |
Customization Level |
|---|---|---|
|
PER_PDS_REHIRE_REASON |
Reasons, such as misconduct and poor performance, for not recommending rehire of a worker |
User |
Areas of responsibility lookups are described in the following table.
|
Lookup Type |
Description |
Customization Level |
|---|---|---|
|
PER_RESPONSIBILITY_TYPES |
Worker responsibilities, such as benefits representative, union representative and fire warden |
Extensible |
Document records enable persons to create and maintain documents such as medical certificates, licenses, and visas. Document categories (for example, absence) provide a way to group these documents into meaningful categories at a higher level. Document subcategories (for example, general or medical) provide further grouping of documents. Document types (for example, leave approval or medical report) provide a lower level categorization of documents. To supplement the predefined document types, categories, and subcategories, you can create your own to suit the requirements of your enterprise.
The type of documents you can access depends on your role. For example, line managers, but not HR managers, may be able to view workers' payslips. Using the document type security profile, you can restrict which users or roles can access particular documents. The document type also indicates if the document requires approval. If you want to track the expiry of the document record, define Valid Till as a required or relevant attribute in the document type and specify the expiration notification period. The Enterprise Scheduler Service (ESS) generates a report of expired documents and notifies persons based on the notification preferences specified in the document type.
Use the DOCUMENT_CATEGORY lookup type to define new document categories and subcategories.
Define document categories as values for the DOCUMENT_CATEGORY lookup type and document subcategories as extended lookup values
for the selected category.
Approval statuses enable you to identify and track
document records requiring approval. Define approval statuses as values
for the lookup type DOCUMENT_STATUS.
Note that the application does not use the approval statuses to determine the document approval process. These statuses are for information purposes only.
Create document records to store information about documents such as work permits, and visas, and upload electronic versions of the documents as attachments. Document records store necessary document details such as the period for which the document is valid. This information can then be used for reporting purposes. For example, HR specialists can see the reports of documents that are near expiration in their dashboard.
The document type you select determines whether the document record requires approval. The list of approvers is predefined for the document type, however, you can add additional approvers. You receive a notification once the document record is approved. Following approval, the document record is then accessible and available for use in reports and analytics, for example.
Several attributes of person, employment, and profile records are used as person-search keywords. Keyword values are copied automatically from the originating records to the PER_KEYWORDS table, where they are indexed to improve search performance.
This topic explains:
How person keywords are maintained
Why you run the Update Person Search Keywords process
How to schedule the Update Person Search Keywords process
Whenever the value of a keyword attribute changes (for example, if a person acquires a language skill or a different phone number), an event is raised. In response, services run a process to update the relevant attributes for the person in the PER_KEYWORDS table; therefore, most changes are made in PER_KEYWORDS immediately and automatically.
When you create a new person record, keyword values for that person are copied automatically to the PER_KEYWORDS table.
Although most changes to the PER_KEYWORDS table are made automatically, you need to run the Update Person Search Keywords process regularly because the automatic process does not apply future-dated changes to the PER_KEYWORDS table. Running the Update Person Search Keywords process also ensures that all changes are copied to the PER_KEYWORDS table, despite any temporary failures of the automatic process.
You can run the Update Person Search Keywords process manually or schedule it to run at regular intervals (for example, weekly at a specified time).
The likely volume and frequency of changes to person records in your enterprise will determine how often you run the Update Person Search Keywords process:
If the volume and frequency are high, you need to schedule the process to run frequently.
If the volume and frequency are low, running the process once a month is recommended.
When you run the Update Person Search Keywords process, the whole PER_KEYWORDS table is refreshed; therefore, you are recommended to run the process at times of low activity to avoid performance problems.
The application searches for keyword values in these attributes of a person's records: department, job name and code, position name and code, person name, primary e-mail, primary phone, work location, competencies, language skills, licenses and certifications, school education, awards and honors, affiliations, areas of interest, and areas of expertise.
This topic describes:
Access to restricted information
Keyword indexing
Searches using date-effective keywords
Access to information about a person's competencies, language skills, licenses and certifications, school education, awards and honors, and affiliations is restricted to a person's line managers. For example, if a line manager searches for a language skill and a match is found in the language-skills information of the manager's direct or indirect reports, that information appears in the search results. Restricted information is not searched and is never included in search results when the searcher is not a line manager. However, if the match is found in public information, such as areas of expertise, it appears in the search results for any user.
Keywords are indexed values, which means that they are copied from person records and organized in a keywords table for fast retrieval. Most changes to person records are copied as they occur to ensure that there is no difference between the source and indexed values. Your enterprise can also run a keyword-refresh process to update all keywords and fix any discrepancies. Depending on when this process was last run, some recent changes to person records may not appear in search results.
In the professional user person search, you can enter an effective as-of date. When date-effective values, such as work location, are copied to the keywords table, their history is not copied: only the latest change is stored in the keywords table. Therefore, if you enter both a keyword value and an effective as-of date, the search results may not be as expected.
For example:
You change the work location of assignment 12345 from Headquarters to Regional Office on 27 January, 2011.
The changed work location is copied automatically to the keywords table on 27 January, 2011.
You search for a person on 1 February, 2011 using the keyword Headquarters and the effective as-of date 10 January, 2011.
Although the work location on 10 January, 2011 was Headquarters, assignment 12345 does not appear in the search results because the work location stored in the keywords table at the time of the search is Regional Office.
Gallery search results can be listed in order of the strength of the relationship between the person performing the search and each person whose assignment is in the search results: the stronger the relationship, the nearer to the top of the results an assignment appears. This topic describes how relationship-strength values are calculated for individual factors, such as proximity in the manager hierarchy and work location, and how those results are combined to give an overall relationship-strength value.
The calculation of relationship strength is based on several factors.
When the searcher's primary assignment is in the same organization or position hierarchy as a person's assignment, the strength of the relationship depends on their proximity to each other in the hierarchy. To calculate the relationship strength, 100 is divided by the number of boundaries plus 1 between the searcher and the person, as shown in the following table.
|
Hierarchy Boundaries |
Calculation |
Relationship Strength (%) |
|---|---|---|
|
0 |
100/1 |
100 |
|
1 |
100/2 |
50 |
|
2 |
100/3 |
33.3 |
|
3 |
100/4 |
25 |
The maximum number of hierarchy boundaries to include in the calculation is 4 by default. You can set this value for the enterprise on the HR: Maximum Hierarchy Proximity profile option.
When the searcher's primary assignment is in the same manager hierarchy as a person's assignment, the strength of the relationship depends on their proximity to each other in any direction in the hierarchy. To calculate the relationship strength, 100 is divided by the number of people removed from the searcher the person is, as shown in the following table.
|
People |
Calculation |
Relationship Strength (%) |
|---|---|---|
|
1 |
100/1 |
100 |
|
2 |
100/2 |
50 |
|
3 |
100/3 |
33.3 |
|
4 |
100/4 |
25 |
Only the manager hierarchy associated with the line manager of the searcher's primary assignment is included in the calculation.
The maximum number of hierarchy boundaries to include in the calculation is 4 by default. You can set this value for the enterprise on the HR: Maximum Hierarchy Proximity profile option.
The location on the searcher's primary assignment is compared with the location on the person's assignment. Relationship strength values are allocated according to the relative locations of the searcher and the person, as shown in the following table.
|
Location |
Relationship Strength (%) |
|---|---|
|
Same floor of building |
100 |
|
Same building |
80 |
|
Same postal code |
60 |
|
Same town or city |
40 |
|
Same country |
20 |
People in a different country from the searcher have no relationship with the searcher.
The number of times the searcher selects a person's assignment from the search results is recorded automatically. This value is compared with the maximum number of times the searcher has selected any person and assignment in a specified period. For example, if the searcher selects Andrew Jones 10 times in a week and Gloria Schmidt twice in a week, then the relationship strength values are 100% for Andrew Jones and 20% for Gloria Schmidt. The period of time during which the searcher's selection history is recorded is 7 days by default. You can set this value for the enterprise on the HR: Selection History Timeout profile option.
If the searcher is in the same social network as the person, then the relationship-strength value is 100%; otherwise, the relationship-strength value is 0%.
The relationship strength for each individual factor is multiplied by a weighting value, which is 0.5 by default, as shown in the following example.
|
Factor |
Relationship Strength (%) |
Weighting |
Result (%) |
|---|---|---|---|
|
Organization hierarchy proximity |
100 |
0.5 |
50 |
|
Position hierarchy proximity |
0 |
0.5 |
0 |
|
Manager hierarchy proximity |
100 |
0.5 |
50 |
|
Location proximity |
80 |
0.5 |
40 |
|
Selection history |
40 |
0.5 |
20 |
|
Social network |
100 |
0.5 |
50 |
|
Totals |
|
3 |
210 |
You can change the weighting values for individual factors on the relevant profile options, such as HR: Manager Hierarchy Weight and HR: Location Proximity Weight, to change the relative importance of those factors.
Each search result has a default searcher rating of 3, which has no effect on the relationship strength. However, the searcher can set this rating for individual results to a value between 1 and 5; values above 3 increase the relationship strength and values below 3 decrease it.
Each rating value is associated with a multiplying factor. The highest multiplying factor (the one used when the searcher sets the rating for a search result to 5) is specified on the profile option HR: Relationship Priority Factor, which is set to 2 by default. This table shows the default multiplying factors
|
Searcher Rating |
Multiplying Factor |
|---|---|
|
1 |
1/2 |
|
2 |
1/1.5 |
|
3 |
1 |
|
4 |
1.5 |
|
5 |
2 |
The total of the individual relationship-strength percentages is multiplied by the multiplying factor associated with the searcher's rating. For example, if the default rating (3) applies, then 210*1 =210. The searcher can double the multiplying factor by setting a search result's rating to 5 or halve it by setting the rating to 1.
If you change the setting of HR: Relationship Priority Factor, then you automatically change the associated multiplying factors. This table shows the multiplying factors for HR: Relationship Priority Factors from 3 through 6.
|
Searcher Rating: |
1 |
2 |
3 |
4 |
5 |
|---|---|---|---|---|---|
|
HR: Relationship Priority Factor 3 |
1/3 |
1/2 |
1 |
2 |
3 |
|
HR: Relationship Priority Factor 4 |
1/4 |
1/2.5 |
1 |
2.5 |
4 |
|
HR: Relationship Priority Factor 5 |
1/5 |
1/3 |
1 |
3 |
5 |
|
HR: Relationship Priority Factor 6 |
1/6 |
1/3.5 |
1 |
3.5 |
6 |
If you increase the HR: Relationship Priority Factor value, you increase the effect of the searcher's ratings relative to the other factors.
The result of multiplying the total of the individual percentages by the factor associated with the searcher's rating is divided by the sum of the individual weighting values. The result of this calculation is the relationship strength between the searcher and the person in the search result. For example: 210/3=70%
Results that are greater than 100 are set to 100%.
Because the factors that contribute to this calculation are likely to change often, the calculation runs daily by default and the results are stored. However, you can schedule the Calculate Relationship Strength process to suit local requirements.
You add eligibility criteria to an eligibility profile, and then associate the profile with an object that restricts eligibility.
The following figure shows the relationships between eligibility components.

You can add different types of eligibility criteria to an eligibility profile. For many common criteria, such as gender or employment status, you can select from a list of predefined criteria values. However, you must create user-defined criteria and derived factors before you can add them to an eligibility profile.
When you add an eligibility criterion to a profile, you define how to use it to determine eligibility. For example, when you add gender as a criterion, you must specify a gender value (male or female) and whether to include or exclude persons who match that value.
You can associate an eligibility profile with different kinds of objects:
Associate an eligibility profile with a variable rate or variable coverage profile to establish the criteria required to qualify for that rate or coverage.
Associate an eligibility profile with a checklist task to control whether that task appears in an allocated checklist.
Associate an eligibility profile with a total compensation statement to apply additional eligibility criteria after statement generation population parameters.
Associate one or more eligibility profiles with a benefits or compensation object to establish the eligibility criteria for specific plans and options.
Derived factors define how to calculate certain eligibility criteria that change over time, such as a person's age or length of service. You add derived factors to eligibility profiles and then associate the profiles with objects that restrict eligibility.
You can create six different types of derived factors: age, compensation, length of service, hours worked, full-time equivalent, and a combination of age and length of service.
For each factor that you create, you specify one or more rules about how eligibility is determined. For example, the determination rule for an age derived factor specifies the day on which to evaluate the person's calculated age for eligibility. If the determination rule is set to the first of the year, then the person's age as of the first of the year is used to determine eligibility.
For the full-time equivalent factor, you specify the minimum and maximum full-time equivalent percentage and whether to use the primary assignment or the sum of all assignments when evaluating eligibility. For example, if the percentage range is 90 to 100 percent for the sum of all assignments, then a person who works 50 percent full-time on two different assignments is considered eligible.
Other settings define the unit of measure for time or monetary amounts, rounding rules, and minimums and maximums.
The following scenarios illustrate how to define different types of derived factors:
Benefits administrators frequently use age factors to determine dependent eligibility. You can also use age as a factor when determining life insurance rates. Age factors typically define a range of ages, referred to as age bands, and rules for evaluating the person's age. The following table illustrates a set of age bands that could be used to determine eligibility for life insurance rates that vary based on age.
|
Derived Factor Name |
Greater Than or Equal To Age Value |
Less Than Age Value |
|---|---|---|
|
Age Under 25 |
1 |
25 |
|
Age 25 to 34 |
25 |
35 |
|
Age 35 to 44 |
35 |
45 |
|
Age 45 to 54 |
45 |
55 |
|
Age 55 to 64 |
55 |
65 |
|
Age 64 or Older |
65 |
75 |
The determination rule and other settings for each age band are the same:
|
Field |
Value |
|---|---|
|
Determination Rule |
First of calendar year |
|
Age to Use |
Person's |
|
Units |
Year |
|
Rounding |
None |
A derived factor for length of service defines a range of values and rules for calculating an employee's length of service. The following table illustrates a set of length-of-service bands that could be used to determine eligibility for compensation objects such as bonuses or severance pay.
|
Derived Factor Name |
Greater Than or Equal To Length of Service Value |
Less Than Length of Service Value |
|---|---|---|
|
Service Less Than 1 |
0 |
1 |
|
Service 1 to 4 |
1 |
5 |
|
Service 5 to 9 |
5 |
10 |
|
Service 10 to 14 |
10 |
15 |
|
Service 15 to 19 |
15 |
20 |
|
Service 20 to 24 |
20 |
25 |
|
Service 25 to 29 |
25 |
30 |
|
Service 30 Plus |
30 |
999 |
The determination rule and other settings for each length-of-service band are the same:
|
Field |
Value |
|---|---|
|
Period Start Date Rule |
Date of hire (This sets the beginning of the period being measured.) |
|
Determination Rule |
End of year (This sets the end of the period being measured.) |
|
Age to Use |
Person's |
|
Units |
Year |
|
Rounding |
None |
A derived factor for compensation defines a range of values and rules for calculating an employee's compensation amount. The following table illustrates a set of compensation bands that could be used to determine eligibility for compensation objects such as bonuses or stock options.
|
Derived Factor Name |
Greater Than or Equal To Compensation Value |
Less Than Compensation Value |
|---|---|---|
|
Less than 20000 |
0 |
20,000 |
|
Salary 20 to 34000 |
20,000 |
35,000 |
|
Salary 35 to 49000 |
35,000 |
50,000 |
|
Salary 50 to 75000 |
50,000 |
75,000 |
|
Salary 75 to 99000 |
75,000 |
100,000 |
|
Salary 100 to 200000 |
100,000 |
200,000 |
|
Salary 200000 Plus |
200,000 |
999,999,999 |
The determination rule and other settings for each compensation band are the same:
|
Field |
Value |
|---|---|
|
Determination Rule |
First of year |
|
Unit of Measure |
US Dollar |
|
Source |
Stated compensation |
|
Rounding |
Rounds to nearest hundred |
The Age to Use value that you select is an important aspect of an age derived factor. This value determines whose birth date is used to calculate the derived age.
In most cases, you use the Person's value in the Age to Use field to define an age derived factor for either a participant or dependent eligibility profile. In this case, each person's birth date is used to calculate the age criterion by which eligibility is evaluated for that person.
For example, if you select Person's as the Age to Use value, and associate the age derived factor with a dependent eligibility profile, each dependent's eligibility is evaluated based on the age calculated from his or her own birth date.
You might select another predefined value in the Age to Use field if you intend to evaluate participant or dependent eligibility or rates based on someone else's age, such as a spouse, child, or other dependent.
Note
If you choose Inherited Age, the evaluation is based on the date of birth as defined in the person extra information flexfield.
If you select Person's oldest child as the Age to Use value, and associate this derived factor with a dependent eligibility profile, eligibility for all dependents is evaluated based on the age of the participant's oldest child. Consequently, when the oldest child reaches the maximum age of eligibility, for instance, all dependents become ineligible.
You can define your own criteria to meet any special needs of your organization. For example, if your organization employs deep sea divers and offers different benefits or benefits rates based on how deep they dive, you can create Depth of Diving as a new eligibility criterion.
The data for the eligibility criterion must be stored in a table that is accessible to the application. If the data is stored in either the Person or Assignment table, you can select the table and column from a list, and then specify the lookup type used to validate input values. You can also allow a range of valid values if the field stores a numeric value or a date.
Note
To select the correct values for the column and lookup fields, you must have a basic understanding of the structure of the table that stores the eligibility criterion information.
If the data is stored in a table other than the Person or Assignment table, you must first create a formula to retrieve the data from the table, and then set the formula type to User-Defined Criteria.
You can define two sets of criteria on the User-Defined Criteria page. The participant must meet the criteria defined in either set to be considered eligible (or to be excluded from eligibility if the Exclude check box is selected when the criteria is added to an eligibility profile).
After you have created your user-defined criteria, you can add it to an eligibility profile.
The following scenarios illustrate how to define different types of user-defined criteria. In each example, you must first create the user-defined criteria and then add it to an eligibility profile and set the criteria values to use in the profile.
A commercial diving company wants to offer different benefit rates to employees who dive to depths greater than 330 feet. This data is stored for each employee in a custom attribute called Dive_Depth in the Person table. To define eligibility based on diving depth, set the following values on the Create or Edit User-Defined Criteria page:
|
Field |
Value |
|---|---|
|
Table |
Person |
|
Column |
Dive_Depth_Attribute |
|
Lookup |
Dive_Depth_Validation |
|
Enable range validation one |
Selected |
Save the user-defined criteria, and then add it to an eligibility profile. Set the following values on the User-Defined Criteria tab, which is under the Other tab on the Create or Edit Eligibility Profile page:
|
Field |
Value |
|---|---|
|
Set 1 Meaning |
329 |
|
Set 1 To Meaning |
9999 |
|
Exclude |
Deselected |
Save the eligibility profile and associate it with a variable rate profile.
An employer wants to exclude work-at-home assignment from eligibility for a transportation benefit option. To accomplish this, set the following values on the Create or Edit User-Defined Criteria page:
|
Field |
Value |
|---|---|
|
Table |
Assignment |
|
Column |
Work_at_home |
|
Lookup |
YES_NO |
|
Enable range validation one |
Deselected |
Save the user-defined criteria, and then add it to an eligibility profile. Set the following values on the User-Defined Criteria tab:
|
Field |
Value |
|---|---|
|
Set 1 Meaning |
Yes |
|
Exclude |
Selected |
Save the eligibility profile and associate it with the transportation benefit option.
A company wants to offer a spot incentive bonus to hourly employees who worked 100 percent of their scheduled shift hours in a three month period. To determine eligibility for the bonus, create a formula that calculates scheduled hours less worked hours for each week in the previous three months. If the result of successive calculations is less than or equal to zero, then the formula returns a result of Yes. The first step is to create the formula. Once the formula has been defined, create a user-defined criterion to run the formula. Enter the following values on the Create or Edit User-Defined Criteria page:
|
Field |
Value |
|---|---|
|
Access One Formula |
Worked_Sched_Hours_Percent |
|
Enable range validation one |
Deselected |
Save the user-defined criteria, and then add it to an eligibility profile. Set the following values on the User-Defined Criteria tab:
|
Field |
Value |
|---|---|
|
Set 1 Meaning |
Yes |
|
Exclude |
Deselected |
Save the eligibility profile and associate it with the bonus compensation object.
Note
For very complex scenarios, your organization or implementation team can write a custom program to evaluate eligibility, and then create a formula that calls the custom program.
This example illustrates how to define eligibility criteria based on the number of hours an employee is scheduled to work within a specified period of time.
You want to limit eligibility for a benefits offering to employees who were scheduled to work between 30 and 40 hours each week or between 130-160 each month as of the end of the previous quarter. To do this, add two different ranges on the Range of Scheduled Hours tab, which is under the Employment tab on the Create or Edit Eligibility Profile page.
Set the values for the first range as shown in this table:
|
Field |
Value |
|---|---|
|
Sequence |
1 |
|
Minimum Hours |
30 |
|
Maximum Hours |
40 |
|
Scheduled Enrollment Periods |
Weekly |
|
Determination Rule |
End of previous quarter |
Set the values for the second range as shown in this table:
|
Field |
Value |
|---|---|
|
Sequence |
2 |
|
Minimum Hours |
130 |
|
Maximum Hours |
160 |
|
Scheduled Enrollment Periods |
Monthly |
|
Determination Rule |
End of previous quarter |
An eligibility profile defines criteria used to determine whether a person qualifies for a benefits offering, variable rate profile, variable coverage profile, compensation object, checklist task, or other object for which eligibility must be established.
The following are key aspects of working with eligibility profiles:
Planning and prerequisites
Specifying the profile type and usage
Defining eligibility criteria
Excluding from eligibility
Assigning sequence numbers
Adding multiple criteria
Viewing the criteria hierarchy
Before you create an eligibility profile, consider the following:
If an eligibility profile uses derived factors, user-defined formulas, or user-defined criteria to establish eligibility, you must create these items before you create the eligibility profile.
If you are defining eligibility criteria for a checklist task, variable rate profile, or variable coverage profile, you must include all criteria in a single eligibility profile, because these objects can be associated with only one eligibility profile. You can, however, associate multiple eligibility profiles with benefits offerings and compensation objects.
Eligibility profiles are reusable, so use names that identify the criteria being defined rather than the object with which the profile is associated. For example, use "Age-20-25+NonSmoker" rather than "Supplemental Life-Min Rate."
When you create an eligibility profile, you specify whether the profile applies to participants or dependents. Use participant profiles to define criteria for employees or ex-employees who are eligible for company-sponsored benefits. Use dependent profiles for participants' spouses, family members, or other individuals who qualify as dependents. Dependent profiles can be associated only with plans and plan types.
An eligibility profile's usage determines the type of objects the profile can be associated with. For example, if you set the profile usage to Benefits, the profile is available for selection when you are associating eligibility profiles with benefits objects, such as programs, plans, plan types, options, variable rate profiles, and variable coverage profiles. You can also set the usage to Compensation, Checklist, or Global.
Criteria defined in an eligibility profile are divided into categories:
Personal: Includes gender, person type, postal code ranges, and other person-specific criteria
Employment: Includes assignment status, hourly or salaried, job, grade, and other employment-specific criteria
Derived factors: Includes age, compensation, length of service, hours worked, full-time equivalent, and a combination of age and length of service
Other: Includes miscellaneous and user-defined criteria
Related coverage: Includes criteria based on whether a person is covered by, eligible for, or enrolled in other benefits offerings.
Some criteria, such as gender, provide a fixed set of choices. The choices for other criteria, such as person type, are based on values defined in tables. You can define multiple criteria for a given criteria type.
For each eligibility criterion that you add to a profile, you can indicate whether persons who meet the criterion are considered eligible or are excluded from eligibility. For example, an age factor can include persons between 20 and 25 years old or exclude persons over 65. If you exclude certain age bands, then all age bands not explicitly excluded are automatically included. Similarly, if you include certain age bands, then all age bands not explicitly included are automatically excluded.
You must assign a sequence number to each criterion. The sequence determines the order in which the criterion is evaluated relative to other criteria of the same type.
If you define multiple values for the same criteria type, such as two postal code ranges, a person needs to satisfy at least one of the criteria to be considered eligible. For example, a person who resides in either postal range is eligible.
If you include multiple criteria of different types, such as gender and age, a person must meet at least one criterion defined for each criteria type.
Select the View Hierarchy tab to see a list of all criteria that you have saved for this profile. The list is arranged by criteria type.
You can define multiple criteria in an eligibility profile or create separate profiles for individual criterion. To determine the best approach, consider the following:
Does the object you are defining eligibility for support multiple eligibility profiles?
What is the best approach in terms of efficiency and performance?
If you are defining eligibility criteria for a checklist task, variable rate profile, or variable coverage profile, you must include all criteria in a single eligibility profile, because these objects can be associated with only one eligibility profile. You can, however, associate multiple eligibility profiles with benefits offerings and compensation objects.
For optimum performance and efficiency, you should usually attach profiles at the highest possible level in the benefits object hierarchy and avoid duplicating criteria at lower levels. Plan types in program, plans in program, plans, and options in plans inherit the eligibility criteria associated with the program. For example, to be eligible for a benefits plan type, a person must satisfy eligibility profiles defined at the program level and at the plan type in program level.
However, it is sometimes faster to create more than one profile and attach the profiles at various levels in the hierarchy. For example, you might exclude employees from eligibility at the program level who do not have an active assignment. At the level of plan type in program, you might exclude employees who do not have a full-time assignment. Finally, at the plan level, you might exclude employees whose primary address is not within a service area you define.
Note
Eligibility criteria can be used to include or exclude persons from eligibility. Sequencing of criteria is more complicated when you mix included and excluded criteria in the same profile. For ease of implementation, try to keep all excluded criteria in a separate eligibility profile.
The following examples illustrate scenarios where eligibility profiles are needed and briefly describe the setup required for each scenario.
A 401(k) savings plan is restricted to full-time employees under 65 years of age. To restrict eligibility for the plan, you must first create a derived factor for the age band of 65 and older, if one does not already exist. Then create an eligibility profile. Set the Profile Usage to Benefits and the Profile Type to Participant. Add the following criteria:
|
Criteria Type |
Name |
Values |
|---|---|---|
|
Employment |
Assignment Category |
Full-Time |
|
Derived Factor |
Age |
Select the age derived factor you created previously, and then select the Exclude check box. |
Associate the eligibility profile with the 401(k) plan.
A bonus is offered to all employees who received the highest possible performance rating in all rating categories. To restrict eligibility for the bonus, create an eligibility profile. Set the Profile Usage to Compensation and the Profile Type to Participant. Add the following criteria for each rating category:
|
Criteria Type |
Name |
Values |
|---|---|---|
|
Employment |
Performance Rating |
Select the performance template and rating name, and then select the highest rating value. |
Associate the eligibility profile with the bonus compensation object.
A new hire checklist contains tasks that do not apply to employees who work in India. To restrict eligibility for the tasks, create a participant eligibility profile. Set the Profile Usage to Checklist and the Profile Type to Participant. Add the following criteria:
|
Criteria Type |
Name |
Values |
|---|---|---|
|
Employment |
Work Location |
Select India as the work location, and then select the Exclude check box. |
Associate the eligibility profile with each checklist task that does not apply to workers in India.
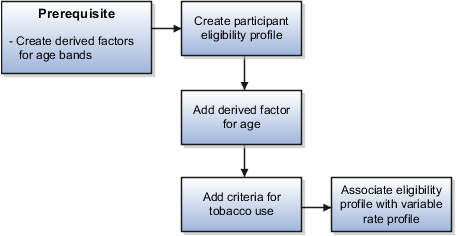
This example demonstrates how to create a participant eligibility profile used to determine eligibility for variable life insurance rates. The profile includes two eligibility criteria: age and tobacco. Once the eligibility profile is complete, you can associate it with a variable rate profile.
The following table summarizes key decisions for this scenario.
|
Decisions to Consider |
In this Example |
|---|---|
|
What is the profile type? |
Participant |
|
What type of object is associated with this profile? |
Variable rate for benefits offering |
|
What types of eligibility criteria are defined in this profile? |
Age derived factor (must have been previously defined) Uses Tobacco criteria |
|
What are the criteria values? |
Age: Under 30 Tobacco Use: None |
|
Should persons meeting these criteria be included or excluded from eligibility? |
Included |
The following figure shows the tasks to complete in this example:
Note
In this example, you create one eligibility profile that defines the requirements for a single variable rate. Typically, you create a set of eligibility profiles, one for each variable rate. When you have completed all steps described in this example, you can repeat them, varying the age and tobacco use criteria, to create a separate profile for each additional rate.
|
Field |
Value |
|---|---|
|
Name |
Age Under 30+Non-Smoking |
|
Profile Usage |
Benefits |
|
Description |
Participant, age under 30, non smoker |
|
Status |
Active |
|
Assignment to Use |
Any assignment |
Note
You can reuse this eligibility profile by associating it with other objects that restrict eligibility, including benefits offerings, compensation plans, and checklist tasks.
|
Copyright © 2011, Oracle and/or its affiliates. All rights reserved. Legal Notices |
|