11g Release 1 (11.1.3)
Part Number E20374-03
Contents
Previous
Next
|
Oracle® Fusion
Accounting Hub Implementation Guide 11g Release 1 (11.1.3) Part Number E20374-03 |
Contents |
Previous |
Next |
This chapter contains the following:
Representing Your Enterprise Structure in Your Financial Reporting Structure: Overview
Financial Enterprise Structure: How It Fits Together
Modeling Your Financial Reporting Structure in Oracle Fusion: Example
Maintain Segment Value Attributes
Creating Cross Validation: Example
Manage Chart of Accounts Mapping
Represent your enterprise structures in your chart of accounts to track and report on your financial objectives and meet your reporting requirements. The benefit of representing your enterprise in the chart of accounts is the Oracle Fusion General Ledger functionality which includes multidimensional reporting with its Essbase tool. Segments included in the chart of accounts become dimensions in Essbase. The recorded data is automatically loaded into the Essbase cube when you post your journal entries. The Essbase tool includes powerful functionality for analysis and reporting on your financial data.
Oracle Fusion Applications is an integrated suite of business applications that connects and automates the entire flow of the business process across both front and back office operations and addresses the needs of a global enterprise. The process of designing the enterprise structure, including the accounting configuration, is the starting point for an implementation. This process often includes determining financial, legal, and management reporting requirements and examining consolidation considerations.
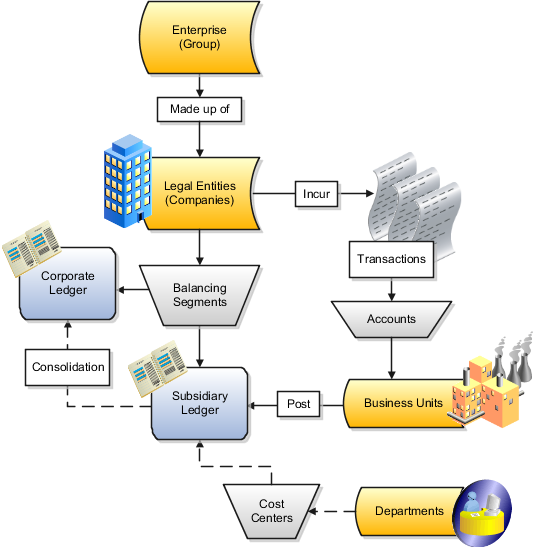
The accounting configuration components are:
Ledgers: A ledger is the main record-keeping structure. A ledger records transactional balances by defining a chart of accounts with a consistent calendar and currency, and accounting rules, implemented in an accounting method. The ledger is associated with the subledger transactions for the business units that are assigned to it, and provides context and accounting for them.
Balancing Segments: Oracle Fusion Applications use the chart of accounts element, balancing segment, to represent and track both legal and management entities. Specifically, Oracle Fusion Applications provide a primary balancing segment to represent your legal entities, and additional balancing segments, you can implement for management reporting and analysis.
Balancing segments provide automatic balancing functionality by legal entity for journal entries, including intercompany and intracompany entries, suspense posting, and rounding imbalances.
Cost Centers: Cost Centers aggregate elements of natural expenses to identify functional costs. A cost center can be the smallest segment of an organization for which costs are collected and reported. Not all cost centers represent organizations. A manager is assigned responsibility for cost control and is assigned both a department and a cost center; in which case the cost center and department might be identified with each other. However, a finance department manager might have separate cost centers for finance cost and audit costs, and an Research and Development department manager might have separate cost centers for research and development.
Cost centers are represented by segment values in the chart of accounts that indicate the functional areas of your business, such as accounting, facilities, shipping, or human resources. You might keep track of functional areas at a detailed level, but produce summary reports that group cost centers into one or more departments. Cost center values are also used by Oracle Fusion Assets to assist the managers in tracking locations and accounting for assets assigned to their departments.
Accounts: The account segment is a code in the chart of accounts that uniquely identifies each type of transactions recorded in the ledger and subledgers. The account segment is mapped to a dimension in the Essbase cube to enable reporting and inquiry. This functionality uses Oracle Fusion Business Intelligence Edition to analyze and drill into expense and revenue transactions.
The following list provides information on how to represent legal entities, business units, and departments in chart of accounts.
Representing Legal Entities in the Chart of Accounts: Legal entity is the term used in Oracle Fusion Applications for registered companies and other organizations recognized in law as having a legal existence and as parties with given rights and responsibilities.
Legal entities are created in the applications and then assigned balancing segment values, sometimes called company codes in your ledgers during accounting configuration.
Representing Business Units in the Chart of Accounts: A business unit (BU) is part of an enterprise managed by a manager with profit and loss responsibility. The business unit is generally tracked in the chart of accounts. A business unit can be represented by a single ledger. For example, in countries where you need document sequencing for unique transaction sequencing within a legal entity, you can have a single ledger with a single business unit and legal entity.
A business unit can also be identified in the chart of accounts as a:
Management segment value
Balancing segment value
Roll up of cost center segments using hierarchies
For example, a business unit manager is responsible for working capital utilization or overall asset utilization. You identify the business unit as a balancing segment value, to enable calculation of ratios for various utilization measurements.
A business unit is assigned to a primary ledger, as well as a default legal entity when it is configured. A BU identifies the primary ledger that subledger transactions are posted to, facilitating the use of more than one BU per general ledger. Each business unit posts transactions to a single primary ledger. For example, a shared service center handles all the procurement functions for the entire company. The procurement transactions are posted to the business unit's ledger with intercompany entries to other ledgers as needed.
Representing Departments in the Chart of Accounts: A department is an organizational structure with one or more operational objectives or responsibilities that exist independently of its manager and that has one or more employees assigned to it. The manager of a department is typically responsible for business deliverables, personnel resource management, competency management, and occasionally, for cost control and asset tracking.
In Oracle Fusion Applications, departments can be set up in Oracle Fusion Human Capital Management (HCM). If desired, they can also be represented by a unique segment in the chart of accounts or a group of cost center values.
This example uses a fictitious global company to demonstrate the analysis that can occur during the financial reporting structure planning process.
Your company, InFusion Corporation, is a multinational conglomerate that operates in the United States (US) and the United Kingdom (UK). InFusion has purchased an Oracle Fusion enterprise resource planning (ERP) solution including Oracle Fusion General Ledger and all of the Oracle Fusion subledgers. You are chairing a committee to discuss creation of a model for your global financial reporting structure including your chart of accounts for both your US and UK operations.
InFusion Corporation has 400 plus employees and revenue of $120 million. Your product line includes all the components to build and maintain air quality monitoring (AQM) systems for homes and businesses. You have two distribution centers and three warehouses that share a common item master in the US and UK. Your financial services organization provides funding to your customers for the start up costs of these systems.
The following are elements you need to consider in creating your model for your financial reporting structure.
Your company is required to report using US Generally Accepted Accounting Principles (GAAP) standards and UK Statements of Standard Accounting Practice and Financial Reporting Standards. How many ledgers do you need to achieve proper statutory reporting?
Your financial services line of business has a different year end. Do you need a different calendar? Your financial services entity must report with average balance sheets. This feature of Oracle Fusion General Ledger provides you with the ability to track average and end-of-day balances, report average balance sheets, and create custom reports using both standard and average balances.
Your corporate management requires reports showing total organizational performance with drill down capability to the supporting details. Do you need multiple balancing segment hierarchies to achieve proper rollup of balances for reporting requirements?
Legal entity balancing options: Do you need to produce financial statements by one or more than one legal entity? Can you record multiple legal entities in one ledger or do you require multiple ledgers? Are you upgrading to Oracle Fusion Applications or a new install? If an upgrade, is your current financial reporting structure meeting your reporting needs?
The following figure and table summarize the model that your committee has designed and uses numerical values to provide a sample representation of your financial reporting structure. The model includes the following recommendations:
Creation of three separate ledgers representing your separate legal entities:
InFusion America Inc.
InFusion Financial Services Inc.
InFusion UK Services Ltd.
Data security is controlled by balancing segment values using Oracle Fusion General Ledger data access sets
Recommendations for the chart of accounts design include:
Segments required for cost centers with hierarchical rollups to departments providing reporting at both the detail (cost center) and summary (department) level.
Accounts configured to provide drill down capability to the subledger transactions, enabling analysis of data.
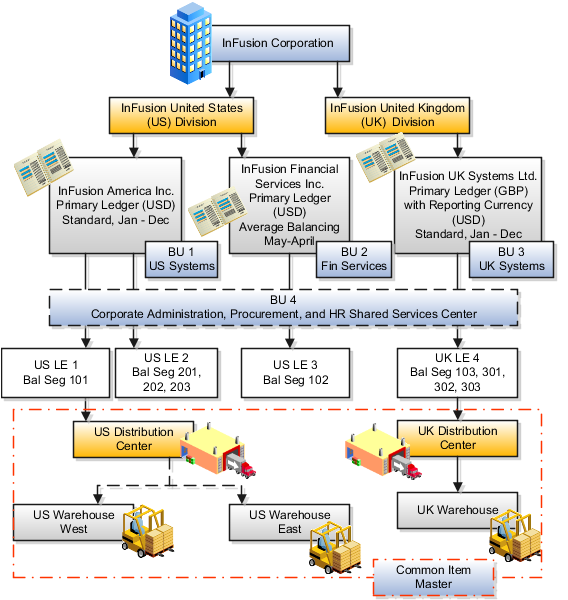
|
Decision |
InFusion America, Inc. |
InFusion Financial Services, Inc. |
InFusion UK Systems, Ltd. |
|---|---|---|---|
|
Type of Ledgers |
Primary |
Primary |
Primary with the use of Reporting Currency functionality |
|
Legal Entity Codes |
US Legal Entity 1: US Corporate US Legal Entity 2: US Systems |
US Legal Entity 3: US Financial Services |
UK Legal Entity 4: UK Systems |
|
Balancing Segments |
101: US Corporate 201: US Systems Components 202: US Systems Installations 203: US Systems Maintenance |
102: US Financial Services |
103: UK Systems 301: Components 302: UK Systems Installations 303: UK Systems Maintenance |
|
Currencies for Reporting |
US Dollar (USD) |
US Dollar (USD) |
Great Britain Pounds Sterling (GBP) US Dollar (USD) |
|
Calendar Ending date |
December 31st |
April 30th |
December 31st |
|
Business Units (BU)* |
BU 1: US Systems BU 4: Corporate (Shared Service Center) |
BU 2: Financial Services |
BU 3: UK Systems |
|
Balances Storage Method |
Standard Balances |
Average and Standard Balances |
Standard Balances |
|
Locations represented by cost centers in the chart of accounts. |
Headquarters US Distribution Center (BU 1) US Warehouse West US Warehouse East |
Headquarters |
UK Distribution Center (BU 3) UK Warehouse |
Note
In the chart of accounts, cost centers, with hierarchical rollups, represent business units. InFusion Corporation is also a legal entity but is not discussed in this example.
The chart of accounts is the underlying structure for organizing financial information and reporting. An entity records transactions with a set of codes representing balances by type, expenses by function, and other divisional or organizational codes that are important to its business.
A well-designed chart of accounts provides the following benefits:
Effectively manages an organization's financial business
Supports the audit and control of financial transactions
Provides flexibility for management reporting and analysis
Anticipates growth and maintenance needs as organizational changes occur
Facilitates an efficient data processing flow
Allows for delegation of responsibility for cost control, profit attainment, and asset utilization
Measures performance against corporate objectives by your managers
The chart of accounts facilitates aggregating data from different operations, from within an operation, and from different business flows, thus enabling the organization to report using consistent definitions to their stakeholders in compliance with legislative and corporate reporting standards and aiding in management decisions.
Best practices include starting the design from external and management reporting requirements and making decisions about data storage in the general ledger, including thick versus thin general ledger concepts.
Thick versus thin general ledger is standard terminology used to describe the amount of data populated and analysis performed in your general ledger. Thick and thin are the poles; most implementations are somewhere in between. Here are some variations to consider:
A general ledger used in conjunction with an enterprise profitability management (EPM) product, which has data standardized from each operation, is designed as a thin general ledger. Use this variation if your solution is project based, and Oracle Fusion Projects is implemented. More detailed reporting can be obtained from the Projects system. In the thin general ledger, business units, divisions, and individual departments are not represented in the chart of accounts.
A general ledger, with segments representing all aspects and capturing every detail of your business, with frequent posting, many values in each segment, and many segments, is called a thick general ledger. A thick general ledger is designed to serve as a repository of management data for a certain level of management. For example, a subsidiary's general ledger is designed to provide the upper management enough data to supervise operations, such as daily sales, without invoice details or inventory without part number details.
A primary ledger and a secondary ledger, where one is a thick general ledger and the other a thin general ledger, provides dual representation for reporting requirements that require more than one ledger.
With a thin general ledger, you use the general ledger for internal control, statutory reporting, and tracking of asset ownership. You minimize the data stored in your general ledger. A thin general ledger has many of the following characteristics:
Minimal chart of accounts
Short list of cost centers
Short list of natural accounts
Short list of cost accounts
Summary level asset and liability accounts
Low number of optional segments
Infrequent posting schedule
A thin general ledger has natural accounts at a statutory reporting level, for example, payroll expense, rent, property taxes, and utilities. It has cost centers at the functional expense level, such as Research and Development (R&D) or Selling, General, and Administrative (SG&A) expense lines, rather than at department or analytic levels. It omits business unit, division, and product detail.
One example of an industry that frequently uses a thin general ledger is retail. In a retail organization, the general ledger tracks overall sales numbers by region. A retail point of sales product tracks sales and inventory by store, product, supplier, markup, and other retail sales measures.
With a thick general ledger, you use the general ledger as a detailed, analytic tool, performing analytic functions directly in the general ledger. Data is broken down by many reporting labels, and populated frequently from the subledgers.
You maximize the data stored in the general ledger. A thick general ledger has many of the following characteristics:
Maximum use of the chart of accounts
Long list of natural accounts
Long list of cost centers
Long list of costing accounts
Detailed asset and liability accounts
Frequent posting schedule
In a thick general ledger, you obtain detail for cost of goods sold and inventory balances and track property plant and equipment at a granular level. Cost centers represent functional expenses, but also roll up to departmental or other expense analysis levels. Using product and location codes in optional segments can provide reporting by line of business. Posting daily, at the individual transaction level, can maximize the data stored in the general ledger.
One example of an industry that frequently uses a thick general ledger is electronic manufacturers. Detail on the revenue line is tagged by sales channel. Product is structured differently to provide detail on the cost of goods sold line, including your bill of materials costs. The general ledger is used to compare and contrast both revenue and cost of goods sold for margin analysis.
Consider implementing a thick ledger if there are business requirements to do any of the following:
Track entered currency balances at the level of an operational dimension or segment of your chart of accounts, such as by department or cost center
Generate financial allocations at the level of an operational dimension or segment
Report using multiple layered and versioned hierarchies of the operational dimension or segment from your general ledger
Consider implementing a thin ledger in addition to a thick ledger, if there are additional requirements for:
Minimal disclosure to the authorities in addition to the requirements listed above. For example, in some European countries, fiscal authorities examine ledgers at the detailed account level.
Fiscal only adjustments, allocations, and revaluations, which don't impact the thick general ledger.
The important consideration in determining if a thick ledger is the primary or secondary ledger is your reporting needs. Other considerations include how the values for an operational dimension or segment are derived and the amount of resources used in reconciling your different ledgers. If values for the operational dimension are always entered by the user like other segments of the accounting flexfield, then a thick primary ledger is the better choice.
However, if values for the operational dimension or segment are automatically derived from other attributes on the transactions in your subledger accounting rules, rather than entered in the user interface, then use a thick secondary ledger. This decision affects the amount of:
Storage and maintenance needed for both the general ledger and subledger accounting entries
System resources required to perform additional posting
In summary, you have:
Minimum demand on storage, maintenance, and system resources with the use of a thin ledger
Greater demand on storage, maintenance, and system resources with the use of a thick ledger
Greatest demand on storage, maintenance and system resources with the use of both thick and thin ledgers
Note
Generally speaking, there is a tradeoff between the volume of journals and balances created and maintained versus system resource demands. Actual performance depends on a wide range of factors including hardware and network considerations, transaction volume, and data retention policies.
The factors you need to consider in your decision to use a thick or thin general ledger for your organization, are your:
Downstream EPM system and its capabilities
Business intelligence system and its capabilities
Subledger systems and their capabilities and characteristics, including heterogeneity
General ledger reporting systems and their capabilities
Maintenance required for the thick or thin distributions and record keeping
Maintenance required to update value sets for the chart of accounts segments
Preferences of the product that serves as a source of truth
Level at which to report profitability including gross margin analysis
Industry and business complexity
There are several important elements to the basic chart of accounts in Oracle Fusion Applications: a structure that defines the account values, segments, and their labels, and rules (security and validation). Account combinations link the values in the segments together and provide the accounting mechanism to capture financial transactions.

The chart of accounts defines the number and attributes of various segments, including the order of segments, the width of segments, prompts, and segment labels, such as balancing, natural account, and cost center.
The chart of accounts further defines the combination of value sets associated with each segment of the chart of accounts, as well as the type, default value, additional conditions designating the source of the values using database tables, and the required and displayed properties for the segments.
A chart of accounts segment is a component of the account combination. Each segment has a value set attached to it to provide formatting and validation of the set of values used with that segment. The combination of segments creates the account combination used for recording and reporting financial transactions. Examples of segments that may be found in a chart of accounts are company, cost center, department, division, region, account, product, program, and location.
The value sets define the attributes and values associated with a segment of the chart of accounts. You can think of a value set as a container for your values. You can set up your flexfield so that it automatically validates the segment values that you enter against a table of valid values. If you enter an invalid segment value, a list of valid values appears automatically so that you can select a valid value. You can assign a single value set to more than one segment, and you can share value sets across different flexfields.
Segment labels identify certain segments in your chart of accounts and assign special functionality to those segments. Segment labels were referred to as flexfield qualifiers in Oracle E-Business Suite. Here are the segment labels that are available to use with the chart of accounts.
Balancing: Ensures that all journals balance for each balancing segment value or combination of multiple balancing segment values to use in trial balance reporting. There are three balancing segment labels: primary, second, and third balancing. The primary balancing segment label is required.
Cost Center: Facilitates grouping of natural accounts by functional cost types, accommodating tracking of specific business expenses across natural accounts. As cost centers combine expenses and headcount data into costs, they are useful for detailed analysis and reporting. Cost centers are optional, but required if you are accounting for depreciation, additions, and other transactions in Oracle Fusion Assets, and for storing expense approval limits in Oracle Fusion Expense Management.
Natural Account: Determines the account type (asset, liability, expense, revenue, or equity) and other information specific to the segment value. The natural account segment label is required.
Management: Optionally, denotes the segment that has management responsibility, such as the department, cost center, or line of business. Also can be attached to the same segment as one of the balancing segments to make legal entity reporting more granular.
Intercompany: Optionally, assigns the segment to be used in intercompany balancing functionality.
Note
All segments have a segment qualifier that enables posting for each value. The predefined setting is Yes to post.
An account combination is a completed code of segment values that uniquely identifies an account in the chart of accounts, for example 01-2900-500-123, might represent InFusion America (company)-Monitor Sales (division)-Revenue (account)-Air Filters (product).
The chart of accounts uses two different types of rules to control functionality.
Security rules: Prohibit certain users from accessing specific segment values. For example, you can create a security rule that grants a user access only to his or her department.
Cross-validation rules: Control the account combinations that can be created during data entry. For example, you may decide that sales cost centers 600 to 699 should enter amounts only to product sales accounts 4000 to 4999.
In Oracle Fusion General Ledger, the chart of accounts model is framed around the concept of a chart of accounts structure, under which one or more chart of accounts structure instances can be created. There are critical choices that need to be considered when creating chart of accounts instances and structures.
When creating the segments for the chart of accounts structure, you must enter segment sequence numbers that are consecutive and begin with the number one.
For segments in your chart of account structure instance that you expect to contain a large number of distinct values, you must perform the following steps:
In the chart of accounts definition, mark the segment query required option as selectively required. In order to perform searches in the transactional user interface, you have to specify the following segment as a mandatory search criteria.
Create required indexes in the GL_CODE_COMBINATIONS table for segments that
are selectively required.
In Oracle Fusion General Ledger, the chart of accounts model is framed around the concept of a chart of accounts structure, under which one or more chart of accounts structure instances can be created. A chart of accounts structure defines the key attributes for your chart of accounts, such as the number of segments, the segment sequences, the segment names, segment prompts, segment labels, for example natural account and primary balancing, and default value sets.
The chart of accounts instance is exposed in the user interfaces and processes. By default, a chart of accounts instance inherits all the attributes of the chart of accounts structure, meaning that all instances of the same structure share a common shape and have the same segments in the same order. However, at the chart of accounts instance level, you can override the default value set assignments for your segments and assign a unique account hierarchy that determines the parent and child relationships between the value set values. At the chart of accounts instance level, determine if allow dynamic insertion is enabled to generate new account combinations dynamically instead of creating them manually.
You are creating a chart of accounts structure as you setup your chart of accounts for your enterprise, InFusion America, Inc. Follow these steps:
Navigate to the Manage Chart of Accounts page from the Functional Setup Manger by querying on Manage Chart of Accounts and clicking on the Go To Task.
Select General Ledger from the Module list of values and click Search.
Click Manage Structures to open the Manage Key Flexfield Structures page.
Select the General Ledger row and click the Create to open the Create Key Flexfield Structure page.
Enter a unique Structure Code, INFUSION_AM_COA_STRUCTURE, and Name, InFusion America COA Structure. Provide an optional Description, InFusion America Inc. Chart of Accounts Structure.
Select the - Delimiter to visually separate your segment values.
Click Save.
To create a new segment, click the Create to open the Create Key Flexfield Segment page.
Enter the following parameters:
|
Parameter |
Value |
|---|---|
|
Segment Code |
INFUSION_AM_CO |
|
Name |
InFusion America Company |
|
Description |
InFusion America Inc. Company |
|
Sequence Number |
1 |
|
Prompt |
Company |
|
Short Prompt |
CO |
|
Display Width |
2 |
|
Column Name |
Segment1 |
|
Default Value Set Code |
INFUSION_AM_COMPANY |
Select an optional segment label, Primary Balancing Segment, to indicate its purpose within your chart of accounts.
Note
Two segment labels are required: primary balancing segment and natural account segment. These labels are not used with each other or with other labels in a specific segment.
Click Save and Close.
Click Done.
Define additional segments following the same process.
You are creating a chart of accounts instance as you setup your chart of accounts for your enterprise, InFusion America, Inc. Follow these steps:
Navigate to the Manage Chart of Accounts page from the Functional Setup Manger by querying on Manage Chart of Accounts and clicking on the Go To Task.
Select General Ledger from the Module list of values and click Search.
Select the General Ledger row and click Manage Structure Instances to open the Manage Key Flexfield Structure Instance page.
Click the Create icon to open the Create Key Flexfield Structure Instance page.
Enter a unique Structure Instance Code, INFUSION_AM_COA_INSTANCE, and Name, InFusion America COA Instance. Provide an optional Description, InFusion America Inc. Chart of Accounts Structure Instance.
Select Dynamic combination creation allowed to indicate that you want to dynamically generate account combinations.
Associate your instance with your Structure Name, InFusion America Structure.
Note
By default, an instance inherits the key attributes of the associated structure. Some attributes, such as the value set assigned to each the segment, can be modified.
Click Save.
Optionally, select the segment row and click Edit to modify instance segments.
Check Required, Displayed, and Business intelligence enabled check boxes.
Note
Check the three options for all segments including those intended for future use. The recommended best practice is to define one segment for future use and set a default value. This ensures room for expansion in your chart of accounts and that the extra segment is populated in the account combinations.
Click OK.
Click Save and Close.
Define additional instances following the same process.
Note
Alternatively, proceed directly with creating your value set values by selecting the corresponding Value Set Code in the Segment Instances table.
Click Done.
Click Deploy Flexfield.
Click OK.
In Oracle Fusion General Ledger, the chart of accounts model is framed around the concept of a chart of accounts structure, under which one or more chart of accounts structure instances can be created.
Your company, InFusion Corporation, is a multinational conglomerate that operates in the United States (US) and the United Kingdom (UK). InFusion has purchased an Oracle Fusion enterprise resource planning (ERP) solution including Oracle Fusion General Ledger and all of the Oracle Fusion subledgers. You are chairing a committee to discuss creation of a model for your global financial reporting structure including your charts of accounts for both your US and UK operations.
InFusion Corporation has 400 plus employees and revenue of $120 million. Your product line includes all the components to build and maintain air quality monitoring (AQM) systems for homes and businesses.
In Oracle Fusion General Ledger, the chart of accounts model is framed around the concept of a chart of accounts structure, under which one or more chart of accounts structure instances can be created.
The chart of accounts structure provides the general outline of the chart of accounts and determines the number of segments, the type, the length, and the label (qualifier) of each segment. This forms the foundation of the chart of accounts definition object.
For each chart of accounts structure, it is possible to associate one or more chart of accounts structure instances. Chart of accounts structure instances under the same structure share a common configuration with the same segments, in the same order, and the same characteristics. Using one chart of accounts structure with multiple instances simplifies your accounting and reporting.
At the chart of accounts structure instance level, each segment is associated with a value set that conforms to the characteristic of that segment. For example, you assign a value set with the same segment type and length to each segment. You are using hierarchies with your chart of accounts segments. Each structure instance segment is assigned a tree code to indicate the source of the hierarchy information for the associated value set. The same value set can be used multiple times within the same or across different chart of accounts instances within the same structure or in different structures. This functionality reduces your segment value creation and maintenance across your charts of accounts.
The collective assignment of value sets to each of the segments forms one chart of accounts instance. At the chart of accounts structure instance level, you can select to enable dynamic insertion. Dynamic insertion allows the creation of account code combinations automatically the first time your users enter that new account combination. The alternative is to create them manually. By deciding to enable dynamic insertion, you save data entry time and prevent delays caused by the manual creation of new code combinations. Well defined cross validation rules help prevent the creation of inappropriate account code combinations.
Perform deployment after a new chart of accounts structure and structure instances are defined or any of their modifiable attributes are updated. Deployment validates and regenerates the necessary objects to enable your charts of accounts and chart of accounts structure instances. By unifying and standardizing you organization's chart of accounts, you are positioned to take full advantage of future functionality in Oracle Fusion General Ledger.
In summary, you are recommending to your company to unify the organization's chart of accounts in a single chart of accounts structure based on chart of accounts commonalities across ledgers. You have also decided to use the chart of accounts structure instance construct to serve different accounting and reporting requirements by using value sets specific to each of your entities.
A cost center represents the smallest segment of an organization for which costs are collected and reported. A department is an organization with one or more operational objectives or responsibilities that exist independently of its manager and has one or more workers assigned to it.
The following two components need to be considered in designing your enterprise structure:
Cost centers
Departments
A cost center also represents the destination or function of an expense as opposed to the nature of the expense which is represented by the natural account. For example, a sales cost center indicates that the expense goes to the sales department.
A cost center is generally attached to a single legal entity. To identify the cost centers within a chart of accounts structure use one of these two methods:
Assign a cost center value in the value set for each cost center. For example, assign cost center values of PL04 and G3J1 to your manufacturing teams in the US and India. These unique cost center values allow easy aggregation of cost centers in hierarchies (trees) even if the cost centers are in different ledgers. However, this approach will require defining more cost center values.
Assign a balancing segment value with a standardized cost center value to create a combination of segment values to represent the cost center. For example, assign the balancing segment values of 001 and 013 with cost center PL04 to represent your manufacturing teams in the US and India. This creates 001-PL04 and 013-PL04 as the cost center reporting values.
The cost center value of PL04 has a consistent meaning. This method requires fewer cost center values to be defined. However, it prevents construction of cost center hierarchies using trees where only cost center values are used to report results for a single legal entity. You must specify a balancing segment value in combination with the cost center values to report on a single legal entity.
A department is an organization with one or more operational objectives or responsibilities that exist independently of its manager. For example, although the manager may change, the objectives do not change. Departments have one or more workers assigned to them.
A manager of a department is typically responsible for:
Controlling costs within their budget
Tracking assets used by their department
Managing employees, their assignments, and compensation
Note
The manager of a sales department may also be responsible for meeting the revenue targets.
The financial performance of departments is generally tracked through one or more cost centers. In Oracle Fusion Applications, departments are defined and classified as Department organizations. Oracle Fusion Human Capital Management (HCM) assigns workers to departments, and tracks the headcount at the departmental level.
The granularity of cost centers and their relationship to departments varies across implementations. Cost center and department configuration may be unrelated, identical, or consist of many cost centers tracking the costs of one department.
To plan for future growth in the business organization that requires additional segments in the chart of accounts, extra segments can be added to the chart of accounts structure during your original implementation. Since all segments of the chart are required and have to be enabled, these unused segments can be assigned value sets that have a single value in the chart of accounts structure instance. This value is set as a default for that segment so that the extra segments are automatically populated when an account code combination is used.
A value set is a set of valid values that you assign to a flexfield segment.
An end user enters a value into a flexfield segment while using the application. The flexfield validates the segment against the set of valid values that you configured as a value set and assigned to the segment.
For example, you can define a required format, such as a five digit number, or a list of valid values, such as green, red, and blue.
Flexfield segments are usually validated, and typically each segment in a given flexfield uses a different value set. You can assign a single value set to more than one segment, and you can share value sets among different flexfields.
Caution
Be sure changes to a shared value set are compatible with all flexfields segments using the value set.
Defining value sets involves making decisions about the following.
Validation
Security
Precision and scale
Usage and deployment
The following types of validation are available for value sets.
Format only, where end users enter data rather than selecting values from a list
Independent, a list of values consisting of valid values you specify
Dependent, a list of values where a valid value derives from the independent value of another segment
Subset, where the list of values is a subset of the values in an existing independent value set
Table, where the values derive from a column in an application table and the list of values is limited by a WHERE clause
A segment that uses a format only value set does not present a list of valid values to users.
You can build a tree structure from the values in an independent value set whose data type is character.
Note
Adding table validated value sets to the list of available value sets available for configuration is considered a custom task.
For more information, see the Oracle Fusion Applications Extensibility Guide.
Value set security only works in conjunction with usage within flexfield segments. If a value set is used standalone, meaning outside a flexfield, value set security is not applied, but Oracle Fusion data security is enforced.
You can specify that data security be applied to the values in flexfield segments that use a value set. Based on the roles provisioned to users, data security policies determine which values of the flexfield segment end users can view or modify.
Value set security applies at the value set level. If a value set is secured, every usage of it in any flexfield is secured. It is not possible to disable security for individual usages of the same value set.
Value set security applies to independent, dependent or table-validated value sets.
Value set security applies mainly when data is being created or updated, and to key flexfield combinations tables for query purposes. Value set security does not determine which descriptive flexfield data is shown upon querying.
Security conditions defined on value sets will always use table aliases. When filters are used, table aliases are always used by default. When predicates are defined for data security conditions, make sure that the predicates will also use table aliases.
For key flexfields, the attributes in the view object that correspond to the code combination ID (CCID), structure instance number (SIN) and data set number (DSN) cannot be transient. They must exist in the database table. For key flexfields, the SIN segment is the discriminator attribute, and the CCID segment is the common attribute.
For a value set with the data type Number, you can specify the precision (maximum number of digits user can enter) or scale (maximum number of digits following the decimal point).
The usage of a value set is the flexfields where that value set is used. The deployment status of flexfields in which the value set is used indicates the deployment status of the value set instance.
The figure shows a value set used by a segment in a key flexfield and the context segment of a descriptive flexfield.
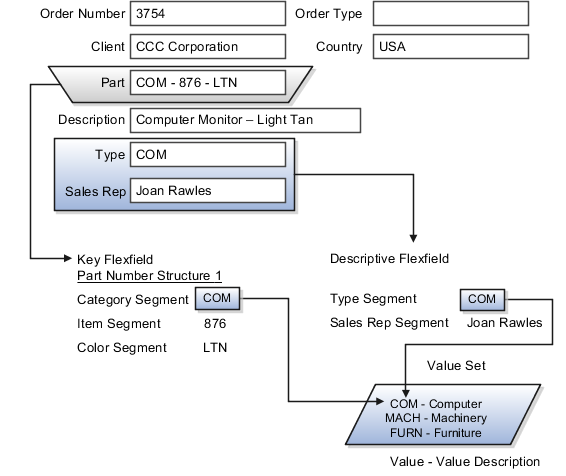
For most value sets, when you enter values into a flexfield segment, you can enter only values that already exist in the value set assigned to that segment.
Global and context-sensitive segment require a value set. You can assign a value set to a descriptive flexfield context segment. If you specify only context values, not value sets for contexts, the set of valid values is equal to the set of context values.
A value set is the collection of account values that are associated with a segment of a chart of accounts structure instance. When creating values sets, consider the following critical choices:
Module Designation
Validation Type
Format Assignments
Security Rules
Values Definition
The module designation is used to tag value sets in Oracle Fusion Applications and sets the value sets apart during upgrades and other processes. Chart of accounts value sets upgraded from Oracle E-Business Suite Release 12 generically bear the module value of Oracle Fusion Middleware. When creating new value sets for a chart of accounts, the module can be specified as Oracle Fusion General Ledger to distinctly identify its intended use in an accounting flexfield, basically a chart of accounts.
Assign one of the following validation types to chart of accounts value sets:
Independent: The values are independently selected when filling out the segment in the account combination.
Table Validated: The values are stored in an external table to facilitate maintenance and sharing of the reference data.
Value sets for chart of accounts must use the Value Data Type of Character. The Value Subtype is set to Text. These two setting support values that are both numbers and characters, which are typical in natural account segment values. Set the maximum length of the value set to correspond to the length of the chart of accounts segment to which it is assigned. Best practices recommend restricting values to Upper Case Only or Numeric values that are zero filled by default.
If flexfield data security rules are to be applied to the chart of accounts segment associated with the value set, the Enable Security check box must be checked for the assigned value set. In addition, assign a data security resource name to enable creation of a data security object automatically for the value set. The data security object is used in the definition of flexfield data security rules.
Once these basic characteristic are defined for the value set, values can be added to the set in the Manage Values page.
Set the values to conform to the value set length and type.
Enter the value, its description, and its attributes including the Enable check box, Start Date, and End Date.
Assign the following attributes: Parent or Summary check box, Posting is allowed, and Budgeting is allowed.
Note
If the value set is used with a natural account segment, the value also requires you set the Natural Account Type, with one of the following values: Asset, Liability, Equity, Revenue or Expense. Other attributes used are Third Party Control Account, Reconciliation indicator, and Financial Category used with Oracle Transaction Business Intelligence reporting.
Oracle Fusion General Ledger best practice is to define the values for the value set after the value set is assigned to a chart of accounts structure instance. Otherwise you are not able to define the mandatory value attributes, such as summary flag, posting allowed, and account type for natural account segment. The attributes must be added after the value set is assigned to a chart of accounts structure instance.
Create your value sets before creating your chart of accounts. A value set can be shared by different charts of accounts or across different segments of the same chart of accounts.
You are creating a company value set to be used in your chart of accounts for your enterprise, InFusion America, Inc. Follow these steps:
Navigate to the Manage Chart of Accounts Value Sets task from within your implementation project and click the Go to Task.
Click the Create icon on the toolbar of the Search Results table. The Create Value Set page opens.
Enter a unique Value Set Code, InFusion America Company, and an optional Description, Company values for InFusion America Inc.
Select General Ledger from the list in the Module field.
Select Independent as Validation Type.
Select Character as the Validation Data Type.
Click Save and Close.
Segment labels identify certain segments in your chart of accounts structure and assign special functionality to those segments. Segment labels were referred to as flexfield qualifiers in Oracle E-Business Suite (EBS). Best practice is to assign each segment label one time within the chart of accounts structure. Here are the segment labels that are available to use with the chart of accounts structure.
Caution: Validations are not performed when segment labels are assigned, so verify that all are assigned correctly before using your chart of accounts.
Ensures that all journals balance for each balancing segment value or combination of multiple balancing segment values. You can secure access to your primary balancing segment values only with data access sets. The general ledger application automatically calculates and creates balancing lines as required in journal entries. For example, recognizing an entity's receivable and the other entity's payable. There are three balancing segment labels: primary, second, and third balancing. The primary balancing segment label is required.
Represents the smallest segment of an organization for which costs are collected and reported. Facilitates grouping of natural accounts by functional cost types, accommodating tracking of specific business expenses across natural accounts. As cost centers combine expenses and headcount data into costs, they are useful for detailed analysis and reporting. Cost centers are optional, but required if accounting for depreciation, additions, and other transactions in Oracle Fusion Assets, and for storing expense approval limits in Oracle Fusion iExpense.
Determines the account type (asset, liability, expense, revenue, or equity), whether posting is allowed, and other information specific to the segment value. The natural account segment is mapped to the Financial Category dimension in the balances cube to enable ad hoc reporting and transactional dashboards. This functionality uses Oracle Fusion Business Intelligence Enterprise Edition to analyze and drill into expense and revenue transactions. The natural account segment label is required.
Optionally, assigns the segment to be used in intercompany balancing functionality. You cannot use the primary balancing or natural account segments as the intercompany segment. It is recommended that you use this segment and assign the same values to both the primary balancing and intercompany value sets to enable clear visibility of the due to and due from relationships inherent in intercompany accounting across the entire organization. Consider using the same values set for the primary balancing and intercompany segments to save maintenance and ensure completeness.
Optionally, denotes the segment that has management responsibility, such as the department, cost center, or line of business. Can be any segment, except the primary balancing or natural account segments. By designating a segment of your chart of accounts to the management segment, you can secure access to the management segment values with data access sets. By providing segment values to represent the lowest level of your organization, you can roll up results by line of business or other management criteria.
Note: Available in a future release. Do not assign this segment to your chart of accounts in Oracle Fusion Version 1.
For a chart of accounts, each segment can be qualified by a label to distinctly indicate its purpose. This designation is also used by the Oracle Fusion General Ledger processes to determine the proper way to display and process transactions and balances that are recorded.
You are creating your chart of accounts with six segments. Oracle Fusion General Ledger permits selection of up to thirty segments for your chart of accounts. You must have a minimum of three required segments, as determined below by the number of required segment labels (qualifiers). Required segment labels are:
Primary Balancing Segment: Main balancing segment typically used to represent the company dimension of the organization. The segment set with this label cannot be set with another label.
Cost Center Segment: Subunits of the company, such as cost or profit centers, or departments. You are required to create this segment if you are implementing Oracle Fusion Assets.
Natural Account Segment: Classification of transactions and balances according to distinct account types: asset, liability, equity, revenue, and expense accounts. The segment set with this label cannot be set with another label.
The following optional segment labels are available and you are implementing all except for the Management Segment:
Second Balancing Segment: Used to balance transactions, as needed, by an additional dimension beyond the primary balancing segment.
Third Balancing Segment: Used to balance transactions, as needed, by an additional dimension beyond the primary and second balancing segments.
Management Segment: Used in a future release. For Oracle Fusion Version 1, do not enable this qualifier.
Intercompany Segment: Used to track intercompany due to and due from balances by identifying the specific trading company. The intercompany qualified segment cannot be set with any of the three balancing segment qualifiers. The values in this segment's value set need to be the same as the primary balancing segment.
Segment labels can only be assigned once within your chart of accounts. The following table shows how you are assigning the segment labels in your chart of accounts.
|
Segment |
Segment Label |
|---|---|
|
Company |
Primary Balancing Segment |
|
Cost Center |
Cost Center and Second Balancing Segment |
|
Location |
Third Balancing Segment |
|
Account |
Natural Account Segment |
|
Product Line |
|
|
Intercompany |
Intercompany Segment |
Note
Validations are not performed when segment labels are assigned, so verify that all are assigned correctly before using your chart of accounts.
For Oracle Transactional Business Intelligence reporting, all labeled or qualified segments of the chart of accounts are automatically maintained in the data that reporting is based on. For non-qualified segments, the granularity of information stored in these segments is summarized and thus, Oracle Transactional Business Intelligence would not be able to provide detailed reporting along by these segments. If it is important to maintain the ability to perform detailed reporting on such segments, create custom labels to qualify these segments.
For example, one of the segments of the chart of accounts is based on product line, and none of the predefined segment labels above are applicable. It is important for the organization to derive product line based Oracle Transactional Business Intelligence reports. Create a custom label called Product Line to use to qualify the Product Line segment of the chart of accounts.
Balancing segments ensure that all journals balance for each balancing segment value or combination of multiple balancing segment values. You can secure access to your primary balancing segment values only with data access sets. The general ledger application automatically calculates and creates balancing lines as required in journal entries. For example, recognizing an entity's receivable and the other entity's payable. There are three balancing segment labels: primary, second, and third balancing. The primary balancing segment label is required.
By enabling multiple balancing segments for your chart of accounts, it is possible to produce financial statements for each unique combination of segment values across not only one, but two or even three qualified balancing segments. This ability provides you greater insights into your operations as it affords you visibility along the critical fiscal dimensions you use to plan, monitor, and measure your financial performance.
The following explains processes that use balancing segments.
Intercompany balancing: Adds lines to unbalanced journals using intercompany rules.
Opening first period of the new accounting year: Calculates retained earnings amounts at the level of granularity that totals revenue and expense account balances for multiple balancing segment value combinations. This applies to standard and average balances.
Importing journals: Adds lines using the suspense account on unbalanced journals.
Posting journals: Adds additional lines to unbalanced journals for the following enabled account types:
Suspense
Rounding
Net income
Retained earnings
Cumulative translation adjustments from replication of revaluation journals to reporting currencies and for multiple reporting currency account type specific conversion
Posting prior period journals: Calculates any income statement impact and posts to the appropriate retained earnings account.
Translating balances: Supports multiple balancing segments for the following accounts:
Retained earnings: Calculated translated retained earnings are post to the retained earnings accounts by balancing segment. Retained earnings represents the summing of the translated revenue and expense accounts across multiple balancing segment values.
Cumulative translation adjustment: Amounts posted by balancing segment to these accounts represents currency fluctuation differences between ranges of accounts which use different rate types. For example, period end rates are used for asset and liability accounts and historical rates for equity accounts.
Revaluing Balances: Supports multiple balancing segments when calculating gain or loss accounts.
Creating Opening Balances: Initializes reporting currency balances by converting from the total primary currency. Any difference in the reporting currency amounts is offset by populating retained earnings accounts.
Closing year end: Supports multiple balancing segments when calculating the income statement offset and closing account in the closing journals.
Oracle Fusion General Ledger supports tracking financial results at a finer level of granularity than a single balancing segment. In addition to the required primary balancing segment for the chart of accounts, which is typically associated with the company dimension of a business organization, two additional segments of the chart of accounts can be optionally qualified as the second and third balancing segments respectively. Possible chart of accounts segments that can be tagged as these additional balancing segments include cost center or department, additional aspects of a business commonly used in measuring financial results.
There are several points to consider in using multiple balancing segments:
Journal entry processing
Implementation timing
Change options
Migration adjustments
Multiple balancing segments ensure that account balances come from journal entries where the debits equal the credits, and thus, the financial reports are properly generated for each unique instance of account value combinations across the balancing segments. Consider this option carefully as it provides more granular reporting but requires more processing resources.
When considering implementing the optional second and third balancing segments, keep in mind that these chart of accounts segment labels are set from the beginning of time and are actively used by your ledgers. This is important to ensure that balances are immediately maintained in accordance with the necessary balancing actions to produce consistent financial reporting for the desired business dimensions. Multiple balancing segment ledgers that are not maintained from the beginning of time require extensive manual balance adjustments to catch up and realign the balances in accordance with the multiple balancing segments.
Note
Do not set a segment already qualified as a natural account or intercompany segment as any of the three balancing segments. Validations are not performed when segment labels are assigned, so verify that all are assigned correctly before using your chart of accounts.
Once a segment has been enabled and designated as a balancing segment, you must not change the segment. Do not disable the segment or remove the segment labels. These settings must be consistently maintained throughout the life of the chart of accounts to control the accuracy and integrity of the financial data.
For charts of accounts migrated from Oracle E-Business Suite to Oracle Fusion General Ledger that use a segment with the secondary balance tracking segment qualifier, steps must be taken to ensure the proper transition to the second and third balancing segments. The required adjustments are extensive.
For ledgers associated with a migrated chart of accounts, its balances must be adjusted manually to be consistent with the second and third balancing segments as though these segment labels have been in place since the beginning of entries for these ledgers. This requires recomputing and updating of the following processes to reflect the correct balancing for each unique combination of segment values across the additional second and third balancing segments.
Intercompany balancing
Suspense posting
Rounding imbalance adjustments on posting
Entered currency balancing
Revaluation gains or losses
Retained earnings calculations at the opening of each new fiscal year
Cumulative translation adjustments during translation
Note
All previously translated balances must also be purged, and new translations run to properly account for translated retained earnings and cumulative translation adjustments with the correct level of balancing.
This simple example illustrate balancing along two balancing segments for a simple chart of accounts with three segments.
Your company has a chart of accounts with two balancing segments and three segments, qualified as follows:
Company: Primary balancing segment
Cost Center: Second balancing segment
Account: Natural account segment
The following multiple company and cost center journal has been entered to transfer advertising and phone expense from Company 1, Cost Center A to Company 2, Cost Center B.
|
Account |
Debit |
Credit |
|---|---|---|
|
Company 1-Cost Center A-Advertising Expense Account |
600 |
|
|
Company 2-Cost Center B-Advertising Expense Account |
|
600 |
|
Company 1-Cost Center A-Phone Expense Account |
800 |
|
|
Company 2-Cost Center B-Phone Expense Account |
|
800 |
During the posting process, the last four lines are created to balance the entry across the primary and second balancing segments, company and cost center.
|
Account |
Debit |
Credit |
|---|---|---|
|
Company 1-Cost Center A-Advertising Expense Account |
600 |
|
|
Company 2-Cost Center B-Advertising Expense Account |
|
600 |
|
Company 1-Cost Center A-Phone Expense Account |
800 |
|
|
Company 2-Cost Center B-Phone Expense Account |
|
800 |
|
Company 1-Cost Center A-Balancing Account |
|
600 |
|
Company 2-Cost Center B-Balancing Account |
600 |
|
|
Company 1-Cost Center A-Balancing Account |
|
800 |
|
Company 2-Cost Center B-Balancing Account |
800 |
|
The Segment Value Inheritance process simplifies the maintenance of the chart of accounts. When the characteristics of values in the value sets are updated, such as changes in enabled status, effective date, posting allowed status, or natural account type, all previously created account code combinations that referenced such values are not automatically updated by these changes. The Segment Value Inheritance process allows you to run a controlled process to update such existing account code combinations. This process maintains and corrects the current attribute settings for those account code combinations that contain the account values that were changed.
For account code combinations where the present settings need to be retained and not impacted by account attribute changes, activate the flag to preserve the account code combination's attribute. Activating the flag prevents those account code combination's attributes from being update when the Segment Value Inheritance process is run.
For example, there are three inactive account code combinations that share a common inactive cost center value of 110.
|
Company-Cost Center-Account |
Enabled |
|---|---|
|
01-110-5210 |
No |
|
04-110-4310 (Preserve Attributes flag enabled) |
No |
|
03-110-6810 |
No |
Cost center 110 went from being disabled to enabled. When the Segment Value Inheritance process is run, the following shows the result on these three account code combinations.
|
Company-Cost Center-Account |
Enabled |
|---|---|
|
01-110-5210 |
Yes |
|
04-110-4310 (Preserve Attributes flag enabled) |
No |
|
03-110-6810 |
Yes |
Note
Once you disable a segment value and you log out of the system and back in, all code combinations containing that segment no longer work, even if the account combination still shows enabled in the account combination page. Use the Segment Value Inheritance process to set the enable flag correctly on the affected account code combinations.
The chart of accounts structure and chart of accounts structure instance are fundamental constructs in the Oracle Fusion General Ledger accounting setup and cannot be altered once they are in use. The number of segments, the segments' order, each segment's label, length, type, and value set assignment are not updateable. These components set the foundation upon which accounting data is recorded for ledgers that use them. Careful and thoughtful planning must precede all decisions pertaining to defining the chart of accounts.
To use a flexfield at runtime, the flexfield must have been deployed at least once. Deployment generates or refreshes the Application Development Framework (ADF) business component objects that render the flexfield in a user interface. Flexfields are deployed for the first time during the application provisioning process.
You can deploy a flexfield to a sandbox for testing or to the mainline for use.
Every flexfield has a: deployment status.
A flexfield can have the following deployment statuses.
|
Deployment Status |
Meaning |
|---|---|
|
Edited |
The flexfield metadata definition has not been deployed yet. Updates of the metadata definition are not applied in the runtime yet. |
|
Patched |
The flexfield metadata definition has been modified through a patch, but the flexfield has not yet been deployed so the patched definition is not reflected in the runtime. |
|
Deployed to Sandbox |
The current metadata for the flexfield is deployed in ADF artifacts and available as a flexfield-enabled sandbox. The status of the sandbox is managed by the Manage Sandboxes task available to the Administrator menu of Setup and Maintenance work area. |
|
Deployed |
The current metadata for the flexfield is deployed in ADF artifacts and available to end users. There have not been any changes to the flexfield since it was last deployed in the mainline. |
|
Error |
The deployment attempt in the mainline failed. |
Note
Whenever a value set definition changes, the deployment status of a flexfield that uses that value set changes to edited. If the change results from a patch, the deployment status of the flexfield changes to patched.
The Oracle Fusion Applications installation loads flexfield metadata into the database. This initial load sets the flexfield status to Edited to indicate that the flexfield has not been deployed yet. The application provisioning process during installation deploys the predefined flexfields of the provisioned applications, which sets their status to Deployed if no errors are encountered.
When accessing a provisioned application, deployed flexfields are ready to use. In some cases, flexfield availability at runtime requires setup, such as defining key flexfields.
Use the Validate Metadata command to view possible metadata errors before attempting to deploy the flexfield. Metadata validation is the initial phase of the Deploy and Deploy to Sandbox commands. By successfully validating metadata before running the deployment commands, you can avoid failures in the metadata validation phase of a deployment attempt. Errors in the metadata validation phase of deployment cause the deployment attempt to abort. Metadata validation results do not affect the deployment status of a flexfield.
Flexfield deployment status indicates how the flexfield metadata definition in the Oracle Applications database relates to the Application Development Framework (ADF) business components generated into a Metadata Services (MDS) repository.
If you have made a change to a flexfield and expect a changed deployment status, be sure you have saved your changes. No settings affect flexfield deployment status.
If the flexfield definition has been edited through the Define Flexfields activity task flows, the status is Edited. The latest flexfield metadata definition in the Oracle Fusion application diverges from the latest deployed flexfield definition. Any change, including if a value set used in a flexfield changes, changes the deployment status to Edited. If a flexfield has never been deployed, its status is Edited.
Note
When an application is provisioned, the provisioning framework attempts to deploy all flexfields in that application.
If you deploy the flexfield to a sandbox successfully, the status is Deployed to Sandbox. The latest flexfield metadata definition in the Oracle Fusion Application matches the metadata definition that generated ADF business components in a sandbox MDS repository. Whether the sandbox is active or not does not affect the deployment status. If the flexfield was deployed by a sandbox and has not been edited or re-deployed to the mainline since then, the status remains Deployed to Sandbox independent of whether the sandbox is active, or who is viewing the status.
If you deploy the flexfield successfully, meaning to the mainline, the status is Deployed. The latest flexfield metadata definition in the Oracle Fusion application matches the metadata definition that generated ADF business components in a mainline MDS repository. Change notifications are sent when a flexfield is deployed successfully to the mainline.
If either type of deployment fails so the current flexfield definition is not deployed, the status is Error. The deployment error message gives details about the error. The latest flexfield metadata definition in the Oracle Fusion application likely diverges from the latest successfully deployed flexfield definition.
If the flexfield definition has been modified by a patch, the status is Patched. The latest flexfield metadata definition in the Oracle Fusion application diverges from the latest deployed flexfield definition.
When a deployment attempt fails and you can access the Deployment Error Message for details.
The flexfield definition in a sandbox corresponds to the flexfield metadata definition in the Oracle Fusion Applications database at the time the flexfield was deployed to the sandbox. When the flexfield is ready for end users, the flexfield must be deployed to the mainline.
A flexfield-enabled sandbox uses the following components.
Flexfield metadata in the Oracle Fusion Applications database
Flexfield business components in a sandbox Metadata Services (MDS) repository
User interface customizations for the flexfield in the mainline MDS repository
The figure shows the two types of deployment available in the Manage Flexfield tasks of the Define Flexfields activity. Deploying a flexfield to a sandbox creates a sandbox MDS repository for the sole purpose of testing flexfield behavior. The sandbox is only accessible to the administrator who activates and accesses it, not to users generally. Deploying a flexfield to the mainline applies the flexfield definition to the mainline MDS repository where it is available to end users. After deploying the flexfield to the mainline, customize the page where the flexfield segments appear. Customization of the page in the sandbox MDS repository cannot be published to the mainline MDS repository.
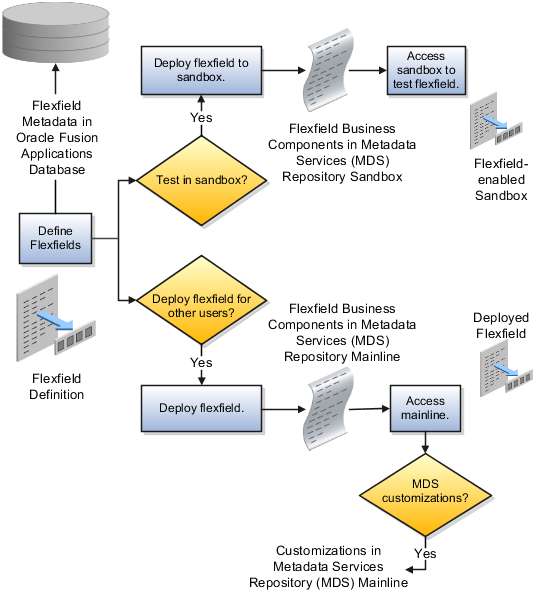
Deploying the flexfield to a sandbox generates the Application Development Framework (ADF) business components of a flexfield in a sandbox MDS repository for testing in isolation.
Warning
Do not make changes to flexfield segment display features in a flexfield-enabled sandbox as these changes will be lost when deploying the flexfield to the mainline.
The Oracle Fusion Applications database stores the single source of truth about a flexfield. From this the ADF business component objects that implement the flexfield in the runtime user interface are generated in the mainline MDS repository when the flexfield is deployed.
Deploying a flexfield to a sandbox creates a flexfield-enabled sandbox . Each flexfield-enabled sandbox contains only one flexfield.
You can test the runtime behavior of a flexfield in the flexfield-enabled sandbox. If changes are needed, return to the Define Flexfield tasks to change the flexfield definition.
When you deploy a flexfield to sandbox, the process reads the metadata about the segments from the database, generates flexfield Application Development Framework (ADF) business component artifacts based on that definition, and stores in the sandbox only the generated artifacts derived from the definition.
The sandbox data allows you to test the flexfield in isolation without first deploying it in the mainline where it could be accessed by users.
Warning
Do not make changes to flexfield segment display features in a flexfield-enabled sandbox as these changes will be lost when deploying the flexfield to the mainline.
When you deploy a flexfield as a sandbox, that flexfield-enabled sandbox automatically gets activated in your user session. When you sign back in to see the changes, the sandbox is active in your session.
You can only deploy a flexfield to a sandbox using the Define Flexfields task flow pages.
You also can use the Manage Sandboxes feature in the Administration menu of the Setup and Maintenance work area to activate, access, or delete a flexfield-enabled sandbox.
Note
Whether you use the Define Flexfields or Manage Sandboxes task flows to access a flexfield-enabled sandbox, you must sign out and sign back in before you can see the changes you deployed in the runtime.
You cannot publish the flexfield from the sandbox to the mainline. You must use the Define Flexfields task flow pages to deploy the flexfield for access by users of the mainline because the flexfield configuration in the mainline is the single source of truth.
You can use the Manage Key Flexfields, Manage Descriptive Flexfields, and Manage Extensible Flexfields tasks to deploy flexfields. You can also use WebLogic Server Tool (WLST) commands for priming the Metadata Services (MDS) repository with predefined flexfield artifacts and for deploying flexfields.
The table describes the available commands.
|
WebLogic Server Tool Command |
Description |
|---|---|
|
Deploys all flexfields for the specified enterprise application. Only flexfields whose status is other than deployed are affected by this command unless the option is enabled to force all flexfields to be deployed regardless of deployment status. Initial application provisioning runs this command to prime the MDS repository with flexfield artifacts. |
|
Deploy a single flexfield regardless of deployment status |
|
Deploys flexfield changes that have been delivered using a flexfield Seed Data Framework (SDF)patch. Deploys flexfields that have a Patched deployment status. |
|
Displays MDS label of flexfield changes for viewing and deleting patching labels. |
Executing these commands outputs a report at the command line. The report provides the following information for every flexfield that is processed.
Application identity (APPID)
Flexfield code
Deployment result, such as success or error
In case of errors, the report lists the usages for which the errors were encountered. If a runtime exception occurs, the output displays the traceback information.
Consider the following aspects of command line deployment.
Preparing to use the WLST flexfield commands
Using the deployFlexForApp command
Using the deployFlex command
Using the deployPatchedFlex command
Exiting the WLST and checking the results
You can only execute the WLST flexfield commands on a WebLogic Administration Server for a domain that has a running instance of the Oracle Fusion Middleware Extensions for Applications (Applications Core) Setup application.
For more information on deploying the Applications Core Setup application, see the Oracle Fusion Applications Developer's Guide.
Ensure that the AppMasterDB data source is registered as a JDBC data source with the WebLogic Administration Server and points to the same database as the ApplicationDB data source.
Start the WebLogic Server Tool (WLST) tool, if it is not currently running.
UNIX:
sh $JDEV_HOME/oracle_common/common/bin/wlst.sh
Windows:
wlst.cmd
Connect to the server, replacing the user name and password arguments with your WebLogic Server user name and password.
connect('wls_username', 'wls_password', 'wls_uri')
The values must be wrapped in single-quotes. The wls_uri value is typically T3://localhost:7101.
For more information on the WLST scripting tool, see the Oracle Fusion Middleware Oracle WebLogic Scripting Tool.
The deployFlexForApp command translates the product application's predefined flexfield
metadata into artifacts in the MDS repository.
Important
This command is run automatically when you provision
applications. However, after custom applications development, you
must run the deployFlexForApp command
after you configure your application to read the flexfield artifacts
from the MDS repository and before you log into the application for
the first time, even if there is no predefined flexfield metadata.
This command does not deploy flexfields that have
a status of Deployed unless the force parameter is set to 'true' (the default setting is 'false').
For more information on priming the MDS partition with configured flexfield artifacts, see the Oracle Fusion Applications Developer's Guide.
From the WLST tool, execute the following commands
to deploy the artifacts to the MDS partition, replacing product_application_shortname with the application's
short name wrapped in single-quotes.
deployFlexForApp('product_application_shortname'[, 'enterprise_id'] [,'force'])
In a multi-tenant environment, replace enterprise_id with the Enterprise ID to which
the flexfield is mapped. Otherwise, replace with 'None' or do not provide a second argument.
To deploy all flexfields regardless of their deployment
status, set force to 'true' (the default
setting is 'false'). If you want to
deploy all flexfields in a single-tenant environment, you either can
set enterprise_id to 'None', or you can use the following signature:
deployFlexForApp(applicationShortName='product_application_shortname',force='true')
Tip
The application's short name is the same as the application's module name.
For more information about working with application taxonomy, see the Oracle Fusion Applications Developer's Guide.
From the WLST tool, execute the following
command to deploy a flexfield, replacing flex_code with the code that identifies the flexfield, and replacing flex_type with the flexfield's type, which is
either DFF, KFF, or EFF.
deployFlex('flex_code', 'flex_type')
The values must be wrapped in single-quotes.
Use the deployPatchedFlex command for situations where the patching framework does not invoke
the command, such as when an application has been patched offline.
If the installation is multi-tenant enabled, the command deploys all patched flexfields for all enterprises. This command is not intended to be invoked manually.
Check with your provisioning or patching team, or the task flows for managing flexfields, to verify that the flexfield has a Patched deployment status.
From the WLST tool, execute the following command to deploy the artifacts to the MDS partition of all flexfields that have a READY status.
deployPatchedFlex()
Execute the following command to deploy all flexfields that have either a READY status or an ERROR status.
deployPatchedFlex(mode='RETRY')
Whenever you deploy flexfield changes to MDS
using the deployPatchedFlex() WLST command,
an MDS label is created in the format FlexPatchingWatermarkdate+time. Use the deleteFlexPatchingLabels command to inquire about and delete these labels.
From the WLST tool, execute the deployPatchedFlex() command with no arguments to delete
the flexfield patching labels.
To output a list of flexfield patching labels, execute
the command with the infoOnly argument,
as follows:
deleteFlexPatchingLabels(infoOnly='true')
To exit the tool, execute the following command.
disconnect()
Optionally, sign into the application, access user interface pages that contain flexfields, and confirm the presence of flexfields for which configuration exists, such as value sets, segments, context, or structures.
In Oracle Fusion General Ledger, use cross validation rules to determine the account combinations that are created dynamically as your users enter transactions or journal entries. Once enabled, a cross validation rule determines whether a selected value for a particular segment of the account combination can be combined with specific values in the other segments to form a new account combination.
A cross validation rule is defined in terms of a condition filter and a validation filter.
The condition filter describes the event under which the rule will be evaluated. If the event specified in the condition filter is not applicable, then the rule will not be evaluated even if it is enabled.
When the event specified in the condition filter is applicable, the validation filter condition must be satisfied before the account combination can be created. The rule is evaluated using the following logic: If condition is satisfied, then perform specified validations.
For example, if your organization has determined that a certain company value, Operations, cannot use a specific cost center, Marketing, define the following cross validation rule to validate your accounts accordingly: If company is equal to Operations, then validate that cost center is not equal to Marketing.
If account combinations already exist and violate the newly enabled cross validation rules, these account combinations continue to be valid. Before disabling any existing account combinations that violate your rules and you are no longer using, move the balances in those accounts to the correct accounts. Then disable the account combinations manually to prevent further posting.
Note
Best practice is to define and enable cross validation rules before:
Balances are loaded
Transactions or journal entries are imported or entered
Account combinations are created
Create cross validation rules to prevent specific combinations of segment values in your account combinations, for example, preventing a particular cost center from being combined with a specific company value. Cross validation rules only affect the creation of new account combinations.
Enter a new cross validation rule to prevents your InFusion America Inc. company value 01 from being combined with your marketing department value 300 in an account combination. Your company, InFusion America Inc. does not have a marketing department.
Navigate to the Manage Cross-Validation Rules task from within your implementation project, and then click the Go to Task icon.
Select your InFusion America chart of accounts. Click the Create icon.
Specify a unique rule Name, IFAM01, an optional Description, Do not combine Marketing Department, 300 with InFusion America, company 01.
Enter an optional effective From Date of today. Check Enabled.
Click on the Change filter condition on the Condition Filter. Enter Company equal to 01. The cross validation rule evaluates if Company 01 was entered and if it was, then the validation process continues to evaluate the rule.
Note
If you do not specify any statement in the condition filter, then the rule is always evaluated.
Click on the Change filter condition on the Validation Filter. Enter Cost Center equal to 300. When the rule is evaluated, an account combination must contain a cost center other than 300 before it can be created.
Enter an Error Message: Cost Center 300 is not allowed with Company 01. The message displays in the relevant user interfaces and processes when an account combination cannot be created because it violates the rule.
Click Save and Close.
The chart of accounts mapping feature supports the ability to correlate a source chart of accounts to a target chart of accounts to allow for the processing of balances or amounts. This is accomplished by either using segment rules, account rules, or a combination of both. A chart of accounts mapping is used by the posting process in propagating transactions from the primary ledger to its secondary ledger, providing the means to map the primary ledger chart of accounts to that of the secondary ledger. The mapping feature is used by both balance transfer processes for balance level secondary ledgers as well as cross ledger transfers, whereby balances from one ledger are copied to another ledger.
Segment rules serve to map each segment of the target chart of accounts to an account value or segment in the source account. Three different mapping actions are available:
Assign a constant value for a segment in the target chart of accounts
Copy the value from the source segment to the corresponding target segment
Note
To use this action, the paired target and source segments must share identical values in their value sets.
Use roll up rules to aggregate source accounts to a corresponding target segment or account
Create a single value mapping when a specific detail source segment value is given a detail target segment value.
Use hierarchical roll up rules when a specific parent source value and all of its child segment values, are mapped to a given detail target segment value. This provides the ability to process groups of source segment values in one single roll up rule.
Define parent source values in roll up rules when date effective versions of the hierarchy are used with the accounting date of the transactions produced by the processes that reference the chart of accounts mapping. This gives the additional benefit of self maintaining mappings since the hierarchies referenced change with time, and the applicable child values are processed automatically.
In addition to segment rules, define account rules for the chart of accounts mapping. Account rules map a complete target account code combination against one or more source account code combinations. The source account code combinations can be defined segment by segment using:
Single detail account values
Detail account value ranges
Parent values for each segment
Note
When using parent values, its child values for the date effective version of the hierarchy, are processed when the mapping is called.
Segment rules serve to map each segment of the target chart of accounts to an account value or segment in the source account of a secondary chart of accounts. A segment is only one part of the account code combination.
Account rules map a complete target account code combination against one or more source account code combinations.
Note
Segment and account rules can be used alone or both types of mapping rules can be used in the same mapping set.
Segment rules and account rules can be exclusively used in a chart of accounts mapping, or you can use a combination of both. If there is an overlap between the two types of rules, whereby a source account is mapped one way by the segment rules, and another by the account rules, the account rule supersedes. As such, segment rules can be used to more broadly define how to map the relationship between two charts of accounts on a segment by segment basis, and account rules can be used to more precisely delineate specific source account code combinations into their intended target accounts.
Use the tree management feature in Oracle Fusion applications to organize data into hierarchies. A hierarchy contains organized data and enables the creation of groups and rollups of information that exist within an organization. Trees are hierarchical structures that enable several data management functions such as better access control, application of business rules at various levels of hierarchies, improved query performance, and so on.
For example, XYZ Corporation has two departments: Marketing and Finance. The Finance department has two functional divisions: Receivables and Payables. Defining a tree for the XYZ Corporation establishes a hierarchy between the organization and its departments, and between the departments and their respective functional divisions. Such a hierarchical modeling of organizational data could be used for executing several data management functions within that organization.
You can create one or more versions of trees, and they can be labeled for better accessibility and information retrieval. You can create trees for multiple data sources, which allow the trees to be shared across Oracle Fusion applications.
A tree structure is a representation of the data hierarchy, and guides the creation of a tree. A tree is an instance of the hierarchy as defined in the tree structure. Tree structures enable you to enforce business rules to which the data must adhere.
The root node is the topmost node of a tree. Child nodes report to the root node. Child nodes at the same level, which report to a common parent node, are called siblings. Leaves are details branching off from a node but not extending further down the tree hierarchy.
A tree is created having only one version. However, users can create more than one tree version depending on the need, and they can make changes to those versions. Depending on varying requirements, users can create one or more tree versions and publish all of them or some of them by making the versions active at the same time. Similar to any other version control system, versions of trees are maintained to keep track of all the changes that a tree undergoes in its life cycle.
Tree labels are short names associated with trees and tree structures and point directly to the data source. Tree labels are automatically assigned to the tree nodes. You can store labels in any table and register the label data source with the tree structure.
A tree structure defines the hierarchy for creating trees and prescribes rules based on which trees are created, versioned, and accessed. You can associate multiple data sources with a tree structure. A tree is an instance of this hierarchy. Every tree structure can contain one or more trees.
You can create tree structures specific to an application but you can share tree structures across applications. If you apply version control to the tree structure, it is carried over to the trees that are based on the tree structure. Each tree version contains at least one root node. Occasionally, a tree version may have more than one root node.
An administrator controls the access to tree structures through a set of rules that are periodically audited for validity.
Defining a tree structure involves specifying several important pieces of information on the Create Tree Structure: Specify Definition page.
The Tree Node table displays data in nodes that exist in the data hierarchy. You must select the correct and most appropriate tree node table to be able to define the tree structure, based on the tree hierarchy you want to establish. This selection also affects the level of security that is set on a tree node and its child entities.
The following options are used to determine the mode of sharing a tree structure across the applications.
Open: Indicates that the tree is associated with all reference data sets.
Set ID: Indicates that the tree will be associated with a specific reference data set.
Indicates the source where the tree structure is being defined. For predefined tree structures select Oracle and for custom structures, select Customers.
You can customize the predefined tree structures as well as the ones that you created. However, customizing the predefined tree structures involves certain level of access restrictions, and will be limited to specific tree nodes and downwards in hierarchy.
One or more trees and tree versions can be based on a tree structure. A tree structure can have one or more trees and tree versions based on it. Usually, only one active version is permitted at any given point of time. However, depending on the requirement, you can allow two or more tree versions to be in the active state for the same date range. This flexibility allows you to choose the tree version that you want to implement.
You can create, edit, and delete tree structures depending upon the requirement. You can also audit and change the status a tree structure.
You can create trees on the basis of a tree structure. When you edit an active tree structure, the status of the tree structure and all associated trees and their versions change to draft. To reuse a tree structure, you can create a copy of it without copying the associated trees and tree versions. If you delete a tree structure, all the associated trees and tree versions are automatically deleted.
Note
For specific information on working with the predefined tree structures that exist in an Oracle Fusion application, refer to the specific product documentation.
If you change the status of a tree structure, the status of the trees and tree versions associated with that tree structure also changes.
The following table lists the different statuses of a tree structure.
|
Status |
Meaning |
|---|---|
|
Draft |
Yet to be published or is in a modified state. |
|
Active |
In use and based on which one or more trees or tree versions are created. |
|
Inactive |
Not in use. |
Use the tree structure audit results to verify the tree structure's correctness and data integrity. The audit results include the following details:
The name of the validator, which is a specific validation check
The result of the validation, including a detailed message
Corrective actions to take if there are any validation errors
Setting the status of a tree structure to active automatically triggers an audit of that tree structure. You can also manually trigger an audit on the manage Tree Structures page, using Actions - Audit. The Tree Structure Audit Result table shows a list of validations that ran against the selected tree structure.
The following table lists the validators used in the audit process and describes what each validator checks for. It also lists possible causes for validation errors and suggests corrective actions.
|
Validator |
Description (what is checked) |
Possible Cause for Validation Failure |
Suggested Corrective Action |
|---|---|---|---|
|
Restrict By Set ID |
On the Manage Tree Structures: Specify Data Sources page, if the Set ID check box is selected to enable the Restrict Tree Node List of Values Based on option for a tree structure, each of its data source view objects must have a reference data set attribute. This validation does not take place when the check box is not selected. |
Even when the check box is selected, one or more of its data source view objects does not contain a reference data set attribute. |
If reference data set restriction is required for this tree structure, include a reference data set attribute on all data sources. Otherwise, deselect the check box. |
|
Row Flattened Table Name |
On the Manage Tree Structures: Specify Performance
Options page, a valid row flattened table must be specified for the
tree structure. It can either be the standard row flattened table |
|
Correct the row flattened table definition. |
|
Available Label Data Sources |
On the Manage Tree Structures: Specify Data Sources page, if a labeling scheme is specified for the tree structure by selecting a list item from the Labeling Scheme list box, the label data source view object specified for each data source must be accessible, and the primary keys must be valid. This restriction does not apply when you select None from the Labeling Scheme list box. |
|
|
|
Available Data Sources |
Each data source view object specified for the tree structure must be accessible, and all its primary key attributes must be valid. |
|
|
|
Column Flattened Table Name |
On the Manage Tree Structures: Specify Performance
Options page, a valid column flattened table must be specified for
the tree structure. It can either be the standard row flattened table |
|
Correct the column flattened table definition. |
|
Restrict by Date |
On the Manage Tree Structures: Specify Data Sources page, if the Date Range check box is selected to enable the Restrict Tree Node List of Values Based on option for a tree structure, each of its data source view objects must have effective start date and effective end date attributes. This validation does not take place when the check box is not selected. |
Even when the check box is selected, one or more of its data source view objects does not contain effective start date and effective end date attributes. |
If the date restriction is required for this tree structure, include the effective start date and effective end date attributes on all data sources. Otherwise, deselect the check box. |
|
Tree Node Table Name |
On the Manage Tree Structures: Specify Definition
page, a valid tree node table must be specified for the tree structure.
It can either be the standard row flattened table |
|
Correct the tree node table definition. |
|
Allow Node Level Security |
If the |
The option is set to No for the tree structure but one or more associated data sources have that option set to Yes. |
Correct the option setting in the tree structure and their data sources. |
The data sources provide the items for establishing hierarchy in a tree structure. In the tree management infrastructure, these data sources are Oracle Application Development Framework (ADF) business components view objects, which are defined by application development.
Selecting a labeling scheme determines how the tree nodes are labeled. You may select a labeling scheme to assign at the data source level, at the parent node level, or keep it open for customer assignment. You may also choose not to have any labeling scheme. However, if you decide to use any of the labeling schemes, you may need to select the following additional options, to restrict the list of values that appear under the selected tree node.
Allow Ragged Nodes: To include nodes that have no child nodes, and are shorter than the remaining nodes in the entire hierarchy.
Allow Skip Level Nodes: To include nodes that are at the same level but have parent nodes at different levels.
You can decide the depth of the tree structure by selecting an appropriate value from the list. Keeping the depth limit open renders an infinite list of values.
Using the following options, you can restrict the list of values that appear for selection under a specific tree node.
Date Range: Specifies whether a selection of nodes should be restricted to the same date range as the tree version.
Allow Multiple Root Nodes: Allows you to add multiple root nodes when creating a tree version.
Reference Data Set: Specifies whether a selection of nodes should be restricted to the same set as the tree.
Tree data sources have optional data source parameters with defined view criteria and associated bind variables. You can specify view criteria as a data source parameter when creating a tree structure, and edit the parameters when creating a tree. Multiple data sources can be associated with a tree structure and can have well-defined relationships among them.
Note
Parameter values customized at the tree level override the default values specified at the tree-structure level.
The data source parameters are applied to any tree version belonging to that data source, when performing node operations on the tree nodes. Data source parameters also provide an additional level of filtering for different tree structures. The tree structure definition supports three data source parameter types.
Bound Value: Captures any fixed value, which is used as part of the view criteria condition.
Variable: Captures and binds a dynamic value that is being used by the data source view object. This value is used by the WHERE condition of the data flow.
View Criteria: Captures the view criteria name, which is applied to the data source view object.
You can also specify which of the data source parameters are mandatory while creating or editing the tree structure.
View objects from the ADF business components are used as data sources. To associate the view object with the tree structure, you can pick the code from ADF business component view objects and provide the fully qualified name of the view object, for example, oracle.apps.fnd.applcore.trees.model.view.FndLabelVO.
Tree structures are heavily loaded with data. As a tree management guideline, use the following settings to improve performance of data rendering and retrieval.
Row Flattening
Column Flattening
Column Flattened Entity Objects
ADF Business Component View Objects
Row flattening optimizes parent-child information for run-time performance by storing additional rows in a table for instantly finding all descendants of a parent without initiating a CONNECT BY query. Row flattening eliminates recursive queries, which allows operations to perform across an entire subtree more efficiently.
To store row flattened data for the specific tree
structure, users can either use the central FND_TREE_NODE_RF table or they can register their own row flattened table. For example,
in a table, if Corporation is the parent of Sales Division (Corporation-Sales
Division), and Sales Division is the parent of Region (Sales Division-Region),
a row-flattened table contains an additional row with Corporation
directly being the parent of Region (Corporation-Region).
Column flattening optimizes parent-child information for run-time performance by storing an additional column in a table for all parents of a child.
To store column flattened data for the specific tree
structure, users can either use the central FND_TREE_NODE_CF table or they can register their own column flattened table. For
example, in a table, if Corporation is the parent of Sales Division
(Corporation-Sales Division), and Sales Division is the parent of
Region (Sales Division-Region), a flattened table in addition to these
columns, contains three new columns: Region, Sales Division, and Corporation.
Although positioned next to each other, the column Region functions
at the lower level and Corporation at the higher level, retaining
the data hierarchy.
In the absence of a column-flattened table, if you need to generate the business component view objects for your tree structure for the flattened table, use the tree management infrastructure to correctly provide the fully qualified name of the entity object for the column flattened table.
View objects from the ADF business components can also be used as data sources, eliminating the need to create new types of data sources. This field is to store the fully qualified name for the business component view object generated by the tree management for business intelligence reporting and usage The business component view object is a combination of the tree data source and column flattened entity. Using this option prevents data redundancy and promotes greater reuse of existing data, thereby improving the performance of the tree structure.
Tree labels are tags that are stored on tree nodes. You can store labels in any table and register the label data source with the tree structure. When a labeling scheme is used for trees, the selected labels are stored in the tree label entity and each tree node contains a reference to a tree label in the labeling scheme.
The following table lists the three ways in which tree labels are assigned to the tree nodes.
|
Labeling Scheme |
Description |
|---|---|
|
Level |
Labels that are automatically assigned based on the data source to which the tree node belongs. A level label points to a specific data source. For example, in a tree that reflects the organizational hierarchy of an enterprise, all division nodes appear on one level and all department nodes on another. |
|
Group |
Labels that you can arbitrarily assign to tree nodes. |
|
Depth |
Labels that are automatically assigned based on the depth of the tree node within the tree. No manual assignment is performed. Note In an unbalanced hierarchy, a level may not be equal to depth. |
You can create and edit trees and tree versions depending upon the requirement. A tree can have one or more tree versions. Typically, when changes are made to an existing tree, a new version is created and published.
Trees are created based on the structure defined in the tree structure. You can create trees, modify existing trees, and delete trees. If you want to copy an existing tree, you can duplicate it. However, only the tree is duplicated and not its versions.
Creating a tree involves specifying the tree definition and specifying the labels that are used on its nodes. If the selected tree structure has data sources and parameters defined for it, they appear on the page allowing you to edit the parameter values at the tree node level.
Note
Parameter values customized at the tree level will override the default values specified at the tree-structure level.
Tree versions are created at the time of creating trees. A tree must contain a version.
Editing an existing tree provides you the choice to update the existing version. You can also edit the existing version that lies nested under the tree in the search results.
When you edit a tree version bearing Active status, the status changes to Draft until the modifications are saved or cancelled.
Use the tree version audit results to verify the tree version's correctness and data integrity. The audit results include the following details:
The name of the validator, which is a specific validation check
The result of the validation, including a detailed message
Corrective actions to take if there are any validation errors
An audit automatically runs whenever a tree version is set to active. You can also manually trigger an audit on the Manage Trees and Tree Versions page, using Actions - Audit. The Tree Version Audit Result table shows a list of validations that ran against the selected tree version.
The following table lists the validators used in the audit process and describes what each validator checks for. It also lists possible causes for validation errors and suggests corrective actions.
|
Validator |
Description (what is checked) |
Possible Cause for Validation Failure |
Suggested Corrective Action |
|---|---|---|---|
|
Effective Date |
The effective start and end dates of the tree version must be valid. |
The effective end date is set to a value that is not greater than the effective start date. |
Modify the effective start and end dates such that the effective start date is earlier than the effective end date. |
|
Root Node |
On the Manage Tree Structures: Specify Data Sources page, if the Allow Multiple Root Nodes check box for the Restrict Tree Node List of Values Based on option is not selected, and if the tree structure is not empty, the tree version must contain exactly one root node. This validation does not take place if the check box is selected. |
Even if the check box is deselected, the tree version has multiple root nodes. |
Modify the tree version such that there is exactly one root node. |
|
Data Source Max Depth |
For each data source in the tree structure, on the Data Source dialog box, if the data source is depth-limited, the data in the tree version must adhere to the specified depth limit. This validation does not apply to data sources for which the Maximum Depth field is set to Unlimited. |
The tree version has data at a depth greater than the specified depth limit on one or more data sources. |
Modify the tree version such that all nodes are at a depth that complies with the data source depth limit. |
|
Duplicate Node |
On the Data Source dialog box, if the Allow Duplicates check box is not selected, the tree version should not contain more than one node with the same primary key from the data source. If the check box is selected, duplicate nodes are permitted. |
Even when the check box is deselected, the tree version contains duplicate nodes. |
Remove any duplicate nodes from the tree version. |
|
Available Node |
All nodes in the tree version should be valid and available in the underlying data source. |
|
Remove any orphaned nodes from the tree version. Update tree reference nodes so that they reference existing tree versions. |
|
Node Relationship |
All nodes must adhere to the relationships mandated by the data sources registered in the tree structure. |
The tree structure has data sources arranged in a parent-child relationship, but the nodes in the tree do not adhere to the same parent-child relationship. For example, if the tree structure has a Project data source with a Task data source as its child, Task nodes should always be under Project nodes in the tree version. This validation fails if there are instances where a Project node is added as the child of a Task node. |
Modify the tree version such that the nodes adhere to the same parent-child relationships as the data sources. |
|
SetID Restricted Node |
On the Manage Tree Structures: Specify Data sources page, if the Set ID check box is selected to enable the Restrict Tree Node List of Values Based on option for each tree node, the underlying node in the data source must belong to the same reference data set as the tree itself. This restriction does not apply when the check box is not selected. |
Even when the check box is selected, the tree version has nodes whose data source values belong to a different reference data set than the tree. |
Modify the tree version such that all nodes in the tree have data sources with reference data set matching that of the tree. |
|
Label Enabled Node |
On the Manage Tree Structures: Specify Data Sources page, if a labeling scheme is specified for the tree structure by selecting a list item from the Labeling Scheme list box, all nodes should have labels. This restriction does not apply when you select None from the Labeling Scheme list box. |
The tree structure has a labeling scheme but the tree version has nodes without labels. |
Assign a label to any node that does not have a label. |
|
Date Restricted Node |
On the Manage Tree Structures: Specify Data Sources page, if the Date Range check box is selected to enable the Restrict Tree Node List of Values Based on option for a tree structure, each node in the underlying data source must have an effective date range same as the effective date range of the tree version. This restriction does not apply if the check box is not selected. |
Even when the check box is selected, there are data source nodes that have a date range beyond the tree version's effective date range. For example, if the tree version is effective from Jan-01-2012 to Dec-31-2012, all nodes in the tree version must be effective from Jan-01-2012 to Dec-31-2012 at a minimum. It is acceptable for the nodes to be effective for a date range that extends partly beyond the tree version's effective date range (for example, the node data source value is effective from Dec-01-2011 to Mar-31-2013). It is not acceptable if the nodes are effective for none or only a part of the tree version's effective date range (for example, the node data source value are effective only from Jan-01-2012 to June-30-2012). |
Ensure that all nodes in the tree version have effective date range for the effective date range for the tree version. |
|
Multiple Active Tree Version |
On the Manage Tree Structures: Specify Definition page, if the Allow Multiple Active Tree Versions check box is not selected for the tree structure, there should not be more than one active tree version under a tree at any time. This restriction does not apply if the check box is selected. |
Even when the check box is not selected, there is more than one active tree version in the tree for the same date range. |
Set no more than one tree version to Active within the same date range and set the others to inactive or draft status. |
|
Range Based Node |
On the Data Source dialog box, if the Allow Range Children check box is not selected, range-based nodes are not permitted from that data source. This restriction does not apply if the check box is selected. |
Even when the check box is not selected, there are range-based nodes from a data source. |
Ensure that any range nodes in your tree version are from a data source that allows range children. |
|
Terminal Node |
On the Data Source dialog box, if the Allow Use as Leaves check box is not selected, values from that data source cannot be added as leaves (terminal nodes) to the tree version. This restriction does not apply if the check box is selected. |
Even when the check box is not selected, values from a data source are added as leaf nodes (terminal nodes). |
Modify the tree version such that all terminal nodes are from data sources for which this check box is selected. |
|
Usage Limit |
On the Data Source dialog box, if the Use All Values option is selected to set the Usage Limit for the data source, every value in the data source must appear as a node in the tree. This restriction does not apply if None option is selected. |
Even if the Use All Values option is selected, there are values in the data source that are not in the tree version. |
For each data source value that is not yet available, add nodes to the tree version. |
Data sources form the foundation for tree management in Oracle Fusion Applications. Tree structures, trees, and tree versions establish direct and real-time connectivity with the data sources. Changes to the data sources immediately reflect on the Manage Trees and Tree Versions page and wherever the trees are being used.
Tree structures contain the metadata of the actual data that is used in Oracle Fusion Applications. Tree structures contain the core business logic that is manifested in trees and tree versions.
Trees and tree versions are built upon the tree structures. They employ the business rules defined in the tree structures and allow an application to select and enable a subset of trees to fulfill a specific purpose in that application.
Source data is mapped to tree nodes at different levels in the database. Therefore, changes you make to the tree nodes affect the source data. Access control set on trees prevents unwanted data modifications in the database. Access control can be applied to the tree nodes or anywhere in the tree hierarchy.
Tree nodes are points of data convergence that serve as the building blocks of a tree structure. Technically, the node may be stored either in a product-specific table or in an entity that has been established by tree management as the default storage mechanism. However, since all data in Oracle Fusion Applications usually have a storage home, only user-created data needs to be stored in an entity.
Nodes are attached to tree versions. Whenever you create or edit a tree version, you need to specify its tree node.
You can create, modify, or delete tree nodes on the Tree Version: Specify Nodes page. To add a tree node, ensure that the tree structure with which the tree version is associated is mapped to a valid data source. You can also duplicate a tree node if the multiple root node feature is enabled.
In most trees, all nodes at the same level represent the same kind of information. For example, in a tree that reflects the organizational hierarchy, all division nodes appear on one level and all department nodes on another. Similarly, in a tree that organizes a user's product catalog, the nodes representing individual products might appear on one level and the nodes representing product lines on the next higher level.
When levels are not used, the nodes in the tree have no real hierarchy or reporting structure but do form a logical summarization structure. Strictly enforced levels mean that the named levels describe each node's position in the tree. This is natural for most hierarchies. Loosely enforced levels mean that the nodes at the same visual level of indentation do not all represent the same kind of information, or nodes representing the same kind of information appear at multiple levels. With loosely enforced levels, users assign a level to each node individually. The level is not tied to a particular visual position.
A tree node has the following node types.
Single: Indicates that the node is a value by itself.
Range: Indicates that the node represents a range of values and possibly could have many children. For example, a tree node representing account numbers 10000 to 99999.
Referenced Tree: Indicates that the tree node is actually another version for the tree based on the same tree structure, which is not physically stored in the same tree. For example, a geographic hierarchy for the United States can be referenced in a World geographic hierarchy.
Oracle Fusion Applications provides integration between Oracle Fusion Accounting Hub and Oracle Hyperion Data Relationship Management, Fusion Edition, if licensed. This integration provides the ability to synchronize chart of accounts values and hierarchies. The functionality also establishes corporate wide accounting structures, for Oracle and non-Oracle ledgers, and automatically updates charts of accounts values and hierarchies across multiple Oracle E-Business Suite and Oracle Fusion instances through a single application.
For more information on completing the post-installation setup for Data Relationship Management, see the Hyperion Data Relationship Management Integration with the Oracle Fusion and E-Business Suite General Ledgers white paper on My Oracle Support at https://support.oracle.com.
Define an accounting calendar to create your accounting year and the periods it contains. Specify common calendar options that the application uses to automatically generate a calendar with its periods. Specifying all the options makes defining a correct calendar easier and more intuitive with fewer errors. The choices you make when specifying the following options are critical, because it is difficult to change your accounting calendar after a period status is set to open or future enterable.
Start Date
Period Frequency
Adjusting Period Frequency
Period Name Format
Note
In Oracle Fusion, the common calendar types, monthly, weekly, 4-4-5, 4-5-4, 5-4-4, 4-week, quarterly, and yearly, are automatically generated. This functionality makes it easier to create and maintain accounting calendars. By using the period frequency option, you no longer have to go through the tedious task of defining each period manually.
If you plan to run translation, specify a calendar start date that is a full year before the start date of the year of the first translation period for your ledger. Translation cannot be run in the first period of a calendar. Consider how many years of history you are going to load from your previous system and back up the start date for those years plus one more. You cannot add previous years once the first calendar period has been opened.
Use period frequency to set the interval for each subsequent period to occur, for example, monthly, quarterly, or yearly. If you select the period frequency of Other, by default, the application generates the period names, year, and quarter number. You specify the start and end dates. You must manually enter the period information. For example, select the period frequency of Other and enter 52 as the number of periods when you want to define a weekly calendar. For manually entered calendars, when you click the Add Year button, the application creates a blank year. Then, you must manually enter the periods for the new year. The online validation helps prevent erroneous entries.
Note
In Oracle Fusion applications a calendar can only have one period frequency and period type. Therefore, if you have an existing calendar with more than one period type associated with it, during the upgrade from Oracle E-Business Suite, separate calendars are created based on each calendar name and period type combination.
Use the adjusting period frequency to control when the application creates adjusting periods. For example, some of the frequencies you select add one adjusting period at year end, two at year end, or one at the end of each quarter. The default is None which adds no adjusting periods. If you select the frequency of Other, the Number of Adjusting Periods field is displayed. Enter the number of desired adjusting periods and then, manually define them.
The User-Defined Prefix field in the Period Name Format region is an optional feature that allows you to enter your own prefix. For example, define a weekly calendar and then enter a prefix of Week, - as the separator, and the period name format of Period numberYY fiscal year. The application creates the names of Week1-11, Week2-11, through Week52-11. The options for the Format field are predefined values. The list of values is filtered based on the selected separator and only displays the options that match the selected separator.
The year displayed in the period names is based on the selected period name format and the dates the period covers or if the period crosses years, on the year of the start date of the period. For example, April 10, 2010 to May 9, 2010 has the period name of Apr-10 and December 10, 2010 to January 9, 2011 has the name of Dec-10. If period frequency is Other, then the period format region is hidden. The application generates a temporary period name for calendars with period frequency of Other, using a fixed format of Period numberYY. You can override this format with your own customized period names.
Note
For an accounting calendar that is associated with a ledger, changing period names or adding a year updates the accounting period dimension in the balances cubes.
Calendar validation is automatic and prevents serious problems when you begin using the calendar. Once you set a calendar period status to open or future enterable, you cannot edit the period.
The calendar validation runs automatically when you save the calendar.
The following table lists the validation checks performed when the accounting calendar is saved.
|
Validation Performed |
Example of Data |
|---|---|
|
Unique period number |
2 assigned for two periods |
|
Unique period name |
Jan-11 entered twice |
|
Period number beyond the maximum number of periods per year |
13 for a 12 period calendar with no adjusting periods |
|
Entered period name contains spaces |
Jan 11 |
|
Single or double quotes in the period name |
Jan '11 |
|
Nonadjusting periods with overlapping dates |
01-Jan-2011 to 31-Jan-2011 and 30-Jan-2011 to 28-Feb-2011 |
|
Period date gaps |
01-Jan-2011 to 28-Jan-2011 and 31-Jan-2011 to 28-Feb-2011 |
|
Missing period numbers |
Periods 1 through 6 defined for a twelve month calendar |
|
Period number gaps |
1, 3, 5 |
|
Period numbers not in sequential order by date |
Period 1 covers 01-Jan-2011 to 31-Jan-2011 and period 2 covers 01-Mar-2011 to 31-Mar-2011, and period 3 covers 01-Feb-2011 to 28-Feb-2011. |
|
Quarter number gaps |
1, 3, 4 |
|
Quarters not in sequential order by period |
1, 3, 2, 4 |
|
Period start or end dates more than one year before or after the fiscal year |
July 1, 2010 in a 2012 calendar |
Oracle Fusion General Ledger identifies erroneous entries online as you enter a new calendar or change data on an existing calendar. The application also automatically validates the data when you save the calendar.
The period naming format determines the year that is appended to the prefix for each period in the calendar. For the example, your accounting year has a set of twelve accounting period with a start date of September 1, 2011 and the end date is August 31, 2012, with each period's date range following the natural calendar month date range.
Calendar period naming format: Select the calendar period format to append the period's start date's year to the prefix. For the period covering September 1, 2011 to December 31, 2011, then 2011 or just 11, depending on the period format selected, is appended to each period's name. For the remaining periods covering January 1, 2012 to August 31, 2012, then 2012 or 12, is appended to each period's name.
Fiscal period naming format: Select the fiscal period format to always append the period's year assignment to the prefix. If the accounting periods in the set of twelve are all assigned the year of 2012, then 2012 or just 12, depending on the period format selected, is appended to the period name of all 12 periods.
Update an existing calendar before the new periods are needed as future periods, based on the future period setting in your accounting configuration. If a complete year has been defined and validated, use the Add Year button to add the next year quickly. Accept or change the new rows as required. For example, with the Other frequency type calendar, dates may differ from what the application generates.
The migration script assigns a period frequency that most closely matches your Oracle E-Business Suite Release 12 calendar. When you use the Oracle Fusion applications Add Year functionality for the first time, you have an opportunity to review and change the period frequency. The Calendar Options page opens only for calendars upgraded from Release 12 to allow one time modification.
Make your changes to the period frequency, adjusting period frequency, and period name format, including the prefix and separator, as needed. Changes can not conflict with the existing upgraded calendar definition. Update the calendar name and description in the calendar header, as needed, for all calendars. Period details for a new year will be generated automatically based on the latest calendar options. You can also manually update the calendar. The modified calendar options affect future years only.
When creating or editing currencies, consider these points relevant to entering the currency code, date range, or symbol for the currency.
You cannot change a currency code after you enable the currency, even if you later disable that currency.
Users can enter transactions denominated in the currency only for the dates within the specified range. If you do not enter a start date, then the currency is valid immediately. If you do not enter an end date, then the currency is valid indefinitely.
Even if you enter a symbol for a currency, the symbol is not always displayed when an amount is displayed in this currency. Some applications use currency symbols when displaying amounts. Others, like Oracle Fusion General Ledger, do not.
Use the Derivation Type, Derivation Factor, and Derivation Effective Date fields to define the relationship between the official currency (Euro) of the European Monetary Union (EMU) and the national currencies of EMU member states. For each EMU currency, you define its Euro-to-EMU fixed conversion rate and the effective starting date.
Note
If you need to use a different currency code for Euro, you can disable the predefined Euro currency and create a new one.
The Euro currency derivation type is used only for the Euro, and the Euro derived derivation type identifies national currencies of EMU member states. All other currencies do not have derivation types.
The derivation factor is the fixed conversion rate by which you multiply one Euro to derive the equivalent EMU currency amount. The Euro currency itself should not have a derivation factor.
The derivation effective date is the date on which the relationship between the EMU currency and the Euro begins.
Create currencies to use, for example for reporting purposes, if they are not already provided. All currencies from the International Organization for Standardization (ISO) 4217 standard are provided.
Enable any currency other than USD for use in Oracle Fusion Applications, for example for displaying monetary amounts, assigning to sets of books, entering transactions, and recording balances. Only USD is enabled by default.
Precision is the number of digits to the right of the decimal point used in regular currency transactions. Extended precision is the number of digits to the right of the decimal point used in calculations for this currency, and it must be greater than or equal to the standard precision. For example, USD would have 2 for precision because amounts are transacted as such, for example $1.00. For calculations, for example adding USD amounts, you might want the application to be more precise than two decimal digits, and would enter an extended precision accordingly.
Note
Some applications use extended precision. Others, such as Oracle Fusion General Ledger, do not.
Minimum accountable unit is the smallest denomination for the currency. For example, for USD that would be .01 for the cent. This unit does not necessarily correspond to the precision for all currencies.
Maintain different conversion rates between currencies for the same period with the Oracle Fusion General Ledger conversion rate types functionality. Four predefined daily conversion rate types are seeded: Spot, Corporate, User, and Fixed, allowing you to use different rate types for different business needs. During journal entry, the conversion rate is provided automatically by the General Ledger based on the selected conversion rate type and currency, unless the rate type is user. For user rate types, you must enter the conversion rate. Define additional rate types as needed. Set your most frequently used rate type as the default. Conversion rate types cannot be deleted.
Assign conversion rate types to automatically populate the associated rate for your period average and period end rates for the ledger. For example, you can assign the predefined rate type Spot to populate your period average rates and the predefined rate type Corporate to populate your period end rates. Period average and period end rates are used in translation of account balances.
Conversion rate types are used to automatically assign a rate when you perform the following accounting functions:
Convert foreign currency journal amounts to ledger currency equivalents
Convert journal amounts from source ledgers to reporting currencies or secondary ledgers
Run Revaluation or Translation processes
In creating new conversion rates, decide whether to do the following:
Enforce inverse relationships
Select pivot currencies
Select contra currencies
Enable cross rates and allow cross rate overrides
Maintain cross rate rules
Check the Enforce Inverse Relationship check box to specify whether or not to enforce the automatic calculation of inverse conversion rates when defining daily rates.
|
Action |
Results |
|---|---|
|
Checked |
When you enter a daily rate to convert currency A to currency B, General Ledger automatically calculates the inverse rate, currency B to A, and enters it in the adjacent column. If either rate is changed, the application automatically recalculates the other rate. You can update the application calculated inverse rate, but once you do, the related rate is updated. The check box enforces that the inverse relationship is maintained but does not prevent you from updating the rates. |
|
Unchecked |
General Ledger calculates the inverse rate but you can change the rate and update the daily rates table without the corresponding rate being updated. |
Select a pivot currency that is commonly used in your currency conversions. A pivot currency is the central currency that interacts with contra currencies. For example, you set up a daily rate between the US dollar (USD) and the Euro currency (EUR) and another between the USD and the Canadian dollar (CAD). USD is the pivot currency in creating a rate between EUR and CAD. EUR and CAD are the contra currencies. Select the pivot currency from the list of values which contains those currencies that are enabled, effective, and not a statistical (STAT) currency. The description of the pivot currency is populated automatically based on the currency definition.
If you want the application to create cross rates against a base currency, define the base currency as the pivot currency. Selected pivot currencies can be changed in the Rate Types page.
Select currencies available on the list of values as contra currencies. The available currencies are those currencies which are enabled, effective, not STAT currency, and not the pivot currency selected earlier. The description of the contra currency is populated automatically based on the currency definition. Add or delete contra currencies in the Contra Currencies region of the Rate Types page.
Check the Enable Cross Rates check box to calculate conversion rates based on defined currency rate relationships. General Ledger calculates cross rates based on your defined cross rate rules. Associate your cross rate rules with a conversion rate type, pivot currency, and contra currencies. Cross rates facilitate the creation of daily rates by automatically creating the rates between contra currencies based on their relationship to a pivot currency. If the Enable Cross Rates check box is changed to unchecked after entering contra currencies, the application stops calculating cross rates going forward for that particular rate type. All the earlier calculated cross rates for that rate type remain in the database unless you manually delete them.
For example, if you have daily rates defined for the pivot currency, USD to the contra currency, EUR, and USD to another contra currency, CAD, the application will automatically create the rates between EUR to CAD and CAD to EUR. This prevents the need to manually define the EUR to CAD and CAD to EUR rates.
Check the Allow Cross Rates Override check box to permit your users to override application generated cross rates. If you accept the default of unchecked, the application generated cross rates cannot be overridden
Define or update your cross rate rules at any time by adding or removing contra currency assignments. Add a contra currency to a cross rate rule and run the Daily Rates Import and Calculation process to generate the new rates. If your remove a cross rate rule or a contra currency from a rule, any cross rates generated previously for that contra currency remain unless you manually delete them. Changes to the rule are not retroactive and will not affect previously stored cross rates. The Cross Rate process generates as many rates as possible and skips currencies where one component of the set is missing.
Note
With a defined web service that extracts daily currency conversion rates from external services, for example Reuters, currency conversion rates are automatically updated for the daily rates and all cross currency relationships.
There are four seeded conversion rate types in Oracle Fusion applications:
Spot
Corporate
User
Fixed
You are the general ledger accountant for InFusion America Inc. You are entering a journal entry to capture three transactions that were transacted in three different foreign currencies:
Canadian dollar (CAD): A very stable currency
Mexican Peso (MXP): A fluctuating currency
Hong Kong dollar (HKD): An infrequently used currency
You enter two lines with accounts and amounts for each foreign currency transaction. Based on your company procedures, you select the appropriate rate type to populate the rate for Corporate and Spot rate types from your daily rates table. You manually enter the current rate for the User rate type.
|
Currency Selected |
Rate Type Selected |
Reason |
|---|---|---|
|
CAD |
Corporate |
Entered a periodic type of transaction. Your company has established a daily rate to use for the entire month across divisions for all transactions in CAD. CAD is a stable currency that only fluctuations slightly over the month. |
|
MXP |
Spot |
Entered a periodic type of transaction. Your company enters daily rates each day for MXP because this currency is unstable and fluctuates. |
|
HKD |
User |
Entered a one time transaction. Your company does not maintain daily rates in HKD. |
Note
Your company does not currently use the Fixed rate type. From January 1, 1999, the conversion rate of the French franc (FRF) against the euro currency (EUR) was set at a fixed rate of 1 EUR to 6.55957 FRF. Your French operations were started in 2007, so you maintain all your French business records in the EUR.
Spot, corporate, user, and fixed conversion rate types differ based on the fluctuations of your entered foreign currency and your company procedures for maintaining daily rates.
|
Rate Type |
Usage |
|---|---|
|
Spot |
For currencies with fluctuating conversion rates or when exact currency conversion is needed. |
|
Corporate |
For establishment of a standard rate across your organization for a stable currency. |
|
User |
For infrequent entries where your daily rates for the entered foreign currency are not set up. |
|
Fixed |
For rates where the conversion is constant between two currencies. |
If you have infrequent foreign currency transactions, the user rate type can simplify your currency maintenance while providing an accurate conversion rate on the date of the transaction.
The statistical unit currency type is used only for the Statistical (STAT) currency. The Statistical currency is used to record statistics such as the number of items bought and sold. Statistical balances can be used directly in financial reports, allocation formulas, and other calculations.
You are required to enter the daily rates for currency conversion from Great Britain pounds sterling (GBP) to United States dollars (USD) each day for your company InFusion America Inc.
Oracle Application Development Framework (ADF) Desktop Integration is an Excel add-in that must be loaded onto each client. Because ADF Desktop Integration is an add-in to Microsoft Office products, you can use this feature only if they have Microsoft Excel 2007 or above, Internet Explorer 7 or above, and Microsoft Windows 7, XP Professional SP2, or Vista. Users must download the installation files from Navigator - Tools - Download Desktop Integrator Installer.
Use the Period Close work area to link to close processes and currency process.
Use the Currency Rates Manager page to create, edit, and review currency rate types, daily rates, and historical rates.
Use the Daily Rates tab to review and enter currency rates.
Use the Create Daily Rates spreadsheet to enter daily rates in a template that you can save and reuse.
You are required to change today's daily rates that were already entered. The rates you are changing are for currency conversion from Great Britain pounds sterling (GBP) to United States dollars (USD) for your company InFusion America Inc.
Currency conversion rates were entered by an automatic load to the Daily Rates table. They can also be entered through a spreadsheet.
Use the Period Close work area to link to close processes and currency process.
Use the Currency Rates Manager page to create, edit, and review currency rate types, daily rates, and historical rates.
Use the Daily Rates tab to review and enter currency rates.
|
Copyright © 2011, Oracle and/or its affiliates. All rights reserved. Legal Notices |
|