11g Release 1 (11.1.3)
Part Number E20375-03
Contents
Previous
Next
|
Oracle® Fusion
Applications
Financials Implementation Guide 11g Release 1 (11.1.3) Part Number E20375-03 |
Contents |
Previous |
Next |
This chapter contains the following:
Accounting Configuration: Overview
Ledgers and Subledgers: Explained
Financial Ledgers: How They Fit Together
Creating Primary Ledgers: Example
Specifying Ledger Options: Worked Example
Assigning Legal Entities and Balancing Segments: Examples
Manage Chart of Accounts Mapping
Manage Journal Reversal Criteria Sets
Manage Allocations and Periodic Entries
The Setup and Maintenance work area in the Oracle Fusion Applications is used to manage the configuration of legal entities, ledgers, and reporting currencies that comprise your accounting configuration. To create a new legal entity or ledger, your implementation consultant or system administrator must create an implementation project. This implementation project can be populated by either adding a financials related offering or one or more task lists.
Note
Setup tasks that are not related to the ledger or legal entity specific setup tasks can be invoked from either an implementation project or launched directly from the Setup and Maintenance work area.
There are two offerings predefined for financial implementations.
The Oracle Fusion Accounting Hub offering is used to add the Oracle Fusion General Ledger and Oracle Fusion Subledger Accounting application features to an existing enterprise resource planning (ERP) system to enhance the current reporting and analysis.
The Oracle Fusion Financials offering, which includes the Oracle Fusion General Ledger and Oracle Fusion Subledger Accounting application features, as well as at least one of the subledger financial applications.
When adding an offering to an implementation project, implementation consultants can customize the tasks displayed by adding additional tasks to the implementation project.
Oracle Fusion Applications reflect the traditional segregation between the general ledger and associated subledgers. Detailed transactional information is captured in the subledgers and periodically imported and posted in summary or detail to the ledger.
A ledger determines the currency, chart of accounts, accounting calendar, ledger processing options, and accounting method for its associated subledgers. Each accounting setup requires a primary ledger and optionally, one or more secondary ledgers and reporting currencies. Reporting currencies are associated with either a primary of secondary ledger.
The number of ledgers and subledgers is unlimited and determined by your business structure and reporting requirements.
If your subsidiaries all share the same ledger with the parent company or they share the same chart of accounts and calendar, and all reside on the same applications instance, you can consolidate financial results in Oracle Fusion General Ledger in a single ledger. Use Oracle Fusion Financial Reporting functionality to produce individual entity reports by balancing segments. General Ledger has three balancing segments that can be combined to provide detailed reporting for each legal entity and then rolled up to provide consolidated financial statements.
Accounting operations using multiple ledgers can include single or multiple applications instances. You need multiple ledgers if one of the following is true:
You have companies that require different account structures to record information about transactions and balances. For example, one company may require a six-segment account, while another needs only a three-segment account structure.
You have companies that use different accounting calendars. For example, although companies may share fiscal year calendars, your retail operations require a weekly calendar, and a monthly calendar is required for your corporate headquarters.
You have companies that require different functional currencies. Consider the business activities and reporting requirements of each company. If you must present financial statements in another country and currency, consider the accounting principles to which you must adhere.
Oracle Fusion Subledgers capture detailed transactional information, such as supplier invoices, customer payments, and asset acquisitions. Oracle Fusion Subledger Accounting is an open and flexible application that defines the accounting rules, generates detailed journal entries for these subledger transactions, and posts these entries to the general ledger with flexible summarization options to provide a clear audit trail.
Companies account for themselves in primary ledgers, and, if necessary, secondary ledgers and reporting currencies. Your transactions from your subledgers are posted to your primary ledgers and possibly, secondary ledgers or reporting currencies. Local and corporate compliance can be achieved through an optional secondary ledger, providing an alternate accounting method, or in some cases, a different chart of accounts. Your subsidiary's primary and secondary ledgers can both be maintained in your local currency, and you can convert your local currency to your parent's ledger currency to report your consolidated financial results using reporting currencies or translation.
A primary ledger is the main record-keeping ledger. Like any other ledger, a primary ledger records transactional balances by using a chart of accounts with a consistent calendar and currency, and accounting rules implemented in an accounting method. The primary ledger is closely associated with the subledger transactions and provides context and accounting for them.
To determine the number of primary ledgers, your enterprise structure analysis must begin with your financial, legal, and management reporting requirements. For example, if your company has separate subsidiaries in several countries worldwide, enable reporting for each country's legal authorities by creating multiple primary ledgers that represent each country with the local currency, chart of accounts, calendar, and accounting method. Use reporting currencies linked to your country specific primary ledgers to report to your parent company from your foreign subsidiaries. Other considerations, such as corporate year end, ownership percentages, and local government regulations and taxation, also affect the number of primary ledgers required.
A secondary ledger is an optional ledger linked to a primary ledger for the purpose of tracking alternative accounting. A secondary ledger can differ from its primary ledger by using a different accounting method, chart of accounts, accounting calendar, currency, or processing options. All or some of the journal entries processed in the primary ledger are transferred to the secondary ledger, based on your configuration options. The transfers are completed based on the conversion level selected. There are four conversion levels:
Balance: Only Oracle Fusion General Ledger balances are transferred to the secondary ledger.
Journal: General Ledger journal posting process transfers the journal entries to the secondary ledger.
Subledger: Oracle Fusion Subledger Accounting creates subledger journals to subledger level secondary ledgers as well as reporting currencies.
Adjustments Only: Incomplete accounting representation that only holds adjustments. The adjustments can be manual or detailed adjustments from Subledger Accounting. This type of ledger must share the same chart of accounts, accounting calendar, and period type combination, and currency as the associated primary ledger.
Note
A full accounting representation of your primary ledger is maintained in any subledger level secondary ledger.
Secondary ledgers provide functional benefits, but produce large volumes of additional journal entry and balance data, resulting in additional performance and memory costs. When adding a secondary ledger, consider your needs for secondary ledgers or reporting currencies, and select the least costly data conversion level that meets your requirements. For secondary ledgers, the least costly level is the adjustment data conversion level because it produces the smallest amount of additional data. The balance data conversion level is also relatively inexpensive, depending upon how often the balances are transferred from the primary to the secondary ledger. The journal and subledger data conversion levels are much more expensive, requiring duplication of most general ledger and subledger journal entries, as well as general ledger balances.
For example, you maintain a secondary ledger for your International Financial Reporting Standards (IFRS) accounting requirements, while your primary ledger uses US Generally Accepted Accounting Principles (GAAP). You decided to select the subledger level for your IFRS secondary ledger. However, since most of the accounting is identical between US GAAP and IFRS, a better solution is to use the adjustment only level for your secondary ledger. The subledger level secondary ledger requires duplication of most subledger journal entries, general ledger journal entries, and general ledger balances. With the adjustment only level, your secondary ledger contains only the adjustment journal entries and balances necessary to convert your US GAAP accounting to the IFRS accounting, which uses a fraction of the resources that are required by full subledger level secondary ledger.
Following are scenarios that may require different combinations of primary and secondary ledgers:
The primary and secondary ledgers use different charts of accounts to meet varying accounting standards or methods. A chart of accounts mapping is required to instruct the application how to propagate balances from the source (primary) chart of accounts to the target (secondary) chart of accounts.
The primary and secondary ledgers use different accounting calendars to comply with separate industry and corporate standards.
Note
Use the same currency for primary and secondary ledgers to avoid difficult reconciliations, if you have the resources to support the extra posting time and data storage. Use reporting currencies or translations to generate the different currency views needed to comply with internal reporting needs and consolidations.
Reporting currencies maintain and report accounting transactions in additional currencies. Each primary and secondary ledger is defined with a ledger currency that is used to record your business transactions and accounting data for that ledger. It is advisable to maintain the ledger in the currency in which the majority of its transactions are denominated. For example, create, record, and close a transaction in the same currency to save processing and reconciliation time. Compliance, such as paying local transaction taxes, is also easier using a local currency. Many countries require that your accounting records be kept in their national currency.
If you need to maintain and report accounting records in different currencies, you do this by defining one or more reporting currencies for the ledger. There are three conversion levels for reporting currencies:
Balance: Only General Ledger balances are converted into the reporting currency using translation.
Journal: General Ledger journal entries are converted to the reporting currency during posting.
Subledger: Subledger Accounting creates subledger reporting currency journals along with primary ledger journals.
Note
A full accounting representation of your primary ledger is maintained in any subledger level reporting currency. Secondary ledgers cannot use subledger level reporting currencies.
Of the three data conversion levels available, the balance data conversion level is typically the least expensive, requiring duplication of only the balance level information. The journal and subledger data conversion levels are more expensive, requiring duplication of most general ledger and subledger journal entries, as well as general ledger balances.
Do not use journal or subledger level reporting currencies if your organization has only an infrequent need to translate your financial statements to your parent company's currency for consolidation purposes. Standard translation functionality meets this need. Consider using journal or subledger level reporting currencies when any of the following conditions exist.
You operate in a country whose unstable currency makes it unsuitable for managing your business. As a consequence, you need to manage your business in a more stable currency while retaining the ability to report in the unstable local currency.
You operate in a country that is part of the European Economic and Monetary Union (EMU), and you choose to account and report in both the European Union currency and your National Currency Unit (NCU).
Note
The second option is rare since most companies have moved beyond the initial conversion to the EMU currency. However, future decisions could add other countries to the EMU, and then, this option would again be used during the conversion stage.
Oracle Fusion Applications is an integrated suite of business applications that connects and automates the entire flow of the business process across both front and back office operations and addresses the needs of a global enterprise. The process of designing the enterprise structure, including the accounting configuration, is the starting point for an implementation. This process often includes determining financial, legal, and management reporting requirements, setting up primary and secondary ledgers, making currency choices, and examining consolidation considerations.
This figure shows the enterprise structure components and their relationships to each other. Primary ledgers are connected to reporting currencies and secondary ledgers to provide complete reporting options. Legal entities are assigned to ledgers, both primary and secondary, and balancing segments are assigned to legal entities. Business units must be connected to both a primary ledger and a default legal entity. Business units can record transactions across legal entities.
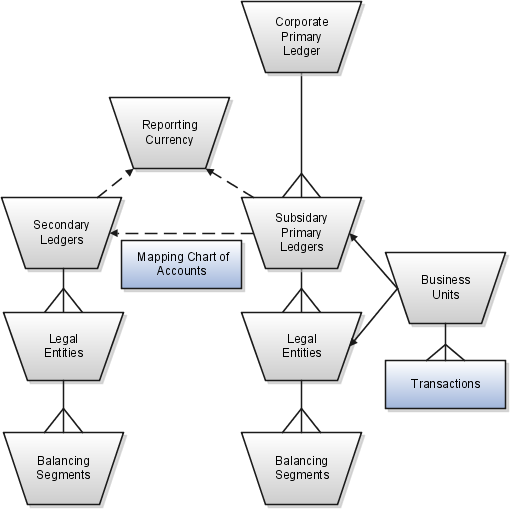
A primary ledger is the main record-keeping ledger. Create a primary ledger by combining a chart of accounts, accounting calendar, ledger currency, and accounting method. To determine the number of primary ledgers, your enterprise structure analysis must begin with determining financial, legal, and management reporting requirements. For example, if your company has separate subsidiaries in several countries worldwide, create multiple primary ledgers representing each country with the local currency, chart of accounts, calendar, and accounting method to enable reporting to each country's legal authorities.
If your company just has sales in different countries, with all results being managed by the corporate headquarters, create one primary ledger with multiple balancing segment values to represent each legal entity. Use secondary ledgers or reporting currencies to meet your local reporting requirements, as needed. Limiting the number of primary ledgers simplifies reporting because consolidation is not required. Other consideration such as corporate year end, ownership considerations, and local government regulations, also affect the number of primary ledgers required.
A secondary ledger is an optional ledger linked to a primary ledger. A secondary ledger can differ from its related primary ledger in chart of accounts, accounting calendar, currency, accounting method, or ledger processing options. Reporting requirements, for example, that require a different accounting representation to comply with international or country-specific regulations, create the need for a secondary ledger.
Below are scenarios and required action for different components in primary and secondary ledgers:
If the primary and secondary ledgers use different charts of accounts, the chart of accounts mapping is required to instruct the system how to propagate journals from the source chart of accounts to the target chart of accounts.
If the primary and secondary ledgers use different accounting calendars, the accounting date and the general ledger date mapping table will be used to determine the corresponding non-adjusting period in the secondary ledger. The date mapping table also provides the correlation between dates and non-adjusting periods for each accounting calendar.
If the primary ledger and secondary ledger use different ledger currencies, currency conversion rules are required to instruct the system on how to convert the transactions, journals, or balances from the source representation to the secondary ledger.
Note: Journal conversion rules, based on the journal source and category, are required to provide instructions on how to propagate journals and types of journals from the source ledger to the secondary ledger.
Reporting currencies are the currency you use for financial, legal, and management reporting. If your reporting currency is not the same as your ledger currency, you can use the foreign currency translation process or reporting currencies functionality to convert your ledger account balances in your reporting currency. Currency conversion rules are required to instruct the system on how to convert the transactions, journals, or balances from the source representation to the reporting currency.
Legal entities are discrete business units characterized by the legal environment in which they operate. The legal environment dictates how the legal entity should perform its financial, legal, and management reporting. Legal entities generally have the right to own property and the obligation to comply with labor laws for their country. They also have the responsibility to account for themselves and present financial statements and reports to company regulators, taxation authorities, and other stakeholders according to rules specified in the relevant legislation and applicable accounting standards. During setup, legal entities are assigned to the accounting configuration, which includes all ledgers, primary and secondary.
You assign primary balancing segment values to all legal entities before assigning values to the ledger. Then, assign specific primary balancing segment values to the primary and secondary ledgers to represent nonlegal entity related transactions such as adjustments. You can assign any primary balancing segment value that has not already been assigned to a legal entity. You are allowed to assign the same primary balancing segment values to more than one ledger. The assignment of primary balancing segment values to legal entities and ledgers is performed within the context of a single accounting setup. The Balancing Segment Value Assignments report is available to show all primary balancing segment values assigned to legal entities and ledgers across accounting setups to ensure the completeness and accuracy of their assignments. This report allows you to quickly identify these errors and view any unassigned values.
A business unit is a unit of an enterprise that performs one or many business functions that can be rolled up in a management hierarchy. When a business function produces financial transactions, a business unit must be assigned a primary ledger, and a default legal entity. Each business unit can post transactions to a single primary ledger, but it can process transactions for many legal entities. Normally, it will have a manager, strategic objectives, a level of autonomy, and responsibility for its profit and loss. You define business units as separate task generally done after the accounting setups steps.
The business unit model:
Allows for flexible implementation
Provides a consistent entity for controlling and reporting on transactions
Enables sharing of sets of reference data across applications
For example, if your company requires business unit managers to be responsible for managing all aspects of their part of the business, then consider using two balancing segments, company and business unit to enable the production of business unit level balance sheets and income statements.
Transactions are exclusive to business units. In other words, you can use business unit as a securing mechanism for transactions. For example, if you have an export business that you run differently from your domestic business, use business units to secure members of the export business from seeing the transactions of the domestic business.
Create a primary ledger as your main record-keeping ledger. Like any other ledger, a primary ledger records transactional balances by using a chart of accounts with a calendar, currency, and accounting rules implemented in an accounting method. The primary ledger is closely associated with the subledger transactions and provides context and accounting for them.
Your company, InFusion Corporation is implementing Oracle Fusion Applications. You have been assigned the task of creating a primary ledger for your InFusion America entity.
Navigate to the Define Accounting Configurations task list and open Manage Primary Ledgers from within your implementation project. Click the Go to Task.
Click the Create icon.
Enter the following values:
|
Field |
Value |
|---|---|
|
Name |
InFusion America |
|
Description |
InFusion America primary ledger for recording transactions. |
|
Chart of Accounts |
InFusion America Chart of Accounts |
|
Accounting Calendar |
Standard Monthly |
|
Currency |
USD |
|
Accounting Method |
Standard Accrual |
Click Save and Edit Task List to navigate back to the accounting configuration task list.
Note
You cannot change the chart of accounts, accounting calendar, or currency for your ledger after you save your ledger.
This example demonstrates specifying the ledger options for your primary ledger. Your company, InFusion Corporation, is a multinational conglomerate that operates in the United States (US) and the United Kingdom (UK). InFusion has purchased an Oracle Fusion enterprise resource planning (ERP) solution including Oracle Fusion General Ledger and all of the Oracle Fusion subledgers.
After completing your InFusion America Primary Ledger, select Specify Ledger Options under the Define Accounting Configuration task list on the Functional Setup Manager page.
Note
Both primary and secondary ledgers are created in the same way and use the same user interface to enable their specific ledger options.
Important: Select a period after the first defined period in the ledger calendar to enable running translation. You cannot run translation in the first defined period of a ledger calendar. In this example, your calendar began with Jan-2010.
Any value between 0 and 999 periods can be specified to permit entering journals but not posting them in future periods. Minimize the number of open and future periods to prevent entry in the wrong period.
This account is required for the General Ledger to perform the movement of revenue and expense account balances to this account at the end of the accounting year.
Note: The Cumulative Translation Adjustment (CTA) account is required for ledgers running translation.
The values entered here are used as the default for balance level reporting currency processing. InFusion America Primary Ledger is using the subledger level reporting currency processing.
|
Option |
Setting |
|---|---|
|
Enable Suspense |
General Ledger |
|
Default Expense Account |
101-00-98199999-0000-000-0000-0000 |
|
Rounding Account |
101-10-98189999-0000-000-0000-0000 |
|
Entered Currency Balancing Account |
101-10-98179999-0000-000-0000-0000 |
|
Balancing Threshold Percent |
10 |
|
Option |
Description |
|---|---|
|
Enable journal approval |
Click to enable journal approval functionality. Approval rules must be created in the Oracle Fusion Approvals Management (AMX). |
|
Notify when prior period journal |
Notify the user when a prior period date is selected on a journal entry. |
|
Allow mixed and statistical journals |
Enter both monetary and statistical amounts on the same line in a journal entry. |
|
Validate reference date |
Requires a reference date in an open or future enterable period. |
Note: To complete the intercompany accounting functionality, you must define intercompany rules.
Optionally, assign legal entities and balancing segments to your accounting configuration.
Assign one or more legal entities to your configuration by following these steps:
Navigate to the Assign Legal Entities task. Click the Go to Task.
Click the Select and Add icon.
Click Search. Select your legal entities.
Click Apply. Click Done.
Click Save and Close.
Assign balancing segment values to your legal entities by following these steps:
Navigate to the Assign Balancing Segment Values to Legal Entities task. Click the Go to Task.
Click the Create icon.
Select the balancing segment value. Optionally, add a Start Date.
Click Save and Close to close the create page.
Click Save and Close.
Assign balancing segment values directly to your ledger by following these steps:
Navigate to the Assign Balancing Segment Value to Ledger task. Click the Go to Task.
Select the balancing segment value.
Optionally enter a start date.
Click Save and Close.
Note
The balancing segment values that are assigned to the ledger represent nonlegal entity transactions, such as adjustments. If you use legal entities, you must assign balancing segment values to all legal entities before assigning values to the ledger. The only available balancing segment values that can be assigned to ledgers are those not assigned to legal entities.
To avoid data corruption, your cumulative adjustment account (CTA) can only be changed if you first perform the following set of steps:
Purge all translated balances
Change the CTA account
Rerun translation
To avoid data corruption, your retained earnings account can only be changed if you first perform the following set of steps:
Enter and post journals to bring the ending balances for your income statement accounts to zero at the end of each accounting year
Purge actual translated balances
Update the retained earnings account
Reverse the journal entries use to bring the ending account balances to zero and rerun translation
In Oracle Fusion General Ledger, use cross validation rules to determine the account combinations that are created dynamically as your users enter transactions or journal entries. Once enabled, a cross validation rule determines whether a selected value for a particular segment of the account combination can be combined with specific values in the other segments to form a new account combination.
A cross validation rule is defined in terms of a condition filter and a validation filter.
The condition filter describes the event under which the rule will be evaluated. If the event specified in the condition filter is not applicable, then the rule will not be evaluated even if it is enabled.
When the event specified in the condition filter is applicable, the validation filter condition must be satisfied before the account combination can be created. The rule is evaluated using the following logic: If condition is satisfied, then perform specified validations.
For example, if your organization has determined that a certain company value, Operations, cannot use a specific cost center, Marketing, define the following cross validation rule to validate your accounts accordingly: If company is equal to Operations, then validate that cost center is not equal to Marketing.
If account combinations already exist and violate the newly enabled cross validation rules, these account combinations continue to be valid. Before disabling any existing account combinations that violate your rules and you are no longer using, move the balances in those accounts to the correct accounts. Then disable the account combinations manually to prevent further posting.
Note
Best practice is to define and enable cross validation rules before:
Balances are loaded
Transactions or journal entries are imported or entered
Account combinations are created
Create cross validation rules to prevent specific combinations of segment values in your account combinations, for example, preventing a particular cost center from being combined with a specific company value. Cross validation rules only affect the creation of new account combinations.
Enter a new cross validation rule to prevents your InFusion America Inc. company value 01 from being combined with your marketing department value 300 in an account combination. Your company, InFusion America Inc. does not have a marketing department.
Navigate to the Manage Cross-Validation Rules task from within your implementation project, and then click the Go to Task icon.
Select your InFusion America chart of accounts. Click the Create icon.
Specify a unique rule Name, IFAM01, an optional Description, Do not combine Marketing Department, 300 with InFusion America, company 01.
Enter an optional effective From Date of today. Check Enabled.
Click on the Change filter condition on the Condition Filter. Enter Company equal to 01. The cross validation rule evaluates if Company 01 was entered and if it was, then the validation process continues to evaluate the rule.
Note
If you do not specify any statement in the condition filter, then the rule is always evaluated.
Click on the Change filter condition on the Validation Filter. Enter Cost Center equal to 300. When the rule is evaluated, an account combination must contain a cost center other than 300 before it can be created.
Enter an Error Message: Cost Center 300 is not allowed with Company 01. The message displays in the relevant user interfaces and processes when an account combination cannot be created because it violates the rule.
Click Save and Close.
The chart of accounts mapping feature supports the ability to correlate a source chart of accounts to a target chart of accounts to allow for the processing of balances or amounts. This is accomplished by either using segment rules, account rules, or a combination of both. A chart of accounts mapping is used by the posting process in propagating transactions from the primary ledger to its secondary ledger, providing the means to map the primary ledger chart of accounts to that of the secondary ledger. The mapping feature is used by both balance transfer processes for balance level secondary ledgers as well as cross ledger transfers, whereby balances from one ledger are copied to another ledger.
Segment rules serve to map each segment of the target chart of accounts to an account value or segment in the source account. Three different mapping actions are available:
Assign a constant value for a segment in the target chart of accounts
Copy the value from the source segment to the corresponding target segment
Note
To use this action, the paired target and source segments must share identical values in their value sets.
Use roll up rules to aggregate source accounts to a corresponding target segment or account
Create a single value mapping when a specific detail source segment value is given a detail target segment value.
Use hierarchical roll up rules when a specific parent source value and all of its child segment values, are mapped to a given detail target segment value. This provides the ability to process groups of source segment values in one single roll up rule.
Define parent source values in roll up rules when date effective versions of the hierarchy are used with the accounting date of the transactions produced by the processes that reference the chart of accounts mapping. This gives the additional benefit of self maintaining mappings since the hierarchies referenced change with time, and the applicable child values are processed automatically.
In addition to segment rules, define account rules for the chart of accounts mapping. Account rules map a complete target account code combination against one or more source account code combinations. The source account code combinations can be defined segment by segment using:
Single detail account values
Detail account value ranges
Parent values for each segment
Note
When using parent values, its child values for the date effective version of the hierarchy, are processed when the mapping is called.
Segment rules serve to map each segment of the target chart of accounts to an account value or segment in the source account of a secondary chart of accounts. A segment is only one part of the account code combination.
Account rules map a complete target account code combination against one or more source account code combinations.
Note
Segment and account rules can be used alone or both types of mapping rules can be used in the same mapping set.
Segment rules and account rules can be exclusively used in a chart of accounts mapping, or you can use a combination of both. If there is an overlap between the two types of rules, whereby a source account is mapped one way by the segment rules, and another by the account rules, the account rule supersedes. As such, segment rules can be used to more broadly define how to map the relationship between two charts of accounts on a segment by segment basis, and account rules can be used to more precisely delineate specific source account code combinations into their intended target accounts.
Journal approval in Oracle Fusion applications uses Oracle Fusion Approvals Management (AMX) to merge the functionality of Oracle Approvals Management (AME) and PeopleSoft Approvals (AWE). In addition, Oracle Business Process Execution Language (BPEL) has replaced Oracle Workflow.
There is one predefined approval rule. If you enable the ledger and the source for approval, then the journal entry is sent for one level of approval by default. You must configure the approval rules in the AMX Rules Setup user interface. For a simple approval scenario, start by defining one or all of the following rules.
Journal approval based on the highest journal line amount per ledger per batch.
Journal approval based on the highest journal amount per ledger per batch.
Journal approval behavior based on where you are in the period close process. For example, are you in the beginning, middle, or end of the month, or in pre-close, close, post close, or quarter close process?
For example, after your ledger is enabled for approval, enter the following approval rules to apply when your maximum journal line amount is:
Less than 50,000 United States dollars (USD), then there is no approval required
Between 50,000 to 100,000 USD, then the journal batch requires one level of approval
Greater than 100,000 USD, then the journal batch requires two levels of approval
Build your rules for every combination of ledger, entered amount, approval level, or other needed scenarios by using the pattern in the suggested rules. In addition, the Oracle Fusion functionality allows you to further define your own rules based on attributes from the different parts of your journal, including the ledger, batch, header, or line level. For example, use category, source, account, or descriptive flexfield information as selection criteria for the journals to be sent for approval.
The ledger is included in the rules because you typically define approval rules per ledger. Set the options that enable journal approval at the ledger level and by journal source. This allows the approval process to determine which journals to send for approval.
Use the following AMX List Builder to build your approval list.
|
List Builder |
Functionality |
Additional Information |
|---|---|---|
|
Human Resources (HR) Supervisory |
This method uses the HR Supervisory hierarchy levels and specifies the number of levels available for approval. |
This method is most effective when the General Accountant enters the journals. For example, if an accountant enters a journal, he needs approval from his manager. If his manager enters a journal he needs approval from his manager and so on up the hierarchy for the specified number of levels. Self approval can be set at any levels in the hierarchy. |
|
Job Level |
A relative dollar amount can be attached to a job. The approval list moves up the HR Supervisory hierarchy to the point it finds a job with the necessary approval amount. |
Enable self-approval to allow approval of journals created within your authority limit. |
|
Position |
A relative dollar amount can be attached to a position. |
This is effective if you need a hierarchy different than the HR Supervisory hierarchy. It is also effective when there are multiple hierarchies that need to be selected based on different attributes. |
|
Approval Group |
Approver groups represent functional or subject matter experts outside the transaction's managerial chain of authority, such as Legal or HR personnel. |
|
|
Dual Chain |
Dual chains can be processed at the same time. |
|
Note
Best practices are to select Job Level, HR Supervisory, or Position list builders for your journal approval rules.
Other functionality to consider before defining approval rules include:
Approval is for the entire journal batch regardless of the attributes used in the approval rules.
For the job and position level approvals, the approval list continues up hierarchy until it finds the approver with the correct approval authority.
If the journal requires approval, submitting a journal for posting automatically routes the journal for approval before posting.
A journal can be escalated to a new approver by the administrator.
The Withdraw Approval button on the Journals page is used at anytime in the approval process to withdraw journals from the process. Clicking this button allows you to edit to the journal. After your changes are made, submit the entry for approval again. When a journal is withdrawn, the completion status is set to Incomplete.
Approval notifications display a table of key journal attributes for each journal and a list of past, current, and future approvers.
The Journals region of the dashboard displays the journals requiring your approval (if you have the privilege to approve journals) and journals with pending approval from others.
The Journals page allows you to approve or reject journals if you are the current approver.
Allocation journals are not routed through the approval process.
Note
Approval is enabled at the ledger and source level. Both the ledger and journal source need to be enabled for the approval process.
This example shows how to create an AutoPost Criteria Set to post your general ledger journal entries that were created by the journal import process for your subledger transactions. Your enterprise, InFusion Corporation, implemented Oracle Fusion General Ledger and the following Oracle Fusion subledgers: Payables and Receivables. You use a non-Oracle subledger called Fast Assets for fixed asset tracking and depreciation. You want to automate posting of your general ledger journal batches created by the journal import process to protect the subledger sourced journal entries from edits or deletion that might inadvertently happen and cause an out-of-balance situation between your subledgers and general ledger.
Consider the following points while creating your criteria set:
Use the All option for category and accounting period to reduce maintenance and ensure that all journal imports are included in the posting process.
Create a criteria set that includes all your subledger sources. Create multiple criteria sets by source only if you need to schedule different posting times to balance close activities or reduce processing time.
Create your AutoPost Criteria Set to automatically post journal entries from both Oracle and non-Oracle subledgers.
|
Priority |
Ledger or Ledger Set |
Source |
Category |
Accounting Period |
|---|---|---|---|---|
|
1 |
InFusion Corporation Ledger |
Payables |
All |
All |
|
2 |
InFusion Corporation Ledger |
Receivables |
All |
All |
|
3 |
InFusion Corporation Ledger |
Fast Assets |
All |
All |
Setting the before and after days with a wide range of days enables the process to run less often.
Schedule the process immediately after the journal imports to prevent changes to the journals. Run the process during nonpeak times to save resources.
Create an AutoPost criteria set and schedule the AutoPost process to run on a regular basis following your scheduled journal imports from your subledgers. When errors occur that prevent posting of the journal imports, you must correct the errors and manually run the AutoPost process. The following scenarios illustrate the kinds of errors that could occur and how you can resolve these errors.
The following errors occurred and prevented the journal batches from posting when the scheduled AutoPost process ran.
|
Error |
Cause |
Solution |
|---|---|---|
|
Error - Unopened accounting period |
The journal import was imported into a future period. An error arises when the AutoPost process runs on a schedule because journals cannot be posted in a future period. |
Open the period. |
|
Error - Invalid or no journals |
Journal import fails to import transactions from the general ledger interface table. The AutoPost process runs on schedule but finds no batches to post. The Posting process does not run and the AutoPost Execution report shows that no batches matched the criteria. |
Correct the error that caused the journal import to fail. |
|
Error - Invalid or no journals |
No journals were selected based on the posting criteria. Journal batches are available for posting. The Posting process does not run and the AutoPost Execution report shows that no batches matched the criteria. |
Revise the criteria set. |
After you correct the errors, manually run the AutoPost process by selecting the Launch AutoPost option from the Tasks panel on the journal pages or by clicking the Generate button on the AutoPost criteria set pages. Verify that the process ran successfully by reviewing the AutoPost Execution report.
After you define an automatic posting criteria set, run the AutoPost process by clicking the Generate button on the Manage AutoPost Criteria Sets page or the Launch AutoPost link from the Journals task pane. The AutoPost process posts the journal batches that meet the criteria defined. Optionally, schedule the AutoPost process for specific automatic posting criteria sets through the Enterprise Scheduler to run at specific times and submission intervals.
Review the AutoPost process results on the AutoPost Execution report. This report is automatically created when the process completes successfully. The report contains the batch name, accounting period, and balance type for each posted journal batch, and lists error statuses for batches that failed to post. The unposted journals with their error status are also displayed on the Requiring Attention tab of the Journals work area and the General Accounting Dashboard.
Verify that the posting criteria set specifies the precise criteria needed to post the desired journals. If the criteria is correct, then verify the following:
Journal imports completed successfully.
Journal batches are error free and ready to post.
Desired accounting period is open.
The ability to submit journal reversals automatically allows you to automate and streamline your journal reversal process. If you routinely generate and post a large number of journal reversals as part of your month end closing and opening procedures, using the automatic reversal functionality saves you time and reduces entry errors.

The journal must meet the following criteria to be automatically reversed:
Balance type is Actual.
Category is enabled to be automatically reversed.
Reversal period is open or future enterable.
Posted but not yet reversed.
Not a reversal journal. Reversal journals cannot be reversed in Oracle Fusion General Ledger.
Not a posted journal for a reporting currency that was replicated from its source journal. Reporting currency journals that were replicated from a source journal will be reversed when the source journal is reversed.
Not a posted journal that originated from Oracle Fusion Subledger Accounting with a frozen source.
There is a new ledger option called Launch AutoReverse After Open Period that you can enable to have journal reversals automatically generated when an accounting period is first opened for the ledger. This ledger option replaces the former profile option called GL: Launch AutoReverse After Open Period. If you prefer to reverse your journals on the last day of every month, disable the ledger option to automatically launch reversals when the period is opened. Then schedule the AutoReverse process to run on the last day of every month.
Define Journal Reversal Criteria Sets to automatically reverse and optionally post journals using the following criteria:
|
Criteria |
Functionality |
Options |
|---|---|---|
|
Category |
Required. The journal category you set as the reversal option. Journals entered with this category are chosen for reversal and optionally, posting. |
All journal categories are listed. |
|
Reversal period |
Required. The accounting period of the reversal journal. The Next day option is only applicable to average daily balance ledgers. Nonaverage daily balance ledgers and consolidation average daily balance ledgers treat the Next day option in the same manner as the No default option. |
|
|
Reversal day |
Required for average daily balance ledgers only. The day of the period on which to reverse the journal. |
|
|
Reversal method |
Required. The method for changing the amounts in the reversal entry. |
|
|
Automatic reversal option |
Required. The option to reverse and post journals automatically. Journals are posted after they are reversed. |
|
After creating your journal reversal criteria sets, assign them to ledgers. Journal reversal criteria set can be shared and assigned to multiple ledgers. Also secure journal reversal criteria set definitions using definition access set security to prevent unauthorized users from using, viewing, or modifying the journal reversal criteria.
If the automatic reversal option is set to reverse and post automatically, the AutoPost process posts all the reversal journals that were generated by the AutoReverse process. The process does not pick up other journals. You manually post reversal journals that were generated outside of the AutoReverse process.
Note
Journals posted by the AutoReverse process always bypass approval.
General Ledger automatically creates the AutoReverse Execution report when the AutoReverse process completes successfully. The report prints the journal name and reversal period for each journal that is successfully reversed and whether the reversal journal is submitted for posting. The AutoPost Execution report is created automatically when the AutoPost process finishes. These reports help you diagnose any problems and verify that all journals were processed properly.
Note
The AutoReverse process does not check that the reversal date is a valid business day for an average balance ledger. The journal validation in the journal pages or import process does the check and if necessary, rolls the date to the next business day.
While implementing your accounting configuration, optionally define and maintain the period close components to customize your accounting configurations setup.
Period close components include allocations, period entries, revaluation, and historical rates.
If you use allocations, revaluation, or translation, configure the following tasks under the Define Period Close Components parent task in your implementation project:
Manage Allocations and Period Entries
Manage Revaluations
Manage Historical Rates
Manage Allocations and Period Entries is a manual task in the implementation project. Use the Allocation Manager to create allocations and other formulaic journal templates for generating periodic journal entries automatically. Base formulas on multiple criteria.
You must perform an external procedure outside the Setup and Maintenance work area to complete this task. In order to setup your allocations rules, navigate to the Journals work area and click the Create Allocations Rules task from the Tasks pane. This task navigates you to Allocation Manager, a framework that enables you define your allocation rules and formulas using a graphical interface and intuitive step-by-step wizards.
Defines currency revaluation options, such as the range of accounts to revalue and the gain or loss accounts. Revaluation is done to adjust foreign entered amounts due to currency fluctuations. Navigate to the Manage Revaluations page, and define and generate your revaluation definitions.
Historical rates are the weighted average rate for transactions that occur at different points in time. Used by the system to calculate the conversion rate on equity account balances during foreign currency translation of the balance sheet.
Navigate to the Currency Rates Manager page to define and maintain your historical rates that are used in the translation process. In Oracle Fusion General Ledger, you can currently define historical rates using an ADF Desktop Integrator spreadsheet.
To create new historical rates, specify the required Ledger and the other optional fields, as needed. Click the Create in Spreadsheet button to open the spreadsheet for uploading.
To update the existing historical rates for your ledgers, click the Edit in Spreadsheet button, the spreadsheet is prepopulated with the existing historical rates.
Note
Before using the historical rates spreadsheet, install the ADF Desktop Integrator client as an add on to Microsoft Excel.
For all ledgers, primary, secondary, and journal and subledger level reporting currencies, open the first period of the ledger when you are ready to transact in that period.
To open the first period of your ledgers, navigate to the Open First Period task in the primary ledger task list and click the Go to Task icon. On the submission page, select the ledger and the period to open. Click the Submit button to launch the open period process.
There are other ways to open the first period or subsequent periods without going into the Setup and Maintenance work area. You can maintain the ledgers' period statuses from the:
Close Status region in the General Accounting Dashboard. The Close Status region provides real time visibility into the period close process from your subledgers to your General Ledger across the entire enterprise.
Manage Accounting Periods task in the Period Close work area.
Process Monitoring work area, which provides a framework for launching, monitoring and maintaining processes across Oracle Fusion Financials.
In Oracle Fusion General Ledger, use the Allocation Manager to create allocations and other formulaic journal templates for generating periodic journal entries automatically. Base formulas on multiple criteria. For example, use account balances or statistical amounts to allocate shared revenue or costs across multiple organizational units and ledgers. Define complex computations based on variables from different charts of accounts. Group journal formulas together and execute sequentially to update account balances in a step-by-step process.
The Allocation Manager provides flexibility, automation, intelligence, and control in distributing costs and revenues across the enterprise. In addition, the Allocation Manager:
Distributes revenues or costs with recursive allocation rules
Creates complex formula rules using formula components
Contains an Allocation Wizard to define allocation and formula rules
Uses real time checking of rule definitions to validate correctness of rules
Minimizes setup and maintenance time with reusable components
Simplifies allocation generation mechanism by integrating with enterprise scheduler
Groups rules together in rule sets and cascading allocations for processing efficiencies
Creates primary, statistical, or foreign currency allocation and formula rules
Access the Allocation Manager from the Tasks pane of the General Accounting dashboard or Journals work area by clicking on the:
Define Allocation Rules link to define or modify allocation definitions
Generate Allocations link to run the allocation process
Note
For more information, see:
Hyperion Allocation Manager Release 11.1.2.1 Designer's Guide
The Allocation Manager creates, validates, deploys, and administers sophisticated allocation rules. In the Allocation Manager:
Base formulas on multiple criteria, such as account balances or statistical amounts, to allocate shared revenue or costs across multiple organizational units.
Use complex computations based on different variables to automatically calculate allocated amounts.
Group journal formulas together and executed sequentially to update account balances step-by-step.
There are three types of objects that can be created in Allocation Manager:
Components: Contain formulas, points of view, or allocation objects.
Rules: Contain components such as points of view, formulas, and templates, which are used to create allocation calculations.
Rule Sets: Contain sets of rules that can be calculated sequentially
The following privileges and permissions are associated with the Allocation Manager:
Generate General Ledger Allocation Formula - Generate Allocation and Periodic Entries: Permits generation of allocation and periodic entries.
Define General Ledger Allocation Formula - Manage Allocation Rules or Rulesets via Allocation Manager: Grants the ability to update allocation rules or rulesets owned by the user with view access to all allocation rules or rulesets regardless of their ownership.
Define Self Managed General Ledger Allocation Formula - Manage Allocation Rules or RuleSets via Allocation Manager: Grants the ability to update allocation rules or rulesets, but limited to the ones owned by the user.
Administer General Ledger Allocation Formula - Administer Allocation Rules or RuleSets via Allocation Manager: Grants the ability to update all aspect of allocation rules or rulesets including the ownership attribute, regardless of the original definition's ownership.
In addition to the Oracle Hyperion Enterprise Performance Management Workspace buttons, the Allocation Manager toolbar displays buttons that are specific to the Allocation Manager. Not all buttons display in all the views and designers within the Allocation Manager.
The Allocation Manager toolbar consists of the following buttons:
Home: Displays the default startup option for the content area.
System View: Displays the main view within the Allocation Manager. (This is the default view).
List View: Displays a list of objects that you can filter by application type, application, object or database type, deployment status, and validation status.
Custom View: Displays a view you can customize with folders you create and objects you drag and drop into them.
Filter Options: Opens the Filter dialog that you can use to filter objects in the List View.
Refresh: Refreshes the view with your latest changes.
The Allocation Manager toolbar adds the following buttons when you open a rule:
Save: Saves the object with which you are working.
Validate: Validates the object with which you are working.
Validate and Deploy: Validates and deploys the object with which you are working.
Allocation Manager menus and menu options display in addition to Oracle Hyperion Enterprise Performance Management Workspace menus and menu options. The menus and options vary depending on the view you are using and the object with which you are working. The default view of the Allocation Manager displays the following menus when you launch Allocation Manager, System View.
Note
This topic describes the Allocation Manager menu options only.
Enables you to create new objects, open and close objects, import and export objects, print rules, and log off.
Note
Not all of these file menu options are available for the products that use Allocation Manager.
New, Rule: Creates a new rule
New, Ruleset: Creates a new rule set
Enables you to edit objects you select. It is available from most of the views and from within the Rule and Component definition pages.
Edit, Delete: Deletes an object selected in the System, List, or Custom View
Edit, Copy: Copies selected text
Edit, Paste: Pastes text copied to the clipboard to the right of the cursor
Edit, Copy Group: Copies a component group
Note
The Edit menu is not available within the Deployment View.
Enables you to open different views.
View, View Pane: Displays or hides a list of existing and/or new objects that you can add to rules, rule sets, components, and templates by dragging and dropping them.
Note
This is the only View menu option available from within the Rule Designer and Ruleset Designer.
View, List View: Displays a list of the objects you select on the Filter dialog. The filter dialog enables you to create a filtered list, by application type of applications, databases, and objects.
View, System View: Displays a list of the Essbase applications, databases, and objects to which you have access. This is the default view.
View, Custom View: Displays a view that you can customize with folders you create and drag and drop objects into them. This view enables you to organize objects in a way that is meaningful to you.
View, Deployment View: Displays a list, by application type and application, of the rules and rule sets that are deployed and not deployed with their deployment and validation status.
Enable you to install other products, search for objects, create a filtered list of objects for the List View, edit the caption of an object, and access the Variable Navigator and Variable Designer.
Tools, Filter: Opens the Filter dialog from which you can filter by application type, application, object type (rule, rule set, formula or script component, or template), calculation type, plan type, database, deployment status, and validation status. You can also select All to display all application types, applications, objects, and databases, regardless of their deployment and validation status.
Tools, Variables: Opens the Variable Navigator in which you can navigate to a location for which you want to create, edit, copy, or delete a variable. From the location you select in the Variable Navigator, you can display the Variable Designer in which you can create, edit, copy, and delete variables for components.
Note
The two menu option listed above are not available within the Deployment View.
Enables you to validate and deploy objects you select in the views and from within the Rule and Ruleset Designers. Not all of the Actions menu options are available from within the views and designers.
Actions, Validate: Validates the rule, rule set, and formula component you selected
Note
This is the only Actions menu option available from within the Deployment View.
Actions, Deploy: Deploys the rules or rulesets you selected.
Actions, Quick Deploy: Deploys the rule in fewer steps than regular deployment by using a shortcut to one or more applications.
Note
This feature is available only from within the Rule Designer for Essbase business rules.
View rules and templates, and the components that comprise them, in a flow chart within the Rule Designer. When you open a rule, move amongst the components that comprise it, for example, formulas, ranges, and loops, by selecting them in the flow chart. Increase or decrease the size of the flow chart to view or hide details of the components.
When you select a component in the flow chart, its properties, usages, and other information are displayed in tabs below the flow chart. As you move among the components, the tabs below the flow chart change. For example, if you open an allocation rule that contains a formula component, and select the formula component in the flow chart the following properties are displayed:
Properties of the formula, such as name, description, application, and application type to which it belongs
Usages of the formula, such as which rules and templates it is used in
Text of the formula, such as the variables, members, and functions, that are displayed in the tabs below the flow chart
Views enable you to see Allocation Manager objects in different contexts. For example, the Deployment View displays objects according to whether they are deployed or not deployed. The Custom View displays objects according to filters and criteria that you select.
The Allocation Manager contains the following views:
List View
System View
Custom View
Deployment View
View Pane
The List View contains a filtered list of Essbase applications, or databases, and objects, rule sets, rules, or formula components, according to filter criteria you specify.
The System View is the default view that is displayed when you launch the Allocation Manager. It contains a list of all of the applications and objects to which you have access. Your access privileges are determined by the role you are assigned in Shared Services. For each object, the owner, the user who made the last change, and the date the changes were last made are listed.
The Custom View enables you to create folders and drag and drop objects into them to create a view that contains only the objects you want. This view enables you to organize objects in a way that is meaningful to you.
The Deployment View contains a list, by application type and application, of the rules and rule sets that are deployable with their deployment and validation status. From this view, select rules and rules sets in an application to make them deployable. Then deploy one or more rules or rule sets (known as a partial deployment), or you can deploy all rules and rule sets in an application (known as a full deployment).
The View Pane enables you to create or open an object. Display the View Pane in the left frame of the window. Depending on whether you are working in a rule or a rule set, the Rule or Ruleset Palette, is displayed in the View Pane. In the Palette, drag new and existing objects and drop them into the rule, rule set, or flow chart.
When working with views, display or hide the View Pane using the View menu. In the Custom View, drag and drop new and existing objects from the View Pane into the custom folders you create. In the System and List views, the View Pane is hidden by default. In the Deployment View, the View Pane is not available.
Note
The content of the View Pane varies depending on which view you are in and whether you are working with a rule set, a rule, a template, or a component.
The following table lists the tasks that can be performed from the various views in the Allocation Manager.
|
Tasks |
List View |
System View |
Custom View |
Deployment |
|---|---|---|---|---|
|
Create, open, rename, delete, refresh, and close objects |
Yes |
Yes |
Yes |
Yes |
|
Set preferences |
Yes |
Yes |
Yes |
Yes |
|
Import and export objects |
Yes |
Yes |
Yes |
Yes |
|
Show the usages of objects |
Yes |
Yes |
Yes |
Yes |
|
Create a copy of objects |
Yes |
Yes |
Yes |
Yes |
|
Print a business rule |
Yes |
Yes |
Yes |
Yes |
|
Select views |
Yes |
Yes |
Yes |
Yes |
|
Exit or log off Workspace |
Yes |
Yes |
Yes |
Yes |
|
Work with favorites |
Yes |
Yes |
Yes |
Yes |
|
Perform an advanced search |
Yes |
Yes |
Yes |
Yes |
|
Access help |
Yes |
Yes |
Yes |
Yes |
|
Filter objects in the view according to criteria you specify |
Yes |
|
|
|
|
Work with variables |
Yes |
Yes |
|
Yes |
|
Validate objects |
Yes |
|
|
Yes |
|
Create a shortcut to a business rule |
|
Yes |
|
|
|
Import and export business rules and other objects |
|
Yes |
Yes |
|
|
Validate and migrate objects |
|
Yes |
Yes |
|
|
Change the owner of an object |
|
|
Yes |
Yes |
|
Deploy objects |
|
|
|
Yes |
You can use filters in the List View to filter objects according to:
Application Type that is populated by default with the application type, such as Essbase, your application or database, in which you are creating the new rule.
Object type, such as allocation rules, allocation rule sets, and formula components
Deployment or validation status
To create a filtered list of objects in the List View:
From the System View, select View, List View.
The Filter dialog is displayed the first time you open the List View. If you select filtering options, then close the List View to work in the System or Custom View. When you reopen the List View, the filter dialog is not displayed. If you want to change the filtering options when you reopen the List View, select Tools, Filter to open the Filter dialog.
In the Filter dialog, on Filter Options, under Application Type, select Essbase.
Do one of these tasks:
For Essbase: In the Application and Object Type fields, select the applications and object types you want to display in the List View. The default is All.
Under Deployed Status and Validated Status, clear any check boxes of selections you do not want to display. All check boxes are selected by default.
Tip
Click Reset to reset the dialog with default values.
On Advanced Options, for Object Label, select one of these options to display only objects whose names match the criteria:
Starts With, to display only objects whose names start with characters you specify.
Ends With, to display only objects whose names end with characters you specify.
Contains, to display only objects whose names contain characters you specify.
Matches, to display only objects whose names match characters you specify.
Enter the characters that are common to the names of the objects you want to display.
Select Ignore case, if you want to display objects whose names contain characters in either upper or lower case, even if the case does not match the case of the text you entered in step 6.
In Created By, enter the name of the user who created objects you want to display.
In Modified By, enter the name of the user who modified objects you want to display.
For Created Date, select After, Before, or Between to display only objects that were created after, before, or between dates you specify. Between is the default. Click the drop down arrows to display calendars from which you can select dates.
For Modified Date, select After, Before, or Between to display only objects that were modified after, before, or between dates you specify. (Between is the default.) Click the dropdown arrows to display calendars from which you can select dates.
For Any Text, select an option to display only objects containing text that starts with, ends with, contains, or matches text that you enter. To display objects that include this text regardless of its case, select Ignore case.
Click OK.
This example demonstrates how to generate an allocation or periodic entry manually from the Oracle Fusion General Ledger.
You are the General Accountant for Infusion America Inc. You have created allocation and periodic journal entry definitions for several monthly entries. You now generate these entries.
Note
Schedule allocations and periodic entries in the Journals work area for automatic generation.
Prior to generating the allocation and periodic entries, the following tasks must be completed:
The period is set to Open or Future Enterable. You post in open periods, but generation can take place in either an open or future enterable period.
The rules or rules sets have been defined, validated, and deployed successfully from the Allocation Manager.
The journal balances, that are inputs for the allocation or periodic rules, are entered and posted in the proper period.
Print Output
E-mail me the output
Notify me when this process ends
If you deselect the check box for the Post Allocations option, you must post the entry manually or define an AutoPost Criteria Set to automatically post the journal entries.
After the generation process is complete, the journal entries created by the process are available for inquiry on the Journals page.
Login into the Oracle Fusion General Ledger application and navigate to the Journals work area. From the Journals work area select the Create Allocation Rules link and automatically log into the Allocation Manager in Workspace to create new allocation rules or rule sets.
Note
The application or the balances cube that is currently selected in the General Ledger Data Access Set is automatically selected in the Allocation Manager.
In the Custom View, create folders that contain only the allocation rules, allocation rule sets, and formulas you want to view and work with. To add objects to your folders, drag them from the Existing Objects pane and drop them into the folders.
To create a folder in the Custom View:
In the System View, select View, Custom View.
In the Custom View, right-click the Essbase application type, and select New Folder.
In New Folder, enter a name for the folder.
Click OK.
Tip
You can create nested folders by right-clicking the folder you want to create a folder in and selecting New Folder.
Rename the folders you create in the Custom View.
To rename a folder in the Custom View:
In the System View, select View, Custom View.
In the Custom View, expand the Essbase application type.
Right-click the folder you want to rename, and select Rename.
In the Rename Folder, enter a new name for the folder.
Click OK.
The revaluation process is used to adjust account balances denominated in a foreign currency. Revaluation adjustments represent the difference in the value of the balance due to changes in conversion rates between the date of the original journal entry and the revaluation date. These adjustments are posted through journal entries to the underlying account with the offset posted to an unrealized gain or loss account. All debit adjustments are offset against the unrealized gain account and all credit adjustments are offset against the unrealized loss account. If the same account is specified in the Unrealized Gain Account and Unrealized Loss Account fields, the net of the adjustments is derived and posted.
For balance sheet accounts, the revaluation journal entries are reversed in the next period. AutoReverse can be used to automate the reversals. For income statement accounts that use the PTD method of revaluation, the revaluation journal entries aren't reversed since each period's revaluation adjustment is just for that period.
In Oracle Fusion General Ledger, the revaluation functionality provides the following advantages:
Full multicurrency functionality to eliminate currency barriers across a global business
Predefined revaluation rules to ensure consistency in generation of revaluation entries each period
Usage of prevailing currency normalization accounting standards including:
US Financial Accounting Standards Board (FASB) Financial Accounting Statement No. 52 (FAS 52), Foreign Currency Translation
International Financial Reporting Standards (IFRS) International Accounting Standard No. 21 (IAS 21), The Effects of Changes in Foreign Exchange Rates
Support for multiple balancing segments to provide clarity in tracking the profitability and performance for more distinct segments of the your enterprise in any currency
When defining your revaluations, perform the following:
Include accounts for tracking gains and losses, currency conversion rates, and the number of transaction currencies to revalue.
Define separate revaluation definitions for each class of accounts, using a different rate type for each class.
Choose various conversion types and methodologies for different account ranges, such as current rates and year-to-date (YTD) method for balance sheet accounts, and average rates and period-to-date (PTD) method for income statement accounts.
Note
Income statement accounts can also be revalued using YTD method.
Hierarchies and flexible account selection criteria, such as usage of parent values from your account hierarchy, streamlines maintenance of revaluation definitions. Leveraging hierarchy versions extends your revaluation definitions during organizational changes. Adjust account selection criteria monthly to retrieve the accounts that need to be revalued for the current accounting period.
Share revaluation definitions across ledgers that have the same chart of accounts to reduce maintenance.
Generating revaluations include:
Using defined revaluation criteria and automatically generating entries to shorten your close process.
Selecting automatic posting as part of the generate revaluation criteria to help you to achieve processing efficiency.
Scheduling revaluations to run during off peak hours to save your system resources.
Utilizing date effective account hierarchies to generate revaluations to keep results in line with your current organization structures.
Always run revaluation to bring monetary balances to current rates before performing currency translation or remeasurement.
The Revalue Balances process automatically generates the Revaluation Execution report when you run revaluation. This report shows the details of your account balance revaluation and the journal batches created after running revaluation. The report includes the currencies and revaluation rates used to revalue your accounts, the unrealized gain or loss account in which you recorded net gains and losses, and the range of accounts revalued. The report also prints the names of your batch and journals that the revaluation process creates for each foreign currency, as well as the total debits and credits of the created entries.
If the Revaluation process cannot locate rates for one or more currencies, balances are not revalued for those currencies. In this case, the Revaluation process completes with a warning and the execution report lists which currencies are missing rates.
Revaluation launches a process that revalues the ledger currency equivalent balances for the accounts and currencies you select, using the appropriate current rate for each currency. Resulting unrealized gain or loss amounts are posted to the unrealized gain or loss accounts or to the cumulative translation adjustment (CTA) account you specify, and are balanced by balancing segment values. This process creates a revaluation journal which can be posted automatically.
Oracle Fusion General Ledger creates journal entries to adjust the ledger currency balances for conversion rate fluctuations, in accordance with Statement of Financial Accounting Standards (SFAS) No. 52, Foreign Currency Translation and International Accounting Standard (IAS) 21, The Effects of Changes in Foreign Exchange Rates.
The revaluation journal entries generated and posted in the primary ledger are automatically generated, converted, and posted to each of their reporting currencies. Define the CTA account for unrealized gains or losses in the reporting currency prior to running revaluation.
Revaluation is the process which adjusts asset or liability accounts that may be materially understated or overstated due to a fluctuation in the conversion rate between the time the transaction was entered and the time revaluation takes place. You may want to revalue income statement accounts as well. The Income Statement Accounts Rule indicates whether period-to-date (PTD) or year-to-date (YTD) method is to be used when revaluing income statement accounts.
Click the Income Statement radio buttons on the Create Revaluation page to specify whether you want to revalue income statement accounts using PTD or YTD balances. There are two radio buttons, one for PTD and one for YTD.
If you select to revalue PTD balances for income statement accounts, the process continues to appropriately revalue YTD balances for balance sheet accounts. In the revaluation definition if the range of accounts consists of both income statement and balance sheet accounts and you select PTD as an option for income statement account revaluation rule, a separate revaluation journal is created for the income statement accounts. Revaluing the PTD balance of your income statement accounts creates weighted average YTD balances using period rates from each corresponding period against the PTD account balance in compliance with the Statement of Financial Accounting Standards (SFAS) No. 52, Foreign Currency Translation.
To summarize, when you run revaluation on your income statement accounts, the process produces two separate journal entries; one that revalues your balance sheet accounts and another for your income statement accounts. You do not need to reverse the PTD revaluation journal entry for your income statement accounts in the subsequent period since that revaluation only applies to last period's activity.
Note
This functionality only applies when the range of accounts to be revalued in the revaluation definition consist of income statement accounts in addition to balance sheet accounts. Normally only balance sheets accounts are revalued.
This example demonstrates how to revalue foreign currency balances across multiple balancing segments. Your company, InFusion America, Inc. has three lines of business. You revalue your foreign currency account balances for two of your divisions, Air Components and Repair Parts. Your Installation Services line of business does not have foreign currency transactions. Your company is your primary balancing segment and your lines of business are represented in your secondary balancing segment.
Note
Enable up to three balancing segments to use the multiple balancing segment feature.
The following are points to consider in running the revaluation process.
Revaluation posts the resulting gain or loss amounts against the unrealized gain or loss accounts, substituting the balancing segment values appropriately for all balancing segments.
Gain or loss accounts and revaluation account ranges are not validated against your data access set security when the revaluation definition is created because the ledger context is not known at the time of definition.
Data access set security is enforced when the Revalue Balances process is executed. Limited write access to the gain or loss accounts due to inadequate access results in an error.
Segment value security rules are enforced when you enter the account ranges and the unrealized gain and loss accounts. Only segment values you have access to are available in the list of values.
Account ranges you have read and write access to are revalued. Account combinations that you do not have access to are ignored.
Revaluation expands all parent balancing segments to the child values. Data access set security applies to the child values only, not the parent value.
Posting supports multiple balancing segments for calculating the entry to the Cumulative Translation Adjustment accounts when replicating revaluation journals to reporting currencies.
|
Field |
Value |
|---|---|
|
Name |
InFusion America Revaluation |
|
Description |
Revaluation for all foreign currency balances. |
|
Chart of Accounts |
InFusion America Chart of Accounts |
|
Currency |
Leave blank Note If left blank, all currencies are revalued and after saving, the field automatically displays: All currencies. |
|
Conversion Rate Type |
Daily |
|
Days to Roll Forward |
5 |
|
Unrealized Gain Account |
011-00-96600000-0000-000-000 |
|
Unrealized Loss Account |
011-00-96700000-0000-000-000 |
|
Income Statement Account Basis |
PTD |
|
Post Automatically |
Yes |
|
Field |
Value |
|---|---|
|
Equals |
011 |
Note: Your Installation Services line of business, 50, is not included because it does not have foreign currency transactions.
|
Field |
Value |
|---|---|
|
Between |
30 |
|
40 |
|
Field |
Value |
|---|---|
|
Between |
10000000 |
|
29999999 |
Optionally, select the Save and Generate buttons to run the revaluation immediately.
|
Copyright © 2011, Oracle and/or its affiliates. All rights reserved. Legal Notices |
|