| Oracle® Fusion Middleware Developer's Guide for Oracle WebCenter Portal 11g Release 1 (11.1.1.6.0) Part Number E10148-18 |
|
|
PDF · Mobi · ePub |
| Oracle® Fusion Middleware Developer's Guide for Oracle WebCenter Portal 11g Release 1 (11.1.1.6.0) Part Number E10148-18 |
|
|
PDF · Mobi · ePub |
There are several ways to integrate content into a WebCenter Portal: Framework application. For more information, see Chapter 26, "Introduction to Integrating and Publishing Content."
This chapter discusses how to configure connections to content repositories to provide access to the content, and how to add content to pages in a Framework application.
This chapter includes the following sections:
In your Framework application, you can use the following adapters:
Oracle WebCenter Content: Content Server: The Content Server adapter is used to integrate content from an automated information system managed by Content Server. This system enables sharing, managing, and distributing of business information through a Web site as a common access point.
This adapter is bundled with Oracle WebCenter Portal extension bundle, so it is integrated by default.
Oracle Portal: The Oracle Portal adapter is used to integrate content from a content repository located in the Oracle Portal schema.
This adapter is bundled with Oracle WebCenter Portal extension bundle, so it is integrated by default.
Oracle WebCenter Adapter for SharePoint: This adapter is used to integrate content from the Microsoft SharePoint 2007 repository.
You must install this adapter, as described in Section 3.6, "Installing the Oracle WebCenter Adapter for SharePoint."
File System: The File System adapter is used to add content located on your operating system's file system to JSF pages.
This adapter is bundled with Oracle WebCenter Portal extension bundle, so it is integrated by default.
Note:
The File System adapter is intended to be used in the development environment only.
Content repository connections are required to access the repository content to be published on JSF pages. These connections are also required to access the repository content through the WebCenter Portal REST API.
This section describes how to configure content repository connections based on Oracle WebCenter Content: Content Server, Oracle Portal, Oracle WebCenter Adapter for SharePoint, and file system adapters. Content Presenter can connect to and retrieve content available in Content Server content repositories. With JCR data controls, you can connect to Content Server, Oracle Portal, Oracle WebCenter Adapter for SharePoint, and file systems.
Connections can be created under Application Resources in the Application Navigator and under IDE Connections in the Resource Palette.
This section includes the following subsections:
Section 27.2.2, "How to Create a Content Repository Connection Based on the Oracle Portal Adapter"
Section 27.2.4, "How to Create a Content Repository Connection Based on the File System Adapter"
Section 27.2.5, "What Happens When You Create a Repository Connection"
Section 27.2.6, "What You May Need to Know When Creating a Repository Connection"
This section describes how to configure a Content Server-based content repository connection. To successfully perform the subsequent steps, you must use Content Server release 11.1.1.4.0 or 10.1.3.5.1. The release 11.1.1.4.0 or 10.1.3.5.1 are required for Content Presenter. For information about how to configure Content Server for Oracle WebCenter Portal, see "Oracle WebCenter Content: Content Server Prerequisites" in Oracle Fusion Middleware Administrator's Guide for Oracle WebCenter Portal.
For an overview of the prerequisites and tasks required to get Content Server working in WebCenter Portal applications (Spaces and Framework applications), see the section "Configuration Roadmap for Content Server" in Oracle Fusion Middleware Administrator's Guide for Oracle WebCenter Portal.
To create a Content Server-based repository connection:
In Oracle JDeveloper, open your Framework application.
In the Application Resources panel, right-click Connections and choose New Connection, then Content Repository.
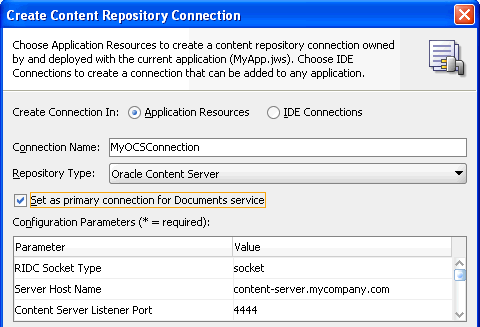
In the Create Content Repository Connection dialog, specify a connection name for the connection; for example, MyOCSConnection.
Tip:
You can choose between creating application-specific connections in the Application Resources panel and creating common connections in the Resource Palette (IDE Connections).
Select Oracle Content Server from the Repository Type box.
Select Set as primary connection for Documents service, to make this connection the primary (default) connection for all content management operations through the Documents service or Content Presenter. Selecting this option writes a configuration to the adf-config.xml file that identifies this connection as the default connection. If connectionName parameter is specified for a Documents service task flow, that value overrides this setting.
Note:
To be able to set a connection as primary (default) connection for the Documents service, you must select the Application Resources option in Create Connection In. This is because connections created as IDE connections cannot be used directly, they must be added to applications.
Under Configuration Parameters, enter values for the parameters, as shown in Table 27-1 and Figure 27-1.
Table 27-1 Configuration Parameters for Content Server
| Configuration Parameters | Values |
|---|---|
|
RIDC Socket Type |
Determines whether the client library connects on the Content Server listener port or the Web server filter. It accepts
Table 27-2 includes more information on the configuration parameters required for each RIDC socket type. |
|
Server Host Name |
Host name of the system where the Content Server is running. For example: |
|
Content Server Listener Port |
Port of the server specified in the Server Host Name field. This corresponds to the |
|
URL of the Web Server Plugin |
If the RIDC socket type is For Content Server release 11.1.1.4.0: For Content Server release 10.1.3.5: |
|
Web Server Context Root |
The Web server context root for Content Server to integrate advanced metadata and Site Studio capabilities in the Framework application. The format of the Web server context root is |
|
Admin Username |
The user name with administrative rights for the Content Server instance. It defaults to |
|
Admin Password |
The password for the Content Server admin user. For example: |
|
KeyStore File Location |
Location of key store that contains the private key used to sign the security assertions. The key store location must be an absolute path. For example: |
|
KeyStore Password |
The password required to access the keystore. |
|
Private Key Alias |
The client private key alias in the keystore. The key is used to sign messages to the server. The public key corresponding to this private key must be imported in the server keystore. |
|
Private Key Password |
The client private key password required to retrieve the key from the keystore. |
|
JAX-WS Client Security Policy |
Enter the client security policy to be used when the RIDC Socket Type is JAX-WS. The JAX-WS client security policy can be any valid OWSM policy, but must match the security policy configured for the Content Server's Native Web Services IdcWebLogin service. For more information about the IdcWebLogin service, see "WebCenter Content Web Services" in the Oracle WebCenter Content Developer's Guide for Content Server. For information about predefined security policies, see the section "Security Policies" in Oracle Application Server Web Services Security Guide. For information about configuring a security policy on client side, see the section "Configuring Clients" in Oracle WebCenter Content Developer's Guide for Content Server. For information about configuring a security policy on the server side, see the section "Configuring WS-Security through WS-Policy" in Oracle WebCenter Content Developer's Guide for Content Server. |
|
Cache Invalidation Interval |
The interval (in minutes) used by WebCenter caches to automatically detect external Content Server content changes. This allows WebCenter to automatically clear cached items when changes to those items are made directly in the Content Server UI.The interval is in minutes. A value of |
|
Binary Cache Maximum Entry Size |
The maximum size (in bytes) for WebCenter caching of Content Server binary documents. Documents larger than this size are not cached by WebCenter.The unit is bytes and defaults to |
Table 27-2 Content Server Connection Parameters for Each RIDC Socket Type
| Connection Parameters | RIDC Socket Type: web | RIDC Socket Type: socket | RIDC Socket Type: socketssl | RIDC Socket Type: jaxws |
|---|---|---|---|---|
|
Server Host Name |
Not Applicable |
Mandatory for Content Presenter Defaults to local host. |
Mandatory for Content Presenter Defaults to local host. |
Not Applicable |
|
Content Server Listener Port |
Not Applicable |
Port specified for the incoming provider in the server. Defaults to |
Port specified for the Defaults to |
Not Applicable |
|
URL of the Web Server Plugin |
Mandatory |
Not Applicable |
Not Applicable |
MandatoryUse format: For example: http(s):// |
|
Web Server Context Root |
Optional |
Optional |
Optional |
Optional |
|
JAX-WS Client Security Policy |
Not Applicable |
Not Applicable |
Not Applicable |
Mandatory, unless Global Policy Attachment is used, in which case it should be left empty. This is the name of an OWSM client security policy. This policy must match the corresponding server side policy applied on the Content Server. For information about security policies, see the section "Security Policies" in Oracle Application Server Web Services Security Guide. |
|
Admin Username |
Mandatory |
Optional Defaults to |
Optional Defaults to |
OptionalDefaults to |
|
Admin Password |
Mandatory |
Not Applicable |
Not Applicable |
Whether the password is used or not depends on the selected JAX-WS security policy. |
|
Key Store and Private Key |
Not Applicable |
Not Applicable |
Mandatory |
Not Applicable |
|
Identity Propagation |
Not supported at runtime |
Supported For testing purpose, connects as guest if no/invalid user name is specified. |
Supported For testing purpose, connects as guest if no/invalid user name is specified. |
Supported, provided that the JAX-WS security policy supports identity propagation. |
|
External Application |
Mandatory |
Supported Password is not used. |
Supported Password is not used. |
SupportedWhether the password is used or not depends on the selected JAX-WS security policy. |
|
User Name and Password |
Supported |
Supported The password is not verified during the test connection operation. |
Supported The password is not verified during the test connection operation. |
SupportedWhether the password is used or not depends on the selected JAX-WS security policy. |
Figure 27-1 Content Repository Connection - Content Server
In the Login Timeout (ms) field, specify the time in milliseconds. This timeout determines how long the application must wait when trying to establish a session with the content repository. If the network connection or the content repository server to which you are trying to connect is slow, then consider overriding the default value specified in this field.
Select the applicable authentication method. See Section 27.2.6.1, "What You Should Know About Using Identity Propagation and External Application Authentication Methods" for information. If you select the Identity Propagation authentication method, then you must configure secure socket layer (SSL) in Content Server. For information, see the section "Oracle WebCenter Content: Content Server - Security Considerations" in Oracle Fusion Middleware Administrator's Guide for Oracle WebCenter Portal.
User Name and Password fields under the Specify login credentials for the current JDeveloper session checkbox are optional for the Identity Propagation authentication method. In a secured application when Identity Propagation is the chosen authentication method, selecting the Specify login credentials for the current JDeveloper session checkbox lets you navigate to the authenticated content repository connection at design time. When this checkbox is selected, you can also validate if user name and password you specified can be authenticated.
Note:
If the Specify login credentials for the current JDeveloper session checkbox is selected, then the credentials you entered are used. If the checkbox is not selected, then the connection is tested using External Application credentials (if they exist), otherwise null credentials are used.
If you have selected External Application for authentication and also specified either public or shared credentials, then you can leave these fields blank, as the public or shared credentials can be used to login at design time. However, if you have selected External Application but have not specified public or shared credentials, then you must specify user name and password here.
Click Test.
During testing user name and password are used (if specified). If they are not specified, but an external application is defined with either shared or public credentials, then this is used. Otherwise the guest user is used.
Click OK.
In the Application Resources panel, expand the repository connection you just created. The Connection Credentials dialog displays.
Note:
The Connection Credentials dialog displays if you do not save the credentials, that is, you do not select the Specify login credentials for the current JDeveloper session checkbox, or if you do not specify an External Application service that uses public or shared credentials.
Enter the User Name and Password for the Content Server connection and click OK. The connection displays under the Application Resources panel.
This section describes how to create a content repository connection based on the Oracle Portal adapter. Before creating a repository connection, see Section 27.2.6, "What You May Need to Know When Creating a Repository Connection". You can use this connection to configure a content data control that will enable you to add content from the Oracle Portal repository to JSF pages.
To create an Oracle Portal repository connection:
In Oracle JDeveloper, open your Framework application.
In the Application Resources panel, right-click Connections and choose New Connection and then Content Repository.
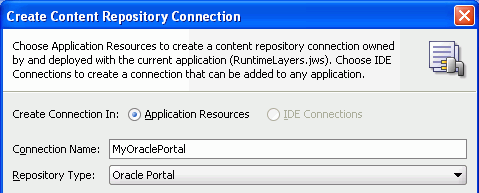
In the Create Content Repository Connection dialog, specify a name for the connection; for example, MyOraclePortal.
Tip:
You can choose between creating application-specific connections in the Application Resources panel and creating common connections in the Resource Palette (IDE Connections).
Select Oracle Portal from the Repository Type box, as shown in Figure 27-2.
Figure 27-2 Content Repository Connection - Oracle Portal
Select Set as primary connection for Documents service to make this connection the primary (default) connection for all content management operations through the Documents service or Content Presenter. Selecting this option writes a configuration to the adf-config.xml file that identifies this connection as the default connection. If connectionName parameter is specified for a Documents service task flow, that value overrides this setting.
Note:
To be able to set a connection as primary (default) connection for the Documents service, you must select the Application Resources option in Create Connection In. This is because connections created as IDE connections cannot be used directly, they must be added to applications.
Select a connection from the Database Connection list, or create a new connection to the Oracle Portal schema:
In the Create Database Connection wizard, specify the connection name and type.
Enter the database user name and password of the Oracle Portal schema. By default, the user is PORTAL.
Under Oracle (JDBC) Settings, if you intend to specify a custom JDBC URL, then select the Enter Custom JDBC URL checkbox, and specify the database URL of the Portal schema in the jdbc format:
jdbc:oracle:thin:@dbhost:dbport:dbsid
If you did not perform the above step, then select a driver, enter the host name, JDBC port, SID, and service name, as shown Table 27-3 and Figure 27-3.
Table 27-3 Parameters for Creating Oracle Portal-based Content Data Control
| Parameters | Description |
|---|---|
|
Driver |
There are two types of drivers: thin and oci8. The thin driver can be used to connect to Oracle Database release 8i or later databases with TCP/IP network protocols. This driver is included in the default Oracle JDBC library for all projects. The oci8 driver is used when creating a Java application that runs against an Oracle Application Server. This is a thick driver optimized for the Oracle Database. It is a mix of Java and native code. This driver handles any database protocol (TCP, IPX, BEQ, and so on). It is recommended for applications that are run from the computer on which they are stored. |
|
Host Name |
Name of the Oracle Database. Use an IP address or a host name that can be resolved by TCP/IP; for example, |
|
JDBC Port |
Value to identify the TCP/IP port. |
|
SID |
Unique system identifier of an Oracle database instance. |
|
Service Name |
The service name for an Oracle database instance. |
Click OK.
In the Create Content Repository Connection dialog, in the Login Timeout (ms) field, specify the time in milliseconds. This timeout determines how long the application must wait when trying to establish a session with the content repository. If the network connection or the content repository server to which you are trying to connect is slow, then consider overriding the default value specified in this field.
Select the applicable authentication method. See Section 27.2.6.1, "What You Should Know About Using Identity Propagation and External Application Authentication Methods" for information.
Select the Specify login credentials for current JDeveloper session checkbox and enter the Oracle Portal single sign-on user name and password for logging in to your portal instance. The Oracle Portal single sign-on user name and password entered here are used to test the connection and are functional only at design time. Then click OK.
Note:
If the Specify login credentials for current JDeveloper session checkbox is selected, then the credentials you entered are used. If the checkbox is not selected, then the connection is tested using External Application credentials (if they exist), otherwise null credentials are used.
If you have selected External Application for authentication and also specified either public or shared credentials, then you can leave these fields blank, as the public or shared credentials can be used to login at design time. If you specified both public and shared credentials for the external application, then the public credentials have higher precedence. However, if you have selected External Application but have not specified public or shared credentials, then you must specify user name and password here.
In the Application Resources panel, expand the repository connection you just created. The Connection Credentials dialog displays.
Note:
The Connection Credentials dialog displays if you do not save the credentials, that is, you do not select the Specify login credentials for the current JDeveloper session checkbox, or if you do not specify an External Application service that uses public or shared credentials.
Enter the user name and password for Oracle Portal connection and click OK. The connection displays under the Application Resources panel.
See Also:
To create a data control using this connection, perform the procedure described in Section 28.2, "Configuring Content Data Controls for JCR Adapters".
The Oracle WebCenter Adapter for SharePoint extracts and searches content within a Microsoft SharePoint 2007 repository. The adapter accesses the repository using the Microsoft SharePoint SOAP interfaces. Oracle recommends that you study Section 27.2.6.3, "What You Should Know About Oracle WebCenter Adapter for SharePoint." before configuring and using Oracle WebCenter Adapter for SharePoint.
This section includes the following subsections:
To create a repository connection based on Oracle WebCenter Adapter for SharePoint:
In Oracle JDeveloper, open your Framework application.
In the Application Resources panel, right-click Connections and choose New Connection, then Content Repository.
In the Create Content Repository Connection dialog, specify a connection name for the connection; for example, MySPConnection.
Tip:
You can choose between creating application-specific connections in the Application Resources panel and creating common connections in the Resource Palette (IDE Connections).
Select JCR SharePoint Adapter from the Repository Type box.
Note:
This option displays only if the extension for Oracle WebCenter Adapter for SharePoint is installed.
Select Set as primary connection for Documents service, if you intend to make it the default connection for the Documents service. Selecting this option writes a configuration to the adf-config.xml file that identifies this connection as the default connection for the Documents service. If a Document Library task flow is used without any connectionName input parameter, then this connection is used. For information about the Documents service, see Chapter 30, "Integrating the Documents Service."
Note:
To be able to set a connection as primary connection for the Documents service, you must select the Application Resources option in Create Connection In. This is because connections created as IDE connections cannot be used directly, they must be added to applications.
Under Configuration Parameters, enter the SharePoint URL which is the web address of the SharePoint site to which you want to connect. For example, http://mysharepoint.mycompany.com, as shown in Figure 27-4.
Figure 27-4 Content Repository Connection - Oracle WebCenter Adapter for SharePoint
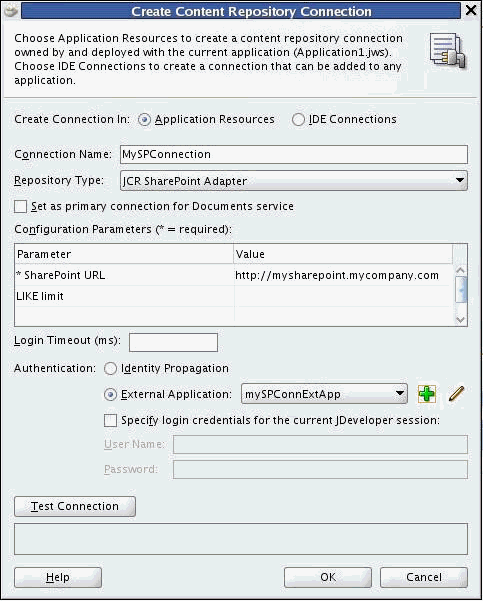
Enter an integer value representing the number of characters for the LIKE limit. If no value is set, the LIKE limit defaults to 64 characters as the limit for search pattern strings that are passed to the Microsoft SharePoint Server. If the value is set to zero, then the full string is passed to the server. That is, the LIKE limit is disabled. This parameter is optional. Oracle recommends that it be left to its default state. For related information, see Section 27.2.6.3, "What You Should Know About Oracle WebCenter Adapter for SharePoint."
In the Login Timeout (ms) field, specify the time in milliseconds. This timeout determines how long the application must wait when trying to establish a session with the content repository. Oracle recommends that there is a fast network connection between the deployed application and the Microsoft SharePoint repository. If the network connection or the content repository server to which you are trying to connect is slow, then consider overriding the default value specified in this field.
Select the External Application authentication method. For information about this authentication method, see Section 27.2.6.1, "What You Should Know About Using Identity Propagation and External Application Authentication Methods."
Note:
Oracle WebCenter adapter for Microsoft SharePoint does not support the Identity Propagation authentication method. Therefore, the External Application authentication method lets you use a single shared set of credentials for all users when accessing the repository. You can also configure this option to enable each user to enter their own login credentials when accessing the repository the first time by omitting both the Shared and Public credentials in the External Application configuration. The system then reuses each unique credential on subsequent access requests.
Select the Specify login credentials for the current JDeveloper session checkbox and specify User Name and Password. This step is optional, and only required if you want to override the External Application authentication credentials created in the previous step. Moreover, this override only applies to the JDeveloper design time.
Click OK.
Optionally, to test the connection, expand the repository connection you just created, in the Application Resources panel. The Connection Credentials dialog displays.
Note:
The Connection Credentials dialog displays if you do not save the credentials, that is, you do not select the Specify login credentials for the current JDeveloper session checkbox, or if you do not specify an External Application service that uses public or shared credentials.
Enter the User Name and Password for this connection and click OK. The connection displays under the Application Resources panel.
This step is optional.
The Oracle WebCenter Adapter for SharePoint is designed to map the content managed in SharePoint servers, such as sites, lists, list items, metadata, documents, as well as content services delivered by Microsoft SharePoint, such as search and security.
The adapter maps content and content services that are relevant to the JCR standard. In other words, the adapter does not map the Microsoft SharePoint graphical user interface (GUI) and the application-level functions that are not part of the JCR standard. For example, the adapter does not map the GUI application logic of the Microsoft SharePoint server (not covered by JCR), but it provides GUI-relevant metadata so that JCR or Java applications can restore some of the GUI logic such as SharePoint lists, if that is the goal of the application.
Default JCR Location of the Microsoft SharePoint Documents Libraries
For a SharePoint Services v3 Team Site, the Shared Documents Library appears at path:/sp:Site/sp:RootWeb/sp:Lists/Shared Documents/sp:Files, as shown in Figure 27-5.
Figure 27-5 The Shared Documents Library Path for a SharePoint Services v3 Team Site

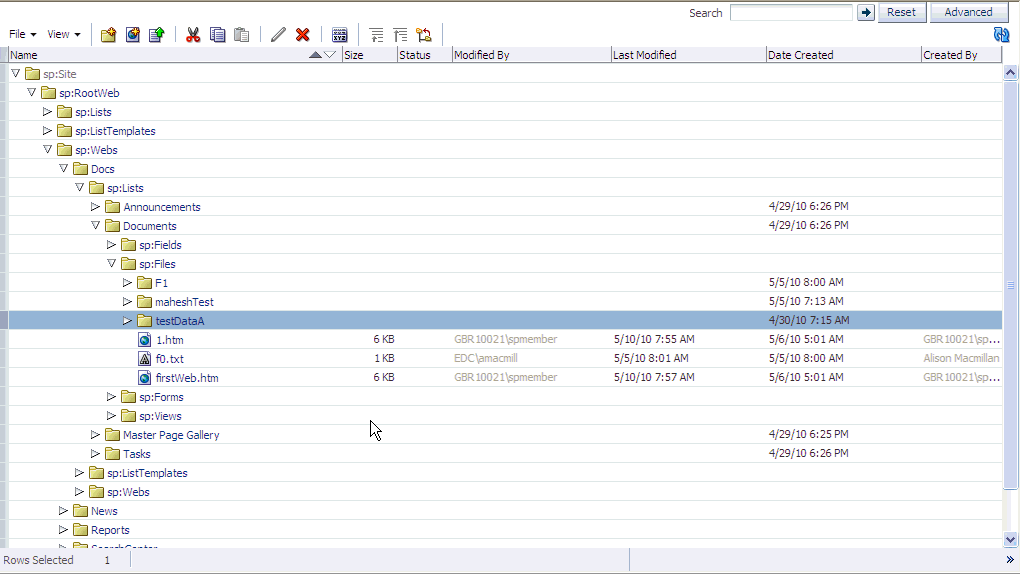
For the MOSS 2007 site created during installation, the Documents Center Document Library appears at path: /sp:Site/sp:RootWeb/sp:Webs/Docs/sp:Lists/Documents/sp:Files, as shown in Figure 27-6. This path reflects the structure where the Documents Center is a subsite in the SharePoint main site.
Files are JCR nodes of primary type nt:file, and of mix-in type sp:File. Folders are JCR nodes of primary type nt:folder and of mix-in type sp:Folder. The sp: mix-ins are similar to nt:unstructured in their definitions.
Figure 27-6 The Documents Center Document Library Path for MOSS 2007 Site
This section describes the procedure to create a content repository connection based on the file system adapter. The File System adapter is intended to be used in the development environment only.
To create a File System repository connection:
In Oracle JDeveloper, open your Framework application.
In the Application Resources panel, right-click Connections and choose New Connection and then Content Repository.
In the Create Content Repository Connection dialog, enter a name for the connection; for example, MyConnection.
Tip:
You can choose between creating application-specific connections in the Application Resources panel and creating common connections in the Resource Palette (IDE Connections).
Select File System from the Repository Type box.
Select Set as primary connection for Documents service to make this connection the primary (default) connection for all content management operations through the Documents service or Content Presenter. Selecting this option writes a configuration to the adf-config.xml file that identifies this connection as the default connection. If connectionName parameter is specified for a Documents service task flow, that value overrides this setting.
Note:
To be able to set a connection as primary (default) connection for the Documents service, you must select the Application Resources option in Create Connection In. This is because connections created as IDE connections cannot be used directly, they must be added to applications.
Under Configuration Parameters, select the Base Path row, and enter the path to the folder in which your content is placed, for example, C:\MyContent.
Note:
The following must be considered while creating a file system connection:
The base path value is used as the root ("/") for the file system-based data control in Section 28.5, "Integrating Content Using Content Data Controls".
When you work on a UNIX system, the File System adapter inherits the case-sensitive file name characteristic of UNIX systems. So, on UNIX systems, you must ensure that references to files follow the same case as that used in the original file names. For example, suppose the Test.html file was created on a Microsoft Windows system. When you reference this file on a Linux system, you must ensure that you use Test.html, and not test.html or TEST.html.
Leave the Login Timeout (ms) field blank.
Click Test Connection to check whether you have entered the connection details correctly. You should see a Success! status, as shown in Figure 27-7.
Click OK.
In the Application Resources panel, expand the repository connection you just created.
When you create a connection to a repository, the contents in the main directory of the repository display under the Content Repository connection in the Application Resources panel, as shown in Figure 27-8. You can double-click folders and files to view them.
You can use repository connections to create JCR data controls that enable integration of the repository content with JSF pages. See Section 28.2, "Configuring Content Data Controls for JCR Adapters" and Section 28.5, "Integrating Content Using Content Data Controls" for information. These connections can also be consumed through the Documents service and Content Presenter task flows. See Chapter 30, "Integrating the Documents Service" for information.
This section includes:
Section 27.2.6.2, "What You Should Know About Oracle Portal"
Section 27.2.6.3, "What You Should Know About Oracle WebCenter Adapter for SharePoint"
The Create Content Repository Connection dialog provides the following options for authentication methods:
Identity Propagation: If you select this option, no credentials are passed to the repository. The repository connector instead uses the current user's identity as determined from the Java security context. This must only be used when the application and the repository use the same identity store to authenticate users.
To apply this authentication method, it is best to configure security for your application using the Configure ADF Security wizard since repositories may support only authenticated users or provide only limited access to the public or guest user. See Section 28.4, "Securing a Content Repository Data Control".
External Application: The External Application method can be used in all other cases where the current user identity should not be propagated directly to the repository. For more information, see Section 69.13, "Working with External Applications" and Section 30.3, "Setting Security for the Documents Service."
The External Application service allows different types of credentials to be associated with a connection:
Public credentials are used whenever an application is not secured, or the user has not yet logged in.
Shared credentials are used for any authenticated user.
If shared credentials are not specified, then mapped credentials can be used to obtain a result similar to identity propagation when the application and content repository do not use the same user store. In that case the external application service provides runtime screens through which users can provide their credentials for accessing the content repository. Those credentials are securely stored and used for any future connection that this user tries to establish.
If you intend to configure the External Application service, then click New to launch the Register External Application wizard and do the following:
Specify name of the external application.
In the Login URL field, enter the URL of the external application; for example, http://content-server.mycompany.com/idc/
Note:
This URL is optional and is required only to provide click through login to the content repository's own user interface. See the External Application service documentation for more information on how to configure click through login.
Then, under Authentication Details, select Basic from the list. Leave the fields under Login Details blank.
This option is selected when click through login is not required. If click through login is enabled, then you must select another option based on the authentication method used in the repository.
Accept the default values and click Next.
Enter shared credentials that can be used at design time and runtime. Do not specify shared credentials, if users must specify their own credentials.
Enter public credentials that can be used at design time and runtime. Specify public credentials only if you intend public users to view documents or contents.
Click Finish.
The following should be considered while using the Oracle Portal adapter:
To use Oracle Portal-based content data control capabilities, you can install Oracle Portal release 10.1.4.1, 10.1.4.2, or 11. If you use the Oracle Portal release 10.1.4.1, then you must update it with the required patches. Consult Oracle Application Server Release Notes for Microsoft Windows (for the required platform) for release 11.1.1.0.0 to know the exact patch number.
Only file, image, imagemap, and text item types and custom types based on these item types are supported.
The portal:container page type and its extensions are supported.
Content is always exposed in the default language of the page group. For example, if there are three page groups with different default languages, then the content displays only for those default languages and not for any translations that exist.
Consider the following while configuring and using Oracle WebCenter Adapter for SharePoint:
The adapter does not support connecting to a Microsoft SharePoint repository configured to allow anonymous access.
There should be a fast network connection between the application server instance on which the adapter is running and the Microsoft SharePoint repository.
Microsoft SharePoint versions: Oracle WebCenter Portal supports the following Microsoft SharePoint versions:
Microsoft Office SharePoint Server (MOSS) 2007 SP2
Microsoft Windows SharePoint Services (WSS) version 3 SP2
Versioning Settings: Oracle WebCenter Portal supports the following Microsoft SharePoint 2007 Document Library versioning settings:
Require Check Out : No
Content Approval : No
Document Version History : No versioning
The adapter does not function correctly if any other Versioning Settings are configured. For example, upload operations fails if Require CheckOut is set to yes. If document version history or content approval are enabled, new versions or documents have restricted visibility.
Session-Based Memory Cache: For performance reasons, Oracle WebCenter Adapter for SharePoint maintains a session-based memory cache. A Framework application, which uses this adapter, must configure an Http Session time-out in the application's web.xml file to ensure that any unused sessions are closed, and the adapter memory cache is released.
Mapping: The mapping takes into account only those content artifacts and services, which are relevant and defined in the JCR API. Additionally, the adapter maps the content and services to the extent supported by native SharePoint web services, as the adapter does not rely on custom additional server-side components. Consequently:
Full text search only returns items that are indexed by the SharePoint server.
Set of searchable columns is limited.
A fixed set of node types is supported in searches.
Some searches require additional network round trip as the adapter does not receive the full information necessary to map results to JCR from the web services.
The adapter exposes content from a Microsoft SharePoint server in a hierarchical way which is similar to the way by which the content is exposed by the native web interface. The items of the hierarchy have a primary type of either nt:folder, nt:file, or a specialization of these. Additional SharePoint specific characteristics are in some instances added by means of mixins, that is, sp:Folder, sp:File, and so on. The SharePoint specific name space, which is identified by the sp prefix in these examples, is used for items controlled by the SharePoint server. Items controlled by the user - webs, documents, list items and the like - are in the default name space. The adapter allows write access to SharePoint document libraries. That is, it allows folders and files to be created within document libraries in correspondence with creating folders or uploading files to the native SharePoint web interface. Examples which demonstrate this hierarchical mapping are described in the next point.
Site Structure: The structure mapping of a SharePoint site is as follows:
/sp:Site: The root element of the site.
/sp:Site/sp:RootWeb: The root web element.
/sp:Site/sp:RootWeb/sp:Lists: The path to the root of all lists in the site.
/sp:Site/sp:RootWeb/sp:Lists/Shared Documents/sp:Files: The path to the start of the file and folder hierarchy within a document library. In this example, the Shared Documents library is shown. All site document libraries are mapped under /sp:Site/sp:RootWeb/sp:Lists, each mapped by their own document library name.
/sp:Site/sp:RootWeb/sp:Lists/Shared Documents/sp:Files/myFiles: An example of a folder within the sites Shared Documents document library.
/sp:Site/sp:RootWeb/sp:Webs/mySubSite: A site's subsites are all mapped under /sp:Site/sp:RootWeb/sp:Webs. This example shows the path to a subsite named mySubSite. The subsite may itself contain Document Libraries.
The adapter does not support the write access to a SharePoint Document Library with settings that require one or more mandatory SharePoint columns.
Search and indexing:
JCR and native Microsoft SharePoint search: The Oracle WebCenter Adapter for SharePoint uses the native SharePoint search web service to evaluate JCR queries. Features present in JCR 1.0 but not available in the SharePoint search service are usually ignored.
Indexed items: The native search finds only those items that are indexed by the Microsoft SharePoint server. Other items that may match the query criteria are ignored. By default, SharePoint Services 2007 is configured for search and full-text indexing of a limited set of document types. For more information, and information on how to enable search and indexing in more complex deployments, see Microsoft documentation.
LIKE limit: The SharePoint native query language uses a LIKE keyword that the adapter uses to constrain queries by URLs (document paths) that match a pattern. The native LIKE operator supports a pattern match on strings up to 64 characters. Therefore, the Oracle WebCenter Adapter for SharePoint applies a client-side filtering on result sets to ensure that the correct constraint on URL is applied. The adapter's LIKE limit parameter controls this feature, and if this limit is not set, it defaults to applying a 64 character limit. The parameter can be set to 0 to disable client-side filtering. The parameter can also be set to some other positive value to apply a different character limit. However, this limit can only be increased if the SharePoint instance supports LIKE tests on URLs greater than 64 characters.
Creation and Modification timestamps: When displaying the contents of a SharePoint Document Library, the adapter reports the Creation and Modification timestamps as the times that the document was created on or last updated in the library. In the case of some document types, for example Microsoft Office documents, the native SharePoint search evaluates against the document metadata stored within each document. This can be different from the times when the document was uploaded or updated in the Document Library, and therefore, it appears to give misleading search results.
Combining search keywords: The adapter does not support combining search keywords in an OR expression.
Search by Last Modifier: The adapter does not support search by Last Modifier.
Supported JCR search operators and properties: The adapter supports the following:
Relational operators for comparison: =, >=, >, <=, <, LIKE, <>, IS NULL, IS NOT NULL. Predicates, descendants, and self operators (//) are supported on the last location step.
Properties for comparison: Size, Author, Modified, URL, Title, IsDocument, ContentClass, SiteName, Description, FileName, jcr:data, jcr:mimeType, jcr:created, jcr:lastModified.
This section describes how you can edit a common or an application-specific content repository connection. This section includes the following subsections:
Common repository connections (IDE connections) are created and edited under the Resource Palette.
To edit a common repository connection:
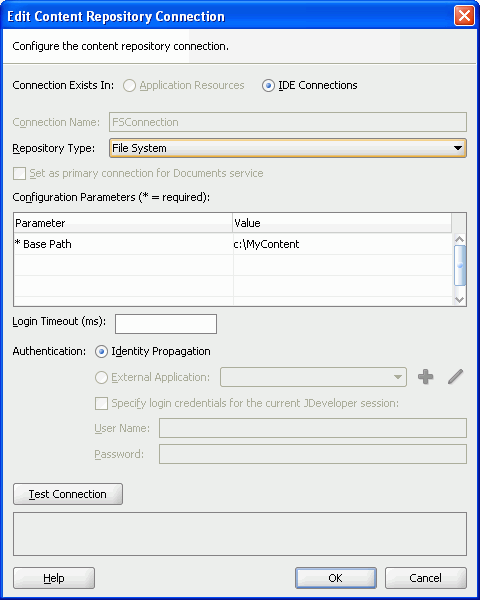
Under the Resource Palette, right-click the repository connection you intend to edit and choose Properties, as shown in Figure 27-9. The Edit Repository Connection dialog displays, as shown in Figure 27-10.
Figure 27-9 Resource Palette - Properties
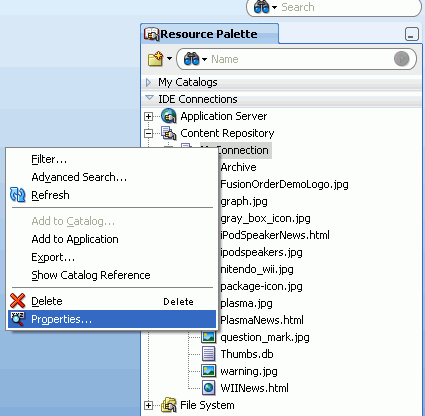
Figure 27-10 Edit Content Repository Connection
Change the appropriate parameters.
Test the connection and click OK.
Application-specific content repository connections exist under the Application Resources panel.
To edit a Framework application-specific content repository connection:
In the Application Resources panel, right-click the connection you intend to edit, and choose Properties, as shown in Figure 27-11. The Edit Content Repository Connection dialog displays, as shown in Figure 27-12.
Figure 27-11 Application Resources - Properties
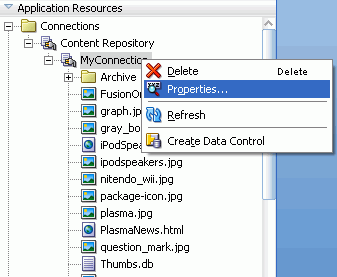
Figure 27-12 Edit Content Repository Connection

Change the appropriate parameters. Depending on the repository type, see the earlier sections that describe how to create repository connections. For example, for Content Server, see Section 27.2.1, "How to Create a Content Repository Connection Based on the Oracle Content Server Adapter".
Test the connection and click OK.
You can use an existing repository connection for any Framework application, if you created it as a common repository under the Resource Palette.
To use an existing repository connection:
In Oracle JDeveloper, open the Framework application for which you intend to use an existing repository connection.
Go to the Resource Palette and select the repository connection that you intend to use for a new application, for example MyConnection_2, and drop it under the Application Resources panel of the new application, as shown in Figure 27-13.
Tip:
Alternatively, right-click the connection and choose Add to Application. The connection is displayed under the Application Resources panel.
Figure 27-13 Dragging an Existing Common Repository Connection (IDE Connection) to an Application

You can now configure a data control for your new application from this repository connection, as described in Section 28.2, "Configuring Content Data Controls for JCR Adapters".