 Working With Oracle Connectivity
This appendix discusses how to:
Work with Oracle connectivity.
Monitor PeopleSoft client database connections.
Set the number of temporary tables.
Use locally managed tablespaces.
Work with Oracle Consumer Groups.
Implement Transparent Database Encryption.
Protect and Manage PeopleSoft applications with Database Vault.
Work With Oracle 11g security features.
Work with Transparent Application Failover.
Implement Oracle Active Data Guard.
Implement Oracle GoldenGate for PeopleSoft off-load reporting.
Set Up the PeopleSoft Installation with Oracle RAC.
Work with Oracle Fine Grained Auditing.
Work with Oracle Secure Files.
Working With Oracle ConnectivityThis section discusses:
NET10g/11g.
PeopleSoft servers and the Oracle connection string.
Open cursors.
 NET10g/11g
NET10g/11g offers peer-to-peer connectivity and a multi-protocol interchange (MPIC). The product is installed as multiple elements including:
Transparent Network Substrate (TNS).
Oracle Protocol Adapter.
Multi-protocol interchange (MPIC).
NET10g/11g uses the configuration files SQLNET.ORA and TNSNAMES.ORA, which can be created using a system editor, or with the NET10g/11g Assistant.
PeopleSoft Servers and the Oracle Connection String
The format of the Oracle connect string used to connect to the database is userid/password@service_name for all PeopleSoft processes, including online, batch, and application server processes.
This makes setup and configuration easy for platform configurations that can support PeopleSoft batch server processes or application server processes. However, performance for the batch processes and application server processes on a server that also functions as the database server is slightly degraded, due to the overhead involved in routing through SQL*NET.
PeopleSoft provides a configuration parameter, UseLocalOracleDB, for you to indicate which connect string to use. You set the parameter while configuring the application server or the Process Scheduler in the Database Options section.
When configuring an application server or the Process Scheduler, you can modify the parameters in the Database Options section if desired.
Values for config section - Database Options
UseLocalOracleDB=0
;ORACLE_SID=
EnableDBMonitoring=0

Do you want to change any values (y/n)? [n]:
Following are descriptions of the Database Options parameters:
|
Parameter |
Description |
|
UseLocalOracleDB |
Indicates if the PeopleSoft database that you are connecting to is in a Local Oracle SID. The default is 0, meaning that the database you are connecting to is remote. The resulting connect string is in the following format: userid/password@service_name. If you set this to 1, then the system used the following connect string when attempting to connect to the target database: userid/password. This implies a local connection. If you decide to use UseLocalOracleDB, then you must add the BEQUEAH_DETACH=YES parameter to the SQLNET.ORA file of the machine running the application server or Process Scheduler servers. This enables Oracle to clean up any orphaned database processes spawned on behalf of PeopleSoft transactions left over from aborted transactions. Note. On Microsoft Windows, UseLocalOracleDB is not supported when using a 32–bit client connecting to a 64–bit database. |
|
Oracle_SID |
Indicates for a Local Oracle connection only, the name of the Local ORACLE_SID to which you want the PeopleSoft processes to connect. Many sites set up more than one ORACLE_SID on their servers. This parameter gives you the ability to choose which ORACLE_SID you wish to connect to when connecting in Local mode. |
|
EnableDBMonitoring |
This parameter enables or disables DB monitoring of three-tier connections. This feature is covered later in this chapter. |
The following tables describe the relationship between the UseLocalOracleDB parameter and the ORACLE_SID environment variable.
|
UseLocalOracleDB Flag |
The target database is local |
The target database is remote |
|
0 is the default setting Internally the system will generate the following connect string when attaching to the target database: UID/PW@TNS_ALIAS |
Access will be made via TNSNAMES |
Access will be made via TNSNAMES |
|
1 is the setting you use if you intend to use a Local Oracle DB. Internally the system will generate the following connect string when attaching to the target database: UID/PW (Note the omission of the TNS_ALIAS.) |
Access will default to the Local DB as designated by the ORACLE_SID environment variable If the ORACLE environment variable TWO_TASK is set to a valid TNS_ALIAS, then this would also work. The existence of the TWO_TASK environment variable is in effect overriding the generated connect string. |
To choose this option does not make sense if it is your intention to use a Local Oracle DB. This combination will work if the ORACLE environment variable TWO_TASK is set to a valid TNS_ALIAS. You are in effect overriding the generated connect string. |
|
ORACLE_SID Parameter |
UseLocalOracleDB Flag |
UseLocalOracleDB Flag |
|
This parameter is delivered in the application server and Process Scheduler configuration file commented out. This indicates that the default setting is however the current ORACLE_SID environment variable is set. |
0 The target database is remote |
1 The target database is local The ORACLE_SID parameter is not enabled (commented out) therefore ORACLE_SID for this process will default to the current ORACLE_SID environment variable. |
|
ORACLE_SID=xxxxxxx where xxxxxxxx equals a valid ORACLE_SID for the server that this process is running on. |
If UseLocalOracleDB Flag is set to zero, then enabling ORACLE_SID is invalid since you are indicating a remote connection, the value associated with the ORACLE_SID parameter will be ignored. |
If UseLocalOracleDB Flag is set to one, and ORACLE_SID is enabled, the value associated with the ORACLE_SID parameter will be exported as an operating system environment variable thus overriding the current ORACLE_SID environment variable. |
See Also
Open Cursors
The minimum number of OPEN_CURSORS required for PeopleSoft applications on an Oracle database is 1000.
Monitoring PeopleSoft Database Connections
This section provides an overview of PeopleSoft database connections and discusses how to:
Enable database connection monitoring.
Track PeopleSoft database connections by PeopleSoft User ID.
Monitor MODULE and ACTION.
Understanding PeopleSoft Database Connections
PeopleTools provides the ability to monitor connections to the database server from Windows workstations (two-tier and three-tier connections) and browser connections. Some possible uses of monitoring database connections include system-wide troubleshooting, performance monitoring, "chargeback" accounting, and security audits for your system.
Administrators can obtain specific information regarding the user and the associated transaction when a user is connected to the database. A PeopleSoft system has many clients and user sessions connecting to one application server (directly, or indirectly through the web server), with only the application server maintaining connections to the database server.
Suppose one of your users has executed an extremely inefficient query that severely impacts the rest of the system. A Database Administrator would want to identify that user and take appropriate action. However, without an ability to monitor users you would probably have to terminate the physical connection, which would mean dropping the connection between the application server and the database server, which could potentially affect hundreds of users.
However, while only the application server maintains the actual database connection, PeopleTools records various information associated with each user connection so that client information can be monitored. Monitoring client information enables an administrator to collect information from two-tier connections, three-tier connections, and browser connections alike.
Associated with each connection and transaction is the following set of user information:
PeopleSoft user ID
OSUserName
MachineName
AppServerDomainName
ProgramExecutable
This information allows the system to associate activity on the database server with a particular workstation and user. This information is stored in the CLIENT_INFO column of the V$SESSION dynamic view.
Administrators are also often interested in compiling performance metrics based on the system usage per application. For this type of monitoring the PeopleSoft system populates the MODULE and ACTION fields of the V$SESSION dynamic view.
Oracle products, such as Oracle Enterprise Manager and Oracle Audit Vault use information stored in the CLIENT_IDENTIFIER column of V$SESSION.
Enabling Database Connection Monitoring
Database monitoring is always enabled for:
COBOL programs.
SQR programs.
Processes run through Process Scheduler.
Two-tier Windows workstation connections.
For connections handled by the application server (browser and three-tier Windows connections) the PeopleSoft systems administrator has the option to enable this feature by setting the EnableDBMonitoring parameter to '1' in PSADMIN or the application server configuration file (PSAPPSRV.CFG).
Tracking PeopleSoft Database Connections by PeopleSoft User ID
This section provides an overview of tracking database connections by user ID, a legend for interpreting illustrations, and discusses the following:
Oracle process connections.
Two-tier Windows client connections.
Application server process connections.
Three-tier Windows client connections.
Browser (PIA) connections.
Process Scheduler connections.
SQR connections.
COBOL connections
Windows and browser connections multithreaded through the application server.
Understanding Tracking PeopleSoft Database Connections by PeopleSoft User ID
To view the information associated with client connections, sign on to SQLPlus for the appropriate SID and execute the following SQL Query:
Note. This is a sample query that ties the OS PID and PeopleSoft CLIENT_INFO to the process connected to the Oracle database.
set linesize 200
select p.spid,
   substr(s.osuser,1,10) osuser,
   substr(s.username,1,8) username,
   substr(s.program,1,24) program,
   substr(s.client_info,1,60) ClientInfo
from v$session s, v$process p
where s.paddr=p.addr
and s.osuser is not null
order by s.osuser
/
The result of this query will differ somewhat per connection type. The following sections describe the information returned for various scenarios.
Legend
|
ID |
Description |
|
JZARATE (uppercase) |
NETWORK login ID for Windows workstation. |
|
JZARATE123199 |
Windows client MACHINENAME. |
|
TMJONES (uppercase) |
NETWORK login ID for Windows workstation. |
|
TMJONES110299 |
Windows client MACHINENAME. |
|
JRSMITH (uppercase) |
NETWORK login ID for Windows workstation. |
|
JRSMITH031198 |
Windows client MACHINENAME. |
|
PREILLY (uppercase) |
NETWORK login ID for Windows workstation. |
|
PREILLY060499 |
Windows client MACHINENAME. |
|
PT844P01 |
PeopleSoft schema (PS SYSADM ID or Access ID). |
|
PT81 |
Tuxedo domain name. |
|
PTDMO, VP1, and PS |
PeopleSoft user IDs used to signon to the database from the various clients. |
|
oracle (lower case) |
Owner ID of all of the Oracle processes. |
|
certora (lowercase) |
UNIX login ID of the PeopleSoft administrator starting the application server and Process Scheduler. |
Oracle Process Connections
Execution of the sample query noted above shows the Oracle Processes for the SID in which PeopleSoft database PT844P01 resides and this SQL*Plus session used to monitor the client info. There is no client info because no PeopleSoft client connections currently exist.
Oracle Processes and this SQLPLUS session are used to monitor the client info for network user JZARATE.
SQL> /
SPID     OSUSER  USERNAME PROGRAM                       CLIENTINFO

-------- ------- -------- ----------------------------- ------------------
15276    JZARATE PT844P01 SQLPLUSW.EXE

8364     oracle           oracle@st-sun01 (PMON)

8366     oracle           oracle@st-sun01 (DBW0)

8368     oracle           oracle@st-sun01 (LGWR)

8370     oracle           oracle@st-sun01 (CKPT)

8372     oracle           oracle@st-sun01 (SMON)

8374     oracle           oracle@st-sun01 (RECO)


7 rows selected.
For the two-tier connection, you can expect to monitor the following client information:
"%oprid%,%osusername%,%machinename%,,%executable%,"
Adding to what was previously displayed, this is a two-tier client connection from workstation TMJONES110299, Peoplesoft OPRID PS, executing PSIDE.
SQL> /
SPID     OSUSER  USERNAME PROGRAM                       CLIENTINFO

-------- ------- -------- ----------------------------- -----------------------
15387    TMJONES PT844P01 pside.exe                     PS,TMJONES,TMJONES110299,,
pside.exe,
15276    JZARATE PT844P01 SQLPLUSW.EXE

8364     oracle           oracle@st-sun01 (PMON)

8366     oracle           oracle@st-sun01 (DBW0)

8368     oracle           oracle@st-sun01 (LGWR)

8370     oracle           oracle@st-sun01 (CKPT)

8372     oracle           oracle@st-sun01 (SMON)

8374     oracle           oracle@st-sun01 (RECO)


8 rows selected.
Application Server Process Connections
For the application server connection, you can retrieve the following information from the database:
"%oprid%,%osusername%,%machinename%,%tuxedo_domain%,%executable%,"
Adding to what was previously displayed, this shows the application server process connections for Domain PT81, from server st-sun01, using UNIX login ID certora, with the application server processes connecting to the database as user ID PTDMO.
Keep in mind that each application server process maintains an individual connection to the database. If your application server is up and running, you should see the following information after executing the session query:
SQL> /
SPID     OSUSER  USERNAME PROGRAM                       CLIENTINFO

-------- ------- -------- ----------------------------- ---------------------------
15387    TMJONES PT844P01 pside.exe                     PS,TMJONES,TMJONES110299,,
pside.exe,
15276    JZARATE PT844P01 SQLPLUSW.EXE

15395    certora PT844P01 PSAPPSRV@st-sun01 (TNS V1-V3) PTDMO,certora,st-
sun01,PT81,PSAPPSRV,
15409    certora PT844P01 PSSAMSRV@st-sun01 (TNS V1-V3) PTDMO,certora,st-
sun01,PT81,PSSAMSRV,
15402    certora PT844P01 PSAPPSRV@st-sun01 (TNS V1-V3) PTDMO,certora,st-
sun01,PT81,PSAPPSRV,
8364     oracle           oracle@st-sun01 (PMON)

8366     oracle           oracle@st-sun01 (DBW0)

8368     oracle           oracle@st-sun01 (LGWR)

8370     oracle           oracle@st-sun01 (CKPT)

8372     oracle           oracle@st-sun01 (SMON)

8374     oracle           oracle@st-sun01 (RECO)


11 rows selected.
Three-Tier Connections – Windows Workstations
For the three-tier connections, you can retrieve the following client information:
"%oprid%,%osusername%,%machinename%,%tuxedo_domain%,%executable%,""
When the three-tier workstation is connected, then you should see the application server process that is executing the transaction for the client. For example, the PSAPPSRV server process handles the majority of the requests. Let’s assume for this example that the PSAPPSRV is processing the current client request.
Adding to what was previously displayed, this is a three-tier workstation JRSMITH031198, signing on as PSOFT with a user ID of VP1, to Domain PT81 and utilizing two application server processes (PSAPPSRV).
SQL> /
SPID     OSUSER  USERNAME PROGRAM                       CLIENTINFO

-------- ------- -------- ----------------------------- ---------------------------
15387    TMJONES PT844P01 pside.exe                     PS,TMJONES,TMJONES110299,,
pside.exe,
15276    JZARATE PT844P01 SQLPLUSW.EXE

15395    certora PT844P01 PSAPPSRV@st-sun01 (TNS V1-V3) VP1,,JRSMITH031198,PT81,
PSAPPSRV,
15409    certora PT844P01 PSSAMSRV@st-sun01 (TNS V1-V3) PTDMO,certora,
st-sun01,PT81,PSSAMSRV,
15402    certora PT844P01 PSAPPSRV@st-sun01 (TNS V1-V3) VP1,,JRSMITH031198,PT81,
PSAPPSRV,
8364     oracle           oracle@st-sun01 (PMON)

8366     oracle           oracle@st-sun01 (DBW0)

8368     oracle           oracle@st-sun01 (LGWR)

8370     oracle           oracle@st-sun01 (CKPT)

8372     oracle           oracle@st-sun01 (SMON)

8374     oracle           oracle@st-sun01 (RECO)


11 rows selected.
For browser connections (PIA connections), you can retrieve the following client information:
"%oprid%,%osusername%,%machinename%,%tuxedo_domain%,%executable%,""
When the user is connected, you should see the application server process that is executing the transaction for the browser. For example, the PSAPPSRV handles the large queries executed by user connections. Let's assume for this example that the PSAPPSRV is processing the current client request.
Adding to what was previously displayed, this is a PIA client, PREILLY060499 (connecting through a web browser), signing on as PSOFT/PTDMO, to Domain PT81 and utilizing two application server processes (PSAPPSRV).
From a monitoring perspective, there is no difference between a three-tier windows connection and a PIA browser connection.
SQL> /
SPID     OSUSER  USERNAME PROGRAM                       CLIENTINFO

-------- ------- -------- ----------------------------- ---------------------------
15387    TMJONES PT844P01 pside.exe                     PS,TMJONES,TMJONES110299,,
pside.exe,
15276    JZARATE PT844P01 SQLPLUSW.EXE

15395    certora PT844P01 PSAPPSRV@st-sun01 (TNS V1-V3) PTDMO,,PREILLY060499,PT81,
PSAPPSRV,
15409    certora PT844P01 PSSAMSRV@st-sun01 (TNS V1-V3) PTDMO,certora,st-sun01,
PT81,PSSAMSRV,
15402    certora PT844P01 PSAPPSRV@st-sun01 (TNS V1-V3) PTDMO,,PREILLY060499,PT81,
PSAPPSRV,
8364     oracle           oracle@st-sun01 (PMON)

8366     oracle           oracle@st-sun01 (DBW0)

8368     oracle           oracle@st-sun01 (LGWR)

8370     oracle           oracle@st-sun01 (CKPT)

8372     oracle           oracle@st-sun01 (SMON)

8374     oracle           oracle@st-sun01 (RECO)


11 rows selected.
For the Process Scheduler connection, you can expect to see the following information:
"%oprid%,%osusername%,%machinename%,,%executable%,"
Adding to what was previously displayed, this is the Process Scheduler running, started by OSUSER certora, from server st-sun01, logged in as PSOFT with a user ID of PTDMO.
SQL> /
SPID     OSUSER  USERNAME PROGRAM                       CLIENTINFO
-------- ------- -------- ----------------------------- ---------------------------
15387    TMJONES PT844P01 pside.exe                     PS,TMJONES,TMJONES110299,,
pside.exe,
15276    JZARATE PT844P01 SQLPLUSW.EXE
15435    certora PT844P01 psprcsrv@st-sun01 (TNS V1-V3) PTDMO,certora,st-sun01,,
psprcsrv,
15395    certora PT844P01 PSAPPSRV@st-sun01 (TNS V1-V3) PTDMO,,PREILLY060499,PT81,
PSAPSRV,
15402    certora PT844P01 PSAPPSRV@st-sun01 (TNS V1-V3) PTDMO,,PREILLY060499,PT81,
PSAPPSRV,
15409    certora PT844P01 PSSAMSRV@st-sun01 (TNS V1-V3) PTDMO,certora,st-sun01,
PT81,PSSAMSRV,
8364     oracle           oracle@st-sun01 (PMON)

8366     oracle           oracle@st-sun01 (DBW0)

8368     oracle           oracle@st-sun01 (LGWR)

8370     oracle           oracle@st-sun01 (CKPT)

8372     oracle           oracle@st-sun01 (SMON)

8374     oracle           oracle@st-sun01 (RECO)


12 rows selected.
For the SQR program connections, you can expect to see the following information:
"%oprid%,%spid%"
Adding to what was previously displayed, this is an SQR report run from the workstation JZARATE123199, submitted from the user ID PS, and having a PID of 15449.
SQL> /
SPID     OSUSER  USERNAME PROGRAM                       CLIENTINFO
-------- ------- -------- ----------------------------- --------------------------
15387    TMJONES PT844P01 pside.exe                     PS,TMJONES,TMJONES110299,,
pside.exe,
15276    JZARATE PT844P01 SQLPLUSW.EXE
15449    JZARATE PT844P01 sqrw.exe                      PS,15449
15435    certora PT844P01 psprcsrv@st-sun01 (TNS V1-V3) PTDMO,certora,st-sun01,,
psprcsrv,
15395    certora PT844P01 PSAPPSRV@st-sun01 (TNS V1-V3) PTDMO,,PREILLY060499,PT81,
PSAPPSRV,
15409    certora PT844P01 PSSAMSRV@st-sun01 (TNS V1-V3) PTDMO,certora,st-sun01,
PT81,PSSAMSRV,
15402    certora PT844P01 PSAPPSRV@st-sun01 (TNS V1-V3) PTDMO,,PREILLY060499,
PT81,PSAPPSRV,
8364     oracle           oracle@st-sun01 (PMON)

8366     oracle           oracle@st-sun01 (DBW0)

8368     oracle           oracle@st-sun01 (LGWR)

8370     oracle           oracle@st-sun01 (CKPT)

8372     oracle           oracle@st-sun01 (SMON)

8374     oracle           oracle@st-sun01 (RECO)


13 rows selected.
For the COBOL program connections, you can expect to see the following information:
"%oprid%,%osusername%,%machinename%,,%executable%,"
Adding to what was previously displayed, this a COBOL program PTPTEDIT, run from the workstation JZARATE123199, submitted from PeopleSoft user ID PS.
SQL> /
SPID     OSUSER  USERNAME PROGRAM                       CLIENTINFO
-------- ------- -------- ----------------------------- --------------------------
15387    TMJONES PT844P01 pside.exe                     PS,TMJONES,TMJONES110299,,
pside.exe,
15276    JZARATE PT844P01 SQLPLUSW.EXE

15449    JZARATE PT844P01 sqrw.exe                      PS,329

15451    JZARATE PT844P01 PTPTEDIT.exe                  PS,JZARATE,JZARATE123199,,
PTPTEDIT,
15435    certora PT844P01 psprcsrv@st-sun01 (TNS V1-V3) PTDMO,certora,st-sun01,,
psprcsrv,
15395    certora PT844P01 PSAPPSRV@st-sun01 (TNS V1-V3) PTDMO,,PREILLY060499,PT81,
PSAPPSRV,
15409    certora PT844P01 PSSAMSRV@st-sun01 (TNS V1-V3) PTDMO,certora,st-⇒
sun01,PT81,PSSAMSRV,
15402    certora PT844P01 PSAPPSRV@st-sun01 (TNS V1-V3) PTDMO,,PREILLY060499,PT81,
PSAPPSRV,
8364     oracle           oracle@st-sun01 (PMON)

8366     oracle           oracle@st-sun01 (DBW0)

8368     oracle           oracle@st-sun01 (LGWR)

8370     oracle           oracle@st-sun01 (CKPT)

8372     oracle           oracle@st-sun01 (SMON)

8374     oracle           oracle@st-sun01 (RECO)


14 rows selected.
Windows Workstation and Browser Connections Multithreading Through the Application Server
For multithreaded connections, you can retrieve the following client information:
"%oprid%,%osusername%,%machinename%,%tuxedo_domain%,%executable%,""
The application server multithreads incoming three-tier Windows or PIA browser connections through the application server processes already connected to the database. The next several examples illustrate a continual changing of the monitoring information displayed through the application server "thread" based on user activity and incoming requests.
Adding to what was previously displayed, accessing the database again from the three-tier Windows workstation JRSMITH031198 reflects a change in the user ID VP1 and client machine name for the both application server processes.
SQL> /
SPID     OSUSER  USERNAME PROGRAM                       CLIENTINFO
-------- ------- -------- ----------------------------- --------------------------
15387    TMJONES PT844P01 pside.exe                     PS,TMJONES,TMJONES110299,,
pside.exe,
15276    JZARATE PT844P01 SQLPLUSW.EXE

15449    JZARATE PT844P01 sqrw.exe                      PS,329

15451    JZARATE PT844P01 PTPTEDIT.exe                  PS,JZARATE,JZARATE123199,,
PTPTEDIT,
15435    certora PT844P01 psprcsrv@st-sun01 (TNS V1-V3) PTDMO,certora,st-sun01,,
psprcsrv,
15395    certora PT844P01 PSAPPSRV@st-sun01 (TNS V1-V3) VP1,,JRSMITH031198,PT81,
PSAPPSRV,
15402    certora PT844P01 PSAPPSRV@st-sun01 (TNS V1-V3) VP1,,JRSMITH031198,PT81,
PSAPPSRV,
15409    certora PT844P01 PSSAMSRV@st-sun01 (TNS V1-V3) PTDMO,certora,
st-sun01,PT81,PSSAMSRV,
8364     oracle           oracle@st-sun01 (PMON)

8366     oracle           oracle@st-sun01 (DBW0)

8368     oracle           oracle@st-sun01 (LGWR)

8370     oracle           oracle@st-sun01 (CKPT)

8372     oracle           oracle@st-sun01 (SMON)

8374     oracle           oracle@st-sun01 (RECO)


14 rows selected.
Adding to what was previously displayed, accessing the database from the browser on machine PREILLY060499 illustrates a change in the user ID PTDMO and client machine name for one of the application server processes.
SQL> /
SPID     OSUSER  USERNAME PROGRAM                       CLIENTINFO
-------- ------- -------- ----------------------------- --------------------------
15387    TMJONES PT844P01 pside.exe                     PS,TMJONES,TMJONES110299,,
pside.exe,
15276    JZARATE PT844P01 SQLPLUSW.EXE

15449    JZARATE PT844P01 sqrw.exe                      PS,329

15451    JZARATE PT844P01 PTPTEDIT.exe                  PS,JZARATE,JZARATE123199,,
PTPTEDIT,
15435    certora PT844P01 psprcsrv@st-sun01 (TNS V1-V3) PTDMO,certora,st-sun01,,
psprcsrv,
15395    certora PT844P01 PSAPPSRV@st-sun01 (TNS V1-V3) PTDMO,,PREILLY060499,PT81,
PSAPPSRV,
15409    certora PT844P01 PSSAMSRV@st-sun01 (TNS V1-V3) PTDMO,certora,st-sun01,
PT81,PSSAMSRV,
15402    certora PT844P01 PSAPPSRV@st-sun01 (TNS V1-V3) VP1,,JRSMITH031198,PT81,
PSAPPSRV,
8364     oracle           oracle@st-sun01 (PMON)

8366     oracle           oracle@st-sun01 (DBW0)

8368     oracle           oracle@st-sun01 (LGWR)

8370     oracle           oracle@st-sun01 (CKPT)

8372     oracle           oracle@st-sun01 (SMON)

8374     oracle           oracle@st-sun01 (RECO)


14 rows selected.
Adding to what was previously displayed, accessing the database from the three-tier Windows workstation JRSMITH031198 reflects a change in the user ID VP1 and client machine name for one of the application server processes.
SQL> /
SPID     OSUSER  USERNAME PROGRAM                       CLIENTINFO
-------- ------- -------- ----------------------------- --------------------------
15387    TMJONES PT844P01 pside.exe                     PS,TMJONES,TMJONES110299,,
pside.exe,
15276    JZARATE PT844P01 SQLPLUSW.EXE

15449    JZARATE PT844P01 sqrw.exe                      PS,329

15451    JZARATE PT844P01 PTPTEDIT.exe                  PS,JZARATE,JZARATE123199,,
PTPTEDIT,
15435    certora PT844P01 psprcsrv@st-sun01 (TNS V1-V3) PTDMO,certora,st-sun01,,
psprcsrv,
15395    certora PT844P01 PSAPPSRV@st-sun01 (TNS V1-V3) VP1,,JRSMITH031198,PT81,
PSAPPSRV,
15409    certora PT844P01 PSSAMSRV@st-sun01 (TNS V1-V3) PTDMO,certora,st-sun01,
PT81,PSSAMSRV,
15402    certora PT844P01 PSAPPSRV@st-sun01 (TNS V1-V3) PTDMO,,PREILLY060499,
PT81,PSAPPSRV,
8364     oracle           oracle@st-sun01 (PMON)

8366     oracle           oracle@st-sun01 (DBW0)

8368     oracle           oracle@st-sun01 (LGWR)

8370     oracle           oracle@st-sun01 (CKPT)

8372     oracle           oracle@st-sun01 (SMON)

8374     oracle           oracle@st-sun01 (RECO)


14 rows selected.
Adding to what was previously displayed, the following illustrates accessing the database from the three-tier Windows workstation JRSMITH031198 executing a functional process that requires use of all of the application server processes. This is reflected in the change in the user ID VP1, and client machine name for all of the application server processes.
Note. Because the SQR program has completed running, there is no SQR information available.
SQL> /
SPID     OSUSER  USERNAME PROGRAM                       CLIENTINFO
-------- ------- -------- ----------------------------- --------------------------
15387    TMJONES PT844P01 pside.exe                     PS,TMJONES,TMJONES110299,,
pside.exe,
15276    JZARATE PT844P01 SQLPLUSW.EXE                                            ⇒

15451    JZARATE PT844P01 PTPTEDIT.exe                  PS,JZARATE,JZARATE123199,,
PTPTEDIT,
15435    certora PT844P01 psprcsrv@st-sun01 (TNS V1-V3) PTDMO,certora,st-sun01,,
psprcsrv,
15395    certora PT844P01 PSAPPSRV@st-sun01 (TNS V1-V3) VP1,,JRSMITH031198,PT81,
PSAPPSRV,
15409    certora PT844P01 PSSAMSRV@st-sun01 (TNS V1-V3) VP1,,JRSMITH031198,PT81,
PSSAMSRV,
15402    certora PT844P01 PSAPPSRV@st-sun01 (TNS V1-V3) VP1,,JRSMITH031198,PT81,
PSAPPSRV,
8364     oracle           oracle@st-sun01 (PMON)

8366     oracle           oracle@st-sun01 (DBW0)

8368     oracle           oracle@st-sun01 (LGWR)

8370     oracle           oracle@st-sun01 (CKPT)

8372     oracle           oracle@st-sun01 (SMON)

8374     oracle           oracle@st-sun01 (RECO)


13 rows selected.
Adding to what was previously displayed, the application server has been shut down and the COBOL process PTPTEDIT has completed. All clients have logged off. The Process Scheduler is still active.
SQL> /
SPID     OSUSER  USERNAME PROGRAM                       CLIENTINFO
-------- ------- -------- ----------------------------- ------------------------
15276    JZARATE PT844P01 SQLPLUSW.EXE
15435    certora PT844P01 psprcsrv@st-sun01 (TNS V1-V3) PTDMO,certora,st-sun01,,
psprcsrv,
8364     oracle           oracle@st-sun01 (PMON)

8366     oracle           oracle@st-sun01 (DBW0)

8368     oracle           oracle@st-sun01 (LGWR)

8370     oracle           oracle@st-sun01 (CKPT)

8372     oracle           oracle@st-sun01 (SMON)

8374     oracle           oracle@st-sun01 (RECO)


8 rows selected.
Monitoring PeopleSoft MODULE and ACTION InformationIn addition to the CLIENT_INFO field, PeopleTools also populates the MODULE and ACTION fields of the V$SESSION and V$SQL dynamic views. This provides increased monitoring capabilities if you use Oracle performance monitoring utilities, including:
Oracle Enterprise Manager
Oracle Database Resource Manager
Oracle Automatic Workload Repository
By monitoring MODULE and ACTION values you can:
Provide more specific PeopleSoft information for several Oracle performance monitoring tools.
View and analyze performance and system resource usage for selected PeopleSoft application modules.
Write custom SQL to aggregate PeopleSoft performance and system usage information based on the MODULE, ACTION, and CLIENT_INFO values.
Depending on the type of connection, or the PeopleTools feature being used, the system populates the MODULE and ACTION fields with the information described in the following table.
|
PeopleSoft Technology |
MODULE Value |
ACTION Value |
|
application server (browser connections) |
PeopleSoft component name |
PeopleSoft page name |
|
Integration Broker |
service operation name |
PeopleCode event |
|
Application Engine |
'PSAE' |
Application Engine program name, section name, step, and type. |
Each SQL statement in V$SQL has a MODULE field populated based on the MODULE field of the session that first submitted the SQL. You can write additional SQL to obtain valuable performance information aggregated based on the values of these fields.
Keeping in mind that the usage of the MODULE and ACTION values is intended mainly to be used within the context of Oracle performance monitoring utilities, to become familiar with the type of information provided you can issue SQL queries, such as the following samples:
select module, action, client_info from v$session;
or
set linesize 200
select p.spid,
   substr(s.osuser,1,10) osuser,
   substr(s.username,1,8) username,
   substr(s.program,1,24) program,
   substr(s.client_info,1,60) ClientInfo,
   substr(s.module,1,48) module,
   substr(s.action,1,32) action
from v$session s, v$process p
where s.paddr=p.addr
and s.osuser is not null
order by s.osuser;
Exposing PeopleSoft User Information Through the CLIENT_IDENTIFIER
ColumnAdditional monitoring information was included enhancing the availability of PeopleSoft user information in Oracle products like Oracle Audit Vault and Oracle Enterprise Manager. PeopleSoft user ID information is also stored in the CLIENT_IDENTIFIER column of the V$SESSION table.
The CLIENT_IDENTIFIER column contains only the user ID, whereas the CLIENT_INFO column also contains the user ID value, but it is typically accompanied by other user information, like machine name for example. In some cases, a monitoring application may only need the user ID information. To get this information from the CLIENT_INFO column would require programmatic transformation and parsing of the CLIENT_INFO string. Displaying only the user ID in the CLIENT_IDENTIFIER column, simplifies the retrieval of the user ID by products like Oracle Audit Vault and Oracle Enterprise Manager. No further transformation or parsing of the string is required.
Database administrators can also retrieve the information directly from the database with queries similar to the following:
SQL> select module, client_identifier, client_info from v$session where module =
 'pside.exe';

MODULE					CLIENT_IDENTIFIER		       CLIENT_INFO
---------------	-------------------	------------------------------
pside.exe				QEDMO							QEDMO,bng2,BENG-PC,,pside.exe,
The example above displays the User ID information in both the CLIENT_INFO and the CLIENT_IDENTIFIER columns. The latter can be used by Oracle Audit Vault. The user ID information can be retrieved from the following connection types:
two-tier connections.
three-tier connections.
programs run through Process Scheduler.
The following sections provide sample queries and results.
Example: Working with CLIENT_IDENTIFIER Information and Three-Tier Connections
The following query displays the user ID information associated with a three-tier connections:
SQL> select module, client_identifier, client_info from v$session where client_i
dentifier like 'QEDMO%';

MODULE
-----------------------------------------------
PSAPPSRV@sp-lnx07.peoplesoft.com (TNS V1-V3)

CLIENT_IDENTIFIER
-------------------
QEDMO

CLIENT_INFO
-----------------------------------------
QEDMO,,10.138.230.162,FS850U02,PSAPPSRV,
In this example the user ID information is available under CLIENT_INTO and CLIENT_IDENTIFIER, however CLIENT_IDENTIFIER only stores the user ID information while CLIENT_INFO stores other information, like the client connection details.
Example: Working with CLIENT_IDENTIFIER Information and Process Scheduler
It is also possible to monitor the user ID for programs running through Process Scheduler. In the following example an Application Engine program ran through Process Scheduler using the user ID QESS. By running the following query, it is possible to display the user ID information.
SELECT module, client_identifier, client_info
FROM v$session
WHERE client_identifier like 'QESS%';

MODULE					CLIENT_IDENTIFIER							CLIENT_INFO
--------------	------------------------------	-------------------------------------
PSAE						QESS													QESS,,sp-lnx07.peoplesoft.com,,PSAESRV,
Setting the Number of Temporary Tables
Normally you will leave the number of temporary tables set to the default of three. You may need to change this setting for optimal performance, depending on various aspects of your implementation, including account transaction volumes, benchmark numbers for the current hardware and database platform, as well as your service-level requirements. Use the following procedure if you need to adjust the number of temporary tables to improve performance in your implementation.
To set the number of temporary tables:
Select PeopleTools, Utilities, Administration, PeopleTools Options.
Set the Temp Table Instances (Total) and Temp Table Instances (Online) fields to the desired settings.
Note. Temp Table Instances (Total) should always be set to the same values as Temp Table Instances (Online), unless you have been instructed otherwise in the application documentation.
Save your changes.
Note. The total number of instances generated consists of the allocations specified on the PeopleTools Options page plus the allocations specified for each individual Application Engine program.
See Also
PeopleTools 8.52 PeopleBook: PeopleSoft Application Engine
PeopleSoft Red Paper “PeopleSoft Batch Performance Tuning on Oracle”
Using Locally Managed Tablespaces
PeopleSoft supports the latest Oracle locally managed tablespace (LMT) syntax to control segment space allocation. A Locally Managed Tablespace (LMT) is a tablespace that manages its own extents maintaining a bitmap in each data file to keep track of the free or used status of blocks in that data file. Each bit in the bitmap corresponds to a block or a group of blocks. When the extents are allocated or freed for reuse, Oracle changes the bitmap values to show the new status of the blocks. These changes do not generate rollback information because they do not update tables in the data dictionary (except for tablespace quota information), unlike the default method of Dictionary - Managed Tablespaces.
Benefits of using LMTs include:
Locally managed tablespaces do not record free space in the data dictionary, it reduces contention on these tables.
Local management of extents automatically tracks adjacent free space, eliminating the need to coalesce free extents.
Avoids recursive space management operations, which can occur in dictionary-managed tablespaces if consuming or releasing space in an extent results in another operation that consumes or releases space in a rollback segment or data dictionary table.
Sizes of extents that are managed locally can be determined automatically by the system. Alternatively, all extents can have the same size in a locally managed tablespace.
Changes to the extent bitmaps do not generate rollback information because they do not update tables in the data dictionary (except for special cases such as tablespace quota information).
Reduced fragmentation No coalescing required.
Specifically, the following scripts have been modified to use this syntax: UTLSPACE.SQL, PTUPGDDL.SQL, and xxDDL.SQL. (Where 'xx' is the product code).
For example:
CREATE TABLESPACE PSINDEX DATAFILE '/u04/oradata/<SID>/psindex.dbf' SIZE 64M
EXTENT MANAGEMENT LOCAL AUTOALLOCATE
SEGMENT SPACE MANAGEMENT AUTO
;
The following guidelines intend to help you determine which tables to migrate to the appropriate ‘LARGE’ tablespaces based on table size during the move to production. If you change tablespace assignments, you first need to run SETASPACE.SQR to synchronize the PeopleSoft metadata with the changes made to the Oracle catalog with respect to any new table space assignments. Also, we recommend that you use LMTs with 1M extent size and ASSM for large objects (> 10000 blocks) and 128K extent size for smaller objects (<10000 blocks). To determine the size of any object (table or index) in blocks > 10000, execute the following SQL statement:
select segment_name, tablespace_name, blocks
from user_extents
where blocks > 10000
GROUP BY segment_name
/
The following is an example of a large tablespace:
CREATE TABLESPACE PSLARGE DATAFILE '/u04/oradata/<SID>/pslarge.dbf' SIZE 64M
EXTENT MANAGEMENT LOCAL UNIFORM SIZE 1M
SEGMENT SPACE MANAGEMENT AUTO;
The following is an example of a non-large tablespace:
CREATE TABLESPACE PSSMALL DATAFILE '/u04/oradata/<SID>/pssmall.dbf' SIZE 64M
EXTENT MANAGEMENT LOCAL UNIFORM SIZE 128K
SEGMENT SPACE MANAGEMENT AUTO;
Working With Oracle Consumer Groups
PeopleTools enables you to map predefined PeopleSoft resource groups to Oracle resource consumer groups that you create, specifically for use with PeopleSoft. Using Oracle Database Resource Manager features, database administrators can monitor and manage the database resource consumption of PeopleTools executables and optimize system performance.
For example, assume that occasionally long running queries run through PeopleSoft Query degrade the performance of the entire system by consuming large amounts of the available database resources. PSQRYSRV.EXE, the application server process dedicated to handling processing requests submitted by PeopleSoft Query, is mapped to the PeopleSoft Resource Group, QUERY SERVER, by default. By creating a ‘PsQuery’ consumer group in your Oracle system, you can limit the percentage of CPU processing available to PSQRYSRV.EXE. If you limit the CPU usage for PSQRYSRV.EXE to 10 percent, for example, other high-priority processing on the system will continue to have system resources available, while PSQRYSRV.EXE is limited only to its allotted 10 percent of CPU processing.
To take advantage of mapping PeopleSoft resource groups to Oracle resource groups, you need to:
Review the delivered, predefined PeopleSoft resource groups.
Determine areas of your PeopleSoft system where you’d like to implement control over CPU usage.
Create the appropriate resource plan and consumer groups in your Oracle database.
Map PeopleSoft resource groups to the consumer groups you created.
See Also
Oracle Database Administrator’s Guide: “Using the Database Resource Manager”
Reviewing PeopleSoft Resource Groups
The following table describes the delivered PeopleSoft resource groups and the PeopleTools executables they contain.
Note. How the executables are grouped is not configurable. For example, you can’t further subdivide nor combine the delivered PeopleSoft resource groups.
|
PeopleSoft Resource Name |
Description |
Mapped Executable(s) |
|
ANALYTICAL SERVER |
Executables required by the PeopleSoft Analytic Calculation Engine. |
PSANALYTICSRV |
|
APPLICATION ENGINE |
Executables required by the PeopleSoft Application Engine. |
PSAESRV PSAE |
|
APPLICATION SERVER |
Executables required by core application server processing. |
PSAPPSRV PSSAMSRV PSPPMSRV PSPRCSRV |
|
COBOL |
Executables required for running COBOL programs. |
PSRUN |
|
DATA MOVER |
Executables required for running Data Mover. |
PSDMTX PSDMT |
|
MISCELLANEOUS |
Executables required for running various PeopleTools executables, from PeopleSoft Configuration Manager to Verity’s spider program. These executables are categorized into this category because they are typically used infrequently and/or do not consume enough system resources to warrant their own resource group. |
JAVAGEN MKSYD MKVDK PRCSADM PSBITEST PSBOERUN PSCBLUCVRT PSCBLUCVRTZ PSCFG PSCRCONV PSCRRUN PSCVTRPT PSDAEMON P SDOCCGI PSEMAGENTSERVICE PSEMAIL PSIDE PSMAIL PSMBSRV PSMCFLOG PSMONITORSRV PSMSFADMIN PSMSFATTACH PSMSFATTRIBUTES PSNTSRV PSNVS PSOLAP PSOSE PSPALDBG PSPALXML PSPSADM PSQED PSREAPER PSREFRESHENGINE PSRELEASEINFO PSRENSRV PSSRCHSRV PSSVCHARNESS PSTAAT PSTRANS PSUNICONV PSUQSRV PSWATCHSRV PSXFR REAPER REGSVR32 SQLAPI TRC2API UBBGEN VSPIDER |
|
PUB SUB |
Executables required for processing and handling the Integration Broker implementation. |
PSBRKDSP PSBRKHND PSSUBHND PSSUBDSP PSPUBHND PSPUBDSP PSDBGPRC PSDBGSRV PSDSTSRV PSMSGDSP PSMSGHND PSMSTPRC |
|
QUERY SERVER |
Executables required to process PeopleSoft Query requests. |
PSQRYSRV |
|
QUICK SERVER |
Executables required for running SQR for PeopleSoft requests. |
PSQCKSRV |
|
SQR |
Executables required for running SQR for PeopleSoft requests. |
PSSQR |
|
VERITY |
Executables required for running core Verity search functionality. |
PSVERITYEXEC PSVERITYPIPEEXEC |
Determining Where to Implement a Consumer GroupWhile PeopleTools delivers a set of predefined resource groups that you can map to Oracle consumer groups, you only need to create consumer groups for the resource groups where you need to introduce control of system resource usage.
For example, if COBOL and PeopleSoft Analytic Calculation Engine processing are the only areas of your PeopleSoft system that cause unwanted resource usage, then you only need to create Oracle consumer groups to map to ANALYTIC SERVER and COBOL PeopleSoft resource groups.
Creating an Oracle Resource Plan and Consumer Groups
This section describes the process of defining the resource plan, consumer groups, and plan directives to correspond to the PeopleSoft resource groups.
To create the plan, groups, and directives, you can use the tool of your choice, such as SQL Plus, Oracle SQL Developer, or the Resource Manager interface in Oracle Enterprise Manager.
Note. This section covers information specific to PeopleSoft. It does not cover all topics related to Oracle Database Resource Manager. This documentation assumes that you have read and understand the information contained in Oracle Database Administrator’s Guide related to Oracle Database Resource Manager.
To create a resource plan, consumer group(s), and directives:
Connect to the Oracle SID containing the PeopleSoft schema.
Create a pending area.
EXECUTE DBMS_RESOURCE_MANAGER.CREATE_PENDING_AREA();
Create a resource plan, with a name of your choice.
For example:
EXECUTE DBMS_RESOURCE_MANAGER.CREATE_PLAN(PLAN => 'PeopleSoft_plan',
COMMENT => 'Resource plan/method for PeopleSoft Users Sessions');
Create the desired consumer groups.
Create the number of consumer groups required to correspond to the PeopleSoft resource groups that need to be controlled. For this example, assume that only the resource usage of executables related to the application server and PeopleSoft Query need to be controlled.
For example:
EXECUTE DBMS_RESOURCE_MANAGER.CREATE_CONSUMER_GROUP
(CONSUMER_GROUP => 'Application Server',
COMMENT => 'Resource consumer group/method for online users sessions');

EXECUTE DBMS_RESOURCE_MANAGER.CREATE_CONSUMER_GROUP(CONSUMER_GROUP => 'PSQuery',
COMMENT => 'Resource consumer group/method for PSQuery sessions');
Create the directives for the consumer groups you created.
For example:
EXECUTE DBMS_RESOURCE_MANAGER.CREATE_PLAN_DIRECTIVE(PLAN => 'PeopleSoft_plan',
GROUP_OR_SUBPLAN => 'Application Server',
COMMENT => 'Applications Server sessions at level 1', CPU_P1 => 50,
CPU_P2=> 0, PARALLEL_DEGREE_LIMIT_P1 => 8);

EXECUTE DBMS_RESOURCE_MANAGER.CREATE_PLAN_DIRECTIVE(PLAN => 'PeopleSoft_plan',
GROUP_OR_SUBPLAN => 'PSQuery',
COMMENT => 'PSQuery sessions at level 1', CPU_P1 => 10, CPU_P2 => 0,
PARALLEL_DEGREE_LIMIT_P1 => 2);
Validate the resource plan.
EXECUTE DBMS_RESOURCE_MANAGER.VALIDATE_PENDING_AREA();
Submit the plan.
EXECUTE DBMS_RESOURCE_MANAGER.SUBMIT_PENDING_AREA();
Grant the PeopleSoft schema user (PeopleSoft Access ID) these additional Oracle privileges necessary to administer resource plans:
GRANT_SYSTEM_PRIVILEGE ADMINSTER_RESOURCE MANAGER
EXECUTE
DBMS_RESOURCE_MANAGER_PRIVS.GRANT_SYSTEM_PRIVILEGE('<ACCESS_ID>',
'ADMINISTER_RESOURCE_MANAGER',TRUE);
GRANT_SWITCH_CONSUMER_GROUP
EXECUTE
DBMS_RESOURCE_MANAGER_PRIVS.GRANT_SWITCH_CONSUMER_GROUP('<ACCESS_ID>',
'<CONSUMER_GROUP_NAME>', FALSE);
Enable the Database Resource Manager in your PeopleSoft SID.
For completing this, you have two options:
Set RESOURCE_MANAGER_PLAN='PeopleSoft_plan’ in the init.ora file for PeopleSoft SID.
Issue the following ALTER statement: ALTER SYSTEM SET RESOURCE_MANAGER_PLAN='PeopleSoft_plan’;
Example: Creating PeopleSoft Resource Plan and Consumer Groups SQL
Script
You can issue each SQL statement separately, or you may elect to create a single script to create the required consumer groups. The following is a sample SQL script for creating a resource plan with consumer groups for your PeopleSoft system.
BEGIN

DBMS_RESOURCE_MANAGER.CREATE_PENDING_AREA();


DBMS_RESOURCE_MANAGER.CREATE_PLAN(PLAN => 'PeopleSoft_plan',
COMMENT => 'Resource plan/method for PeopleSoft Users Sessions');


DBMS_RESOURCE_MANAGER.CREATE_CONSUMER_GROUP(CONSUMER_GROUP => 'Application Server',
COMMENT => 'Resource consumer group/method for online users sessions');

DBMS_RESOURCE_MANAGER.CREATE_CONSUMER_GROUP(CONSUMER_GROUP => 'PSQuery',
COMMENT => 'Resource consumer group/method for PSQuery sessions');

DBMS_RESOURCE_MANAGER.CREATE_CONSUMER_GROUP(CONSUMER_GROUP => 'PubSub',
COMMENT => 'Resource consumer group/method for PUBSUB sessions');

DBMS_RESOURCE_MANAGER.CREATE_CONSUMER_GROUP(CONSUMER_GROUP => 'Application Engine',
COMMENT => 'Resource consumer group/method for Application Engine');

DBMS_RESOURCE_MANAGER.CREATE_CONSUMER_GROUP(CONSUMER_GROUP => 'Cobol',
COMMENT => 'Resource consumer group/method for Cobol');


DBMS_RESOURCE_MANAGER.CREATE_PLAN_DIRECTIVE(PLAN => 'PeopleSoft_plan',
GROUP_OR_SUBPLAN => 'Application Server',
COMMENT => 'Applications Server sessions at level 1', CPU_P1 => 50, CPU_P2=> 0,
 PARALLEL_DEGREE_LIMIT_P1 => 8);

DBMS_RESOURCE_MANAGER.CREATE_PLAN_DIRECTIVE(PLAN => 'PeopleSoft_plan',
GROUP_OR_SUBPLAN => 'PSQuery',
COMMENT => 'PSQuery sessions at level 1', CPU_P1 => 10, CPU_P2 => 0,
PARALLEL_DEGREE_LIMIT_P1 => 2);

DBMS_RESOURCE_MANAGER.CREATE_PLAN_DIRECTIVE(PLAN => 'PeopleSoft_plan',
GROUP_OR_SUBPLAN => 'PubSub',
COMMENT => 'PubSub sessions at level 1', CPU_P1 => 10, CPU_P2 => 0,
PARALLEL_DEGREE_LIMIT_P1 => 3);

DBMS_RESOURCE_MANAGER.CREATE_PLAN_DIRECTIVE(PLAN => 'PeopleSoft_plan',
GROUP_OR_SUBPLAN => 'Application Engine',
COMMENT => 'Application Engine sessions at level 1', CPU_P1 => 10, CPU_P2 => 50,
 CPU_P3 => 50);

DBMS_RESOURCE_MANAGER.CREATE_PLAN_DIRECTIVE(PLAN => 'PeopleSoft_plan',
GROUP_OR_SUBPLAN => 'Cobol',
COMMENT => 'Cobol sessions at level 1', CPU_P1 => 10, CPU_P2 => 50, CPU_P3 => 50);


DBMS_RESOURCE_MANAGER.VALIDATE_PENDING_AREA()
Mapping PeopleSoft Resource Groups to Oracle Consumer Groups
The Pt Ora Resource page enables you to map PeopleSoft resource groups with the Oracle consumer groups you have defined.
Select PeopleTools, Utilities, Administration, Oracle Resource Management.
|
PeopleSoft Resource Name |
PeopleTools provides predefined PeopleSoft resource groups containing one or more PeopleTools executables. The entire set of delivered PeopleSoft resource groups appears in this list. |
|
Oracle Consumer Group |
After you have created the appropriate Oracle resource plan and consumer groups to correspond to the PeopleSoft resource groups, enter the name of the appropriate Oracle resource group in the edit box. Enter the consumer group name exactly as it appears in the SQL you submitted to create it. For example, if the SQL you used to create the consumer group appeared as:
Then, in the Oracle Consumer Group edit box, enter PSQuery. |
Implementing Oracle Transparent Data Encryption
This section contains an overview and discusses how to:
Determine fields to encrypt.
Set up the Oracle Wallet.
Set the encryption algorithm.
Encrypt fields.
Manage fields encrypted for TDE.
See Also
For more information on Oracle's Transparent Data Encryption feature refer toOracle® Database Advanced Security Administrator's Guide
Understanding Transparent Data Encryption
PeopleTools enables you to implement Oracle’s Transparent data encryption (TDE) feature to encrypt the columns you select, enhancing the security of your PeopleSoft applications.
Transparent data encryption (TDE) enables encryption of sensitive data in database columns as it is stored in the operating system files. It provides for secure storage and management of encryption keys in a security module located outside database, separating ordinary program functions from those that pertain to security, such as encryption.
This separation enables you to divide administration duties between DBAs and security administrators, which is a strategy that enhances security because no administrator is granted comprehensive access to data. For example, one administrator manages only the keys, while another manages only the database.
TDE is a key-based access control system enforcing authorization using these keys:
|
Key |
Description |
|
Table |
For each database table that contains encrypted columns, there is one encryption key used to encrypt all the columns, regardless of the number of encrypted columns in a given table. |
|
Master |
Each table's column encryption key is, in turn, encrypted with the database server's master key. The Master key is stored in an Oracle wallet, which is part of the external security module. |
TDE is transparent to the application, and no views or additional tables are required. The application logic associated with SQL and table access will continue to work without modification.
To implement this feature within your PeopleSoft application, you need to:
Determine the fields that are candidates for TDE.
Set up the Oracle wallet.
Set the encryption algorithm.
Encrypt fields.
Note. This feature is available for Oracle databases running 10g R2 and later. Oracle did not provide this feature on any earlier version.
Determining Fields to Encrypt
Examples of information that are candidates for TDE include:
Names.
Contact information (address, telephone number, email address, and so on).
Credit card number.
Passport number.
Driver’s license number.
Age.
Salary.
Academic grades, scores, marks, and so on.
Note. Depending on the type of business and country in which you are running your PeopleSoft applications, there may be specific types of information, PII, that needs to be encrypted to comply with regulatory standards.
See Also
Your PeopleSoft application documentation
Managing the Oracle Wallet
With TDE, each individual table has its own table key, which is used to encrypt the selected columns in that table. Each table key is, in turn, encrypted using the TDE master key. The TDE master key is stored and protected outside the database in an Oracle Wallet, which is a container that stores authentication and signing credentials, including:
TDE master key.
PKI private keys.
Certificates.
Trusted certificates for SSL.
Encrypted table keys are placed in the data dictionary. When a user enters data into the column defined as encrypted, the Oracle database retrieves the master key from the wallet, decrypts the encryption key for that table from the data dictionary, uses that encryption key on the input value, and stores the encrypted data in the database.
Setting up the Oracle Wallet
Before implementing TDE, creating an Oracle Wallet is required.
Warning! After implementing TDE, the Oracle Wallet must be opened each time a database instance starts (or has been restarted) or else TDE will not work. If the wallet is not open, users will see error messages if they attempt to access any data encrypted using TDE.
To set up an Oracle Wallet for TDE:
Specify the wallet location.
By default, the wallet is created in the directory $ORACLE_BASE/admin/$ORACLE_SID/wallet.
So, if $ORACLE_BASE is /ds1/product/oracle and $ORACLE_SID is HRDMO, then the wallet will be stored in the directory /ds1/product/oracle/admin/HRDMO/wallet.
You can set a different directory by specifying it in the sqlnet.ora file located in $ORACLE_HOME/network/admin. For instance, if you want the wallet to be in /orawall directory, place the following lines in the sqlnet.ora file:
ENCRYPTION_WALLET_LOCATION =
 (SOURCE=
   (METHOD=file)
     (METHOD_DATA=
       (DIRECTORY=/orawall)))
Note. Oracle recommends adding this location to regular backup utility.
Create the wallet.
Issue the following SQL as a user with the ALTER SYSTEM privilege, such as SYSTEM, SYS, or SYSDBA. In this example, HRMSTKEY is the password.
alter system set encryption key
authenticated by "HRMSTKEY";
The preceding command creates the wallet in the specified location, sets the password of the wallet as HRMSTKEY, and opens the wallet for TDE to store and retrieve the master key.
Note. The password is case-sensitive and must be enclosed in double quotes. The password doesn't show up in clear text in any dynamic performance views or logs.
Opening and Closing the Wallet
After you create the wallet and set the password, every time you start the database, you'll have to open the wallet explicitly, using SYS, SYSTEM, or SYSDBA accounts.
For example,
alter system set encryption wallet open authenticated by "HRMSTKEY";
To close the wallet:
alter system set encryption wallet close;
Setting the Encryption Algorithm
You set the desired encryption algorithm used by TDE on the PeopleTools Options page in the Database Encryption Algorithm edit box.
Access the PeopleTools Options page (PeopleTools, Utilities, Administration, PeopleTools Options).
The algorithms you can enter are:
Advanced Encryption Standard algorithm with a 128-bit, 192-bit, or 256-bit key.
Triple DES algorithm with a 168-bit key.
Specify the desired algorithm by entering one of the following values into the Database Encryption Algorithm edit box exactly as it appears below:
AES128
AES192
AES256
3DES168
Note. You must specify an encryption algorithm to enable the Encrypt option for a field definition in Application Designer.
Encrypting Fields
You encrypt fields in Application Designer by selecting the Encrypt check box on a field definition, and then creating a table or altering an existing table.
Note. The Encrypt check box is enabled only on Oracle databases running version 10g R2 or later that also have an encryption algorithm specified in the Database Encryption Algorithm edit box on the PeopleTools Options page.
These PeopleSoft field types can be encrypted:
Character
Long Character (see note below)
Number
Signed number
Date
DateTime
Time
Note. Long Character field types may only take advantage of TDE when the following conditions are true: the field length is greater than 0 and less than 1334 and the Raw Binary field attribute is not set.
These PeopleSoft field types can not be encrypted:
Image
Image reference
Attachment
After you define the field to be encrypted, and either create a table or alter an existing table containing that field definition, the Build feature generates DDL SQL containing the ENCRYPT clause in the following syntax:
ENCRYPT using ‘ALGORITHM’
For example,
ALTER TABLE  PS_AM_BI_HDR
MODIFY (CR_CARD_NBR ENCRYPT using ‘AES256’ NO SALT);
Note. If you are using Oracle Database version 10.2.0.4
or higher, the syntax includes the NOMAC parameter. For example, ALTER TABLE PS_AM_BI_HDR MODIFY
(CR_CARD_NBR ENCRYPT using 'AES192' 'NOMAC' NO SALT);
The NOMAC parameter reduces the storage requirements and provides improved
performance.
See your Oracle database documentation for more information on NOMAC.
When DDL SQL containing the ENCRYPT clause is run against the database, Oracle:
creates a cryptographically secure encryption key for the table containing the column.
encrypts the clear text data in the column, using the specified encryption algorithm.
Managing Fields Encrypted for TDE
This section covers these topics related to the ongoing maintenance of encrypted fields:
Decrypting fields.
Regenerating an encryption key.
Upgrading TDE encrypted fields.
If you decide that you no longer want a field encrypted for TDE, you can issue a SQL ALTER operation using the DECRYPT clause. For example, assume you wanted to decrypt the SSN field on the ACCOUNT table.
ALTER TABLE ACCOUNT MODIFY (SSN DECRYPT);
Regenerating An Encryption Key
Situations where you might consider regenerating a table encryption key include:
You suspect a table key has been compromised.
You want to take advantage of a different encryption algorithm.
You regenerate a table encryption key by issuing a SQL ALTER operation using the REKEY clause. For example, assume you wanted to rekey the PS_AM_BI_HDR table to take advantage of AES256.
ALTER TABLE PS_AM_BI_HDR REKEY using 'AES256';
This creates a new table key and recreates the encrypted column values using the new table key.
Upgrading TDE Encrypted Fields
All metadata field definitions are delivered with no-encryption attributes enabled. PeopleSoft applications will not deliver any metadata indicating encryption enabled for any field for an initial installation database file, project, or a PeopleTools or PeopleSoft application patch.
If you customize the field by adding TDE encryption, you need to keep track of the fields and associated record definitions and ensure that you maintain the desired encryption status through any upgrades that you perform.
See Your PeopleSoft upgrade documentation
Altering Tables With TDE Encrypted Fields
When altering tables with TDE encrypted fields using the Alter in Place option, Application Designer automatically switches the Index Creation Options selection to Recreate index only if modified even if you specifically select Recreate index if it already exists in the Build Settings dialog box.
Protecting and Managing PeopleSoft Applications with Database Vault
This section provides an overview and discusses:
Restricting access for the access ID.
Restricting access for PSFTDBA ID.
Using multiple, alternate, access IDs.
Understanding Oracle Database VaultOracle Database Vault provides an extra layer of security that protects a database against insider security threats. One of Database Vault’s key features is that it protects PeopleSoft application data from being accessed by super-privileged users, such as DBA or system administrators, but it still allows them to maintain the Oracle database.
A super-privileged user, such as a DBA, should not have access to PeopleSoft application data. Application data can include salary, identification numbers, credit card numbers, and other personal information. On the other hand, the DBA must still be able to perform database maintenance, such as back up and recovery. Database Vault allows DBAs to do their jobs, but does not allow the DBA to have access to application data.
PeopleTools has validated the use of Oracle Database Value with PeopleSoft applications. From that validation effort we’ve provided sample PeopleSoft DB Vault security policies. The sample policies are available on Oracle Technology Network (OTN).
See http://www.oracle.com/technology/software/products/database_vault/index.html
These sample policies lock the database to allow all PeopleSoft application processes to access the database, while restricting any super user, like a DBA, from viewing the data using any Oracle delivered query tool. These policies illustrate a minimal usage of Database Vault functionality and may be modified or enhanced based on your specific level of required database security. The following table illustrates how the implementation of the example Database Vault policies affects the PeopleSoft Access ID and end-users, such as VP1 or PS.
|
User Account |
Database Vault |
|
SYSADM (Peoplesoft Access ID) |
Before Database Vault, the Oracle DBA would use the Access ID for all database maintenance tasks, and they could view all of the data in the database. For example, a DBA might have used the PeopleSoft Access ID during all system testing to query the database when they needed to verify data in the database. Once Database Vault is enabled, the Access ID will no longer be able to access SQL*Plus, for example. |
|
PSFTDBA (Account for DBAs) |
With Database Vault enabled, the Oracle DBA responsible for applying PeopleSoft upgrades will no longer use the PeopleSoft Access ID. The DBA will now use the new PSFTDBA account to login to SQL*Plus and perform database maintenance tasks. The PSFTDBA account does not allow the DBA to run SELECT statements on the database tables, but INSERT, UPDATE, and DELETE are allowed. |
|
General PeopleSoft user IDs (VP1, PS, and so on) |
The PeopleSoft "end-user" IDs, such as VP1, are not affected by Database Vault. Database Vault is transparent to VP1 and other PeopleSoft end-users. |
Restricting Access For the Access ID
In the PeopleSoft system, the access ID is the Oracle owner of all schema objects in a PeopleSoft database. With Database Vault you can restrict Oracle users other than the access ID from having 'SELECT' privilege on any access ID objects.
This restrictive usage is supported by using the sample PeopleSoft Database Vault security policies. When the sample PeopleSoft Database Vault security policies are implemented and Database Vault is enabled on a PeopleSoft database running on Oracle, the policies allow the access ID to do everything it currently needs to do on behalf of PeopleSoft components.
By design, all DML including SELECT DML is allowed by the access ID if the DML is issued through a "known" PeopleTools component, as defined in the sample PeopleSoft Database Vault security policies.
SELECT DML access is restricted for the access ID if not executed through a defined PeopleTools component.
SQLPlus and other ad hoc query tools are not explicitly defined in the sample policies and therefore cannot be used to issue SELECT DML against the database.
Restricting Access For PSFTDBA ID
The sample policies and scripts provide for non-access ID access to the database through the Oracle user, PSFTDBA. This user is intended to be used when you need SQLPLUS access to the system.
In order for DBAs to perform system maintenance, upgrade tasks, and so on, the sample policy scripts create the PSFTDBA account. With this account the following actions are allowed on database tables:
INSERT
UPDATE
DELETE
The sample PeopleSoft Database Vault security policies restrict the PSFTDBA ID from performing a SELECT against the access ID's objects. If you use the PSFTDBA account to run a SELECT statement, an error message similar to the following appears:
sp-hp15:$ sqlplus PSFTDBA/PSFTDBA@Q8501123

SQL*Plus: Release 11.1.0.6.0 - Production on Wed Apr 9 10:45:36 2008

Copyright (c) 1982, 2007, Oracle.  All rights reserved.

Connected to:
Oracle Database 11g Enterprise Edition Release 11.1.0.6.0 - 64bit Production
With the Partitioning, Oracle Label Security, Oracle Database Vault and
Real Application Testing options

SQL> select * from Q8501123.PSSTATUS;
select * from Q8501123.PSSTATUS
                       *
ERROR at line 1:
ORA-01031: insufficient privileges
The PSFTDBA ID is designed so that your DBA’s use it rather than the access ID to increase security when performing database maintenance. When performing some tasks, keep in mind that PSFTDBA does not have sufficient access to the database to perform all PeopleSoft maintenance tasks, such as all upgrade tasks.
For example, when running SQRs from the workstation, the PSFTDBA user ID cannot run SELECTs on the database to generate reports. This is a defined PeopleSoft Database Vault policy restriction. SQR’s should be run as scheduled Process Scheduler jobs on the server. Also, when applying PeopleSoft upgrades involves some steps that require access to the database using the access ID. For example, in some cases you need to run Data Mover in bootstrap mode using the access ID/password. Data Mover scripts cannot be run as PSFTDBA. In these cases, the key limitation to keep in mind is that the PSFTDBA ID cannot run a select against any access ID owned tables, which includes tables required for Data Mover to log in to the system.
In cases, where you need SELECT access for certain features (SQR, Data Mover, and so on) you can configure a set of specific, alternative ID’s to be used for PeopleSoft upgrade tasks while still remaining in compliance with the Database Vault policies.
Using Multiple Alternate Access IDs
The sample PeopleSoft Database Vault security policies provide protection of highly sensitive information in the PeopleSoft tables from database "super users." In some cases, you may need a more tailored access, such as in the cases of upgrades, patching, auditing, and the separation of duties for the PeopleSoft Access ID.
You can leverage Database Vault so that PeopleSoft tables, procedures and triggers could be protected can still be protected while allowing special access to complete upgrade and maintenance tasks. The privileges in the Database Vault PeopleSoft template can be given to the multiple, alternate, access IDs. By using multiple, alternate, access IDs to perform PeopleSoft maintenance, you can mitigate the issues involved with distributing the password of the base access ID to multiple users.
The multiple, alternate, access IDs (PSFTDBAnn) technique has been tested with Database Vault in the field on PeopleSoft installations and offers a solution where unique, identifiable accounts can be used to perform PeopleSoft patching and upgrades. These accounts can be limited to the modules and machine names from which the PSFTDBAnn ID can run. These accounts also can be heavily audited, to make sure that they do not introduce malicious code, which removes the need to implement heavy auditing on the base access ID account.
With multiple, alternate, access IDs you can:
Use multiple, alternate, access IDs that can be used just for PeopleSoft upgrade/maintenance.
Create PSFTDBAnn accounts that have many auditing options enabled, not affecting the use of the production access ID (SYSADM).
Use Oracle’s Audit Vault to enhance the separation-of-duties when it comes to centrally managing audit information.
Configure Database Vault so that the PSFTDBAnn account can be restricted to particular machines and times, and so on.
Tale advantage of Database Vault's strictly DBA account(s) (PSFTDBA) that can modify the database and system, but not issue selects on tables in the PeopleSoft Realm. The PSFTDBA account can do many DBA activities such as alter tablespaces, examine performance, start and stop the system, but not see sensitive information. The PSFTDBA account can apply Oracle Database Patches, but not apply PeopleSoft type of patches.
Restrict knowledge of the access ID password, as it is no longer required for PeopleSoft maintenance.
Address many more of the concerns third party auditors are identifying on systems that contain highly sensitive information in PeopleSoft applications.
In the following examples, the unofficial account "PSFTDBAn" represents multiple access IDs, although it can be almost any name. The PSFTDBAn accounts need to retain the ability to do ‘SELECTS’ on PeopleSoft objects. This technique leverages a protected Login Trigger that alters the CURRENT_SCHEMA, so that the PSFTDBAn accounts can act as the access ID (SYSADM) account, but preserve the user's identity (PSFTDBA1) when running any commands.
To configure multiple, alternate, access IDs:
Create one to 'n' multiple, alternate, access IDs (authorized Oracle USERS):
create user psftdba1 identified by oracle_1;
create user psftdba2 identified by oracle_1;
create user psftdba3 identified by oracle_1;
Grant minimal privilidges to these alternate authorized USERS:
grant connect,resource to psftdba1;
grant connect,resource to psftdba2;
grant connect,resource to psftdba3;
CREATE an Oracle instance level logon trigger to issue an ALTER SESSION SET CURRENT_SCHEMA whenever an alternative authorized user logs into the instance.
drop trigger psft_login_trg;
create or replace trigger psft_login_trg
after logon on database

begin
-- * use dvf if in a database vault environemnt.
-- * database vault would also help protect the peoplesoft realm, and
logon trigger, and so on
-- if dvf.f$session_user in ('PSFTDBA1' , 'PSFTDBA2', 'PSFTDBA3') then
if sys_context('userenv','session_user') in in ('PSFTDBA1' , 'PSFTDBA2',
 'PSFTDBA3') then
execute immediate 'alter session set current_schema=’SYSADM';
end if;
end;
/
Every time one of the alternative authorized USERs logs into the instance, an ALTER SESSION SET CURRENT_SCHEMA=ACCESSID is issued. From here on in any operation performed that is unqualified would be done in the ACCESSID schema.
For example, if the 'PSFTDBA1' were logged into the database directly using SQLPLUS or indirectly using Data Mover, then any 'VALID' operation performed that is unqualified would be done in the ACCESSID schema. All of ‘PSFTDBA1's actions on the database could be audited if the Oracle Auditing facility (Audit Vault) were used. If you need to verify you have database connectivity, you can use the PSFTDBAn account for your test. Data Mover and SQR testing from the workstation will be able to use the PSFTDBAn account.
Working With Oracle 11g Security Features
Oracle 11g introduces security features, which from a database security perspective, increase restrictions for database access. These changes are part of the "Secure By Default" configuration of 11g. These changes include setting a defined limit for the PASSWORD_LIFE_TIME and PASSWORD_GRACE_TIME associated with the default profile. This section discusses how PeopleSoft systems are affected and what your options are.
Understanding Default Profiles
All Oracle users created in an instance are assigned a default profile, such as the default profile delivered with 11g. There are differences between the default profiles for 10g and 11g.
|
Oracle Database Version |
Default Profile Values |
|
Oracle 10g |
PASSWORD_LIFE_TIME: UNLIMITED PASSWORD_LOCK_TIME: UNLIMITED PASSWORD_GRACE_TIME: UNLIMITED |
|
Oracle 11g |
PASSWORD_LIFE_TIME: 180 PASSWORD_LOCK_TIME: 1 PASSWORD_GRACE_TIME: 7 |
For pre-11g Oracle releases, the default profile did not specify a PASSWORD_LIFE_TIME limit. As such, by default, the password for a given Oracle user never expired. PASSWORD_LOCK_TIME and PASSWORD_GRACE_TIME were also unlimited. For 11g, the default profile has a PASSWORD_LIFE_TIME of 180 days. PASSWORD_LOCK_TIME and PASSWORD_GRACE_TIME also have limits.
For a PeopleSoft installation on the Oracle platform, several Oracle user IDs are created during the installation. Those Oracle users are:
ACCESSID (default is SYSADM)
CONNECT ID (default is people)
PS (owns the PSDBOWNER table)
The ACCESSID is the schema owner for all database objects related to a specific PeopleSoft application installation. The ACCESSID and ACCESSID password are stored and encrypted in the PeopleSoft security table PSACCESSPRFL.
SQL> descr SYSADM.PSACCESSPRFL
 Name                                      Null?    Type
 ----------------------------------------- -------- -----------------------

 SYMBOLICID                                NOT NULL VARCHAR2(8 CHAR)
 VERSION                                   NOT NULL NUMBER(38)
 ACCESSID                                  NOT NULL VARCHAR2(16 CHAR)
 ACCESSPSWD                                NOT NULL VARCHAR2(16 CHAR)
 ENCRYPTED                                 NOT NULL NUMBER(38)

SQL> SELECT  * from SYSADM.PSACCESSPRFL;;

SYMBOLIC    	VERSION 	ACCESSID        	ACCESSPSWD        	ENCRYPTED
-------- 		---------- 		---------------- 	---------------- 		----------
SYSADM1           7		 sBzLcYlPrag=     sBzLcYlPrag=              	1
The connect ID is a pseudo logon which allows PeopleSoft to associate multiple PeopleSoft user IDs to the same connect ID. The connect ID has the minimum privileges required to connect to the database (only SELECT privileges on specific PeopleTools tables). After a connection has been established using the connect ID, PeopleSoft security uses the PeopleSoft user ID to control access to objects in the database. The PeopleSoft signon process validates the connect ID on the server, rather than the user ID. The connect ID simplifies database security maintenance, as you don't need to maintain access for all PeopleSoft users, just for the connect ID.
The PS ID is used once, during PeopleSoft database creation, to create the PSDBOWNER table. Once this table has been created, read access and write privileges are made public to everyone, then the PS user ID privileges are revoked.
Encountering Issues Related to Oracle 11g SecurityWhen the PASSWORD_LIFE_TIME has been reached, the PeopleSoft Oracle users (in this case the PeopleSoft ACCESSID and CONNECT ID) will be locked out of the database. This means that any PeopleSoft process cannot access the database, such as application server, Process Scheduler, COBOL, Data Mover, and so on.
If this occurs you will see any of the following Oracle database error messages:
ORA-28000: the account is locked
Cause: The user has entered wrong password consequently for maximum number of⇒
 times specified by the user's
profile parameter FAILED_LOGIN_ATTEMPTS, or the DBA has locked the account
Action: Wait for PASSWORD_LOCK_TIME or contact DBA


ORA-28001: the password has expired
Cause: The user's account has expired and the password needs to be changed
Action: change the password or contact the DBA


ORA-28002 the password will expire within string days
Cause: The user's account is about to about to expire and the password needs to be
 changed.
Action: Change the password or contact the database administrator.
These messages may appear in a SQL trace, an application server log, a Process Scheduler log, or in an error message in the GUI when attempting to access the database (signon to Application Designer or Data Mover). The following are some select examples of what you can expect to see in log and trace files.
The trace will show the login failing as follows:
CONNECTID.


2-4     13.06.56    1.581000 Cur#0.6060.QE849C42 RC=28001 Dur=1.581000
Connect=Primary/QE849C42/people/
2-5     13.06.56    0.000000 Cur#0.6060.QE849C42 RC=-1 Dur=0.000000 XER
rtncd=761802124 msg=
2-6     13.06.56    0.000000 Cur#0.6060.QE849C42 RC=0 Dur=0.000000 ERR rtncd=28001
 msg=ORA-28001: the password has expired
The following illustrates an application server or Process Scheduler boot with passwords already expired:
PeopleTools 8.xx.07 Client Trace - 2008-10-24

PID-Line  Time        Elapsed  Trace Data...
--------  --------  ---------- -------------------->
 1-1      14.25.45             Tuxedo session opened {oprid='QEDMO',
appname='Two Tier', addr='//TwoTier:7000', open at 01C67EC8, pid=4956}
 1-2      14.25.45    0.058000 Cur#0.4956.QE849C41 RC=0 Dur=0.003000 --- router
 PSORA load succeeded
 1-3      14.25.45    0.155000 Cur#0.4956.QE849C41 RC=0 Dur=0.155000 INI
 1-4      14.25.45    0.192000 Cur#0.4956.QE849C41 RC=28002 Dur=0.192000
Connect=Primary/QE849C41/people/
 1-5      14.25.45    0.000000 Cur#0.4956.QE849C41 RC=-1 Dur=0.000000 XER
rtncd=761800508 msg=
 1-6      14.25.45    0.000000 Cur#0.4956.QE849C41 RC=0 Dur=0.000000 ERR
rtncd=28002 msg=ORA-28002:
the password will expire within 7 days
 1-7      14.25.48    2.718000 Cur#0.4956.notSamTran RC=0 Dur=0.000000 DON
 1-8      14.25.51    2.742000 Tuxedo session opened { DisconnectAll at01C67EC8,
 pid=4956}
The following illustrates a client trace of a application server or Process Scheduler boot:
PeopleTools 8.49.07 Client Trace - 2008-10-24

PID-Line  Time        Elapsed  Trace Data...
--------  --------  ---------- -------------------->
 1-1      14.30.38             Tuxedo session opened {oprid='QEDMO',
appname='Two Tier', addr='//TwoTier:7000', open at 01C67EC8, pid=3328}
 1-2      14.30.38    0.056000 Cur#0.3328.QE849C41 RC=0 Dur=0.004000 --- router
 PSORA load succeeded
 1-3      14.30.38    0.238000 Cur#0.3328.QE849C41 RC=0 Dur=0.238000 INI
 1-4      14.30.38    0.529000 Cur#1.3328.QE849C41 RC=0 Dur=0.529000
Connect=Primary/QE849C41/people/
 1-5      14.30.38    0.036000 Cur#1.3328.QE849C41 RC=0 Dur=0.000000 GET
type=1003 dbtype=4
 1-6      14.30.38    0.000000 Cur#1.3328.QE849C41 RC=0 Dur=0.000000 GET
type=1004 release=11
 1-7      14.30.38    0.076000 Cur#1.3328.QE849C41 RC=0 Dur=0.000000 COM
Stmt=
SELECT OWNERID FROM PS.PSDBOWNER
WHERE DBNAME=:1
.
1-41     14.30.40    0.200000 Cur#1.3328.QE849C41 RC=0 Dur=0.200000 Disconnect
 1-42     14.30.40    0.251000 Cur#0.3328.QE849C41 RC=28002 Dur=0.220000
Connect=Primary/QE849C41/QE849C41/
 1-43     14.30.40    0.000000 Cur#0.3328.QE849C41 RC=-1 Dur=0.000000 XER
rtncd=18874368 msg=
 1-44     14.30.40    0.000000 Cur#0.3328.QE849C41 RC=0 Dur=0.000000 ERR
rtncd=28002 msg=ORA-28002: the password will expire within 7 days
 1-45     14.30.42    2.293000 Cur#0.3328.notSamTran RC=0 Dur=0.000000 DON
 1-46     14.30.43    0.788000 Tuxedo session opened { DisconnectAll
at01C67EC8, pid=3328}
The failure and return of the GRACE PERIOD warning message gives you time to react before the password actually expires, enabling you to be proactive and reset or change the ACCESSID and/or the CONNECT ID password(s).
Oracle 11g Security Configuration OptionsThis section discusses options for dealing with Oracle 11g security, including:
Setting the PASSWORD_LIFE_TIME to unlimited.
Creating a PeopleSoft-specific profile.
Resetting the PeopleSoft installation user IDs.
Changing the PeopleSoft installation user IDs.
Setting the PASSWORD_LIFE_TIME to Unlimited
You can set the PASSWORD_LIFE_TIME in the default profile to unlimited. If this is done prior to creating the PeopleSoft-specific Oracle user IDs used for the PeopleSoft database installation, then the default behavior will mimic the pre-Oracle 11g behavior.
This can be done by creating the ACCESSID and CONNECT ID using the following command:
ALTER PROFILE DEFAULT LIMIT PASSWORD_LIFE_TIME UNLIMITED
;
Note. While feasible, this particular solution is counter to the secure by default positioning of Oracle 11g and to regulations requiring periodic changes to important passwords.
Creating a PeopleSoft-Specific Profile
You can create a PeopleSoft-specific profile which sets the PASSWORD_LIFE_TIME to unlimited. Creating the new PeopleSoft profile should be done when you create the database rather than altering PeopleSoft users from the default profiles to the PeopleSoft-specific profiles. Switching the a PeopleSoft-specific profile after you have created the PeopleSoft-specific users expired password limits does not automatically modify the expiry_date column in USER_USERS (done when creating the users with the default profile).
Create the ACCESSID and CONNECT ID user IDs using the delivered scripts, PS_HOME/scripts/PSADMIN.SQL and PS_HOME/scripts/CONNECT.SQL. After doing so, the PeopleSoft Oracle user IDs would have the default profile assigned. Alter the ACCESSID and CONNECT ID user IDs to make use of the alternate profile rather than the default. This can be done using the following commands:
CREATE PROFILE PSPROFILE LIMIT  PASSWORD_LIFE_TIME UNLIMITED
;
This creates the PSPROFILE profile with password limits values set. All values not explicitly listed are derived from the default profile.
The following statements alter both the default ACCESSID and CONNECT ID to utilize the PSPROFILE profile with the password limit set for PASSWORD_LIFE_TIME to unlimited:
ALTER USER SYSADM PROFILE PSPROFILE
;
ALTER USER PEOPLE  PROFILE PSPROFILE
;
Note. While feasible, this solution will allow the profile expiration behavior to mimic the pre-Oracle 11g behavior, but this runs counter to the intent of regulations that require changing critical passwords on a regular basis.
Resetting the PeopleSoft Installation User IDs
You can reset the PeopleSoft installation Oracle user ID passwords (the ACCESSID and CONNECT ID) in all of the places it needs to be reset. After the passwords expire, reset them to the original value. You can reset the password using the PASSWORD command or by ALTER USER command.
Note. If using Database Vault, then only the database vault account manager can reset the account, because the access ID cannot login to SQLPLUS to change the password.
Note. While feasible, this option runs counter to the intent of regulations that require changing critical passwords on a regular basis.
Changing the PeopleSoft Installation User IDs
The recommended option is to change the PeopleSoft installation required Oracle user ID passwords (the ACCESSID and CONNECT ID) after they have expired, and reflect those changes in all required locations. This option enables you to conform to regulations that require changing critical passwords on a regular basis.
If the password expires and an Oracle user ID password is changed within the Oracle database for the ACCESSID or CONNECT ID, the PeopleSoft system will still have the old password stored in the PeopleSoft security metadata tables and configuration files. These changed passwords will have to be reflected in the PeopleSoft security metadata tables and configuration files as well as the database.
At the database level, you can use the PASSWORD and ALTER USER commands to change the ACCESS ID and CONNECT ID passwords. For example:
C:\Documents and Settings\>sqlplus people/peop1e@QE849C42

SQL*Plus: Release 10.2.0.3.0 - Production on Tue Oct 21 10:55:57 2008

Copyright (c) 1982, 2006, Oracle.  All Rights Reserved.

ERROR:
ORA-28001: the password has expired

Changing password for people
New password: <changed to  ‘peop2e’>
Retype new password: <changed to  ‘peop2e’>
Password changed

SQL> exit
Or,
ALTER USER QE849C42 IDENTIFIED BY CHANGEPW ACCOUNT UNLOCK;

User altered.

ALTER USER people IDENTIFIED BY peop2e ACCOUNT UNLOCK;

User altered.

SQL> exit
Note. You may also have to include the UNLOCK keyword to unlock the account (if the password retry has been exceeded).
In PeopleTools, open Configuration Manager and change the Connect Password value on the Startup tab.
Then, open Data Mover in bootstrap mode (using the new ACCESSID password) to run the necessary commands to change the ACCESSID passwords on the appropriate PeopleSoft metadata tables. For example,
SET LOG c:\temp\changeaccessidpswd.out;
UPDATE PSSTATUS SET OWNERID = 'QE849C42';
UPDATE PSOPRDEFN SET OPERPSWD = OPRID, ACCTLOCK=0, ENCRYPTED = 0;
UPDATE PSACCESSPRFL SET ACCESSID = 'QE849C42', ACCESSPSWD = 'CHANGEPW',
VERSION = 0, ENCRYPTED = 0;
ENCRYPT_PASSWORD *;
Note. For Oracle 11g, the password is case sensitive.
Lastly, apply the connect ID changes to the psprcs.cfg and psappsrv.cfg configurations files and rebuild the domains. For example:
[Startup]
;=========================================================================
; Database Signon settings
;=========================================================================
DBName=QEDMO
DBType=ORACLE
UserId=QEDMO
UserPswd==QEDMO
ConnectId=people
ConnectPswd=peop2e
ServerName=
Working With Oracle Transparent Application Failover
PeopeTools provides limited support for Oracle Transparent Application Failover (TAF). PeopleTools TAF support includes:
PeopleSoft servers can be configured to transparently reconnect to a surviving RAC instance in the event of an instance failure with in a RAC cluster.
PeopleSoft servers can be configured to transparently fail over to an Oracle Database Data Guard standby when the primary database is lost.
Note. In most cases, other than a slight pause in the operation, the failover is transparent to the application end user.
PeopleTools is designed to listen for Oracle fast application notification (FAN) events to derive the failover behavior. Upon receipt of a FAN event, PeopleSoft servers break their existing TCP connections and initiate TAF, which references the TNSNAMES.ORA connect alias address list and establishes a connection to the surviving instance.
See Your Oracle RAC and database administration guides for the details of implementing and managing Oracle RAC clusters.
End-User System Behavior With TAF ConfiguredThe following table summarizes PeopleSoft behavior during RAC or Data Guard failover when TAF is configured.
|
PeopleSoft Client Scenario |
Behavior |
|
End user is updating data and submits or saves the updates during or just after the database failure. |
Oracle reconnects and reconstructs the database session on a surviving node and PeopleSoft resubmits the update. |
|
End user is paging through queried data when the database failure occurs. |
Oracle reconnects and reconstructs the database session on a surviving node, re-executes the query, repositions the SQL cursor, and returns the next set of rows. |
|
End user is issuing a new query or switching screens just after the database failure. |
Oracle reconnects and reconstructs the database session on a surviving node. |
Batch System Behavior With TAF ConfiguredThe following table summarizes PeopleSoft batch system behavior during RAC or Data Guard failover when TAF is configured.
|
PeopleSoft Batch System Scenario |
Behavior |
|
Process Scheduler |
Oracle reconnects and reconstructs the session on a surviving node. The Process Scheduler fails over with no administration intervention required. |
|
Application Engine job submitted just before primary instance failure |
Oracle reconnects and reconstructs the session on a surviving node but Application Engine job may fail and appear in the PeopleSoft Process Monitor with a status of No Success. These jobs will need to be resubmitted. If the Application Engine job has been implemented to be restartable, the Process Scheduler will automatically restart the job. If the Application Engine job was not in an open-transaction and was performing only SELECT statements, it will fail over and complete successfully. |
|
Application Engine submitted during or just after primary instance failure |
Oracle reconnects and reconstructs the session on a surviving node, the Application Engine job is then submitted on the new primary database and completes successfully. |
|
COBOL jobs just before primary instance failure |
If the COBOL program does pure queries (SELECT statements), then it will fail over to the surviving node and complete successfully. If the COBOL program executes INSERTS, UPDATEs and DELETEs, it will not complete successfully on the surviving node. Manual intervention is required to restart the COBOL jobs. |
|
Crystal and SQR reports |
The behavior is the same as COBOL |
|
PSQUERY, Tree Viewer, BI Publisher Query Report Viewer |
Will fail over and complete successfully. |
Implementing Oracle Active Data Guard
This section provides an overview and discusses:
Installing and configuring Oracle Active Data Guard.
Setting up the secondary access ID.
Creating the domain boot user.
Configuring Domains.
Configuring read-only components.
Configuring read-only process definitions.
Creating synonyms and database links.
Understanding Active Data Guard Within PeopleSoftOracle Active Data Guard, with Oracle Database 11g Enterprise Edition, enables you to offload resource-intensive activities from a production database to a synchronized standby database. Oracle Active Data Guard enables read-only access to a physical standby database for queries, sorting, reporting, web-based access, and so on, while continuously applying changes received from the production database.
If you use Oracle Active Data Guard at your site, PeopleTools provides the infrastructure to use Active Data Guard with your PeopleSoft application databases.
The following diagram depicts how Oracle Active Data Guard enables you to incorporate the use of a standby database for you to offload designated read-only transactions, freeing up more resources to handle the read-write transactions on your primary (production) database.
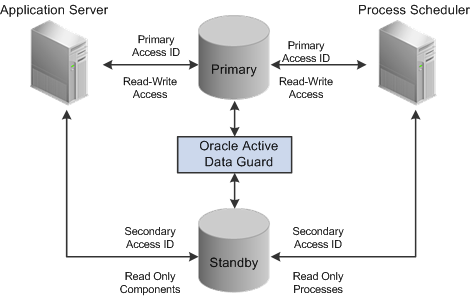
Oracle Active Data Guard synchronizing the primary and standby database so read-only requests can be routed to the standby database for processing
The following table describes the elements within the diagram:
|
Element |
Description |
|
Primary Database |
Your production database, handling the read-write requests of your transactional system. For example, this database fills orders, updates employee information, adds new product offerings, and so on. |
|
Standby Database |
Your clone of the primary database designed to handle read-only, or mostly-read-only (MRO), requests so that those transactions can be offloaded from your primary database, conserving resources on the production system. Examples of MRO requests include, PSQUERY Viewer, Tree Viewer, components that only submit SELECT SQL to display lists of employees, products, and so on. |
|
Oracle Active Data Guard |
Synchronizes the data stored in the primary and standby databases so that they remain exact duplicates. This is achieved using a combination of Oracle Active Data Guard features and DBLINKS and Remote Synonyms defined by scripts delivered with PeopleTools. |
|
Primary Access ID |
The PeopleSoft access ID used for connecting to the primary, production database. |
|
Secondary Access ID |
The alternative PeopleSoft database user (access ID), which will be used for connecting to the standby database and subsequently accessing the primary database’s tables using LOCAL and REMOTE synonyms. |
|
Read Only components |
When Oracle Active Data Guard is enabled, these components will run "out of the box" against the standby database:
Other components can also be made to run against the standby database, by setting the Read Only option in the component properties dialog box in Application Designer. |
|
Read Only processes |
When PeopleSoft is configured for Oracle Active Data Guard these Processes are enabled "out of the box" to run against the standby database:
Other processes can also be enabled to run against the standby database by setting the Read Only option on the Process Definition properties page in Process Scheduler. Note. The use of Oracle Active Data Guard with PeopleSoft batch processing only applies to the following: Application Engine processes run through the Process Scheduler with PSAESRV configured and SQR processes. Note. PeopleSoft does not deliver any SQR processes enabled by default to run against the standby database. To enable SQR processes to run against the standby database, refer to the "Configuring Read-Only Processes" section. SQR Processes that are generally considered reports are ideal candidates for redirection to the standby database. |
Installing and Configuring Oracle Active Data Guard
Oracle Active Data Guard needs to be licensed, installed, and enabled for your server before you can begin setting up your PeopleSoft system to take advantage of this feature. The primary and standby databases need to be set up according to the Oracle Active Data Guard documentation.
See Also
http://www.oracle.com/technology/deploy/availability/htdocs/DataGuardOverview.html
Creating the Secondary Access ID
This section discusses how to configure the secondary access ID for use with your primary and standby databases.
To configure the secondary access ID:
Run the psadmin.sql script against your primary database.
Run the script from PS_HOME\scripts.
When prompted, provide the secondary access ID and password.
Insert a row in the PSDBOWNER table for the standby database and the secondary access ID.
For example:
INSERT INTO PS.PSDBOWNER VALUES('DATABASE', 'ACCESS_ID’);
Commit;
Create an access profile to associate the secondary access ID with a new symbolic ID.
In Application Designer, select Tools, Misc Def, Access Profile, and click New.
Provide the new symbolic ID, and enter the secondary access ID and password you created using psadmin.sql.
Creating the Domain Boot User
Create or clone a PeopleSoft user ID and associate it with the secondary access ID so that the user profile will be able to start an application server domain and alternate Process Scheduler server connecting to the standby database.
To create the domain boot user:
Select PeopleTools, Security, Copy User Profiles, and enter a new user ID and password.
From the Symbolic ID dropdown list on the General tab for the user ID you just created, select the symbolic ID associated with your secondary access ID.
Open Data Mover and encrypt the new user profile’s password by running the following:
UPDATE  PSOPRDEFN SET operpswd=’<PASSWORD>’, encrypted=0
Where oprid=’<USER_ID>’;
ENCRYPT_PASSWORD *;
Configuring Domains
The domains connecting to your primary database must also be configured to connect to your standby database. This is accomplished by specifying the standby connection credentials in the Startup section of the domain configuration for both the application server and Process Scheduler domains.
For example:
Values for config section - Startup
    DBName=PRIMARY
    DBType=ORACLE
    UserId=QEDMO
    UserPswd=QEDMO
    ConnectId=people
    ConnectPswd=peop1e
    ServerName=
    StandbyDBName=STANDBY
    StandbyDBType=ORACLE
    StandbyUserId=PTSTNDBY
    StandbyUserPswd=PTSTNDBY
The Startup section enables you to specify signon credentials for both the primary and standby databases. The following table shows which parameters are associated with which database.
|
Database |
Parameters |
|
Primary |
DBName DBType UserId UserPswd |
|
Standby |
StandbyDBName StandbyDBType StandbyUserID StandbyUserPswd |
The Standby… parameters are used to maintain the simultaneous connection to the standby database.
Note. Typically, the primary and standby database share a common connect ID.
Configuring Read-Only Components
When Oracle Active Data Guard is enabled, the following components are supported for running against the standby database:
Query Manager: PSQUERY Viewer
Query Manager: Scheduled Query is supported, however users cannot select output type FEEDS on the Process Scheduler Request page.
Tree Manager: Tree Viewer
BI Publisher: Query Report Viewer
Pivot Grid: Pivot Grid Viewer
SES Feeds Generation
Feeds Reader
QAS for Feeds (Query as a Service)
IB for Feeds (Integration Broker)
However, you can also set other components to run against the standby database to divert selected requests from your primary database. To set a component to run in "Read-Only" mode (run against the standby database) you need to modify the component properties.
To configure a component for read-only processing:
In Application Designer, open the component.
Select View, Definition Properties.
On the Component Properties dialog box, select the Use tab.
Select the Read Only check box.
Click OK.
Note. Selecting the Read Only property should only be done after detailed analysis.
Note. It is important to understand the behavior of a mostly read only (MRO) component when it calls other components. If an MRO component is executed, then all components subsequently called by the MRO marked component will inherit the MRO attribute behavior and the SQL calls and the called components will be redirected to the standby database. Given this behavior, you need to make sure that the requests generated from the component (and called components) perform operations like selecting and displaying lists, rather than inserting, updating, or deleting rows. If there are some DML operations that the component must execute, the affected tables need to be identified, and a remote synonym needs to be created between the standby and primary databases. See the delivered PS_HOME/scripts/CREATEREMOTESYNONYMS.SQL script for example on how to create a remote synonym.
Configuring Read-Only Processes
If you have Oracle Active Data Guard configured and enabled for your PeopleSoft system, Process Scheduler processes can be set to run against the standby database to divert selected processes from your primary database.
Note. The use of Oracle Active Data Guard with PeopleSoft batch processing only applies to the following: Application Engine processes run through the Process Scheduler with PSAESRV configured and SQR processes.
Note. PeopleSoft does not deliver any SQR processes enabled by default to run against the standby database. SQR Processes that are generally considered reports are ideal candidates for standby database processing (being set to read-only).
To configure Process Scheduler processes for read-only processing:
Select PeopleTools, Process Scheduler, Processes.
Open the process definition.
On the Process Definition page, select the Read Only check box.
Click OK.
Note. Selecting the Read Only option should only be done after detailed analysis. You need to make sure that the processes perform operations like selecting data or generating reports, rather than inserting, updating, or deleting rows. If there are some DML operations that the process must make, the affected tables need to be identified, and a remote synonym needs to be created between the standby and primary databases.
Note. If an MRO marked SQR program runs and is performing DML on a table not accounted for in the Oracle Active Data Guard configuration, then that SQR process will fail. To fully enable this SQR process, the tables being written to need to have remote synonyms created between the standby and primary databases. See the delivered PS_HOME/scripts/CREATEREMOTESYNONYMS.SQL script for example on how to create a remote synonym.
Creating Synonyms and Database Links
The mechanism used in the PeopleSoft implementation of Oracle Active Data Guard for making database objects in the standby database available relies on the existence of a secondary access ID.
The secondary access ID does not own any objects, so sufficient access to and awareness of objects in the primary database must be made to the secondary access ID. To associate standby database objects with the equivalents in the primary database, the following must be established:
Local synonyms.
Remote synonyms.
Database links to the primary database.
Note. Remote synonyms and database links are required for the tables to which the standby database needs non-SELECT access.
To create the synonyms and database links, PeopleTools delivers these scripts in PS_HOME\scripts:
createlocalsynonyms.sql
createremotesynonyms.sql
createdblinktoprimary.sql
To create local synonyms you use the createlocalsynonyms.sql script. This script creates local synonyms for all PeopleSoft tables and views.
You run this script against the primary database while connected as the primary access ID.
Before running the script, edit it to include your primary access ID in place of the <SYSADM> variable
Remote synonyms are required for the tables identified as requiring DML access. If you decide to set a component to "read-only" after your analysis, then you need to include the underlying tables that require DML access to this script manually.
To create remote synonyms, you run the createremotesynonyms.sql script.
You run this script against the primary database connected as the secondary access ID.
Creating Database Links to the Primary Database
To create database links, you run the createdblinktoprimary.sql script.
This script creates a fixed database link between the secondary access ID and the primary access ID on the primary database.
Before running this script, open it and edit it, and replace:
<DBNAME> with the primary database TNSALIAS.
<SYSADM> with the primary access ID.
<PASSWORD> with the primary access ID password.
You run this script connected to the primary database with the secondary access ID.
Implementing Oracle GoldenGate for PeopleSoft Off-Load Reporting
This section contains an overview and discusses:
Installing Oracle GoldenGate.
Configuring Oracle GoldenGate.
Configuring PeopleSoft databases for use with Oracle GoldenGate.
Configuring PeopleSoft Domains for use with Oracle GoldenGate.
Configuring read-only components.
Configuring read-only process definitions.
Creating synonyms and database links.
Understanding GoldenGate Within PeopleSoft
Oracle GoldenGate, with Oracle Database 11g, enables you to off-load resource-intensive activities from a production database to a synchronized standby database. Oracle GoldenGate enables access to a physical standby database for queries, sorting, reporting, web-based access, and so on, while continuously applying changes received from the production database. If you use Oracle GoldenGate at your site, PeopleTools provides the infrastructure to use GoldenGate with your PeopleSoft application databases.
The following diagram depicts how Oracle GoldenGate enables you to incorporate the use of a standby database for you to offload designated read-only transactions, freeing up more resources to handle the read-write transactions on your primary (production) database.
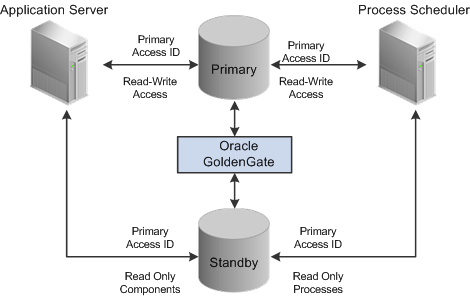
Oracle GoldenGate synchronizing data on the primary and standby databases
The following table describes the elements within the diagram:
|
Element |
Description |
|
Primary Database (source) |
Your production database, handling the read-write requests of your transactional system. For example, this database fills orders, updates employee information, adds new product offerings, and so on. |
|
Standby Database (target) |
Your clone of the primary database designed to handle read-only, or mostly-read-only (MRO), requests so that those transactions can be off-loaded from your primary database, conserving resources on the production system. Examples of MRO requests include, PSQUERY Viewer, Tree Viewer, components that only submit SELECT SQL to display lists of employees, products, and so on. |
|
Oracle GoldenGate |
Synchronizes the data stored in the primary and standby databases so that they remain exact duplicates. This is achieved using a combination of Oracle GoldenGate features, DBLINKS, and Remote Synonyms defined by scripts delivered with PeopleTools. |
|
Primary Access ID |
The PeopleSoft access ID used for connecting to the primary production database as well as the standby database. Note. Only one access ID is requires, unlike Oracle Active Data Guard, where the PeopleSoft implementation requires two access IDs (a primary and a secondary access ID). |
|
Read Only components |
When PeopleSoft is configured for Oracle GoldenGate these components are enabled "out of the box" to run against the standby database:
Other components can also be enabled to run against the standby database, by setting the Read Only option in the component properties dialog box in Application Designer. To enable additional components, refer to the section "Configuring Read-Only Components." |
|
Read Only processes |
When PeopleSoft is configured for Oracle Golden Gate these Processes are enabled out of the box to run against the standby database:
Other processes can also be enabled to run against the standby database, by setting the Read Only option on the PeopleTools, Process Scheduler, Processes page. Note. The use of Oracle Golden Gate with PeopleSoft batch processing only applies to the following: Application Engine processes run through the Process Scheduler with PSAESRV configured and SQR processes. Note. PeopleSoft does not deliver any SQR processes enabled by default to run against the standby database. To enable SQR processes to run against the standby database, refer to the "Configuring Read-Only Processes" section. SQR Processes that are generally considered reports are ideal candidates for redirection to the standby database. |
Oracle GoldenGate needs to be licensed, installed, and enabled for your server before you can begin setting up your PeopleSoft system to take advantage of this feature. The primary and standby databases need to be set up according to the Oracle GoldenGate documentation.
The basic configuration for PeopleSoft and Oracle GoldenGate (OGG) consists of two databases, your Primary database and the Standby database. Characteristics of the server connections to these databases are:
|
Server |
Connection Characteristics |
|
Application Server |
|
|
Process Scheduler Server |
|
GoldenGate operates between the two databases, sits between the two databases, and manages a set of components associated with each of the databases. Depending on your implementation, one to many of these components may be in use. GoldenGate transaction replication software consists of several key components, including:
GoldenGate manager process: controls background process behavior.
GoldenGate Extract or Capture component process: extracts data from the online or archive redo log files within an Oracle database.
GoldenGate trail files: store the extracted data as part of the replication processing.
GoldenGate pump process: moves the data in the trail files from one database to the other.
GoldenGate delivery or replicate process: applies the captured data using a change data capture (CDC) process to the target database environment.
Note. For a GoldenGate environment, the secondary connection to the Standby database utilizes the same login credentials used for the Primary connection.
Note. Whether both databases reside on the same or different servers, GoldenGate binaries need to be installed twice, in two separate directories. One installation is for the Primary database, and the other is for the Standby database.
See Also
Oracle GoldenGate Documentation at http://download.oracle.com/docs/cd/E18101_01/index.htm
Installing Oracle GoldenGate for a PeopleSoft Implementation
The installation described here assumes an Oracle installation where the Primary and Standby database instances are on the same machine. If the Primary and Standby database instances are on separate machines, then many of these steps are duplicated on the database server hosting the standby database.
Before beginning the installation, make sure these items are in place:
To install on Windows, the user installing GoldenGate must log in as Administrator.
To install on UNIX, the user installing GoldenGate must have read and write privileges on the GoldenGate installation directory.
The GoldenGate processes require an operating system user that has privileges to read, write, and delete files and subdirectories in the GoldenGate directory. In addition, the user for the Manager process requires privileges to control GoldenGate processes.
The Extract process requires an operating system user that has read access to the transaction log files, both online and archived. On UNIX systems, that user must be a member of the group that owns the Oracle instance.
It is recommended that these operating system users be dedicated to GoldenGate. Sensitive information might be available to anyone running a GoldenGate process, depending on how database authentication is configured.
To install Oracle GoldenGate for a PeopleSoft Implementation:
Download the latest media from E-Delivery: https://edelivery.oracle.com/.
FTP or copy the media to database server.
Login on the database host as the ‘oracle’ user.
On your database server, create a directory that the ‘oracle’ user has read/write/execute access to, such as:
/data1/ogg
Copy the media to the directory you created.
Logged in as the ‘oracle’ user, unzip the media file.
For example:
unzip V22230-01.zip

rtdc68005spdb:$ unzip V22230-01.zip
Archive:  V22230-01.zip
  inflating: ggs_Linux_x64_ora11g_64bit_v11_1_1_0_0_078.tar
  inflating: OGG_WinUnix_Rel_Notes_11.1.1.0.0_078.pdf
  inflating: README.txt
Expand the tarball twice: once to a primary directory and once again to a standby directory.
Note. The following examples assume the primary and standby directories already exist.
The primary database will use the primary directory installation and the standby database will use the other installation. For example:
tar -xvf  <tar ball> -C primary/

tar -xvf  <tar ball> -C standby/
View the primary and standby directory to verify the install directory and object creation.
For example:
rtdc68005spdb:$ ls
ggs_Linux_x64_ora11g_64bit_v11_1_1_0_0_078.tar  primary
rtdc68005spdb:$

rtdc68005spdb:$ cd primary
rtdc68005spdb:$ ls
UserExitExamples           ddl_remove.sql                   extract
bcpfmt.tpl                 ddl_session.sql                  freeBSD.txt
bcrypt.txt                 ddl_session1.sql                 ggMessage.dat
chkpt_ora_create.sql       ddl_setup.sql                    ggsci
cobgen                     ddl_sqlmx.tpl                    help.txt
convchk                    ddl_status.sql                   keygen
db2cntl.tpl                ddl_staymetadata_off.sql         libicudata.so.38
ddl_access.tpl             ddl_staymetadata_on.sql          libicui18n.so.38
ddl_cleartrace.sql         ddl_sybase.tpl                   libicuuc.so.38
ddl_db2.tpl                ddl_tandem.tpl                   libxerces-c.so.28
ddl_db2_os390.tpl          ddl_trace_off.sql                libxml2.txt
ddl_ddl2file.sql           ddl_trace_on.sql                 logdump
ddl_disable.sql            ddl_tracelevel.sql               marker_remove.sql
ddl_enable.sql             ddlcob                           marker_setup.sql
ddl_informix.tpl           ddlgen                           marker_status.sql
ddl_mss.tpl                defgen                           mgr
ddl_mysql.tpl              demo_more_ora_create.sql         notices.txt
ddl_nopurgeRecyclebin.sql  demo_more_ora_insert.sql         params.sql
ddl_nssql.tpl              demo_ora_create.sql              replicat
ddl_ora10.sql              demo_ora_insert.sql              reverse
ddl_ora10upCommon.sql      demo_ora_lob_create.sql          role_setup.sql
ddl_ora11.sql              demo_ora_misc.sql                server
ddl_ora9.sql               demo_ora_pk_befores_create.sql   sqlldr.tpl
ddl_oracle.tpl             demo_ora_pk_befores_insert.sql   tcperrs
ddl_pin.sql                demo_ora_pk_befores_updates.sql  usrdecs.h
ddl_purgeRecyclebin.sql    emsclnt                          zlib.txt
rtdc68005spdb:$ cd ..
Creating Subdirectories for Primary and Standby GoldenGate InstallationsIn each installation directory (primary and standby) you must create these required sub directories.
|
Subdirectory |
Description |
|
dirchk |
GoldenGate checkpoint files. |
|
dirdat |
GoldenGate extract and trail files. |
|
dirdef |
Source data definitions generated by the DEFGEN utility. (Used to translate heterogeneous data.) |
|
dirpcs |
Process status files. |
|
dirout |
Directory no longer used. |
|
dirprm |
GoldenGate parameter files (run time configuration files). |
|
dirrpt |
Process report files. |
|
dirsql |
SQL files. |
|
dirtmp |
Temporary storage for transactions. |
|
dirver |
GoldenGate Veridata directory. (Only used if Veridata is also installed in this GoldenGate instance.) |
To install Oracle GoldenGate subdirectories:
Change directories to your \primary directory.
Launch the GoldenGate command line interface (GGSCI).
rtdc68005spdb:$ cd \data1\ogg\primary
rtdc68005spdb:$ ./ggsci

Oracle GoldenGate Command Interpreter for Oracle
Version 11.1.1.0.0 Build 078
Linux, x64, 64bit (optimized), Oracle 11 on Jul 28 2010 13:13:42

Copyright (C) 1995, 2010, Oracle and/or its affiliates. All rights reserved.
Use the create subdirs command to create the required subdirectories.
GGSCI (rtdc68005spdb) 1> create subdirs

Creating subdirectories under current directory /data1/ogg/primary

Parameter files                /data1/ogg/primary/dirprm: created
Report files                   /data1/ogg/primary/dirrpt: created
Checkpoint files               /data1/ogg/primary/dirchk: created
Process status files           /data1/ogg/primary/dirpcs: created
SQL script files               /data1/ogg/primary/dirsql: created
Database definitions files     /data1/ogg/primary/dirdef: created
Extract data files             /data1/ogg/primary/dirdat: created
Temporary files                /data1/ogg/primary/dirtmp: created
Veridata files                 /data1/ogg/primary/dirver: created
Veridata Lock files            /data1/ogg/primary/dirver/lock: created
Veridata Out-Of-Sync files     /data1/ogg/primary/dirver/oos: created
Veridata Out-Of-Sync XML files /data1/ogg/primary/dirver/oosxml: created
Veridata Parameter files       /data1/ogg/primary/dirver/params: created
Veridata Report files          /data1/ogg/primary/dirver/report: created
Veridata Status files          /data1/ogg/primary/dirver/status: created
Veridata Trace files           /data1/ogg/primary/dirver/trace: created
Stdout files                   /data1/ogg/primary/dirout: created
Exit the command line interface.
GGSCI (rtdc68005spdb) 2> exit
View the primary directory to verify the additional subdirectories were created.
Repeat these steps for your standby directory.
Verify for each installation that the GoldenGate manager is stopped prior to continuing with further configuration instructions.
For example:
rtdc68005spdb:$ cd \data1\ogg\primary
rtdc68005spdb:$ ./ggsci

GGSCI (rtdc68005spdb) 2> info all

Program     Status      Group       Lag           Time Since Chkpt

MANAGER     STOPPED

GGSCI (rtdc68005spdb) 3>
Configuring PeopleSoft Databases for Oracle GoldenGate
This section explains these setup steps that need to be performed on the primary and standby databases:
Creating the Oracle GoldenGate User
GoldenGate requires a separate Oracle database user that is dedicated to GoldenGate installation defined in both the Primary and Standby databases. It can be the same user for all of the GoldenGate processes that must connect to a database, such as:
Extract (source/primary database)
Replicate (target/standby database)
Manager (source/primary database, if using DDL support)
DEFGEN (source or target database)
Note. For the purposes of this document, the same GoldenGate Oracle user is defined on both databases.
Note. To preserve the security of your data, and to monitor GoldenGate processing accurately, do not permit other users, applications, or processes to log on or operate as the GoldenGate database user.
Note. Keep a record of the application database user (PeopleSoft Access ID). It is required in the GoldenGate parameter files, as in, the USERID parameter for the database.
The following table outlines the required database user privileges.
|
User Privilege |
Extract |
Replicat |
|
Create Session, Alter Session |
X |
X Note. If RESOURCE cannot be granted to Replicat, use ALTER USER <user> QUOTA {<size> | UNLIMITED} ON <tablespace>, where <tablespace> represents all tablespaces that contain target objects. |
|
Resource |
X |
X Note. Required only if Replicat owns target objects or any PL/SQL procedures. If CONNECT cannot be granted, grant CREATE <object>for any object Replicat will need to create. |
|
Connect |
X |
X |
|
Select Any Dictionary |
X |
X |
|
Flashback Any Table Or Flashback On <owner.table> |
X |
|
|
Select Any Table Or Select On <owner.table> |
X |
X |
|
Insert, Update, Delete on <target tables> |
X |
|
|
Create Table Note. Required if using ADD CHECKPOINTTABLE in GGSCI to use the database checkpoint feature. |
X |
|
|
Execute on DBMS_FLSHBACK package (4) Note. GoldenGate must make a call to DBMS_FLASHBACK.GET_SYSTEM_CHANGE_NUMBER. |
X |
You can create the Oracle GoldenGate user by creating a script similar to the following:
set echo on
spool createogguser.log
-- Create the OGG User
GRANT CONNECT, RESOURCE to OGGUSER identified by OGGUSER;
--Grant OGG required privileges
GRANT CREATE SESSION to OGGUSER;
GRANT ALTER SESSION to OGGUSER;
GRANT SELECT ANY DICTIONARY to OGGUSER;
GRANT FLASHBACK ANY TABLE to OGGUSER;
GRANT ALTER ANY TABLE to OGGUSER;
GRANT SELECT ANY TABLE to OGGUSER;
GRANT INSERT ANY TABLE to OGGUSER;
GRANT DELETE ANY TABLE to OGGUSER;
GRANT UPDATE ANY TABLE to OGGUSER;
GRANT CREATE TABLE to OGGUSER;
GRANT UNLIMITED TABLESPACE to OGGUSER;
GRANT EXECUTE on DBMS_FLASHBACK to OGGUSER;
GRANT SELECT ON dba_clusters to OGGUSER;
spool off;
To list the privileges granted to the OGG User, you can run the following script:
set echo on
set heading off
spool showogguserprivileges.log
-- Show all privileges associated with the OGG User
select
  lpad(' ', 2*level) || granted_role "USER, his roles and privileges"
from
  (
  /* THE USERS */
    select
      null     grantee,
      username granted_role
    from
      dba_users
    where
      username like upper('OGGUSER')
  /* THE ROLES TO ROLES RELATIONS */
  union
    select
      grantee,
      granted_role
    from
      dba_role_privs
  /* THE ROLES TO PRIVILEGE RELATIONS */
  union
    select
      grantee,
      privilege
    from
      dba_sys_privs
  )
start with grantee is null
connect by grantee = prior granted_role;
spool off;
When the previous script is run, you should see results similar to:
  OGGUSER
    ALTER ANY TABLE
    ALTER SESSION
    CONNECT
      CREATE SESSION
    CREATE TABLE
    DELETE ANY TABLE
    FLASHBACK ANY TABLE
    INSERT ANY TABLE
    RESOURCE
      CREATE CLUSTER
      CREATE INDEXTYPE
      CREATE OPERATOR
      CREATE PROCEDURE
      CREATE SEQUENCE
      CREATE TABLE
      CREATE TRIGGER
      CREATE TYPE
    SELECT ANY DICTIONARY
    SELECT ANY TABLE
    UNLIMITED TABLESPACE
    UPDATE ANY TABLE

22 rows selected.
Enable Archive Logging
Archive logging needs to be enabled in both the primary and standby databases.
To enable archive logging for Oracle GoldenGate, use these commands in SQLPlus:
ALTER DATABASE ARCHIVELOG;
ALTER DATABASE OPEN;
For example:
SQL> startup mount
ORACLE instance started.

Total System Global Area  805933056 bytes
Fixed Size                  2230680 bytes
Variable Size             469763688 bytes
Database Buffers          327155712 bytes
Redo Buffers                6782976 bytes
Database mounted.
SQL> ALTER DATABASE ARCHIVELOG;

Database altered.

SQL> ALTER DATABASE OPEN;

Database altered.
To view the archive logging status:
SQL>ARCHIVE LOG LIST;

SQL> ARCHIVE LOG LIST;
Database log mode              Archive Mode
Automatic archival             Enabled
Archive destination            /products/oracle/11.2.0.2.0-64bit/dbs/arch
Oldest online log sequence     201
Next log sequence to archive   203
Current log sequence           203
SQL>
Enabling Supplemental Logging
Once the Oracle Golden Gate user is created on both databases, you need to enable supplemental logging on each database. You can enable supplemental logging using the following SQL on each database while logged in as SYSDBA in SQLPlus:
SQL> ALTER DATABASE ADD SUPPLEMENTAL LOG DATA;
ALTER SYSTEM SWITCH LOGFILE;
SELECT SUPPLEMENTAL_LOG_DATA_MIN FROM V$DATABASE;
Database altered.

SQL>
System altered.

SQL>
SUPPLEME
--------
YES

SQL> exit
Generating PeopleSoft Parameter File Input
Prior to creating and editing the Oracle GoldenGate configuration files, you need to generate PeopleSoft-specific input parameters for the GoldenGate parameter files.
To generate PeopleSoft-specific GoldenGate parameter files:
Open the following SQL script in your SQL editor or text editor: PS_HOME/scripts/psggconfiggenerateparmfilelists.sql.
Modify the following variables:
Modify all occurrences of <OWNER> to reflect the access ID for the database.
Modify all occurrences of <PATH> to reflect the script output directory path (as in, /data1/PT852/scripts/ or c:\temp\).
Note. The ending slash is mandatory for the path.
Save your changes to the SQL file.
Log into SQLPlus using your PeopleSoft access ID.
Run the psggconfiggenerateparmfilelists.sql script.
Verify that these files appear in the output directory:
PSGGconfiggenerateparmfilelists.log
PSGGgeneratetableexcludes.txt
PSGGgeneratetrandatadeletes.txt
Note. You will add the output from the .txt files to the appropriate GoldenGate parameter files manually.
Creating Oracle GoldenGate Parameter Files for the Primary Database
This section describes the parameter files that you need to create and modify manually for the primary database. These files need to be created in the dirparm directory of your primary Oracle GoldenGate installation. For example, C:\OGG\primary\dirparm. The files you need to create for the primary installation are:
mgr.prm
priaddtrndata.oby
configure_primary.oby
primecap.prm
primepmp.prm
Creating mgr.prm
Create a file named mgr.prm and add the following:
--
--  mgr.prm file
--
PORT 7809
PURGEOLDEXTRACTS ./dirdat/*, USECHECKPOINTS, MINKEEPDAYS 3
Note. The port number defaults to 7809 or 7810.
Creating priaddtrndata.oby
Create a file named priaddtrndata.oby and add the following.
--
--  PRIADDTRNDATA.oby file
--
-- ################################################################################⇒
##########
-- ADD Trandata Obey file for Primary
-- This file defines the tables which we are interested in having OGG capture⇒
 changes from the Transaction logs.
-- We initially specify an add TRANDATA SYSADM.* with wildcard to capture all⇒
 tables.
-- We then direct OGG to ignore specific table trandata.  In our case all of the⇒
 PeopleSoft type ‘7’ temp tables.
-- This is done by appending the output from the PSGGgeneratetrandatadeletes.txt ⇒
(eg. just the generated
-- DELETE -- TRANDATA statements) after the ADD TRANDATA SYSADM.* statement
-- ################################################################################⇒
##########
--
-- Edit and modify 'OGGUSER' to Oracle GoldenGate Admin Userid and PW
--
-- Edit and modify 'SYSADM' to PSACCESSID
--
-- Append the output from the PSGGgeneratetrandatadeletes.txt (eg. just the⇒
 generated
-- DELETE TRANDATA       -- statements) after the ADD TRANDATA SYSADM.* statement
--
-- ################################################################################⇒
##########
DBLOGIN USERID OGGUSER PASSWORD OGGUSER

ADD TRANDATA SYSADM.*

-- ################################################################################⇒
##########
-- This section lists the generated DELETE TRANDATA  statements
-- ################################################################################⇒
##########

<Copy in the generated DELETE TRANDATA statements after the preceding ADD⇒
 TRANDDATA statement.>

-- Example:
-- DELETE TRANDATA SYSADM.PS_AR_CMANRT_TAO3
-- DELETE TRANDATA SYSADM.PS_AR_CMANRT_TAO4
-- DELETE TRANDATA SYSADM.PS_AR_CMANRT_TAO5
-- <more>


-- ################################################################################⇒
##########
-- This section lists the required static DELETE TRANDATA statements
-- ################################################################################⇒
##########

DELETE TRANDATA SYSADM.PSLOCK
DELETE TRANDATA SYSADM.PS_SERVERMONITOR
DELETE TRANDATA SYSADM.PS_SERVERACTVTY
DELETE TRANDATA SYSADM.PS_PRCSSEQUENCE
DELETE TRANDATA SYSADM.PS_MESSAGE_LOGPARM
DELETE TRANDATA SYSADM.PS_MESSAGE_LOG
DELETE TRANDATA SYSADM.PS_AETEMPTBLMGR
DELETE TRANDATA SYSADM.PS_AERUNCONTROLPC
DELETE TRANDATA SYSADM.PS_AERUNCONTROL
DELETE TRANDATA SYSADM.PS_AELOCKMGR
DELETE TRANDATA SYSADM.PSWEBPROFHIST
DELETE TRANDATA SYSADM.PSSERVERSTAT
DELETE TRANDATA SYSADM.PSQRYTRANS
DELETE TRANDATA SYSADM.PSPRCSJOBSTATUS
DELETE TRANDATA SYSADM.PSOPRDEFN
DELETE TRANDATA SYSADM.PSIBSUBSLAVE
DELETE TRANDATA SYSADM.PSIBPUBSLAVE
DELETE TRANDATA SYSADM.PSIBFOLOCK
DELETE TRANDATA SYSADM.PSIBFAILOVER
DELETE TRANDATA SYSADM.PSIBBRKSLAVE
DELETE TRANDATA SYSADM.PSACCESSLOG
DELETE TRANDATA SYSADM.PS_PTFP_ACCESS_LOG
DELETE TRANDATA SYSADM.PS_PTFP_OPTIONS
DELETE TRANDATA SYSADM.PSIBPROFILESYNC
DELETE TRANDATA SYSADM.PSIBLOGHDR
DELETE TRANDATA SYSADM.PSIBLOGERR
DELETE TRANDATA SYSADM.PSIBLOGERRP
DELETE TRANDATA SYSADM.PSIBLOGDATA
DELETE TRANDATA SYSADM.PSIBLOGIBINFO
DELETE TRANDATA SYSADM.PSQASRUN
DELETE TRANDATA SYSADM.PSPRCSRQST
DELETE TRANDATA SYSADM.PSPRCSQUE
DELETE TRANDATA SYSADM.PSPRCSRQSTFILE
DELETE TRANDATA SYSADM.PSPRCSPARMS
DELETE TRANDATA SYSADM.PSPRCSRQSTTEXT
DELETE TRANDATA SYSADM.PSPRCSRQSTTEXT2
DELETE TRANDATA SYSADM.PS_CDM_LIST
DELETE TRANDATA SYSADM.PS_CDM_TRANSFER
DELETE TRANDATA SYSADM.PS_CDM_AUTH
DELETE TRANDATA SYSADM.PS_BAT_TIMINGS_LOG
DELETE TRANDATA SYSADM.PS_BAT_TIMINGS_DTL
DELETE TRANDATA SYSADM.PS_AE_TIMINGS_LG
DELETE TRANDATA SYSADM.PS_AE_TIMINGS_DT
DELETE TRANDATA SYSADM.PS_BAT_TIMINGS_FN
DELETE TRANDATA SYSADM.PSQRYFAVORITES
DELETE TRANDATA SYSADM.PSQRYSTATS
DELETE TRANDATA SYSADM.PSFILE_ATTDET
DELETE TRANDATA SYSADM.PSPTFILE_REF
DELETE TRANDATA SYSADM.PSPTFILE_WART
DELETE TRANDATA SYSADM.PS_PTSF_SCHED_STAT
DELETE TRANDATA SYSADM.PSPGVIEWOPT
DELETE TRANDATA SYSADM.PSPGCHARTOPT
DELETE TRANDATA SYSADM.PSPGGRIDOPT
DELETE TRANDATA SYSADM.PSPGQRYPROMPT
DELETE TRANDATA SYSADM.PSPGCHARTOPTLNG
DELETE TRANDATA SYSADM.PSPGVIEWOPTLANG
DELETE TRANDATA SYSADM.PSPTFILE_PRCS
Creating configure_primary.oby
Create a file named configure_primary.oby and add the following:
-- ################################################################################⇒
##########
--
-- Edit and modify local and remote Trail Directory
--
-- ################################################################################⇒
##########
add extract primecap, tranlog, begin now
add exttrail ./dirdat/pt, extract primecap
add extract primepmp, exttrailsource ./dirdat/pt
add rmttrail ./dirdat/pr, extract primepmp
Creating primecap.prm
Create a file named primecap.prm and add the following:
-- ################################################################################⇒
##########
-- Edit and modify NLS_LANG parameter as required (eg. language.territory.character⇒
)
-- Edit and modify ORACLE_HOME
-- Edit and modify Primary ORACLE_SID
--
-- Edit and modify 'OGGUSER' to Oracle GoldenGate Admin Userid and PW
--
-- Edit and modify 'SYSADM' to PSACCESSID
--
-- Copy the output from the PSGGgeneratetableexcludes.txt (eg. just the generated⇒
 TABLEEXCLUDE
-- statements) between the WILDCARDRESOLVE DYNAMIC statement and before the TABLE⇒
 SYSADM.*
-- statement
--
-- ################################################################################⇒
##########
EXTRACT primecap

SETENV (NLS_LANG = "AMERICAN_AMERICA.AL32UTF8")
SETENV (ORACLE_HOME = "/products/oracle/11.2.0.2.0-64bit")
SETENV (ORACLE_SID = pg112064")

USERID OGGUSER PASSWORD OGGUSER

DISCARDFILE ./dirrpt/primecap.dsc, purge

EXTTRAIL ./dirdat/pt

WILDCARDRESOLVE DYNAMIC

-- ################################################################################⇒
##########
-- This section lists the generated TABLEEXCLUDE statements
-- ################################################################################⇒
##########

-- <Copy in the generated TABLEEXCLUDE statements after the preceding⇒
 WILDCARDRESOLVE DYNAMIC
-- statement.>

-- Example:

-- TABLEEXCLUDE SYSADM.PS_AR_CMANRT_TAO3;
-- TABLEEXCLUDE SYSADM.PS_AR_CMANRT_TAO4;
-- TABLEEXCLUDE SYSADM.PS_AR_CMANRT_TAO5;
-- TABLEEXCLUDE SYSADM.PS_AR_CMANRT_TAO6;
-- TABLEEXCLUDE SYSADM.PS_AR_CMANRT_TAO7;
-- TABLEEXCLUDE SYSADM.PS_AR_CMCOLPRC_I;
-- TABLEEXCLUDE SYSADM.PS_AR_CMCOLPRC_I1;


-- ################################################################################⇒
##########
-- This section lists the required static TABLEEXCLUDE statements
-- ################################################################################⇒
##########


TABLEEXCLUDE SYSADM.PSLOCK;
TABLEEXCLUDE SYSADM.PS_SERVERMONITOR;
TABLEEXCLUDE SYSADM.PS_SERVERACTVTY;
TABLEEXCLUDE SYSADM.PS_PRCSSEQUENCE;
TABLEEXCLUDE SYSADM.PS_MESSAGE_LOGPARM;
TABLEEXCLUDE SYSADM.PS_MESSAGE_LOG;
TABLEEXCLUDE SYSADM.PS_AETEMPTBLMGR;
TABLEEXCLUDE SYSADM.PS_AERUNCONTROLPC;
TABLEEXCLUDE SYSADM.PS_AERUNCONTROL;
TABLEEXCLUDE SYSADM.PS_AELOCKMGR;
TABLEEXCLUDE SYSADM.PSWEBPROFHIST;
TABLEEXCLUDE SYSADM.PSSERVERSTAT;
TABLEEXCLUDE SYSADM.PSQRYTRANS;
TABLEEXCLUDE SYSADM.PSPRCSJOBSTATUS;
TABLEEXCLUDE SYSADM.PSOPRDEFN;
TABLEEXCLUDE SYSADM.PSIBSUBSLAVE;
TABLEEXCLUDE SYSADM.PSIBPUBSLAVE;
TABLEEXCLUDE SYSADM.PSIBFOLOCK;
TABLEEXCLUDE SYSADM.PSIBFAILOVER;
TABLEEXCLUDE SYSADM.PSIBBRKSLAVE;
TABLEEXCLUDE SYSADM.PSACCESSLOG;
TABLEEXCLUDE SYSADM.PS_PTFP_ACCESS_LOG;
TABLEEXCLUDE SYSADM.PS_PTFP_OPTIONS;
TABLEEXCLUDE SYSADM.PSIBPROFILESYNC;
TABLEEXCLUDE SYSADM.PSIBLOGHDR;
TABLEEXCLUDE SYSADM.PSIBLOGERR;
TABLEEXCLUDE SYSADM.PSIBLOGERRP;
TABLEEXCLUDE SYSADM.PSIBLOGDATA;
TABLEEXCLUDE SYSADM.PSIBLOGIBINFO;
TABLEEXCLUDE SYSADM.PSQASRUN;
TABLEEXCLUDE SYSADM.PSPRCSRQST;
TABLEEXCLUDE SYSADM.PSPRCSQUE;
TABLEEXCLUDE SYSADM.PSPRCSRQSTFILE;
TABLEEXCLUDE SYSADM.PSPRCSPARMS;
TABLEEXCLUDE SYSADM.PSPRCSRQSTTEXT;
TABLEEXCLUDE SYSADM.PSPRCSRQSTTEXT2;
TABLEEXCLUDE SYSADM.PS_CDM_LIST;
TABLEEXCLUDE SYSADM.PS_CDM_TRANSFER;
TABLEEXCLUDE SYSADM.PS_CDM_AUTH;
TABLEEXCLUDE SYSADM.PS_BAT_TIMINGS_LOG;
TABLEEXCLUDE SYSADM.PS_BAT_TIMINGS_DTL;
TABLEEXCLUDE SYSADM.PS_AE_TIMINGS_LG;
TABLEEXCLUDE SYSADM.PS_AE_TIMINGS_DT;
TABLEEXCLUDE SYSADM.PS_BAT_TIMINGS_FN;
TABLEEXCLUDE SYSADM.SYSADM.PSQRYFAVORITES;
TABLEEXCLUDE SYSADM.SYSADM.PSQRYSTATS;
TABLEEXCLUDE SYSADM.SYSADM.PSFILE_ATTDET;
TABLEEXCLUDE SYSADM.SYSADM.PSPTFILE_REF;
TABLEEXCLUDE SYSADM.SYSADM.PSPTFILE_WART;
TABLEEXCLUDE SYSADM.PS_PTSF_SCHED_STAT;
TABLEEXCLUDE SYSADM.PSPGVIEWOPT;
TABLEEXCLUDE SYSADM.PSPGCHARTOPT;
TABLEEXCLUDE SYSADM.PSPGGRIDOPT;
TABLEEXCLUDE SYSADM.PSPGQRYPROMPT;
TABLEEXCLUDE SYSADM.PSPGCHARTOPTLNG;
TABLEEXCLUDE SYSADM.PSPGVIEWOPTLANG;
TABLEEXCLUDE SYSADM.PSPTFILE_PRCS;

TABLE SYSADM.*;
Creating primepmp.prm
Create a file named primepmp.prm and add the following:
-- ################################################################################⇒
##########
-- Pump for Extract primecap
--
-- Edit and modify REMOTE Host, Port and Trail Directory
-- Edit and modify 'SYSADM' to PSACCESSID
-- ################################################################################⇒
##########
EXTRACT primepmp

PASSTHRU
PASSTHRUMESSAGES

-- Remote Host and Trail Information
RMTHOST rtdc68005spdb.us.oracle.com MGRPORT 7810
RMTTRAIL ./dirdat/pr

-- Table Mapping Parameters
WILDCARDRESOLVE DYNAMIC

TABLE SYSADM.*;
Creating Oracle GoldenGate Parameter Files for the Standby Database
This section describes the parameter files that you need to create and modify manually for the standby database. These files need to be created in the dirparm directory of your standby Oracle GoldenGate installation. For example, C:\OGG\standby\dirparm. The files you need to create for the standby installation are:
mgr.prm
configure_standby.oby
trgtrep.prm
Creating mgr.prm
Create a file named mgr.prm, and add the following:
--
--  mgr.prm file
--
PORT 7810
PURGEOLDEXTRACTS ./dirdat/*, USECHECKPOINTS, MINKEEPDAYS 3
Note. The default GoldenGate port is 7809. When installing twice on the same host, 7810 is the other default port.
Creating configure_standby.oby
Create a file named configure_standby.oby, and add the following”
-- ################################################################################⇒
##########
-- Edit and modify 'OGGUSER' to Oracle GoldenGate Admin Userid and PW
-- Edit and modify REMOTE Host and Trail
-- ################################################################################⇒
##########
add extract trgtcap, tranlog, begin now
add exttrail ./dirdat/tt, extract trgtcap
add extract trgtpmp, exttrailsource ./dirdat/tt
add rmttrail ./dirdat/tr, extract trgtpmp
dblogin, userid OGGUSER, password OGGUSER
add checkpointtable OGGUSER.GGSCHKPT
add replicat trgtrep, exttrail ./dirdat/pr, checkpointtable OGGUSER.GGSCHKPT
Creating trgtrep.prm
Create a file named trgtrep.prm, and add the following:
-- ################################################################################⇒
##########
-- Edit and modify NLS_LANG parameter as required (eg. language.territory.character⇒
)
-- Edit and modify ORACLE_HOME
-- Edit and modify Primary ORACLE_SID
-- Edit and modify 'OGGUSER' to Oracle GoldenGate Admin Userid and PW
-- Edit and modify 'SYSADM' to PSACCESSID
-- ################################################################################⇒
##########
REPLICAT trgtrep

SETENV (NLS_LANG = "AMERICAN_AMERICA.AL32UTF8")
SETENV (ORACLE_HOME = "/products/oracle/11.2.0.2.0-64bit")
SETENV (ORACLE_SID = "sg112064")

USERID OGGUSER PASSWORD OGGUSER

ASSUMETARGETDEFS
DISCARDFILE ./dirrpt/trgtrep.dsc, APPEND

DISCARDROLLOVER ON SUNDAY

MAP SYSADM.*, TARGET SYSADM.*;
Creating Database Links and Remote Synonyms
This section contains an overview and discusses:
creating database links
creating remote synonyms.
Understanding Remote Synonyms with DBLINKS for PeopleSoft and GoldenGate
The default GoldenGate configuration is all changes that occur on the Primary get replicated to the Standby. For the PeopleSoft reporting infrastructure to run correctly we would also need to synchronize the following tables back to the Primary from the Standby should any update be made to the following tables:
SYSADM.PSPRCSLOCK;
SYSADM.PS_CDM_TRNFR_RJCT;
SYSADM.PS_PRCSSYSTEM;
SYSADM.PSLOCK;
SYSADM.PS_SERVERMONITOR;
SYSADM.PS_SERVERACTVTY;
SYSADM.PS_PRCSSEQUENCE;
SYSADM.PS_MESSAGE_LOGPARM;
SYSADM.PS_MESSAGE_LOG;
SYSADM.PS_AETEMPTBLMGR;
SYSADM.PS_AERUNCONTROLPC;
SYSADM.PS_AERUNCONTROL;
SYSADM.PS_AELOCKMGR;
SYSADM.PSWEBPROFHIST;
SYSADM.PSSERVERSTAT;
SYSADM.PSQRYTRANS;
SYSADM.PSPRCSJOBSTATUS;
SYSADM.PSOPRDEFN;
SYSADM.PSIBSUBSLAVE;
SYSADM.PSIBPUBSLAVE;
SYSADM.PSIBFOLOCK;
SYSADM.PSIBFAILOVER;
SYSADM.PSIBBRKSLAVE;
SYSADM.PSFILE_ATTDET;
SYSADM.PSACCESSLOG;
SYSADM.PS_PTFP_ACCESS_LOG;
SYSADM.PS_PTFP_OPTIONS;
SYSADM.PSIBPROFILESYNC;
SYSADM.PSIBLOGHDR;
SYSADM.PSIBLOGERR;
SYSADM.PSIBLOGERRP;
SYSADM.PSIBLOGDATA;
SYSADM.PSIBLOGIBINFO;
SYSADM.PSQASRUN;
SYSADM.PSPRCSRQST;
SYSADM.PSPRCSQUE;
SYSADM.PSPRCSRQSTFILE;
SYSADM.PSPRCSPARMS;
SYSADM.PSPRCSRQSTTEXT;
SYSADM.PSPRCSRQSTTEXT2;
SYSADM.PS_CDM_LIST;
SYSADM.PS_CDM_TRANSFER;
SYSADM.PS_CDM_AUTH;
SYSADM.PS_BAT_TIMINGS_LOG;
SYSADM.PS_BAT_TIMINGS_DTL;
SYSADM.PS_AE_TIMINGS_LG;
SYSADM.PS_AE_TIMINGS_DT;
SYSADM.PS_BAT_TIMINGS_FN;
SYSADM.PSQRYFAVORITES;
SYSADM.PSQRYSTATS;
SYSADM.PSUSERPRSNLOPTN;
SYSADM.PSVERSION;
SYSADM.PSFILE_ATTDET;
SYSADM.PSPTFILE_REF;
SYSADM.PSPTFILE_WART;
SYSADM.PS_PTSF_SCHED_STAT;
SYSADM.PSPGVIEWOPT
SYSADM.PSPGCHARTOPT
SYSADM.PSPGGRIDOPT
SYSADM.PSPGQRYPROMPT
SYSADM.PSPGCHARTOPTLNG
SYSADM.PSPGVIEWOPTLANG
SYSADM.PSPTFILE_PRCS
SYSADM.PS_NVS_REPORT
SYSADM.PS_NTNVSQRYPROMPTS
SYSADM.PSPRCSRUNCNTLS
SYSADM.PS_PRCSRUNCNTLDTL
SYSADM.PS_QUERY_RUN_CNTRL
SYSADM.PS_PRCSRUNCNTLDIST
SYSADM.PS_PRCSRUNCNTLEOPT
SYSADM.PS_PRCSRUNCNTLOUT
SYSADM.PS_QUERY_RUN_PARM
SYSADM.PS_QRY_RUN_TREEPRM
Normally in a GoldenGate configuration you use GoldenGate to replicate changes made on these tables from the standby to the primary database. PeopleSoft cannot take advantage of GoldenGate's bi-directional replication mechanism due to possible issues in the PeopleSoft reporting infrastructure in an environment where both databases are active at all times. The PeopleSoft reporting infrastructure (Process Scheduler, PSAESRV, PSPRCSRV, DISTSRV, and so on) will not accommodate database synchronization lag time with sequence numbers and instance numbers. To address this issue when using GoldenGate, PeopleSoft needs to utilize Remote Synonyms and Database Links to redirect all DML requested on the standby database to the primary database for a subset of the tables that make up the PeopleSoft reporting infrastructure.
Creating Database Links to the Primary Database
To create database links to the primary database:
Drop ‘Like’ named redirected tables in the standby database.
Prior to creating the database links and the remote synonyms, you need to drop ‘like’ named redirected tables on the standby database by running the following script.
PS_HOME/scripts/dropredirectedtables.sql
Run this script against the standby database connected as the primary access ID in SQLPlus.
Edit the createdblinktoprimary.sql script.
This script creates a fixed database link between the primary access ID on the standby database to the primary access ID on the primary database. Open the createdblinktoprimary.sql script in PS_HOME\scripts, and modify it as follows:
Replace <DBNAME> with the primary database TNSALIAS.
<SYSADM> with the primary access ID.
<PASSWORD> with the primary access ID password.
Run the createdblinktoprimary.sql script.
Run this script against the standby database connected as the primary access ID.
Creating Remote Synonyms
Remote synonyms are required for the tables identified as requiring DML access. If you decide to set a component to "read-only" after your analysis, then you need to include the underlying tables that require DML access to this script manually.
To create remote synonyms, you run the PS_HOME/scripts/createremotesynonyms.sql script. You must run this script against the standby database connected as the primary access ID.
Configuring Oracle GoldenGate for PeopleSoft
This section describes:
Configuring the primary and standby databases.
Starting the GoldenGate processes.
Configuring the Primary and Standby Databases
When working with each database, ensure that the ORACLE_HOME and ORACLE_SID environment variables are set before invoking the Golden Gate command line interpreter (GGSCI). Make sure you invoke GGSCI from $OGG_HOME or add $OGG_HOME to the $PATH environment variable.
To configure the primary and standby databases:
Add supplemental log groups to the primary database.
GGSCI > obey ./priaddtrndata.
Configure the GoldenGate processes on the primary database.
GGSCI > obey ./configure_primary.oby
Configure the GoldenGate processes on the standby database.
GGSCI > obey ./configure_standby.oby
Starting the GoldenGate Processes on the Primary and Standby Datbases
To start the GoldenGate processes on the primary and standby databases:
Issue the following commands on the primary database server to start the GoldenGate processes:
GGSCI > start manager
GGSCI> start primecap
GGSCI > info all
Issue the following commands on the standby database server to start the GoldenGate processes:
GGSCI > start manager
GGSCI > info all
Issue the following command on the primary database server to start the GoldenGate pump processes.
GGSCI> start primepmp
GGSCI> info all
Issue the following command on the standby database server to start the GoldenGate repository processes.
GGSCI> start trgtrep
GGSCI> info all
Configuring PeopleSoft to Work with Golden GateTo set up your PeopleSoft system to recognize both the primary and standby databases, as well to recognize the components and processes that will use the GoldenGate implementation, you need to:
Specify the standby database information in the application server and Process Scheduler configuration files.
Configure read-only components.
Configure read-only processes.
The procedures for performing these tasks are identical to those for setting up Oracle ADG.
Note. Its important to understand the inherited behavior for marking a component as MRO. If an initial component is marked as MRO and this component calls other components, the called components will inherit the MRO flag. That is, not only will the initial components SQL be redirected to the STANDBY database, all the SQL from the called components will also be redirected to the STANDBY database. Oracle has accounted for tables that may be involved with DML SQL operations from the supported components and processes listed at the beginning of this section by including those tables in the CREATEREMOTESYNONYM.SQL script. If additional components are marked MRO and perform DML SQL operations on any tables not previously accounted for, then REMOTE SYNONYMS must be created for those tables as well.
See Also
Configuring Read-Only Components
Configuring Read-Only Processes
Setting Up the PeopleSoft Installation with Oracle RAC
This section contains an overview and discusses:
Setting up prerequisites.
Creating the database.
Creating Raw Devices.
Editing the CREATEDB10.SQL Script.
Editing the UTLSPACE.SQL Script.
Editing the XXDDL Script.
Configuring Database Security.
Configuring the Tnsnames and Listener Files.
Configuring the Application Server.
Understanding the PeopleSoft Installation on Oracle RACAn Oracle RAC configuration is a multi-Oracle instance environment that uses cluster software to communicate between different Oracle instances and cluster members.
You must use the manual database creation procedure, described in the PeopleTools installation guide if you are installing on an Oracle RAC database. The manual procedure gives you the ability to specify multiple mounting points for raw devices, edit database setup scripts, and edit Data Mover scripts.
See PeopleTools 8.52 Installation for Oracle: "Creating a Database Manually on UNIX"
See PeopleTools 8.52 Installation for Oracle: "Creating a Database Manually on Windows"
Setting Up PrerequisitesTo use the Oracle RAC system with PeopleTools, the cluster environment must support the cluster file system. Before beginning the implementation, verify that your system satisfies the following requirements:
Oracle data files and control files must be raw devices unless a cluster file system is supported by the cluster software.
Each data file or control file is a single raw device that must be shareable to all cluster members.
You must have installed Operating System Cluster Software.
You must have installed the RAC version of the Oracle database.
You must modify certain operating system parameters.
See Oracle® Real Application Clusters Installation and Configuration Guidefor your Oracle version.
Creating the DatabaseUse the following guidelines in setting up the Oracle RAC database:
Follow the instructions in the PeopleTools installation guide for creating a database manually on either UNIX or Windows.
Edit the following scripts as per the instructions in the manual database creation instructions:
CREATEDB10.SQL
NN represents your Oracle database version.
UTLSPACE.SQL
XXDDL.SQL
XX is a two-letter code for the PeopleSoft application.
Create an ORACLE_SID for each Oracle instance.
Each Oracle instance must have its own ORACLE_SID and its own Oracle initialization file. Within each specific Oracle initialization file, you must define the thread, instance_number, instance_thread, undo tablespaces, the name of a common initialization file, and service name. Within the common initialization file, you must specify the control files and the value cluster_database=true.
Creating Raw DevicesYou must create raw volumes for each tablespace and control file which the database uses unless a cluster file system is supported by the cluster software. The following list is an example of raw devices and sizes used in the XXDDL.SQL script.
|
Raw Devices Function |
Example Names |
Sizes (MB) |
|
Oracle Instance required: |
None |
NA |
|
Control file 1 |
None |
NA |
|
Control file 2 |
None |
NA |
|
System |
/dev/vg_rac/rlv_system |
350 |
|
Sysaux |
/dev/did/rdsk/rlv_sysaux |
500 |
|
Log 1 |
/dev/did/rdsk/rlv_log1 |
190 |
|
Log 2 |
/dev/did/rdsk/rlv_log2 |
190 |
|
Log 3 |
/dev/did/rdsk/rlv_log3 |
190 |
|
Log 4 |
/dev/did/rdsk/rlv_log4 |
190 |
|
Undo 1 |
/dev/did/rdsk/rlv_psundo1 |
300 |
|
Undo 2 |
/dev/did/rdsk/rlv_psundo2 |
300 |
|
Temp |
/dev/did/rdsk/rlv_pstemp |
100 |
|
Default |
/dev/did/rdsk/rlv_psdefault |
250 |
Editing the CREATEDB10.SQL ScriptYou must edit the CREATEDB10.SQL script to so that the database has:
sufficient maxinstances.
sufficient maxlogfiles.
different logfiles for each Oracle instance.
a different thread for each Oracle instance.
Example: Original CREATDB10.SQL
The following is an unmodified CREATEDB10.SQL file.
create database   <SID>
    maxdatafiles  1021
    maxinstances  1
    maxlogfiles   8
    maxlogmembers 4
    CHARACTER SET WE8ISO8859P15
    NATIONAL CHARACTER SET AL32UTF8
0240K MAXSIZE UNLIMITED<SID>/system01.dbf' SIZE 2000M REUSE AUTOEXTEND ON NEXT⇒
 1EXTENT MANAGEMENT LOCAL
SYSAUX DATAFILE '/u01/oradata/<SID>/sysaux01.dbf' SIZE 120M REUSE AUTOEXTEND ON
NEXT  10240K MAXSIZE UNLIMITED
DEFAULT TEMPORARY TABLESPACE TEMP TEMPFILE '/u01/oradata/<SID>/temp01.dbf' SIZE
20M REUSE AUTOEXTEND ON NEXT  640K MAXSIZE UNLIMITED
M REUSE AUTOEXTEND ON NEXT  5120K MAXSIZE UNLIMITEDSID>/psundots01.dbf' SIZE 300
LOGFILE GROUP 1 ('/u01/oradata/<SID>/redo01.log') SIZE 100M,
        GROUP 2 ('/u01/oradata/<SID>/redo02.log') SIZE 100M,
        GROUP 3 ('/u01/oradata/<SID>/redo03.log') SIZE 100M;
Example: CREATEDB10.SQL Modified for RAC
The following is an example of a CREATEDB10.SQL used for setting up Oracle RAC.
create database   RAC
   		 maxdatafiles  1021
    		maxinstances  2
   		 maxlogfiles   8
    		maxlogmembers 4
    		character set WE8ISO8859P15
   	 datafile
       		 '/dev/did/rdsk/rlv_system'      size 350M
SYSAUX DATAFILE '/dev/did/rdsk/rlv_sysaux' SIZE 500M
UNDO TABLESPACE PSUNDO1 DATAFILE '/dev/did/rdsk/rlv_psundo1' SIZE 300M
maxinstances  2
	    logfile
       		 '/dev/did/rdsk/rlv_log1'         size 190M,
       		 '/dev/did/rdsk/rlv_log2'         size 190M;
   	 alter database add logfile thread 2
       		 '/dev/did/rdsk/rlv_log3'         size 190M,
       		 '/dev/did/rdsk/rlv_log4'         size 190M;
   	 alter database enable thread 2;
Editing the UTLSPACE.SQL ScriptEdit the UTLSPACE.SQL script to create an additional UNDO tablespace, and to specify the correct raw devices for the tablespaces. Each Oracle instance needs its own UNDO tablespace. The following examples use the names and locations given in the section Creating Raw Devices.
Modify the script to include the following statement for the second UNDO tablespace:
CREATE UNDO TABLESPACE PSUNDO2
DATAFILE              '/dev/did/rdsk/rlv_psundo2'
REUSE AUTOEXTEND ON NEXT 5120K MAXSIZE UNLIMITED
;
Modify the script to specify raw devices. This example is for the PSTEMP tablespace:
REM * Create a temporary tablespace for database users.
REM *
CREATE TEMPORARY TABLESPACE PSTEMP
TEMPFILE              '/dev/did/rdsk/rlv_pstemp'           SIZE 300M
EXTENT MANAGEMENT LOCAL UNIFORM SIZE 128K
;
Editing the XXDDL ScriptEdit the XXDDL.SQL script (xx is a two-letter code for your product line) to reflect the correct tablespace naming and tablespace sizing if you are using raw devices. For example, to specify the size of the PSIMAGE tablespace:
CREATE TABLESPACE PSIMAGE DATAFILE '/dev/did/rdsk/rlv_psimage' SIZE 100M EXTENT MANAGEMENT LOCAL AUTOALLOCATE
In addition, for Oracle RAC, autoextend of tablespaces is not supported if you are using raw devices. Do not uncomment the autoextend SQL statements in the xxddl.sql script.
Creating Initialization FilesEach Oracle instance must have its own ORACLE_SID and its own Oracle initialization file. For example:
Oracle initialization file for first Oracle Instance where ORACLE_SID=RAC1:
InitRAC1.ora:

  instance_name=RAC1
  instance_number=1
  thread=1
  ifile= initRAC.ora
  service_names=RAC
  undo_tablespace=PSUNDO1
Oracle initialization file for second Oracle Instance where ORACLE_SID=RAC2:
InitRAC2.ora:

  instance_name=RAC2
  instance_number=2
  thread=2
  ifile= initRAC.ora
  service_names=RAC
  undo_tablespace=PSUNDO2
The following is the common Oracle initialization file. This file contains the following parameters that must be listed in addition to the regular Oracle initialization file parameters.
initRAC.ora

  compatible = 10.1.0
  cluster_database=true
  cluster_database_instances=2
  undo_management=auto
  undo_tablespace=PSUNDO1
  control_files=/dev/did/rdsk/rlv_cnt1
  open_cursors=300
Note. Any control_files must be changed to raw devices if there is no cluster file system support.
Configuring Database SecurityThere must be an entry in ps.psdbowner for each Oracle instance. The Owner ID field must be the same for all entries and the DBNAME must be a name that PeopleSoft software uses in its connection to the Oracle database. There can be multiple entries in ps.psdbowner depending on how tnsnames.ora is set up.
Make sure the ps.psdbowner table contains entries to the multiple DBNAMES and Owner IDs. For example:
DBNAMES      Owner ID
--------     ---------
RAC1         RAC1
RAC2         RAC1
To add an entry to the ps.psdbowner table, use SQL*Plus; for example:
sqlplus>RAC1/RAC1
Insert into ps.psdbowner values ('RAC2','RAC1');
Commit;
Configuring the Tnsnames and Listener FilesAs a safeguard, the information on database security is defined in two locations. The tnsnames.ora file includes an ADDRESS_LIST containing an IP address and a unique CONNECT_DATA (SERVICE_NAME) for each cluster member. Each corresponding listener.ora file includes this unique SERVICE_NAME and the INSTANCE_NAME that is associated with it.
Example: TNSNAMES.ORA File
The following is a sample tnsnames.ora file:
rac =
  (DESCRIPTION =
   (load_balance=on)
      (ADDRESS = (PROTOCOL = TCP) (host = pt-suncluster01.peoplesoft.com) (port
= 1521))
      (ADDRESS = (PROTOCOL = TCP) (host = 192.168.225.80) (port = 1521))
   (CONNECT_DATA =
      (service_name = rac)
   )
  )


rac1 =
  (DESCRIPTION =
    (ADDRESS = (PROTOCOL = TCP) (host = pt-suncluster01.peoplesoft.com) (port =
1521))
    (ADDRESS = (PROTOCOL = TCP) (host = pt-sun29.peoplesoft.com) (port = 1521))
    (CONNECT_DATA =
      (service_name = rac)
    )
  )

rac2 =
  (DESCRIPTION =
    (ADDRESS = (PROTOCOL = TCP) (host = 192.168.225.80) (port = 1521))
    (ADDRESS = (PROTOCOL = TCP) (host = pt-sun30.peoplesoft.com) (port = 1521))
    (CONNECT_DATA =
      (service_name = rac)
    )
)
Example: TNSLISTENER.ORA File
The following is a sample listener.ora file.
SID_LIST_LISTENER_PT-SUN30 =
  (SID_LIST =
    (SID_DESC =
      (SID_NAME = PLSExtProc)
      (ORACLE_HOME = /products/oracle/10.1.0.3-64bit)
      (PROGRAM = extproc)
    )
  )

SID_LIST_LISTENER_PT-SUN29 =
  (SID_LIST =
    (SID_DESC =
      (SID_NAME = PLSExtProc)
      (ORACLE_HOME = /products/oracle/10.1.0.3-64bit)
      (PROGRAM = extproc)
    )
  )

LISTENER_PT-SUN30 =
  (DESCRIPTION_LIST =
    (DESCRIPTION =
      (ADDRESS_LIST =
        (ADDRESS = (PROTOCOL = IPC)(KEY = EXTPROC))
      )
      (ADDRESS_LIST =
        (ADDRESS = (PROTOCOL = TCP)(HOST = 192.168.225.80)(PORT = 1521))
      )
      (ADDRESS_LIST =
        (ADDRESS = (PROTOCOL = TCP)(HOST = 192.168.225.78)(PORT = 1521))
      )
    )
  )

LISTENER_PT-SUN29 =
  (DESCRIPTION_LIST =
    (DESCRIPTION =
      (ADDRESS_LIST =
        (ADDRESS = (PROTOCOL = IPC)(KEY = EXTPROC))
      )
      (ADDRESS_LIST =
        (ADDRESS = (PROTOCOL = TCP)(HOST = pt-suncluster01.peoplesoft.com)(PORT
= 1521))
      )
      (ADDRESS_LIST =
        (ADDRESS = (PROTOCOL = TCP)(HOST = 192.168.225.77)(PORT = 1521))
      )
    )
  )
To start the listener, use the following command, where <CLUSTER_MEMBER> is the name of the cluster member in the listener.ora file:
lsntrctl start <CLUSTER_MEMBER>
For example, to start the listener on the first cluster member in the example above, use the following command:
lsntrctl start LISTENER_PT-SUN29
Configuring the Server DomainsWhen configuring application server and Process Scheduler server domains, keep these items in mind:
Make sure that the PS_MACH field in the application server configuration file corresponds to the proper IP address for the cluster member. It may be using the internal connection IP address for the cluster.
The DBNAME specified in the domain configuration file must be one of the values in ps.psdbowner.
Configure additional application servers and Process Scheduler servers to point to the additional RAC instance.
Working with Oracle Fine Grained AuditingPeopleTools supports the use of Oracle Fine Grained Auditing. Oracle Fine Grained Auditing (FGA) enables you to create policies that define specific conditions that must be met in order for an audit to occur. It provides granular auditing of queries, and INSERT, UPDATE, and DELETE operations.
Using FGA creates more meaningful and focused audit trails. Rather than recording each and every access or update of a table, FGA allows you to set parameters for audits to make them more efficient. For example, you might decide to audit only under these circumstances:
Tables accessed between 6 p.m. and 6 a.m. or only on Saturday and Sunday.
An IP address from outside the corporate network is used.
A specific column has been selected or updated, perhaps with a specific value.
Note. Any policies created using FGA will be preserved after upgrading your PeopleSoft application. During an upgrade, PeopleTools will store your FGA policies and then reapply them to the newly upgraded tables. Use the Oracle FGA documentation to implement FGA on your PeopleSoft implementation.
Important! FGA policies are preserved only during upgrade. If you alter a table using Application Designer, and that table has FGA policies defined for it, you will need to reapply those policies manually.
To enable the preservation of your FGA policies during upgrades, PeopleTools provides the following scripts in PS_HOME\scripts.
|
Script |
Description |
|
preupgfgareport.sql |
Generates a report showing the current (pre-upgrade) FGA policies. |
|
preupgfgaprocess.sql |
Stores the current FGA policy in a temporary table, and creates these scripts:
|
|
postupgreport.sql |
Generates these reports:
|
|
postupgfgavalidation.sql |
Generates a report showing the differences between the pre and post-upgrade FGA policies, and drops the temporary table storing the FGA policies. |
See Also
Your PeopleTools and PeopleSoft application upgrade documentation
Oracle® Database Security Guide 11g Release 1 (11.1): "Verifying Security Access with Auditing," Auditing Specific Activities with Fine-Grained Auditing
Working with Oracle SecureFilesPeopleTools supports the use of Oracle SecureFiles. Oracle SecureFiles is a feature introduced with Oracle Database 11g and is designed to deliver high performance storage and retrieval for unstructured data files in your system. Traditionally, relational data is stored in a database while unstructured data is stored as files in the file system. Oracle SecureFiles enables you to store unstructured files in your database while maintaining performance comparable to the performance of traditional file systems, all while retaining the advantages of the Oracle database.
PeopleSoft applications generate and store a variety of unstructured data files, such as Microsoft Word, Microsoft Excel, text files, Crystal reports, SQR reports, and so on. Using Oracle SecureFiles you can apply advanced capabilities, including encryption, compression, and versioning.
To use SecureFiles the following items need to be in place:
Tablespaces need to be created with ASSM (Automatic Segment Space Management). This is the default for PeopleSoft tablespaces.
Compatibility level should be set to 11.1 or higher.
Database Initialization parameter db_securefile must be set in init.ora. For example:
ALTER SYSTEM SET db_securefile = 'ALWAYS'
Note. To use compression and encryption in LOB storage parameters you must purchase Oracle Advanced Security and Oracle Advanced Compression Packs.
PeopleTools preserves any SecureFiles storage parameters during a PeopleTools upgrade. For example:
If a table is defined as Secure File the customization would be retained.
If a table is defined as Basic File, it would be retained as a Basic File during upgrade.
Note. PeopleTools preserves any customization with respect to SecureFiles during an upgrade only. If you have made SecureFiles customizations to a table, and perform a Build for that record in Application Designer you could lose your SecureFiles changes. You can modify the build scripts to make sure underlying LOB objects are stored as secure files, as needed.
See Also
Oracle® Database SecureFiles and Large Objects Developer's Guide 11g Release:"Using Oracle SecureFiles"