 Understanding Restrictions on Method and Function Use
This chapter provides an overview of restrictions on method and function use and discusses how to:
Implement modal transfers.
Implement the multi-row insert feature.
Use the ImageReference field.
Insert rows using PeopleCode.
Use object linking and embedding (OLE) functions.
Use the Select and SelectNew methods.
Use standalone rowsets.
Use errors and warnings.
Use the RemoteCall feature.
See Also
Understanding Restrictions on Method and Function UseThis section discusses:
Think-time functions.
WinMessage and MessageBox functions.
Program execution with fields not in the data buffer.
Errors and warnings.
DoSave function.
Record class database methods.
SQL class methods and functions.
Component interface restricted functions.
SearchInit PeopleCode function restrictions.
CallAppEngine function.
ReturnToServer function.
GetPage function.
GetGrid function.
Publish method.
SyncRequest method.
 Think-Time Functions
Think-time functions suspend processing either until the user has taken some action (such as clicking a button in a message box) or until an external process has run to completion (for example, a remote process).
Avoid think-time functions in the following PeopleCode events:
SavePreChange.
Workflow.
RowSelect.
SavePostChange.
Any PeopleCode event that executes as a result of a ScrollSelect, ScrollSelectNew, RowScrollSelect, or RowScrollSelectNew function call.
Any PeopleCode event that executes as a result of a Rowset class Select or SelectNew method.
Violation of this rule can result in application failure.
The following are think-time functions:
Calls to an external DLL.
DoCancel.
DoModal and DoModalComponent.
Exec (this is think-time only when synchronous).
File attachment functions AddAttachment, DetachAttachment, MAddAttachment, and ViewAttachment.
InsertImage.
Object functions, such as CreateObject, ObjectDoMethod, ObjectSetProperty, and ObjectGetProperty (these are think-time only when the object requires user action).
Prompt.
RemoteCall.
RevalidatePassword.
WinExec (think-time only when synchronous).
WinMessage and MessageBox (depending on the style parameter).
WinMessage and MessageBox Functions
The WinMessage and MessageBox functions sometimes behave as think-time functions, depending on the value passed in the function’s style parameter, which controls, among other things, the number of buttons displayed in the message dialog box.
Note. The style parameter is ignored if the message has any severity other than Message.
Here is the syntax of both functions:
MessageBox(style, title, message_set, message_num, default_txt [, paramlist]) WinMessage(message [, style] [, title])
Note. The WinMessage function is supported for compatibility with previous releases of PeopleTools. New applications should use MessageBox instead.
If the style parameter specifies more than one button, the function behaves as a think-time function and is subject to the same restrictions as other think-time functions (that is, it should never be used from SavePreChange through SavePostChange PeopleCode, or in RowSelect).
If the style parameter specifies a single button (that is, the OK button), then the function can be called in any PeopleCode event.
Note. In the Microsoft Windows client, MessageBox dialog boxes include an Explain button to display more detailed information stored in the message catalog. The presence of the Explain button has no bearing on whether a message box behaves as a think-time function.
The style parameter is optional in WinMessage. If style is omitted, WinMessage displays OK and Cancel buttons, which causes the function to behave as a think-time function. To avoid this situation, always pass an appropriate value in the WinMessage style parameter.
The following table shows the values that can be passed in the style parameter. To calculate the value to pass, make one selection from each category in the table, then add the selections.
|
Category |
Value |
Constant |
Meaning |
|
Buttons |
0 |
%MsgStyle_OK |
The message box contains one button: OK. |
|
Buttons |
1 |
%MsgStyle_OKCancel |
The message box contains two buttons: OK and Cancel. |
|
Buttons |
2 |
%MsgStyle_AbortRetryIgnore |
The message box contains three buttons: Abort, Retry, and Ignore. |
|
Buttons |
3 |
%MsgStyle_YesNoCancel |
The message box contains three buttons: Yes, No, and Cancel. |
|
Buttons |
4 |
%MsgStyle_YesNo |
The message box contains two buttons: Yes and No. |
|
Buttons |
5 |
%MsgStyle_RetryCancel |
The message box contains two buttons: Retry and Cancel. |
Note. The following values for style can only be used in the Microsoft Windows client. They have no affect in PeopleSoft Pure Internet Architecture.
|
Category |
Value |
Constant |
Meaning |
|
Default Button |
0 |
%MsgDefault_First |
The first button is the default. |
|
Default Button |
256 |
%MsgDefault_Second |
The second button is the default. |
|
Default Button |
512 |
%MsgDefault_Third |
The third button is the default. |
|
Icon |
0 |
%MsgIcon_None |
None |
|
Icon |
16 |
%MsgIcon_Error |
A stop-sign icon appears in the message box. |
|
Icon |
32 |
%MsgIcon_Query |
A question-mark icon appears in the message box. |
|
Icon |
48 |
%MsgIcon_Warning |
An exclamation-point icon appears in the message box. |
|
Icon |
64 |
%MsgIcon_Info |
An icon consisting of a lowercase letter i in a circle appears in the message box. |
See Also
Program Execution with Fields Not in the Data Buffer
Under certain conditions, when you access a field that is not in the data buffer, a portion of your PeopleCode program is skipped. The skip occurs when:
The reference is in the Import Manager.
The reference is from the FieldDefault or FieldFormula events.
After the call to the invalid field, execution skips to the next top-level statement. Top-level statements are not nested inside other statements. The start of a PeopleCode program is a top-level statement. Nesting begins with the first conditional statement (such as While or If) or the first function call.
For example, if your code is executing in a function and inside an If … then … end-if statement, and it runs into the skip conditions, the next statement executed is the one after the End-if statement, still inside the function.
Errors and Warnings
Errors and warnings should not be used in FieldDefault, FieldFormula, RowInit, FieldChange, RowInsert, SavePreChange, WorkFlow, and SavePostChange PeopleCode events. An error or warning in these events causes a runtime error that forces cancellation of the component.
See Also
DoSave Function
DoSave can be used in the following PeopleCode events only: FieldEdit, FieldChange, or ItemSelected (for menu items in popup menus only).
See Also
Record Class Database Methods
You use the following record class methods to update the database:
Delete
Insert
Save
Update
Only use these methods in the following events (events that allow database updates):
SavePreChange
WorkFlow
SavePostChange
FieldChange
Application Engine PeopleCode action
See Also
SQL Class Methods and Functions
Use the SQL class to update the database. Use these functions and methods only in the following events (events that allow database updates):
SavePreChange
WorkFlow
SavePostChange
FieldChange
Application Engine PeopleCode action
Component Interface Restricted Functions
PeopleCode events and functions that relate exclusively to the page interface (the GUI) and online processing can’t be used by Component Interfaces. These include:
Menu PeopleCode and pop-up menus.
The ItemSelected and PrePopup PeopleCode events are not supported. In addition, the DisableMenuItem, EnableMenuItem, and HideMenuItem functions aren’t supported.
Transfers between components, including modal transfers.
The DoModal, EndModal, IsModal, Transfer, TransferPage, DoModalComponent, TransferNode, TransferPortal, and IsModalComponent functions cannot be used.
Cursor position.
SetControlValue cannot be used.
WinMessage cannot be used.
Save in the middle of a transaction.
DoSave cannot be used.
The page Activate event cannot be used.
When executed using a component interface, these functions do nothing and return a default value. In addition, using the Transfer function terminates the current PeopleCode program.
For the unsupported functions, you should put a condition around them, testing whether there’s an existing Component Interface.
If %ComponentName Then
   /* process is being called from a Component Interface */
   /* do CI specific processing */
Else
   /* do regular processing */
   .  .  .
End-if;
See Also
Programming Component Interfaces Using PeopleCode
SearchInit PeopleCode Function Restrictions
You cannot use the following functions in SearchInit PeopleCode:
DoModal and DoModalComponent.
Transfer and TransferPage.
CallAppEngine Function
Use the CallAppEngine function only in events that allow database updates, because, generally, if you are calling Application Engine, you intend to perform database updates. This category of events includes the following PeopleCode events:
SavePreChange (Page)
SavePostChange (Page)
Workflow
FieldChange
CallAppEngine cannot be used in a Application Engine PeopleCode action. If you need to access one Application Engine program from another Application Engine program, use the CallSection action.
See Also
Creating Application Engine Programs
ReturnToServer Function
The ReturnToServer function returns a value from a PeopleCode application messaging program to the publication or subscription server. You would use this in either your publication or subscription routing code, not in one of the standard Component Processor events.
See Also
GetPage Function
The GetPage function cannot be used until after the Component Processor has loaded the page. You should not use this function in an event prior to the PostBuild event.
See Also
PeopleCode and the Component Processor
GetGrid and GetAnalyticGrid Functions
PeopleSoft builds a grid one row at a time. Because the grid and AnalyticGrid classes apply to a complete grid, you cannot use either the GetGrid or GetAnalyticGrid functions in an event prior to the Activate event.
See Also
PeopleCode and the Component Processor
Publish Method
If you are using PeopleSoft Integration Broker, your sending PeopleCode should go in the SavePostChange event, for either the record or the component.
See Also
SyncRequest Method
If you are using PeopleSoft Integration Broker, your SyncRequest PeopleCode should go in the SavePostChange event, for either the record or the component.
See Also
Implementing Modal TransfersThis section provides an overview of modal transfers and discusses how to implement modal transfers.
Understanding Modal Transfers
When you use modal transfers to transfer from one component (the originating component) to another component (the modal component), the user must click the OK or Cancel buttons on the modal component before returning to the originating component.
Modal transfers provide some control over the order in which the user fills in pages, which is useful where data in the originating component can be derived from data entered by the user into the modal component.
Limit use of this feature, as it forces users to complete interaction with the modal page before returning to the main component.
Note. Modal transfers cannot be initiated from SearchInit PeopleCode.
A modal component resembles a Microsoft Windows modal dialog box. It displays three buttons: OK, Cancel, and Apply. No toolbars or windows are available while the modal component has the focus. The OK button saves changes to the modal component and returns the user to the originating component. The Apply button saves changes to the modal component without returning to the originating component. The Cancel button returns the user to the originating component without saving changes to the modal component.
Modal components are generally smaller than the page from which they are invoked. Remember that OK and Cancel buttons are added at runtime, thus increasing the size of the pages.
The originating component and the modal component share record fields in a derived/work record called a shared work record. The derived/work fields of this record provide the two components with an area in memory where they can share data. Edit boxes in both components are associated with the same derived/work field, so that changes made to this field in the originating component are reflected in the modal component, and vice versa. The following diagram illustrates this shared memory:
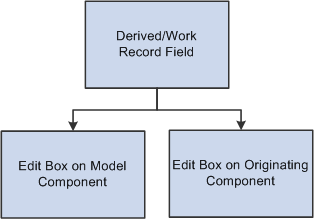
Edit boxes on the originating and modal components share the same data
Edit boxes associated with the same derived/work fields must be placed at level zero in both the originating component and the modal component.
You can use the shared fields to:
Pass values assigned to the search keys in the modal component search record.
If these fields are missing or invalid, the search page appears, enabling the user to enter search keys.
Pass other values from the originating component to the modal component.
Pass values back from the modal component to the originating component.
Implementing Modal Transfers
Any component accessible through an application menu system can be accessed using a modal transfer. However, to implement a modal transfer, you must modify pages in both the originating component and the modal component. After these modifications are complete, you can implement the modal transfer using the DoModalComponent function from a page in the originating component.
Before beginning this process, you should answer the following questions:
Should the originating component provide search key values for the modal component?
If so, what are the search keys? (Check the modal component's search record.)
Does the originating component need to pass any data to the modal component?
If so, what record fields are needed to store this data?
Does the modal component need to pass any data back to the originating component?
If so, what record fields are needed to store this data?
To implement a modal transfer:
Create derived/work record fields for sharing data between the originating and modal components.
Create a new derived/work record or open an existing derived/work record. If suitable record fields exist, you can use them; otherwise create new record fields for any data that needs to be shared between the components. These can be search keys for the modal component, data to pass to the modal component, or data to pass back to the originating component.
Add derived work fields to the level-zero area of the originating component.
Add one edit box for each of the derived/work fields that you need to share between the originating and modal components to the level-zero area of the page from which the transfer will take place. You probably want to make the edit boxes invisible.
Add the same derived work fields to the level-zero area of the modal component.
Add one edit box for each of the edit boxes that you added in the previous step to the level-zero area of the page to which you are transferring. You probably want to make the edit boxes invisible.
Add PeopleCode to pass values into the derived/work fields in the originating component.
To provide search key values or pass data to the modal page, write PeopleCode that assigns appropriate values to the derived/work fields before DoModalComponent is called.
For example, if the modal component search key is PERSONAL_DATA.EMPLID, you could place the following assignment statement in the derived/work field's RowInit event:
EMPLID = PERSONAL_DATA.EMPLID
You also might assign these values in the same program where DoModalComponent is called.
Add PeopleCode to access and change the derived/work fields in the modal component.
No PeopleCode is required to pass search key values during the search. However, if other data has been passed to the modal component, you may need PeopleCode to access and use the data. You may also need to assign new values to the shared fields so that they can be used by the originating component.
It is possible that the component was accessed through the menu system and not through a modal transfer. To write PeopleCode that runs only in the component when it is running modally, use the IsModalComponent function:
If IsModalComponent() Then
   /* PeopleCode for modal execution only.  */
End-If
Add PeopleCode to access changed derived/work fields in the originating component.
If the modal component has altered the data in the shared work fields, you can write PeopleCode to access and use the data after DoModalComponent has executed.
Note. You can use the EndModalComponent function as a programmatic implementation of the OK and Cancel buttons.
See Also
Implementing the Multi-Row Insert Feature
Enabling the multi-row insert feature in grids or scroll areas can reduce response times for transactions that usually require entering many rows of data. With the multi-row feature, users specify the number of rows to add to a grid or scroll area, and empty rows appear for data entry.
This feature cannot be used with effective-dated grids or scroll areas. In addition, the feature may not apply if the entire row is populated using PeopleCode, especially if the data is copied from prior rows. If the feature does apply in this case, the default value of the ChangeOnInit property can be used (the default value is True, which means any PeopleCode updates done in the RowInit or RowInsert events set the IsChanged and IsNew properties to True).
To use the multi-row insert feature:
Specify deferred mode processing.
The multi-row feature reduces transaction times by eliminating excess server trips. To take full advantage of this feature, the transaction should be set to execute in deferred mode. Deferred mode should be set for the component, all pages in the component, and all fields on those pages.
Enable the multi-row feature.
For each grid or scroll area where appropriate, select the Allow Multi-row Insert check box under the Use tab in the grid or scroll area property sheet.
Add ChangeOnInit PeopleCode.
Setting the ChangeOnInit property for a rowset to False enables PeopleCode to modify data in the rowset during RowInit and RowInsert events without flagging the rows as changed. This ensures that only user changes cause the affected row to be saved.
Note. Each rowset that is referenced by a grid or scroll area with the multi-row feature enabled should have the ChangeOnInit property for the rowset set to False. This includes lower-level rowsets. In addition, this property must be set prior to any RowInsert or RowInit PeopleCode for the affected row.
Empty rows at save.
After a transaction is saved, any empty rows are discarded before the page is redisplayed to the user. An empty row means that the user did not access the data because PeopleCode or record defaults may have been used to initialize the row for the initial display.
Note. PeopleCode save processing (SaveEdit and SavePreChange) PeopleCode executes for all rows in the buffer (including the empty ones). Therefore, SaveEdit and SavePreChange PeopleCode should be coded so that it is executed only if the field contains data, or if the row properties IsNew and IsChanged are both True. An alternative method is adding PeopleCode in the first save program in the component, to explicitly delete any row based on the IsNew and IsChanged properties. If you choose this method, then rows should be deleted from the bottom of the data buffer to the top (last row first).
See Also
Using the ImageReference Field
To associate an image definition with a field at runtime, the field has to be of type ImageReference. An example of this is referencing a red, yellow, or green light on a page, depending on the context.
To change the image value of an ImageReference field:
Create a field of type ImageReference.
Create the images you want to use.
These images must be saved in PeopleSoft Application Designer as image definitions.
Add the field to a record that will be accessed by the page.
Add an image control to the page and associate the image control with the ImageReference field.
Assign the field value.
Use the keyword Image to assign a value to the field. For example:
Local Record &MyRec; Global Number &MyResult; &MyRec = GetRecord(); If &MyResult Then &MyRec.MyImageField.Value = Image.THUMBSUP; Else &MyRec.MyImageField.Value = Image.THUMBSDOWN; End-If;
See Also
Inserting Rows Using PeopleCode
When inserting rows using PeopleCode, you can either use the Insert method with a record object or create a SQL Insert statement using the SQL object. If you do a single insert, use the Record Insert method. If you are in a loop and,therefore, calling the insert more than once, use the SQL object. The SQL object uses dedicated cursors and, if the database you are working with supports it, bulk insert.
A dedicated cursor means that the SQL gets compiled only once on the database, so PeopleTools looks for the meta-SQL only once. This can increase performance.
For bulk insert, inserted rows are buffered and sent to the database server only when the buffer is full or a commit occurs. This reduces the number of round-trips to the database. Again, this can increase performance.
The following is an example of using the Record Insert method:
&REC = CreateRecord(Record.GREG);
&REC.DESCR.Value = "Y" | &I;
&REC.EMPLID.Value = &I;
&REC.Insert();
The following is an example using a SQL object to insert rows:
&SQL = CreateSQL("%INSERT(:1)");
&REC = CreateRecord(Record.GREG);
&SQL.BulkMode = True;
For &I = 1 to 10
   &REC.DESCR.Value = "Y" | &I;
   &REC.EMPLID.Value = &I;
   &SQL.Execute(&REC);
End-For;
See Also
Using OLE FunctionsThis section provides an overview of OLE functions and discusses how to:
Use the Object data type.
Share a single object instance.
Use the Exec and WinExec functions.
Understanding OLE Functions
OLE automation is a Microsoft Windows protocol that enables one application to control another’s operation. The applications communicate by means of an OLE object. One of the applications (called the automation server) makes available an OLE object that the second application (the client application) can use to send commands to the server application. The OLE object has methods associated with it, each of which corresponds to an action that the server application can perform. The client runs the methods, which cause the server application to perform the specified actions.
PeopleCode includes a set of functions that enable your PeopleCode program to be an OLE client. You can connect to any application that’s registered as an OLE automation server and invoke its methods.
Note. Differences in Microsoft Windows applications from one release to the next (that is, properties becoming methods or vice versa) can cause problems with the ObjectGetProperty, ObjectSetProperty and ObjectDoMethod functions.
See the documentation for the OLE-automated application.
See Also
Using the Object Data Type
To support OLE, PeopleCode has a special data type, Object, which it uses for OLE objects. The purpose of the Object data type is to hold OLE objects during the course of a session so that you can run its methods. You cannot store Object data for any extended period of time.
Important! Object is a valid data type for variables, but not for record fields. Because OLE objects are by nature temporary, you cannot store Object data in a record field, including work record fields.
Some OLE object methods return data to the client. You can use such methods to get data from the automation server, if the method returns the data in a PeopleCode-supported data type. If the method returns data in an spreadsheet, for example, you cannot accept the data, because PeopleCode does not support spreadsheets.
Sharing a Single Object Instance
When you need the services of an OLE automation server, you create an instance of its OLE object, using the CreateObject function. After you have the object, you can run its methods as often as you like. You do not need to create a new instance of the object each time.
In a typical scenario, you have a PeopleSoft component that needs to access Microsoft Excel or Word, or some other automation server, perhaps one you have created yourself. Various PeopleCode programs associated with the component must run OLE object methods.
Rather than create a new instance of the OLE object in each PeopleCode program, you should create one instance of the OLE object in a PeopleCode program that runs when the component starts (such as RowInit) and assign it to a global variable. Then, any PeopleCode program can reference the object and invoke its methods.
Using the Exec and WinExec Functions
The WinExec and Exec built-in functions provide another way to start another application from PeopleCode. Unlike the OLE functions, however, Exec and WinExec do not enable you to control what actions the application takes after you start it. You can start the application, and if you use the synchronous option you can find out when it closes, but you cannot affect its course or receive any data in return.
WinExec is appropriate in two situations:
When you want to start an application and continue processing.
When you have a short, unvarying process that you want to run, such as copying a file.
The Exec function, unlike WinExec and the OLE functions, is not Microsoft Windows-specific. You can run it on an application server to call an executable on the application server platform, which in PeopleTools release 7 and later can be either Windows NT or UNIX.
Important! If you use the WinExec function with its synchronous option, the PeopleCode program (and the PeopleSoft application) remain paused until the called program is complete. If you start a program that waits for user input, such as Notepad, the application appears to hang until the user closes the called program. The synchronous option also imposes limits on the PeopleCode.
See Also
Using the Select and SelectNew MethodsThis section provides an overview of the Select method and discusses how to use the Select method.
Understanding the Select and SelectNew Methods
The Select and SelectNew methods, like the ScrollSelect functions, enable you to control the process of selecting data into a page scroll area. The Select method selects rows from a table or view and adds the rows to either a rowset or a row. Let’s call the record definition of the table or view that it selected from the select record. Let’s call the primary database record of the top-level rowset object executing the method the default scroll record.
The select record can be the same as the default scroll record, or it can be a different record definition that has the same key fields as the default scroll record. If you define a select record that differs from the default scroll record, you can restrict the number of fields loaded into the buffers by including only the fields you actually need.
You can use these methods only with a rowset. A rowset can be thought of as a page scroll area.
A level zero rowset starts at the top level of the page, level zero, and contains all the data in the component buffers. A child rowset is contained by an upper-level rowset, also called the parent rowset. For example, a level one rowset could be considered the child rowset of a level zero, or parent, rowset. Or a level two rowset could be the child rowset of a level one rowset. The data contained in a child rowset depends on the row of the parent rowset.
When a rowset is selected into, any autoselected child rowsets are also read. The child rowsets are read using a Where clause that filters the rows according to the Where clause used for the parent rowset, using a Subselect.
The Select method automatically places child rowsets in the rowset object executing the method under the correct parent row. If it cannot match a child rowset to a parent row, an error occurs.
The Select method also accepts an optional SQL string that can contain a Where clause restricting the number of rows selected into the scroll area. The SQL string can also contain an Order By clause, enabling you to sort the rows.
The Select and SelectNew methods generate an SQL Select statement at runtime, based on the fields in the select record and the Where clause passed to them in the function call. This gives Select and SelectNew a significant advantage over the SQLExec function: they enable you to change the structure of the select record without affecting the PeopleCode program, unless the field affected is referred to in the Where clause string. This can make the application easier to maintain.
Also, if you use one of the meta-SQL constructs or shortcuts in the Where clause, such as %KeyEqual or %List, even if a field has changed, you do not have to change your code.
Unlike the ScrollSelect functions, neither Select or SelectNew allow you to operate in turbo mode.
Note. In addition to these methods, the SelectByKey record class method enables you to select into a record object. If you’re only interested in selecting a single row of data, consider this method instead.
See Also
Using the Select Method
The syntax of the Select method is:
Select([parmlist], RECORD.selrecord [, wherestr, bindvars]);
Where paramlist is a list of child rowsets, given in the following form:
SCROLL.scrollname1 [SCROLL., scrollname2] . . .
The first scrollname must be a child rowset of the rowset object executing the method, the second scrollname must be a child of the first child, and so on.
This syntax does the following:
Specifies an optional child rowset into which to read the selected rows.
Specifies the select record from which to select rows.
Passes a string containing a SQL Where clause to restrict the selection of rows or an Order By clause to sort the rows, or both.
The first part of the Select syntax specifies a child rowset into which rows are selected. This parameter is optional.
If you do not specify any child rowsets in paramlist, Select selects from a SQL table or view specified by selrecord into the rowset object executing the method. For example, suppose you’ve instantiated a level one rowset &BUS_EXPENSES_PER. The following would select into this rowset:
Local Rowset &BUS_EXPENSES_PER;

&BUS_EXPENSES_PER = GetRowset(SCROLL.BUS_EXPSNESE_PER);
&BUS_EXPENSES_PER.Select(RECORD.BUS_EXPENSE_VW,
"WHERE SETID = :1 and CUST_ID = :2", SETID, CUST_ID);
If the rowset executing the method is a level zero rowset, and you specify the Select method without specifying any child rowsets with paramlist,, the method reads only a single row, because only one row is allowed at level zero.
Note. For developers familiar with previous releases of PeopleCode: In this situation, the Select method is acting like the RowScrollSelect function.
If you specify a child rowset in paramlist, the Select method selects from a SQL table or view specified by selrecord into the child rowset specified in paramlist, under the appropriate row of the rowset executing the method.
In the following example, rows are selected into a child rowset BUS_EXPENSE_DTL, matching level-one keys, and with the charge amount equal to or exceeding 200, sorting by that amount:
Local Record &REC_EXP;
Local Rowset &BUS_EXPENSE_PER;

&REC_EXP = GetRecord(RECORD.BUSINESS_EXPENSE_PER;
&BUS_EXPENSE_PER = GetRowset(SCROLL.BUS_EXPSNESE_PER);
&BUS_EXPENSE_PER.Select(SCROLL.BUS_EXPENSE_DTL,
RECORD.BUS_EXPENSE_DTL, "WHERE %KeyEqual(:1) AND EXPENSE_AMT
>= 200 ORDER BY EXPENSE_AMT", &REC_EXP);
The record definition of the table or view being selected from is called the select record, and identified with RECORD.selrecord.. The select record can be the same as the primary database record associated with the rowset executing the method, or it can be a different record definition that has compatible fields.
The select record must be defined in PeopleSoft Application Designer and be a built SQL table or view (using Build, Project), unless the select record is the same record as the primary database record associated with the rowset.
The select record can contain fewer fields than the primary record associated with the rowset, although it must contain any key fields to maintain dependencies with other records.
If you define a select record that differs from the primary database record for the rowset, you can restrict the number of fields that are loaded into the buffers on the client work station by including only the fields you actually need.
The Select method accepts a SQL string that can contain a Where clause restricting the number of rows selected into the object. The SQL string can also contain an Order By clause to sort the rows.
Select and SelectNew generate a SQL Select statement at runtime, based on the fields in the select record and the Where clause passed to them in the method parameters.
To avoid errors, the Where clause should explicitly select matching key fields on parent and child rows. You do this using the %KeyEqual meta-SQL.
If the rowset executing the method is a level zero rowset, and you specify Select without specifying any child rowsets with paramlist, the method reads only a single row, because only one row is allowed at level zero.
Note. For developers familiar with previous releases of PeopleCode: In this situation, the Select method is acting like the RowScrollSelect function.
If you qualify the lower-level rowset so that it only returns one row, it acts like the RowScrollSelect method.
&RSLVL1 = GetRowset(SCROLL.PHYSICAL_INV);
&RSLVL2 = &RSLVL1(&PHYSICAL_ROW).GetRowset(SCROLL.PO_RECEIVED_INV);
&REC2 = &RSLVL2.PO_RECEIVED_INV;
If &PO_ROW = 0 Then
   &RSLVL2.Select(PO_RECEIVED_INV, "WHERE %KeyEqual(:1)
and qty_available > 0", &REC2);
End-if;
See Also
Using Standalone RowsetsThis section provides an overview of standalone rowsets and discusses how to:
Use the Fill rowset method.
Use the CopyTo rowset method.
Add child rowsets.
Use standalone rowsets to write a file.
Use standalone rowsets to read a file.
Understanding Standalone Rowsets
Standalone rowsets are not associated with a component or page. Use them to work on data that is not associated with a component or page buffer.In earlier releases, this was done using derived work records. You still must build work pages.
Note. Standalone rowsets are not connected to the Component Processor, so there are no database updates when they are manipulated. Delete and insert actions on these types of rowsets are not automatically applied at save time.
As with any PeopleTools object, the scope of standalone rowsets can be Local, Global, or Component. Consider the following code:
Local Rowset &MYRS;

&MYRS = CreateRowset(RECORD.SOMEREC);
This code creates a rowset with SOMEREC as the level zero record. The rowset is unpopulated. Functionally, it is the same as an array of rows.
Using the Fill Method
The Fill method fills the rowset by reading records from the database, by first flushing out all the contents of the rowset. A Where clause must be provided to get all the relevant rows.
Local Rowset &MYRS;
Local String &EMPLID;

&MYRS = CreateRowset(RECORD.SOMEREC);
&EMPLID = '8001';

&MYRS.Fill("where EMPLID = :1", &EMPLID);
Use the Fill method with standalone rowsets, created using the CreateRowset function. Do not use Fill with component buffer rowsets.
Using the CopyTo Method
The CopyTo method copies like-named fields from a source rowset to a destination rowset. To perform the copy, it uses like-named records for matching, unless specified. It works on any rowset except the Application Engine state records. The following is an example:
Local Rowset &MYRS1, MYRS2;
Local String &EMPLID;

&MYRS1 = CreateRowset(RECORD.SOMEREC);
&MYRS2 = CreateRowset(RECORD.SOMEREC);

&EMPLID = '8001';

&MYRS1.Fill("where EMPLID = :1", &EMPLID);
&MYRS1.CopyTo(&MYRS2);
After running the previous code segment, &MYRS2 contains that same data as &MYRS1. Both &MYRS1 and &MYRS2 were built using like-named records.
To use the CopyTo method where there are no like-named records, you must specify the source and destination records. The following code copies only like-named fields:
Local Rowset &MYRS1, MYRS2;
Local String &EMPLID;

&MYRS1 = CreateRowset(RECORD.SOMEREC1);
&MYRS2 = CreateRowset(RECORD.SOMEREC2);

&EMPLID = '8001';

&MYRS1.Fill("where EMPLID = :1", &EMPLID);
&MYRS1.CopyTo(&MYRS2, RECORD.SOMEREC1, RECORD.SOMEREC2);
Adding Child Rowsets
The first parameter of the CreateRowset method determines the top-level structure. If you pass the name of the record as the first parameter, the rowset is based on a record. You can also base the structure on a different rowset. In the following example, &MYRS2 inherits the structure of &MYRS1:
Local Rowset &MYRS1, MYRS2;

&MYRS1 = CreateRowset(RECORD.SOMEREC1);
&MYRS2 = CreateRowset(&MYRS1);
To add a child rowset, suppose the following records describe a relationship. The structure is made up of three records:
PERSONAL_DATA
BUS_EXPENSE_PER
BUS_EXPENSE_DTL
To build rowsets with child rowsets, use code like the following:
Local Rowset &rsBusExp, &rsBusExpPer, &rsBusExpDtl;

&rsBusExpDtl = CreateRowset(Record.BUS_EXPENSE_DTL);
&rsBusExpPer = CreateRowset(Record.BUS_EXPENSE_PER, &rsBusExpDtl);
&rsBusExp = CreateRowset(Record.PERSONAL_DATA, &rsBusExpPer);
Another variation is
&rsBusExp = CreateRowset(Record.PERSONAL_DATA,
CreateRowset(Record.BUS_EXPENSE_PER,
CreateRowset(Record.BUS_EXPENSE_DTL)));
Using Standalone Rowsets to Write a File
The following is an example of using standalone rowsets along with a file layout to write a file:
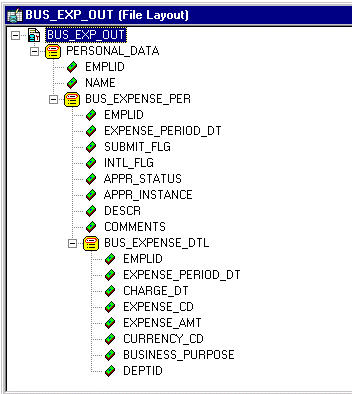
File layout example
The following example writes a file using a file layout that contains parent-child records:
Local File &MYFILE;
Local Rowset &rsBusExp, &rsBusExpPer, &rsBusExpDtl;
Local Record &rBusExp, &rBusExpPer, &rBusExpDtl;
Local SQL &SQL1, &SQL2, &SQL3;

&rBusExp = CreateRecord(Record.PERSONAL_DATA);
&rBusExpPer = CreateRecord(Record.BUS_EXPENSE_PER);
&rBusExpDtl = CreateRecord(Record.BUS_EXPENSE_DTL);

&rsBusExp = CreateRowset(Record.PERSONAL_DATA,
CreateRowset(Record.BUS_EXPENSE_PER,
CreateRowset(Record.BUS_EXPENSE_DTL)));
&rsBusExpPer = &rsBusExp.GetRow(1).GetRowset(1);

&MYFILE = GetFile("c:\temp\BUS_EXP.out", "W", %FilePath_Absolute);
&MYFILE.SetFileLayout(FileLayout.BUS_EXP_OUT);

&EMPLID = "8001";

&SQL1 = CreateSQL("%selectall(:1) where EMPLID = :2", &rBusExp, &EMPLID);
&SQL2 = CreateSQL("%selectall(:1) where EMPLID = :2", &rBusExpPer, &EMPLID);

While &SQL1.Fetch(&rBusExp)
   &rBusExp.CopyFieldsTo(&rsBusExp.GetRow(1).PERSONAL_DATA);
   &I = 1;
   While &SQL2.Fetch(&rBusExpPer)
      &rBusExpPer.CopyFieldsTo(&rsBusExpPer(&I).BUS_EXPENSE_PER);
      &J = 1;
      &SQL3 = CreateSQL("%selectall(:1) where EMPLID = :2
and EXPENSE_PERIOD_DT = :3", &rBusExpDtl, &EMPLID,
&rsBusExpPer(&I).BUS_EXPENSE_PER.EXPENSE_PERIOD_DT.Value);
      &rsBusExpDtl = &rsBusExpPer.GetRow(&I).GetRowset(1);
      While &SQL3.Fetch(&rBusExpDtl)
         &rBusExpDtl.CopyFieldsTo(&rsBusExpDtl(&J).BUS_EXPENSE_DTL);
         &rsBusExpDtl.InsertRow(&J);
         &J = &J + 1;
      End-While;

      &rsBusExpPer.InsertRow(&I);
      &I = &I + 1;
   End-While;
   &MYFILE.WriteRowset(&rsBusExp);
End-While;
&MYFILE.Close();
The previous code generates the following output file.
AA8001       Schumacher,Simon
BB8001       06/11/1989YNA0        Customer Go-Live Celebration
CC8001       06/11/1989
             06/01/198908226.83              USDEntertain Clients  ⇒
 10100
BB8001       08/31/1989YNA0        Customer Focus Group Meeting
CC8001       08/31/198908/11/1989012401.58             USDCustomer Visit     ⇒
 10100
CC8001       08/31/198908/12/198904250.48              USDCustomer Visit     ⇒
 10100
CC8001       08/31/198908/12/198902498.34              USDCustomer Visit     ⇒
 10100
BB8001       03/01/1998YYP0        Attend Asia/Pacific Conference
CC8001       03/01/199802/15/1998011200                USDConference         ⇒
 00001
CC8001       03/01/199802/16/19980220000               JPYConference         ⇒
 00001
BB8001       05/29/1998NNP0        Annual Subscription
CC8001       05/29/199805/29/199814125.93              USDSoftware, Inc.     ⇒
 10100
BB8001       08/22/1998NNP0        Regional Users Group Meeting
CC8001       08/22/199808/22/19981045.69               USDDrive to Meeting   ⇒
 10100
CC8001       08/22/199808/22/19980912.44               USDCity Parking       ⇒
 10100
BB8001       12/12/1998NNP0        Customer Visit: Nevco
CC8001       12/12/199812/02/199801945.67              USDCustomer Feedback  ⇒
 00001
CC8001       12/12/199812/02/19981010.54               USDTo Airport         ⇒
 00001
CC8001       12/12/199812/03/19980610                  USDAirport Tax        ⇒
 00001
CC8001       12/12/199812/03/199804149.58              USDCustomer Feedback  ⇒
 00001
CC8001       12/12/199812/04/1998055.65                USDCheck Voicemail    ⇒
 00001
CC8001       12/12/199812/04/19980988                  USDAirport Parking    ⇒
 00001
CC8001       12/12/199812/04/199802246.95              USDCustomer Feedback  ⇒
 00001
CC8001       12/12/199812/04/199803135.69              USDCustomer Feedback   00001
See Also
Constructing File Layouts and Performing Data Interchanges
Using Standalone Rowsets to Read a File
The following code shows an example of reading in a file and inserting the rows into the database:
Local File &MYFILE;
Local Rowset &rsBusExp, &rsBusExpPer, &rsBusExpDtl;
Local Record &rBusExp, &rBusExpPer, &rBusExpDtl;
Local SQL &SQL1;

&rBusExp = CreateRecord(Record.PERSONAL_DATA);
&rBusExpPer = CreateRecord(Record.BUS_EXPENSE_PER);
&rBusExpDtl = CreateRecord(Record.BUS_EXPENSE_DTL);

&rsBusExp = CreateRowset(Record.PERSONAL_DATA,
CreateRowset(Record.BUS_EXPENSE_PER,
CreateRowset(Record.BUS_EXPENSE_DTL)));

&MYFILE = GetFile("c:\temp\BUS_EXP.out", "R", %FilePath_Absolute);
&MYFILE.SetFileLayout(FileLayout.BUS_EXP_OUT);

&SQL1 = CreateSQL("%Insert(:1)");

&rsBusExp = &MYFILE.ReadRowset();
While &rsBusExp <> Null;
   &rsBusExp.GetRow(1).PERSONAL_DATA.CopyFieldsTo(&rBusExp);
   &rsBusExpPer = &rsBusExp.GetRow(1).GetRowset(1);
   For &I = 1 To &rsBusExpPer.ActiveRowCount
      &rsBusExpPer(&I).BUS_EXPENSE_PER.CopyFieldsTo(&rBusExpPer);
      &rBusExpPer.ExecuteEdits(%Edit_Required);
      If &rBusExpPer.IsEditError Then
         For &K = 1 To &rBusExpPer.FieldCount
            &MYFIELD = &rBusExpPer.GetField(&K);
            If &MYFIELD.EditError Then
               &MSGNUM = &MYFIELD.MessageNumber;
               &MSGSET = &MYFIELD.MessageSetNumber;
            End-If;
         End-For;
      Else
         &SQL1.Execute(&rBusExpPer);
         &rsBusExpDtl = &rsBusExpPer.GetRow(&I).GetRowset(1);
         For &J = 1 To &rsBusExpDtl.ActiveRowCount
            &rsBusExpDtl(&J).BUS_EXPENSE_DTL.CopyFieldsTo(&rBusExpDtl);
            &rBusExpDtl.ExecuteEdits(%Edit_Required);
            If &rBusExpDtl.IsEditError Then
               For &K = 1 To &rBusExpDtl.FieldCount
                  &MYFIELD = &rBusExpDtl.GetField(&K);
                  If &MYFIELD.EditError Then
                     &MSGNUM = &MYFIELD.MessageNumber;
                     &MSGSET = &MYFIELD.MessageSetNumber;
                  End-If;
               End-For;
            Else
               &SQL1.Execute(&rBusExpDtl);
            End-If;
         End-For;
      End-If;
   End-For;
   &rsBusExp = &MYFILE.ReadRowset();
End-While;
&MYFILE.Close();
Using Errors and Warnings
For the most part, errors and warnings display messages to users informing them about invalid data. For this reason, they are almost always placed in FieldEdit or SaveEdit PeopleCode, or in SearchSave PeopleCode for validation during search processing. In conjunction with edits, errors stop processing, while warnings allow processing to continue. When errors and warnings appear in places other than FieldEdit or SaveEdit, their effects vary.
This section discusses how to:
Use errors and warning syntax.
Use errors and warnings in edit events.
Use errors and warnings in RowSelect events.
Use errors and warnings in RowDelete events.
Use errors and warnings in other events.
Using Error and Warning Syntax
Errors and warnings require only a message that the Component Processor displays to users. You can code the message into the error or warning statement, or you can use the message catalog. Use the message catalog with the MsgGet, MsgGetExplainText, and similar functions.
Errors and warnings use the same syntax. For example:
Error MsgGet(11100, 180, "Message not found.");
Warning MsgGet(11100, 180, "Message not found.");
Using Errors and Warnings in Edit Events
You can use the following PeopleCode events for validation edits: FieldEdit and SaveEdit. The Component Processor applies FieldEdit when the user changes a field, and SaveEdit when the user saves a component. Errors and warnings in these events display a message. Most errors and warnings appear in these event types, although you can use errors and warnings elsewhere.
FieldEdit Event Errors
You can use either the record field or component record field event. The record field event for each record runs before the component record field event for that record.
An error in FieldEdit prevents the system from accepting the new value of a field. The Component Processor highlights the problem field. The user must either change the field back to its original value or to something else which does not trigger the error. A warning enables the Component Processor to accept the new data. The Component Processor does not highlight a field that has warnings.
SaveEdit Event Errors
You can use the record field or the component record event. All record field events for a record run before the component record events.
An error in SaveEdit prevents the system from saving any row of data. The Component Processor does not update the database for any field if one field has an error. Although the Component Processor displays an error message, it does not turn any field red. Unlike FieldEdit errors, SaveEdit errors can happen anywhere on a page or component, for any row of data. The data causing the error may appear on a different page within the same group, or a row of data not currently displayed. If this is the case, the field in error is brought into view by the system.
A warning in SaveEdit also is applied to all data in the page or component, but the Component Processor will accept the data, if told to by the user. In a FieldEdit warning, the Component Processor displays a message box with the text and two buttons: OK and the standard Explain (the Explain button returns an explanation for the last message retrieved with the MsgGet function). In a SaveEdit warning, the message box contains an additional button, Cancel. OK accepts the data, overriding the warning and continuing the save process. Cancel ends the save process.
Because errors and warnings apply to all rows of data and all pages in a group, you must provide the user explicit information about what caused the error. Typically, you use the message catalog function to store messages and substitute variables into them. However, you can also facilitate this by concatenating in a field value. For example, if you have a stack of historical data on the page, you could use the following error statement:
Error ("The value exceeds the maximum on "|effdt|".");
Using Errors and Warnings in RowSelect Events
RowSelect PeopleCode filters out rows of data after the system applies search record criteria. It also can stop the Component Processor from reading additional rows of data.
Note. Errors and warnings should no longer be used in RowSelect processing; instead, use DiscardRow and StopFetching. The behavior of errors and warnings in RowSelect PeopleCode is retained for compatibility with previous releases of PeopleTools.
A warning causes the Component Processor to reject the current row, but the Component Processor continues reading more data. An error prevents more data coming into the page or component. The Component Processor accepts the row that causes the error, but does not read any more data. To reject the current row and stop loading additional rows, issue a warning and an error.
You must specify text for an error or warning, but the Component Processor does not display messages from RowSelect. You can still use the message text as a way of documenting the program.
See Also
Accessing PeopleCode and Events
Using Errors and Warnings in RowDelete Events
When you delete a row of data, the system prompts you to confirm. If you confirm, any record field RowDelete PeopleCode runs, and any component record RowDelete PeopleCode also runs. Errors and warnings in RowDelete display a message box.
A warning from RowDelete presents two choices: accept the RowDelete (the OK button), or cancel the RowDelete (the Cancel button). An error from RowDelete PeopleCode prevents the Component Processor from removing that row of data from the page.
Using Errors and Warnings in Other Events
Do not put errors or warning in PeopleCode attached to the FieldDefault, FieldFormula, RowInit, FieldChange, RowInsert, SavePreChange, WorkFlow, and SavePostChange events. These event types activate processing that a user has no direct control over. However, the Component Processor may issue its own errors and warnings when it runs PeopleCode and encounters an unrecoverable error. The Component Processor cancels the transaction to avoid unpredictable results.
See Also
Using the RemoteCall FeatureThis section provides an overview of RemoteCall components and discusses how to:
Decide between RemoteCall and PeopleSoft Process Scheduler.
Modify PeopleSoft Process Scheduler programs to run with RemoteCall.
See Also
Understanding RemoteCall Components
RemoteCall is a PeopleTools feature that enables executing a COBOL program remotely from within a PeopleSoft application. Remote calls are made using the RemoteCall PeopleCode function.
Because all PeopleCode runs on the application server, the RemoteCall PeopleCode function has more limited utility. However, RemoteCall can enable you to take advantage of existing COBOL processes.
In the application server configuration file, you can specify where the COBOL executables are located.
See Remote Call Options.
The RemoteCall function is a synchronous call. The PeopleSoft system passes parameters to the remote program, and then waits while the program runs. When the remote program is done, it returns any results or status information to the client, which then resumes execution. This means that RemoteCall is a think-time function. RemoteCall is designed for fast response time, and has an application programming interface (API) that provides programs with the response time needed for transaction processing. However, RemoteCall has no scheduling or multistep job capabilities. Each execution of RemoteCall is independent.
Note. For PeopleTools 8, you can no longer use RemoteCall to execute an Application Engine program. Use the CallAppEngine function instead.
The RemoteCall PeopleTools feature consists of the following components:
PeopleCode program.
This interface consists of the RemoteCall PeopleCode function. It is used from PeopleCode to start a remote program and process results. The PeopleCode program does not include any special code to specify where the remote program is executed. You can configure Oracle Tuxedo to locally execute the program for testing.
Remote program API.
This is used by the remote COBOL program to receive or pass parameters and return status information.
PeopleSoft RemoteCall service.
The PeopleSoft application server, PSAPPSRV, advertises the RemoteCall service. The service receives requests from clients and starts the requested program. When the program is completed, it passes the parameters and status code back to the client.
Oracle Tuxedo.
Oracle Tuxedo is a message-based transaction monitor for distributed applications. No direct Oracle Tuxedo calls need to be implemented in PeopleCode or remote programs.
You can execute the RemoteCall function from PeopleCode associated with any Component Processor event except SavePostChange, SavePreChange, Workflow, RowSelect, or in any PeopleCode event resulting from a ScrollSelect or related function call. However, remote programs that change data should not be run as part of a SaveEdit process, because the remote program may complete successfully even though an error occurs later in the save process.
To call a remote program that changes data, use FieldChange PeopleCode in a record field associated with a command button, or from a pop-up menu item.
Do not use RemoteCall if you expect the remote program to return a large amount of data to the client, because data is passed back only through the parameters of the PeopleCode API.
Authorization to run a remote program is like authorization to run a PeopleCode program. Because a remote program is started from PeopleCode, the user has authorization to use the page that executes the PeopleCode.
The remote program runs in a different unit of work from the page. A commit is issued by PeopleTools if needed on the client before RemoteCall is called. This means that, by default, the remote program does not know about any database changes unless the page is saved before the program is called. After the remote program starts, it runs to completion and commits or ends before returning to the page. In this way, the remote program and the page do not have locking contention. To ensure that the save has actually been done, use the DoSaveNow built-in function.
When using RemoteCall to execute a COBOL program, two types of errors can occur:
PeopleTools errors.
An error could occur in PeopleTools or Oracle Tuxedo, or the service might not be found. These are treated as hard errors by PeopleCode. An error message box appears, and that piece of PeopleCode is terminated. In the case of a PeopleTools error, the remote program always either returns a code of zero or terminates with a message due to a system error.
Application-specific errors.
Any error information specific to the remote application must be passed back in regular data variables, and the application can process these in an application-specific way. If you have a status code on which the application depends, you should initialize it to an invalid value to be sure the COBOL program does return the status code.
Because the remote program is executed synchronously, users receive an hourglass icon and cannot do anything in the current window until the remote application completes. They could move to another window and do processing there, or they could open another PeopleSoft window. They cannot cancel the remote program after it starts. If the program does not terminate in a timely fashion (as determined by the RemoteCall timeout set with PeopleSoft Configuration Manager), RemoteCall attempts to terminate the process and returns an error indicating that the program was terminated.
The remote program API provides the functions to get and put data between the network and the COBOL program. These functions are implemented in C, but are callable from COBOL through the PTPNETRT program. For an example, see the PTPNTEST.CBL program.
Note. If these APIs are called when the program is not running as a remote program, ACTION-GET and ACTION-PUT return an error. All other actions return without doing anything.
If an unexpected error is found, call PTPNETRT with ACTION-RESET, then with ACTION-PUT to send back any error status variables, then with ACTION-DONE to send the buffer.
The RemoteCall service serves as a bridge between the PeopleCode API and remote COBOL programs. RemoteCall is one of many services advertised from the PSAPPSRV Oracle Tuxedo server, and can be configured as part of the standard domain setup and administration.
The client sends the RemoteCall service request, consisting of the connect information and the program name, as well as any other parameters for the program, to the application server. The RemoteCall service then executes the program and passes it the connect string.
RemoteCall Programming Guidelines
Keep the following points in mind when using RemoteCall:
Do not use RemoteCall for long-running batch jobs.
As a general rule, if you think execution will take more than 15 seconds, you should not be using RemoteCall, but should instead use PeopleSoft Process Scheduler.
RemoteCall is meant for running jobs on the server.
It should not be used to invoke client-only programs. Support for local calling with RemoteCall is provided solely as a debugging and development aid. For client-only programs, use Declare Function, then call the external function from a library.
If you do not want to modify an existing program, then pass only the program name and run control, and do not return any parameters.
This way, the program requires few changes to run as a remote function.
Deciding Between RemoteCall and PeopleSoft Process Scheduler
COBOL application programs initiated by the RemoteCall service use the same COBOL application architecture used by PeopleSoft Process Scheduler. After being initiated by the dispatcher, COBOL application programs call the COBOL SQL API program, PTPSQLRT, to connect to the relational database management system to compile and execute SQL statements. You can design and implement COBOL programs to be understood by both PeopleSoft Process Scheduler and RemoteCall.
Follow these guidelines to select the optimal method for running a particular COBOL program:
Use PeopleSoft Process Scheduler for asynchronous processes, or processes that can be scheduled, are multistep, or that require printed output.
Use RemoteCall for synchronous processes that are quick (transaction processing types of processes).
Modifying PeopleSoft Process Scheduler Programs to Run with RemoteCall
To enable an existing program that runs under PeopleSoft Process Scheduler to run under RemoteCall as well, make the following changes:
Include the PTCNETRT copy member.
Include the PTCNCHEK member before the connection call to PTPSQLRT.
Add the call to PTPNETRT ACTION-DONE just before the program terminates (after the call to disconnect from the database).
This should be conditional on whether you are RUNNING-REMOTE-CALL.
If you are running as a RemoteCall, ensure that PROCESS-INSTANCE OF PRUNSTATUS is not set.
Otherwise your calls to PTCPSTAT try to update the PSPRCSRQST table. This does not cause an error, but it is unnecessary processing.
This program can now run from PeopleSoft Process Scheduler or from RemoteCall. If a program has to pass parameters, it must have RemoteCall-specific ACTION-GET and ACTION-PUT calls.