 Understanding Component Interface Class
This chapter provides an overview of Component Interface class and discusses the following topics:
Life cycle of a Component Interface.
Declaring a Component Interface object.
Scope of a Component Interface object.
Implementing a Component Interface object.
Component Interface methods and timeouts.
Traversing a Component Interface and using data collections.
Working with effective-dated data.
Reusing existing code.
Component Interface Reference.
Understanding Component Interface Class
Component Interfaces are the focal points for externalizing access to existing PeopleSoft components. They provide realtime synchronous access to the PeopleSoft business rules and data associated with a component outside the PeopleSoft online system. Component Interfaces can be viewed as "black boxes" that encapsulate PeopleSoft data and business processes, and hide the details of the structure and implementation of the underlying page and data.
Component Interfaces are one of the many APIs that PeopleSoft provides for enabling integration with other systems.
A Component Interface maps to one, and only one, PeopleSoft component. The Component Interface object, instantiated from a session object, is created at runtime to access the data specified by the Component Interface.
When you instantiate a Component Interface object:
All the PeopleCode programs associated with the record fields, pages, component, and so on, and
The runtime component processor still perform all of the work that they do in the online environment.
The exceptions are any GUI manipulation found in a PeopleCode program, and search dialog specific processing.
Component Interfaces are programmable through a C interface, an OLE/COM or C/C++ interface, and through PeopleCode. Application Engine programs, message notification programs, or any other PeopleCode programs are able to use Component Interfaces.
Like a component, you create the structure of a Component Interface in Application Designer, then at runtime, you populate the structure with data. This document is concerned with the runtime portion of a Component Interface.
When you populate a Component Interface with data, the first thing you fill out are its keys, as you would in a component. These can be keys for getting an existing instance of the data or for creating a new instance of the data.
In addition to keys, a Component Interface is composed of properties and methods.
Component Interface properties provide access to the data in a component buffer.
Component Interface methods are functions that can be called to perform operations on a Component Interface.
There are two types of both methods and properties: standard and user-defined. Standard properties and methods are provided automatically when you create a Component Interface. They perform operations common to all Component Interfaces, such as indicating what mode to operate the Component Interface, saving, or creating a Component Interface. User-defined properties are the specific record fields that an application developer has chosen to expose to an external system with the Component Interface. User-defined methods are PeopleCode programs that an application developer can write to perform operations on a Component Interface. Each is specific to that Component Interface.
You can instantiate a Component Interface object only from a session object. Through the session object you can control access to the Component Interface, check for errors, control the runtime environment, and so on.
See Also
PeopleTools 8.52: PeopleSoft Component Interfaces
Life Cycle of a Component Interface
At runtime, there are certain things you want to do with a Component Interface, such as getting an instance of it, populating it with data, and so on. The following is an overview of this process. These steps are expanded in other sections.
Execute the GetCompIntfc method on the PeopleSoft session object to get a Component Interface.
Set the key values for the Component Interface object. If the keys you specify don’t uniquely describe a component (partial keys), proceed to step 3. If the keys uniquely describe a component, skip to step 4.
Do one of the following:
Execute the Find standard method on the Component Interface. This returns a collection of Component Interfaces with their key values filled out. The user can then select the unique Component Interface they want.
Execute either the Get or Create standard method to instantiate the Component Interface (populate it with data.)
Get property values, set property values, or execute user-defined methods. Setting a property value will fire the standard PeopleSoft business rules for the field associated with the property (any PeopleCode program associated with FieldChange, RowInsert, and so on.)
Execute the Save standard method to fire the standard PeopleSoft save business rules (any PeopleCode programs associated with SavePreChange, WorkFlow, and so on.) and commit any changes to the database.
At any point, the standard method Cancel can be executed to reset the Component Interface to its state in step 1.
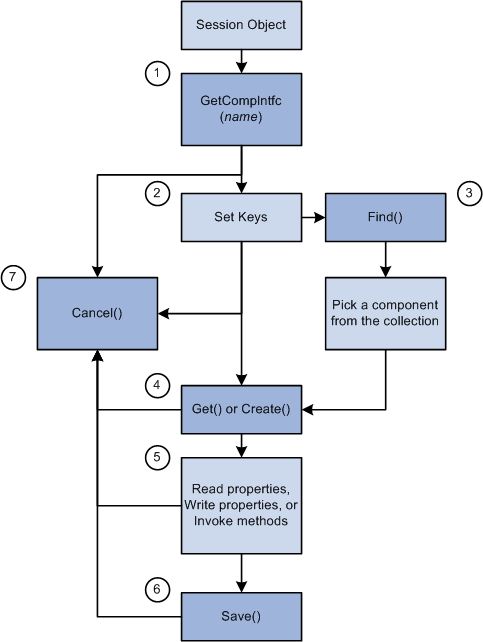
Component interface life cycle
 Setting Component Interface Keys
The keys for a Component Interface are based on the key fields of the underlying component. There can be different types of keys for a Component Interface.
CREATEKEYS: A list of the primary key fields of the search record specified to be used in Add mode for the component. This list is automatically generated.
GETKEYS: A list of the primary (required) key fields on the search record. This list is automatically generated.
FINDKEYS: A list of primary and alternate key fields on the primary search record for the component.
If the Component Interface has CREATEKEYS, these are the keys you must set before you execute the Create() method to create a new instance of the data. If the Component Interface doesn’t have CREATEKEYS, use the GETKEYS to specify a new instance of the data.
Use either the GETKEYS or FINDKEYS to specify an existing instance of the data.
To set key values, use the field names listed under GETKEYS, CREATEKEYS or FINDKEYS like properties on the Component Interface object. The following example sets the CREATEKEYS values to create a new instance of the data.
&MYCI = GetCompIntfc(CompIntfc.EXPRESS_ISSUE);
&MYCI.BUSINESS_UNIT = "H01B";
&MYCI.INTERNAL_FLG = "Y";
&MYCI.ORDER_NO = "NEXT’;
&MYCI.Create();
Standard and User-Defined Component Interface Methods
Every Component Interface comes with a standard set of methods:
Cancel()
Create()
Find()
Get()
Save()
Use these methods during runtime to affect the data of the Component Interface.
The application developer can, at design time, disable any of these methods for the Component Interface.
In addition, an application developer can write their own methods. These methods are written as Functions using Component Interface PeopleCode. For example, suppose you wanted to be able to copy an instance of Component Interface data. You might write your own Clone method.
Note. User-defined method names must not be named GetPropertyName. The C header for Component Interfaces creates functions with that name so you can access each property. If you create your own GetPropertyName functions, you receive errors at runtime. User-defined methods can take only simple types of arguments (such as number, character, and so on) because user-defined methods can be called from C/C++ or COM as well as from PeopleCode. PeopleCode can use more complex types (like rowset, array, record, and so on), but these types of arguments are unknown to C/C++ or COM.
See Also
Component Interface Class Methods
PeopleTools 8.52: PeopleSoft Component Interfaces
Accessing Component Interface Standard Properties
Every Component Interface comes with a standard set of properties. These properties can be divided as follows:
Properties that affect how the Component Interface is executed
The following properties affect how a component interface is executed:
EditHistoryItems
GetHistoryItems
InteractiveMode
These properties must be set before the Component Interface is populated with data. That is, you must set these properties before you use the Get or Create methods.
EditHistoryItems and GetHistoryItems work together to determine how data is accessed:
If EditHistoryItems is False (the default) and GetHistoryItems is True, you access the data in the Component Interface in a similar manner as if you were accessing a component in update/display All mode. This means all history rows are returned, however, you can edit rows only with a date set in the future.
If EditHistoryItems is True and GetHistoryItems is True, you access the data in the Component Interface in a similar manner as if you were accessing a component in correction mode. This means all history rows are returned, and you can edit them.
If GetHistoryItems is False, you access the data in the Component Interface in a similar manner as if you were accessing a component in update mode. The EditHistoryItems has no effect when GetHistoryItems is False.
InteractiveMode causes the Component Interface to emulate an online component. For example, if you set a value for a field in a Component Interface and you have set InteractiveMode to True, then any FieldChange PeopleCode programs associated with that field fire as soon as you set that value.
Properties that return information about the structure of the Component Interface
The following properties return information about the structure of the Component Interface:
CreateKeyInfoCollection
FindKeyInfoCollection
GetKeyInfoCollection
PropertyInfoCollection
See Also
Component Interface Class Properties
Accessing User-Defined Component Interface Properties
Every user-defined property in a Component Interface definition can be used like a property on the object instantiated from that Component Interface at runtime.
For example, the following Component Interface definition has RETURN_DT defined as one of its properties.
At runtime, you can use PeopleCode to assign a value to that property (field), or to access the value of that field.
&MYCI.RETURN_DT = "05/05/2000";

/*  OR  */

&DATE = &MYCI.RETURN_DT;
Data Type of a Component Interface Object
Component Interfaces are declared as type ApiObject. For example,
Local ApiObject &MYCI;
Note. Component Interface objects can be declared only as Local.
Scope of a Component Interface ObjectA Component Interface can be instantiated from PeopleCode, from a Visual Basic program, from Java, COM and C/C++.
This object can be used anywhere you have PeopleCode, that is, in an application class, Application Engine PeopleCode, record field PeopleCode, and so on.
If you’re instantiating a Component Interface from an online page, after you finish working with the component, you may want to refresh your page. The Refresh method, on a rowset object, reloads the rowset (scroll) using the current page keys. This causes the page to be redrawn. GetLevel0().Refresh() refreshes the entire page. If you want a particular scroll only to be redrawn, you can refresh just that part.
Considerations Using Component Interfaces and Related Languages
If you update a field using a Component Interface through an external program (such as Java, VB, and so on) the Related Language Table gets updated, even if they are using a base language of ENG.
Considerations Using Component Variables With Component Interfaces
A component variable is scoped locally to its component or its Component Interface. This means that you cannot use a component variable to share data between a component and a Component Interface. In order to share information between components, use global variables.
If your page (component) calls a Component Interface (using the existing session), that in turn initializes a component variable, that component variable is shared with the calling component. When the Component Interface is closed, the component variable is no longer in scope.
When the calling component is closed, any component scoped variables created by it or by the Component Interface go out of scope.
See Also
PeopleTools 8.52: PeopleSoft Component Interfaces
Implementing a Component Interface
After you create your Component Interface definition, you can use PeopleCode to access it. This PeopleCode can be long and complex. Rather than write it directly, you can drag and drop the Component Interface definition from Application Designer Project View into an open PeopleCode edit pane. Application Designer analyzes the definition and generates initial PeopleCode as a template, which you can modify.
You can also access your Component Interface using COM. You can automatically generate a Visual Basic or a C template, similar to the PeopleCode template, to get you started.
The following are the usual actions that you perform with a Component Interface:
Create a new instance of data
Get an existing instance of data
Retrieve a list of instances of data
The following procedures cover each of these actions in more detail.
Another standard action is inserting or deleting a row of data (an item). This involves traversing a Component Interface (going from level zero to level one, from level one to level two, and so on) and accessing data collections.
You may want to work with effective-dated information. There are several properties you can set to allow you to do this.
In addition to these standard actions, you can also look at the structure of a Component Interface.
See Also
Create a New Instance of Data Example
Getting an Existing Instance of Data Example
Retrieving a List of Instance of Data Example
Traversing a Component Interface and Using Data Collections
Working With Effective-Dated Data
Accessing the Structure of a Component Interface
Component Interface Methods and Timeouts
The file pstools.properties controls when a Component Interface method times out. If you're having problems with methods timing out, you may want to change the values in this file. This file is located in the default directory for the application you're running. If this file isn't in this directory, copy it into the directory before you make your changes to it.
Traversing a Component Interface and Using Data Collections
The data in a Component Interface can be contained in a hierarchy: like the page it's built on, there may be data at level zero, level one, level two, and so on.
Each level of data in a Component Interface is known as a collection, such as:
level zero

  -- level one (Collection)

    -- Level 2 (Collection)
A collection is a set of similar things, like a group of already existing Component Interfaces. Most collections have the same standard properties and methods, with some additional ones specific to that collection. For example, all collections have the property Count, which indicates how many items are in that collection, but only a data collection has the method ItemByKeys.
A data collection is the collection of data, available at runtime or during test mode, associated with a particular scroll (or record.) The data collection object returns information about every row of data (item) that is returned for that record at runtime.
To access the level two collection, in general, you could use the following:
&Level_1 = &CI.Level_1;
&Level_1_Item = &Level_1.Item(ItemNumber);

&Level_2 = &Level_1_Item.Level_2;
This example shows a Component Interface with a two-level hierarchy, that is, two data collections: EMPL_CHECKLIST and EMPL_CHKLST_ITM. To get a data collection for the first level, use the following code:
&Level1 = &MYCI.EMPL_CHECKLIST;
To access the secondary scroll (EMPL_CHKLST_ITM) you have to get the appropriate row (item) of the upper level scroll first:
&Level1 = &MYCI.EMPL_CHECKLIST;
&Item = &Level1.Item(1);
&Level2 = &Item.EMPL_CHKLST_ITM;
Note. Scrolls represent a hierarchical order. You must get the first level row that contains the secondary scroll before you can access the secondary scroll.
Every data collection has a set of methods and standard properties.
See Also
Inserting or Deleting a Row of Data Example
Working With Effective-Dated Data
When you work with effective-dated data, use some combination of the following methods:
CurrentItem
GetEffectiveItem
Both these methods return an item, however, there are some differences:
The CurrentItem method takes no parameters, so it bases the item it returns on the current system date.
The GetEffectiveItem method bases the item it returns on a user-provided date. They all perform the same logic, they just use a different date.
Note. To show all history for an effective-dated collection, you must set GetHistoryItems to True before you populate the Component Interface.
See Also
Inserting Effective-Dated Data Example
Inserting Effective-Dated Data Example Using Visual Basic
How a Developer Uses GetEffectiveItem
If a user is making an update to an effective-dated record, they don’t always want to insert a row at the end.
Suppose the database contained the following data:
|
EMPLID |
EFFDT |
SEQNO |
|
8000 |
3/1/99 |
0 |
|
8000 |
7/1/99 |
0 |
|
8000 |
9/1/99 |
0 |
|
8000 |
12/1/99 |
0 |
Now suppose the user wants to enter info with EFFDT of 11/1/99. If they were looking at a PeopleSoft component, they would visually scan to see where that date falls and then press ALT+7 and ENTER at the row that they want to insert after.
GetEffectiveItem enables you to pass in the correct effective date, instead of having to loop through every item in the collection doing a comparison, looking for the correct item.
Why Can't it Just Go at the End?
The InsertItem method simulates pressing ALT+7 and ENTER online to insert a row in a scroll. Part of the logic that occurs in the Component Processor is that if the scroll is effective-dated, the ALT+7 and ENTER carries the values forward from the previous row. This functionality is still there if you use InsertItem at the end of the collection, but the values may be incorrect.
Reusing Existing Code
One of the advantages of using a Component Interface is that it enables you to reuse existing PeopleCode and business logic. However, a Component Interface isn’t exactly equivalent to a component, which means there are a few key areas in which you should expect differences in behavior between a Component Interface and the component it’s based on. This section discusses the differences in:
Search dialog processing
Event and function behavior
Differences in Search Dialog Processing
When you run a Component Interface, the SearchInit, SearchSave, and RowSelect events don’t fire. This means that any PeopleCode associated with these events won’t run. The first event to run is RowInit.
Differences in PeopleCode Event and Function Behavior
PeopleCode events and functions that relate exclusively to the page interface (the GUI) and online processing can’t be used by Component Interfaces. These include:
Menu PeopleCode and pop-up menus.
The ItemSelected and PrePopup PeopleCode events are not supported. In addition, the DisableMenuItem, EnableMenuItem, and HideMenuItem functions aren’t supported.
Transfers between components, including modal transfers.
The DoModal, EndModal, IsModal, Transfer, TransferPage, DoModalComponent, TransferNode, TransferPortal, and IsModalComponent functions cannot be used.
Cursor position.
SetControlValue cannot be used.
WinMessage cannot be used.
Save in the middle of a transaction.
DoSave cannot be used.
The page Activate event cannot be used.
When executed using a component interface, these functions do nothing and return a default value. In addition, using the Transfer function terminates the current PeopleCode program.
For the unsupported functions, you should put a condition around them, testing whether there’s an existing Component Interface.
If %ComponentName Then
   /* process is being called from a Component Interface */
   /* do CI specific processing */
Else
   /* do regular processing */
   .  .  .
End-if;
Using %Menu Conditions
If you associate a Component Interface definition with a menu in Application Designer, a PeopleCode program that conditionally checks for that menu runs when the Component Interface is executed. For example, suppose you associate a Component Interface with the MP_HR_MENU. The following PeopleCode program, if called from that Component Interface, executes:
If %Menu = MP_HR_MENU Then
See Also
Associating Component Interfaces with Menus
Session Class Methods
Component Interfaces don’t have any built-in functions. They are instantiated from the Session class.
This section discusses the Session class methods used to instantiate Component Interfaces. The methods are discussed in alphabetical order.
FindCompIntfcs
Syntax
FindCompIntfcs([ComponentName])
Description
The FindCompIntfcs method, used with the session object, returns a reference to a Component Interface collection, filled with zero or more Component Interfaces. The ComponentName parameter takes a string value. You can use a partial value to limit the set of Component Interfaces returned. You can also specify a null value, that is, two quotation marks with no space between them, ("") to return the entire list of Component Interfaces available.
Using the FindCompIntfcs method is equivalent to using File, Open, and selecting Component Interface in Application Designer.
Example
In the following example, a partial key was used to open all components starting with "APP".
Local ApiObject &MYSESSION;
Local ApiObject &MYCI;

&MYSESSION = %Session;
&MYCICOLL = &MYSESSION.FindCompIntfcs("APP");
&MYCI = &MYCICOLL.First();
GetCompIntfc
Syntax
GetCompIntfc([COMPINTFC.]ComponentName)
Description
The GetCompIntfc method, used with the session object, returns a reference to a Component Interface. ComponentName when used by itself takes a string value. If you use COMPINTFC.componentname it isn’t a string value: it’s a constant that automatically is renamed in your code if the Component Interface definition is ever renamed. You must specify an existing Component Interface, otherwise you receive a runtime error.
Example
Local ApiObject &MYSESSION;
Local ApiObject &MYCI;

&MYSESSION = %Session;
&MYCI = &MYSESSION.GetCompIntfc(COMPINTFC.PERSONAL_DATA_BC);
The following example uses the '@' operator to dynamically call a Component Interface from PeopleCode.
&MYCI = &MYSESSION.GetCompIntfc(@("CompIntfc." | &CIname));
Component Interface Collection Methods
A Component Interface collection is a list of the available Component Interfaces. An equivalent list is generated by starting Application Designer, selecting File, Open, Component Interface.
You get a Component Interface collection by using the FindCompIntfcs method with a session object.
First
Syntax
First()
Description
The First method returns the first Component Interface in the Component Interface collection object executing the method. This returns the structure of the Component Interface with only the key fields filled in. The rest of the data is not present. To populate the Component Interface with data, you must set the key values and use the Get method.
Example
&MYCI = &CICOLLECTION.First();
Item
Syntax
Item(number)
Description
The Item returns the Component Interface that exists at the number position in the Component Interface collection executing the method. This returns the structure of the Component Interface with only the key fields filled in. The rest of the data is not present. To populate the Component Interface with data, you must set the key values and use the Get method. number takes a number value.
Example
For &I = 1 to &COLLECTION.Count;
&MYCI = &COLLECTION.Item(&I);
/* do processing */
End-For;
Next
Syntax
Next()
Description
The Next method returns the next Component Interface in the Component Interface collection object executing the method. You can use this method only after you have used either the First or Item methods: otherwise the system doesn’t know where to start. This returns the structure of the Component Interface with only the key fields filled in. To populate the Component Interface with data, you must set the key values and use the Get method.
Example
&MYCI = &COLLECTION.Next();
Component Interface Collection Property
This section discusses the Count property.
Count
Description
This property returns the number of Component Interfaces in the Component Interface collection, as a number.
This property is read-only.
Example
&COUNT = &MYCI_COLLECTION.Count;
Component Interface Class Methods
This section discusses the Component Interface class methods. The methods are discussed in alphabetical order.
Cancel
Syntax
Cancel()
Description
The Cancel method cancels the instance of the Component Interface object executing the method, rolling back any changes that were made. This sets the Component Interface state to the same state it was in immediately after it was created by GetCompIntfc. This closes the Component Interface.
Parameters
None.
Returns
A Boolean value: True if component was successfully cancelled, False otherwise.
CopyRowset
Syntax
CopyRowset(&Rowset [, InitialRow] [, record_list]);
Where record_list is a list of record names in the form:
[RECORD.source_recname1, RECORD.target_recname1
[, RECORD.source_recname2, RECORD.target_recname2]].  .  .
Description
The CopyRowset method copies the specified rowset object to the Component Interface executing the method, copying like-named record fields and data collections (child rowsets) at corresponding levels. If pairs of source and destination record names are given, these are used to pair up the records and data collections before checking for like-named record fields.
CopyRowset uses the Page Field order when copying properties. This helps ensure that dependent fields are set in the required order.
Note. This method works in PeopleCode only. This method uses the names of the records in the collection, not the name you may give the collection when you create the Component Interface.
If there are blanks in source rowset or record, they are copied over to the Component Interface only if the field’s IsChanged property is set to True. Otherwise blanks are not copied.
Use this method when you are using a Component Interface to verify the data in your application message.
Note. The structure of the rowset you’re copying data from must exactly match the existing rowset structure, with the same records at level zero, 1, 2, and so on. CopyRowset is intended to be used with a notification process, that is, with message data. As all notifications work only in two-tier mode, CopyRowset works only in two-tier mode.
Parameters
|
&Rowset |
Specify an existing, instantiated rowset object that contains data. |
|
InitialRow |
Specify the initial transaction row to begin with. This parameter provides a quick way to loop through a rowset that has multiple level zero rows. The default value for this parameter is 1. |
|
record_list |
Specify a list of source and target record names. All source_recnames are records being copied from, in the rowset object being copied from. All target_recnames are records being copied to, in the Component Interface being copied to. |
Returns
None.
Example
The following example would be in your notification PeopleCode. The Exit(1) causes all changes to be rolled back, and the message is marked with the status ERROR so you can correct it.
Local message &MSG;
Local ApiObject &SESSION;
Local ApiObject &PO;
Local rowset &ROWSET;

&MSG = %IntBroker.GetMessage();
&ROWSET = &MSG.GetRowset();

&SESSION = %Session;

If &SESSION <> NULL Then
/* Session connected correctly */
/* Set key values to create component */
&PO = &SESSION.GetCompIntfc(COMPINTFC.PO);
&PO.BU = &MSG(&I).PO_HDR.BU.Value;
&PO.PO_ID = &MSG(&I).PO_HDR.PO_ID.Value;
&PO.Create();

&PO.CopyRowset(&ROWSET);
If NOT (&PO.Save()) Then
   Exit(1);
End-if;
Else
/* do error processing */
End-If;
The following example loops through all the transactions of a message rowset.
Local message &MSG;
Local ApiObject &SESSION;
Local ApiObject &CI;
Local rowset &ROWSET;

&MSG = %IntBroker.GetMessage();
&ROWSET = &MSG.GetRowset();


&SESSION = %Session;
If &SESSION <> Null Then)
   &CI = &SESSION.GetCompIntfc(CompIntfc.VOL_ORG);
   &I = 0;
   While (&I < &ROWSET.RowCount)
      &I = &I + 1;
      &CI.VOLUNTEER_ORG = &ROWSET.GetRow(&I).VOLNTER_ORG_2.  VOLUNTEER_ORG.Value;
      If &CI.Create() Then
         If &CI.CopyRowset(&ROWSET, &I, Record.VOLNTER_ORG_TBL, Record.⇒
VOLNTER_ORG_TBL) Then

         /* App specific processing */

            If Not &CI.Save() Then
               Winmessage("Save Failed");
               /* Other app specific processing */
            End-If;
         End-If;
      End-If;
   &CI.Cancel();
   End-While;
End-If;
CopyRowsetDelta
Syntax
CopyRowsetDelta(&Rowset [, InitialRow] [, record_list]);
Where record_list is a list of record names in the form:
[RECORD.source_recname1, RECORD.target_recname1
[, RECORD.source_recname2, RECORD.target_recname2]].  .  .
Description
The CopyRowsetDelta method copies the changed rows in the specified rowset object to the Component Interface executing the method, copying like-named record fields and data collections (child rowsets) at corresponding levels. If pairs of source and destination record names are given, these are used to pair up the records and data collections before checking for like-named record fields.
Note. This method works in PeopleCode only. This method uses the names of the records in the collection, not the name you give the collection when you create the Component Interface.
If there are blanks in source rowset or record, they are copied over to the Component Interface only if the field’s IsChanged property is set to True. Otherwise blanks are notcopied.
You will generally use this method with a Component Interface to verify data from a message.
Note. CopyRowsetDelta is intended for a notification process, that is, with message data. As all notifications work only in two-tier mode, CopyRowsetDelta works only in two-tier mode.
If the rowset you’re copying from is a message rowset, the CopyRowsetDelta method uses the AUDIT_ACTN field in the PSCAMA table in the message to know whether the row is to be inserted, updated, or deleted inside the Component Interface.
If the rowset you’re copying from is not a message rowset, that rowset must have the same structure as a message, that is, it must have a PSCAMA record with an AUDIT_ACTN field on every level of the rowset.
Warning! CopyRowsetDelta uses a record's keys to locate the target row to change for all audit actions other than Add. CopyRowsetDelta actions (other than Add) therefore work only on rowsets that have keys that uniquely identify all rows in the rowset. Rowsets that do notdistinguish between rows using a key field will be updated in an unpredictable fashion.
Considerations Using CopyRowsetDelta with Effective-Dated Rowsets
If a message data row inserted using a PSCAMA Audit action of "A" belongs to an effective dated scroll containing child scrolls, the insertion of the parent row causes child rows of the previous effective-dated row to be copied over, and their effective date is updated with that of the inserted parent.
If the message also contains a child row being inserted with a PSCAMA Audit action of "A", the component interface being populated will end up having two child rows: the one inserted as part of the Effective-dated processing and the one inserted using the PSCAMA Audit action "A" in the message.
Parameters
|
&Rowset |
Specify an existing, instantiated rowset object that contains data. |
|
InitialRow |
Specify the initial transaction row to begin with. This parameter provides a quick way to loop through a rowset that has multiple level zero rows. The default value for this parameter is 1. |
|
record_list |
Specify a list of source and target record names. All source_recnames are records being copied from, in the rowset object being copied from. All target_recnames are records being copied to, in the Component Interface being copied to. |
Returns
None.
Example
The following PeopleCode would exist in your notification process. The Exit(1) causes all changes to be rolled back, and the message is marked with the status ERROR so you can correct it.
Local Message &MSG;
Local ApiObject &SESSION;
Local ApiObject &PO;
Local Rowset &ROWSET;

&MSG = %IntBroker.GetMessage();
&ROWSET = &MSG.GetRowset();

&SESSION = %Session;

If &SESSION <> Null Then
/* Session connected correctly */
/* Set key values to get component */
&PO = &SESSION.GetCompIntfc(COMPINTFC.PO);
&PO.BU = &MSG(&I).PO_HDR.BU.Value;
&PO.PO_ID = &MSG(&I).PO_HDR.PO_ID.Value;
&PO.Get();


&PO.CopyRowsetDelta(&ROWSET);
If NOT (&PO.Save()) Then
   Exit(1);
End-if;
Else
   /* do error processing */
End-If;
See Also
CopySetupRowset
Syntax
CopySetupRowset(&Rowset [, InitialRow] [, record_list]);
Where record_list is a list of record names in the form:
RECORD.source_recname, RECORD.target_recname
Description
The CopySetupRowset method is used to copy a setup table application message to a Component Interface. A setup table has the same record at level zero and level one, while a Component Interface has only a single copy of a record. This method copies the contents of the message (at level zero) to the first level collection (level one) of the Component Interface.
The CopySetupRowset method copies like-named record fields. If a pair of source and destination record names are given, these are used to pair up the records and data collections before checking for like-named record fields.
Note. This method works in PeopleCode only. This method uses the names of the records in the collection, not the name you may give the collection when you create the Component Interface.
If there are blanks in source rowset or record, they are copied over to the Component Interface only if the field’s IsChanged property is set to True. Otherwise blanks are not copied.
Note. CopySetupRowset is for a notification process, that is, with message data. As all notifications work only in two-tier mode, CopySetupRowset works only in two-tier mode.
Parameters
|
&Rowset |
Specify an existing, instantiated rowset object that contains data. |
|
InitialRow |
Specify the initial transaction row to begin with. This parameter provides a quick way to loop through a rowset that has multiple level zero rows. The default value for this parameter is 1. |
|
record_list |
Specify source and target record names. The source_recname is the record being copied from, in the rowset object being copied from. The target_recname is the record being copied to, in the Component Interface being copied to. |
Returns
None.
Example
The following example would be in your Notification PeopleCode.
Local ApiObject &SESSION; Local ApiObject &PSMESSAGES; Local ApiObject &CI; Local Message &MSG; Local Rowset &RS; &SESSION = %Session; &PSMESSAGES = &SESSION.psmessages; &MSG = %IntBroker.GetMessage(); &RS = &MSG.GetRowset(); &CI = &SESSION.getcomponent(Component.VOL); /** Set Business Component Properties **/ &CI.gethistoryitems = True; /*&CI.InteractiveMode = True;*/ /*&CI.stoponfirsterror = True;*/ For &TRANSACTION = 1 To &RS.RowCount &CI.VOLUNTEER_ORG = &RS(&TRANSACTION).VOLNTER_ORG_TBL.VOLUNTEER_ORG.Value; /* note: You can achieve better performance if you add code here to check if⇒ the keys are the same L0 keys as the last time through the loop and, if so,skip⇒ the Get/Create section. */ If Not &CI.create() Then &PSMESSAGES.DeleteAll(); If Not &CI.get() Then /** Check Error Messages **/ For &I = 1 To &PSMESSAGES.count &TYPE = &PSMESSAGES.item(&I).type; &TEXT = &PSMESSAGES.item(&I).text; End-For; Exit(1); End-If; End-If; If Not &CI.CopySetupRowset(&RS, &TRANSACTION) Then /** Check Error Messages **/ For &I = 1 To &PSMESSAGES.count &TYPE = &PSMESSAGES.item(&I).type; &TEXT = &PSMESSAGES.item(&I).text; End-For; Exit(1); End-If; If Not &CI.Save() Then /** Check Error Messages **/ For &I = 1 To &PSMESSAGES.count &TYPE = &PSMESSAGES.item(&I).type; &TEXT = &PSMESSAGES.item(&I).text; End-For; Exit(1); End-If; &CI.Cancel(); End-For;
See Also
Component Interface class: CopySetupRowsetDelta method, CopyRowset method.
CopySetupRowsetDelta
Syntax
CopySetupRowsetDelta(&Rowset [, InitialRow] [, record_list]);
Where record_list is a list of record names in the form:
RECORD.source_recname, RECORD.target_recname
Description
The CopySetupRowsetDelta method is used to copy a setup table with changed rows in an application message to a Component Interface. A setup table has the same record at level zero and level one, while a Component Interface has only a single copy of a record. This method copies the contents of the message (at level zero) to the first level collection (level one) of the Component Interface.
Note. This method works in PeopleCode only. CopySetupRowsetDelta copies all the like-named fields from the changed row into the message. It is not copying only the changed fields.
The CopySetupRowsetDelta method copies like-named record fields, in those rows where the IsChanged property is True. If a pair of source and destination record names are given, these are used to pair up the records and data collections before checking for like-named record fields.
Note. This method uses the names of the records in the collection, notthe name you may give the collection when you create the Component Interface.
If there are blanks in source rowset or record, they are copied over to the Component Interface only if the field’s IsChanged property is set to True. Otherwise blanks are notcopied.
Note. CopySetupRowsetDelta is for a notification process, that is, with message data. As all notifications work only in two-tier mode, CopySetupRowsetDelta works only in two-tier mode.
Warning! CopySetupRowsetDelta uses a record's keys to locate the target row to change for all audit actions other than Add. CopySetupRowsetDelta actions (other than Add) therefore work only on rowsets that have keys that uniquely identify all rows in the rowset. Rowsets that do notdistinguish between rows using a key field will be updated in an unpredictable fashion.
Parameters
|
&Rowset |
Specify an existing, instantiated rowset object that contains data. |
|
InitialRow |
Specify the initial transaction row to begin with. This parameter provides a quick way to loop through a rowset that has multiple level zero rows. The default value for this parameter is 1. |
|
record_list |
Specify source and target record names. The source_recname is the record being copied from, in the rowset object being copied from. The target_recname is the record being copied to, in the Component Interface being copied to. |
Returns
None.
Example
Local ApiObject &SESSION; Local ApiObject &PSMESSAGES; Local ApiObject &CI; Local Message &MSG; Local Rowset &RS; &SESSION = %Session; &PSMESSAGES = &SESSION.psmessages; &MSG = %IntBroker.GetMessage(); &RS = &MSG.GetRowset(); &CI = &SESSION.getcomponent(Component.VOL); /** Set Business Component Properties **/ &CI.gethistoryitems = True; /*&CI.InteractiveMode = True;*/ /*&CI.stoponfirsterror = True;*/ For &TRANSACTION = 1 To &RS.RowCount &CI.VOLUNTEER_ORG = &RS(&TRANSACTION).VOLNTER_ORG_TBL.VOLUNTEER_ORG.Value; /* note: You can achieve much better performance if you add code here to check ⇒ if the keys are the same L0 keys as the last time through the loop and, if so,⇒ skip the Get/Create section. */ If Not &CI.create() Then &PSMESSAGES.DeleteAll(); If Not &CI.get() Then /** Check Error Messages **/ For &I = 1 To &PSMESSAGES.count &TYPE = &PSMESSAGES.item(&I).type; &TEXT = &PSMESSAGES.item(&I).text; End-For; Exit(1); End-If; End-If; If Not &CI.CopySetupRowsetDelta(&RS, &TRANSACTION) Then /** Check Error Messages **/ For &I = 1 To &PSMESSAGES.count &TYPE = &PSMESSAGES.item(&I).type; &TEXT = &PSMESSAGES.item(&I).text; End-For; Exit(1); End-If; If Not &CI.Save() Then /** Check Error Messages **/ For &I = 1 To &PSMESSAGES.count &TYPE = &PSMESSAGES.item(&I).type; &TEXT = &PSMESSAGES.item(&I).text; End-For; Exit(1); End-If; &CI.Cancel();
See Also
Component Interface class: CopySetupRowset method, CopyRowsetDelta method.
Create
Syntax
Create()
Description
The Create method associates the Component Interface object executing the method with a new, open Component Interface that matches the key values that were set prior to using the Create method. If there are CREATEKEYS values associated with the Component Interface, these are the values you must set. If there are no CREATEKEYS values, you must set the required GETKEYS values instead. All keys required for creating a new Component Interface must be set before using the Create method, otherwise you receive a runtime error. If you do not use unique key values, (that is, you try to set the keys to values that already exist in the database) you receive a runtime error.
Setting the key values prior to using the Create method is analogous to filling in the key values in the Add dialog for a component when you access it in add mode.
Parameters
None.
Returns
A Boolean value: True if component was successfully created, False otherwise.
Example
&MYCI = &MYSESSION.GetCompIntfc(COMPINTFC.ACTION_REASON);
&MYCI.ACTION = "Additional Job";
&MYCI.ACTION_REASON = "0001";
&MYCI.Create();
Find
Syntax
Find()
Description
Note. Find can be used only at level zero within the Component Interface.
You do not have to set values for all the key values. You can use the same wildcards in your Find that you can use in the search dialog, that is, % for one or more characters in a search pattern, and _ (underscore) for exactly one character. In addition, you can use partial values. For example, the following code finds all the data items where the employee ID starts with an "8":
&MYCI.Emplid = "8";
&MYDC = &MYCI.Find();
This is analogous to using a partial key from the search dialog, opening a component.
After you have a data collection, you can use one of the data collection methods to open the Component Interface.
Parameters
None.
Returns
A collection of Component Interfaces.
See Also
Get
Syntax
Get()
Description
The Get method associates the Component Interface object executing the method with an open Component Interface that matches the key values that were set prior to using the Get method. The key values you must set are the required GETKEYS values for the Component Interface.
Note. To retrieve all the history data for a Component Interface, you must specify the GetHistoryItems property as True before you use the Get method. If you want any PeopleCode programs associated with the fields to fire immediately after a value is changed, you must set the InteractiveMode property as True beforeyou use the Get method.
After any execution of Get, you should check if there are any errors pending on the session object. In some special circumstances (involving failure of previously cached operations failing after the Get has executed) Get returns True even though the component wasn’t retrieved.
Parameters
None.
Returns
A Boolean value: True if component was successfully retrieved, False otherwise.
Example
&MYCI.EMPLID = "8001";
&MYCI.Get();
If %Session.ErrorPending Then
   /* Get Unsuccessful, do error processing */
Else
   /* do regular processing */
End-if;
GetPropertyByName
Syntax
GetPropertyByName(string)
Description
The GetPropertyByName method returns the value of the property specified by string. For a collection, it returns a reference to the collection. Generally this function is used only in applications that cannot get the names of the component interface properties until runtime.
Parameters
|
string |
The name of the property. |
Returns
String. The value of the property.
ApiObject. For a collection. The value of the property.
Example
Local ApiObject &oSession, &oCI;
Local array of string &Keys_Arr, &Temp_Arr, &Prop_Arr;
Local string &strCIName, &PropertyValue;
Local number &I, &J, &K;

Function getPropertyValue(&oDataColl As ApiObject, &PropertyName As string)⇒
 Returns string
rem ***** Return property value
   Return &oDataColl.GetPropertyByName(&PropertyName);
End-Function;

Function getCollection1(&collectionName As string)
   Local ApiObject &oL1_DataColl, &oL1_DataItem;
rem ***** Return collection
   &oL1_DataColl = &oCI.GetPropertyByName(&collectionName);
   For &J = 1 To &oL1_DataColl.Count
      &oL1_DataItem = &oL1_DataColl.Item(&J);
      For &K = 1 To &Prop_Arr.Len
         &Temp_Arr = Split(&Prop_Arr [&K], "|");
         If &Temp_Arr [1] = "1" Then
            If &Temp_Arr [3] = "Property" Then
               &PropertyValue = getPropertyValue(&oL1_DataItem,
                   &Temp_Arr [2]);
            Else
               rem ***** Code to Get Collection 2 goes here *****;
            End-If;
         End-If;
      End-For;
   End-For;
End-Function;
See Also
Component Interface class: SetPropertyByName method.
Save
Syntax
Save()
Description
Saves any changes that have been made to the data of the Component Interface executing the method. You must save any new Component Interfaces you create before they are added to the database.
The standard PeopleSoft save business rules (that is, any PeopleCode programs associated with SaveEdit, SavePreChange, WorkFlow, and so on.) is executed after you execute this method. If you didn’t specify the Component Interface to run in interactive mode, FieldEdit, FieldChange, and so on, also run at this time.
If there are multiple errors, all errors are logged to the PSMessages collection, not just the first occurrence of an error. As you correct each error, you may want to delete it from the PSMessages collection.
Note. If you’re running a Component Interface from an Application Engine program, the data won’t actually be committed to the database until the Application Engine program performs a COMMIT.
Parameters
None.
Returns
A Boolean value: True if component was successfully saved, False otherwise.
Example
&MYCI.Emplid = "8001";
&MYCI.Get();
&MYCI.CHECKLIST_CD = "00001";
&MYCI.Save;
See Also
Component Interface class: InteractiveMode property.
SetPropertyByName
Syntax
SetPropertyByName(string, value)
Description
The SetPropertyByName method sets the value of the property specified by string. Generally this function is used only in applications that cannot set the names of the component interface properties until runtime.
Parameters
|
string |
The name of the property. |
|
value |
The value to which the property is to be set. |
Returns
None.
Example
Local ApiObject &oSession, &oCI;
Local array of string &Keys_Arr, &Temp_Arr, &Prop_Arr;
Local string &strCIName, &PropertyValue;
Local number &I, &J, &K;

&strCIName = "SDK_BUS_EXP";
&Keys_Arr = CreateArrayRept("", 0);
&Keys_Arr.Push("SDK_EMPLID|" | "8001");

&oSession = %Session;
&oCI = &oSession.GetCompIntfc(@("CompIntfc." | &strCIName));

For &I = 1 To &Keys_Arr.Len
   &Temp_Arr = Split(&Keys_Arr [1], "|");
   &oCI.SetPropertyByName(&Temp_Arr [1], &Temp_Arr [2]);
End-For;
See Also
Component Interface class: GetPropertyByName method.
Component Interface Class Properties
In this section, we discuss the Component Interface class properties. The properties are discussed in alphabetical order.
ComponentName
Description
This property returns the name of the Component Interface, as defined in Application Designer, as a string.
This property is read-only.
CreateKeyInfoCollection
Description
This property returns a CompIntfPropInfoCollection collection that contains a CompIntfPropInfoCollection object for every key in CREATEKEYS.
This property is read-only.
Example
&CREATEKEYS = &CI.CreateKeyInfoCollection;
See Also
Accessing the Structure of a Component Interface.
EditHistoryItems
Description
This property works with the GetHistoryItems property to specify what data is accessed, and whether you can edit that data:
If EditHistoryItems is False (the default) and GetHistoryItems is True, you access the data in the Component Interface in a similar manner as if you were accessing a component in Update/Display All mode. This means all history rows are returned, however, you can edit only rows with a date set in the future.
If EditHistoryItems is True and GetHistoryItems is True, you access the data in the Component Interface in a similar manner as if you were accessing a component in Correction mode. This means all history rows are returned, and you can edit them.
If GetHistoryItems is False, you access the data in the Component Interface in a similar manner as if you were accessing a component in Update mode. The EditHistoryItems has no effect when GetHistoryItems is False.
You must set this property to True before you execute the Get method.
This property is read-write.
See Also
Component Interface class: GetHistoryItems property.
FindKeyInfoCollection
Description
This property returns a CompIntfPropInfoCollection collection that contains a CompIntfPropInfoCollection object for every key in FINDKEYS.
This property is read-only.
See Also
Accessing the Structure of a Component Interface.
GetDummyRows
Description
When a new scroll is inserted on a page, that scroll is displayed even though it has no underlying data. Any scroll that is empty has one dummy row displayed with only the defaults set.
This property is True if the dummy row is to be displayed, False if you do not want to display the dummy row. The default value for this property is True.
This property is read-write.
Example
&MyCI.GetDummyRows = False;
GetHistoryItems
Description
This property works with the EditHistoryItems property to specify what data is accessed, and whether you can edit that data:
If EditHistoryItems is False (the default) and GetHistoryItems is True, you access the data in the Component Interface in a similar manner as if you were accessing a component in Update/Display All mode. This means all history rows are returned, however, you can edit only rows with a date set in the future.
If EditHistoryItems is True and GetHistoryItems is True, you access the data in the Component Interface in a similar manner as if you were accessing a component in Correction mode. This means all history rows are returned, and you can edit them.
If GetHistoryItems is False, you access the data in the Component Interface in a similar manner as if you were accessing a component in Update mode. The EditHistoryItems has no effect when GetHistoryItems is False.
You must set this property to True before you execute the Get method.
This property is read-write.
Example
The following example checks the current status of the mode, then sets the GetHistoryItems and EditHistoryItems properties to True if the mode is Correction mode.
If %Mode = "C" Then
   &CI.EditHistoryItems = True;
   &CI.GetHistoryItems = True;
End-if;
See Also
Component Interface class: EditHistoryItems property.
GetKeyInfoCollection
Description
This property returns a CompIntfPropInfoCollection collection that contains a CompIntfPropInfoCollection object for every key in GETKEYS.
This property is read-only.
See Also
Accessing the Structure of a Component Interface.
InteractiveMode
Description
When this property is set as True, the Component Interface runs the same as a component: that is, any PeopleCode programs associated with FieldChange, RowInsert, and so on, run immediately after you make a change. If this property is set to False, these programs won’t run until you execute the Save method.
This property is read-write.
See Also
Session class: ErrorPending property.
PropertyInfoCollection
Description
This property returns a CompIntfPropInfoCollection object for every property that isn’t a collection (that is, a scroll.) If the property is a collection (scroll), use the PropertyInfoCollection property to get another collection.
This property is read-only.
See Also
Accessing the Structure of a Component Interface.
StopOnFirstError
Description
When this property is set as True, the CopyRowset (or CopyRowsetDelta) method currently executing halts its processing at the first error generated by the Component Interface.
When this property is set as True and InteractiveMode is set as False, processing of queued operations at save time is halted at the first error.
The default value is False.
This property is read-write.
Data Collection Methods
A data collection is the collection of data, available at runtime or during test mode, associated with a particular scroll (or record.) The data collection object returns information about every row of data (item) that is returned for that record at runtime.
To access a data collection, use the name of the record (scroll) as a property on a Component Interface.
See Also
Traversing a Component Interface and Using Data Collections.
CurrentItem
Syntax
CurrentItem()
Description
If the component associated with the Component Interface is effective-dated, CurrentItem returns a reference to the current effective-dated item (row of data). To get a specific item based on a date, use GetEffectiveItem.
If there is no current item, a Null is returned.
Example
&MYCD = &MYCI.EMPL_CHKLST_ITM;
&ITEM = &MYDC.CurrentItem();
DeleteItem
Syntax
DeleteItem(number)
Description
The DeleteItem method deletes the item (row of data) at the position specified by number. This parameter takes a number value.
When the DeleteItem method is executed, if there are any RowDelete PeopleCode programs associated with any of the fields, they fire as well, as if the user pressed ALT+8 and ENTER or clicked the DeleteRow icon. However, the programs are executed as if turbo mode was selected. (In turbo mode default processing is performed only for the row being deleted.)
If you set the InteractiveMode property to True, any RowDelete PeopleCode runs immediately after you execute DeleteItem. If this property is set to False, any RowDelete PeopleCode runs after you execute the Save method.
The deleted item is not actually deleted from the database until after you use the Save method.
Example
For example, suppose your Component Interface had two scrolls: EMPL_CHECKLIST and EMPL_CHKLST_ITM. The data collection EMPL_CHECKLIST has four items (rows of data.) The data collection EMPL_CHKLST_ITM (under the third item) has five items (rows of data.) If you run this component in the Component Interface Tester, it would look as follows:

EMPL_CHK_BC in Component Interface Tester
To delete the third row in the third item, use the following:
Local ApiObject &MYSESSION;
Local ApiObject &MYCI;

&MYSESSION = %Session;
&MYCI = &MYSESSION.GetCompIntfc(COMPINTFC.EMPL_CHK_BC);
&MYLVL1 = &MYCI.EMPL_CHECKLIST;
&ITEM2 = &MYLVL1.Item(3);
&MYLVL2 = &ITEM2.EMPL_CHKLST_ITM;
&MYLVL2.DeleteItem(3);
&MYCI.Save();
GetEffectiveItem
Syntax
GetEffectiveItem(DateString, SeqNo)
Description
If the component associated with the Component Interface is effective-dated, GetEffectiveItem returns a reference to the closest effective-dated item (row of data) that is less than or equal to the date specified by the DateString. To get an item based on the current effective date, use CurrentItem.
Note. DateString takes only a string value. You must convert a date variable into a string before you can use it for DateString. You can use the String function to do this.
Parameters
|
DateString |
Specify the year, month, and day of the effective date that you want to look for. This parameter takes a string value. You can specify the date either as YYYY-MM-DD orMM/DD/YY. |
|
SeqNo |
Specify the sequence number of the effective date that you want to look for. This parameter takes a number value. |
Returns
A reference to an effective-dated item.
Example
&MYCD = &MYCI.EMPL_CHKLST_ITM;
&DSTRING = String(&MYDATE);
&ITEM = &MYDC.GetEffectiveItem(&DSTRING, 1);
See Also
GetEffectiveItemNum
Syntax
GetEffectiveItemNum(DateString, SeqNo)
Description
If the component associated with the Component Interface is effective-dated, GetEffectiveItemNum returns a reference to the number of the closest effective-dated item (row of data) that is less than or equal to the date specified by the DateString. To get an item number based on the current effective date, use CurrentItemNum.
Note. DateString takes only a string value. You must convert a date variable into a string before you can use it for DateString. You can use the String function to do this.
Considerations for Returning Rows
GetEffectiveItemNum returns a valid row number only when EFFDT is less than or equal to DateString. If the value you use for DateString pre-dates all the rows in the data collection, this method returns a zero and logs a message in the PSMessages collection.
For example, if 12/01/1990 was the earliest date in the collection, the following would return zero:
&NUM = &MYDC.GetEffectiveItemNum("01/01/1900", 1);
Parameters
|
DateString |
Specify the year, month, and day of the effective date that you want to look for. This parameter takes a string value. You can specify the date either as YYYY-MM-DD orMM/DD/YYYY. |
|
SeqNo |
Specify the sequence number of the effective date that you want to look for. This parameter takes a number value. |
Returns
A number. This method returns 0 if no row matching the criteria is found.
Example
&MYCD = &MYCI.EMPL_CHKLST_ITM;
&DSTRING = String(&MYDATE);
&ITEMNUM = &MYDC.GetEffectiveItemNum(&DSTRING, 1);
See Also
InsertItem
Syntax
InsertItem(number)
Description
The InsertItem method inserts the item (row of data) at the position specified by number. This parameter takes a number value. You can insert items below only the zero level scroll. If you need to add a new data item, use the Create method instead.
InsertItem adds the new row after the current row. If the row has an effective date (EFFDT) or an effective sequence (EFFSEQ), these values are copied into the new row.
If a collection has n items and you specify n as the value for number, InsertItem inserts a new item (row) after the last row.
The InsertItem method returns a reference to the newly created item (row of data).
When the InsertItem method is executed, if there are any RowInsert PeopleCode programs associated with any of the fields, they fire also, as if the user pressed ALT+7 and ENTER or clicked the InsertRow icon. However, the programs are executed as if turbo mode was selected. (In turbo mode default processing is performed only for the row being inserted.)
If you set the InteractiveMode property to True, any RowInsert PeopleCode runs immediately after you execute InsertItem. If this property is set to False, any RowInsert PeopleCode runs after you execute the Save method.
The inserted item is not added to the database until after you use the Save method.
Example
In the following example a new item (row of data) is added at the end of the current collection.
&MYDC = &MYCI.EMPL_CHECKLIST;
&COUNT = &MYDC.Count;
&ITEM = &MYDC.InsertItem(&COUNT);
&ITEM.CHECKLIST_CD = "00001";
&ITEM.RESPONSIBLE_ID = "6609";
&RSLT = &MYCI.Save();
Item
Syntax
Item(number)
Description
The Item returns the item (row of data) that exists at the number position in the data collection executing the method. The parameter takes a number value.
ItemByKeys
Syntax
ItemByKeys(­key_values)
Description
The ItemByKeys method returns the item specified by the parameters. The number and type of keys are unique to each specific collection. Each key must be separated by a comma.
The collection reference must be the name of the Component Interface, followed by the record name. This method won’t work on a collection reference (that is, &CI.RECNAME.ItemByKeys, not &MYCOLLECTION.ItemByKeys).
After you’ve returned an item, use the ItemNum property to determine the number of the item.
The keys must be in the exact order as in the Component Interface. A second level data collection also contains the keys of the parent data collection.
An easy way to determine the keys and their order in PeopleCode is to open the Component Interface in Application Designer, and use the Test Component. To determine the keys in Visual Basic, use the Object Browser.
See Data Item class: ItemNum property.
To see the signature for ItemByKeys:
Open the Component Interface in Application Designer.
Start the Component Interface Tester.
Select the open Component Interface, then right-click, and select Test Component Interface from the pop-up menu.
Instantiate an object.
Add data to the Get or Create keys and click Get Existing or Create New, respectively.
Expand the instantiated component until you find the collection in which you’re interested.
Right-click on the collection and select ItemByKeys from the resulting pop-up menu.
The dialog that follows shows you the specific parameters, types, and order in which you should call ItemByKeys.
Returns
An item (row) of data from a data collection.
Example
Local ApiObject &MYSESSION;
Local ApiObject &CI;
Local ApiObject &CI_COLLECTION;
Local ApiObject &CI_ITEM;

&MYSESSION = %Session;
&CI = &MYSESSION.GetCompIntfc(COMPINTFC.CM_EVAL);
&CI.EMPLID = "8001";
If &CI.Get() <> 1 Then
   Exit;
End-If;

&CI_COLLECTION = &CI.CM_EVALUATIONS;
&COUNT = &CI_COLLECTION.Count;

&CI_ITEM = &CI.CM_EVALUATIONS.itembykeys("01");
&CI_ITEM.DESCR50 = "TEST";
If &CI.Save() <> 1 Then
   Exit;
End-If;
See Also
Data Collection Properties
This section explains the following Data Collection properties:
Count
CurrentItemNumber
Count
Description
This property returns the number of data items (rows of data) in the data collection.
This property is read-only.
Example
&CI = &MYSESSION.GetCompIntfc(COMPINTFC.CM_EVAL_BC);
&CI.EMPLID = "8001";
&CI.Get()

&CI_COLLECTION = &CI.CM_EVALUATIONS;
&COUNT = &CI_COLLECTION.Count;
CurrentItemNumber
Description
If the component associated with the Component Interface is effective-dated, this property returns the item number for the current effective-dated item (row of data).
This property is read-only.
Data Item Class Property
This section discusses the ItemNum property.
ItemNum
Description
This property returns the number of the data item (row) in the collection. For example, many of the data collection methods takes a number as a parameter. Use this property to determine the item number (row number) of an item in a collection, then use that number in another method.
This property is read-only.
Example
Evaluate USER_ACTION

.  .  .

When = "D"
   &CI_ITEM = &CI_LVL1_NAMES.ItemByKeys(&NAME_TYPE, &NAME_PART);
   If &CI_ITEM <> Null then
      &I = &CI_LVL1_NAMES.ItemNum;
      &CI_LVL1_NAMES.DeleteItem(&I);
   End-if;
.  .  .
End-Evaluate;
Accessing the Structure of a Component Interface
The structure of a Component Interface can be accessed using a CompIntfPropInfoCollection object. You access a CompIntfPropInfoCollection object from a CompIntfPropInfoCollection collection. There is more than one way to instantiate a CompIntfPropInfoCollection collection.
Note. You don’t have to populate a Component Interface with data before you access the structure. You can access the structure of a Component Interface immediately after you use the GetCompIntfc method with a session object. Accessing the structure of a Component Interface before you populate it with data may increase your performance.
See Session class: GetCompIntfc method.
CompIntfPropInfoCollection Collection
There are two types of CompIntfPropInfoCollection object properties: field properties and collection properties.
A field property maps to a specific record field. You can access structural information about the field using a CompIntfPropInfoCollection object. This information includes the name of the field, whether it’s required, is it based on a prompt table, and so on.
A collection property is just that, a collection of properties. And before you can access a CompIntfPropInfoCollection object, you must first get a CompIntfPropInfoCollection collection. The following are the valid types of CompIntfPropInfoCollection collections:
CREATEKEYS, GETKEYS and FINDKEYS
When you create a component, you must specify the search record to be used with that component. You can also specify an alternate search record to be used when the component is accessed in Add mode. The key fields from those records make up the GETKEYS, FINDKEYS, and CREATEKEYS collections.
Note. In order for a component interface to validate a key against a prompt table, both the Search Edit and List Box Item options must be selected in the record field properties for the key.
CREATEKEYS: A collection containing the key fields of the search record specified to be used in Add mode. Use the CreateKeyInfoCollection property to instantiate the CompIntfPropInfoCollection collection.
GETKEYS: A collection containing the primary required key fields from the primary search record. Use the GetKeyInfoCollection property to instantiate the CompIntfPropertInfo collection.
FINDKEYS: A collection containing the key fields and the alternate key fields from the primary search record. Use the FindKeyInfoCollection property to instantiate the CompIntfPropertInfo collection.
A page scroll
The fields associated with a page scroll are in this type of collection. This may or may not be all the fields associated with the record. Use the PropertyInfoCollection property to instantiate this kind of collection.
If the page the Component Interface is based on contains a secondary scroll, you can check the Type property to determine if the object is a CompIntfPropInfoCollection object (that is, a field), or a scroll. Then, to get the properties of the fields associated with that secondary scroll, you can use the PropertyInfoCollection property on the CompIntfPropInfoCollection object.
For example, the following Component Interface has a level zero and level one scroll.
The level zero scroll is made up of three fields: CHECKLIST_CD, RESPONSIBLE_ID, COMMENTS, and a level one scroll, EMPL_CHKLST_ITM. The CompIntfPropInfoCollection collection for this Component Interface would have four items in it. Three would be CompIntfPropInfoCollection objects (the three fields.) The last item, EMPL_CHKLST_ITM would not be a valid CompIntfPropInfoCollection object. You can use the IsCollection property to verify if an item in a collection is itself a collection or a valid CompIntfPropInfoCollection object.
To access the fields in a lower level scroll, you must use the PropertyInfoCollection property first, to return a collection of those fields.
The following example loops through a Component Interface. It pulls out the names of the properties in the first three levels of a Component Interface. If the property is a nested collection, it prefixes the ancestor collection name to the property name.
&MYSESSION = %Session;
&CI = &MYSESSION.GetCompIntfc(COMPINTFC.VOLNEW);
&PROPINFO_0 = &CI.PropertyInfoCollection;
For &I = 1 To &PROPINFO_0.Count;
   &PROPITEM_0 = &PROPINFO_0.Item(&I);
   Warning (&PROPITEM_0.Name);
   If (&PROPITEM_0.IsCollection) Then
      &PROPINFO_1 = &PROPITEM_0.PropertyInfoCollection;
      For &J = 1 To &PROPINFO_1.Count;
         &PROPITEM_1 = &PROPINFO_1.Item(&J);
         &S1 = &PROPITEM_0.Name | "." | &PROPITEM_1.Name;
         Warning (&S1);
         If (&PROPITEM_1.IsCollection) Then
            &PROPINFO_2 = &PROPITEM_1.PropertyInfoCollection;
            For &K = 1 To &PROPINFO_2.Count;
               &PROPITEM_2 = &PROPINFO_2.Item(&K);
               &S1 = &PROPITEM_0.Name | "." | &PROPITEM_1.Name | "." | ⇒
&PROPITEM_2.Name;
               Warning (&S1);
            End-For;
         End-If
      End-For;
   End-If;
End-For;
CompIntfPropInfoCollection Collection Methods
This section explains the CompIntfPropInfoCollection collection methods.
First
Syntax
First()
Description
The First method returns the first CompIntfPropInfoCollection object in the CompIntfPropInfoCollection collection object executing the method.
Example
&CIINFO = &CIPROPCOLL.First();
Item
Syntax
Item(number)
Description
The Item method returns a CompIntfPropInfoCollection object that exists at the number position in the CompIntfPropInfoCollection collection executing the method
If the specified item is itself a collection, the CompIntfPropInfoCollection object that gets returned is invalid (set to NULL). You can use the PropertyInfoCollection property to return a collection of CompIntfPropInfoCollection objects for the collection.
Example
&SCROLL1 = &MYCI.PropertyInfoCollection;
For &I = 1 to &SCROLL1.Count;
&PROPERTY = &SCROLL1.Item(&I);
If &PROPERTY.IsCollection Then
&SCROLL2 = &PROPERTY.PropertyInfoCollection;
/*do scroll 2 processing */
Else
/* do scroll 1 processing */
End-If;
End-For;
Next
Syntax
Next()
Description
The Next method returns the next CompIntfPropInfoCollection object in the CompIntfPropInfoCollection collection object executing the method. You can use this method only after you have used either the First or Item methods: otherwise the system doesn’t know where to start.
CompIntfPropInfoCollection Collection Properties
This section explains the Count property.
Count
Description
This property returns the number of CompIntfPropInfoCollection objects in the CompIntfPropInfoCollection collection object executing the method.
This property is read-only.
Example
&COUNT = &MYCIPROPINFOC.Count;
CompIntfPropInfoCollection Object Properties
This section explains the CompIntfPropInfoCollection Object properties.
Format
Description
This property returns the field format for the object executing the property (that is, name, phone, zip, SSN, and so on) as a number. The values are:
|
Value |
Description |
|
0 |
No Format |
|
1 |
Name |
|
2 |
Phone |
|
3 |
Zip |
|
4 |
SSN |
|
5 |
Routine |
|
6 |
Mixed Case |
|
7 |
Raw Binary |
|
8 |
Number only |
|
9 |
SIN |
|
10 |
Phone International |
|
11 |
Zip International |
|
12 |
Seconds |
|
13 |
Microseconds |
|
14 |
Custom |
This property is read-only.
IsCollection
Description
This property returns True if the object executing the property is a data collection, False otherwise. If IsCollection is True, other field-oriented properties like Required, Type, Xlat, YesNo, Prompt and Format are undefined. If IsCollection is False, the object represents a field and all the previous properties are defined as described.
This property is read-only.
IsReadOnly
Description
This property returns True if the property marked Read Only in the Component Interface Definition; False otherwise.
This property is read-only.
Key
Description
This property returns True if the object executing the property is a key, False otherwise.
This property is read-only.
LabelLong
Description
This property returns the record field LongName value as a string. If there is a component override for this value, it is not included.
This property is read-only.
LabelShort
Description
This property returns the record field ShortName value as a string. If there is a component override for this value, it is not included.
This property is read-only.
Length
Description
This property returns the length of the field property as a number. If the property is a collection, this property returns a zero.
The length of the field is calculated by converting it to a string then getting the length of the string. This means that everything in the field is counted as a character, including spaces, date time separation characters, decimal points, sign indicators, and so on.
For example, the following string has 10 characters:
01/01/2001
The following string has five characters:
10.10
The following string has six characters:
-10.10
This property is read-only.
Name
Description
This property returns the name of the object executing the property as a string.
This property is read-only.
Prompt
Description
This property returns True if the object executing the property is associated with a prompt table, False otherwise.
This property is read-only.
PropertyInfoCollection
Description
This property returns another CompIntfPropInfoCollection collection if the object executing the property is a collection.
This property is read-only.
Example
&SCROLL1 = &MYCI.PropertyInfoCollection;
For &I = 1 to &SCROLL1.Count;
   &PROPERTY = &SCROLL1.Item(&I);
   If &PROPERTY.IsCollection Then
   &SCROLL2 = &PROPERTY.PropertyInfoCollection;
   /*do scroll 2 processing */
   Else
/* do scroll 1 processing */
   End-If;
End-For;
Required
Description
This property returns True if the object executing the property is a required property, False otherwise.
This property is read-only.
Type
Description
This property returns the field type, as a number, of the object. The values are:
|
Value |
Description |
|
0 |
Character |
|
1 |
Long Character |
|
2 |
Number |
|
3 |
Signed Number |
|
4 |
Date |
|
5 |
Time |
|
6 |
DateTime |
|
7 |
SubRecord (Not supported with Component Interfaces) |
|
8 |
Image (Limited support with Component Interfaces) |
|
9 |
ImageReference (Not supported with Component Interfaces) |
This property is read-only.
Xlat
Description
This property returns True if the object executing the property is associated with an XLAT table, False otherwise.
This property is read-only.
YesNo
Description
This property returns True if the object executing the property is associated with the Yes/No table, False otherwise.
This property is read-only.
Component Interface Examples
The following are examples of some of the most usual actions you're likely to perform using a Component Interface.
Create a New Instance of Data Example
The following is an example of how to create a new instance of a Component Interface.
To create a new instance of data:
In this example, you are creating a new instance of data for the EXPRESS Component Interface, which is based on the EXPRESS_ISSUE_INV component. The following is the complete code sample: the steps explain each line.
Local ApiObject &MYSESSION;
Local ApiObject &MYCI;


&MYSESSION = %Session;
&MYCI = &MYSESSION.GetCompIntfc(COMPINTFC.EXPRESS);
&MYCI.BUSINESS_UNIT = "H01B";
&MYCI.INTERNAL_FLG = "Y";
&MYCI.ORDER_NO = "NEXT’;
&MYCI.Create();
&MYCI.CUSTOMER = "John’s Chicken Shack";
&MYCI.LOCATION = "H10B6987";
.
.
.
If NOT(&MYCI.Save()) Then
   /* save didn’t complete */
   &COLL = &MYSESSION.PSMessages;
   For &I = 1 to &COLL.Count
      &ERROR = &COLL.Item(&I);
      &TEXT = &ERROR.Text;
      /* do error processing */
   End-For;
   &COLL.DeleteAll();
End-if;
Get a session object.
Before you can get a Component Interface, you have to get a session object. The session controls access to the Component Interface, provides error tracing, enables you to set the runtime environment, and so on.
&MYSESSION = %Session;
Get a Component Interface.
Use the GetCompIntfc method with a session object to get the Component Interface. You must specify a Component Interface definition that has already been created. You receive a runtime error if you specify a Component Interface that doesn’t exist.
&MYCI = &MYSESSION.GetCompIntfc(COMPINTFC.EXPRESS);
After you execute the GetCompIntfc method, you have only the structure of the Component Interface. You haven’t populated the Component Interface with data yet.
Set the CREATEKEYS.
These key values are required to open a new instance of the data. If the values you specify aren’t unique, that is, if an instance of the data already exists in the database with those key values, you receive a runtime error.
&MYCI.BUSINESS_UNIT = "H01B";
&MYCI.INTERNAL_FLG = "Y";
&MYCI.ORDER_NO = "NEXT’;
Create the instance of data for the Component Interface.
After you set the key values, you must use the Create method to populate the Component Interface with the key values you set.
&MYCI.Create();
This creates an instance of this data. However, it hasn’t been saved to the database. You must use the Save method before the instance of data is committed to the database.
Set the rest of the fields.
Assign values to the other fields.
&MYCI.CUSTOMER = "John’s Chicken Shack";
&MYCI.LOCATION = "H10B6987";
.
.
.
If you have specified InteractiveMode as True, every time you assign a value or use the InsertItem or DeleteItem methods, any PeopleCode programs associated with that field (either with record field or the component record field) fires (FieldEdit, FieldChange, RowInsert, and so on.)
Save the data.
When you execute the Save method, the new instance of the data is saved to the database.
If NOT(&MYCI.Save()) Then
The Save method returns a Boolean value: True if the save was successful, False otherwise. You can use this value to do error checking.
The standard PeopleSoft save business rules (that is, any PeopleCode programs associated with SaveEdit, SavePreChange, WorkFlow, and so on.) are executed. If you didn’t specify the Component Interface to run in interactive mode, FieldEdit, FieldChange, and so on, also run at this time for all fields that had values set.
Note. If you’re running a Component Interface from an Application Engine program, the data won’t actually be committed to the database until the Application Engine program performs a COMMIT.
Check Errors.
You can check if there were any errors using the PSMessages property on the session object.
If NOT(&MYCI.Save()) Then
   /* save didn’t complete */
   &COLL = &MYSESSION.PSMessages;
   For &I = 1 to &COLL.Count
      &ERROR = &COLL.Item(&I);
      &TEXT = &ERROR.Text;
      /* do error processing */
   End-For;
   &COLL.DeleteAll();
End-if;
If there are multiple errors, all errors are logged to the PSMessages collection, not just the first occurrence of an error. As you correct each error, delete it from the PSMessages collection.
The Text property of the PSMessage returns the text of the error message. At the end of this text is a contextual string that contains the name of the field that generated the error. The contextual string has the following syntax:
{BusinessComponentName.[CollectionName(Row).[CollectionName(Row).[CollectionName⇒
(Row)]]].PropertyName}
For example, if you specified the incorrect format for a date field of the Component Interface named ABS_HIST, the Text property would contain the following string:
Invalid Date {ABS_HIST.BEGIN_DT} (90), (1)
The contextual string (by itself) is available using the Source property of the PSMessage.
Note. If you’ve called your Component Interface from an Application Engine program, all errors are also logged in the Application Engine error log tables.
See Error Handling, Source.
Getting an Existing Instance of Data Example
The following is an example of how to get an existing instance of a Component Interface.
In this example, you are getting an existing instance of data for the EMPL_CHKLST_BC Component Interface, which is based on the EMPLOYEE_CHECKLIST component. The following is the complete code sample: the steps explain each line.
Local ApiObject &MYSESSION;
Local ApiObject &MYCI;

&MYSESSION = %Session;
&MYCI = &MYSESSION.GetCompIntfc(COMPINTFC.EMPL_CHKLST_BC);
&MYCI.EMPLID= "8001";
&MYCI.Get();

/* Get checklist Code */

&CHECKLIST_CD = &MYCI.CHECKLIST_CD;

/* Set Effective date */

&MYCI.EFFDT = "05-01-1990";
.
.
.
If NOT(&MYCI.Save()) Then
   /* save didn’t complete */
   &COLL = &MYSESSION.PSMessages;
   For &I = 1 to &COLL.Count
      &ERROR = &COLL.Item(&I);
      &TEXT = &ERROR.Text;
      /* do error processing */
   End-For;
   &COLL.DeleteAll();
End-if;
Get a session object.
Before you can get a Component Interface, you have to get a session object. The session controls access to the Component Interface, provides error tracing, enables you to set the runtime environment, and so on.
&MYSESSION = %Session;
Get a Component Interface.
Use the GetCompIntfc method with a session object to get the Component Interface. You must specify a Component Interface definition that has already been created. You receive a runtime error if you specify a Component Interface that doesn’t exist.
&MYCI = &MYSESSION.GetCompIntfc(COMPINTFC.EMPL_CHKLST_BC);
After you execute the GetCompIntfc method, you have only the structure of the Component Interface. You haven’t populated the Component Interface with data yet.
Set the GETKEYS.
These are the key values required to return a unique instance of existing data. If the keys you specify allow for more than one instance of the data to be returned, or if no instance of the data matching the key values is found, you receive a runtime error.
&MYCI.EMPLID = "8001";
Get the instance of data for the Component Interface.
After you set the key values, you have to use the Get method.
&MYCI.Get();
This populates the Component Interface with data, based on the key values you set.
Get field values or set field values.
At this point, you can either get values or set values.
&CHECKLIST_CD = &MYCI.CHECKLIST_CD;

/* OR */
&MYCI.EFFDT = "05-01-1990";
If you have specified InteractiveMode as True, every time you assign a value, any PeopleCode programs associated with that field (either with record field or the component record field) fires (FieldEdit, FieldChange, and so on.)
Save or Cancel the Component Interface, as appropriate.
If you’ve changed values and you want to save your changes to the database, you must use the Save method.
If NOT(&MYCI.Save()) Then
The Save method returns a Boolean value: True if the save was successful, False otherwise. Use this value to do error checking.
The standard PeopleSoft save business rules (that is, any PeopleCode programs associated with SaveEdit, SavePreChange, WorkFlow, and so on.) are executed. If you didn’t specify the Component Interface to run in interactive mode, FieldEdit, FieldChange, and so on, also run at this time.
Note. If you’re running a Component Interface from an Application Engine program, the data won’t actually be committed to the database until the Application Engine program performs a COMMIT.
If you don’t want to save any changes to the data, use the Cancel method. The Component Interface is reset to the state it was in just after you used the GetCompIntfc method.
&MYCI.Cancel();
This is similar to a user pressing ESC while in a component, and choosing to not save any of their changes.
Check Errors.
You can check if there were any errors using the PSMessages property on the session object.
If NOT(&MYCI.Save()) Then
   /* save didn’t complete */
   &COLL = &MYSESSION.PSMessages;
   For &I = 1 to &COLL.Count
      &ERROR = &COLL.Item(&I);
      &TEXT = &ERROR.Text;
      /* do error processing */
   End-For;
   &COLL.DeleteAll();
End-if;
If there are multiple errors, all errors are logged to the PSMessages collection, not just the first occurrence of an error. As you correct each error, delete it from the PSMessages collection.
The Text property of the PSMessage returns the text of the error message. At the end of this text is a contextual string that contains the name of the field that generated the error. The contextual string has the following syntax:
{ComponentInterfaceName.[CollectionName(Row).[CollectionName(Row).[CollectionName⇒
(Row)]]].PropertyName}
For example, if you specified the incorrect format for a date field of the Component Interface named ABS_HIST, the Text property would contain the following string:
Invalid Date {ABS_HIST.BEGIN_DT} (90), (1)
The contextual string (by itself) is available using the Source property of the PSMessage.
Note. If you’ve called your Component Interface from an Application Engine program, all errors are also logged in the Application Engine error log tables.
See Error Handling, Source.
Retrieving a List of Instance of Data Example
The following is an example of how to retrieve a list of instances of data.
To retrieve a list of instances of data:
In this example, you are getting a list of existing instances of data for the EMPL_CHKLST_CI Component Interface, which is based on the EMPLOYEE_CHECKLIST component. The following is the complete code sample: the steps break it up and explain each line.
Local ApiObject &MYSESSION;
Local ApiObject &MYCI;
Local ApiObject &MYNEWCI;


&MYSESSION = %Session;
&MYCI = &MYSESSION.GetCompIntfc(COMPINTFC.EMPL_CHKLST_CI);
&MYCI.EMPLID= "8";
&MYCI.LAST_NAME_SRCH = "S";
&MYLIST = &MYCI.Find();
For &I = 1 to &MYLIST.Count;

   /* note: do not reuse the CI used to create the list, or the list will be⇒
 destroyed */

&MYNEWCI = &MYLIST.Item(&I);

/* CI from list still must be instantiated to use it */

&MYNEWCI.Get();

/* do some processing */

End-For;
Get a session object.
Before you can get a Component Interface, you have to get a session object. The session controls access to the Component Interface, provides error tracing, enables you to set the runtime environment, and so on.
&MYSESSION = %Session;
Get a Component Interface.
Use the GetCompIntfc method with a session object to get the Component Interface. You must specify a Component Interface definition that has already been created. You receive a runtime error if you specify a Component Interface that doesn’t exist.
&MYCI = &MYSESSION.GetCompIntfc(COMPINTFC.EMPL_CHKLST_CI);
After you execute the GetCompIntfc method, you have only the structure of the Component Interface. You haven’t populated the Component Interface with data yet.
Set the FINDKEYS values.
These can be alternate key values or partial key values. If no instance of the data matching the key values is found, you receive a runtime error.
&MYCI.EMPLID = "8";
&MYCI.LAST_NAME_SRCH = "S";
Get a list of data instances for the Component Interface.
After you set the alternate or partial key values, use the Find method to return a list of data instances for the Component Interface.
&MYLIST = &MYCI.Find();
Note. The Find method can be executed only at level zero in a Component Interface.
Select an instance of the data.
To select an instance of the data, you can use any of the following standard data collection methods:
First
Item
Next
For example, you could loop through every instance of the data to do some processing:
For &I = 1 to &MYLIST.Count;
   /* note: do not reuse the Component Interface used to */
   /* create the list here, or the list will be destroyed */
&MYNEWCI = &MYLIST.Item(&I);
/* CI from list must still be instantiated to use it */
&MYNEWCI.Get();
/* do some processing */
End-For;
After you have a specific instance of the data, you can get values, set values, and so on.
Inserting Effective-Dated Data Example
You can rename a collection in a Component Interface. For example, suppose you had the same record at level zero and at level one. You may want to rename the level one data collection to reflect this. The data in a data collection is associated with the primary database record of a scroll, not with the name you supply.
Here is an example of using a Component Interface that has the same record at level zero and level one. The Component Interface is based on the CURRENCY_CD_TBL component.
The following code example is based on this Component Interface and does the following:
Gets an existing Component Interface.
Finds the current effective-dated item index.
Inserts a new row before the current effective-dated item using the InsertItem method.
Local ApiObject &Session;
Local ApiObject &CURRENCY_CD;
Local ApiObject &CURRENCY_CD_TBLCol;
Local ApiObject &CURRENCY_CD_TBLItm;
Local ApiObject &PSMessages;
Local string &ErrorText, &ErrorType;
Local number &ErrorCount;
Local Boolean &Error;

Function CheckErrorCodes()

   &PSMessages = &Session.PSMessages;
   &ErrorCount = &PSMessages.Count;
   For &i = 1 To &ErrorCount
      &ErrorText = &PSMessages.Item(&i).Text;
      &ErrorType = &PSMessages.Item(&i).Type;
   End-For;

End-Function;

/* Initialize Flags */
&Error = False;

&Session = %Session;

If &Session <> Null Then

   CheckErrorCodes();
   /* Application Specific Error Processing */

Else

   &CURRENCY_CD = &Session.GetCompIntfc(CompIntfc.CURRENCY_CD);

   If &CURRENCY_CD = Null Then

      CheckErrorCodes();
      /* Application Specific Error Processing */

   Else

      /* Set Component Interface Get Keys */
      &CURRENCY_CD.CURRENCY_CD = "USD";

      If Not &CURRENCY_CD.Get() Then

         CheckErrorCodes();
         /* Application Specific Error Processing */
         &Error = True;

      End-If;

      If Not &Error Then

         &CURRENCY_CD_TBLCol = &CURRENCY_CD.CURRENCY_CD_TBL;
         &CURRENCY_CD_TBLItm = &CURRENCY_CD_TBLCol.InsertItem(&CURRENCY_CD_⇒
TBLCol.CurrentItemNum());
         &CURRENCY_CD_TBLItm.EFFDT = %Date;
         &CURRENCY_CD_TBLItm.EFF_STATUS = "A";
         &CURRENCY_CD_TBLItm.DESCR = "NewCurrencyCode";
         &CURRENCY_CD_TBLItm.DESCRSHORT = "New";
         &CURRENCY_CD_TBLItm.COUNTRY = "USA";
         &CURRENCY_CD_TBLItm.CUR_SYMBOL = "?";
         &CURRENCY_CD_TBLItm.DECIMAL_POSITIONS = 4;
         &CURRENCY_CD_TBLItm.SCALE_POSITIONS = 0;

         /* Save Instance of Component Interface */
         If Not &CURRENCY_CD.Save() Then

            CheckErrorCodes();
            /* Application Specific Error Processing */

         End-If;

      End-If;
      /* End: Set Component Interface Properties */

      /* Cancel Instance of Component Interface */
      &CURRENCY_CD.Cancel();

   End-If;
End-If;
Inserting Effective-Dated Data Example Using Visual Basic
Here's a code example in Visual Basic that does the same thing as the previous code example.
Private Sub CURRENCY_CD()

        On Error GoTo eMessage

        '***** Set Object References *****
        Dim oCISession As Object
        Dim oCURRENCY_CD As Object
        Dim oCURRENCY_CD_TBL As Object
        Dim oCURRENCY_CD_TBLItem As Object

        '***** Set Connect Parameters *****
        strAppSeverPath = "//PSOFT101999:9000"
        strOperatorID = "PTDMO"
        strPassword = "PTDMO"

        '***** Create PeopleSoft Session Object *****
        Set oCISession = CreateObject("PeopleSoft.Session")

        '***** Connect to the App Sever *****
        oCISession.Connect 1, strAppSeverPath, strOperatorID, strPassword, 0

        '***** Get the Component *****
        Set oCURRENCY_CD = oCISession.GetCompIntfc("CURRENCY_CD")

        '***** Set the Component Interface Mode *****
        oCURRENCY_CD.InteractiveMode = False
        oCURRENCY_CD.GetHistoryItems = True

        '***** Set Component Get/Create Keys *****
        oCURRENCY_CD.CURRENCY_CD = "USD"

        '***** Execute Create *****
        oCURRENCY_CD.Get

        'Set CURRENCY_CD_TBL Collection Field Properties --
        'Parent: PS_ROOT Collection
        Set oCURRENCY_CD_TBL = oCURRENCY_CD.CURRENCY_CD_TBL
        Set oCURRENCY_CD_TBLItem = oCURRENCY_CD_TBL.InsertItem(oCURRENCY_CD_⇒
TBL.CurrentItemNum())

        oCURRENCY_CD_TBLItem.EFFDT = Date
        oCURRENCY_CD_TBLItem.EFF_STATUS = "A"
        oCURRENCY_CD_TBLItem.DESCR = "NewCurrencyCode"
        oCURRENCY_CD_TBLItem.DESCRSHORT = "New"
        oCURRENCY_CD_TBLItem.COUNTRY = "USA"
        oCURRENCY_CD_TBLItem.CUR_SYMBOL = "?"
        oCURRENCY_CD_TBLItem.DECIMAL_POSITIONS = 4
        oCURRENCY_CD_TBLItem.SCALE_POSITIONS = 0

        '***** Save Component Interface *****
        oCURRENCY_CD.Save
        oCURRENCY_CD.Cancel

        Exit Sub

eMessage:
        '***** Display VB Runtime Errors *****
        MsgBox Err.Description

        '***** Display PeopleSoft Error Messages *****
        If oCISession.PSMessages.Count > 0 Then
                For i = 1 To oCISession.PSMessages.Count
                        MsgBox oCISession.PSMessages.Item(i).Text
                Next i
        End If

End Sub

Sub MAIN()
    CURRENCY_CD
End Sub
Inserting or Deleting a Row of Data Example
The CopyRowset and CopyRowsetDelta methods use the primary database name of a scroll, not the name you may give a collection.
A data collection represents a row of data. You often insert or delete a row of data.
To insert or delete a row of data:
In this example, you are getting a existing instance of data for the BUS_EXP Component Interface, which is based on the BUSINESS_EXPENSES component, then inserting (or deleting) a row of data in the second level scroll.
The following is the complete code sample: the steps explain each line.
Local ApiObject &MYSESSION; Local ApiObject &MYCI; &MYSESSION = %Session; &MYCI = &MYSESSION.GetCompIntfc(COMPINTFC.BUS_EXP); &MYCI.EMPLID= "8001"; &MYCI.Get(); &MYLEVEL1 = &MYCI.BUS_EXPENSE_PER; /* get appropriate item in lvl1 collection */ For &I = 1 to &MYLEVEL1.Count &ITEM = &MYLEVEL1.Item(&I); &MYLEVEL2 = &ITEM.BUS_EXPENSE_DTL; &COUNT = &MYLEVEL2.Count /* get appropriate item in lvl2 collection */ For &J = 1 to &COUNT &LVL2ITEM = &MYLEVEL2.Item(&J); &CIDATE = &LVL2ITEM.CHARGE_DT; If &CIDATE <> %Date Then /* insert row */ &NEWITEM = &MYLEVEL2.InsertItem(&COUNT); /* set values for &NEWITEM */ Else /* delete last row */ &MYLEVEL2.DeleteItem(&COUNT); End-If; End-For; End-For; If NOT(&MYCI.Save()) Then /* save didn’t complete */ &COLL = &MYSESSION.PSMessages; For &I = 1 to &COLL.Count &ERROR = &COLL.Item(&I); &TEXT = &ERROR.Text; /* do error processing */ End-For; &COLL.DeleteAll(); End-if;
Get a session object.
Before you can get a Component Interface, you have to get a session object. The session controls access to the Component Interface, provides error tracing, enables you to set the runtime environment, and so on.
&MYSESSION = %Session;
Get a Component Interface.
Use the GetCompIntfc method with a session object to get the Component Interface. You must specify a Component Interface definition that has already been created. You receive a runtime error if you specify a Component Interface that doesn’t exist.
&MYCI = &MYSESSION.GetCompIntfc(COMPINTFC.BUS_EXP);
After you execute the GetCompIntfc method, you have only the structure of the Component Interface. You haven’t populated the Component Interface with data yet.
Set the GETKEYS.
These are the key values required to return a unique instance of existing data. If the keys you specify allow for more than one instance of the data to be returned, or if no instance of the data matching the key values is found, you receive a runtime error.
&MYCI.EMPLID = "8001";
Get the instance of data for the Component Interface.
After you set the key values, you must use the Get method.
&MYCI.Get();
This populates the Component Interface with data, based on the key values you set.
Get the level one scroll.
The name of the scroll can be treated like a property. It returns a data collection that contains all the level one data.
&MYLEVEL1 = &MYCI.BUS_EXPENSE_PER
Get the appropriate item in the level one data collection.
Remember, scroll data is hierarchical. You must get the appropriate level one row before you can access the level two data.
For &I = 1 to &MYLEVEL1.Count
&ITEM = &MYLEVEL1.Item(&I);
Get the level two scroll.
This is done the same way as you accessed the level one scroll, by using the scroll name as a property.
&MYLEVEL2 = &ITEM.BUS_EXPENSE_DTL;
Get the appropriate item in the level two data collection.
A data collection is made up of a series of items (rows of data.) You have to access the appropriate item (row) in this level also.
&COUNT = &MYLEVEL2.Count
/* get appropriate item in lvl2 collection */
For &J = 1 to &COUNT
&LVL2ITEM = &MYLEVEL2.Item(&J);
Insert or delete a row of data.
You can insert or delete a row of data from a data collection. The following example finds the last item (row of data) in the second level scroll. If it matches the value of %Date, the last item is deleted. If it doesn’t match, a new row is inserted.
&CIDATE = &LVL2ITEM.CHARGE_DT;
If &CIDATE <> %Date Then
   /* insert row */
&NEWITEM = &MYLEVEL2.InsertItem(&COUNT);
/* set values for &NEWITEM */
Else
   /* delete last row */
&MYLEVEL2.DeleteItem(&COUNT);
End-If;
Save the data.
When you execute the Save method, the new instance of the data is saved to the database.
If NOT(&MYCI.Save()) Then
The Save method returns a Boolean value: True if the save was successful, False otherwise. Use this value to do error checking.
The standard PeopleSoft save business rules (that is, any PeopleCode programs associated with SaveEdit, SavePreChange, WorkFlow, and so on) are executed. If you did not specify the Component Interface to run in interactive mode, FieldEdit, FieldChange, and so on, also run at this time.
Note. If you’re running a Component Interface from an Application Engine program, the data won’t actually be committed to the database until the Application Engine program performs a COMMIT.
Check Errors.
You can check if there were any errors using the PSMessages property on the session object.
If NOT(&MYCI.Save()) Then
   /* save didn’t complete */
   &COLL = &SESSION.PSMessages;
   For &I = 1 to &COLL.Count
      &ERROR = &COLL.Item(&I);
      &TEXT = &ERROR.Text;
      /* do error processing */
   End-For;
   &COLL.DeleteAll();
End-if;
If there are multiple errors, all errors are logged to the PSMessages collection, not just the first occurrence of an error. As you correct each error, delete it from the PSMessages collection.
The Text property of the PSMessage returns the text of the error message. At the end of this text is a contextual string that contains the name of the field that generated the error. The contextual string has the following syntax:
{BusinessComponentName.[CollectionName(Row).[CollectionName(Row).[CollectionName⇒
(Row)]]].PropertyName}
For example, if you specified the incorrect format for a date field of the Component Interface named ABS_HIST, the Text property contains the following string:
Invalid Date {ABS_HIST.BEGIN_DT} (90), (1)
The contextual string (by itself) is available using the Source property of the PSMessage.
Note. If you’ve called the Component Interface from an Application Engine program, all errors are also logged in the Application Engine error log tables.
See Error Handling, Source.