 Understanding Run Control IDs
This chapter provides an overview of run control IDs and discusses how to:
Submit process requests.
Schedule process requests.
Use process status notifications.
Note. This chapter is intended for the PeopleSoft application user who uses PeopleSoft Process Scheduler from a web browser to run background processes, such as PeopleSoft Application Engine, COBOL, or Structured Query Report (SQR). Depending on your security authorizations, you can run background processes on your browser or on a network server.
Understanding Run Control IDs
To run a report, you must tell the system when and where you want the report to run. For example, you might tell the system to run the report on the database server at midnight or on a Microsoft Windows server every Sunday afternoon, or you might tell it to run the report immediately. For most reports, you must also set parameters that determine the content of the report, such as the business unit or time period on which to report.
A run control is a database record that provides values for these settings. Instead of entering the same values each time you run a report, you create and save a run control with those settings. The next time that you run the report, you select the run control, and the system completes the settings.
You can create run controls that apply to several related reports. For example, suppose that all of the reports that you run at the end of a month require the same parameters: business unit, department, and from and to dates. You can create a single run control that provides values for these parameters and use it for every report.
Conversely, you can create several run controls for the same report to manage different situations. For example, you can create one run control that sets the parameters for a quarterly report and another run control that sets them for a year-to-date version of the same report. Each time that you run the report, you select the appropriate run control. This way, you can print several variations of the same report without changing the settings every time.
A run control ID is used as a key (with a user ID) for records that contain the parameters that a process needs at runtime. Storing the parameters in a table that the process can query using the run control ID and user ID enables the process to run without user intervention. Run control IDs are stored in a minimum of two tables: an application run control table and the Tools Run Control table (PSPRCSRQST). You can examine the PS_PRCSRUNCNTL table as a sample application run control table.
The PeopleTools Run Control table stores information that is required by PeopleSoft Process Scheduler, such as output type, format, distribution, file dependency, and destination. The application run control table stores information that is required to run a process, such as the from date, department ID, employee ID, and so on. All application run control tables are keyed by user ID and run control ID.
Note. Run control IDs are product-specific. See your PeopleSoft product documentation for details on the run control IDs that you will be using. It is recommended to use alphanumeric characters when possible since some special characters may cause conflicts with some products.
Submitting Process Requests
This section discusses how to:
Use the Process Request Dialog page.
Run processes from PeopleSoft applications.
 Page Used to Submit Process Requests
|
Page Name |
Definition Name |
Navigation |
Usage |
|
Process Request Dialog |
PRCSSAMPLEPNL1 |
PeopleTools, Process Scheduler, System Process Requests Select a run control ID and submit a process request. |
Run processes from PeopleSoft applications. |
Using the Process Request Dialog Page
The Process Request Dialog page shows the run control ID that you selected or added for submitting your process request. It also includes links to Report Manager and Process Monitor so that you can check the progress of your job and view its content immediately after it is posted.
The Process Request Dialog page has two additional pages that show your options for submitting requests if you do not run the process from the browser:
The Component Interface page enables you to run the process from a component.
The ProcessRequest PeopleCode page enables you to run the process using PeopleCode.
This chapter is written with the primary focus of submitting process requests from the browser. Click the Run button to access the Process Scheduler Request page.
See Also
Scheduling Processes from Outside the PeopleSoft System
Using the PeopleCode ProcessRequest Class
Running Processes from PeopleSoft Applications
To expedite the process of running reports, PeopleTools delivers Run Control subpages for application developers. Using these subpages, application developers can run reports without accessing the Process Request Dialog page.
The following subpages are recommended for application developers to use:
PRCSRUN_LC_SBP
PRCSRUN_RL_SBP
PRCSRUN_SBP
PRCSRUN_SBP2
The subpages comprise the following buttons:
|
Run Now |
Click to request a process to run without launching the Process Request Dialog page. Process Scheduler will run the first process as listed on the Process Request Dialog page. If the process has previously been run, the system will retain the default output type based on the Run Control record. |
|
Advance Schedule |
Click to launch the Process Scheduler Request page to submit requests and configure the output type and output format of the process. This option is synonymous with the Run button on the Process Request Dialog page. |
See Also
Scheduling Process Requests
This section provides an overview of PeopleSoft Process Scheduler Requests and discusses how to:
Specify process variables.
Set job detail information.
Select output types and formats.
Set report distribution.
Set log/output directory and report repository.
Understanding PeopleSoft Process Scheduler Requests
The Process Scheduler Request page enables you to submit a job or process to run. This page is commonly integrated into applications to support process requests that you make from a PeopleSoft application by clicking Run.
When you click Run, the Process Scheduler Request page appears, showing all of the jobs and processes that you have the security to run.
The Process Scheduler Request page enables you to specify variables, such as where a process runs and in what format the process output is generated. You can set:
Server name.
Run date, run time, and time zone.
Recurrence.
Output type.
Output format.
Output destination.
Distribution.
Pages Used to Schedule Process Requests
|
Page Name |
Definition Name |
Navigation |
Usage |
|
Process Scheduler Request |
PRCSRQSTDLG |
PeopleTools, Process Scheduler, System Process Requests Click Run on the Process Request Dialog page. |
Specify process variables. |
|
Job Detail |
PRCSRQSTITEMS_DLG |
Click a job description listed on the Process Scheduler Request page. |
Set job detail information. |
|
Distribution Detail |
PRCSRQSTCDMAUTH |
Click a Distribution link on the Process Scheduler Request page. |
Set report distribution. |
|
File Dependency |
PRCSRQST_FILE |
Click a File Dependency link on the Process Scheduler Request page. |
Change the file dependency filename. |
Specifying Process Variables
To specify process variables:
Select PeopleTools, Process Scheduler, System Process Requests.
Select an existing run control ID or add a new run control ID.
Click Run.
See Also
Defining Recurrence Definitions
Defining Process Type Definitions
Defining Process Output Formats
Setting Process Definition Options
Setting Job Detail Information
To access the Job Detail page, click a job description listed on the Process Scheduler Request page.
When a job or JobSet is listed, only the main job appears on the Process Scheduler Request page. The Job Detail page displays all of the jobs and processes that are attached to the main job in a hierarchical view that assists you with specifying output options and distribution information for individual processes.
Note. You can specify the output options for jobs either at the main job level or for each job or process in the job.
See Also
Selecting Output Types and Formats
You can choose from several file output types and formats for your process. The following table lists file output types by process type. The output type for PS/nVision is the same as the default output type on the PS/nVision Report Request page.
Note. TheWindow output type is
not available if the user does not have REN server Report Window permission,
or no active REN server cluster is available for Reporting.
To grant access to the new browser window, the permission lists of the
users must include full access for the Realtime Event Notification for Reporting
Window and the WEBLIB_RPT web library with full access.
See Defining Permissions.
Note. For Process Type XML Publisher, available output options are based on the BI report definition template type.
Note. When running Crystal Reports to Email/HTM, any attached
images for the emailed report must be saved to a subdirectory named “images”
for them to show up when viewing the report. For example:
Emailed report attachments:
XRFWIN_217.htm
XRFWIN_217_b589e45e-08f3-4c2e-a765-688f65d1bd03.png
Save to location:
C:\Reports\XRFWIN_217.htm
C:\Reports\images\XRFWIN_217_b589e45e-08f3-4c2e-a765-688f65d1bd03.png
See Creating Report Definitions.
|
Process Type |
Output Type |
Default |
|
WEB |
||
|
NONE, WINDOW, WEB |
NONE |
|
|
WEB, WINDOW, EMAIL, FILE, PRINTER |
WEB |
|
|
NONE |
NONE |
|
|
WEB, WINDOW, EMAIL, FILE, PRINTER, DEFAULT |
DEFAULT |
|
|
WEB, WINDOW, EMAIL, FILE, PRINTER |
WEB |
|
|
WEB, WINDOW |
WEB |
|
|
FILE, WEB, WINDOW |
WEB |
|
|
Essbase Cube Builder |
ANY Generates an OLAP cube which can be viewed via Smart View in MS Office applications, or in Essbase applications. |
ANY |
|
FILE, WEB, EMAIL, PRINTER |
WEB |
|
|
OTHER |
WEB, WINDOW, EMAIL, FILE, PRINTER, NONE |
NONE |
The following table lists valid file output formats by process type.
|
Process Type |
Output Type |
Output Format |
Default |
|
FILE |
PDF, XLS, TXT, HTM, XML Note. XML formats only apply when running Schedule queries. See Scheduling Queries. |
TXT |
|
|
AppEngine |
WEB |
PDF, XLS, TXT, HTM, XML Note. XML formats only apply when running Schedule queries. |
TXT |
|
AppEngine |
WINDOW |
PDF, XLS, TXT, HTM, XML Note. XML formats only apply when running Schedule queries. |
TXT |
|
AppEngine |
|
PDF, XLS, TXT, HTM, XML Note. XML formats only apply when running Schedule queries. |
TXT |
|
COBOL |
NONE |
NONE |
NONE |
|
COBOL |
WEB |
TXT |
TXT |
|
COBOL |
WINDOW |
TXT |
TXT |
|
Crystal |
|
DOC, HTM, PDF, RPT, RTF, TXT, XLS |
|
|
Crystal |
FILE |
DOC, HTM, PDF, RPT, RTF, TXT, XLS |
|
|
Crystal |
PRINTER |
RPT |
RPT |
|
Crystal |
WEB |
DOC, HTM, PDF, RPT, RTF, TXT, XLS |
|
|
Crystal |
WINDOW |
DOC, HTM, PDF, RPT, RTF, TXT, XLS |
HTM |
|
Cube |
NONE |
NONE |
NONE |
|
nVision |
|
HTM, XLS |
XLS |
|
nVision |
FILE |
HTM, XLS |
XLS |
|
nVision |
PRINTER |
HTM, XLS |
XLS |
|
nVision |
WEB |
HTM, XLS |
XLS |
|
nVision |
WINDOW |
HTM, XLS |
XLS |
|
nVision |
DEFAULT |
DEFAULT |
DEFAULT |
|
SQR |
|
CSV, HP, HTM, LP, PDF, PS, SPF |
|
|
SQR |
FILE |
CSV, HP, HTM, LP, PDF, PS, SPF, OTHER |
|
|
SQR |
PRINTER |
HP, LP, PS, WP, OTHER |
PS |
|
SQR |
WEB |
CSV, HP, HTM, LP, PDF, PS, SPF |
|
|
SQR |
WINDOW |
CSV, HP, HTM, LP, PDF, PS, SPF |
|
|
WinWord |
WEB |
DOC |
DOC |
|
WinWord |
WINDOW |
DOC |
DOC |
|
Data Mover |
FILE |
TXT |
TXT |
|
Data Mover |
WEB |
TXT |
TXT |
|
Data Mover |
WINDOW |
TXT |
TXT |
|
Essbase Cube Builder |
ANY |
OLAP cube |
ANY |
|
XML Publisher |
FILE |
PDF, HTM, RTF, XLS |
HTM |
|
XML Publisher |
PRINTER |
|
|
|
XML Publisher |
WEB |
PDF, HTM, RTF, XLS |
HTM |
|
XML Publisher |
|
HTM, PDF, RTF, XLS |
HTM |
|
OTHER |
NONE |
NONE |
NONE |
Note. You must install Adobe Acrobat Reader on your workstation to read PDF files.
Note. When using BusinessObjects Enterprise XI, the default output format for Window output type is PDF.
Setting Report Distribution
To access the Distribution Detail page, click a distribution link on the Process Scheduler Request page.
Note. You must specify an output type of Web, Window, or Email for the distribution list to be accepted when the process instance is created
See Also
Setting Log/Output Directory and Report RepositoryWhen Process Scheduler submits a request, the system creates a new subdirectory to store the log, trace, and reports that were generated by the request. This subdirectory is created in the directory that is specified in the Log/Output Directory parameter in the Process Scheduler configuration file psprcs.cfg. When a high volume of requests is being processed by the Process Scheduler server, limitations imposed by the operating system can prevent additional directories from being generated for the new requests. For instance, certain UNIX operating systems only allocate 32K inodes for a directory.
To prevent the Log/Output directory from reaching the limit that is imposed by the operating system, you can set up additional subdirectories using meta variables. You can modify the Log/Output directory parameter to include any of the meta variables that are listed below in order to build additional subdirectories.
The meta variables are:
|
Meta Variable |
Description |
|
%OPRID% |
PeopleSoft User ID |
|
%REPORTID% |
Report Instance |
|
%PRCSINSTANCE% |
Process Instance |
|
%PRCSTYPE% |
Process Type |
|
%SERVER% |
Process Scheduler Server |
|
%CURRDATE% |
Current Date |
|
%CURRHOUR% |
Current Hour |
|
%JOBNAME% |
Job Name |
|
%JOBINSTANCE% |
Job Instance |
Log/Output Directory
By default, the Log/Output directory is %PS_SERVDIR%\log_output. You can modify the structure of the subdirectory to include the date and hour as subdirectories by changing the default parameter to:
%PS_SERVDIR%\log_output\%CURRDATE%\%CURRHOUR%
Report Repository
You can use the same mechanism to alter the subdirectory structure for the Report Repository. To change the directory structure in the Report Repository, you need to modify the definition of the Report Node stored in the PS_CDM_DIST_NODE.
In the PS_CDM_DIST_NODE table, the field CDM_DIR_TEMPLATE sets the directory structure like this:
%DBNAME%/%CURRDATE%/%REPORTID
You can alter the value of the field to include any of the meta-variables listed previously.
See Also
Using Process Status Notifications
This section provides an overview of process status notification and describes how to:
Enable process status notifications locally
Enable process notification between systems
Understanding Process Status NotificationProcess status notification provides the ability to publish a process request status notification either locally or to a remote application. Upon receipt of the notification, you can trigger additional logic in your application based on the notification results. Notifications are published using service operations and routed by the Integration Broker. The service operation PRCS_STATUS_OPER is delivered and triggered when the SetNotifyAppMethod is invoked. This service operation does not contain any delivered routings. You can also create your own service operation and trigger it with the SetNotifyService method.
SetNotifyAppMethod
This method allows you to create your own application class to handle the notification and information you want to send. This method will invoke the service operation PRCS_STATUS_OPER, as shown in this diagram:
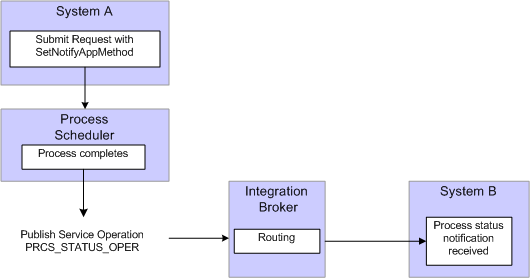
SetNotifyAppMethod
To use this method:
Create an application class to handle notifications.
This is an example of an application class to handle notifications:
class ProcessNotification
   method ProcessNotification();
   method ReceiveNotification(&_MSG As Message);
end-class;

method ProcessNotification
end-method;

method ReceiveNotification
   /+ &_MSG as Message +/
   Local Rowset &rs_msg, &NotifyInfo;
   Local Message &message;
   Local string &sName, &sValue;
   &rs_msg = &_MSG.GetRowset();

   /*************************************************************/
   /* Add logic you want to execute upon receiving notification */
   /* For example :                                             */
   /*  &RQST.SetNotifyAppMethod("RECEIVE_NOTIFICATION:ProcessNotification",⇒
 "ReceiveNotification"); */
   /*  &RQST.AddNotifyInfo("SQR Report", "XRFMENU");            */

   If &rs_msg(1).PRCS_STATUS.RUNSTATUS.Value = "9" Then /* process ran to success⇒
 */

      &NotifyInfo = &rs_msg.GetRow(1).GetRowset(Scroll.PRCSNOTIFYATTR);
      /* if you have more name-value pairs                           */
      /* add code to traverse the rows from the PRCSNOTIFYATTR rowset*/

      /* e.g. Get the first name-value pair */
      &sName = &NotifyInfo(1).PRCSNOTIFYATTR.PRCS_ATTRIBUT_NAME.Value;
      &sValue = &NotifyInfo(1).PRCSNOTIFYATTR.PRCS_ATTRIBUT_VALU.Value;

      /* logic to excute on success  */
      /* e.g. submit another process */
      Local number &PrcsInstance;
      Local ProcessRequest &RQST;
      &RQST = CreateProcessRequest();
      &RQST.ProcessType = &sName;
      &RQST.ProcessName = &sValue;
      &RQST.RunControlID = "test";
      &RQST.RunLocation = "PSNT";
      &RQST.OutDestType = "WEB";
      &RQST.OutDestFormat = "PDF";
      &RQST.RunDateTime = %Datetime;
      &RQST.TimeZone = %ServerTimeZone;
      &RQST.Schedule();
   Else
      /* other processing */
   End-If;
   /*************************************************************/

end-method
See Application Classes.
Include SetNotifyAppMethod, using the application class and method created in step 1, in the process request.
Optionally, use AddNotifyInfo to include specific information in the message that will be published.
This is an example of a process request:
/***********************************************************************
* Construct a ProcessRequest Object.                                   *
***********************************************************************/
&RQST = CreateProcessRequest();
&RQST.ProcessType = "SQR Report";
&RQST.Processname = "XRFMENU";
&RQST.RunControlID = "TEST";
&RQST.OutDestType = "WEB";
&RQST.OutDestFormat = "PDF";
&RQST.NotifyTextMsgSet = 65;
&RQST.NotifyTextMsgNum = 237;
&RQST.RunDateTime = %Datetime;
&RQST.TimeZone = %ServerTimeZone;
&RQST.SetNotifyAppMethod("RECEIVE_NOTIFICATION:ProcessNotification",⇒
 "ReceiveNotification");
&RQST.AddNotifyInfo("SQR Report", "XRFMENU");
&RQST.Schedule();
&PRCSSTATUS = &RQST.Status;
&PRCSINSTANCE = &RQST.ProcessInstance;
If &PRCSSTATUS = 0 Then
   MessageBox(%MsgStyle_OK, "", 65, 366, "Process Instance", "XRFMENU",⇒
 &PRCSINSTANCE);
Else
   MessageBox(%MsgStyle_OK, "", 65, 0, "Process Instance", "Process Not⇒
 submitted");
End-If;
Add an outbound routing to the service operation PRCS_STATUS_OPER pointing to your remote system.
On the remote system add an inbound routing to the service operation PRCS_STATUS_OPER.
SetNotifyService
This method requires you to create your own service operation and service operation handler to publish the message when the process request completes.
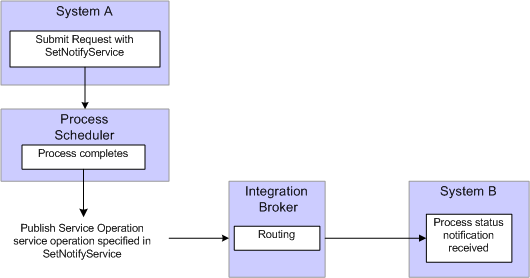
SetNotifyService
To use this method:
Create a service operation and service operation handler to handle the notification. The service operation must use the message definition PRCS_STATUS_MSG.
Note. This service operation and all its related metadata, such as message and handler classes must be on all participating systems. You can create a project in Application Designer and migrate the definitions.
Include SetNotifyService using the service operation created in step 1 in the process request.
Optionally, include AddNotifyInfo in the process request.
Add an outbound routing to the service operation you created in step 1 pointing to your remote system.
On the remote system add an inbound routing to the service operation you created in step 1.
See SetNotifyAppMethod, SetNotifyService, AddNotifyInfo.
Enabling Process Status Notification LocallyThis diagram illustrates how you can set up process status notification to run locally:
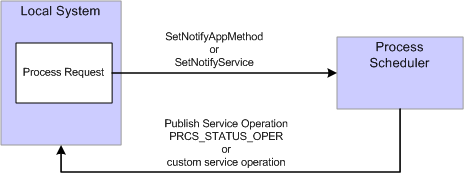
Local process status notification
To enable process status notification locally:
Include SetNotifyService or SetNotifyAppClass in the process request.
Include AddNotifyInfo in the process request.
Add a local-to-local routing to the service operation PRCS_STATUS_OPER if you are using SetNotifyAppMethod. If you are using SetNotifyService, add the local-to-local routing to the service operation referenced in the SetNotifyService method.
To add the local routing to PRCS_STATUS_OPER service operation:
Select PeopleTools, Integration Broker, Integration Setup, Service Operations.
Select PRCS_STATUS_OPER.
Select the Generate Local-to-Local check box.
Click Save.
Submit the process request.
After the process request completes, you can check the service operation monitor to verify that your process notification was received.
Select PeopleTools, Integration Broker, Service Operations Monitor, Monitoring Asynchronous Services.
Select the Operation Instances tab.
Enter PRCS_STATUS_OPER (or your custom service operation if you used SetNotifyService) in the service operation field and click Refresh.
Click the Details link for your Transaction Id.
This is an example of the asynchronous details page. If any errors occur, the View Error/Info link can be used to view the error message. The View XML link will display the XML message.
Note. The message may contain report instance related information for process requests with an output type of Web or Windows. Refer to the message PRCS_STATUS_MSG for the details on the fields that are published. (Select PeopleTools, Integration Broker, Integration Setup, Messages and search for message name PRCS_STATUS_MSG).
See Managing System-Generated Routing Definitions.
Enabling Process Notifications Between SystemsTo enable process notification between systems:
Include SetNotifyService or SetNotifyAppClass in the process request.
Include AddNotifyInfo in the process request.
Add an outbound routing to the service operation PRCS_STATUS_OPER (or your custom service operation if you are using SetNotifyService) pointing to your remote system.
Select PeopleTools, Integration Broker, Integration Setup, Service Operations.
Select PRCS_STATUS_OPER.
Access the Routing tab.
Enter a Routing Name for your routing and click Add.
Enter the Sender Node (node name for the system where you are logged on).
Enter the Receiver Node (node of the PeopleSoft application where you want to send the notification).
Click Save.
On the Receiving system, follow the steps a thru d in step 3.
The Sending node is the remote system and the Receiving node is the current system.
Save the routing.