4 Copy a Version
This chapter contains these topics:
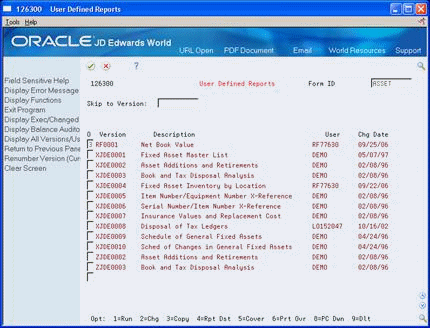
4.1 Copying a Version
From Fixed Assets (G12), choose Cost Information & Reports
From Cost Information & Reports (G1213), choose User Defined Reports
You can copy and revise any version that does not have User Exclusive security set up for medium-to-full or full security on Additional Parameters. In addition, you can copy and run any version that does not have full security set up. STAR provides you with a set of DEMO versions that you can copy and revise to suit your needs.
When you copy a version, you can choose the screens you need to work with to revise the version. STAR displays the screens you chose. As you complete each screen, press Enter to proceed to the next screen. Press F12 if you need to return to the previous screen. Press F3 to return to User Defined Reports.
This section contains the following:
-
Revising Identifying Information for STAR
-
Revising Default Information
-
Revising the Work File
-
Revising Columns
-
Overriding Defaults for a Column
-
Arranging Columns in a New Sequence
-
Reviewing and Running the Report
Note:
The tasks listed above will vary from report to report, depending on your needs.See Also:
See the following chapters for information about other ways you can revise the report to suit your needs:
4.2 Revising Identifying Information for STAR
When you copy a version, you must assign a new version ID. In addition, you can revise the version title and optional report title to suit your needs.
To revise the identifying information for STAR
On User Defined Reports
-
For the version you want to revise, choose the Copy option.
-
On the Dream Writer Version Copy window, complete the following field:
-
New Version
The STAR Definition Options window appears. All functions are selected. You can remove the 1 next to any function you don't need to modify.
-
-
To continue to Version Identification, press Enter.
-
On Version Identification, complete the following fields:
-
Version Title
-
Optional Report Title
-
4.3 Revising Default Information
After you copy a version, you can revise any of the values on Override Default Information to suit your needs.
To revise the default information
On Override Default Information
Complete the following fields:
-
Print Row When 0
-
Print Description with Keys
-
Date Title
-
Default Edit Code
Figure 4-2 Override Default Information screen
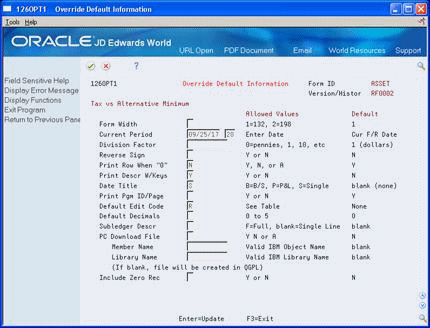
Description of "Figure 4-2 Override Default Information screen"
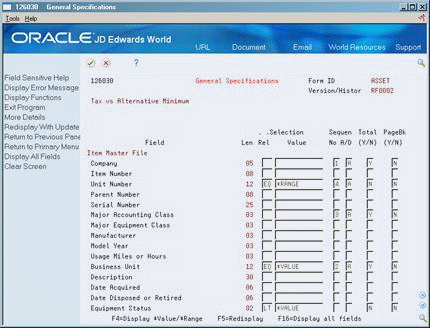
4.4 Revising the Work File
You can revise the work file in a copied version in a variety of ways, including:
-
Choosing different records from the Item Master and Item Balances tables
-
Arranging the data in rows in a different sequence
-
Defining new totals
See Also:
-
Choose Display All Fields to display all the fields in the Item Master and Item Balances tables.
-
Complete the following fields for the data fields in the Item Master and Item Balances tables that are relevant to your report:
-
Relationship
-
Value
-
Sequence Number
-
Sequence Ascending/Descending
-
Total
-
Page Break
Do not press Enter.
-
-
To use *VALUE or *RANGE to define multiple values or ranges of values for a data field, choose Display *Value/*Range (F4).
-
In the detail area, page down to the data field for which you want to define multiple values or ranges.
-
Complete the following field and choose the Redisplay function (F5):
-
*Range or *Value
-
The detail area for Item Number will appear as follows:
Figure 4-4 General Specifications (Detail) screen
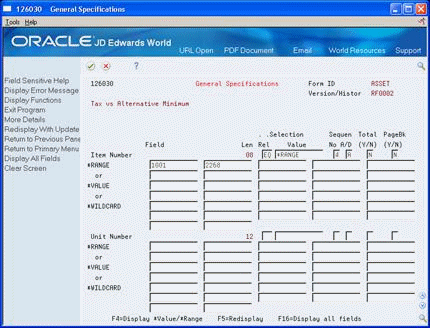
Description of "Figure 4-4 General Specifications (Detail) screen"
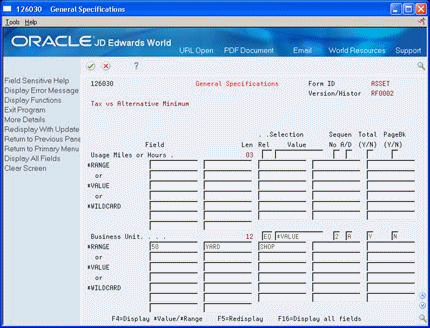
The detail area for Business Unit will appear as follows:
Figure 4-5 General Specifications (Business Unit Details) screen
Description of "Figure 4-5 General Specifications (Business Unit Details) screen"
The detail area for Ledger Type will appear as follows:
Figure 4-6 General Specifications (Ledger Type Detail) screen

Description of "Figure 4-6 General Specifications (Ledger Type Detail) screen"
4.5 Revising Columns
You can revise columns in a copied version in a variety of ways, including:
-
Revising the description column
-
Revising data columns
-
Adding new data columns
-
Deleting data columns
-
Overriding defaults defined on Override Default Information and General Specifications, for individual columns
-
Resequencing columns by assigning new column numbers and print column numbers
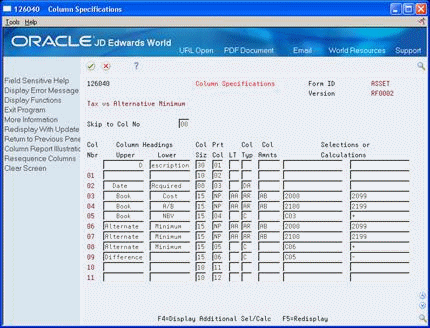
Column Report Illustration appears after you revise the information on General Specifications and press Enter.
On Column Reports Illustration
-
Choose the Column Maintenance function (F9).
-
On Column Specifications, to revise the title for the description column, complete the following fields on the first line (the line with no column number) that are relevant to your report:
-
Column Headings
-
Column Size
-
Print Column
Do not press Enter.
-
-
To define the selection columns, complete the following fields that are relevant to your report as they apply to each column:
-
Column Headings
-
Column Size
-
Print Column
-
Ledger Type
-
Column Type
-
Column Amounts
-
Selections or Calculations
Do not press Enter.
-
-
To define the calculation columns, complete the following fields that are relevant to your report and choose the Redisplay function:
-
Column Headings
-
Column Size
-
Print Column
-
Column Type
-
Selections or Calculations
-
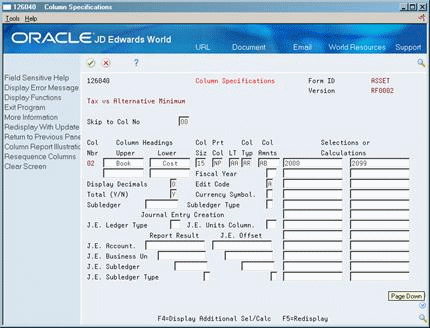
4.6 Overriding Defaults for a Column
Defaults for the following fields, which are in the detail area of Column Specifications, are defined on Override Default Information and General Specifications:
-
Display Decimals
-
Edit Code
-
Total
You can override these defaults for individual columns when you create, copy, or revise a version.
Note:
Totals can be useful in columns that show amounts. Totals might not be useful in columns that show percentages if the percentages are not intended to add up to 100%. Also, they may not be useful in columns that are defined to display only values above, below, or both above and below a certain value or percentage.To override defaults for a column
On Column Specifications
-
Choose Display Additional Selections/Calculations (F4).
Figure 4-8 Column Specifications (Additional) screen
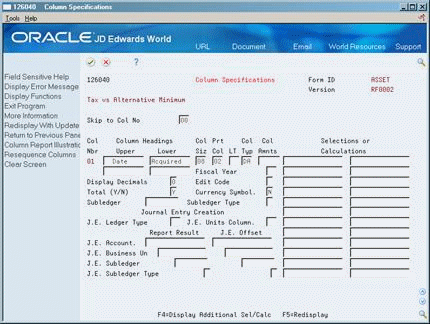
Description of "Figure 4-8 Column Specifications (Additional) screen"
-
In the detail area, locate the column that you want to define or revise.
-
Complete any of the following fields that apply to your report and choose Redisplay With Update (F5):
-
Display Decimals
-
Edit Code
-
Total
Figure 4-9 Column Specifications (Details) screen
Description of "Figure 4-9 Column Specifications (Details) screen"
-
4.7 Arranging Columns in a New Sequence
You might want to assign new column numbers to make the column specifications easier to read if you delete or add columns to a version, or if you want to arrange columns in a new sequence on the printed report. When you assign new column numbers, the system automatically revises calculations in calculation columns so that they contain the correct column numbers.
For example, assume column 4 of a version is the result of column 2 + column 3. When you revise the version, you want to delete column 1. To keep the column specifications easy to read, you also want to assign column numbers 1, 2, and 3 to the remaining columns. When you use the Resequence Columns function (F16), STAR automatically changes the calculation from column 2 + column 3 = column 4 to column 1 + column 2 = column 3.
To arrange the columns in a new sequence
On Column Specifications
-
Choose Resequence Columns (F16).
Figure 4-10 STAR Column Resequencing screen

Description of "Figure 4-10 STAR Column Resequencing screen"
-
On the STAR - Column Resequencing window, complete the following fields for each column that you want to modify the column number or print sequence:
-
New Column Number
-
New Print Number
-
-
Press Enter twice to return to Column Report Illustration.
Figure 4-11 Column Resequencing (Details) screen
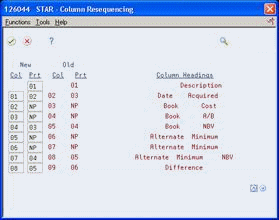
Description of "Figure 4-11 Column Resequencing (Details) screen"
| Field | Explanation |
|---|---|
| New Col | Allows a column number to be changed to a new column number. |
| New Prt | Allows the current value of the print column to be changed. The Description column cannot have a value of NP (non-printing), but all other columns can have this value. |