3 Set Up Locations
This chapter contains these topics:
3.1 Setting Up Locations
A location is a place that you use to put away (store), pick (retrieve), or replenish (refill) items that you stock in your warehouse. Your warehouse may consist of many locations, each with its own characteristics, such as:
-
Length
-
Width
-
Height
-
Weight capacity
-
Proximity to other locations
-
Temperature
-
Humidity
-
Lighting
Setting up locations is a major step in defining your warehouse. By setting up locations, you can match stock items to your locations based on the items' size, weight, and special needs like temperature or lighting.
3.2 Creating the Warehouse
From Advanced Warehouse Management (G46), enter 29
From Warehouse System Setup (G4641), choose Branch/Plant Constants
To create your warehouse, you use branch/plant constants. You specify whether you want the system to track locations and their contents.
On Branch/Plant Constants - Page 1
Figure 3-1 Branch/Plants Constants - Page 1 screen
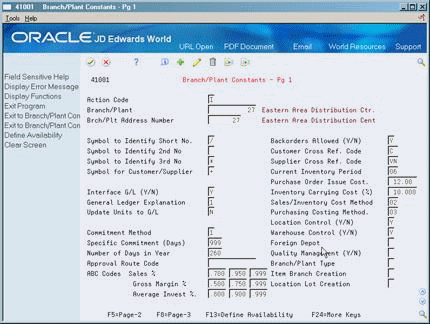
Description of "Figure 3-1 Branch/Plants Constants - Page 1 screen"
Complete the following fields (populate both with 'Y'):
-
Location Control
-
Warehouse Control
| Field | Explanation |
|---|---|
| Location Control (Y/N) | A code that indicates what type of location control the system requires. You should use location control if you want to use only locations that are in the Location Master table.
Valid codes are: Y – Yes, use only locations in Location Master (F4100). N – No, do not restrict locations to those in Location Master. Use all locations, as long as they conform to the location format defined on Branch/Plant Constants - Page 2. If Warehouse Control is set to Yes, Location Control also must be set to Yes. |
| Warehouse Control (Y/N) | A code that determines whether the system creates warehouse transactions for the branch/plant. |
3.3 Defining Warehouse Specifications
You define warehouse specifications to:
-
Define the format in which the system displays a location, such as 1.A.1 or C/3/5
-
Specify the inclusion rule that defines the orders and statuses that you want the Advanced Warehouse Management system to process
-
Define the default units of measure for dimensions, weight, and volume
-
Define the default locations for receiving and shipping
You use an inclusion rule (also known as the request inclusion version) to define which orders to process based on the next status code that is assigned to the order.
To define warehouse specifications
On Branch/Plant Constants - Pg 1
-
Access Branch/Plant Constants - Pg 2.
Figure 3-2 Branch/Plants Constants - Page 2 screen
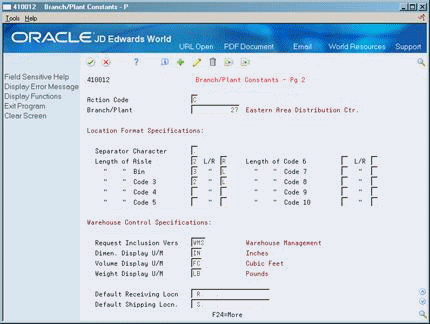
Description of "Figure 3-2 Branch/Plants Constants - Page 2 screen"
-
On Branch/Plant Constants - Pg 2, complete the following fields:
-
Separator Character
-
Length of Aisle
-
L/R
-
Length of Bin
-
L/R
-
Length of Code 3
-
L/R
-
Length of Code 4
-
L/R
-
Length of Code 5
-
L/R
-
Length of Code 6
-
L/R
-
Length of Code 7
-
L/R
-
Length of Code 8
-
L/R
-
Length of Code 9
-
L/R
-
Length of Code 10
-
L/R
-
-
Complete the following fields:
-
Request Inclusion Version
-
Dimension Display Unit of Measure
-
Volume Display Unit of Measure
-
Weight Display Unit of Measure
-
Default Receiving Location
-
Default Shipping Location
-
| Field | Explanation |
|---|---|
| Separator Character | A character that divides the elements of the location when you display them on forms or reports. For example, you might use a slash (/) as a separator character to divide elements such as aisle, bin, and shelf in a location code.
Separators are not stored in the tables, but are used to edit a location on a form or report. If you do not want to use separators, leave this field blank. However, you must enter characters and spaces to equal the correct length of each element in the location code. The system then displays the location as one string of characters. Form-specific information The system uses the character you enter in this field to separate the combination of tank/owner and aisle/bin as it appears on forms or reports. Companies commonly use a period (.) as the separator character. |
| Length of Aisle | Identifies the number of characters to represent the tank (or aisle for packaged stock). Valid values are numbers 1 through 8. |
| L/R - Aisle | A character (L or R) that specifies left or right justification for the Aisle element in the location format. |
| Number - Characters (Bin) | Identifies the number of characters to represent the owner for commingled bulk stock (or aisle for packaged stock). Valid values are numbers 1 through 8. |
| L/R - Bin | Left or Right justification for Bin in the location format specification. |
| Number - Characters (Code 3) | The number of characters to represent Code 3 in the location format specification. |
| L/R - Code 3 | Left or Right justification for Code 3 in the location format specification. |
| Number - Characters (Code 4) | The number of characters to represent Code 4 in the location format specification. |
| L/R - Code 4 | Left or Right justification for Code 4 in the location format specification. |
| Number - Characters (Code 5) | The number of characters to represent Code 5 in the location format specification. |
| L/R - Code 5 | Left or Right justification for Code 5 in the location format specification. |
| Number - Characters (Code 6) | The number of characters to represent Code 6 in the location format specification. |
| L/R - Code 6 | Left or Right justification for Code 6 in the location format specification. |
| Number - Characters (Code 7) | The number of characters to represent Code 7 in the location format specification. |
| L/R - Code 7 | Left or Right justification for Code 7 in the location format specification. |
| Number - Characters (Code 8) | The number of characters to represent Code 8 in the location format specification. |
| L/R - Code 8 | Left or Right justification for Code 8 in the location format specification. |
| Number - Characters (Code 9) | The number of characters to represent Code 9 in the location format specification. |
| L/R - Code 9 | Left or Right justification for Code 09 in the location format specification. |
| Number - Characters (Code 10) | The number of characters to represent Code 10 in the location format specification. |
| L/R - Code 10 | Left or Right justification for Code 10 in the location format specification. |
| Request Inclusion Vers | A user defined code (system 40/type RV) that identifies an inclusion rule that you want the system to use for this branch/plant. The Manufacturing and Advanced Warehouse Management systems use inclusion rules as follows:
For Manufacturing
For Advanced Warehouse Management
|
| Dimen. Display U/M | A user defined code (system 00/type UM) that identifies the unit of measure that the system uses to display dimensions for the warehouse. The system provides the ability to establish inches, centimeters, meters, and so forth, as a measuring standard. |
| Volume Display U/M | A user defined code (system 00/type UM) that identifies the unit of measure that the system uses to display volume for this branch/plant. The system inputs a value in this field from Branch/Plant Constants - Page 2 (P410012). You can override this default value. |
| Weight Display U/M | A user defined code (system 00/type UM) that identifies the unit of measure that the system uses to display weight for this item. You can specify ounces, grams, kilograms, and so on, as weight standards. The system uses this unit of measure for the item or overrides it for an individual item or container. |
| Default Receiving Locn | A code that identifies the location that the system uses for receiving goods into the warehouse. This location defaults into purchase order detail lines for the item. You can define this location as a staging location (a location that has unlimited space) through Location Profile (P46020). |
| Default Shipping Locn | A code that identifies the location that the system uses for packing and shipping goods out of the warehouse. You can define this location as a staging location (a location that has unlimited space) through Location Profile (P46020). |
3.4 Entering Locations
Your warehouse consists of locations, such as bins, spaces on a rack, pallet spaces on the floor, and so on. You must enter these locations into the system to use them for putaway, picking, or replenishment. Use the format that you specified on Branch/Plant Constants to enter each location where you store inventory in your warehouse.
Complete the following tasks:
-
Enter locations interactively
-
Enter locations by batch
-
Enter locations using existing location data
-
Define zones
-
Define the level of detail for locations
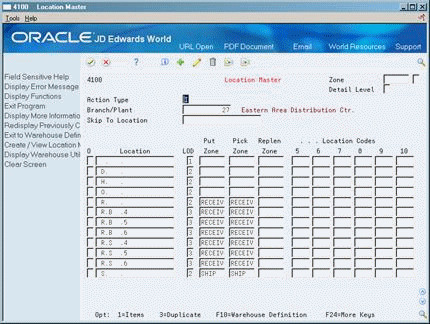
3.4.1 Entering Locations Interactively
From Advanced Warehouse Management (G46), enter 29
From Warehouse System Setup (G4641), choose Location Master
You can enter locations interactively to create locations one at a time. You choose the naming convention (a combination of numbers, letters, or both, such as A/3/4, 6/B/2/A, and so on), and use the format that you specified on Branch/Plant Constants (a separator character, such as / or . , to name locations A/3/4 or 3.C.9). You enter locations interactively if you have only a few locations to create, or if you do not want to use the batch process.
To enter locations interactively
On Location Master
-
Access the detail area (F4).
Figure 3-4 Location Master (Details) screen
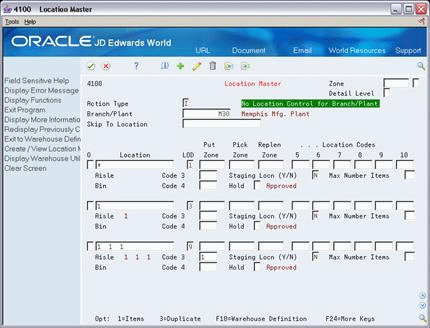
Description of "Figure 3-4 Location Master (Details) screen"
-
-
Location
-
Hold (Optional, to place the location on hold)
-
| Field | Explanation |
|---|---|
| Location | A code that identifies inventory locations in a branch/plant. You define the format of the location identifier by branch/plant.
Form-specific information A location format is composed of elements and, optionally, a separator character. Elements represent more specific locations in a branch/plant. If the tank contains commingled stock, include the separator character defined on Branch/Plant Constants - Page 2 and identify the owner. The total length of all elements in this field, including separators, cannot exceed 20 characters. The location for a single tank can contain up to the number of characters identified in the Length of Tank/Aisle field on Branch/Plant Constants - Page 2. The owner ID can contain up to the number of characters identified in the Length of Owner/Bin field on Branch/Plant Constants - Page 2. If you leave this field blank and do not use a separator character, the system displays the location as an asterisk. If you use a separator character, the system displays the location with the correct number of spaces for each element, followed by the separator character. |
| Hold | The Hold field is located in the detail area of the Location Master. You can enter a hold status code in this field to place the location on hold, regardless of the item status. |
3.4.2 Entering Locations by Batch
From Advanced Warehouse Management (G46), enter 29
From Warehouse System Setup (G4641), choose Speed Location Maintenance
You can enter locations in batches instead of individually. This allows you to set up your warehouse quickly by copying an existing location to create new locations. You specify the range of locations to create (starting and ending at locations that you define) and the incremental value that separates each location. This method is much faster than entering locations interactively (one at a time). However, if any errors exist in the original location, you will duplicate them in each new location.
Figure 3-5 Speed Location Maintenance screen
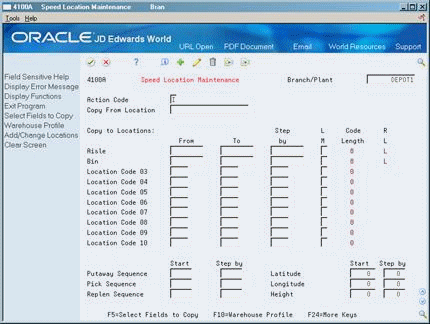
Description of "Figure 3-5 Speed Location Maintenance screen"
-
To identify the location to use as a model for new locations, complete the following fields:
-
Branch/Plant
-
Copy From Location
-
-
To enter new locations, complete the following fields:
-
From Aisle
-
To Aisle
-
Step By
-
Limit Method
-
From Bin
-
To Bin
-
Step By
-
Limit Method
-
-
To specify levels of detail for each location, complete the following fields:
-
From Location Code
-
To Location Code
-
Step By Location Code
-
Limit Method
-
-
To specify the sequence and proximity information for each location, complete the following fields:
-
Start Putaway Sequence
-
Step By Putaway Sequence
-
Start Pick Sequence
-
Step By Pick Sequence
-
Start Replenishment Sequence
-
Step By Replenishment Sequence
-
Start Latitude
-
Step By Latitude
-
Start Longitude
-
Step By Longitude
-
Start Height
-
Step By Height
-
-
Access User Defined Code Revisions.
Figure 3-6 User Defined Code Revisions screen
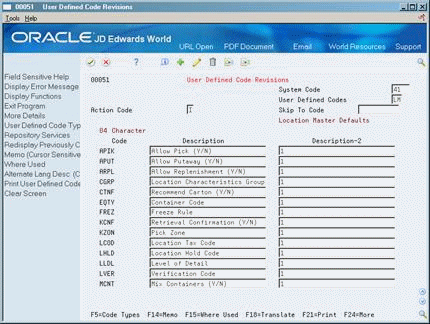
Description of "Figure 3-6 User Defined Code Revisions screen"
-
On User Defined Code Revisions, complete the following field for each value you want to copy from the model location:
-
Description - 2
If you leave the field blank, the system inputs the default value. If a default value does not exist, the system leaves the field blank for an alphabetic value or inputs a zero for a numeric value.
-
-
Access Speed Location Maintenance.
-
On Speed Location Maintenance, choose Add/Change Locations to create the new locations.
| Field | Explanation |
|---|---|
| Copy From Location | A code that identifies inventory locations in a branch/plant. You define the format of the location identifier by branch/plant. |
| Aisle | A code that identifies a location in a warehouse. This code is used in conjunction with a bin and lot identifier, to indicate a specific, tangible storage area within a warehouse or yard. |
| Step by | A number (alphabetic or numeric) that the system uses to create locations within a range of locations that you specify in Speed Location Maintenance. When the system creates each new location, it increments the next new location by the step number that you entered separates locations within a specified range of locations.
For example: To create new locations: From Location: 1 To Location: 7 Step by: 2 The new locations are: 1, 3, 5, and 7. |
| Step Limit Method | A code that indicates what limits are used in the stepping process:
blank – Upper & Lower Limit. You create location codes beginning with the From value, ending with the To value, then starting again at the From value. 1 – Upper Limit. You create location codes beginning with the From value, ending with the To value, then starting again at the lowest value for that location code. 2 – Lower Limit. You create location codes beginning with the From value, ending with the highest value for that location code, then starting again at the From value. 3 – No Limit. You create location codes beginning with the From value, ending with the highest value for that location code, and then starting again at the lowest value for that location code. |
| Bin | A specific storage location within a warehouse or store. The system uses the bin with an aisle location to identify a storage area whose width, depth, and height can be readily measured. |
| Location Code 03 | A code that the system uses for one of two purposes:
|
| Putaway Sequence | A number that you assign to a location to determine its place in the putaway sequence. Putaway is the movement of inventory to storage after receipt. A sequence of locations describes the path that warehouse employees follow through the warehouse during movement tasks. You can specify in the Movement Instructions (P46095) whether the system uses the putaway sequence as a tiebreaker when there is more than one location selected for putaway. For example, you can establish sequencing for the most efficient putaway routing. |
| Pick Sequence | A number that you assign to a location to determine its place in the picking sequence. Picking is the movement of inventory from storage to satisfy an order. A sequence of locations describes the path that warehouse employees follow through the warehouse during movement tasks. You can specify in the Movement Instructions (P46095) whether the system uses the picking sequence as a tiebreaker when there is more than one location selected to pick from. For example, you can establish sequencing for the most efficient pick routing. |
| Replen Sequence | A number that you assign to a location to determine its place in the replenishment sequence. Replenishment is the movement of inventory from storage locations to picking locations. A sequence of locations describes the path that warehouse employees follow through the warehouse during movement tasks. You can specify in the Movement Instructions (P46095) whether the system uses the replenishment sequence as a tiebreaker when there is more than one location selected to replenish from. For example, you can establish sequencing for the most efficient replenishment routing. |
| Latitude | The X or latitude coordinate of a location in the warehouse. The system can use latitude, longitude, and height as a tiebreaker when suggesting locations for putaway and picking. |
| Longitude | The Y or longitude coordinate of a location in the warehouse. The system can use latitude, longitude, and height as a tiebreaker when suggesting locations for putaway and picking. |
| Height | The Z or height coordinate of a location in the warehouse. The system can use latitude, longitude, and height as a tiebreaker when suggesting locations for putaway and picking. |
3.4.3 What You Should Know About
| Topic | Description |
|---|---|
| Entering steps | A step is a number that the system uses to separate locations within the range of locations you are creating. When the system creates each new location, it increments the name of each location by the step number that you enter. You can enter many locations simultaneously by entering a range of locations along with a step increment. |
| Entering limits | A limit is a code that tells the system the location names at which you want to start and stop entering locations, such as 1/A/1 to 1/A/9, according to the minimum and maximum values for location elements. |
| Deleting incorrect locations | If you make a mistake in setting up your locations with Speed Location Maintenance, you can:
You cannot delete locations using Speed Location Maintenance. You must use Location Master. |
3.4.4 Entering Locations Using Existing Location Data
From Advanced Warehouse Management (G46), enter 27
From Warehouse Advanced and Technical Operations (G4631), choose Build Location Master
Use the Build Location Master program to update the Location Master table (F4100) with information from existing records in the Item Location table (F41021). This saves time in creating or changing locations, because Item Location contains all of the valid locations for your warehouse. The system prints a report that lists the updated locations and detailed information.
Caution:
You should run this batch program only once, during initial system setup. Do not run the program again after setup.Build Location Master is a DREAM Writer program.
3.4.6 Defining Zones
From Advanced Warehouse Management (G46), enter 29
From Warehouse System Setup (G4641), choose Location Master
You use zones to group similar locations. After you define a zone, you can use it to make inquiries, without having to access each location contained in the zone. The most common zones you use in a warehouse are for putaway, picking, and replenishment. You can also use zones to set up special areas for items that require explosion safeguards, refrigeration, low humidity, low light, and so on.
Defining zones is optional. However, defining zones can save processing time and help you to structure your employees' movement patterns through the warehouse.
You choose a zone name from User Defined Code Revisions. If the predefined zones do not meet your needs, you enter a new zone on User Defined Code Revisions and then reference that zone name on Location Master.
On Location Master
Complete the following fields:
-
Putaway Zone
-
Pick Zone
-
Replenishment Zone
| Field | Explanation |
|---|---|
| Put Zone | A code (system 46/type ZN) that identifies areas in the warehouse where goods are put away or stored.
Form-specific information
|
| Pick Zone | A code (system 46/type ZN) that identifies an area from which items are picked for shipment. |
| Replen Zone | A code (system 46/type ZN) that identifies the areas in the warehouse from which items are retrieved to replenish or refill picking locations. |
3.4.7 Defining the Level of Detail for Locations
From Advanced Warehouse Management (G46), enter 29
From Warehouse System Setup (G4641), choose Location Master
You use levels of detail to control how the system displays storage areas and their capacities and available space. You define what each level of detail represents (aisles, racks, bins, and so on). For example, if you use Location Utilization to view the contents of your warehouse using a level of detail of 1 (warehouse level), the system displays one location (the warehouse). If you use a level of detail of 4 (rack level), for example, the system displays zones, aisles, and racks, and specifies capacities and available space for each rack.
To define the level of detail for locations
For each location, complete the following field:
-
Level Of Detail
| Field | Explanation |
|---|---|
| Level of Detail - Location | A code that summarizes or classifies locations and provides a hierarchy of locations for review purposes. For instance, you can assign aisles to level 3, and individual racks within the aisle as level 4.
Form-specific information Use the Detail Level field to specify the beginning level of detail that you want the system to display. Use the Level of Detail field in the lower portion of the form to identify the level of detail for the location. |
3.5 Defining Location Dimensions
From Advanced Warehouse Management (G46), enter 29
From Warehouse System Setup (G4641), choose Location Dimensions
You define each location's dimensions to maximize the system's use of your warehouse's space. After you define a location's dimensions, the system can determine which items fit best into the location with a minimum of wasted space. You can define:
-
Gross and usable dimensions (width, depth, and height)
-
Gross and usable volume, which the system calculates from the dimensions
-
Maximum weight that a location can hold
3.5.1 Before You Begin
-
Verify that you have set up warehouse controls for default dimension information on Branch/Plant Constants - Pg 2.
On Location Dimensions
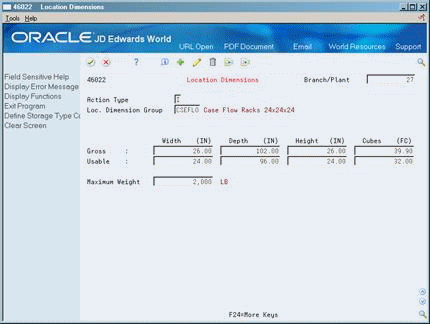
-
Complete the following fields:
-
Branch/Plant
-
Location Dimension Group
-
Gross Width
-
Gross Depth
-
Gross Height
-
Usable Width
-
Usable Depth
-
Usable Height
-
-
Complete the following optional field:
-
Maximum Weight
-
| Field | Explanation |
|---|---|
| Group - Location Dimension | A code (system 46/type LD) that identifies a group of locations that share the same dimensions. A location dimension group defines the dimensions for all locations that belong to the group. After you set up a location dimension group, you can assign locations to the group through Location Profile Detail (P460201).
You must define location dimensions if you plan to use volume-based putaway. |
| Gross : Width ( ) | The gross width of the location(s) defined within the location dimension group, the gross width of an item as defined in the Unit Of Measure Definition (by item or group), or the gross width of a storage or shipping container. The unit of measure is defined in Branch/Plant Constants - Page 2 (P410012). |
| Gross : Depth ( ) | The gross depth of the location(s) defined within the location dimension group, the gross depth of an item as defined in the Unit Of Measure Definition (by item or group), or the gross depth of a storage or shipping container. The unit of measure is defined in Branch/Plant Constants - Page 2 (P410012). |
| Gross : Height ( ) | The gross height of the location(s) defined within the location dimension group, the gross height of an item as defined in the Unit Of Measure Definition (by item or group), or the gross height of a storage or shipping container. The unit of measure is defined in Branch/Plant Constants - Page 2 (P410012). |
| Cubic Dimensions - Gross | The gross cubic dimensions of the locations defined within the location dimension group, the gross cubic dimensions of an item as defined in the Unit Of Measure Definition (by item or group), or the gross cubic dimensions of a storage or shipping container. The unit of measure is defined in Branch/Plant Constants - Page 2 (P410012).
Form-specific information If you leave this field blank, the system calculates cubic dimensions based on the numbers you entered for the width, depth, and height. |
| Usable - Width | The available storage width of the location(s) defined within the location dimension group. The system uses this width only if you use one of two capacity methods to select a putaway location for an item:
Form-specific information If you leave this field blank, the system uses the number you entered in the Gross Width field. |
| Usable - Depth | The available storage depth of the location(s) defined within the location dimension group. The system uses this depth only if you use one of two capacity methods to select a putaway location for an item:
Form-specific information If you leave this field blank, the system uses the number you entered in the Gross Depth field. |
| Usable - Height | The available storage height of the location(s) defined within the location dimension group. The system uses this height only if you use one of two capacity methods to select a putaway location for an item:
Form-specific information If you leave this field blank, the system uses the number you entered in the Gross Height field. |
| Cubic Dimensions - Usable | The actual cubic volume that you can use for storage in a location. You define usable location space through Location Dimensions (P46022), and assign it to individual locations using Location Profile Detail (P460201). The unit of measure is defined in Branch/Plant Constants - Page 2 (P410012).
Form-specific information If you leave this field blank, the system calculates cubic dimensions using the numbers you entered for the width, depth, and height. |
| Maximum Weight | The maximum weight a location can hold. During putaway location selection, the system accumulates item and/or container weights, which it adds to the weight currently available in the location, and compares the total to this maximum allowed weight. |
3.5.2 What You Should Know About
| Topic | Description |
|---|---|
| Building the tie-breaker table | If you use random locations for putaway, you must rebuild the Tie-breaker table whenever you define or change the dimensions of a random location. |
| Maximum storage weight | If you do not specify a maximum storage weight, the system assumes the location has an unlimited capacity for weight. |
| Capacity checking | The system uses location dimensions to verify that the location has enough space for the item to fit. You can use volume checking (capacity method 1) or layering (capacity method 2) for an item's unit of measure definition, as follows:
You define the capacity method on Unit of Measure Definition. |
See Also:
-
Section 3.3, "Defining Warehouse Specifications" for more information about processing methods.
3.6 Defining Location Characteristics
From Advanced Warehouse Management (G46), enter 29
From Warehouse System Setup (G4641), choose Location Characteristics
A characteristic is anything that makes a location (or a location group) unique. For example, you might stock items that must be kept cold to prevent spoilage, so you can identify locations, such as a refrigerator, whose characteristics include cold. You can assign an unlimited number of characteristics to each location in your warehouse.
If you want the system to randomly choose locations for putaway, picking, or replenishment (instead of using fixed locations), you must define location characteristics.
You can choose a predefined characteristic from User Defined Code Revisions. If the predefined characteristics do not meet your needs, you can define the new characteristic on User Defined Code Revisions and then reference that characteristic on Location Characteristics.
You can:
-
Define characteristics for a single location
-
Define characteristics for a location group
Use location characteristic groups to reduce the number of locations for which you need to define characteristics, by grouping them all together.
Figure 3-9 Location Characteristics screen
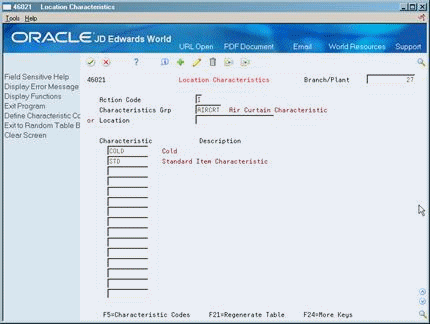
Description of "Figure 3-9 Location Characteristics screen"
3.6.1 What You Should Know About
| Topic | Description |
|---|---|
| Regenerating the Random Locations table | If you use random locations for putaway, picking, or replenishment, and you change characteristics for any of those random locations, you must regenerate the Random Locations table (F46821). This ensures that the system uses a current table when it searches for random locations. |
| Building the tie-breaker table | If you use random locations for putaway, you must rebuild the tie-breaker table whenever you change the characteristics of a random location. |
To define characteristics for a single location
Complete the following fields:
-
Branch/Plant
-
Location
-
Characteristic
| Field | Explanation |
|---|---|
| Location | A code that identifies inventory locations in a branch/plant. You define the format of the location identifier by branch/plant. |
| Characteristic | A code (system 46/type DF) defines a characteristic for a location or location group. You can define unlimited characteristics (such as Cold, Dark, Dry, Heavy, and Secure) for any location or location group. |
To define characteristics for a location group
Complete the following fields:
-
Branch/Plant
-
Characteristics Group
-
Characteristic
| Field | Explanation |
|---|---|
| Characteristics Grp | A code (system 46/type LC) that identifies a group of locations that share the same characteristics. A location characteristics group defines the characteristics for all locations that belong to the group. After you set up a location characteristics group, you can assign locations to the group through Location Characteristics (P46021). |
3.7 Defining Location Profile Information
From Advanced Warehouse Management (G46), enter 29
From Warehouse System Setup (G4641), choose Location Profile
You define location profile information to attach specific attributes to each location. These attributes define the location's purpose, and its physical position in the warehouse. The system can use these attributes during inventory movement to choose locations for putaway, picking, or replenishment, as well as to determine what location is the best fit for the item, based on the attributes. You define:
-
Location sequences, which can form the routes that warehouse employees follow for putaway, picking, and replenishment
-
Relative coordinates for each location in the warehouse, which the system uses to calculate the distance between two locations
-
The maximum number of items you can have in the location
-
A location dimension group for the location
-
A characteristic group for the location (optional)
-
Whether you can mix container types or old and new items in the location
-
Whether the location is used for putaway, picking, replenishment, or for staging inventory during movement
To define location profile information
-
For each location in your warehouse, complete the following fields:
-
Allow Putaway
-
Allow Pick
-
Allow Replenishment
-
Putaway Sequence
-
Pick Sequence
-
Replenishment Sequence
-
Latitude
-
Longitude
-
Height
-
-
Access Location Profile Detail.
Figure 3-11 Location Profile Detail screen
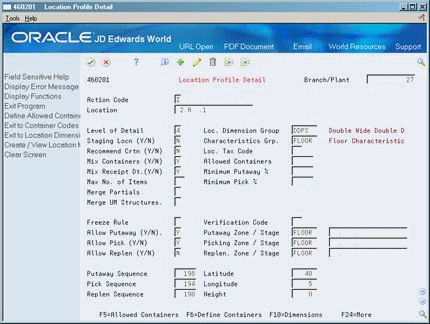
Description of "Figure 3-11 Location Profile Detail screen"
-
On Location Profile Detail, complete the following fields:
-
Location Dimension Group
-
Characteristics Group
-
Staging Location
-
Mix Containers
-
Mix Receipt Dates
-
Maximum Number of Items
-
Merge Partial Structures
-
Merge UM Structures
-
| Field | Explanation |
|---|---|
| Allow Putaway (Y/N) | A code that indicates whether the location is valid for putaway selection.
Valid codes are: Y – Yes, use this location for putaway N – No, do not use this location for putaway |
| Allow Pick (Y/N) | A code that indicates whether this location is valid for picking.
Valid codes are: Y – Yes, use this location for picking N – No, do not use this location for picking |
| Allow Replen (Y/N) | A code that indicates whether you allow replenishment from a location (Location Profile (P46020) and Location Profile Detail (P460201)) or whether a picking instruction triggers replenishment (Picking Instructions (P46095)).
Form-specific information A code that indicates whether you allow replenishment from a location. The system issues a replenishment while reviewing locations for picking suggestions if it did not find any locations to satisfy the pick request. In this case, the system uses the replenishment to satisfy the pick request. Valid codes are: Y – Yes, use this location for replenishment N – No, do not use this location for replenishment The system also issues replenishments to a location that has reached its minimum letdown point if this field is set to Y and if the processing option allowing replenishment during the selection process (P46171) is active. You define minimum letdown points on Fixed Picking Locations (P46012). Note: You must have quantity on hand in a location to automatically replenish to that location. |
| Putaway Sequence | A number that you assign to a location to determine its place in the putaway sequence. Putaway is the movement of inventory to storage after receipt. A sequence of locations describes the path that warehouse employees follow through the warehouse during movement tasks. You can specify in the Movement Instructions (P46095) whether the system uses the putaway sequence as a tiebreaker when there is more than one location selected for putaway. For example, you can establish sequencing for the most efficient putaway routing. |
| Pick Sequence | A number that you assign to a location to determine its place in the picking sequence. Picking is the movement of inventory from storage to satisfy an order. A sequence of locations describes the path that warehouse employees follow through the warehouse during movement tasks. You can specify in the Movement Instructions (P46095) whether the system uses the picking sequence as a tiebreaker when there is more than one location selected to pick from. For example, you can establish sequencing for the most efficient pick routing. |
| Replen Sequence | A number that you assign to a location to determine its place in the replenishment sequence. Replenishment is the movement of inventory from storage locations to picking locations. A sequence of locations describes the path that warehouse employees follow through the warehouse during movement tasks. You can specify in the Movement Instructions (P46095) whether the system uses the replenishment sequence as a tiebreaker when there is more than one location selected to replenish from. For example, you can establish sequencing for the most efficient replenishment routing. |
| Latitude | The X or latitude coordinate of a location in the warehouse. The system can use latitude, longitude, and height as a tiebreaker when suggesting locations for putaway and picking. |
| Longitude | The Y or longitude coordinate of a location in the warehouse. The system can use latitude, longitude, and height as a tiebreaker when suggesting locations for putaway and picking. |
| Height | The Z or height coordinate of a location in the warehouse. The system can use latitude, longitude, and height as a tiebreaker when suggesting locations for putaway and picking. |
| Characteristics Grp | A code (system 46/type LC) that identifies a group of locations that share the same characteristics. A location characteristics group defines the characteristics for all locations that belong to the group. After you set up a location characteristics group, you can assign locations to the group through Location Characteristics (P46021). |
| Mix Containers (Y/N) | A code that indicates whether you want to allow more than one type of storage container for an item to be stored in the location. Valid codes are:
Y – Allow more than one type of container in this location N – Do not allow more than one type of container in this location You use Allowed Containers (P46026) to define which containers are allowed in the location. You must also set up the item profile to allow mixing of containers. |
| Mix Receipt Dt.(Y/N) | A code that indicates how you want the system to assign items to a location. |
| Max No. of Items | A number that specifies the maximum number of different items that can be stored in this location at one time.
Enter a number from 1 to 99. If you leave the field blank (or zero), the system does not limit the number of different items in the location. |
| Merge Partials | A code that indicates whether a partial unit of measure can be added to another partial unit of measure in the Location Detail File (F4602). A partial quantity is a quantity in any UM in a structure that is less than one. For example, an item with a case-each structure, where case = 10 each, would have a partial quantity if there were 5 each of the item.
Valid Codes are: blank – Do not merge two partial units of measure. 1 – Merge two partial units of measure. Form-specific information To merge partials, you must also set this field to one on the Item Profile form. |
| Merge UM Structures | A code that indicates whether two unit of measure structures can be merged. Valid Codes are:
blank – Do not merge unit of measure structures. 1 – Merge unit of measure structures. Form-specific information To merge UM structures, you must also set this field to one on the Item Profile form. |
3.7.1 What You Should Know About
| Topic | Description |
|---|---|
| Building the tie-breaker table | If you use random locations for putaway, you must rebuild the tiebreaker table whenever you change the putaway sequence or proximity (latitude, longitude, or height) of a random location. |
| Merging partial quantities or unit of measure structures | You can merge partial quantities or UM structures in location detail records to minimize the number of records created by the system. To do this, you must set Merge Partials or Merge UM Structures to 1 in both the Item Profile and Location Profile Detail form. Merging partials or UM structures can cause the system to over or understate the available space in a location. |
3.8 Defining Location Capacity
From Advanced Warehouse Management (G46), enter 29
From Warehouse System Setup (G4641), choose an option
Each location has a finite capacity to hold items (except for staging locations). You can categorize your locations by location dimension group, such as bin, flow rack, pallet, or bulk, according to the size of the locations. Or, you can define each location's capacity individually. You then define how many items will fit in each location or location dimension group.
You can modify location capacity by setting up items to use one of the following capacity checking methods:
-
Volume, where the system compares the item's cubic dimensions with the available cubic dimensions in the location.
-
Layering, where the system compares the item's length, width, and height to the length, width, and height of the available space in the location. You must also specify whether the item's unit of measure definition allows the system to rotate the item during putaway.
-
Quantity, where the system compares the quantity of the item to store to the quantity that you can still fit into the location.
A location dimension group only defines the volume of each location in the group. If you define an item's unit of measure to use quantity when you verify a location's capacity, you must use Capacity Definition by Item or Group to define the quantity of the item that will fit into a location group's dimensions.
Defining quantities by item dimension group is faster, because you do not have to define quantities and capacities for every item that you stock.
You can:
-
Define location capacity by item
-
Define location capacity by item dimension group
3.8.1 What You Should Know About
| Topic | Description |
|---|---|
| Setting the type of capacity checking | When you define units of measure by item or by item group, you can set the type of capacity checking to use. You can check a location's capacity by volume, layering, or quantity. You use capacity definition by item only if you use quantity capacity checking. |
To define location capacity by item
On Capacity Definition by Item
Figure 3-12 Capacity Definition by Item screen
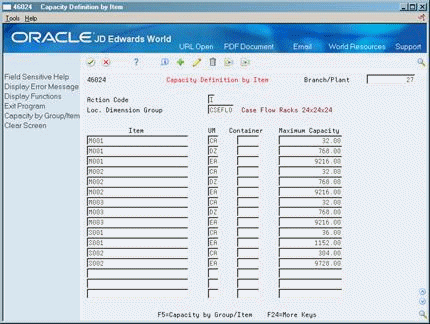
Description of "Figure 3-12 Capacity Definition by Item screen"
Complete the following fields:
-
Branch/Plant
-
Location Dimension Group
-
Item
-
Unit of Measure
-
Container Code
-
Maximum Capacity
| Field | Explanation |
|---|---|
| Loc. Dimension Group | A code (system 46/type LD) that identifies a group of locations that share the same dimensions. A location dimension group defines the dimensions for all locations that belong to the group. After you set up a location dimension group, you can assign locations to the group through Location Profile Detail (P460201).
You must define location dimensions if you plan to use volume-based putaway. |
| Item | A number that the system assigns to an item. It can be in short, long, or 3rd item number format. |
| UM | A user defined code (00/UM) that indicates the quantity in which to express an inventory item, for example, CS (case) or BX (box). |
| Container Code | A code (system 46/type EQ) that identifies a storage container or a shipping carton. A storage container can be an open container where items are stored on the container (for example, a pallet), or a closed container where items are stored in the container (for example, a box). You use Container and Carton Codes (P46091) to define storage containers. |
| Maximum Capacity | The maximum of an item or item dimension group that can fit in the specified location dimension group. You can also define a storage container to limit the quantity. |
To define location capacity by item dimension group
On Capacity Definition by Group
Figure 3-13 Capacity Definition by Group screen
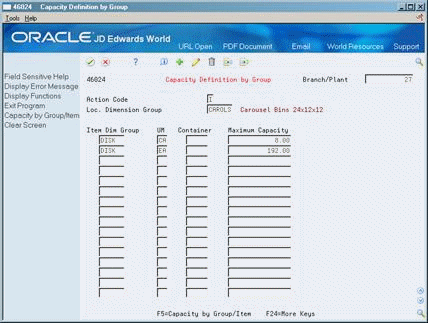
Description of "Figure 3-13 Capacity Definition by Group screen"
-
Branch/Plant
-
Location Dimension Group
-
Item Dimension Group
-
Unit of Measure
-
Container Code
-
Maximum Capacity
3.9 Building the Tie-Breaker Table
From Advanced Warehouse Management (G46), enter 27
From Warehouse Advanced and Technical Operations (G4641), choose Build Tiebreaker Information
Whenever you move inventory, the system uses movement instructions (F46095) to suggest locations for picking, putaway, or replenishment. If several locations satisfy these instructions, the system uses the information stored in a tiebreaker table to select the optimum location. To determine tiebreaker information for putaway, you must create a tiebreaker table that stores the following information about every location in the warehouse:
-
Sequence number
-
Available space
-
Proximity to a base location
You build the tiebreaker table using a program that selects locations and calculates their proximity and available space. You can use the generic program to build a tiebreaker table for all locations in your warehouse, or you can modify the program to create a table with fewer locations.
You must rebuild the tie-breaker table whenever you change any of the following:
-
Putaway, Picking, or Replenishment Sequence Code
-
Location characteristics
-
Location dimensions
-
Location proximity (latitude, longitude, or height)
If you change characteristics for any random locations, you must regenerate the Random Locations table before building the tiebreaker table, because the system uses random rules to determine tiebreaker information.