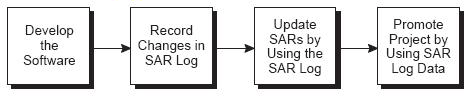
11 Promote a Project
This chapter contains these topics:
11.1 About Promoting a Project
After you create a project, link promotion paths and SARs to it, and complete project development, you are ready to begin the promotion process.
The SAR system uses the Work Order files (F4801 and F4802). If your production environment uses these files, or if the F4802 file has different record types than is needed by version control, define a separate library that contains these files for version control purposes only.
11.2 Update the SARs
The SARs, which are contained in the Work Order Header file (F4801), have detailed information in the Work Order Detail file (F4802). You must update the information in the SARs to reflect software developments that are recorded in the SAR log.
When you developed the software, the changes were recorded in the SAR log automatically. You now must update the F4802 file.
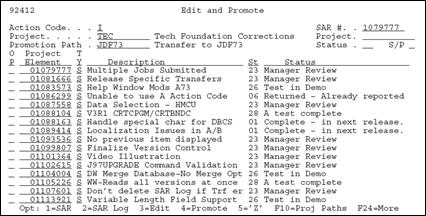
From the Version Control menu (G9261), choose Edit and Promote.
-
On the Edit and Promote form, inquire on the project you want to promote.
-
In the OP (Option) field next to the project SAR you want to update, enter 2 (SAR Log).
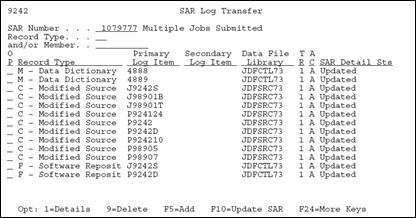
The SAR Log Transfer form displays, which lists all added or changed records logged in the SAR log (F9810) according to record type. The SAR Detail Status field shows whether the record has been updated in the F4802 file.
If this screen lists many SAR log records, you can narrow your search by entering information in the Record Type and the and/or Member fields.
To view the details of a SAR log item, enter 1 (Details) in the OP (Option) field next to the item. On the form that displays, you can edit the SAR details. If the SAR logging system does not log an item that you want to include, press F5 (Add) from the SAR Log Transfer form to add it.
-
To update the F4802 file, press F10 (Update SAR).
Before you update a SAR, verify that each SAR log record should be transferred with the SAR. Change or delete those that are associated incorrectly with the SAR. To display all records with data that can be transferred (TR field value is 1) or with test data (TR field value is 0), press F16 (Display Update Capable/All Items). Update only those records that should be transferred with this SAR.
The system creates or updates the records in the SAR file that is located in the SAR library you indicated in the Edit and Promote processing options (not the SAR library appearing in your library list).
11.3 Validating a Promotion Path
Before you promote a SAR, you must perform a pre-promotion edit, or validation, against the promotion path that will be used for this SAR.
-
From the Edit and Promote form, inquire on the project you want to promote.
-
In the Promotion Path field, type the name of the promotion path you want to use for your project.
-
In the OP (Option) field next to the project SAR you want to update, enter 3 (Edit).
If you did not choose a promotion path for the project, the Project Promotion Paths form lists all promotion paths defined for the project.
Figure 11-4 Project Promotion Paths screen
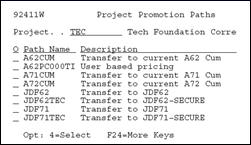
Description of "Figure 11-4 Project Promotion Paths screen"
-
In the O (Option) field next to the promotion path you use to promote the project, enter 4 (Select). If you have run pre-promotion edits previously for this SAR, the Pre-Promotion Edit History form lists them. Otherwise, this form is blank.
Figure 11-5 Pre Promotion Edit History screen
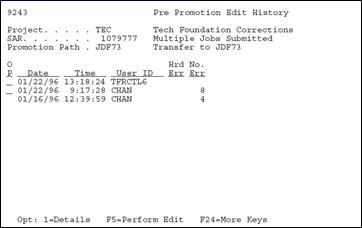
Description of "Figure 11-5 Pre Promotion Edit History screen"
-
To view the errors associated with a pre-promotion edit, enter 1 (Details) in the OP (Option) field next to the desired history record.
Figure 11-6 Pre Promotion Edit Details screen
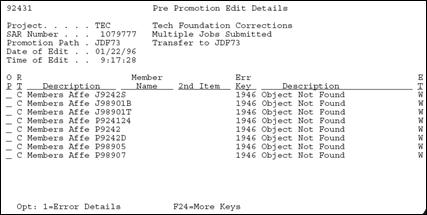
Description of "Figure 11-6 Pre Promotion Edit Details screen"
-
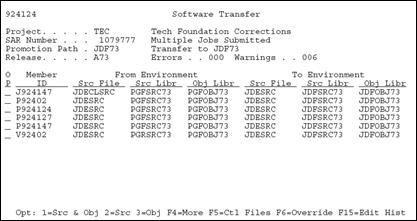
From the Pre-Promotion Edit History form, press F5 (Perform Edit) to perform the pre-promotion edit.
-
Correct any errors and perform the edit until no errors occur. You do not need to resolve warnings that can occur.
The following table shows a partial list of errors and how to resolve them.
| Error Code | Cause and Resolution |
|---|---|
| 0020 | Cause: You entered a "From" library that does not exist or you are not authorized to use.
Resolution: Correct the library name, create the library, or get authorization to use it. |
| 0092 | Cause: A database table or member could not be opened because it did not exist, a conflicting lock state held by another job exists, or you are not authorized to open it.
Resolution: Check your job log messages. |
| 1046 | Cause: An XJDE or ZJDE version was expected but not found.
Resolution: If an XJDE or ZJDE version should exist, create it. If not, then change the processing option for form ID P926304. |
| 1370 | Cause: You entered a "From" table that does not exist or you are not authorized to use.
Resolution: Review the "From" library for the promotion path control table. Either correct the library name or create the table. |
| 1371 | Cause: You entered a "To" table that does not exist or you are not authorized to use.
Resolution: Review the "To" library for the promotion path control table. Either correct the library name or create the table. |
| 1372 | Cause: A key you wanted to copy from the "From" library does not exist.
Resolution: Review the "From" library for the promotion path control table. Either correct the library name or re-enter the data record. |
| 2892 | Cause: A "From" library name is the same as the corresponding "To" library name.
Resolution: Review the "From" and "To" libraries for the promotion path control table. Make the appropriate changes. |
| 4395 | Cause: No records exist in the Promotion Path Members file (F92401) for the promotion path you specified.
Resolution: Complete the Promotion Path Members form for the promotion path. |
| 4396 | Cause: No records exist in the Promotion Path Control file Members file (F92402) for the promotion path you specified.
Resolution: Complete the Promotion Path Control Files form for the promotion path. |
| 4397 | Cause: No records exist in the SAR Log table (F9810) for the project you specified.
Resolution: In the project master record, change the based-on file for the Pre-Promotion Edit to the SAR Detail table (F4802), then manually update the SAR Detail records for the members and control file records updated by this project. |
| 4400 | Cause: No record exists in the Promotion Path Members file (F92401) for the function code of the member you want to promote.
Resolution: For the specified promotion path, enter the environment for the function code of the member. |
| 4402 | Cause: No record exists in the Promotion Path Control Files file (F92402) for the control table you want to promote.
Resolution: For the specified promotion path, enter the environment for the control file of the record. |
| 4439 | Cause: An error occurred while you attempted to copy a source code member.
Resolution: Check for valid library, table, and member names, as well as options in the CPYF command. Check the job log for the error message ID. |
11.4 Promoting a Project
The promotion process involves transferring members and copying control file data.
11.4.1 Before You Begin
-
Before you promote the project, be sure you have edited all items that appear on the SAR Log Transfer screen. Otherwise, the SAR Log Transfer screen displays when you attempt to promote the project.
-
You must update all SAR log records associated with the SAR before you promote it.
-
You also must resolve all errors (not warnings) before you promote the SAR.
-
On the Promote a Project form, inquire on the project you want to promote.
-
In the OP (Option) fields next to the project elements you want to promote, enter 4 (Promote).
To select all project elements automatically for promotion, press F14.
-
On the Project Promotion Paths form, enter 4 (Select) in the O (Option) field.
-
In the OP (Option) fields next to the member IDs, specify whether to transfer:
-
Both source and object code (option 1)
-
Source code only (option 2)
-
Object code only (option 3)
To override the From Environment and To Environment object libraries before you transfer the members, press F6 before you enter options 1, 2, or 3. Enter the names of the object libraries to which you want the members transferred.
The system transfers the members you selected to the target environment.
You can review the batch job that was submitted by this transfer program from the JD Edwards World command line. To display the command line, press F2.
If your promotion is successful, the system deletes all SAR log records for transferred items. It also creates a new SAR log record for each transferred item and associates it with the target library.
-
-
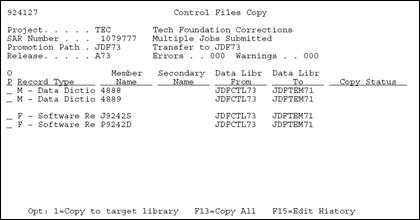
To copy control file data, press F5 (Control Files) from the Software Transfer form.
-
In the OP (Option) fields next to the items you want to copy, enter 1 (Copy to target library).
Note:
Press F13 to select all items automatically for copying. The system copies the items you selected to the target environment.