30 Update the Cross-Reference Table
After you generate a cross-reference index for substitute select keys, you must update the table that cross-references the data for the substitute select keys. EBB uses the cross-reference table of data to burst reports.
Any EBB version can refer to any table. You can reference multiple reports within multiple versions that burst using the same original and substitute select key combinations, to the same cross-reference table. To distinguish one burst report from another, print the substitute select key on the reports.
To update a substitute select key cross-reference, you must set up a version of a form for each cross-reference table. You set up a cross-reference table using a DREAM Writer version with form P98E08 for each cross-reference table.
This chapter contains these topics:
30.1 Before You Begin
-
Ensure you are familiar with the reports, version, and file information.
-
You must be familiar with DREAM Writer.
-
A current cross-reference index must exist.
30.2 Adding a DREAM Writer Report Version for P98E08
You must add a version of Form P98E08 for each cross-reference table prior to processing the EBB version.
From DREAM Writer (G81), choose Version List
To add a DREAM Writer report version for P98E08
-
On Versions List, enter P98E08 for the Form field.
-
Enter 3 in the Option field for the appropriate version.
Figure 30-2 Dream Writer Version Copy screen

Description of "Figure 30-2 Dream Writer Version Copy screen"
-
On Dream Writer Version Copy, complete the following field:
-
`Continue by completing the steps for Identifying the Version.
-

| Field | Explanation |
|---|---|
| Form | This form name is the name of the RPG program which controls the function format of this DREAM Writer report. For FASTR and P & E FASTR reports, the form name can normally be any name the users may create. |
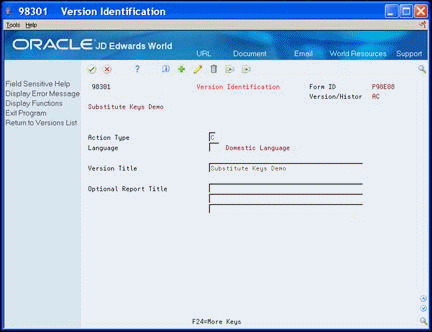
30.3 Identifying the Version
Use the Version Identification screen to:
-
Identify a report title for the Versions List. Enter a version title that is meaningful.
-
Specify up to three report titles to display on the hard copy of the report.
-
Indicate the language based on a user defined code. The system uses the language on screens and printed reports.
Figure 30-3 Version Identification screen
Description of "Figure 30-3 Version Identification screen"
On Version Identification, complete the following fields:
-
Language
-
Version Title
-
Optional Report Title
Continue by completing the steps for Defining Version Parameters.
| Field | Explanation |
|---|---|
| Language | A user defined code (01/LP) that specifies a language to use in screens and printed reports.
For World, if you leave the Language field blank, the system uses the language that you specify in your user preferences. If you do not specify a language in your user preferences, the system uses the default language for the system. Before any translations can become effective, a language code must exist at either the system level or in your user preferences. Screen-specific information A user defined code that specifies the language used for the title of this version. The allowed values are found in system 01, user defined code type LP. |
| Version Title | A description of the version that appears next to the version number. The version title is different from the report title. |
| Optional Report Title | The title that appears at the top of the report. It can include up to three lines with 40 characters each. The lines are automatically centered on the report. |
30.4 Defining Version Parameters
Additional Parameters contains various job control parameters.
On Additional Parameters, complete the following field:
-
Based on File
The Based on File field must be the file that contains the original select keys and the substitute select keys.

Note:
If you change the based on file, you might need to delete and add the data sequence setup records so that the system associates the correct file name with the internal keys.Continue by completing the steps for Specifying Processing Option Revisions.
| Field | Explanation |
|---|---|
| Based on File | Identifies the name of the physical file on which a logical file is based. In DREAM Writer, the based on file refers to the file on which all operations, such as Data Selection, Data Sequence, and so forth are to be done.
Screen-specific information The file on which Data Selection and Data Sequence are done. |
30.5 Specifying Processing Option Revisions
Processing Options Revisions identify the table number to which you assign the substitute select key table.
To specify processing options for substitute select key table
On Processing Options Revisions, enter the table number for the substitute select key table.
Name this table logically.
Figure 30-5 Processing Options Revisions screen

Description of "Figure 30-5 Processing Options Revisions screen"
30.6 Selecting Data
Because substitute select keys do not use data selection, press Enter without selecting any data.
30.7 Assigning Sequence Numbers to Select Keys
You use the Data Sequence Set Up screen to locate the field that represents the original select key.
When you assign sequence numbers to select keys, you use a different range of numbers than the original select key so that you can distinguish the original from the substitute select key. For example, if you are updating the cross-reference table to use the region code as the original select key and the group code as the substitute select key, enter the sequence number 001 next to the region. On the group code, enter the sequence number 100 and change the Option field to Y (yes).
To assign sequence numbers to select keys
-
On Data Sequence Set Up, enter a number in the Sequence field for the original select key.
If there are multiple fields that make up the original select key, assign all fields a sequence number in the appropriate order, from left to right.
-
Ensure that the original select key fields contain an N (no) in the Option field.
Do not press Enter.
-
Enter a different range of numbers in the Sequence field for the substitute select key.
Do not press Enter.
-
To identify the substitute select key fields, enter Y in the Option field.
-
Press Enter.
-
Run the DREAM Writer version.
