38 Review Hidden Selection Tools
This chapter contains these topics:
38.1 Reviewing Hidden Selection Tools
From Master Directory (G), choose Hidden Selection 27
From Advanced & Technical Operations (G9), choose Run Time Setup
From Run Time Setup (G90), choose Menus
From Menus (G901), choose Revisions
You can define and add your own Hidden Selections to execute a job or go to a menu. Hidden Selections must be a number from 25 to 99. Remember that JD Edwards World has preset Hidden Selections 25, 27, 29, and 97.
When you add or change a Hidden Selection, sign off and back onto the system to load the new Hidden Selections.
38.1.1 What are the ZHIDDEN User Tools?
The ZHIDDEN user tools are:
-
Selection 33, display submitted jobs
-
Selection 34, display user messages
-
Selection 39, change user print queue
-
Selection 42, display user job queue
-
Selection 43, display user print queue
-
Selection 50, calendar
-
Selection 82, hold submitted jobs
-
Selection 88, change your password
-
Selection 85, display user defaults
-
Selection 90, sign off
38.1.2 What are the ZHIDDEN002 Operator Tools?
The ZHIDDEN002 operator tools are:
-
Selection 27, advanced operations
-
Selection 29, technical operations
-
Selection 30, EOJ without sign off
-
Selection 41, system operator messages
-
Selection 44, display active jobs
-
Selection 45, display print writer
-
Selection 84, IBM queue and a data base
-
Selection 97, install history display
-
Selection 98, secondary job
38.1.3 What are the ZHIDDEN003 Programmer Tools?
The ZHIDDEN003 programmer tools are:
-
Selection 25, menu specifications
-
Selection 35, global menu travel
-
Selection 36, command entry screen
-
Selection 38, display library list
-
Selection 40, file field description
-
Selection 46, display compile queue
-
Selection 60, break message window
-
Selection 99, display file overrides
Complete the following tasks:
-
Locate the Hidden Selection menus
-
Add Hidden Selections
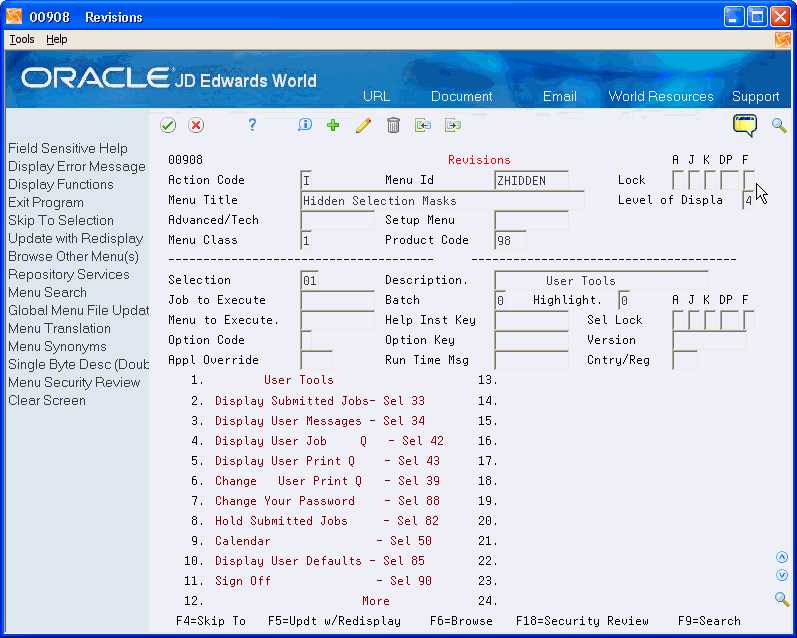
38.2 Locating the Hidden Selection Menus
To locate the Hidden Selections Menus
-
On Revisions, enter one of the hidden selection IDs, such as ZHIDDEN, in the Menu Id field.
-
Click Inquire.
38.3 Adding Hidden Selections
Complete the following tasks:
-
Add Hidden Selections that call a job
-
Add Hidden Selections that call a menu
To add Hidden Selections that calls a job
-
On the Revisions screen, complete the following field:
-
Enter SELECTxx, where xx is the Hidden Selection number, in the Job to Execute field.
-
Enter 1 in the Option Code field.
-
Enter the name of the CL program in the Option Key field.
Figure 38-1 Revisions (Hidden Selections That Call a Job) screen

Description of "Figure 38-1 Revisions (Hidden Selections That Call a Job) screen"
-
Click Change.
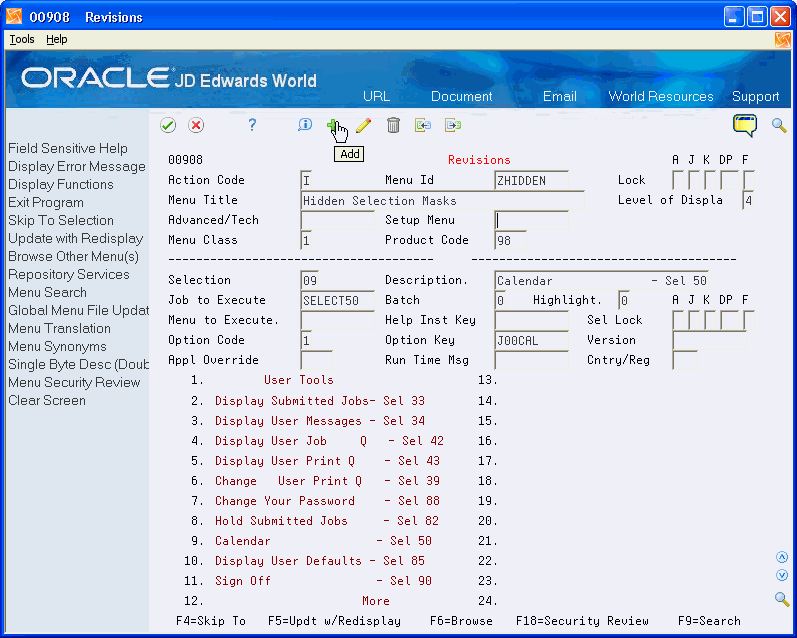
To add Hidden Selections that calls a menu
-
On Revisions, describe the Hidden Selection.
A Hidden Selection description ends in '- Sel xx', where 'xx' is the Hidden Selection number, which you position at the end of the Description field.
Figure 38-2 Revisions (Hidden Selections That Call a Menu) screen
Description of "Figure 38-2 Revisions (Hidden Selections That Call a Menu) screen"
-
Enter SELECTxx, where xx is the Hidden Selection number, in the Job to Execute field.
-
Enter 2 in the Option Code field.
-
Enter the menu ID in the Option Key field.
-
Click Change.
Note:
Use any open selections in the range of 1 through 12, then 13 to 24.To use the new hidden selection, sign off and sign on to the system. The system loads hidden selections at signon.
To add Hidden Selections to a menu
-
On Revisions, enter ZHIDDEN, ZHIDDEN002, or ZHIDDEN003 in the following field.
-
Menu ID
-
-
Locate a hidden selection.
-
For that hidden selection, note the information in the following fields:
-
Batch
-
Option Code
-
Option Key
-
Version (if applicable)
Figure 38-3 Revisions (Add Hidden Selections to a Menu) screen
Description of "Figure 38-3 Revisions (Add Hidden Selections to a Menu) screen"
-
-
Locate the menu to which you want to add hidden selections and a blank Selection field.
-
Enter the data you noted from the hidden selection in the previous step in following fields and click Enter:
-
Job to execute
Enter the same value you enter in the Option Key field.
-
Description
-
Batch
-
Option Code
-
Option Key
-
Version
Figure 38-4 Revisions (Added Data from Hidden Selections) screen

Description of "Figure 38-4 Revisions (Added Data from Hidden Selections) screen"
Note:
Some hidden selections have no Option Key and you cannot add these to a menu. -
-
Access the menu and test the hidden selection.
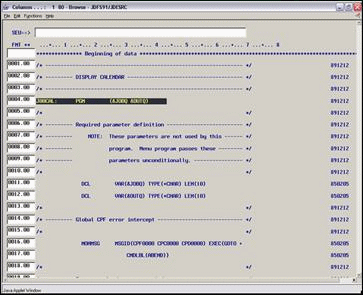
Note:
JD Edwards World recommends that you browse the CL source prior to making changes and read the note in CL. As most hidden selection jobs receive two parameters, the program in the Job to Execute field must accept two parameters. The system issues the following error message if you customize your source without two parameters: ERROR: 'Cannot resolve to object SELECTxx. Type and Subtype X'0201' Authority X'0000.'
38.4 Helpful Hints - Hidden Selection 60 (Break Message)
| Issue | Solution |
|---|---|
| Hidden Selection 60 Break Message Window does not display a Send Window Message window (V96MSG) at the message recipient's workstation | This might occur when a user is not signed on. However, the workstation's message wait (MW) indicator is active.
If the MW indicator does not appear on the Library List Control menu (G944), choose Pre-open Files Setup. Locate User Type *SYS. Ensure that it contains file J96SMSGQ and it contains the description: Message Handling - Set Message Queue Win. If the file does not exist, add file J96SMSGQ. Locate User Type: *SYS again to ensure that the change took place. As this is a pre-open file you must sign off and then sign on for the change to take effect. Note: If your IBM security level is set to 40, then the MW indicator does not activate due to restrictions of this security level: |
| Retain Hidden Selection 60 messages in MSGQ | To retain Hidden Selection 60 messages, you can modify the J96MSG program. On the Edit screen, remove the statement RMVMSG MSGQ(&LIBARY/&MSGQUE) MSGKEY(&MSGKEY) as shown below. Rename the existing object and recompile member J96MSG. This allows the user to utilize the IBM command DSPMSG to display all user messages that have not yet been deleted. |
Figure 38-6 CL Program Source (Hidden Message 60) screen
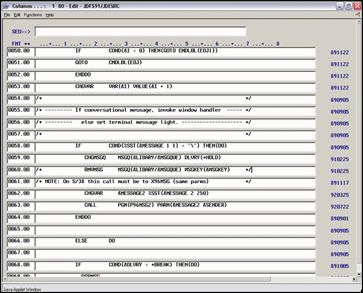
Description of "Figure 38-6 CL Program Source (Hidden Message 60) screen"