Managing Oracle Inventory Optimization Plans from Oracle Advanced Planning Command Center
Introduction to Managing Plans in Advanced Planning Command Center
The integration between Oracle Inventory Optimization and Oracle Advanced Planning Command Center lets you define multiple IO plans, modify their inputs, compare plans, launch plans, and evaluate their results, from within APCC. You can do this on two levels:
-
Quick simulations in which you can change a constraint at the plan level and launch your plans
-
Detailed simulations in which you can copy your base plan, modify several different inputs at various levels, and launch any or all of your plans
You can work with your IO plans from the Inventory Analysis page of the Supply Chain Analyst dashboard and the SLA Analysis page of the Service Supply Chain Analyst dashboard.
In APCC you can:
-
Run a Quick Simulation by modifying a constraint on the base plan at the plan level
-
Copy plans and edit their inputs
-
Launch multiple plan runs
-
Review and compare plan results
Running a Quick Simulation
Quick Simulations let you evaluate the impact of changing one input on a plan by comparing it to other similar plans. For example, if you want to evaluate the impact on safety stock values for different service levels, demand fulfillment lead time levels, or budget values, you can set up plans that are otherwise similar, change some parameters and launch each plan.
To run a quick simulation:
-
Navigate to the Inventory Analysis page of the Supply Chain Analyst or the SLA Analysis page of the Service Supply Chain Analyst dashboard.
-
From the Baseline Plan field, choose the baseline plan you want to use.
-
Click the Quick Simulations link.
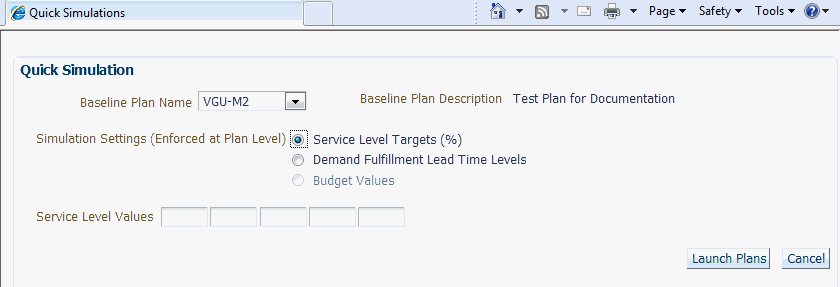
The Quick Simulation page appears.
-
Click the radio button for the parameter you want to modify in the simulation.
Enforce Service Level plan enables the Service Level Targets and Demand Fulfillment Lead Time Levels radio buttons. An Enforce Budget plan enables the Budget Values radio button.
You can change only one parameter at a time.
Enforce Capacity plans are not supported at this time.
-
Enter the values you wish to use for the simulation.
-
To run more than one quick simulation, enter additional values for the parameter in the values field.

-
Click Launch Plans.
A confirmation page opens and gives you the ID number for each plan.
-
Click OK to close this page
Copying Plans and Editing Inputs
You can set up and compare plans and modify multiple simulations plans to determine the most efficient stocking strategy. The simulation plans need to have inputs that are similar, but have some differences their plan options to make a meaningful comparison. For example, you may want to:
-
Change a supplier lead time to evaluate the impact on budget
-
Change a warehouse capacity to evaluate the impact on service levels
-
Change service levels to evaluate impact on budgets
Copying a Plan
-
1. From the Oracle Applications Home Page Main Menu, navigate to the Inventory Analysis page in the Supply Chain Analyst dashboard or the SLA Analysis page in the Service Supply Chain Analyst dashboard.
Make sure you select your base plan.
-
Click Copy Plan.
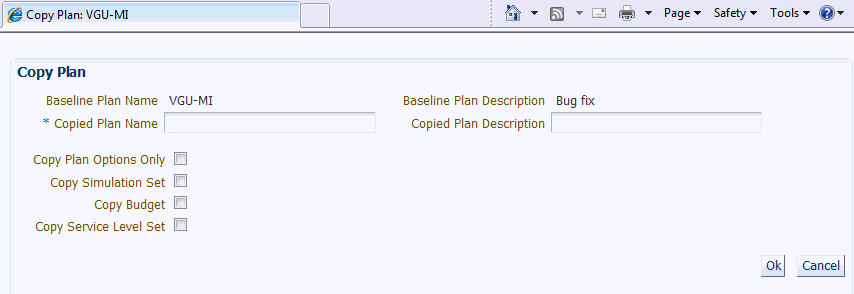
The Copy Plan page appears.
-
In the Copied Plan Name field, enter a unique name for the new plan.
-
Enter a description for the plan in the Copied Plan Description.
-
Select the remaining options, as required:
-
• Copy Plan Options Only: Copies only the plan options. Check this option if you want to change key inputs and launch the plan with a refresh snapshot.
-
• Copy Simulation Set, Copy Budget, Copy Service Level Set: Copies the data from the base plan of the options you checked.
-
• If the base plan has a set named S1 attached to it, and you named your copied plan Plan2, the new simulation set, budget or service level set is called S1 (Plan2). Select one or more of these options if you plan to modify the data in that set without modifying the values in the base plan.
-
-
Click OK.
A confirmation page appears.
-
Click OK.
The Edit Plan page appears, in which you can edit your copied plan. See the section Editing a Plan in this document.
Editing a Plan
You access the Edit Plans page in one of two ways:
-
If you want to edit your base plan, click Edit Plan Inputs from the Inventory Analysis page in the Supply Chain Analyst dashboard or the SLA Analysis page in the Service Supply Chain Analyst dashboard.
-
If you want to edit the plan that finished copying, continue from the Edit Plans page that opened when you copied your plan.
To edit a plan:
-
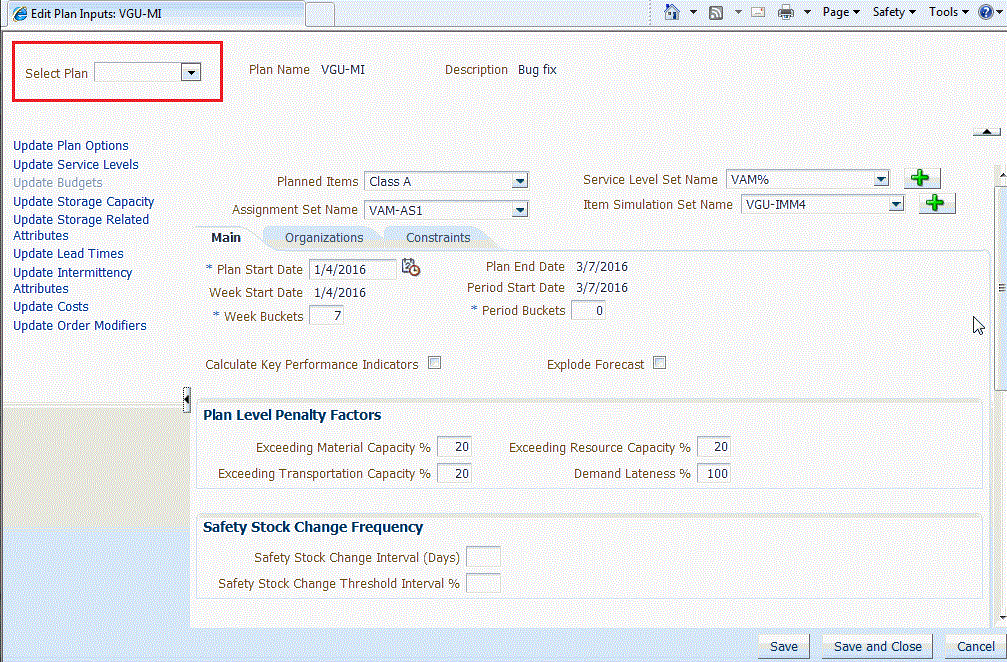
On the Edit Plan Inputs page, from the Attribute Group on the left side, select the group of attributes that you wish to edit. For example, to modify Plan Options on the copied plan, click Update Plan Options.
-
You can also click the Organizations tab and the Constraint tab and make changes on the respective pages.
Creating a New Service Level Set or Item Simulation Set
To create a new Service Level Set or Item Simulation Set:
-
From the Oracle Applications Home Page Main Menu, navigate to the Inventory Analysis page in the Supply Chain Analyst dashboard. Alternatively, navigate to the SLA Analysis page in the Service Supply Chain Analyst dashboard.
-
Navigate to the Edit Plan Inputs, then Update Plan Options.
-
Click the Create icon (the plus sign) next to the Service Level Set Name field or the Item Simulation Set Name field.

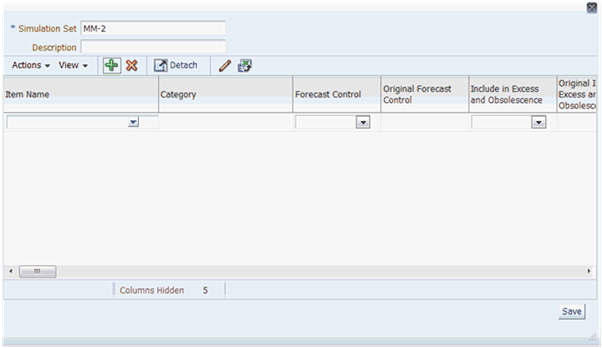
A form opens in which you enter the information for the new Service Level Set or Item Simulation Set.
The procedure for creating a new Service Level Set and an Item Simulation Set is similar. This procedure outlines how to create a new Simulation Set.
The procedure for creating a new Service Level Set and an Item Simulation Set is similar. This procedure outlines how to create a new Simulation Set.
-
On the new form, enter a name for the new set.
-
Optionally, enter a description for the Service Level Set.
-
In the details section of the screen, populate the row with the desired values for the simulation set. Scroll horizontally to access additional values.
-
Click Save when you have completed populating the fields.
The system updates the new Simulation Set.
Working with Attributes
You can change some of the attributes in your copied plan. Logical attribute groups contain the most commonly used attributes. You access the attributes from the links on the left of your page.
Note: Some attribute groups edit the Plan Options. See the section below on plan options.
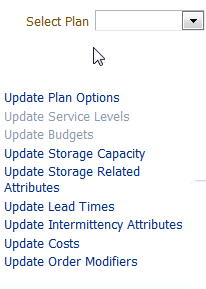
There are five screens, one of which will open up on the right hand pane when you select an attribute group:
-
Item Simulation Set screen
-
Plan Options screen
-
Service Level Set screen
-
Budget Set screen
-
Storage Capacity screen
Item Simulation Set Screen
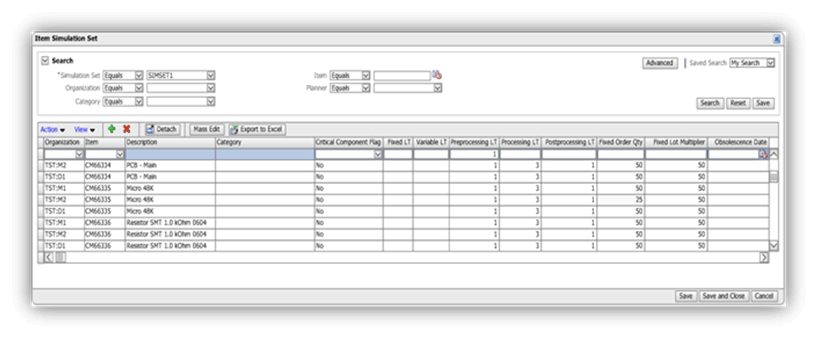
You can edit and add items to the item simulation set from the Item Simulation Set screen, which you can access from the Supply Chain Analyst Dashboard. The default Item Simulations Set is the set you created when you copied your plan. To edit a different Item Simulation Set, change the search criteria
When you insert a row into the simulation, you can select your Organization/Item combination. When you edit an existing record, you cannot edit the Organization or Item columns.
If you change a value, the row is color coded.
To edit and add items to an item simulation set:
-
On the Inventory Analysis page, click Edit Plan Inputs.
The Edit Plan Inputs page appears.
-
Select the Attribute Group, based on the attributes you want to update.
The attributes display on the right side of your screen automatically.
-
To add a new row, click the Add icon (the plus sign).
The system adds a row at the top of the table.
-
Enter or edit information, as required.
Mass Editing
The simulation set supports mass edit, which lets you edit multiple rows simultaneously.
To mass edit:
-
On the toolbar, click Mass Edit to open the Item Simulation Set Mass Edit screen.
-
In the Item Simulation Mass Edit screen, make your changes and click an action.
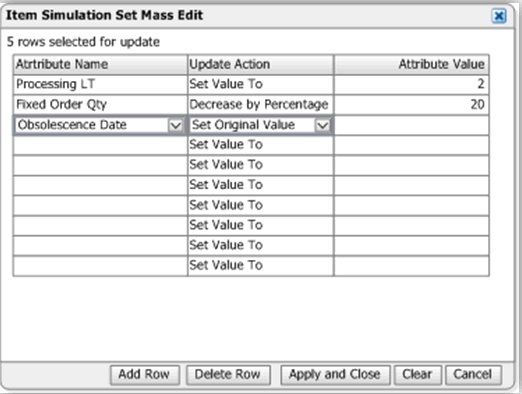
The system displays the number of rows you select in the Item Simulation Set Mass Edit dialog. The table below explains the columns of the Mass Edit page:
| Name | Description |
| Attribute Name | You can select any of the item attributes that are editable. |
| Update Action | For Numeric fields, valid values are:
For Date and String fields, valid values are:
|
| Attribute Value | The new value of the attribute. If you select the Set Original Value, you cannot enter an attribute value. |
Working with the Plan Options Screen
When you select Update Plan Options, the Plan Options form opens and the Main tab is highlighted.
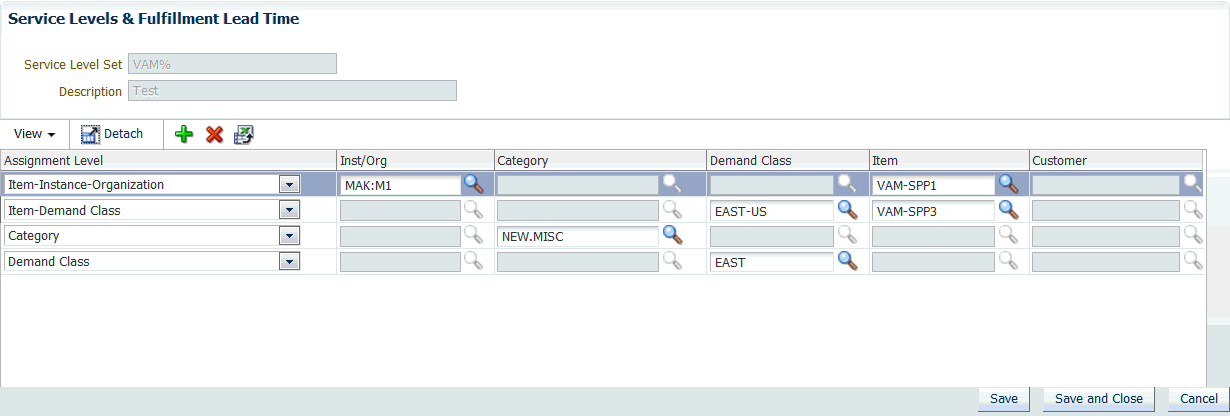
Changing Records in the Service Level Set Form
The Service Level Set that is attached to the copied plan opens by default. You can also access the Service Level Set from the Update Service Levels attribute.
Click Create (plus sign) to add and edit records in the Service Level Set.
Updating the Budget
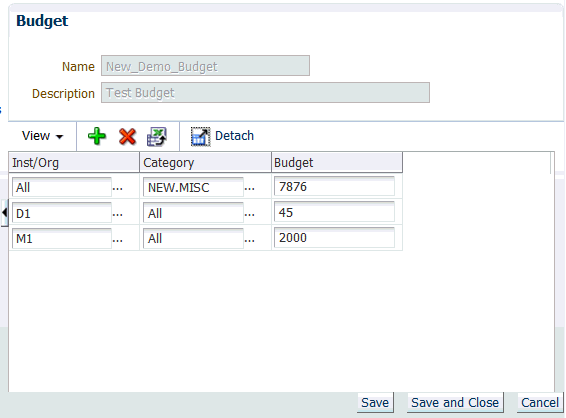
When you select Update Budgets from the attribute groups, the Budgets form opens in the right pane.
-
To add a new row, click the Add icon (the plus sign).
-
Add or edit information, as required.
Note: When you edit an existing record, only the Budget field is editable.
Using the Storage Capacity Form
Use this page to specify capacities for your storage types.
You set up Warehouse Storage Capacity at either the Organization Level or the Organization– Storage Type level. The profile option: MSO: Warehouse Capacity Granularity, which takes on values Organization Level and Category Organization Level, governs the setup.
If you select:
-
Organization level: Specify the capacity in EBS and collect it over. Editing it from within APCC is not supported.
-
Category Organization level: Specify the capacity in this page. The Storage Capacity form opens for editing only if you have set the profile MSO: Warehouse Capacity Granularity to Category Organization Level.
To access the Storage Capacity form:
-
Click Update Storage Capacity from the attribute groups in the left.
The Storage Capacity page appears.
-
Add and edit information, as required.
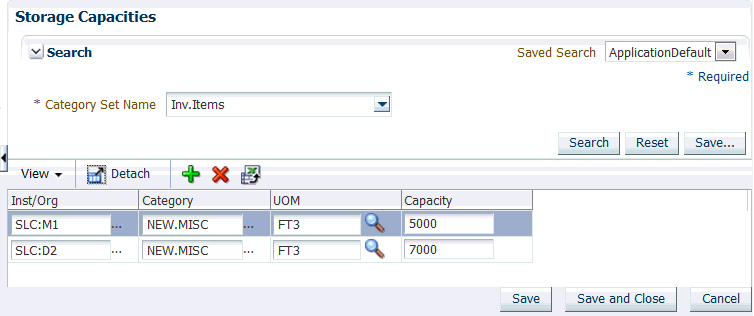
You cannot insert a record if a record already exists for the Organization-Category. If you edit existing records, only the Capacity and UoM fields are editable.
Launching Plans
You can select and launch several IO plans at one time from within APCC. You can also change the launch parameters for each plan.
To launch plans:
-
From the Oracle Applications Home Page Main Menu, navigate to the Supply Chain Analyst dashboard.
-
Click the Inventory Analysis tab.
-
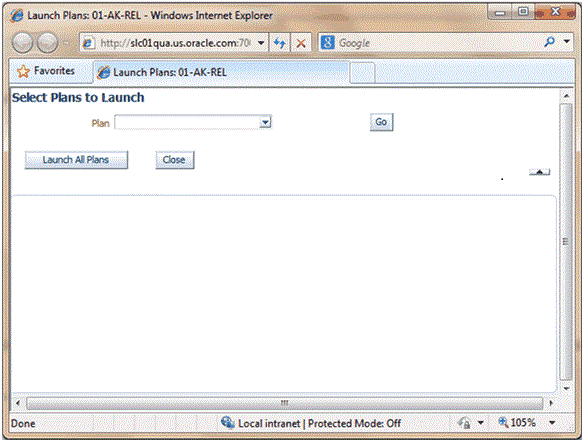
Click Launch Plans.
The Select Plans to Launch page appears.
-
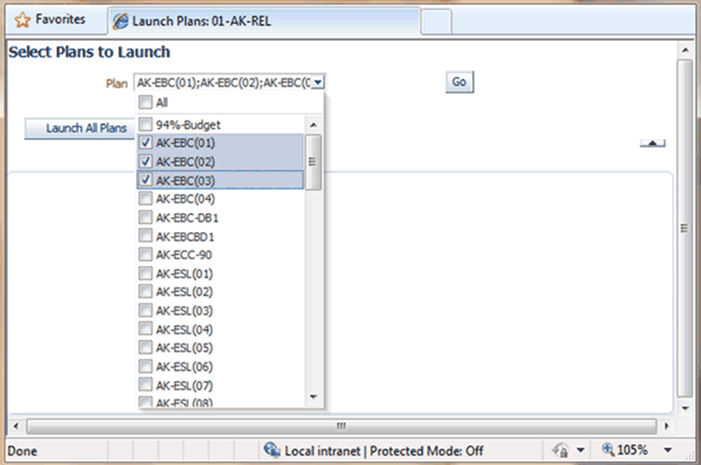
In the Plan drop-down field, click the checkbox adjacent to each of the plans you want to launch.
-
Click Go.
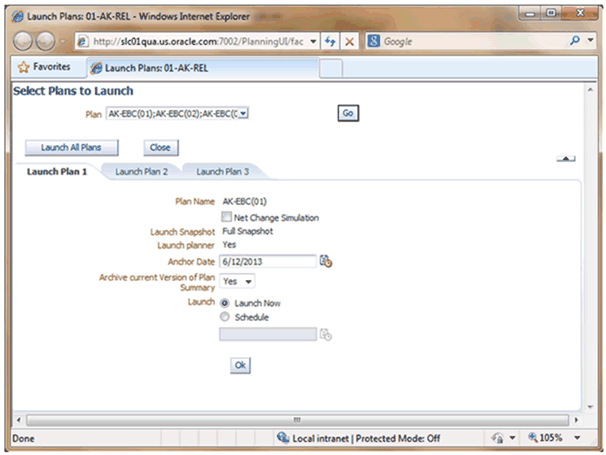
The page refreshes and a Launch Plan tab appears for each plan.
-
Review and change any launch parameters.
-
Click OK in each plan.
Plan Launch Parameters
The table below lists the Plan Launch parameters:
| Parameter | Description |
| Plan Name | Name of the plan being launched (non-editable) |
| Net Change Simulation | If you check Net Change Simulation, you launch the plan in net-change simulation mode, without snapshot. The added or edited plan inputs that you added after you copied the base plan are updated before launching the optimization engine. This is relevant only if the complete plan was copied (Copy Plan Options only unchecked). If you do not check Net Change Simulation, the system launches the plan as usual with complete snapshot and the optimization engine runs. |
| Anchor Date | The anchor date for the plan. |
| Archive current version of Plan Summary | Select yes if you want to review the plan results in APCC. |
| Launch | Launch Now: Launch the plans now. |
APCC Measures for Inventory Analysis
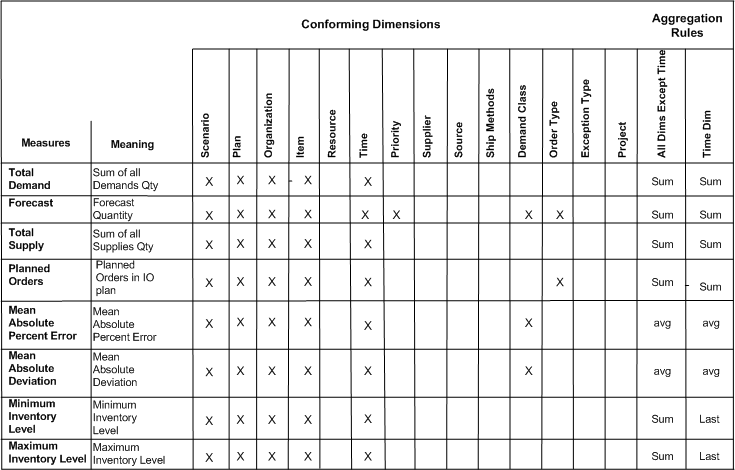
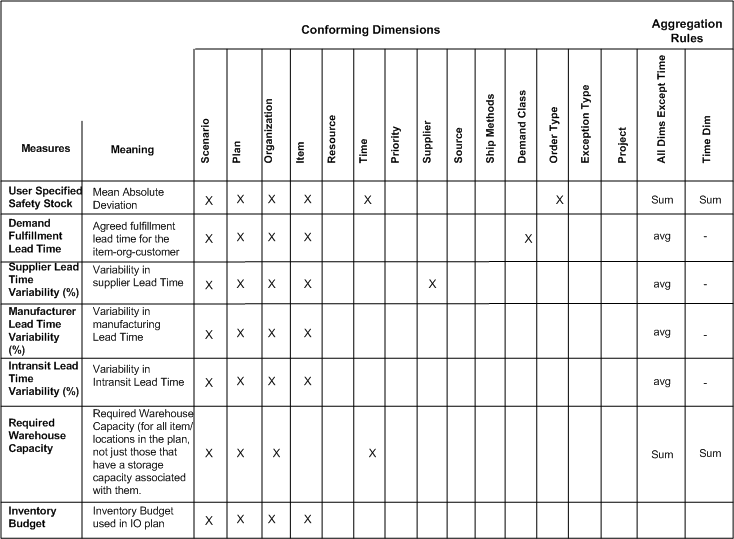
While reviewing the plan results, you can look at your plan inputs. For example, while reviewing the recommended safety stock values, you may want to review the lead time variables. To support this analysis, the system archives measures related to inventory planning, makes them available in APCC when it archives the base IO plans, and archives them in APCC when you set up and launch a plan in APCC.
You can see these inventory planning measures associated with each plan:
-
Total Demand
-
Forecast
-
Total Supply
-
Planned Orders
-
Mean Absolute Deviation
-
Minimum Inventory Level
-
Maximum Inventory Level
-
User Specified Safety Stock
-
Demand Fulfillment Lead Time
-
Supplier Lead Time Variability (%)
-
Manufacturing Lead Time Variability (%)
-
Intransit Lead Time Variability (%)
-
Required Warehouse Capacity
-
Inventory Budget
The following tables explain the measures in detail.
