Working with Models
This chapter covers the following topics:
- Models Overview
- Opening Models
- The Model Workspace
- Viewing Models in Flow View
- Viewing Models in Map View
- Saving Models
- Selecting and Unselecting Nodes, Arcs and Commodities
- Exporting Nodes and Arcs in .imp Format
Models Overview
Node Movement and Alignment
You can move or align nodes in a model to see them more clearly. For example, you can move nodes if they are too close together or overlap. You can move a node or nodes by dragging them across the screen. If you want to move a node or nodes to part of the model that is not currently on the screen, you can drag the node or nodes to the edge of the drawing space. The window automatically scrolls to display the next part of the model.
Nodes can be aligned in:
-
Columns. If you align two nodes in a column, they appear in a vertical column halfway between the original horizontal positions of the two nodes. If you align several nodes in a column, the vertical position of the top and bottom nodes does not change and the nodes between them are spaced evenly.
-
Rows. If you align nodes in a row, they appear in a horizontal line halfway between the highest and lowest node.
-
Sorted columns. Aligning nodes in a sorted column arranges nodes in alphabetical order in a vertical column.
-
Sorted rows. Aligning nodes in a sorted row arranges nodes in alphabetical order in a horizontal row.
You can also align subordinate nodes in a block node so that they appear according to the commodity flow.
Node Display Options
You can change how nodes appear in models by:
-
Compressing nodes or block nodes. Normally, a node increases in size as you add attach points to it. You can compress all nodes or only the block nodes in a model. Compressing block nodes allows you to see a complex model's structure and attach points without having block nodes take up too much space in the drawing area.
When nodes are compressed:
-
All nodes are the same size
-
Attach points do not appear
-
Arcs connecting any two nodes are displayed as a single arc
-
-
Hiding nodes. You can hide:
-
Unused nodes. If you hide unused nodes, nodes that were not used in the most recent solve do not appear in your model.
-
Lonely nodes. If you hide lonely nodes, nodes that are not visually connected to other nodes are hidden. A node is lonely if arc connections exist but are hidden.
-
Arc Display Options
You can change the appearance of arcs in a model by:
-
Displaying fat arcs. If you click Fat Arcs, the width of an arc indicates the amount of commodity it carries. This option also applies when you display models on maps.
-
Showing simple flow directions. If you select this option, arcs between compressed nodes appear in just one color. If you do not select this option, arcs between compressed nodes appear in two colors and indicate the direction of flow along the arc. Selecting this option can improve the drawing speed for some models.
-
Displaying arc information in the status bar.
You can also hide arcs in a model. You can:
-
Hide all arcs. If you hide all arcs, no arcs appear in the model.
-
Hide unused arcs. If you hide unused arcs, arcs that are not used do not appear in the model. Unused arcs have a commodity flow of zero after the most recent solve.
-
Hide unselected arcs. If you hide unselected arcs, arcs that are not currently selected do not appear in the model.
-
Hide unselected commodities. If you hide unselected commodities, arcs only appear if they carry commodities selected in the Commodities window. Arcs carrying unselected commodities do not appear.
You can save arc appearance options in views.
Block Options
Within the Blocks tree in the Model Workspace, you can right-click a Block node and then select an option. The following table describes the options:
| Option | Description |
|---|---|
| Block | This option reblocks a Block node that was unblocked. This option is inactive if the Block node is already blocked. |
| Unblock | This option unblocks the selected Block node. It is inactive if the Block node is already unblocked. |
| Single-Period Properties | When a Block node is blocked, this option performs a single-period query on the selected Block node. |
| Multi-Period Properties | When a Block node is blocked, this option performs a multi-period query on the selected Block node |
| Bar Chart Properties | When a Block node is blocked, this option performs a bar chart query on the selected Block node. |
| Duplicate | When a Block node is blocked, this option duplicates the selected Block node. You can either duplicate only the contents of the Block node, or the contents of the Block node, and its paths. |
| Add Selected to Block | In flow view, this option adds selected objects to a Block node. It can be used only in flow view, and only when the Block node is unblocked. |
| Align Contents | This option aligns the contents of a Block node in vertical columns. It can be used only in flow view, and only when the Block node is unblocked. |
| Find | This option searches the selected Block node for specified criteria. |
| Replace | This option launches the Block Replace tool, which is used to change data in certain Block nodes by entering values or expressions. |
| Rename | When a Block node is blocked, this option allows you to change the name of the Block node. |
| Delete | When a Block node is blocked, this option deletes the Block node from the model. |
| Contents | This option displays the node and arc contents of the Block. |
User-Defined Views
After your model is displayed the way you want, you can create and save a new view. User-defined views can be easily accessed from the Model Workspace, and can be used to display model data in different ways, depending on different situations and what the model is used for. Examples of options that you can use within user-defined views are as follows:
-
Which view you are in (map or flow view
-
Whether unused or lonely nodes are hidden or displayed
-
Whether nodes are compressed
-
Whether unused or unselected arcs are hidden or displayed
-
Whether tall nodes and arc arrows are hidden or displayed (map view only)
-
Which layout options have been applied (Multi Tier, Mixed, Force Directed, or Block All)
-
Zoom level
You can save find queries, allowing complex searches to be retained. You no longer need to manually enter detailed search criteria every time you want to run commonly used find queries.
You can use expressions and wildcard characters to help you find data. In Windows, you can use only the * and ? characters; in UNIX, you can use the wildcard characters shown in the following table:
| Wildcard | Function |
|---|---|
| * | Find any pattern. |
| \ | The next character does not have a symbolic meaning. For example, \? means that the ? is part of the text and is not a wildcard character. |
| ? | Find any single character. |
| [ ] | Find any character enclosed in the brackets. |
| - | Find a range of characters separated by this character; works only within square brackets. |
Opening Models
Opening Models Overview
When you view a model online, you can move, shrink, or enlarge the model in the Strategic Network Optimization drawing space. When you shrink a model, you can see more of the model on screen. When you enlarge a model, you can see the model in more detail.
When you shrink or enlarge a model, Scale Diagram automatically appears. Scale Diagram shows the size and position of the drawing space relative to the model.
To view an entire model online, you can size the model to fit the drawing space. You can size a selected part of a model to fit the drawing space.
Strategic Network Optimization models are saved in symbolic format (.sym) or compressed gzip format (.gz).
You can open recently used models directly from the File menu. Strategic Network Optimization stores the names of the five most recently opened files in the linx.ini file in your home directory and displays these file names in the File menu. Strategic Network Optimization also comes with sample models that you can open.
To open models:
-
From the File menu, select Open.
-
To locate a model, do one of the following:
-
Click the Up One Level button and browse through other directories.
-
Enter the location of a model in the Look in field.
-
Enter a match pattern in the File name field or the Look in field and click Open.
-
-
Select a model and click Open.
By default, Strategic Network Optimization populates the Files of type field with *.sym. To open a gzip file, select *.sym.gz from the Files of type drop-down list. When a .sym.gz file is opened, it is automatically decompressed.
A progress bar depicts the length of time that remains before the model opens. When the model appears, the path and name of the model and the current time period appear in the title bar.
To open a sample model:
-
From the File menu, select Open.
-
Browse to the SNO sample_data directory.
-
Select a sample model and click Open.
The Model Workspace
The Model Workspace Overview
The Model Workspace provides additional model structure. Many of the functions of the Model Workspace can also be accessed through the main Strategic Network Optimization menu, but the Model Workspace includes all of these functions in one location, enabling you to better evaluate the overall structure of the model.
From the Model Workspace, you can:
-
View the hierarchical structure of Block nodes
-
View and create the hierarchical structure of commodity groups
-
View period groups
-
Find data in nodes
-
Toggle among user-defined views
-
Create new search queries
-
Run scenarios
Model data displayed in the Model Workspace includes Block nodes, commodities, periods, and scenarios.
The following example shows the Model Workspace:
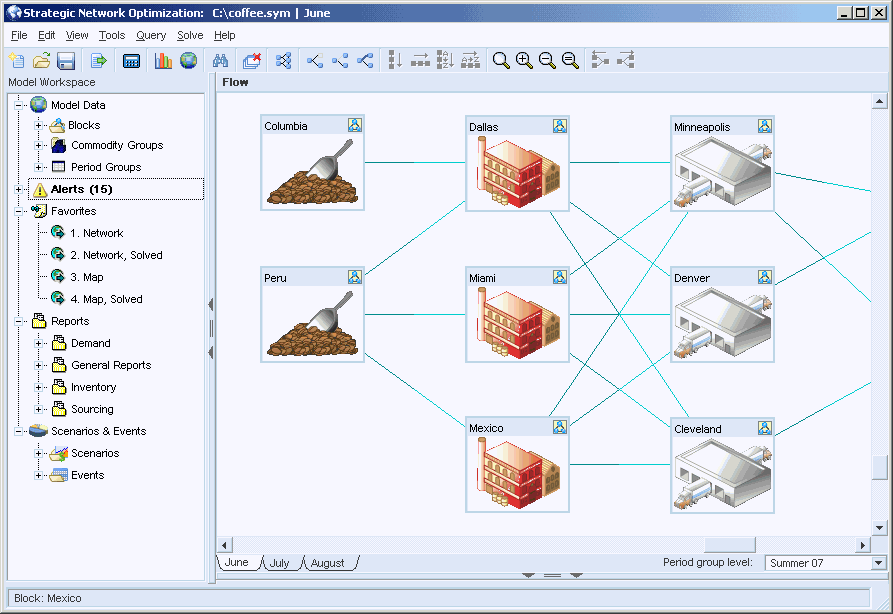
To open the Model Workspace click the Model Workspace button on the main Strategic Network Optimization tool bar.
To solve a model from the Model Workspace:
-
Right-click Model Data.
-
From the shortcut menu, select Solve.
To open reports from the Model Workspace:
-
Right-click Model Data.
-
From the shortcut menu, select Detailed Report or Summary Report.
Blocks
All Block nodes in a model are listed in a hierarchical structure in the Blocks section of the Model Workspace. When you click the name of a Block node in the Model Workspace, the system highlights the node in the main view. From the Blocks section of the Model Workspace, you can perform queries and duplicate, rename, and delete Block nodes.
Models can contain many Block nodes and nested groups of Block nodes. This level of complexity can affect the amount of time necessary to navigate through the model, especially if you are not familiar with the model. Instead of navigating through a model by unblocking various layers of Block nodes in the main view, you can simply expand or collapse the Blocks list in the Model Workspace.
The hierarchical structure of the Block nodes in the Model Workspace not only simplifies navigation through the model, but it also enables the user to gain a better understanding of how the model is organized.
To create a new Block node from the Model Workspace:
-
Select the nodes that you want to block.
-
In the Model Workspace, right-click Blocks.
-
Select New Block from the shortcut menu.
To perform a Block node search from the Model Workspace:
-
Right-click Blocks.
-
Select Find from the shortcut menu.
-
In the Block Find window, enter the search criteria.
-
Select an option from the Actions menu.
To perform a Block node replace from the Model Workspace:
-
Right-click Blocks.
-
Select Replace from the shortcut menu.
-
In the Block Replace window, enter the replacement data.
-
Select an Option from the Actions menu.
Commodity Groups
Commodity groups allow the user to organize commodities and then filter by them in views. The user can create and define commodity groups and then add commodities to that commodity group. Commodity groups can be accessed from the Commodities window or from the Commodity Groups area of the Model Workspace tree structure.
To access the Commodities window from the Model Workspace, double-click Commodities Groups.
Favorites
The Favorites section of the Model Workspace lists user-defined views and find queries in a model. You can create, save, rename, and delete user-defined views, and create and run detailed find queries in the Favorites section.
To create a new user-defined view in the Model Workspace:
-
Right-click Favorites.
-
Select New User-Defined View.
-
Enter a name for the user-defined view.
To create a new find query:
-
Right-click Favorites and select New Find Query.
-
In the Select Find Query Type window, select an arc or a node type.
-
Click OK.
-
Enter the search criteria in the Find window and close the window.
-
Enter a name for the find query.
To run an existing find query from the Model Workspace:
-
Select a find query in Favorites.
-
Right-click the find query and select Run Find Query.
To edit a find query in the Model Workspace:
-
Select a find query in Favorites.
-
Right-click the find query and select Edit Find Query from the shortcut menu.
-
Modify the search criteria in the Find window and close the window.
To rename a find query in the Model Workspace:
-
Select a find query in Favorites.
-
Right-click the find query and select Rename from the shortcut menu.
-
Rename the find query.
To delete a find query in the Model Workspace:
-
Select a find query in Favorites.
-
Right-click the find query and select Delete from the shortcut menu.
The system prompts you to confirm the deletion.
-
Click OK.
To save a user-defined view:
-
Select a view in the Favorites list.
-
Right-click the view and select Save Current View from the shortcut menu. The system prompts you to confirm whether you want to replace the view.
-
Click Yes.
To switch to a user-defined a view from the Model Workspace, do one of the following actions:
-
Double-click the view that you want to be restored.
-
Right-click the view and select Restore View from the shortcut menu.
To rename a user-defined view in the Model Workspace:
-
Select a view in the Favorites list.
-
Right-click the view and select Rename from the shortcut menu.
-
Rename the view.
To delete a user-defined view in the Model Workspace
-
Select a view in the Favorites list.
-
Right-click the view and select Delete from the shortcut menu.
The system prompts you to confirm the deletion.
-
Click OK.
Periods
You can view period groups or access the Periods window from the Period Groups section of Model Workspace. In the Periods window, you can toggle between different periods in the model. You can also create, rename, and delete periods, by accessing the Periods window.
To access the Periods window from the Model Workspace, double-click Periods.
Alerts
Alerts help you identify and manage exceptions after solving a model. Alerts are displayed in the Model Workspace. The results of alerts are shown in the Alerts area at the bottom of the main user interface. This Alerts area can be expanded or collapsed by using the small gray up and down arrows seen at the top of the example below:

Scenarios and Events
The Scenarios and Events section of the Model Workspace provides a list of defined scenarios and events and displays events which have been associated with a scenario. These scenarios and events are used to create Key Performance Indicators which are displayed in the main user interface. Using the right-click options in this section, you can:
-
Create unplanned or planned events and scenarios
-
Add unplanned or planned events to scenarios
-
Select Key Performance Indicators to be displayed in the main user interface
-
Specify whether to include or exclude penalty costs from a scenario
-
Set up scenarios
-
Run scenarios
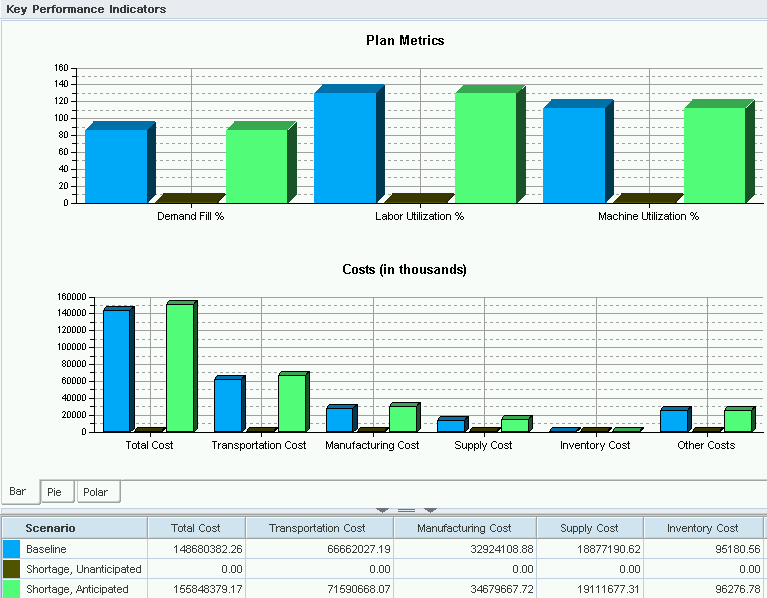
Key Performance Indicators
After a scenario is run, Key Performance Indicators display performance metrics which are useful when you need to compare relative results. These Key Performance Indicators can be displayed in the main user interface in either Bar, Pie, or Polar chart format, as seen in the example below:
Viewing Models in Flow View
Flow, Map, and KPI Views
By default, Strategic Network Optimization displays models in Flow view. Models can also be displayed in Map view or KPI view. If you are in Map view or KPI view and you wish to return to Flow view, click the Flow View button, seen here below:
![]()
Moving, Shrinking, and Enlarging Models
In Flow view, you can move models and change the size of models on screen. When viewing models, you can display the Scale Diagram window, which shows the size and position of the nodes and arcs on screen relative to the entire drawing space.
To move a model on screen, hold down CTRL and the left mouse button and then drag the model to a new position.
To shrink or enlarge a model, select Resize from the View menu, and then select an option.
To fit a model in the drawing space, do one of the following:
-
From the View menu, select Scale, and then select To Fit.
-
In the Model Workspace, right-click Blocks and select Scale to Fit.
To fit part of a model in the drawing space:
-
Select the nodes and arcs that you want to show in the drawing space.
-
From the View menu, select Scale, and then select one of the following:
-
Selected Nodes
-
Selected Nodes and Arcs
-
You can also use the Scale Selected Nodes button, seen here below:
![]()
When you click the Scale Selected Nodes button, the mouse pointer becomes a magnifying glass. Left-click and drag the magnifying glass around the nodes that you want to scale. When you let go, the selected nodes are scaled to fit into the main workspace.
To display the Scale Diagram window, from the View menu, select Scale, and then select Show Scaling.
Moving and Aligning Nodes
-
Point to the node that you want to move and then click the left mouse button.
-
Drag and drop the node to a new location.
To move a group of nodes:
-
Select the nodes that you want to move.
-
Press the SHIFT key, point to one of the selected nodes, and click the left mouse button.
-
Drag and drop the nodes to a new location.
To align nodes:
-
Select the nodes that you want to align.
-
From the Tools menu, select Align, and then select one of the following:
-
Nodes in Column
-
Nodes in Row
-
Nodes in Column (Sorted)
-
Nodes in Row (Sorted)
-
To align nodes in a block node:
-
Select the block of nodes that you want to align.
-
From the Tools menu, select Align, and then select Contents of Block.
If the message Nodes too close together - not enough room appears, select Resize from the View menu, and then select Occupy Full Drawing Space. Then repeat steps 1 and 2 to align the nodes.
Model Layout Options
There are many challenges with modelling a complex supply chain network. For example, the structure of nodes, Block nodes, and arcs, the size of a model, and elaborate supply chain networks can affect a model's visual layout. Strategic Network Optimization contains several algorithms which can be used to logically lay out the nodes and arcs in a supply chain network. These layout algorithms produce three different layout options; Multi Tier, Mixed, and Force Directed.
After your model is displayed the way you want it, you can create and save a new view which will reflect the model layout options you have selected. This user-defined view can be easily accessed from the Model Workspace.
The Multi Tier Layout Option
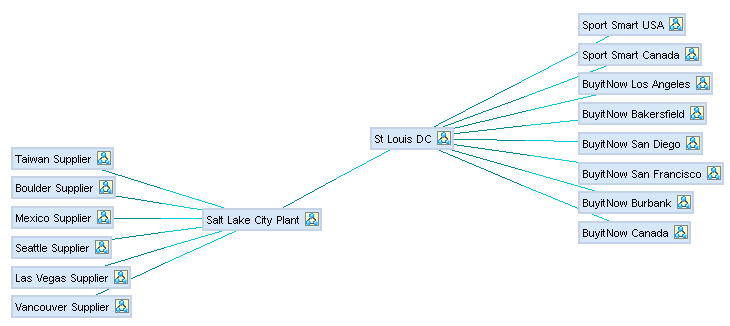
The Multi Tier algorithm layout option lays nodes out in vertical tiers, then parallel rows. The Multi Tier option places nodes in a left to right pattern and attempts to minimize the number of arcs which cross each other, making your model easier to read and possibly more visually appealing. When you apply the Multi Tier layout option, it is applied to both the highest level of the model and to all subsequent levels beneath. Consider the following example of a supply chain network layout:
When the Multi Tier layout option is applied, it has the following result:
To select the Multi Tier layout option:
-
From the main menu, select View, Options.
-
In the View Options window, click the Display tab.
-
In the Network Layout Options area, select the Multi Tier option.
-
Click Apply or OK.
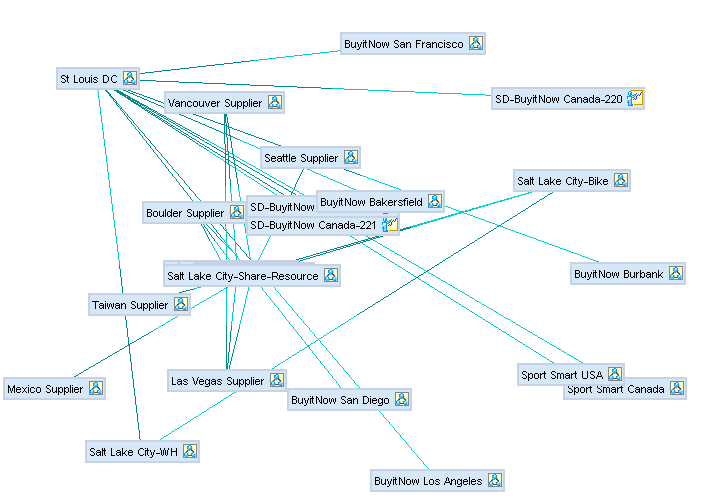
The Force Directed Layout Option
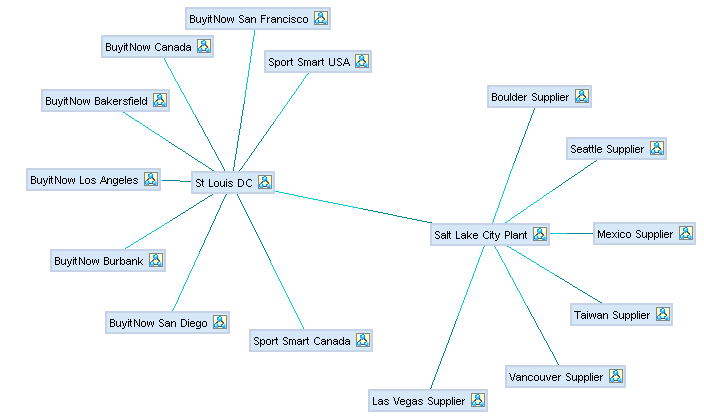
The Force Directed layout option lays nodes out in a radial pattern similar to the spokes on a wheel. Nodes are positioned to emphasize the central nodes with the greatest influence on the supply chain network. This type of layout also attempts to minimize the number of arcs which cross each other, making your model easier to read and possibly more visually appealing. The Force Directed layout option is particularly useful for models that contain many distribution centers and demand nodes. When you apply the this layout option, it is applied to both the highest level of the model and to all subsequent levels beneath.
The following is an example of the Force Directed layout option:
To select the Force Directed layout option:
-
From the main menu, select View, Options.
-
In the View Options window, click the Display tab.
-
In the Network Layout Options area, select the Force Directed option.
-
Click Apply or OK.
The Mixed Layout Option
The Mixed option is similar to the Force Directed layout option because it places nodes in a radial pattern, attempting to minimize the number of arcs which cross each other. However, unlike the Force Directed layout option, the Mixed layout option is only applied to the highest level in the model. In all lower levels, the Multi Tier layout option is applied.
To select the Mixed layout option:
-
From the main menu, select View, Options.
-
In the View Options window, click the Display tab.
-
In the Network Layout Options area, select the Mixed option.
-
Click Apply or OK.
The Block All Option
The Block All option is used in conjunction with the Multi Tier, Mixed, or Force Directed layout options. If Block All is selected, all unblocked nodes are reblocked when the layout option is applied. If Block All is not selected, unblocked nodes are not reblocked when the layout option is applied.
To select or unselect the Block All option:
-
From the main menu, select View, Options.
-
In the View Options window, click the Display tab.
-
In the Network Layout Options area, select or unselect the Block All check box.
-
Click Apply or OK.
Batch Commands for Layout Options
You can also use the following batch commands to set layout options:
-
addroot
-
addview
-
layout
Changing Node Display Options
To change the appearance of nodes:
-
From the main menu, select View, Options.
-
In the View Options window, click the Nodes tab.
-
On the Nodes tab, click one or more of the following:
-
Hide Unused
-
Hide Lonely
-
Compressed Nodes
-
Compressed Block Nodes
-
Show Associations
-
-
Click Apply.
To change the node name font size:
-
Click the Display tab.
-
On the Display tab, click the Font field and select the font that you want from the menu.
-
Click Apply.
Changing Arc Display Options
To change the appearance of arcs:
-
From the View menu, select Options.
-
In the View Options window, click the Arcs tab.
-
On the Arcs tab, click one or more of the following:
-
Hide All
-
Hide Unused
-
Hide Unselected
-
Hide Unselected Commodities
-
Fat Arcs
-
Simple Flow Directions
The Simple Flow Directions option only works if nodes in the model are compressed. To compress nodes, click the Nodes tab. On the Nodes tab, click Compressed Nodes.
-
Display Arc in Status Bar
-
-
Click Apply.
Unblocking Nodes
You can unblock a block node to view all of the nodes that it contains. When you unblock a node, you can also scale its contents to fit the Strategic Network Optimization drawing space.
To unblock a node, do one of the following:
-
Select the blocked node. From the View menu, select Unblock, and then Selected.
-
Point to the blocked node and press U.
-
From the Tools menu, select Sets. In the Sets window, select Block Sets.
To unblock a node and scale its contents to fit the drawing space, do one of the following:
-
Select the blocked node. From the View menu, select Unblock, and then select Selected to Fit.
-
Point to the blocked node and double-click.
Reblocking Nodes
You can reblock one or all block nodes in a model. When you reblock a node, you can also scale the model to fit the window. An unblocked block node is also called a structural set.
To reblock a block node, do one of the following:
-
Select a node that is part of the block. From the View menu, select Reblock, and then select Selected.
-
Point to a node that is part of the block. Press B.
-
From the Tools menu, select Sets. In the Sets window, select Structural Sets. In the Sets area, select the structural set that you want to block. Click Block.
To reblock all block nodes, do one of the following:
-
From the View menu, select Reblock and then select All.
-
In the Model Workspace, right-click Blocks and select Reblock All.
To reblock a block node and scale the model to fit the window, point to a node that is part of the block and then do one of the following:
-
Press Shift +B
-
Double-click
Displaying Images on Block Nodes
You can display an image on a block node in addition to its name and node symbol to make the node easy to identify. An image appears on a block node only when the node is blocked.
You can display images in the following formats on block nodes: Windows bmp (not compressed), jpg (or jpeg), and xpm.
You must size the image appropriately before displaying it on a block node. You cannot change the dimensions of an image after adding it to a block node. Images are not supplied with Strategic Network Optimization. You can add images to block nodes or remove existing images. The image field of a block node shows the directory and file name of an image displayed on it.
To add an image to a block node:
-
Right-click the block node, select Block Image from the shortcut menu, and then select New.
-
New Image, select the image and click OK.
To remove an image from a block node, right-click the block node, select Block Image from the shortcut menu, and then select Delete.
Viewing Models in Map View
Map View Overview
You can load base maps in Strategic Network Optimization and display your models geographically. This method of displaying models is called map view. By displaying models on maps, you can better visualize, communicate, and support business decisions that are based on Strategic Network Optimization solves.
In map view, only block nodes are displayed, and you can only navigate down from one block to another block. If multiple arcs connect two block nodes in map view, they appear as a single arc. However, when you query an arc in map view, results appear for all of the arcs that are between those two blocks.
If you move your mouse pointer over an arc, a tooltip displays the amount of product flow leaving a location.
Toggling Between Flow and Map View
Strategic Network Optimization displays models in flow view or map view. Flow view is the default view.
To toggle from flow view to map view, do one of the following on Strategic Network Optimization Map Mode:
-
Select Map View from the View menu.
-
Click the Map View button on the tool bar.
To toggle from map view to flow view, do one of the following in Strategic Network Optimization Map Mode window:
-
Select Flow View from the View menu.
-
Click the Flow View button on the tool bar.
Loading Maps
By default, Strategic Network Optimization loads a world map that is displayed in map view. You can override this default map by loading other maps (.map or .shp files) from the \SNO\vers_x.x\data directory.
To load maps:
-
In the Strategic Network Optimization Map Mode window, select Options from the View menu.
-
In the View Options window, click the Map Options tab.
-
On the Map Options tab, click the Browse button.
-
In the Load Map window, select a map and click the Open button.
-
In the View Options window, click Apply.
Map View Options
In map view, you can show or hide node names, tall nodes, and arc arrows. There are other display options for nodes, such as fat nodes, and for arcs, such as displaying distances in miles or kilometers. You can load a map, change the zoom level, and define the map legend. To access map view options, select Options from the View menu.
Show Node Names
Only Block nodes are displayed in map view, so the names of nodes other than block nodes are not shown. Node names can be turned on or off by selecting or unselecting the Show Node Names option. If Show Node Names is turned off, the node's name appears in a tooltip when you move the mouse pointer over the node.
To show or hide node names in map view:
-
From the main menu, select View, Options.
-
In the View Options window, click the Map Options tab and do one of the following:
-
To show node names, select the Show Node Names option.
-
To hide node names, unselect the Show Node Names option.
-
-
Click Apply.
Show Tall Nodes
User-Defined Map Views
This option displays nodes so that their height is relative to the amount of commodity flowing out of them. If there is no commodity flowing from a node, its height is based on the amount of commodity flowing into the node. All tall nodes are rectangular in shape, regardless of the shape of their map symbol.
To show tall nodes in map view:
-
From the main menu, select View, Options.
-
In the View Options window, click the Map Options tab.
-
Select the Show Tall Nodes option.
-
Click Apply.
Show Arc Arrows
This option displays arrows on arcs that indicate the directional flow of commodity from one location to another. An arrowhead is shown at the mid-point of each color-shaded segment of the arc. The arrowhead is scaled to the same width as the arc.
If there are overlapping arcs with product flow moving in both directions, arrowheads pointing in both directions are displayed on the arc.
To show arc arrows in map view:
-
From the main menu, select View, Options.
-
In the View Options window, click the Map Options tab.
-
Select the Show Arc Arrows option.
-
Click Apply.
Show Legend
By default, the map legend is displayed in map view, but it can be hidden.
To show or hide the map legend:
-
From the main menu, select View, Options.
-
In the View Options window, click the Map Options tab and do one of the following:
-
To show the map legend, select the Show Legend option.
-
To hide the map legend, unselect the Show Legend.
-
-
Click Apply.
Hiding Unused or Lonely Nodes
Unused nodes are nodes that were not used in a period during the most recent solve. Nodes are lonely if they are not visually connected to other nodes. For example, if you hide unselected arcs in a model, nodes that do not appear to be connected with arcs are considered lonely.
To hide unused or lonely nodes:
-
From the main menu, select View, Options.
-
In the View Options window, click the Nodes tab.
-
On the Nodes tab, click one or both of the following:
-
Hide Unused
-
Hide Lonely
-
-
Click Apply.
Hiding Unused Arcs
Unused arcs are arcs that have not been used or that have a commodity flow of zero in a period during the most recent solve.
To hide unused arcs:
-
From the main menu, select View, Options.
-
In the View Options window, click the Arcs tab.
-
On the Arcs tab, click Hide Unused.
-
Click Apply.
Displaying Block Nodes or Arcs Relative to the Commodity Flow
In map view, you can display Block nodes so that their size is relative to the amount of commodity flowing out of them. If no commodity is flowing from a Block node, its size is based on the amount of commodity flowing into the node.
Block nodes in map view are always compressed and attach points do not appear on the nodes. In map view, you can also display arcs so that their size is relative to the amount of commodity flowing through them. If multiple arcs connect two Block nodes in map view, they appear as a single arc.
To display Block nodes or relative to the commodity flow:
-
From the main menu, select View, Options.
-
In the View Options window, click the Nodes tab.
-
On the Nodes tab, click Fat Nodes.
-
Click the Map Options tab.
-
On the Map Options tab, click Show Tall Nodes.
-
Click Apply.
To display arcs relative to the commodity flow:
-
From the main menu, select View, Options.
-
In the View Options window, click the Arcs tab.
-
On the Arcs tab, click Fat Arcs.
-
Click Apply
User-Defined Map Views
In addition to the information that Strategic Network Optimization routinely saves, you can customize map view options and save one or more views for future use. A map view is saved permanently when you save the model. Each view contains information routinely saved with a model, as well as the following information specified in the View Options window, such as:
-
Hidden and fat nodes or arcs
-
Tall nodes
-
Arc arrows
-
Legend
-
Background map
-
Zoom levels
You can save map view options as a new map view or as a modified map view. If you no longer need a map view, you can delete it. If you have changed the appearance of a model and decide you want to revert its appearance to the way it was, or change the display to a different view, you can restore a view.
To save a map view do one of the following:
-
In the View field, enter a name for the map view. From the Actions menu, select New.
-
In the Views area, select the map view that you want to replace. From the Actions menu, select Save Current As
To delete or restore a map view:
-
From the Views list, select the map view that you want to delete or restore.
To search for a map view, enter a match pattern in the Filter field and click Filter. You can define the match pattern by using wildcard characters.
-
From the Actions menu, select one of the following:
-
Delete
-
Restore
-
To rename a view:
-
From the Views list, select the map view with the name that you want to change.
To search for a map view, enter a match pattern in the Filter field and click Filter. You can define the match pattern using wildcard characters.
-
In the View field, enter the new name.
-
From the Actions menu, select Rename.
Zooming in or Out
-
Zoom in on a model. When you zoom in on a model, the model doubles in size on screen. If the model becomes too large for the drawing space, some of the model might not appear on screen.
-
Zoom in on a selected part of a model. When you zoom in on a selected part of a model, you select the part of the model that appears enlarged in the drawing space.
-
Zoom out on a model. When you zoom out on a model, the model is reduced to half its size and more of the model might appear in the drawing space
-
Select a specific zoom level for a model to shrink or enlarge the model.
To zoom out on a model in map view, press Ctrl and click the right mouse button.
To zoom in on a model in map view, press Ctrl and click both mouse buttons simultaneously.
To zoom in on a selected part of a model in map view, press Ctrl, press and hold the left mouse button, and drag a rectangle across the area that you want to enlarge.
To set a zoom level in map view:
-
In the main menu, select View, Options.
-
In the View Options window, click the Map Options tab.
-
On the Map Options tab, do one of the following:
-
To zoom in, enter a larger number in the Zoom field.
-
To zoom out, enter a smaller number in the Zoom field.
-
Color Options
In map view, you can change the colors of specific arcs and Block nodes. Displaying arcs and Block nodes in different colors enables you to immediately identify nodes that are significant or similar in some way. The following color functions are available:
-
GRAY()
-
YELLOW()
-
RED()
-
BLUE()
-
GREEN()
-
BLACK()
-
PINK()
-
ORANGE()
-
VIOLET()
-
DEFAULT() (same as GRAY() )
-
SELECT() (same as YELLOW() )
Nodes in map view are always compressed. When more than one arc connects two compressed nodes, the arcs appear as a single arc and the color specified for only one of the arcs appears. Oracle recommends specifying the same color for all arcs between two Block nodes.
To change arc and Block node colors:
-
Select the node with a color that you want to change.
-
From the Query menu, select Single-Period Properties, and then select one of the following:
-
Block
-
Arcs
-
-
In the properties window, enter a color function or expression in one of the following fields:
-
Map Node Color
-
Map Arc Color
-
You can specify arc and Block node colors using expressions. For example, to see all open facilities in green and all closed facilities in red, enter the following expression in the Map Node Color field of the block nodes:
IF(Open,GREEN(),RED())
For another example, to see all arcs with fixed flows in black, and all arcs without fixed flows in the default color, enter the following expression in the Map Arc Color field of the arc:
IF(Fix=1,BLACK(),DEFAULT())
For fields with either Yes or No, use either 1 or 0. In the example above, Fix =1 indicates Fix = Yes.
Map Legend
You can select whether or not you want to display a map legend. You can also define keys in the legend. For example, if your model uses squares for distribution centers, you can create a key with a square and the description Distribution Center.
You can click the left mouse button and drag the legend anywhere on the map, and you can also select the background color for the legend.
To change the background color of the legend:
-
From the main menu, select View, Options.
-
In the View Options window, select the Map Options tab.
-
Click Edit Legend.
-
In the Edit Legend Keys window, select Set Fill Color from the Actions menu. 2.
-
In the Select Color window, select the color that you want to use as a background for the legend box.
-
Click OK.
The text always displays in black, so if you select a dark background color, you might not be able to read the text of the legend.
To add a key to the map legend:
-
From the main menu, select View, Options.
-
In the View Options window, select the Map Options tab.
-
Click Edit Legend.
-
In the Edit Map Legend Keys, select New Key from the Actions menu.
-
Select an item from the Map Item drop-down menu.
-
Enter a name for the item in the Description field.
-
Click Apply.
To delete a key from the map legend:
-
From the main menu, select View, Options.
-
In the View Options window, select the Map Options tab.
-
Click Edit Legend.
-
In the Edit Map Legend Keys, select the key that you want to delete.
-
From the Actions menu, select Delete Key.
To move keys up or down:
-
From the main menu, select View, Options.
-
In the View Options window, select the Map Options tab.
-
Click Edit Legend.
-
In the Edit Map Legend Keys, select the key that you want to move.
-
From the Actions menu, do one of the following:
-
Select Move Key Up to move the key up one position.
-
Select Move Key Down to move the key down one position.
-
Moving Block Nodes
You can move Block nodes in map view (only Block nodes are displayed in map view) so they appear in the correct geographic location of the facilities that they represent. You can move a Block node by either dragging it with your mouse, or by entering new longitude and latitude values. Longitude and latitude values represent the location of a node or facility on earth. A longitude value represents the node's east-west position.
Any Block node located west of the prime meridian has a negative longitude value. A latitude value represents the node's north-south position. Any Block node located south of the equator has a negative latitude value. Enter longitude and latitude values in decimal degrees, and not in degrees, minutes, and seconds.
To convert values from degrees, minutes, and seconds to decimal degrees, use the following formula:
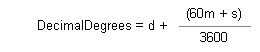
where d equals the number of degrees, m equals the number of minutes, and s equals the number of seconds.
Longitude and latitude values appear in a Block node's Longitude and Latitude fields. When Block nodes appear in their correct locations on a geographic map, you can view the longitude and latitude of the nodes and the distances between the facilities that they represent.
The distance between two Block nodes is displayed on the arcs connecting them. You can display distances in either miles or kilometers.
To move a Block node on a map by dragging, point to the node, click and hold the left mouse button, then drag and drop the node to a new position on the map. The system automatically updates the node Longitude and Latitude fields to reflect the new position.
To move a Block node on a map by entering new longitude or latitude values:
-
Select the node that you want to move.
-
From the Query menu, select Single-Period Properties, and then select Block.
-
In the Block Single-Period window, enter the decimal degrees in the Longitude or Latitude field.
Saving Models
Saving Models Overview
You can save models with new names or in new directories or convert them to a new format. You can save a model with a new name or in a different directory to make backups, change the name of the model, or to make a copy of the model that you want to modify.
When you save a model, the system saves the following information:
-
Nodes and arcs in the models and their data
-
Nodes and arcs that are selected or marked
-
Position of the nodes and arcs
-
Sizing and scaling
-
Position of the scroll bars
To save a model in symbolic format, from the File menu, select Save.
If you have not saved the model before, the system prompts you for a path and file name.
Your model is saved with its current file name and path.
To save a model under a new name or directory:
-
From the File menu, select Save As.
-
Enter a file path and file name and click Save.
You can also save a model in compressed gzip format to reduce disk space and potential network traffic during integration. When you save a file in compressed gzip format, it is given a .sym.gz file. The file is compressed when you save it, and is automatically decompressed when you open it.
To save a model in compressed gzip format:
-
From the File menu, select Save As.
-
Enter a file path and file name.
-
In the Save as type field, select *.sym.gz.
-
Click Save.
By default, models are saved as .sym files.
Selecting and Unselecting Nodes, Arcs and Commodities
Selecting and Unselecting Nodes, Arcs, and Commodities Overview
Before performing some operations in Strategic Network Optimization, you must select nodes or arcs. For example, to move a group of nodes and arcs in a model, you must first select the nodes and arcs. Selected nodes and arcs change color. Unless otherwise specified, selecting a node or an arc applies to the node or arc in the current time period only.
When you start Strategic Network Optimization and open a model, the model appears in the main Strategic Network Optimization window, which includes the following components:
| Component | Purpose |
|---|---|
| Menu bar | To perform tasks in Strategic Network Optimization, select items from the menu bar. |
| Tool bar | By clicking tool bar buttons, you can perform some tasks more quickly than by choosing menu items. When you point to a button, a small label displays the button name. |
| Status bar | When you point to a node, the status bar at the bottom of the main Strategic Network Optimization window displays the node type and name. When you point to an attach point, the status bar displays the attach point's node information, commodity, and commodity flow direction. |
| Drawing space | When you load a model, the model appears in the drawing space. |
| Time period tabs | To change the time period, click a period tab at the bottom of the window. You can also use Ctrl + PgUp or Ctrl + PgDn on your keyboard to toggle between periods. A model has the same structure in every period but includes different data for each time period. |
You can access some functions through shortcut menus instead of the menu bar. Shortcut menus are context sensitive- that is, menu items depend on which objects are selected in the model. For example, if no arcs are selected, arc query items in the shortcut menu are disabled.
In addition to the main system window, you can have many property sheets and Data Editor windows open during a Strategic Network Optimization session. When several windows are open, locating the pointer or a specific window can often be difficult. Strategic Network Optimization enables you to locate the pointer or a specific window.
To delete commodities, add attach points to a node, or change the way that arcs appear, you sometimes need to select commodities. You can select commodities in the Commodities window or the Node Attach Points window. You can select more than one commodity by dragging the pointer across the commodity names or by selecting all commodities in the same family. Selecting all commodities in the same family is particularly useful when the Hide Unselected Commodities option is selected in the View Options window because the model shows only a particular product family. You can sort commodities by name, description, or family by clicking a column heading.
Selecting Nodes
To select individual nodes, click the node.
To select additional nodes, press Ctrl while clicking each node.
To select all of the nodes of a particular type, from the Edit menu, choose Select, select Nodes, and then select one of the following options:
-
Nodes of a particular kind. For example, you can select all Machine nodes simultaneously.
-
Multi-Sourced Blocks. This option selects all of the block nodes that are designed to be single-sourced but are not single-sourced in the current period.
-
Unused. This option selects all of the unused nodes. Unused nodes are nodes that contribute nothing to the model. For example, an unused Machine node does not supply any time to processes. Nodes can become unused after a solve.
-
Lonely. This option selects all of the nodes that are not connected to other nodes.
To select nodes that are directly connected to a selected node:
-
Select a node.
-
From the Edit menu, choose Select, select Adjacent, and then select one of the following:
-
Used Nodes To. This option selects adjacent nodes that supply commodities to the selected node.
-
Used Nodes From. This option selects adjacent nodes that receive commodities from the selected node.
-
All Nodes To. This option selects all of the nodes that are directly connected by arcs to input attach points on the selected node. You can also click the Adjacent All Nodes To button in the main toolbar.
-
All Nodes From. This option selects all of the nodes that are directly connected by arcs to output attach points on the selected nodes. You can also click the Adjacent All Nodes From button in the main toolbar.
-
To select nodes with specific capacities, from the Edit menu, choose Select, select Capacity, and then do one of the following:
-
Select Nodes Over, and then select the kind of nodes that you want to use.
-
Select Nodes At Capacity, and then select the kind of nodes that you want to use.
-
Select Nodes Under Min or Safety, and then select the kind of nodes that you want to use.
To select all of the nodes in a set:
-
From the Tools menu, select Sets.
-
In the Sets window, click a set type and select a set type from the drop-down menu.
-
In the Sets area, select the set name.
-
Click Uncover.
Selecting Arcs
To select individual or multiple arcs, do one of the following:
-
To select one arc, click the arc or drag the pointer across the arc.
-
To select multiple arcs, press Ctrl while clicking the arcs or dragging the pointer across multiple arcs.
To select all of the arcs in a model:
-
From the Edit menu, choose Select
-
Select Arcs and then select All.
To select arcs between adjacent nodes:
-
Select two or more adjacent nodes in a model.
-
From the Edit menu, choose Select.
-
Select Arcs, and then select Between Adjacent Nodes.
To select unused arcs:
-
From the Edit menu, choose Select.
-
Select Arcs, and then select Unused.
To select all of the arcs at capacity:
-
From the Edit menu, choose Select
-
Select Capacity, and then select Arcs at Capacity.
To select nodes and arcs that are changed by the most recent solve or import:
-
From the Edit menu, choose Select.
-
Select one of the following:
-
Changed By Last Solve
-
Changed By Last Import
-
To select nodes and arcs that have changed from the baseline:
-
From the Edit menu, choose Select.
-
Select Changed From Baseline.
Selecting Multiple Nodes and Arcs
To select all of the nodes and arcs in a model, from the Edit menu, choose Select, and then select All.
To select nodes and arcs in part of a model, hold down the left mouse button, and draw a box around all the nodes and arcs that you want to select.
To select a path of connected nodes and arcs:
-
Select a node that you want at the start or end of a path of connected nodes and arcs.
-
From the Edit menu, choose Select, select Paths, and then select one of the following:
-
Used Paths To
-
Used Paths From
-
All Paths To
-
All Paths From
-
Selecting Nodes and Arcs in All Time Periods
To select nodes and arcs in all time periods:
-
Select the nodes and arcs in one time period.
-
From the Edit menu, choose Select, and then select Selected Nodes and Arcs in all Periods.
To select unused nodes and arcs in all time periods:
-
From the Edit menu, choose Select.
-
Select Capacity, and then select Unused Arcs/Nodes.
Unselecting Nodes and Arcs
To unselect all nodes and arcs, click anywhere on the background of the Strategic Network Optimization drawing space.
To unselect all nodes:
-
From the Edit menu, select Unselect.
-
Select Nodes, and then select All.
To unselect all arcs:
-
From the Edit menu, select Unselect.
-
Select Nodes, and then select Arcs.
To unselect one type of node:
-
From the Edit menu, select Unselect.
-
Select Nodes, and then select the node type that you want to unselect.
To unselect specific nodes:
-
From the Edit menu, select Mark, and then select Selected Nodes.
-
Select the nodes you want to unselect.
-
In the Edit menu, select Mark, and then select Exchange Marked and Selected Nodes.
Selecting, Unselecting, and Sorting Commodities
To select a commodity or commodities:
-
From the Tools menu, select Commodities.
-
In the Commodities window, do one of the following:
-
To select one commodity, click the commodity.
-
To select more than one commodity, drag the pointer across the commodities or hold Ctrl and click the commodities.
-
To select all of the commodities in the same family:
-
From the Tools menu, select Commodities.
-
In the Commodities window, select one commodity in the family.
-
From the Actions menu, choose Select All in Family.
Exporting Nodes and Arcs in .imp Format
Import (.imp) Format
You can export nodes and arcs in import (.imp) format. The exported .imp file can then be imported into other models, essentially allowing you to copy and paste a section of a model. This functionality is only available in flow view and only if objects are selected. If you are in map view or if haven't selected any nodes or arc, the Import functionality appears grayed out. If you select a Block node, everything inside the Block node is included in the .imp file.
The .imp file contains only the objects that you have selected. If you select a node and an arc, but not the node attached to the other end of the arc, and then you try to bring that .imp file into another model, you will get an error.
To export selected nodes and arcs in import formula:
-
In flow view, select the nodes and arcs that you want to export.
-
Do one of the following:
-
Right-click the objects and select Export.
-
From the File menu, select Export.
-
-
In the Export window, use the Save in field to browse to a location and enter a name in the File name field.
-
Click the Save button.