Reporting and Extracting Data
This chapter covers the following topics:
- Reporting and Extracting Data Overview
- Extracting Data Using Report Queries
- Organizing Report Queries Using Groups
- Report Overrides
- Extracting Data Using Commands
- Working with Publishing Profiles
Reporting and Extracting Data Overview
Reports and Report Queries
Report queries are patterns of nodes and arcs used for extracting data from a model. This extracted data can be viewed in the Data Editor, used to create reports or edit data, and exported to other systems. To build a report, you:
-
Decide what information you want to extract from the model.
-
Determine where the data resides (which type of nodes and in which arcs).
-
Make a report query which will extract this information.
Report queries look like small models. However, the nodes and arcs in a report query do not represent model data. They represent nodes and arcs in a model from which you want to extract data. Before building the report query, you must first decide what information you want to extract from the model. You then determine which nodes and arcs contain this information.
Your report query must include nodes and arcs of the type that you want to extract data from. For example, if you conclude that the information you want to extract resides in arcs which flow from Storage nodes into Demand nodes, your report query must contain one Storage node, with an arc attached to it, flowing into one Demand node. Next, you create and set up a report query which will extract the information.
To make a report query, you:
-
Create nodes, arcs, and commodities that represent the nodes, arcs, and commodities in the model from which you want to extract data.
-
Create queries which specify the information you want to extract and the layout of the extracted information.
To create the report query in the Report area of the main user interface, you create and connect nodes and arcs using the same techniques you use to build models. Next, you create report queries which specify the information that you want to extract from the model.
For example, you could request the storage and demand amounts from StorageDemand nodes in your model. After opening or building a report query, you extract the data by running the report.
When you run a report, Strategic Network Optimization:
-
Finds nodes and arcs in the model that match the report query pattern
-
Extracts data specified in the report query from nodes and arcs that match the report query patterns
-
Saves the data to the .smart file
-
Launches the report in the Data Editor window
An Example of Building a Report
When building a report query, you need to know what you want to show in your report. In this example, suppose you want to produce a report which displays the flow of all the coffee brands from all of the distribution centers to all of the customers. You could get this information by going into the model and manually performing individual arc queries. However, you would have to do many individual arc queries in each period. This could be very time consuming, not visually appealing, and prone to human error, especially in large models.
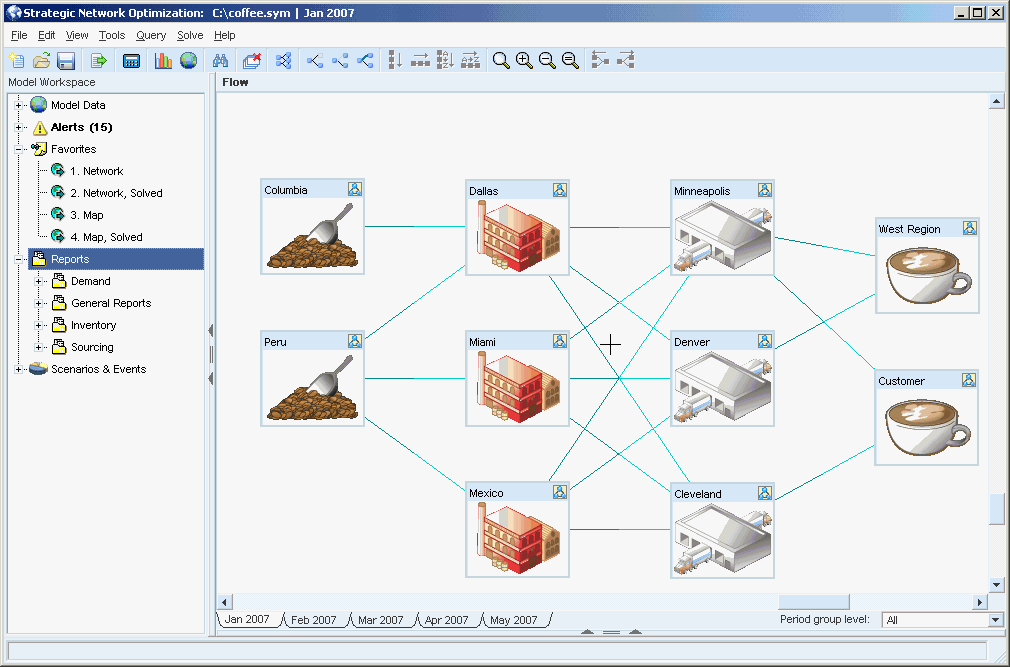
Now that you have decided what information you want to see in your report, you need to figure out where that information is located in your model. You determine that the information you want to extract resides in arcs which flow from StorageDemand nodes into Demand nodes. Next, you construct a report query which will extract data from all the arcs that flow from StorageDemand nodes into Demand Nodes.
-
In the Model Workspace area, click Reports and then select New Report. A blank Reports workspace is displayed in the main user interface. To return to your model, click Model Data in the Model Workspace area.
-
In the Reports area of the main user interface, create a StorageDemand node with an arc connecting it to a Demand node, and a commodity carried in the arc. You can name the nodes, arc, and commodity anything you want. If you provide a label, the information is included in the report. In the example below, you can see the DC1–Mellow StorageDemand node, with an arc connecting it to the Vancouver Demand node. This is what a report query looks like.
-
Strategic Network Optimization will to go into the model and find all the instances of this combination of nodes and arcs. But first, you need to use report queries to define the data fields that you want to extract from the model and place include in your report.
In this example, the following report queries are defined:
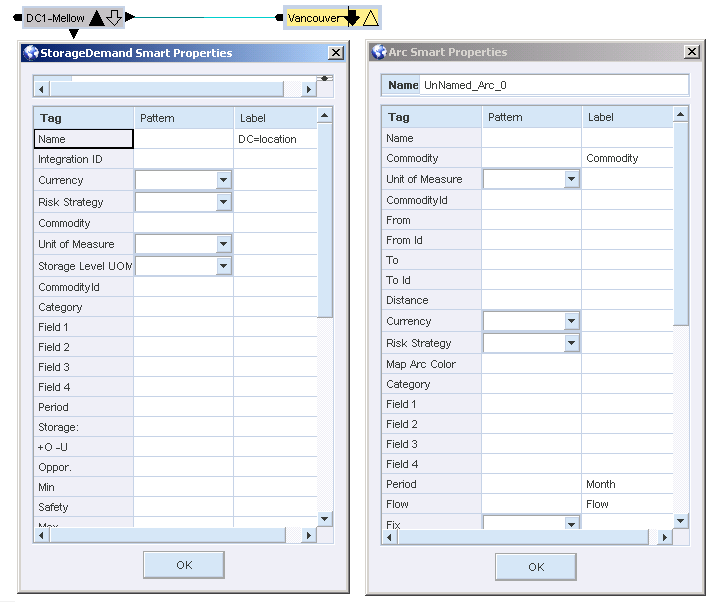
-
The data in the above example is well defined, in that the source (DC), commodity (Commodity), the amount of flow (Flow), and the period (Month) are all identified with a meaningful label. This is the data that is displayed in the report.
-
Although a Period field appears in each properties window, you only need to define it once.
-
The label DC=location is a report query override. This populates the DC column in the report with all the values in the location field.
When you run this report, the Data Editor appears, as seen here below:
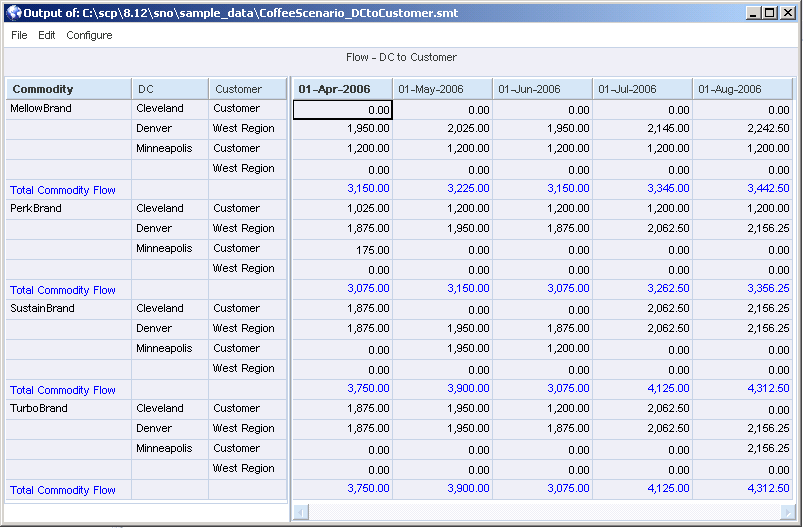
Strategic Network Optimization extracts the requested information and puts it in a table format in the Data Editor. From here, you can save or export this report. When using the Data Editor, you can copy and paste data from one cell to another. You can copy from and paste to multiple cells by using Shift + arrow keys or Shift + left-click at the end of a range of cells. You can use Ctrl C , Ctrl V, or select copy and paste from right-click menus.
Extracting Data Using Report Queries
Opening Report Queries
When working with report queries in the Reports main user interface, a blank workspace is displayed and you can't see your model. To return to your model, click Model Data in the Model Workspace area.
To select a report query in the Model Workspace area, left-click on it once. If you double-click on the name, the report query runs and the Data Editor launches, displaying the report.
To open a report query, in the Reports area of the Model Workspace:
-
Right-click on Reports and select Add Report.
-
In the Open window, browse to the directory where the report query resides. All report queries have .smt extensions.
-
Select a report query and click Open.
Running Report Queries
To run a report query, in the Reports area of the Model Workspace, double-click the report query. The Data Editor launches and displays the report which contains data extracted from the report query. You can also:
-
Right-click on a report query.
-
Select Open and then select On Model.
To run report queries for a selected part of a model:
-
Select the part of a model that you want to query.
-
In the Reports area of the Model Workspace, right-click on a report query.
-
Select Open and then select Selected Nodes and Arcs.
To run report queries for a set:
-
Select a set from the Sets area of the model.
-
In the Reports area of the Model Workspace, right-click on a report query.
-
Select Open and then select Sets.
When you open reports from the Reports level of the Model Workspace by right-clicking on Reports, selecting Open, and then one of Open options, the action applies to all report queries listed in the Reports area. For example, if you right-click on Reports, select Open, and then select Selected Nodes and Arcs, every report query in the list will be run for selected nodes and arcs.
Marking and Unmarking for AutoOpen
Report Queries can be marked or unmarked for AutoOpen. By default, when you open a report query or build a new one, it is marked for AutoOpen. All report queries which are marked for AutoOpen can be run at once from the Reports level above them. When a report query is marked for AutoOpen, a blue checkmark appears next to it as seen here below. The first and third report queries are marked for AutoOpen and the second and fourth are not.
To mark a report query for AutoOpen:
-
Right-Click the report query.
-
Select Mark for AutoOpen.
To unmark a report query for AutoOpen:
-
Right-Click the report query.
-
Select Unmark for AutoOpen
To mark all report queries for AutoOpen:
-
Right-click on Reports.
-
Select Mark All for AutoOpen.
To unmark all report queries for AutoOpen:
-
Right-click on Reports.
-
Select Unmark All for AutoOpen.
To run all report queries which have been marked for AutoOpen:
-
Right-click on Reports.
-
Select Open Marked and then select one of the following:
-
On Model
-
Selected Nodes and Arcs
-
Sets Building Report Queries
-
Building Report Queries
To build a report query, in the Reports area of the Model Workspace:
-
Right-click Reports.
-
Select New Report.
-
In the Reports workspace, create nodes, arcs, and commodities that represent the nodes, arcs, and commodities in the model from which you want to extract data.
-
In the Reports area of the Model Workspace, right-click the report query and select Save.
Note: When you save a report query, it is saved as a separate file with a .smt extension. If you rename this report query in the user interface, it renames the actual file. However, deleting the file in the user interface does not actually delete a file.
To set up a report query:
-
In a report query, right-click a node or arc from which you want to extract data.
-
Select Node Properties or Arc Properties.
-
In the Report Properties window, enter a heading for each field from which you want to extract data in the Label column.
Data is extracted only from fields that have a heading in the Label column. Extracted data appears in the Data Editor under the headings that you enter.
You can also enter report overrides in the Label column. Report overrides enable you to extract information about items that you cannot find directly in a report query. For example, you can use report overrides to find the total amount of commodities flowing into or out of a node.
-
If you want to extract data only from nodes or arcs that meet certain criteria, enter search expressions in the Pattern column.
You can use any search expression that you can use for Find functions.
-
Click OK.
Deleting a Report Query
To delete a report query, in the Reports area of the Model Workspace:
-
Right-click a report query.
-
Select Delete.
The system prompts you to confirm whether you want to remove the selected report query.
-
Click OK.
The report query is removed from the Reports area of the Model Workspace. However, it is not actually deleted from the folder where it resides, and you can reload it to your model at any time.
Exporting Report Query Results
You can export the results of a report query to either a XML file or a comma-separated variable file (CSV). These formats are useful for importing the data into Windows applications, particularly for database tables and reporting purposes.
To export report query results:
-
Right-click the report query that you want to export.
-
Select Export.
-
In the File name field in the Export As window, enter a name for the file.
-
In the Save as type drop-down list, select either XML or CSV.
-
Click Save.
The report is saved with the model.
Specifying the Default Location of Report Queries
You can change the default location where new reports are saved.
To specify the location:
-
From the View menu, select Options.
-
In the View Options window, click the Report tab.
-
Click the Browse button.
-
In the Browse for Folder window, specify the default directory.
If you move the location of a report query and the system can't find it, a red X is put through it's name in the Reports area of the Model Workspace. To fix this:
-
From the View menu, select Options.
-
In the View Options window, click the Report tab.
-
Click the Repair invalid reports button.
Organizing Report Queries Using Groups
Creating a Report Query Group
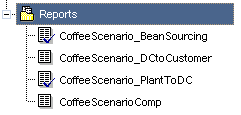
Typically, you create more than one report query for a model. To organize your report queries, you can create a list of them in the Model Workspace. This list is called a report query group. You can open a report query group and immediately have access to all related report queries. You can run all the report queries in the group at once, or only certain report queries within a group.
The name of each report query in a group is listed beneath the name of the group. You can easily switch from one report query in the group to another by left-clicking once the name of the report query once. If you double-click on the report query, it runs and the Data Editor launches.
When you save a model, report query groups are saved with the file. Unlike individual report queries, they are not saved as separate files.
To create a new report query group, in the Model Workspace:
-
Right-click Reports.
-
Select New Group.
-
Enter a name for the report query group.
-
Save the model by selecting File, then Save.
Working With Report Query Groups
To add a report query to a report query group:
-
Right-click on a report query group and select Add Report.
-
In the Open window, browse to the directory where the report query resides.
All report queries have .smt extensions.
-
Select a report query and click Open.
To remove a report query from a report query group:
-
Right-click a report query in the report query group.
-
Select Delete.
The system prompts you to confirm whether you want to remove the selected report query.
-
Click OK.
The report query is removed from the report query group but it is not deleted from your system.
To run all report queries in a report query group:
-
Right-click on the report query group.
-
Select Open and then select one of the following:
-
On Model
-
Selected Nodes and Arcs
-
Sets
-
To run all report queries in a report query group which have been marked for AutoOpen:
-
Right-click on the report query group.
-
Select Open Marked and then select one of the following:
-
On Model
-
Selected Nodes and Arcs
-
Sets
-
To create a report query in a report query group:
-
Right-click Reports.
-
Select New Report.
-
Build the report query.
Report Overrides
Using Report Overrides to Extract Data
In report queries, some of the information must be extracted using report overrides. Report overrides enable you to extract data that you cannot query directly, such as block node or commodity flow information. They allow you to specify the data and data fields that you want to extract from the report query. Report overrides can be used to extract data from or about:
-
Block Nodes
-
Blender Nodes
-
Capital Asset Management
-
Commodities and Commodity Flow
-
Separator Nodes
-
User-Defined Fields
Report overrides are case-independent. You can use a mixture of uppercase and lowercase letters in the overrides to make them more readable. For example, the following are all valid overrides: LocationX, outFlow, and quantityTo.
Report overrides can be entered in the Label column in a Report Properties window. The syntax is:
label=override
where:
-
label is any text that uniquely identifies the data
-
override is any report override
If rows with data field names in the Tag column are full, in a blank row at the bottom of the Report Properties window, enter a report override in the Tag column. The syntax for a report override in the Tag column of a blank row is:
ov(override)
where override is any report override. In the same row, enter a label for the data in the Label column.
Report Overrides Example
The following example demonstrates how to do use report overrides to extract sourcing information from your model. Suppose you have three plants (P1, P2, and P3) represented by three block nodes, and three distribution centers (DC1, DC2, and DC3) represented by three block nodes.
All three plants ship to all three distribution centers, and you want to find the following information:
Parent Block Levels in Report Overrides
In some report overrides, you must specify the level of the parent block in which you are interested in. For example, specifying the override Name=blockname:2 extracts the name of the block two levels higher than the current node. If no such block exists, the name of the highest block is used.
Nested blocks are numbered from the innermost to the outermost level. For example, in the diagram below, each rectangle represents a block. Individual plants and distribution centers are level 1 blocks, plants and distribution centers are level 2 blocks, and facilities in South is a level 3 block. To determine the longitude of the facilities in South block, you could run a report query for a node in the Plant A block, and enter longitude:3 in the Label field.

For example, consider the following Properties window. The Tag ov (blockname:1) is specified in one of the blank rows. When the report query is applied, the resulting Data Editor shows both the name of the node (with the label NAME) and the block node to which the node belongs (with the label BLOCK).
Node Report Overrides
The following table describes report overrides:
| Report Override | Description |
|---|---|
| type | Returns the kind of the node. This override can be particularly useful if you use it with the IgnoreNodeType option to match on any kind of node. |
| x | Returns or imports the x position of a node |
| y | Returns or imports the y position of a node. |
| element:n | Returns the nth element of the corresponding field, where n is a positive integer. |
Block Node Report Overrides
The following table displays Block node report overrides:
| Report Override | Description |
|---|---|
| location | Returns the name of the highest block to which a node belongs. |
| locationfrom | This override is applied to an arc and returns the name of the highest block node from which a commodity flows. |
| locationto | This override is applied to an arc and returns the name of the highest block node into which a commodity flows. |
| blockname:n | Returns the name of the parent block n levels higher than the current node, where n is a positive integer. |
| locationx | Returns or imports the x position of the highest block a node is in. |
| locationy | Returns or imports the y position of the highest block a node is in. |
| longitude:n | Returns the longitude of the parent block n levels higher than the current node. |
| latitude:n | Returns the latitude of the parent block n levels higher than the current node. |
| mapsymbol:n | Returns the symbol representing the parent block n levels higher than the current node. |
Blender Node Report Overrides
The following table describes report overrides for Blender nodes:
| Report Override | Description |
|---|---|
| minPartsTo | Returns the minimum parts from a Blender node. |
| maxPartsTo | Returns the maximum parts from a Blender node. |
| actualPartsTo | Returns the actual parts from a Blender node. |
| violationTo | Returns the parts violation from a Blender node. |
| underCostTo | Returns the value of the underCost field in an arc that carries a commodity to a Blender node. |
| overCostTo | Returns the value of the overCost field in an arc that carries a commodity to a Blender node. |
| actualFlowTo | Returns the value of the actualFlow field in an arc that carries a commodity to a Blender node. |
Commodity and Commodity Flow Report Overrides
The following table describes the report overrides for commodity and commodity flow:
| Report Override | Description |
|---|---|
| commoditydescription | For a node, this override returns the commodity description of the first attach point on the node. For an arc, this override returns the commodity description on the arc. |
| commodityfamily | This override returns the family field. |
| inflow | This override returns the sum of the flow of all arcs for a commodity flow coming into a node. The ReservedTime commodity is not included in report = inflow override calculations. For example, this commodity is carried on the arc that leads from a Machine node to a Monitor node. |
| inflowto | For an arc, this override returns the total flow entering the same attach point into which the arc enters. This override is particularly useful if several arcs enter a Controller node and you want to know the total inflow of a particular commodity so that you can make a distribution-percentage sourcing matrix. |
| outflow | This override returns the sum of the flow of all the arcs for a commodity flow that is exiting a node. The StorageLevel commodity is not included in report = outflow override calculations. For example, this commodity is carried on the arc that leads from a StorageDemand node to a Monitor node. |
| outflowfrom | For an arc, this override returns the total flow leaving the same attach point from which the arc leaves. This override is particularly useful if several arcs leave a Controller node and you want to know the total outflow of a particular commodity so that you can make a distribution-percentage sourcing matrix. |
| quantityfrom | For an arc, this override returns the output rate from a Process node from which a commodity flows. |
| quantityto | For an arc, this override returns the input rate from the Process node into which a commodity flows. |
Separator Node Report Overrides
The following table describes report overrides for Separator nodes:
| Report | Override |
|---|---|
| minPartsFrom | Returns the minimum parts from a Separator node. |
| maxPartsFrom | Returns the maximum parts from a Separator node. |
| actualPartsFrom | Returns the actual parts from a Separator node. |
| violationFrom | Returns the parts violation from a Separator node. |
| actualFlowFrom | Returns the value of the actualFlow field in an arc that carries a commodity out of a Separator node. |
User-Defined Fields Report Overrides
The following table describes report overrides for user-defined fields:
| Report Override | Description |
|---|---|
| category:n | Returns the value of the Category field in a Block node. |
| field1:n | Returns the value of Field 1 in a Block node n levels higher. |
| field2:n | Returns the value of Field 2 in a Block node n levels higher. |
| field3:n | Returns the value of Field 3 in a Block node n levels higher. |
| field4:n | Returns the value of Field 4 in a Block node n levels higher. |
Report Patterns
You can use Pattern fields in Report Properties windows for data filtering. The following table shows examples of report patterns:
| Report Overrides | Matches |
|---|---|
| commodityfamily=Fam1|Fam2|Fam3 | Arcs that carry a commodity with the family name Fam1, Fam2, or Fam3 |
| location=Factory 1 | Nodes of a certain kind in the block |
| Factory 1 location=Toronto|Chicago | Returns results where the highest level Block node name is Toronto or Chicago. |
| commoditydescription=*Export* | Arcs that carry a commodity with a description that contains the word Export |
| blockname:1Group 2 | Nodes of a certain kind with an immediate parent block has the name Group 2 |
Report Queries in Specific Time Periods
You can query data in a specific time period by following a special syntax in the Pattern column for the Period field to specify the number of the time period, where the first time period is number.
Example: Report Queries for Specific Time Periods
To extract the first three periods, you can use either of the following methods:
'Period:#1'|'Period:#2'|'Period:#3'
'Period:#1,#2,#3'
This example matches the third period to the end of the horizon:
'Period:#3..*'
This example matches periods 1, 5, and 8, and relative period 3:
'Period:#1,3,#5,#8'
This example matches periods 1 to 3:
'Period:#1..3'
This example matches relative periods 4 and 5, absolute periods 1 to 3, and relative periods 7 to 9:
'Period:4,5,#1..3,7..9'
Extracting Data Using Commands
The lxextr Command
You can extract data from models by using report queries, but you can also use commands, such as lxextr. Extracted data is stored in an ASCII file which you can send the file to other systems for integration or reporting purposes. The lxextr command is not a batch command; it is a separate executable. You can run the lxextr command from a command line or from within a script.
When you run the lxextr command, it searches each line of a symbolic model file. The fields for lines that meet your criteria are displayed online or written to a file. Using the lxextr command is an alternative to using report queries, however, the lxextr command is less powerful than report queries. While it allows you to extract information from individual nodes and arcs, it does not enable you to examine and compare data relationships between model components.
To extract data, use the following command:
lxextr -table"prefix"
-matchtag="value"...
-printtag ...
-separatorcharacter
<inputfile
>outputfile
Enter the command on one line. It is shown on several lines here for clarity.
When you import a file in Oracle Strategic Network Optimization, the import file must begin with the word $begintable and end with the word $endtable. When you use the -table parameter with the lxextr command, these words are added automatically to the import file that you create.
The following table describes the parameters:
| Parameter | Description |
|---|---|
| -match | Defines the matching criteria. It specifies conditions that must be met for a particular line of data to be matched. Data is selected for extraction only where the specified tag has the specified value. You can specify any number of tag=valuepairs. You must include the quotation marks around the value. The tag to use for command names is command. |
| Specifies the data fields that are extracted and printed (to the monitor or to a file). If your model has multiple periods, you should include the period tag. This parameter also supports tag-less references. If the command is tagless, @1 refers to the first value after the -print command. The following import commands support tag-less references; addtoview, blockset, addnodetoset, addcommoditygroup, addcommoditytogroup, addperiodgroup, addperiodtogroup, addperiodgrouplevel, and usermessage. |
|
| -separator | Specifies the character that separates fields in the output file. The default separator is a space. If you want to use a tab, enter the word tab for the character. |
| inputfile | Symbolic file from which you are extracting data. |
| outputfile | Specifies where you want the results to be sent: to the screen or to a file. If you want the results to print to a file, specify the name of the file. If you want the results to be displayed on the screen, do not specify a file. |
Matching with Wildcard Characters
You can use wildcard characters to match patterns with the -match parameter of the lxextr command. Wildcard characters for the -match parameter are the same as other wildcard characters, except for the characters listed in the following table:
| Character | Meaning |
|---|---|
| . | Matches any single character |
| * | Matches all characters |
| ^ | The beginning of a word |
| $ | The ending of a word |
The following examples show how you can specify match patterns for the -match parameter. The examples use the following nodes:
-
AppleDemand
-
AppleDemand.2
-
BlueberryDemand
-
PlainDemand
-
WholeWheatDemand
To match on any name that contains the capital letter P, enter the following command:
lxextr -match name=P -print name
This command matches on PlainDemand.
To match on any name that begins with the letter a and ends with the letter d, enter the following command:
lxextr -match name=^a.*d$ -print
This command matches on AppleDemand.
To match on any name that has the letter p as the second character, enter the following:
name lxextr -match name=^.p -print name
This command matches on AppleDemand and AppleDemand.2.
To match on any name that starts with the letter B or P and ends with Demand, enter the following command:
lxextr -match name=^[BP].*Demand$ -print name
This command matches on BlueberryDemand and PlainDemand.
To match on any name that starts with a letter from B to W and ends with Demand, enter the following:
lxextr -match name=^[B-W].*Demand$ -print name
This command matches on BlueberryDemand and WholeWheat Demand.
To match on any name that begins with AppleDemand followed by the characters .2, enter the following:
lxextr -match name=^AppleDemand\.2$ -print name
This command matches on AppleDemand.2.
Example: Extracting Data Using the lxextr Command
The following examples show how you can use the lxextr command. In this example, in a file called Pancakes.sym, you want to find the lines in which the symbolic tag <type>is set to Demand, and you want the values for the <name>, <min>, and <max> tags to be printed to a file called Pancakes.out. Use the following command:
lxextr -table "Symbolic tag=Demand"-match type=Demand -print name min max <Pancakes.sym> Pancakes.out
The resulting file Pancakes.out contains the following lines:
AppleDemand 130 130 PlainDemand 125 125 BlueberryDemand 125 125 WholeWheatDemand 125 125
Now you want to search the Pancakes.sym file and match the arcs that leave the nodes with a name beginning with Pack and enter the nodes whose name ends with Demand. You want to print the values for the <from>, <to>, and <flow> data fields to the Pancakes.out file and separate the values with tabs. You could use the following command:
lxextr -table "Pack to Demand"-match from=Pack.*
to=.*Demand -print from to flow -separator tab <Pancakes.sym>
Pancakes.out
The resulting Pancakes.out file contains the following lines:
PackApple AppleDemand 130 PackPlain PlainDemand
125 PackBlueberry BlueberryDemand 125 PackWholeWheat
WholeWheatDemand 125
Now you want to search the Pancakes.sym file and match on all lines that have the import command addcommodity. You want the values in the <name> field to be printed to the Pancakes.out file. This procedure creates a list of all the commodities in the model. Use the following command:
lxextr -match command=addcommodity -print
name <Pancakes.sym> Pancakes.out
The resulting Pancakes.out file contains the following data:
"Apple"
"Apple Pancakes"
"PackagingTime"
"Blueberry"
"BlueberryPancakes"
"Plain"
"PlainPancakes"
"WholeWheat"
"WholeWheatPancakes"
The following example demonstrates tag-less -print references:
lxextr -match command=usermessage -print
@1 <Pancakes.sym> Pancakes.out
The resulting Pancakes.out file contains the model description for Pancakes.sym.
The lxsmartstrip Command
You can use the lxsmartstrip command to extract data from a .smart file and convert it into a data file that can be used in a database or spreadsheet. The command removes the system-specific information from the .smart file but preserves the raw data.
The syntax is:
lxsmartstrip <smartfile> strippedfile-quote-separatorcharacter
The smart file is a .smart file created by applying report queries to a model. The stripped file is the output file containing data but no system-specific information. Optionally, specify -quote if you want the output data to be enclosed in quotation marks. Optionally, specify a delimiter character with the -separator parameter. The character can be tab or semicolon.
Creating an Import File Using lxextr
To create an import file using the lxextr command, run the following command from a batch script:
lxextr -table "prefix"
-match tag= "value"...
-print "tag" ...
-separatorcharacter
<inputfile
>outputfile
Enclose the prefix in quotation marks. The prefix is the import prefix, which consists of the import file command and the data. When you import a file in Oracle Strategic Network Optimization, the import file must begin with the word $begintable and end with the word $endtable. When you use the -table parameter with the lxextr command, these words are added automatically to the import file that you create.
Example: Creating an Import File Using the lxextr Command
For example, if you want to match all Supply nodes in file.sym and print the values of the <name> and <min> fields to the file file.imp, you can use the following command:
lxextr -table "addnode type Supply"
-match type= "Supply" -print name min
-separator tab <file.sym> file.imp
This resulting file.imp file contains the following lines:
$begintable 'addnode type Supply' <name> <min>
"supplynode1" 0.0
"supplynode2" 50.0
.
.
.
$endtable
Working with Publishing Profiles
Creating a Publishing Profile
In Oracle Strategic Network Optimization, you can create user-defined menu options that run scripts which publish different sets of data and plans. You can also create and run publishing profiles that allow you to publish optimized plans. Publish actions contained in a publishing profile can be used to commit a plan during any session.
Existing report queries and script files are used as input, and the output from the publish action is data that is written to a file. Profiles determine which data to publish and allow you to initiate an integration process with an external system. You can refine your publishing preferences by editing an existing profile, or by creating a new profile for a specific business need.
Note: The publish process is not intended to generate reports.
To create a publishing profile:
-
From the File menu, select Publish, then click New.
-
Complete the following fields in the New Profile window:
Field Description Profile name Specify a unique name for the publishing profile. Description Optionally, specify a description for the publishing profile. Format Select the format that will be used for publishing the data. There are three different formats: .xml, .csv, and .smart. Output file Specify the directory in which to save the published data. You can explicitly specify the location of the directory or click Browse to browse for a directory. -
Optionally, specify a script that will be initiated after the data is published. You can explicitly specify the location of the script or click Browse to browse for a script.
The following table lists the Batch Mode commands that can be used in a script file.
Command Description #comment Comment line. !command Runs the specified shell command. For example, on UNIX, ! ls displays a directory listing. -
Select the Data Selection Tab.
-
In the Report field, specify the name of the report which will be used to publish the profile.
You can explicitly specify the location of the report or click Browse to browse for a report.
-
Click OK.
Publishing Data
To publish data using a profile:
-
From the File menu, select Publish.
-
In the Publish window, select a profile in the Profiles list.
-
Click Publish.
Editing a Publishing Profile
To edit a publishing profile:
-
From the File menu, select Publish.
-
In the Publish window, edit the fields in the General and Data Selection tabs as applicable.
-
Click OK.
Deleting a Publishing Profile
To delete a publishing profile:
-
From the File menu, select Publish.
-
In the Publish window, select a profile in the Profiles list.
-
Click Delete.
-
Click Yes to confirm that you want to delete the profile.