Demand Signal Repository
This chapter covers the following topics:
- Demand Signal Repository (DSR) Implementation
- Prerequisites
- Setting Up Oracle Data Integrator (ODI)
- Configuring the Physical Architecture in Topology Manager
- Configuring the Context and Logical Architecture in Topology Manager
- Executing Scenarios
- Setting Up Oracle Business Intelligence Enterprise Edition (OBIEE)
- Setting Up Oracle Business Intelligence Enterprise Translations
- Setting Up the Exception Management Dashboard Feature
- Configuring a Web Service in OBIEE
- Setting Up Web Services
- Setting Up Demand Signal Repository - Demantra Integration
- Setting up Demand Signal Repository - Retail Merchandise System (RMS) Integration
- Configuring the User Parameters in DSR Lookups
- Creating the Directories Defined in the DDR_R_LKUP_MST Table
- Copying the Class and DTD Files
- Importing the DSR - RMS Project Objects in the ODI Designer
- Configuring the Physical Architecture in Topology Manager
- Configuring the Context and Logical Architecture in Topology Manager
- Copying the EDIDLPRD.dat File
- Executing the Scenario
Demand Signal Repository (DSR) Implementation
The following install instructions apply to installing Demand Signal Repository as part of an E-Business Suite implementation or for upgrading DSR from an earlier release.
Prerequisites
Make sure the following prerequisites are met before installing Demand Signal Repository:
-
Oracle Database 11.2.0.3 must be installed. Please refer to Oracle Database installation documents.
http://www.oracle.com/pls/db112/portal.portal_db?selected=11&frame=
-
Oracle Data Integrator 11.1.1.6 must be installed with both master and work repositories ID's greater than 300. Please refer to Oracle Data Integrator installation documents.
http://docs.oracle.com/cd/E23943_01/core.1111/e16453/toc.htm
-
Oracle Business Intelligence Enterprise Edition 11.1.1.6 must be installed. Please refer to Oracle Business Intelligence Enterprise Edition installation documents.
-
To use Demand Signal Repository and Retail Merchandising System (RMS) integration you must have Retail Merchandising System (RMS) version 10.0 or higher.
-
If you are planning to use Demand Signal Repository and Demantra integration, you must have Demantra version 7.2 or higher.
Setting Up Oracle Data Integrator (ODI)
This section contains the activities required to set up ODI.
Copy the DSR ODI XML Files to a Temporary Folder
Copy the DSR ODI XML files from the APPL_TOP of your environment to a folder that will be used to import the ODI objects. This folder must be accessible from the ODI client you will use to perform the import.
DSR ODI XML files are located in the APPL_TOP folders:
-
ddr/patch/115/odi/US/master
-
ddr/patch/115/odi/US/model
-
ddr/patch/115/odi/US/project/DDR
Import the DSR Project Objects in the ODI Designer
Import all XML files with prefixes of FOLD_% from the ODI Studio.
Importing the Folders
-
Select the Designer tab.
-
From the Connect Manager button, select Import > Smart Import.
-
In the file selection box, click the search button, navigate to the folder where the XML files from ddr/patch/115/odi/US/project/DDR were downloaded, and select the file to import in the list above.
Leave the response file empty.
-
Click Next.
-
Accept all defaults on the Import Actions screen, and click Next.
-
On the Summary screen, click Finish to import the object.
-
Verify that the folders were imported correctly.
Import all XML files with the prefix of KM_% from the ODI Studio.
Importing the Knowledge Modules
-
Select the Designer tab.
-
From the Connect Manager button, select Import >Smart Import.
-
In the file selection box, click the search button, navigate to the folder where the XML files from ddr/patch/115/odi/US/project/DDR were downloaded, and select the file to import in the list above.
Leave the response file empty.
-
Click Next.
-
Accept all defaults on the Import Actions screen, and click Next.
-
On the Summary screen, click Finish to import the object.
-
Verify that the knowledge modules were imported correctly.
Import all XML files with the prefix of VAR_% from the ODI Studio.
Importing the Variables
-
Select the Designer tab.
-
From the Connect Manager button, select Import >Smart Import.
-
In the file selection box, click the search button, navigate to the folder where the XML files from ddr/patch/115/odi/US/project/DDR were downloaded, and select the file to import in the list above.
Leave the response file empty.
-
Click Next.
-
Accept all defaults on the Import Actions screen, and click Next.
-
On the Summary screen, click Finish to import the object.
-
Verify that the variables were imported correctly.
Importing the DSR Model in the Designer
Perform the following procedure from ODI Studio to import the DSR Model.
-
Select the Designer tab.
-
From the Connect Manager button, select Import >Smart Import.
-
In the file selection box, click the search button, navigate to the folder where the XML files from ddr/patch/115/odi/US/project/model were downloaded, and select the MFOL_DDR.xml.
Leave the response file empty.
-
Click Next.
-
Accept all defaults on the Import Actions screen, and click Next.
-
On the Summary screen, click Finish to import the object.
-
Verify that the model was imported correctly.
Importing the Topology Objects
Import the topology objects in the following order:
-
LSC_DDR_RMS_XML_RETLDLPRD.xml
-
LSC_DDR_TDLINX_FILE.xml
-
LSC_DDR_ORACLE_DDR.xml
-
LSC_DDR_ORACLE_APPS.xml
-
CONN_DDR_RMS_XML_DATASERVER.xml
-
CONN_DDR_TDLINX_FILE.xml
-
CONN_DDR_ORACLE_DATASERVER.xml
-
CONT_DDR_CONTEXT.xml
Perform the following procedure from ODI Studio to import the topology objects.
-
Select the Topology tab.
-
From the Connect Manager button, select Import >Smart Import.
-
In the file selection box, click the search button, navigate to the folder where the XML files from ddr/patch/115/odi/US/master were downloaded, and select the file to import in the order above.
Leave the response file empty.
-
Click Next.
-
Accept all defaults on the Import Actions screen, and click Next.
-
On the Summary screen, click Finish to import the object.
-
Verify that all the objects were imported correctly.
Configuring the Physical Architecture in Topology Manager
This section provides procedures for configuring the Oracle dataserver and TDLINX.
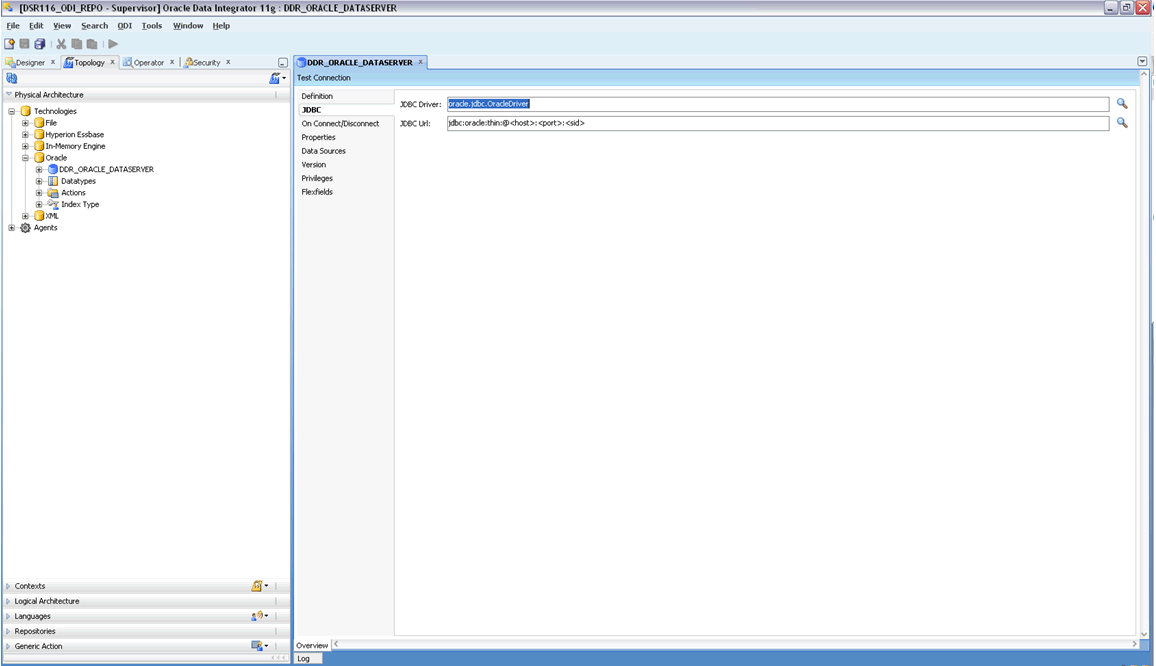
Configuring the Oracle Dataserver
Perform the following procedure to configure Oracle dataserver.
-
On the Physical Architecture tab under Oracle, open the “DDR_ORACLE_DATASERVER” object.
-
On the JDBC subtab, change the JDBC URL to point to the DSR database.
-
On the Definition subtab, change the password for the apps user.
-
Save the changes.
-
Click Test Connection and make sure the connection is successful.
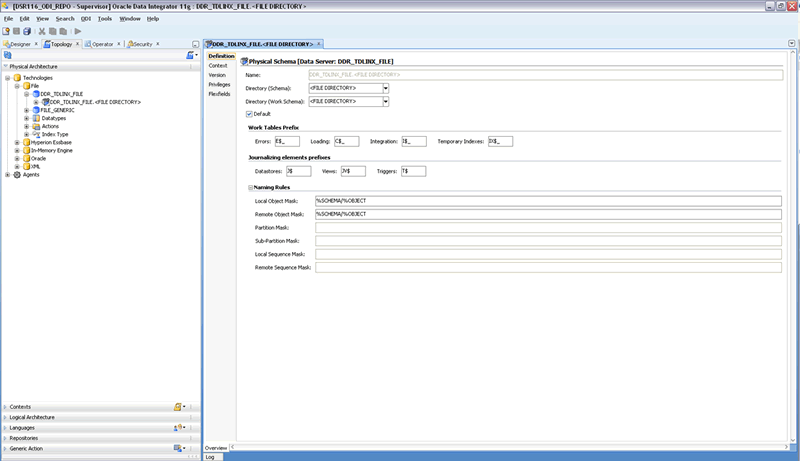
Configuring TDLINX
Perform the following procedure to configure TDLINX.
-
On the Physical Architecture tab under File, expand the “DDR_TDLINX_FILE” object and open the DDR_TDLINX_FILE.<FILE DIRECTORY> object.
-
On the Definition subtab, change the Directory (Schema) and Directory (Work Schema) to point to the location where the TDLINX file will reside on the server. Only provide the directory path; do not include the file name in the path.
-
Save the changes.
Configuring the Context and Logical Architecture in Topology Manager
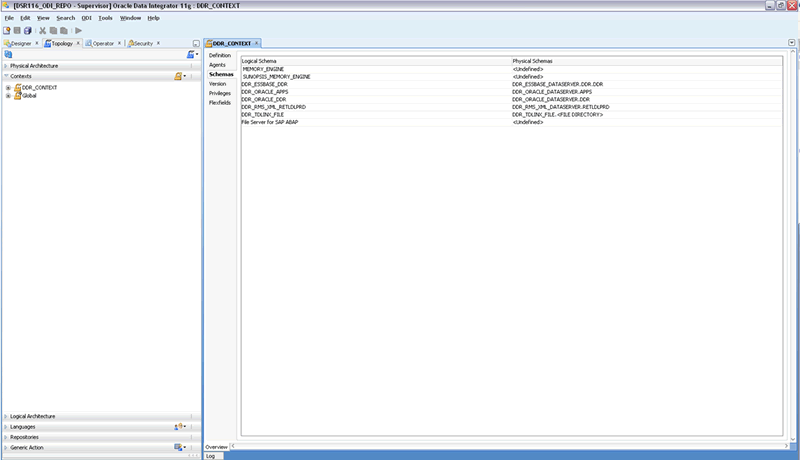
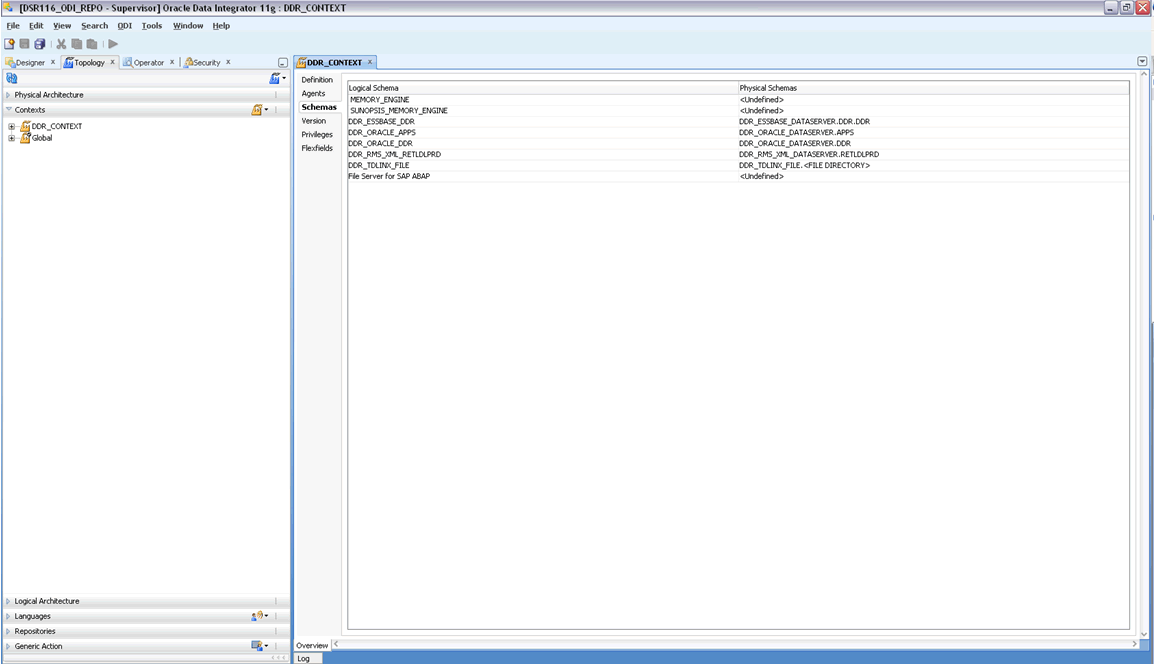
Perform the following procedure to configure the context and logical architecture in Topology Manager.
On the Contexts tab, verify the following on the Schemas subtab for the “"DDR_CONTEXT":
-
Logical Schema "DDR_ORACLE_APPS" = "DDR_ORACLE_DATASERVER.APPS" Physical Schema
-
Logical Schema "DDR_ORACLE_DDR" = "DDR_ORACLE_DATASERVER.DDR" Physical Schema
-
Logical Schema "DDR_TDLINX_FILE" = "DDR_TDLINX_FILE.<FILE DIRECTORY> Physical Schema
Executing Scenarios
Perform the following procedure to execute scenarios.
-
Right-click the scenario object and select Execute.
-
Select “DDR_CONTEXT” for the context, you can leave the defaults for the other fields, and click ok.
-
For any execution parameter you wish to change, uncheck the "Last Value" check box, and then enter a new value in the Value box. You must exit this text field for the value to save your change.
-
Click OK.
-
Monitor the execution on the Operator tab.
Setting Up Oracle Business Intelligence Enterprise Edition (OBIEE)
This section provides the following instructions:
-
Setting Up the Oracle Business Intelligence Enterprise Edition Server
-
Setting Up the Oracle Business Intelligence Enterprise Edition Presentation Services
-
Configuring the Oracle Business Intelligence Enterprise Edition Infrastructure
Setting Up the Oracle Business Intelligence Enterprise Edition Server
Files ddrpd.zip and ddrwebcat.zip contain the following files for use with the Oracle Business Intelligence Suite Enterprise Edition 11.1.1.6:
-
DSR_Reports.rpd - This is the Oracle Demand Signal Repository product repository file; this file is contained in ddrrpd.zip.
-
DSR_Reports - This directory is the Oracle Demand Signal Repository product Web catalog; this file is contained in ddrwebcat.zip.
-
Copy these ZIP files (ddrrpd.zip, ddrwebcat.zip) from the obiee (APPL_TOP/ddr/patch/115/obiee) directory.
-
Unzip ddrrpd.zip to display DSR_Reports.rpd.
-
Open the DSR_Reports.rpd file in Oracle Business Administration Tool using Administrator1 as the password.
-
In the physical layer, change the username/password for the database connection in DDR connection Pool.
-
Add entry for the database in the correct TNSNAMES.ora file.
Setting Up the Oracle Business Intelligence Enterprise Edition Presentation Services
Perform the following procedure to set up the Oracle Business Intelligence Enterprise Edition Presentation Services.
-
Change the directory to the catalog directory for the Oracle Business Intelligence Enterprise Edition Presentation server. Typically $OBIEE_HOME/instances/instance1/bifoundation/OracleBIPresentationServicesComponent/coreapplication_obips1.
-
Rename or delete the existing catalog directory.
-
Unzip ddrwebcat.zip to get DSR_Reports catalog directory.
Configuring the Oracle Business Intelligence Enterprise Edition Infrastructure
Perform the following procedure to configure the Oracle Business Intelligence Enterprise Edition Infrastructure.
-
Open the Enterprise Manager. The default URL is http://localhost:7001/em.
-
Expand the Business Intelligence Node and select the application setup in the obiee installation. The default is coreapplication.
-
Open the Deployment Tab and then select the Repository subtab.
-
Click the Lock and Edit Configuration button.
-
In the Upload BI Server Repository section, click the browse button.
-
Select the DSR_Reports.rpd that you configured with the Administrator tool to connect to your database.
-
Enter Administrator1 in both password fields.
-
In the BI Presentation Catalog section, edit the path to include the DSR_Reports directory that was created by unzipping the ddrwebcat.zip.
The path appears similar to the example below:
$ORACLE_INSTANCE/bifoundation/OracleBIPresentationServicesComponent/$COMPONENT_NAME/catalog/DSR_Reports
-
Click the Apply button.
-
Click the Activate Changes button.
-
Click the Restart Services to Activate Changes button. The Overview tab appears.
-
On the Overview tab, click the Restart button to restart the services to complete the configuration.
Setting Up Oracle Business Intelligence Enterprise Translations
Perform this setup only if you are planning to use translated OBIEE UI. This process uses the "transx" utility that is part of the Oracle DB install.
-
Configure Transx using the instructions provided in the links below:
-
http://docs.oracle.com/cd/E11882_01/appdev.112/e23582/adx_j_transx.htm#ADXDK1200
-
http://docs.oracle.com/cd/E11882_01/appdev.112/e23582/adx_j_gs.htm#CHDDHEIJ
The OBIEE translated files are shipped under APPL_TOP/ddr/patch/115/obiee directory and are named as ddr_obiee_<language id>.zip. For example, ddr_obiee_fr.zip.
-
-
Unzip the language ZIP file to be used to a local drive (for example c:\ drive). The DLF files are extracted into the C:\ddr\OracleBI\Repository directory.
-
Import the files into the DB by executing the following transx command:
transx "hostname:port:sid" username password filename
For example, to load the Spanish translation version you use the following:
c:\transx rws60147rems:1524:mz1dv220 apps apps ddr_es.dlf
-
Verify that the seed data is uploaded correctly in DDR_TRANSLATED_MESSAGE by using the following query:
SELECT Count(*)
FROM DDR_TRANSLATED_MESSAGE
GROUP BY lang_id='<language id>'
-
Copy the file sharedcaptions.xml from ddr\OracleBIData\l_<language id>\ into $OBIEE_HOME\instances/obieedb/bifoundation/OracleBIPresentationServicesComponent/coreapplication_obips1/msgdb/l_<language id>\captions. If the directory "l_<language id> is not there, first create subdirectory l_<language id>\captions under $OBIEE_HOME\instances/obieedb/bifoundation/OracleBIPresentationServicesComponent/coreapplication_obips1/msgdb directory.
-
Restart the BI servers to verify the translation.
-
To use the translated UI, select an appropriate language and then enter user id/password when you log in to Presentation Service.
Setting Up the Exception Management Dashboard Feature
Perform the set up described in this section only if you plan to use the exception management dashboard feature. Setup steps assume the use of bundled WebLogic server.
-
Get the following EAR file:
APPL_TOP/ddr/patch/115/ear/DDRExceptionHandler.ear
-
Log in to Admin Console.
-
After logging in, navigate to Services > Data Sources.
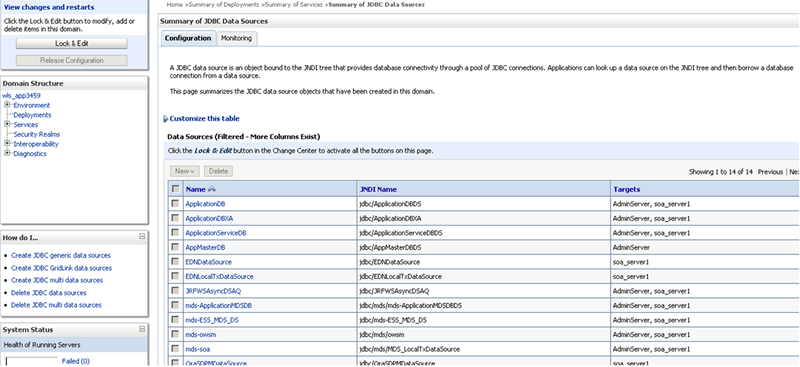
-
Click Lock & Edit and New > Generic Data Source.

-
Enter the following information:
-
Name: DDRDS
-
JNDI Name: jdbc/DDRDS
Enter the other connection details.
-
-
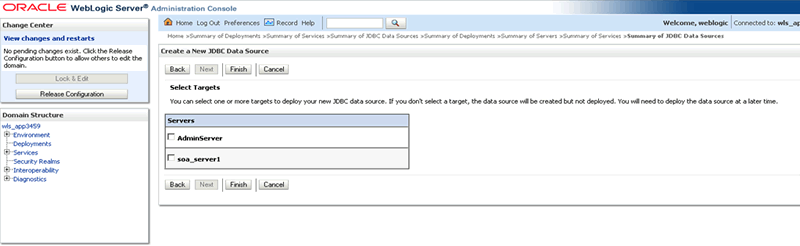
Select the targets for this connection.
-
Click Finish to create the connection, and then click the Activate Changes button.
-
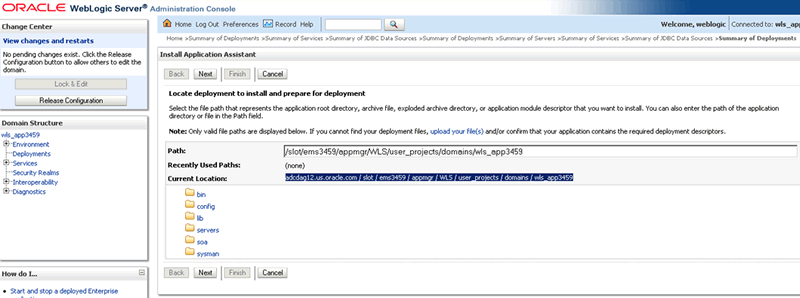
Navigate to Deployments > Install.
-
Next, either pick up the EAR file from the server file location, or if you have saved the EAR file in your local, click "Upload your file" and choose the EAR file.
-
Assign the Targeting style of "Install as an Application" and choose the target server to deploy. A default name appears.
-
Click Finish.
-
Click Activate Changes.
-
Expand the deployed app and click the Web Service Name.
-
In this settings page, click the expand icon next to the Web Service Name.
-
Right-click on the WSDL link and copy it. This is required in the next step.

Configuring a Web Service in OBIEE
This section contains information on the followings procedures:
-
Adding an action
-
Adding a new agent
Adding an Action
Perform the following to add an action.
-
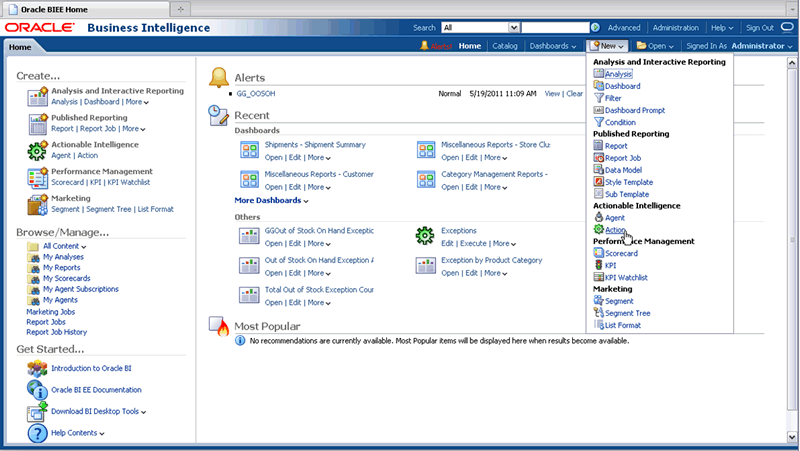
Select the New button and click Action.
-
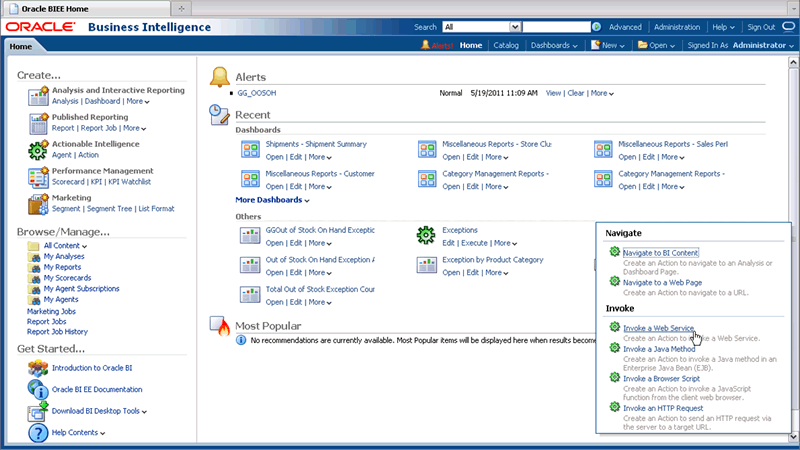
Select Invoke a Web Service.
The Web Service Operation dialog appears
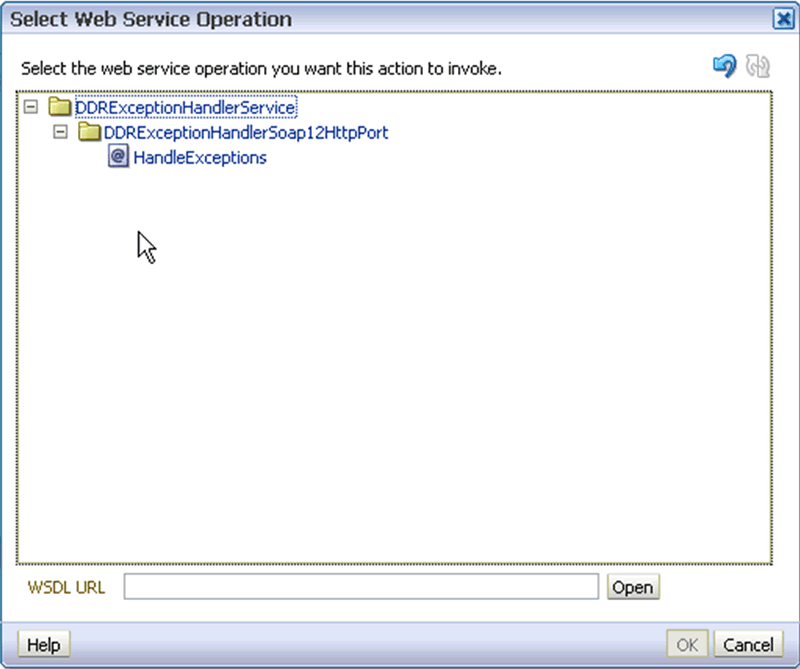
-
Paste WSDL link copied from the last step of "Setting Up the Exception Management Dashboard Feature", select the HandleExceptions, and click OK.
The parameter configuration screen appears.
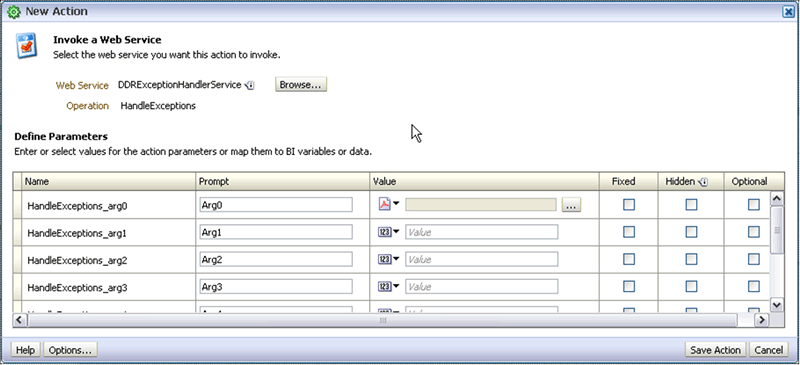
-
Enter the following Prompt values:
-
Arg0 = Report
-
Arg1 = Exception Type
-
Arg2 = Exception Source Code
-
Arg3 = Date Offset
-
Arg4 = User
Select Session Variable and Enter USER. Select Hidden and Fixed options.
-
Arg5 = Debug On
Select Hidden and Fixed options.
-
Arg6 = Debug File Location
Select Hidden and Fixed options.
-
Arg7 = Debug Log Level
Select Hidden and Fixed options.
-
-
Click Save Action, and select the location and Name for the action
Adding a New Agent
Perform the following procedure to add a new agent.
-
Select the New button and click Agent.

-
Navigate to the Delivery Content tab and select the Analysis (Report) that the Agent will run.

-
On the Actions tab, in the Agent Condition True or No Condition Exists box, select the Add existing action button, and select the action you just added to configure it for this agent.
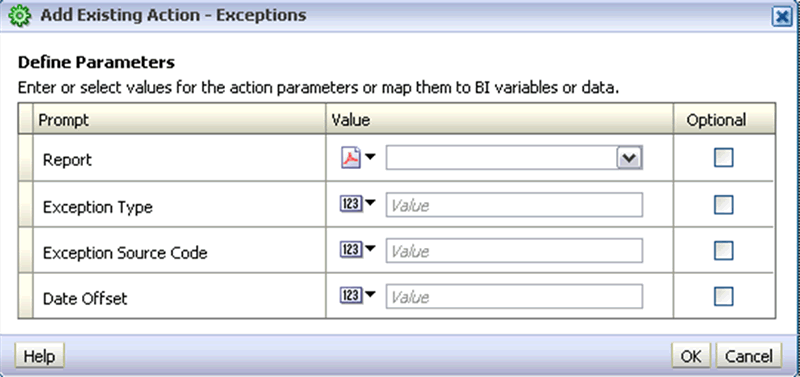
-
Enter the following values:
-
Report - Select XML from drop down and select Delivery Content.
-
Exception Type - Select the Exception type that you are running with this agent.
-
Exception Source Code - Select the Exception source code that you are running with this agent.
-
Date Offset - Select or enter number of days to go back and delete previous Exceptions.

-
-
Click OK and save the agent.
Setting Up Web Services
Demand Signal Repository provides a set of Web services that can be optionally deployed. Implementers can use these Web services to automate their processes or perform integration with third party systems.
The following procedure assume you are using the bundled WebLogic server.
-
Get the following EAR file:
APPL_TOP/ddr/patch/115/ear/ddrwsfal.ear
-
Log in to Admin Console.
-
After logging in, navigate to Services > Data Sources.
-
Click Lock & Edit, and select New > Generic Data Source.
-
Enter the following:
-
Name: DDRDS
-
JNDI Name: jdbc/DDRDS
Enter other connection details.
-
-
Select the targets for this connection.
-
Click Finish to create the connection, and then click the Activate Changes button.
-
Navigate to Deployments > Install.
-
Next, either pick up the EAR file from the server file location, or if you have saved the EAR file in your local, click "Upload your file" and choose the EAR file.
-
Select "Install as an Application" as the targeting style, and choose the target server to deploy. A default name appears.
-
Click Finish.
-
Click the Activate Changes button.
Setting Up Demand Signal Repository - Demantra Integration
If you want to use Oracle Demantra Release 7.2 with DSR, apply the script msddemcrwf3.sql to create the series, integration profiles and workflows required for the integration.
The SQL file is not executed during patch application. It must be applied manually.
The SQL file location is: $MSD_TOP/patch/115/sql/msddemcrwf3.sql.
Case 1: DSR (APS) and Demantra are on the same database instance.
-
Make sure that the profile 'MSD_DEM: Schema' is set to the correct Demantra Schema name.
-
Make sure the Demantra installation is not in use for any activity.
-
Apply the SQL File msddemcrwf3.sql in the APPS schema.
-
Restart the Demantra Application Web Server.
-
Create a synonym named 'BIIO_DSR_SALES_DATA' in the APPS schema of the instance where DSR is installed.
This synonym should point to the table 'BIIO_DSR_SALES_DATA' in the Demantra Schema. For example, if the Demantra schema name is 'DMTRA_TEMPLATE', then create the synonym by running the following command in the APPS schema:
CREATE OR REPLACE SYNONYM BIIO_DSR_SALES_DATA FOR DMTRA_TEMPLATE.BIIO_DSR_SALES_DATA
Case 2: Demantra is on separate database instance.
-
Create the package MSD_DEM_DEMANTRA_UTILITIES in the Demantra schema by applying the following files:
-
$MSD_TOP/patch/115/sql/msddemdus.pls - Package Specification
-
$MSD_TOP/patch/115/sql/msddemdub.pls - Package Body
-
-
Make sure the Demantra installation is not in use for any activity.
-
Apply the SQL File msddemcrwf3.sql in the Demantra schema.
-
Restart the Demantra Application Web Server.
-
Create a synonym named 'BIIO_DSR_SALES_DATA' in the APPS schema of the instance where DSR is installed. This synonym should point to the table 'BIIO_DSR_SALES_DATA' in the Demantra Schema.
Setting up Demand Signal Repository - Retail Merchandise System (RMS) Integration
Follow instructions in this section only if you are planning to implement Demand Signal Repository integration with Retail Merchandising System (RMS).
Copy the DSR RMS Integration XML Files to a Temporary Folder
This topic provides information about copying ODI files and the class and DTD files.
Copying ODI Files
Copy the DSR RMS Integration ODI XML files from the APPL_TOP of your environment to a folder that will be used to import the ODI objects. This folder must be accessible from the ODI client you plan to use to perform the import.
DSR RMS Integration ODI XML files are in the following APPL_TOP folders:
-
ddr/patch/115/odi/US/master
-
ddr/patch/115/odi/US/model
-
ddr/patch/115/odi/US/project/DDR_RMS
Copying Class and DTD Files
Copy the ddrrms.zip file from the APPL_TOP of your environment to a temporary folder and unzip. Location of this zip is ddr/patch/115/odi/US/project/DDR_RMS
The following files are extracted:
-
DLPRDFileToXmlConverter.class
-
RETLDLPRD.dtd
Using ODI Objects in the RMS Integration
The following ODI objects are used in the RMS integration:
-
Topology Objects - These objects are exported from the Topology Manager.
-
CONN_DDR_RMS_XML_DATASERVER.xml - Establishes the physical connection to the .dtd file for the XML format.
-
LSC_DDR_RMS_XML_RETLDLPRD.xml - Establishes the logical connection for the XML file which ties the physical connection and the context together.
-
-
Designer Objects - These objects have scenarios generated then exported from the Designer.
-
FOLD_RETL_to_DSR.xml
-
KM_CKM_Oracle.xml
-
KM_IKM_SQL_Control_Append.xml
-
KM_LKM_SQL_to_Oracle.xml
-
VAR_V_DDR_RETL_CLASS_DIR.xml
-
VAR_V_DDR_RETL_FAILED_DIR.xml
-
VAR_V_DDR_RETL_FM_ADDR.xml
-
VAR_V_DDR_RETL_MAIL_SERVER.xml
-
VAR_V_DDR_RETL_ORG_CD.xml
-
VAR_V_DDR_RETL_SRC_DIR.xml
-
VAR_V_DDR_RETL_SRC_FILENAME.xml
-
VAR_V_DDR_RETL_SUCCESS_DIR.xml
-
VAR_V_DDR_RETL_TO_ADDR.xml
-
Configuring the User Parameters in DSR Lookups
Configure the following parameters in the DSR Lookup table DDR_R_LKUP_MST.
DDR_R_LKUP_MST Table
The parameters specified below in the LKUP_CD column need to be configured and set up by the user. Sample values appear in the table below.
| MFG_ORG_CD | LKUP_TYP_CD | LKUP_CD | LKUP_NAME | LKUP_DESC |
|---|---|---|---|---|
| -1 | SYS_PARAM | RETL_DSR_SRC_DIR | ODI_HOME/retldsr/source | The directory where the RMS EDIDLPRD File should be kept for upload to DSR. |
| -1 | SYS_PARAM | RETL_DSR_SRC_FILENAME | EDIDLPRD.dat | The RMS EDIDLPRD File name that needs to be loaded into Oracle DSR. |
| -1 | SYS_PARAM | RETL_DSR_SUCCESS_DIR | ODI_HOME/retldsr/sucess | The directory where the RMS EDIDLPRD file should be moved after the successful upload. |
| -1 | SYS_PARAM | RETL_DSR_FAILED_DIR | ODI_HOME/retldsr/failed | The directory where the RMS EDIDLPRD File should be moved after the upload fails. |
| -1 | SYS_PARAM | RETL_DSR_TO_ADDR | nimit.mankodi@oracle.com | The admin e-mail address where the error or success notification should be sent. |
| -1 | SYS_PARAM | RETL_DSR_FM_ADDR | retl-dsr@integrator.com | The Integrator admin e-mail from which the error or success notification should be sent. |
| -1 | SYS_PARAM | RETL_DSR_MAIL_SERVER | Mail.oracle.com | Mail Server that will send the ODI email notifications. |
| -1 | SYS_PARAM | RETL_DSR_CLASS_DIR | ODI_HOME/retldsr/source | The directory where the DLPRDFileToXMLConverter.class File is located. |
Creating the Directories Defined in the DDR_R_LKUP_MST Table
Create the directories that were defined to be the source, success, and failure directories.
Copying the Class and DTD Files
Perform the following procedure to copy the class and DTD files to the appropriate folders.
-
Copy the class file DLPRDFileToXMLConverter.class from the folder where the ZIP file was originally downloaded to the directory specified in the DDR_R_LKUP_MST table.
-
Copy the DTD file RETLDLPRD.dtd from the folder where the ZIP file was downloaded to the source directory specified in the DDR_R_LKUP_MST table.
Importing the DSR - RMS Project Objects in the ODI Designer
This section provides procedures for importing DSR - RMS project objects using ODI Designer.
Import the DSR - RMS Project Objects in the ODI Designer
Import all XML files with prefixes of FOLD_% from the ODI Studio.
Importing the Folders
-
Select the Designer tab.
-
From the Connect Manager button, select Import > Smart Import.
-
In the file selection box, click the search button and navigate to the folder where the XML files from ddr/patch/115/odi/US/project/DDR_RMS were downloaded and select the file to import in the list above.
Leave the response file empty.
-
Click Next.
-
Accept all defaults on the Import Actions screen and click Next.
-
On the Summary screen, click Finish to import the object.
-
Verify that the folders were imported correctly.
Import all XML files with the prefix of KM_%. from the ODI Studio
Importing the Knowledge Modules
-
Select the Designer tab.
-
From the Connect Manager button select Import >Smart Import.
-
In the file selection box, click the search button and navigate to the folder where the XML files from ddr/patch/115/odi/US/project/DDR_RMS were downloaded and select the file to import in the list above.
Leave the response file empty.
-
Click Next.
-
Accept all defaults on the Import Actions screen and click Next.
-
On the Summary screen, click Finish to import the object.
-
Verify that the knowledge modules were imported correctly.
Import all XML files with the prefix of VAR_% from the ODI Studio.
Importing the Variables
-
Select the Designer tab.
-
From the Connect Manager button select Import >Smart Import.
-
In the file selection box, click the search button and navigate to the folder where the XML files from ddr/patch/115/odi/US/project/DDR_RMS were downloaded and select the file to import in the list above.
Leave the response file empty.
-
Click Next.
-
Accept all defaults on the Import Actions screen and click Next.
-
On the Summary screen, click Finish to import the object.
-
Verify that the Variables were imported correctly.
Importing the Topology Objects
Import the topology objects in the following order:
-
LSC_DDR_RMS_XML_RETLDLPRD.xml
-
CONN_DDR_RMS_XML_DATASERVER.xml
Perform the following procedures from the ODI Studio.
-
Select the Topology tab.
-
From the Connect Manager button select Import >Smart Import.
-
In the file selection box, click the search button and navigate to the folder where the XML files from ddr/patch/115/odi/US/master were downloaded and select the file to import in the order above.
Leave the response file empty.
-
Click Next.
-
Accept all defaults on the Import Actions screen, and click Next.
-
On the Summary screen, click Finish to import the object.
-
Verify that all the objects were imported correctly.
Configuring the Physical Architecture in Topology Manager
Use the following procedure to configure the RMS XML Dataserver.
Configuring the RMS XML Datasever
-
On the Physical Architecture tab under XML, open the “DDR_RMS_XML_DATASERVER” object.
-
On the JDBC subtab, change the JDBC URL to point to the file RETLDLPRD.dtd in the source directory created.
-
Save your changes.
-
Click Test Connection and make sure the connection is successful.
Example: jdbc:snps:xml?d=\\server\rms\source\RETLDLPRD.dtd&s=RETLDLPRD

Configuring the Context and Logical Architecture in Topology Manager
Use the following procedure to configure the context and logical architecture for a DSR-RMS integration in the Topology Manager.
On the Contexts tab, verify the Schemas tab for the "DDR_CONTEXT".
Logical Schema "DDR_RMS_XML_RETLDLPRD" = "DDR_RMS_XML_DATASERVER.RETLDLPRD" Physical Schema
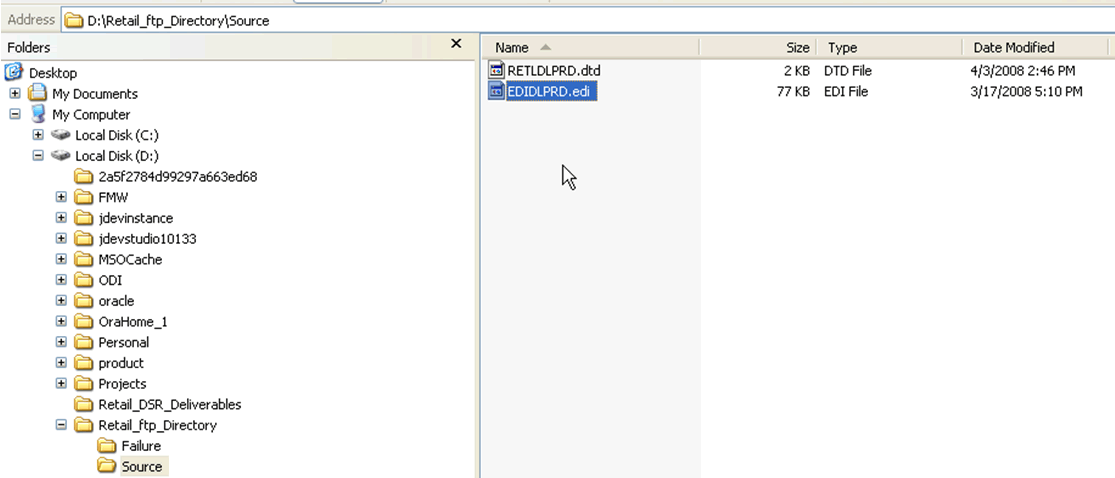
Copying the EDIDLPRD.dat File
Copy the EDIDLPRD.dat file to the location as specified in RETL_DSR_SRC_DIR lookup.
Executing the Scenario
Perform the following procedure to execute the scenario for a DSR-RMS integration.
-
Right-click the LOAD_RETL_ITEMS_TO_DSR_PKG object from the Operator on the Scenario tab and select Execute.
-
Uncheck the "Last Value" check box and then enter a value for RTL_ORG_CD in the Value box. You must exit this text field for the value to be saved.
-
Click OK.
-
Select the Sessions List tab to check the status of the execution.