Labeling Setup
This chapter covers the following topics:
- Overview
- Setting Up Printers
- Choosing Document and Label Printers
- Label Formats
- Assigning Label Types to Business Flows
- Setup Example
Overview
It is assumed that the customer is using a certified 3rd party Label Printing software package and using the asynchronous integration method. The steps for configuring the 3rd party software are not discussed here.
You can print labels automatically as part of a specified business flow, such as PO Receipt, or Ship Confirm, or you can manually request a label to be printed for certain material.
When a print request is generated, Oracle Mobile Supply Chain Applications gathers the necessary information to construct the XML file for the 3rd party printing software. There are two ways to determine the label type: manual, and automatic. You determine the label type when you generate a manual print request. The business Flow/label type generates the label type if the label generates automatically. Each Label Type has one default label format the system uses to print labels of that type. The printer is determined according to the current printer assignments.
Once all the necessary information is collected, Oracle Mobile Supply Chain Applications generates the XML instruction and deposits the XML file into the specified directory for the 3rd party label printing software to retrieve and execute.
Definitions
-
Label Type: A broad category of labels that specifies the superset of available data elements that may be included on a single label.
-
Label Format: A single instance of a label type that specifies the subset of available fields contained on a particular label.
-
Business Flow: An identifiable business process that occurs as part of material handling within Oracle Warehouse Management.
Setting Warehouse Management Profile Options
The following profile options need to be set within Oracle Applications:
-
WMS: Label Print Mode: This profile option determines the label print mode for the integration. Set this profile to asynchronous.
-
WMS: Label output directory: This profile option determines the directory for the XML files. This is the directory from which the third party software picks up and processes the files. Both the Oracle database and the third party software must have read/write privileges to this directory. For the directory to be accessible to the Oracle database, it must be a database directory defined for PL/SQL file I/O. See My Oracle Support Knowledge Document 2525754.1, Using UTL_FILE_DIR or Database Directories for PL/SQL File I/O in Oracle E-Business Suite Releases 12.1 and 12.2.
-
WMS: Label file prefix: This profile option determines the prefix for the XML files that will be written to the output directory. Label print file names are generated according to the following format: PPPNNN.xml where PPP is the prefix specified in this profile and NNN is a sequential integer generated for each new label print request.
Related Topics
Label Printing Integration Kit: Oracle Warehouse Management Implementation Guide.
Setting Up Printers
When printers are set up for label printing for Oracle Mobile Supply Chain Applications within Oracle Applications, they do not require printer drivers as typically required in other printer installations. Instead, third party label printing software processes the actual print request.
To set up printer types
You use the system administrator responsibility to create printers. First, you must create a printer type, then create individual printers. The following procedure lists the steps necessary to create printer types.
Note: Before you set up printer types and printers, log in to Oracle Applications, and select the System Administrator Responsibility.
-
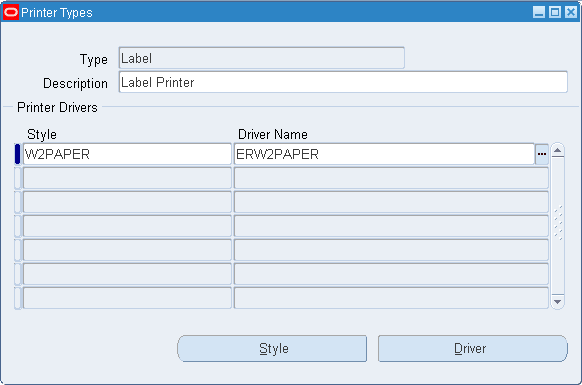
Navigate to Install > Printer > Types top open the Printer Types window.
-
Enter Label in the type field.
-
Enter a description in the description field.
-
Save your work.
To set up printers
The following procedure lists the steps necessary to set up printers.
Note: Before you set up printer types and printers, log in to Oracle Applications, and select the System Administrator Responsibility.
-
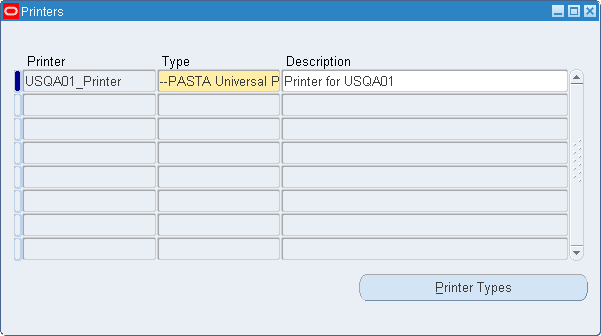
Navigate to the Printers window.
-
(N) Install > Printer > Register
-
-
Enter the label printer name in the Printer field.
-
Select Label from the types field list of values.
-
Enter a description in the description field.
-
Save your work.
Note: The printer name assigned in this setup must correspond to the name of the printer as recognized by the 3rd Party printing software.
Choosing Document and Label Printers
You can assign documents, label types, and selected reports to specific printers in the Choose Document and Label Printers window. You can assign them at the following levels: Application, Site, Responsibility, User, Zone/Subinventory, Organization, and Format.
To assign printer label types
Complete the following steps to assign a printer to a document, label type, or selected report.
Note: Before you assign printers, log in to Oracle Applications, and select the Inventory responsibility.
-
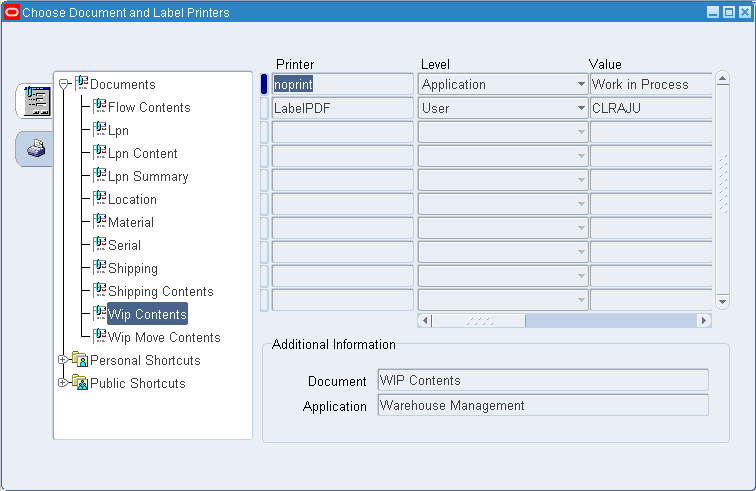
Navigate to the Choose Document and Label Printers window.
-
(N) Setup > Label Printing > Assign Printers
-
-
Click to expand the Documents node to display the documents currently assigned to printers (label types and selected reports are listed under the Documents node). Oracle Mobile Supply Chain Applications supports various label types including Location, Material, Serial, Shipping, and Shipping Contents label types.
-
Select one of the following options:
-
Select a document (label type) from the Documents list.
-
If a label type does not appear in the tree view, right-click the Documents node, and select New. Find the label type, and click OK. The label type is added to the Documents list and you can start assigning printers to it.
Note: In a new installation of Mobile Supply Chain Applications, you must add all of the label types.
-
-
Select a printer to be assigned to the document.
-
Select a level. The printer at the User level is selected first. However, if one does not exist at the User level, then the system will look for a printer at the Responsibility level. This pattern will continue until a printer is found at one of the levels. If more than one printer is set up at a level, then you must use the Default check box to specify the preferred printer at that level. You should only have one default printer at each level.
-
Select a Value.
-
Enter a Comment if desired.
-
Select the Enabled check box to enable the printer.
-
Select the Default check box to set this as the default for the label type.
-
Save your work.
Label Formats
You need to define label formats within Oracle Mobile Supply Chain Applications after you use the third party label design software to define the label formats. The label format designed in the third party software usually contains variable fields that need to be populated with data from Oracle Mobile Supply Chain Applications. You must define a label format within Oracle Applications that specifies the data elements to include in that format as well as the variables to use in referring to those elements.
To define label formats
The following procedure lists the steps necessary to define label formats in the Define Label Formats and Sets window.
Note: Before you can define label formats, log in to Oracle Applications, and select the Inventory Responsibility.
-
Navigate to Define Label Formats and Sets window.
-
(N) Setup > Label Printing > Label Formats

-
-
Select a Label Type.
-
Enter a label name in the Names field.
This should be the name the third party printing software uses.
-
Enter a label format description if necessary.
-
Enter a disable date.
-
Select the Default Format check box to use this format as the default format for the label type.
Note: Mobile Supply Chain Applications only allows one label format per label type. The default label format is always used.
-
Save your work.
To define label field variables
Complete the following steps to define label field variables.
-
Click the Label Fields and Variables button on the Define Label Formats and Sets window.

-
Select a Field Name.
The contents that appear in the list of values are the values that can be included on a label format of the specified Label Type.
-
Enter a Field Variable Name.
The Field Variable Name must match the variable used within the third Party printing software. The Field Variable Name is used as the identifier on the generated XML file.
Related Topics
Defining Label Formats: Oracle Warehouse Management User's Guide
Assigning Label Types to Business Flows
You can assign label types to business flows so when a transaction processes a label print request generates. You can assign label types to business flows Label Types at all levels. To assign label types to business flows complete the following procedure.
Note: Before you can assign label types to business flows, log in to Oracle Applications and select the Inventory responsibility.
To assign label types to business flows
-
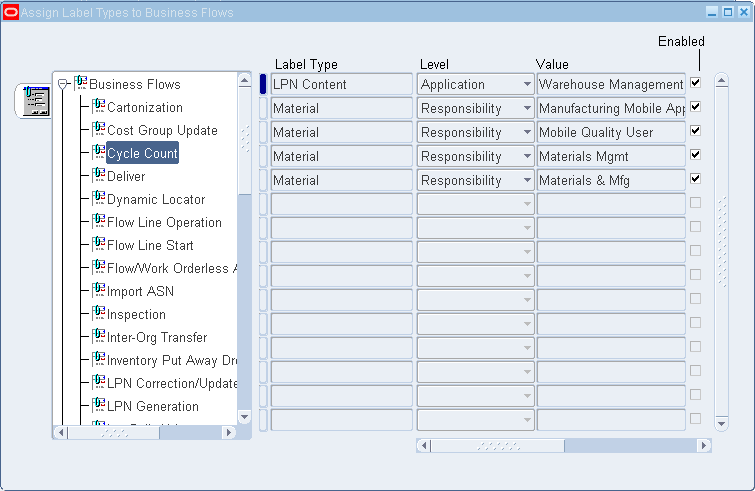
Navigate to the Assign Label Types to Business Flows.
-
(N) Setup > Label Printing > Assign Label Types
-
-
Select the appropriate business flow.
Note: In a new installation of Oracle Mobile Supply Chain Applications you must add all of the business flows. Follow the same procedure used to add label types to add business flows to the tree structure.
-
In the Level field, select the level at which you want to control printing for this label type: Site, Application, Responsibility, or User.
-
In the Value field, select the value for the level that you selected in the previous step.
Note: The Value field is disabled if you select Site level. If you select Application, the list of values displays a list of valid applications, if you select User, the list of values displays a list of valid users, if you select Responsibility, the list values displays a list of valid responsibilities.
-
Verify that the Enabled check box is selected. This indicates this label type can be used to generate the label associated with the business flow. If you deselect the check box, the label cannot be generated for the business flow.
-
Enter additional information in the Comments field if necessary.
-
Save your work.
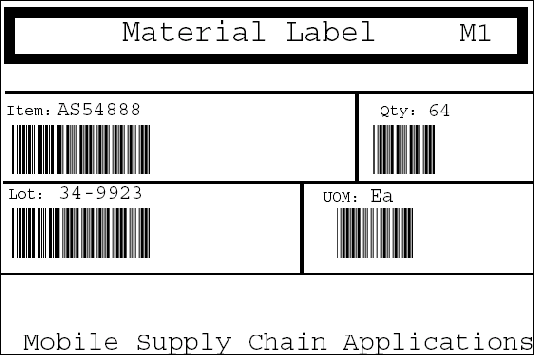
Setup Example
Consider the following setup as an example:
A Printer is created called Label Printer One with Printer Type of Label.
Label Printer One is assigned to the Label Type of Material at the Responsibility Level for materials Mgmt responsibility.
A Label Format called Material Format is created. This format contains the Item and Quantity fields, referenced by the variables ITEM and QTY, respectively.
The Material Label Type is assigned to the business Flow of receipt as the user level, for user RCV10.
According to this setup, when the RCV10 user logs in and performs a Receipt of material (such as a Purchase Order Receipt), an XML file with instructions to print a Material Label of format Material Format to printer label Printer One will be generated and deposited in the specified directory.
Material Label
Related Topics
Windows and Navigator Paths Oracle Mobile Supply Chain Applications User's Guide