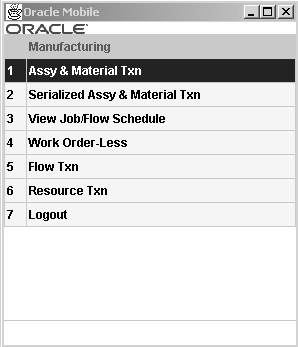
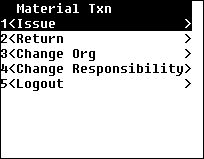
Mobile Manufacturing
This chapter covers the following topics:
- Overview of Mobile Manufacturing
- Assembly Transactions
- Moving Assemblies
- Completing Jobs
- Return Transactions
- Scrapping Assemblies
- Return Assemblies from Scrap
- Rejecting Assemblies
- Return from Reject
- Material Transactions
- Picking for Manufacturing
- Serial Assembly Transactions
- Moving Serial Assemblies
- Completing Serialized Assemblies
- Serialized Move Completions
- Serialized Return Transactions
- Serial Material Transactions
- Serial Status
- Label Printing
- Viewing Job and Flow Schedule Information
- Work Order-Less Transactions
- Flow Manufacturing Transactions
- Resource Transactions
Overview of Mobile Manufacturing
Oracle Mobile Manufacturing provides Oracle Work in Process transactions using mobile device hardware. You can perform shop floor transactions including:
-
Moving, completing, and scrapping assemblies
-
Issuing and returning material
-
Completing jobs and assemblies with License Plate Number (LPN) data
-
Transacting Work Order-less completions with LPN data
-
Viewing transaction information including job status, completions, scrap quantities, and schedule dates
-
Work Order-less Completion transactions without LPN data
-
Oracle Flow Manufacturing completion and scrap transactions
-
Resource transactions
Note: In order to access and perform LPN transactions, you must have the Oracle Warehouse Management System application installed, be in a warehouse management enabled organization, and choose the Whse Mgmt responsibility upon logon. LPN transactions are supported only in a standard costing organization
Manufacturing Mobile Page
Note: If Oracle Quality is installed and at least one qualified collection plan exists, the
<Quality>button is enabled on Mobile Manufacturing windows. When mandatory collection plans are used, you must enter and save quality results data before you can save your transaction. See: Using Oracle Quality with Oracle Work in Process, Oracle Quality User's Guide.
Assembly Transactions
Oracle Mobile Manufacturing provides all the assembly transactions available in Oracle Work in Process including:
-
Moving from one operation or intraoperation step to another
-
Completing parts of the assembly or the entire quantity
-
Returning to previous operations or steps
-
Scrapping or rejecting parts of the assembly or the entire quantity
-
Reversing reject or scrap transactions
-
Issuing and Returning Components to jobs
These transactions are available on the menu in the Assembly Transaction window.
Assembly Transaction Page
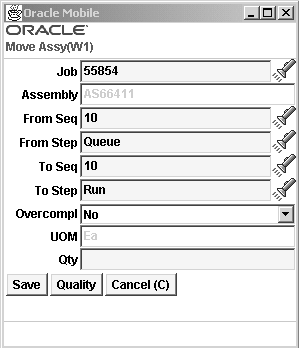
Moving Assemblies
You can move Assemblies from one operation or intraoperation step to another. You can move assemblies forward and backward within and between operations, and on to completion.
To move an assembly to another operation
-
Navigate to the Move Assembly window.
Move Assembly Page
-
In the Job field—enter, select from the list of values, or scan the number. The assembly displays, and when applicable the values for from operation sequence number and from operation step are defaulted.
-
In the To Seq field, select the To Operation Sequence.
-
In the To Step field, select the To Operation Step.
-
In the Overcompl field, you can indicate if this transaction is an over completion.
You can over-complete and over–move assembly quantities that are greater than the job quantity.
The unit of measure for this assembly displays in the UOM field.
-
Enter the transaction quantity in the Qty field.
-
If the components of the assembly are under serial or lot control, you will be prompted to enter the component backflush information
-
If the component is lot controlled, enter the lot number in the Lot field.
-
Enter the lot quantity in the Lot Qty field. The total lot quantity must match the required component quantity. If necessary, you can enter more than one lot.
-
If you are performing forward move transactions and if the assembly is under serial control, enter the assembly serial number in the Parent SN field to create genealogy between the component and the assembly. If you are performing backward moves, any previously created genealogy will automatically be disabled.
-
Enter the component serial number in the SN field. Enter the remaining components serial numbers as necessary.
The remaining fields indicate the number of component serial numbers, or lot numbers that require additional input.
-
Choose
<Next Component>to enter the component information for the remaining components of the assembly. -
Choose
<Save>to save your work, <Quality> to record collection plan results, or <Cancel> to cancel the transaction.When you choose <Save>, a message displays confirming your transaction is saved. You can then enter another Move transaction or access another transaction window.
If a mandatory Quality collection plan has been set up for this assembly, you must choose <Quality> to record the results. This accesses the Quality window, see.
Related Topics
Move Assemblies, Oracle Work in Process User's Guide
Move Transactions, Oracle Work in Process User's Guide
Over-Completions and Over-Moves, Oracle Work in Process User's Guide
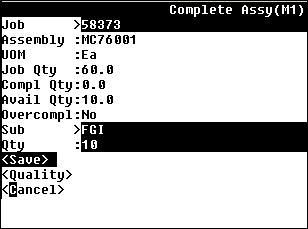
Completing Jobs
You can complete assemblies from discrete jobs into inventory, and also complete a greater quantity than the job amount as long as it is within the set tolerance level.
To complete jobs and assemblies
-
Navigate to the Complete Assembly window.
-
In the Job field—enter, select from the list of values, or scan the discrete job.
The default values display for job assembly number, unit of measure, job quantity, quantity previously completed, quantity available to complete, and overcompletion flag.
Complete Assembly Page
-
Enter the subinventory and, if applicable, the locator values in the Sub and Loc fields.
-
Enter the quantity completed in the QTY field.
-
If the assembly is under lot control, enter the lot information.
-
If the assembly is under serial control, enter the serial information.
-
If the components of the assembly are under serial or lot control, choose
<Components>to enter the component backflush information -
If the component is lot controlled, enter the lot number in the Lot field.
-
Enter the lot quantity in the Lot Qty field. The total lot quantity must match the required component quantity. If necessary, you can enter more than one lot.
-
If the assembly is under serial control, enter the assembly serial number in the Parent SN field to create genealogy between the component and the assembly.
-
Enter the component serial number in the SN field. Enter the remaining components serial numbers as necessary.
The remaining fields indicate the number of component serial numbers, or lot numbers that require additional input.
-
Choose
<Next Component>to enter the component information for the remaining components of the assembly. -
Choose <Save> to save your work, <Quality> to record collection plan results, or <Cancel> to cancel the transaction.
When you choose <Save>, a message displays confirming your transaction is saved. You can then enter another completion transaction or access another transaction window.
If a mandatory Quality collection plan has been set up for this assembly, you must choose <Quality> to record the results. This accesses the Quality window, see.
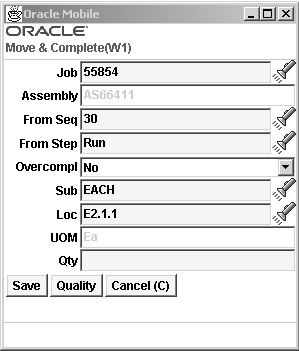
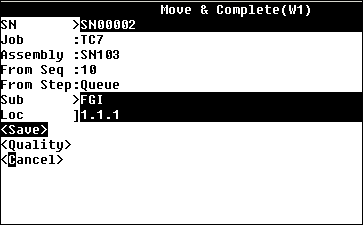
To complete an assembly from an operation:
-
Navigate to the Move and Complete window.
-
In the Job field—enter, select from the list of values, or scan the discrete job. The Assembly, Overcompl, Sub, and UOM fields populate automatically. The From Seq and From Step fields populate automatically only when all assemblies are in the same operation and step. Otherwise, you can enter any From Seq and From Step to indicate where you are completing assemblies from the shop floor.
-
If applicable, enter the locator in the Loc field.
-
Enter the quantity to complete in the Qty field.
Move and Complete Page
-
If the assembly is under lot control, enter the lot information.
-
If the assembly is under serial control, enter the serial information.
-
If the components of the assembly are under serial or lot control, choose
<Components>to enter the component backflush information -
If the component is lot controlled, enter the lot number in the Lot field.
-
Enter the lot quantity in the Lot Qty field. The total lot quantity must match the required component quantity. If necessary, you can enter more than one lot.
-
If the assembly is under serial control, enter the assembly serial number in the Parent SN field to create genealogy between the component and the assembly.
-
Enter the component serial number in the SN field. Enter the remaining components serial numbers as necessary.
The remaining fields indicate the number of component serial numbers, or lot numbers that require additional input.
-
Choose
<Next Component>to enter the component information for the remaining components of the assembly. -
Choose <Save> to save your work, <Quality> to record collection plan results, or <Cancel> to cancel the transaction.
When you choose <Save>, a message displays confirming your transaction is saved. You can then enter another completion transaction or access another transaction window.
If a mandatory Quality collection plan has been set up for this assembly, you must choose <Quality> to record the results. This accesses the Quality window.
Related Topics
Assembly Completion and Returns, Oracle Work in Process User's Guide
Move Completion/Return Transactions, Oracle Work In Process User's Guide
Move Transactions Options, Oracle Work In Process User's Guide
Move Transaction Types, Oracle Work In Process User's Guide
Performing Move Completion / Return Transactions, Oracle Work In Process User's Guide
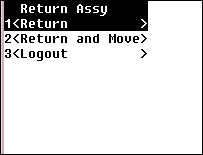
Return Transactions
You can reverse an assembly completion and return it from a subinventory back to work in process.
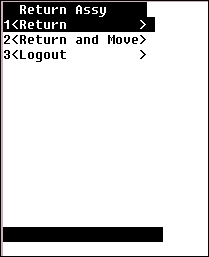
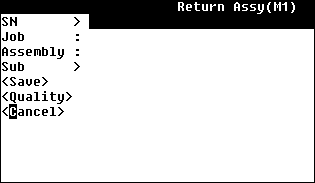
To return a completed assembly back to work in process:
-
Navigate to the Return Assembly page.
-
Choose Return.
Return Assy Page with Return Selected
-
In the Job field—enter, select from the list of values, or scan the discrete job.
The job assembly number displays—and default values for unit of measure, job quantity, and completed quantity.
-
Enter the subinventory and, if applicable, the locator values in the Sub and Loc fields.
Return Assembly Page
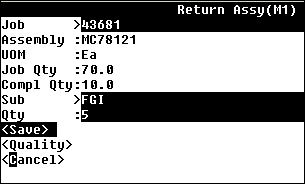
-
In the Qty field, enter the quantity of this assembly that you are returning.
-
If the assembly is under lot control, enter the lot information.
-
If the assembly is under serial control, enter the serial information.
-
If the components of the assembly are under serial or lot control, choose
<Components>to enter the component backflush information -
If the component is lot controlled, enter the lot number in the Lot field.
-
Enter the lot quantity in the Lot Qty field. The total lot quantity must match the required component quantity. If necessary, you can enter more than one lot.
-
Enter the component serial number in the SN field. Enter the remaining components serial numbers as necessary.
The remaining fields indicate the number of component serial numbers, or lot numbers that require additional input.
-
Enter the sales order number in the SO Num field. The SO Number field is displayed only if the Discrete Job's Assembly has inventory that is reserved against any Sales Order.
Note: The SO Number is displayed if the Assembly is an ATO Item and there is a single Sales Order that has Inventory reservations for the assembly.
-
Enter the sales line in the SO Line field. The SO Line field is displayed if user enters a valid Sales Order Number.
Note: The SO Number is displayed if the Assembly is an ATO Item and there is a single Sales Order that has Inventory reservations for the assembly.
-
Choose
<Next Component>to enter the component information for the remaining components of the assembly. -
Choose <Save> to save your work, <Quality> to record collection plan results or <Cancel> to cancel the transaction.
When you choose <Save>, a message displays confirming your transaction is saved. You can then enter another return transaction or access another transaction window.
If a mandatory Quality collection plan has been set up for this assembly, you must choose <Quality> to record the results. This accesses the Quality window.
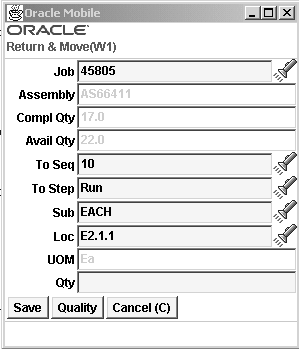
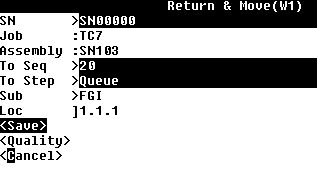
To return a completed assembly to an operation step:
-
Navigate to the Return Assembly page.
-
Choose Return and Move.
-
Enter the job number in the Job field. The Assembly and Compl Qty fields populate automatically.
-
Enter the to sequence in the To Seq field to indicate where you are returning assemblies back into the shop floor.
-
Enter the to step in the To Step field.
-
Enter the subinventory in the Sub field to indicate where you are returning the assemblies from inventory.
-
If applicable, enter the locator in the Loc field.
-
Enter the Qty in the quantity field.
-
If the assembly is under lot control, enter the lot information.
-
If the assembly is under serial control, enter the serial information.
-
If the components of the assembly are under serial or lot control, choose
<Components>to enter the component backflush information -
If the component is lot controlled, enter the lot number in the Lot field.
-
Enter the lot quantity in the Lot Qty field. The total lot quantity must match the required component quantity. If necessary, you can enter more than one lot.
-
Enter the component serial number in the SN field. Enter the remaining components serial numbers as necessary.
The remaining fields indicate the number of component serial numbers, or lot numbers that require additional input.
-
Choose
<Next Component>to enter the component information for the remaining components of the assembly.Return and Move Page
-
Choose <Save> to save your work, <Quality> to record collection plan results or <Cancel> to cancel the transaction.
When you choose <Save>, a message displays confirming your transaction is saved. You can then enter another return transaction or access another transaction window.
If a mandatory quality collection plan has been set up for this assembly, you must choose <Quality> to record the results. This accesses the Quality window.
Related Topics
Completing and Returning Assemblies, Oracle Work in Process User's Guide
Move Completion/Return Rules, Oracle Work in Process User's Guide
Performing Move Completion/Return Transactions, Oracle Work in Process User's Guide
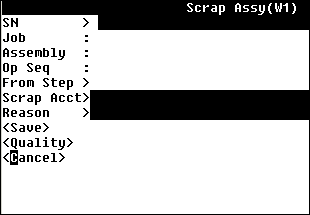
Scrapping Assemblies
You can only scrap assemblies at the current operation.
To scrap an assembly at an operation
-
Navigate to the Scrap Assy page.
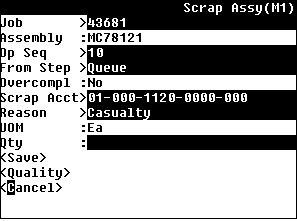
Scrap Assy Page with Scrap Selected
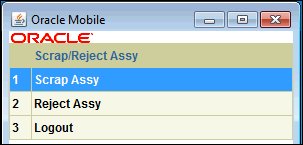
-
Choose Scrap.
-
In the Job field—enter, select from the list of values, or scan the discrete job. The assembly number for the job you select defaults in the Assembly field.
-
In the Op Seq field, select the Operation Sequence number where the quantity is residing.
-
In the From Step field, select the From Operation Step where the quantity is residing.
You can change the value that displays in the Overcompletion field.
Note: Unit of measure (UOM) values: Transactions for UOM values in mobile applications are performed with the primary UOM only.
-
Optionally, enter a scrap account in the Scrap Acct field.
Note: This step may be required depending on if you have the Require Scrap Account check box checked on the WIP parameters window.
-
Optionally, select a transaction Reason code from the list of values.
-
Enter the transaction quantity in the Qty field.
-
If the components of the assembly are under serial or lot control, you will be prompted to enter the component backflush information.
-
If the component is lot controlled, enter the lot number in the Lot field.
-
Enter the lot quantity in the Lot Qty field. The total lot quantity must match the required component quantity. If necessary, you can enter more than one lot.
-
If the assembly is under serial control, enter the assembly serial number in the Parent SN field to create genealogy between the component and the assembly.
-
Enter the component serial number in the SN field. Enter the remaining components serial numbers as necessary.
The remaining fields indicate the number of component serial numbers, or lot numbers that require additional input.
-
Choose
<Next Component>to enter the component information for the remaining components of the assembly.Scrap Assembly Page
-
Choose
<Save>to save your work, <Quality> to record collection plan results, or <Cancel> to cancel the transaction.When you choose <Save>, a message displays confirming your transaction is saved. You can then enter another transaction or access another transaction window.
If a mandatory quality collection plan has been set up for this assembly, you must choose <Quality> to record the results. This accesses the Quality window.
Related Topics
Scrapping Assemblies, Oracle Work in Process User's Guide
Rework Production, Oracle Work in Process User's Guide.
Defining Transaction Reasons, Oracle Inventory User's Guide
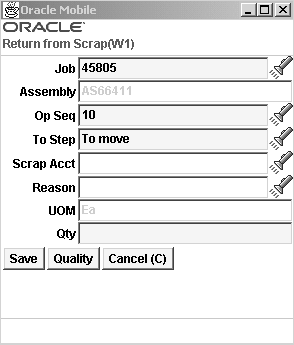
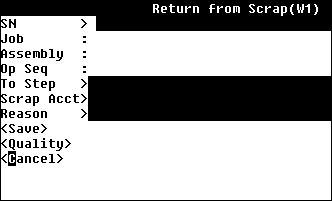
Return Assemblies from Scrap
You can return assemblies from scrap to any intraoperation step on the same operation.
To Return Assemblies from Scrap:
-
Navigate to the Scrap Assy page
-
Choose Return from Scrap.
-
In the Job field—enter, select from the list of values, or scan the discrete job. The assembly number for the job you select defaults in the Assembly field.
-
Enter, the operation sequence in the Op Seq field to which to return from scrap.
-
Enter the to step in the To Step field.
-
Optionally, enter the scrap account in the Scrap Acct field.
Note: This step may be required depending on if you have the Require Scrap Account check box checked on the WIP parameters window.
-
Optionally, select a transaction Reason from the list of values.
-
Enter the quantity to return from scrap in the Qty field.
-
If the components of the assembly are under serial or lot control, you will be prompted to enter the component backflush information
-
If the component is lot controlled, enter the lot number in the Lot field.
-
Enter the lot quantity in the Lot Qty field. The total lot quantity must match the required component quantity. If necessary, you can enter more than one lot.
-
Enter the component serial number in the SN field. Enter the remaining components serial numbers as necessary.
The remaining fields indicate the number of component serial numbers, or lot numbers that require additional input.
-
Choose
<Next Component>to enter the component information for the remaining components of the assembly.Return from Scrap Page.
-
Choose
<Save>to save your work, <Quality> to record collection plan results, or <Cancel> to cancel the transaction.When you choose <Save>, a message displays confirming your transaction is saved. You can then enter another transaction or access another transaction window.
If a mandatory quality collection plan has been set up for this assembly, you must choose <Quality> to record the results. This accesses the Quality window.
Related Topics
Scrapping Assemblies, Oracle Work in Process User's Guide
Rework Production, Oracle Work in Process User's Guide
Defining Transaction Reasons, Oracle Inventory User's Guide
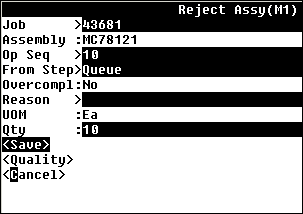
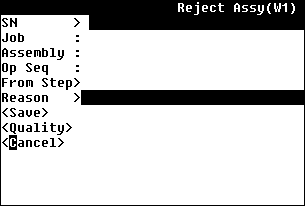
Rejecting Assemblies
You can only reject assemblies at the current operation.
To reject an assembly:
-
Navigate to the Reject Assy page.
Reject Assy Page with Reject Selected
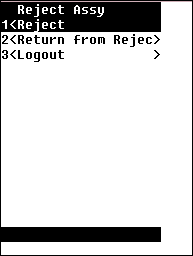
-
Choose Reject.
-
Enter, select or scan the job number in the Job field. The Assembly, Overcompl, and UOM fields populate automatically.
-
Enter, scan or select the Op Seq.
-
Enter, scan or select the From Step.
-
Optionally, select the Reason from the list of values.
-
Enter the quantity to reject in the Qty field.
-
If the components of the assembly are under serial or lot control, you will be prompted to enter the component backflush information
-
If the component is lot controlled, enter the lot number in the Lot field.
-
Enter the lot quantity in the Lot Qty field. The total lot quantity must match the required component quantity. If necessary, you can enter more than one lot.
-
If the assembly is under serial control, enter the assembly serial number in the Parent SN field to create genealogy between the component and the assembly.
-
Enter the component serial number in the SN field. Enter the remaining components serial numbers as necessary.
The remaining fields indicate the number of component serial numbers, or lot numbers that require additional input.
-
Choose
<Next Component>to enter the component information for the remaining components of the assembly.Reject Assy Page
-
Choose
<Save>to save your work, <Quality> to record collection plan results, or <Cancel> to cancel the transaction.When you choose <Save>, a message displays confirming your transaction is saved. You can then enter another transaction or access another transaction window.
If a mandatory quality collection plan has been set up for this assembly, you must choose <Quality> to record the results. This accesses the Quality window.
Related Topics
Intraoperation Steps, Oracle Work In Process User's Guide
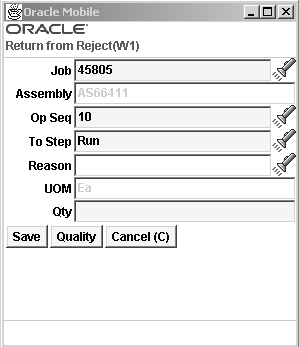
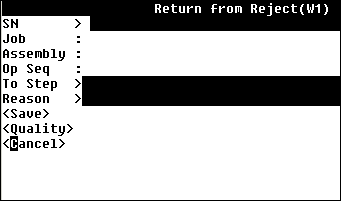
Return from Reject
You can an assembly from rejection to any intraoperation on the same operation.
To return an assembly from rejection:
-
Navigate to the Reject Assy page.
-
Choose Return from Reject.
-
Enter, select or scan the job number in the Job field. The Assembly, Overcompl, and UOM fields populate automatically.
-
Enter, scan or select the Op Seq to return to.
-
Enter the to step in the To Step field.
-
Optionally, select the Reason from the list of values.
-
Enter the quantity to return in the Qty field.
-
If the components of the assembly are under serial or lot control, you will be prompted to enter the component backflush information
-
If the component is lot controlled, enter the lot number in the Lot field.
-
Enter the lot quantity in the Lot Qty field. The total lot quantity must match the required component quantity. If necessary, you can enter more than one lot.
-
Enter the component serial number in the SN field. Enter the remaining components serial numbers as necessary.
The remaining fields indicate the number of component serial numbers, or lot numbers that require additional input.
-
Choose
<Next Component>to enter the component information for the remaining components of the assembly.Return from Rejection Page
-
Choose
<Save>to save your work, <Quality> to record collection plan results, or <Cancel> to cancel the transaction.When you choose <Save>, a message displays confirming your transaction is saved. You can then enter another transaction or access another transaction window.
If a mandatory quality collection plan has been set up for this assembly, you must choose <Quality> to record the results. This accesses the Quality window.
Related Topics
Intraoperation Steps, Oracle Work In Process User's Guide
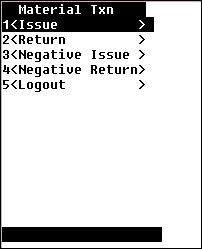
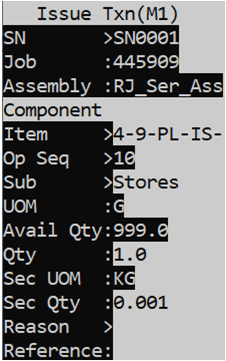
Material Transactions
Mobile Manufacturing enables you to perform all work in process material transactions. This includes issuing material from inventory to charge against a job, reversing component issues, and issuing components from jobs to fill negative material requirements.
Note: You can set the Allow Negative Balances Parameter in Oracle Inventory so that the inventory balances of items can be driven negative.
Lot and serial number control are maintained when issuing components. You can issue partial requirement quantities and over–issue requirements. You can issue any item even if it is not on the BOM for the job.
You also can perform material transactions for dual unit of measure items with deviations in secondary quantity.
To issue or return material for a job:
-
Navigate to the Material Transaction window.
Material Transactions Page
-
Select a transaction type. You can deliver parts to a job using component issue and take parts previously issued back to inventory using component return. You can also issue components to satisfy negative job requirements. When you issue negative requirement components, the components are returned from the job to inventory. You can reverse negative component issues with negative component returns. When you return components that have negative requirements, the components are issued from inventory to the job.
Note: The prompts for all material transactions are the same. The window name distinguishes the transaction type: Issue, Return, Negative Issue, and Negative Return.
You can personalize all the pages for the material transaction types. For more information, see Personalization.
-
In the Job field—enter, select from the list of values, or scan the discrete job.
The Assembly number for the job you select displays in the Assembly field.
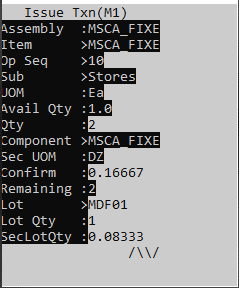
Issue Transaction Window
-
In the Item field—enter, select, or scan the item number for the part that you are issuing to the job.
-
Enter the item revision in the Rev field if applicable.
-
The unit of measure defaults in the UOM field.
-
The available quantity defaults in the Avail Qty field.
-
In the Op Seq field, enter or select the operation sequence where you want to issue or return the item.
-
In the Sub field enter the subinventory from which to issue the item, or to which to return the item. Enter the locator in the loc field if applicable.
-
In the Qty field enter the quantity of the item.
-
When you enter the quantity, remaining quantity defaults in the Remaining field.
-
If the item is dual unit of measure controlled, the secondary unit of measure defaults in the Sec UOM field. You can then enter the secondary UOM quantity in the Confirm field. If the item is also lot controlled, then you will be prompted to enter information in the Lot, Lot Qty, and SecLotQty fields.
-
If the component is under serial or lot control, you will be prompted to enter the component backflush information
-
If the component is lot controlled, enter the lot number in the Lot field.
-
Enter the lot quantity in the Lot Qty field. The total lot quantity must match the required component quantity. If necessary, you can enter more than one lot.
-
If you are issuing components to the job and if the assembly is under serial control, enter the assembly serial number in the Parent SN field to create genealogy between the component and the assembly. If you are returning components from the job to Inventory, any previously created genealogy will automatically be disabled.
-
Enter the component serial number in the SN field. Enter the remaining components serial numbers as necessary.
The remaining fields indicate the number of component serial numbers, or lot numbers that require additional input.
-
Choose <Save> to save your work, choose <Quality> to record collection plan results, or choose <Cancel> to cancel the transaction.
When you choose <Save>, a message displays confirming your transaction is saved. You can then enter another transaction or access another transaction window.
If a mandatory quality collection plan has been set up for this assembly, you must choose Quality to record the results. This accesses the Quality window.
Related Topics
WIP Material Transaction Types, Oracle Work in Process User's Guide
Component Issues and Returns, Oracle Work in Process User's Guide
Negative Component Issues and Returns, Oracle Work in Process User's Guide
Picking for Manufacturing
Oracle Inventory creates move orders and allocations for material requirements on a job or a schedule. The component pick release process supports discrete jobs, repetitive schedules, lot-based jobs, and flow schedules.
For more information on about the component pick release process, see Oracle Inventory User's Guide.
This section covers the features of Picking for Manufacturing for Oracle Mobile Supply Chain Applications:
-
Picking Process
-
Change Management
Picking Process
In Oracle Mobile Supply Chain Applications, the move orders can be transacted on either the desktop or on the mobile device. The mobile form allows the user to confirm the item, revision, and if applicable, lot and serial numbers of the move order. The mobile directs the operator to move the material either to the supply subinventory and locator if the supply type is operator or assembly pull, or to the job or schedule if the supply type is push.
Over Picking
Over picking may be desirable for a number of reasons. It may improve operational efficiency to pick a whole container rather than to spend time unpacking a small residual quantity. It may be necessary to compensate for handling/shrinkage losses during shipment or in a manufacturing process. The picked item may have an intrinsic variation in quantity, and there is an agreement with the customer to accept such variations. Over picking support provides mobile pickers with the option to over pick material, with ease and flexibility, when transacting sales orders, manufacturing component move order requisitions or replenishment picks. This enables over picking of material through the mobile interfaces and helps streamline and speed up the execution of the entire material picking process.
Change Management
The change management supported for jobs and schedules is identical for Oracle Mobile Supply Chain Applications as it is for Oracle Inventory, with the exception that move orders for which the source document has been canceled will not be available for transacting on the mobile. Canceling the move order and thus relieving the allocation must be performed via the Transact Move Order form from the desktop .
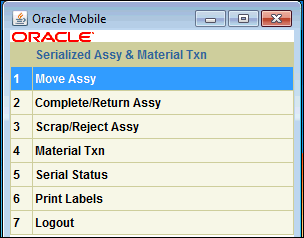
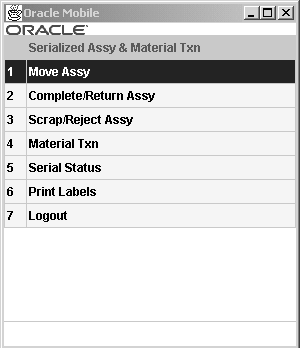
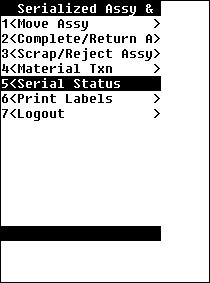
Serial Assembly Transactions
You can conduct assembly transactions by individual serial numbers. You can use a serial number to find information such as Job Number, Assembly Number, and the current operation of the assembly. Before you can perform serial assembly transactions, you must complete the following prerequisites:
-
Inventory Setup
-
Specify the Serial control type as Predefined
-
Establish the type of serial number uniqueness for the organization.
-
-
Work in Process Setup
-
Set the Default Serialization Start Operation
You can set this parameter either on the assembly routing, or in Work in Process.
-
Set the Default Intraoperation Step for Assembly Moves.
-
Associate serial numbers to a job.
Note: You must use a mobile device to perform serial assembly transactions.
Serialized Assy & Material Txn Page with Move Assy Selected
-
Related Topics
Inventory Attribute Group, Oracle Inventory User's Guide
Defining Revisions, Lot, LPN, Serial Parameters, Oracle Inventory User's Guide
Defining WIP Parameters, Oracle Work in Process User's Guide
Setting Up Serial Number Control Tracking, Oracle Work in Process User's Guide
Creating Discrete Jobs, Oracle Work in Process User's Guide
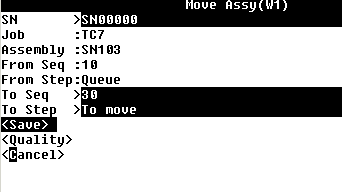
Moving Serial Assemblies
You can move serialized assemblies from one operation or intraoperation step to another. You can move serialized assemblies forward and backward within and between operations, and on to completion. The following limitations apply when moving serial assemblies
-
All serial controlled assemblies must make a stop in the Queue step of the serialization starting operation.
-
Assemblies cannot be moved across the serialization starting operation sequence number.
To move serialized assemblies:
-
Navigate the Move Assembly Window.
-
Enter, select, or scan the serial number. The job number, assembly number, from Sequence, and From step default automatically.
-
Modify the To Seq if necessary.
-
Modify the To Step if necessary.
Serial Move Assembly Window
-
If the components of the assembly are under serial or lot control, enter the component backflush information
-
If the component is lot controlled, enter the lot number in the Lot field.
-
Enter the lot quantity in the Lot Qty field. The total lot quantity must match the required component quantity. If necessary, you can enter more than one lot by performing a separate transaction for each lot.
-
Enter the component serial number in the SN field creating genealogy between the component and the assembly. Enter the remaining components serial numbers as necessary.
The remaining fields indicate the number of components, serial numbers, or lot numbers that require additional input.
-
Choose
<Next Component>to enter the component information for the remaining components of the assembly. -
Choose <Save> to save your work, <Quality> to record collection plan results, or <Cancel>, to cancel the transaction.
When you choose <Save>, a message displays confirming your transaction is saved. You can then enter another Move transaction or access another transaction window.
If a mandatory Quality collection plan has been set up for this assembly, you must choose <Quality> to record the results. This accesses the Quality window, see.
Related Topics
Interoperation Moves, Oracle Work in Process User's Guide
Intraoperation Moves, Oracle Work in Process User's Guide
Serial Number Control, Oracle Inventory User's Guide
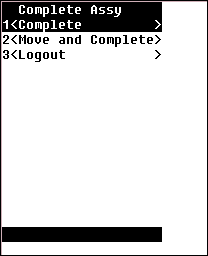
Completing Serialized Assemblies
You can complete serial assemblies from discrete jobs into inventory, and also complete a greater quantity than the job amount as long as it is within the tolerance level set and there are sufficient serial numbers associated to the job.
To complete jobs and assemblies:
-
Navigate to the serial Complete Assembly page.
-
Choose Complete.
Complete Assy Page with Complete Selected
-
Enter, select, or scan the serial number. The job and assembly default automatically.
Complete Assembly Page
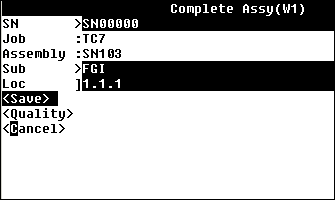
-
Modify, or enter the subinventory and, if applicable, the locator values in the Sub and Loc fields.
-
If the assembly is under lot control, enter the lot information.
-
If the components of the assembly are under serial or lot control, choose
<Components>to enter the component backflush information -
If the component is lot controlled, enter the lot number in the Lot field.
-
Enter the lot quantity in the Lot Qty field. The total lot quantity must match the required component quantity. If necessary, you can enter more than one lot by performing a separate transaction for each lot.
-
Enter the component serial number in the SN field creating genealogy between the component and the assembly. Enter the remaining components serial numbers as necessary.
The remaining fields indicate the number of components, serial numbers, or lot numbers that require additional input.
-
Choose
<Next Component>to enter the component information for the remaining components of the assembly. -
Choose <Save> to save your work, <Quality> to record collection plan results, or <Cancel>, to cancel the transaction.
When you choose <Save>, a message displays confirming your transaction is saved. You can then enter another completion transaction or access another transaction window.
If a mandatory quality collection plan has been set up for this assembly, you must choose <Quality> to record the results. This accesses the Quality window, see:.
Related Topics
Move Transactions, Oracle Work In Process User's Guide
Interoperation Moves, Oracle Work In Process User's Guide
Operation and Completion Moves, Oracle Work In Process User's Guide
Move Transactions Options, Oracle Work In Process User's Guide
Move Transaction Types, Oracle Work In Process User's Guide
Serial Number Control, Oracle Inventory User's Guide
Serialized Move Completions
You can use move completion transactions to move a serial assembly from any intraoperation step to inventory in one transaction. This transaction can be used only on assemblies which are in or beyond the serialization start operation in the routing.
To move and complete serialized jobs:
-
Navigate to the serial Complete Assy Page.
-
Choose Move and Complete.
-
In the SN field, enter, select or scan the serial number.
The Job, Assembly, From Seq, From Step, and Sub fields populate automatically.
Serial Move & Complete Page
-
Modify, or enter the subinventory and, if applicable, the locator values in the Sub and Loc fields.
-
If the assembly is under lot control, enter the lot information.
-
If the components of the assembly are under serial or lot control, choose
<Components>to enter the component backflush information -
If the component is lot controlled, enter the lot number in the Lot field.
-
Enter the lot quantity in the Lot Qty field. The total lot quantity must match the required component quantity. If necessary, you can enter more than one lot by performing a separate transaction for each lot.
-
Enter the component serial number in the SN field. Enter the remaining components serial numbers as necessary.
The remaining fields indicate the number of components, serial numbers, or lot numbers that require additional input.
-
Choose
<Next Component>to enter the component information for the remaining components of the assembly. -
Choose <Save> to save your work, <Quality> to record collection plan results, or <Cancel> to cancel the transaction.
-
When you choose <Save>, a message displays confirming your transaction is saved. You can then enter another completion transaction or access another transaction window.
-
If a mandatory Quality collection plan has been set up for this assembly, you must choose <Quality> to record the results. This accesses the Quality window.
Related Topics
Move Transactions Options, Oracle Work In Process User's Guide
Move Transaction Types, Oracle Work In Process User's Guide
Performing Move Completion / Return Transactions, Oracle Work In Process User's Guide
Serialized Return Transactions
You can reverse a serialized assembly completion and return it from a subinventory back to work in process. For assembly return transactions backflush components are returned to inventory.
To return a completed assembly back to an operation:
-
Navigate to the serial Return Assembly page.
-
Choose Return.
Return Assy Page with Return Selected
-
Enter, select, or scan the serial number. Serialized Assemblies must be returned to the job on which they were completed.
Note: If the components are under lot and or serial control, you are not required to enter the lot and serial information. The system knows automatically which components to return.
Serial Return Assembly page.
-
Choose <Save> to save your work, <Quality> to record collection plan results, or <Cancel> to cancel the transaction.
When you choose <Save>, a message displays confirming your transaction is saved. You can then enter another return transaction or access another transaction window.
If a mandatory Quality collection plan has been set up for this assembly, you must choose <Quality> to record the results. This accesses the Quality window.
To return and move serial assemblies:
Note: Assemblies being returned from inventory to a job can only be returned to a step in or after the serialized start operation.
-
Navigate to the serial Return Assy page.
-
Choose Return and Move.
-
Enter, or Select the SN number. Serialized Assemblies must be returned to the job on which they were completed
-
Enter the to sequence in the To Seq field.
-
Enter the to step in the To Step field.
Note: If the components are under lot and or serial control, you are not required to enter the lot and serial information. The system knows automatically which components to return.
Serial Return and Move Page
-
Choose <Save> to save your work, <Quality> to record collection plan results, or <Cancel>, to cancel the transaction.
When you choose <Save>, a message displays confirming your transaction is saved. You can then enter another return transaction or access another transaction window.
If a mandatory quality collection plan has been set up for this assembly, you must choose <Quality> to record the results. This accesses the Quality window.
To scrap serialized assemblies:
-
Navigate to the Scrap Assembly window.
Serial Scrap Assembly Page
-
Enter, select, or scan the serial number. The job number, assembly number, from Sequence, and From step default automatically.
-
If the components of the assembly are under serial or lot control, enter the component backflush information
-
If the component is lot controlled, enter the lot number in the Lot field.
-
Enter the lot quantity in the Lot Qty field. The total lot quantity must match the required component quantity. If necessary, you can enter more than one lot by performing a separate transaction for each lot.
-
Enter the component serial number in the SN field creating genealogy between the component and the assembly. Enter the remaining components serial numbers as necessary.
The remaining fields indicate the number of components, serial numbers, or lot numbers that require additional input.
Choose
<Next Component>to enter the component information for the remaining components of the assembly.Note: There is no to-seq field implying that scrapping occurs in the same operation as where the assemblies reside.
-
Optionally, enter a scrap account in the Scrap Acct field.
-
Optionally, select a transaction Reason code. from the list of values.
-
Choose <Save> to save your work, <Quality> to record collection plan results, or <Cancel> to cancel the transaction.
When you choose <Save>, a message displays confirming your transaction is saved. You can then enter another scrap transaction or access another transaction window.
If a mandatory quality collection plan has been set up for this assembly, you must choose <Quality> to record the results. This accesses the Quality window.
To return serial assemblies from scrap:
-
Navigate to the serialized Return from Scrap window.
Serial Return from Scrap Window
-
Enter, select, or scan the serial number. The job number, and the assembly number populate automatically.
-
Enter the operation sequence that you want to return the scrapped assemblies to in the Op Seq field.
-
Enter the operation step in the To Step field.
-
Optionally, enter a scrap account in the Scrap Acct field.
-
Optionally, select a transaction Reason code. from the list of values.
Note: If the components are under lot and or serial control, you are not required to enter the lot and serial information. The system knows automatically which components to return.
-
Choose <Save> to save your work, <Quality> to record collection plan results, or <Cancel> to cancel the transaction.
When you choose <Save>, a message displays confirming your transaction is saved. You can then enter another return from scrap transaction or access another transaction window.
If a mandatory quality collection plan has been set up for this assembly, you must choose <Quality> to record the results. This accesses the Quality window.
To reject serial assemblies:
-
Navigate to the Serial Reject Assy window.
Serial Reject Assembly Window
-
Enter, select, or scan the serial number. The job number, assembly number, from Sequence, and From step default automatically.
Note: There is no to-seq field implying that reject occurs in the same operation as where the assemblies reside.
-
If the components of the assembly are under serial or lot control, enter the component backflush information
-
If the component is lot controlled, enter the lot number in the Lot field.
-
Enter the lot quantity in the Lot Qty field. The total lot quantity must match the required component quantity. If necessary, you can enter more than one lot by performing a separate transaction for each lot.
-
Enter the component serial number in the SN field creating genealogy between the component and the assembly. Enter the remaining components serial numbers as necessary.
The remaining fields indicate the number of components, serial numbers, or lot numbers that require additional input.
-
Choose
<Next Component>to enter the component information for the remaining components of the assembly. -
Optionally, select a transaction Reason code. from the list of values.
-
Choose <Save> to save your work, <Quality> to record collection plan results, or <Cancel> to cancel the transaction.
When you choose <Save>, a message displays confirming your transaction is saved. You can then enter another reject transaction or access another transaction window.
If a mandatory quality collection plan has been set up for this assembly, you must choose <Quality> to record the results. This accesses the Quality window, see.
To return serial assemblies from reject:
-
Navigate to the Return from Reject window.
Serial Return from Reject Window
-
Enter, select, or scan the serial number. The job number and assembly number populate automatically.
Note: If the components are under lot and or serial control, you are not required to enter the lot and serial information. The system knows automatically which components to return.
-
Enter the operation sequence that you want to return the rejected assemblies to in the Op Seq field.
-
Enter the operation step in the To Step field.
-
Optionally, select a transaction Reason code. from the list of values.
-
Choose <Save> to save your work, <Quality> to record collection plan results, or <Cancel> to cancel the transaction.
When you choose <Save>, a message displays confirming your transaction is saved. You can then enter another return from reject transaction or access another transaction window.
If a mandatory quality collection plan has been set up for this assembly, you must choose <Quality> to record the results. This accesses the Quality window, see.
Related Topics
Serial Number Control, Oracle Inventory User's Guide
Assembly Completions and Returns, Oracle Work in Process User's Guide
Serial Material Transactions
Oracle Mobile Manufacturing enables you to perform all work in process material transactions. This includes issuing material from inventory to charge against a job, reversing component issues, and issuing components from jobs to fill negative material requirements.
Note: You can set the Allow Negative Balances Parameter in Oracle Inventory so that the inventory balances of items can be driven negative.
Serial Component Issue
You can issue ad-hoc components (not defined in bill of materials) for serialized jobs in the Serial Material Transaction mobile page. You can perform material issue for lot-controlled components.
Components defined with supply type Push can be issued to a job any time after serial number association as long as the job is in status Released or Complete. You enter the parent serial number then components serial or item number, and genealogy is built based on this transaction. During serial component issue serial genealogy is created between the assembly and it's components. For non serialized items, transaction quantity defaults to the lesser of required or open quantity for the job as a whole, but you can override this default. For push issues of components that are only lot controlled, if components of more than one lot are being issued to a single assembly, you must perform one transaction for each component lot.
Serial Component Return
When you return a component to inventory, you must enter the parent serial number then the component serial or item number, and the genealogy is de-activated based on this transaction. You can only return a serial number issued to the current job. When you return the a serialized component. The serial genealogy is disabled. The return quantity of a serialized component is fixed at 1 and the return quantity of a non serialized component cannot exceed the quantity issued to the job.
To issue or return serial material for a job:
-
Navigate to the Serial Material Transaction window.
Material Transactions Page
-
Select a transaction type. To deliver parts to a job, choose issue. To take back parts previously issued, choose Return.
Depending on your selection, the issue or return window displays.
Note: The prompts for all material transactions are the same. The window name distinguishes the transaction type: Issue or Return.
-
Enter, select, or scan the assembly serial number.
Issue Transaction Window
-
Enter, select or scan the component serial and or lot number. The item field populates automatically. If the component is not serial or lot controlled the serial and lot number fields do not display, and you enter, select, or scan the component item number.
-
In the Op Seq field, enter or select the operation sequence where you want to issue or return the item.
-
In the Qty field enter the quantity of the item. You can enter a secondary quantity if the item is under dual unit of measure control.
-
Choose <Save> to save your work, or choose Quality to record collection plan results.
When you choose <Save>, a message displays confirming your transaction is saved. You can then enter another issue or return transaction or access another transaction window.
If a mandatory quality collection plan has been set up for this assembly, you must choose <Quality> to record the results. This accesses the Quality window.
Related Topics
WIP Material Transaction Types, Oracle Work in Process User's Guide
Component Issues and Returns, Oracle Work in Process User's Guide
Serial Status
You can use the Serial Status page to view the status of a serial number.
To view serial Status information:
-
Navigate to the Serialized Assy & Material Txn page.
Serialized Assy & Material Txn page with Serial Status Selected
-
Choose Serial Status.
-
Enter, scan or select the assembly serial number. The Job, Assembly, and Status fields populate automatically.
Serial Info page.
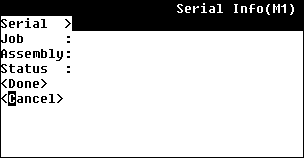
-
Choose <Done> to check the status of another serial number, or <Cancel> to return to the previous menu.
Label Printing
Labels can be printed manually or automatically at various transaction points.
The Labels menu enables you to submit requests to print labels. The following label types are available from the Mobile Manufacturing Responsibility:
-
Material
-
Serial
-
Location
-
Shipping
-
Shipping Contents
-
Flow Contents
-
LPN (available only in a warehouse management enabled organization)
-
LPN Content (available only in a warehouse management enabled organization)
-
LPN Summary (available only in a warehouse management enabled organization)
Viewing Job and Flow Schedule Information
You can query jobs and view the job details such as status, completion and scrap quantities, and scheduling information. You can also view Flow Schedule information.
To view job and assembly information:
-
Navigate to View Job/Flow Schedule page.
View Job / Flow Schedule Page with Job Selected
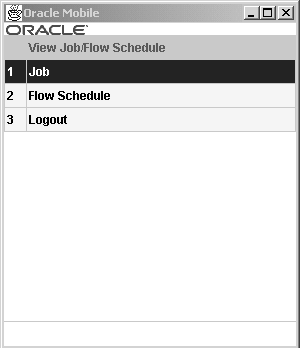
-
Choose Job.
-
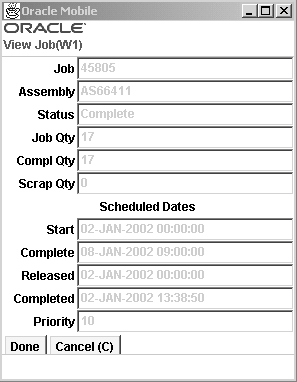
Enter or select a Job name.
Details for this specific job display, including: job priority, assembly number, job status, quantities (job, completion, scrap), and scheduled start and completion dates, whether it is closed or has a due date.
View Job Page
-
Choose <Done> to end this query.
To view flow schedule information:
-
Navigate to the View Job / Flow Schedule page.
-
Choose Flow Schedule.
-
Enter or select the Sched Num (Schedule Number) from the list of values.
Details for this specific flow schedule display, including: The Line, Status, Assembly, Dates, Plan Qty, Compl Qty, and Scrap Qty.
View Flow Schedule Page

-
Choose <Done> to end this query.
Related Topics
Discrete Job Statuses, Oracle Work in Process User's Guide
Job and Repetitive Schedule Status Changes, Oracle Work in Process User's Guide
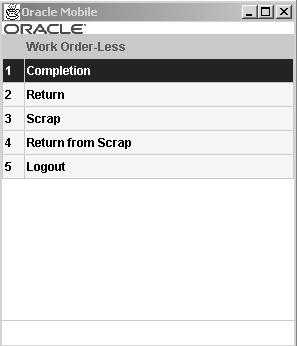
Work Order-Less Transactions
In the Work Order-Less window you can complete unscheduled assemblies to inventory, and return assemblies from inventory. You can also scrap assemblies and return assemblies from scrap. Mobile Manufacturing also supports online and background transactions for work orderless transactions.
Note: The prompts for all transaction selections on the Work Order-Less menu are the same. The window name distinguishes the transaction type, either WOL Completion, WOL Return, WOL Scrap, or WOL Return from Scrap.
Sales Order Reference Information
Sales order line information defaults only for open and active sales order statuses. Otherwise the Sales Order field is null on the Work Order-less Completions window. The following information applies to sales order defaults on this window:
-
Sales order information does not default if the original sales order line associated with the Flow schedule is cancelled or closed.
-
You can create reservations for assemblies linked to sales orders.
-
When completing unscheduled assemblies, you can select sales orders that are open for standard items or configured items in at least one of the order lines.
-
Sales order lines selected should not be linked to a discrete job.
-
If the sales order has been split into several sales order lines, the new lines do not display on the Work Order-less Completions window.
-
If the sales order has been split into new sales order lines, and only one order line is valid, that new line displays on the Work Order-less Completions window.
-
For Flow schedules with sales order reservations, you can reserve overcompletion quantities. This is set in the item master attributes for the following values:
-
Overcompletion Tolerance Type and Overcompletion Tolerance Value in the Work In Process Attribute Group
-
Over Shipment Tolerance in the Order Management Attribute Group
If the overcompletion quantity is within the over shipment tolerance value, the quantity is reserved to the sales order within that tolerance amount.
-
To create work order-less completion, scrap, and return transactions:
-
Navigate to the Work Order-Less menu.
Work Order-Less Completion window
-
Select a transaction.
Your choices are Completion, Return, Scrap, and Return from Scrap.
-
In the Assembly field—enter, select from the list of values, or scan the assembly number.
-
Enter the subinventory and if applicable locator values in the sub and loc fields. The fields may populate automatically depending the parameters you set.
WOL Page

-
For completion transactions, select the kanban number, if applicable.
-
For return, scrap, and return from scrap transactions, optionally you can select a reason for this transaction.
-
In the Qty field enter the quantity of the item you are transacting.
-
If the assembly is under lot control, enter the lot information.
-
If the assembly is under serial number control, enter the serial numbers for the completed assemblies.
-
If the components of the assembly are under serial or lot control, choose
<Components>to enter the component backflush information. -
If the component is lot controlled, enter the lot number in the Lot field.
-
Enter the lot quantity in the Lot Qty field. The total lot quantity must match the required component quantity. If necessary, you can enter more than one lot.
-
If you are performing Work Orderless Completion or Scrap transactions and if the assembly is under serial control, enter the assembly serial number in the Parent SN field to create genealogy between the component and the assembly. If you are performing Work Orderless Returns or Return from Scrap transactions, any previously created genealogy will automatically be disabled.
-
Enter the component serial number in the SN field. Enter the remaining components serial numbers as necessary.
The remaining fields indicate the number of component serial numbers, or lot numbers that require additional input.
-
Choose
<Next Component>to enter the component information for the remaining components of the assembly. -
Choose <Save> to save your work, choose <Quality> to record collection plan results, or choose <Cancel> to cancel the transaction.
When you choose <Save>, a message displays confirming your transaction is saved. You can then enter another transaction or access another transaction window.
If a mandatory quality collection plan has been set up for this assembly, you must choose <Quality> to record the results. This accesses the Quality window.
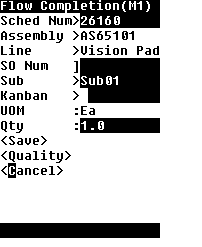
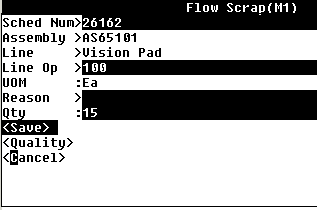
Flow Manufacturing Transactions
You can perform Oracle Flow Manufacturing completion and scrap transactions. Both of these transaction types can be queried by schedule number or assembly number. When you scrap assemblies, all components are backflushed. Mobile Manufacturing supports online and background transactions for flow manufacturing transactions.
Flow Transaction Window
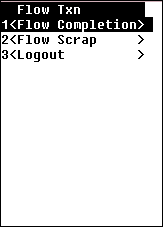
Note: The prompts for Flow transactions are similar. The window name distinguishes the transaction type either Flow Completion or Flow Scrap windows.
To create completion or scrap transactions for Flow Manufacturing assemblies:
-
Navigate to the Flow Txn window.
-
Select the transaction you want to create.
Depending on your selection, either the Flow Completion or Flow Scrap window displays.
-
Select the mode for querying the flow schedule, either by Schedule Number or Assembly number.
-
If you are entering information by Schedule, enter the schedule number in Sched Num field. If you are entering information by Assembly, scan or enter that number in the Assembly field.
-
Select the flow line in the Line field.
Flow Completion Window
-
If applicable enter the sales order number in the So Num field. If you enter a sales order the system creates a reservation as part of the mobile flow completion transaction, and transfer this reservation to inventory. Sales order number and sales order line fields are available, and when these fields are populated, the completed assemblies are reserved against the sales order and line specified.
-
Enter the subinventory in the sub field, and if applicable, enter the locator in the loc field.
-
When completing production kanban, select the kanban card number in the Kanban field.
-
The open quantity for the flow schedule is defaulted in the Qty field. you can accept the default value or change the quantity you are completing.
-
For Flow Scrap transactions, enter the Line Op and optionally select a reason for this transaction.
Note: The scrap account used here is the account setup in the WIP parameter mobile tab Default Scrap account.
Flow Scrap Page
-
If the assembly is under lot control, enter the lot information.
-
If the assembly is under serial number control, enter the serial numbers for the completed assemblies.
-
If the components of the assembly are under serial or lot control, choose
<Components>to enter the component backflush information. -
If the component is lot controlled, enter the lot number in the Lot field.
-
Enter the lot quantity in the Lot Qty field. The total lot quantity must match the required component quantity. If necessary, you can enter more than one lot.
-
If the assembly is under serial control, enter the assembly serial number in the Parent SN field to create genealogy between the component and the assembly.
-
Enter the component serial number in the SN field. Enter the remaining components serial numbers as necessary.
The remaining fields indicate the number of component serial numbers, or lot numbers that require additional input.
-
Choose
<Next Component>to enter the component information for the remaining components of the assembly. -
Choose <Save> to save your work, or choose <Quality> to record collection plan results.
When you choose <Save>, a message displays confirming your transaction is saved. You can then enter another transaction or access another transaction window.
If a mandatory quality collection plan has been set up for this assembly, you must choose <Quality> to record the results. This accesses the Quality window.
-
Choose <Cancel> if you want to cancel to the transaction.
Resource Transactions
Resources include people, tools, machines, outside processing services. They are used to cost and schedule jobs. Resource transactions are only available in background mode. You can charge resources defined in a job, as well as resources that are not defined in a job.
To charge resources to operations:
-
Navigate to the Resource Txn window.
-
In the Job field—enter, select from the list of values, or scan the discrete job.
The assembly number for the job you select defaults in the Assembly field.
Resource Transaction Page
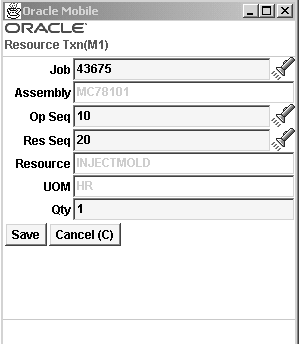
-
Select the Op Seq of the resource to charge.
-
Select the Res Seq. You can enter an existing resource in the Res Seq field, or you can enter a new resource sequence.
Resources are assigned to specific resource sequences. The resource and unit of measure displays in the Resource and UOM fields.
-
If you entered a new resource sequence, you must enter a new resource in the Resource field. You can select resources available to the department attached to the operation.
-
Enter the count of this resource used in the Qty field.
-
Save your work.
Related Topics
Charging Resources Manually, Oracle Work in Process User's Guide
Overview of Resource Management, Oracle Work in Process User's Guide
Defining a Resource, Oracle Bills of Material User's Guide
Adding and Updating Resource Requirements, Oracle Work in Process User's Guide