Navigation
This chapter covers the following topics:
- Logging On, Selecting Menu Options and Organizations
- Navigating in Mobile Supply Chain Applications
- Function Key and Action Button Mappings
- Personalization
Logging On, Selecting Menu Options and Organizations
The following procedures list the steps necessary to log on to the mobile device, select menu options, and select organizations.
Additional Information: Using Oracle Mobile Web Application with Single Sign-On (SSO): If your system is enabled with single sign-on, then you can also use your single sign-on credentials to log in to the Oracle mobile web application (MWA) server. For more information, see Logging in to the Oracle Mobile Web Application Using Single Sign-On Credentials, Oracle Mobile Supply Chain Applications Implementation Guide.
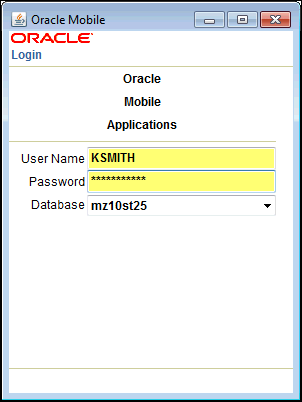
To log on to Oracle Mobile Supply Chain Applications
-
Enter your user name and corresponding password.
Mobile Applications Login window
-
Choose Enter
The Responsibility window appears displaying the Oracle Mobile Supply Chain applications.
Responsibility window
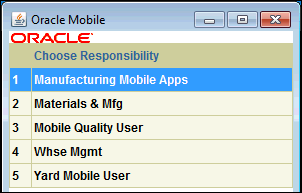
-
Navigate to the responsibility using the down arrow key on the mobile device, and choose Enter, or choose the number next to the responsibility and then choose Enter.
Selecting Menu Options and Organizations
-
Navigate to the responsibility you want to use. Menu options for that responsibility display.
-
Navigate to the menu option using the down arrow key on the mobile device, and then choose Enter, or choose the number next to the menu option.
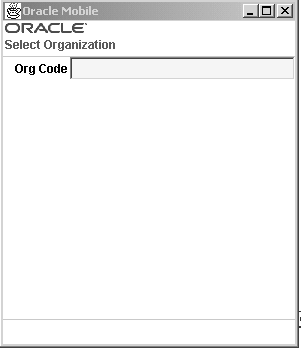
After you select a transaction, you are prompted for the Organization, the Select Organization window displays.
-
Select an organization, either by entering the value in the Org Code field, selecting from the list of values, or scanning it with your mobile device.
Organization page
The window for the transaction or inquiry you selected appears.
-
Proceed through the prompts for the transaction you selected. When you have completed the transaction, save your work.
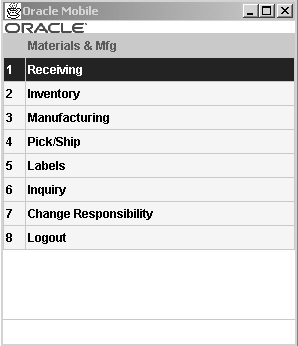
Changing Organizations and Responsibilities
-
Once you have selected an organization, the menu windows display the Change Org menu option to change the organization. Select Change Org.
-
Select an organization, either by entering the value in the Org Code field, selecting from the list of values, or scanning it with your mobile device
Materials & MFG window
-
To change responsibilities, select Change Resp.
The Responsibility menu for Oracle Mobile Supply Chain Applications displays, where you can choose a different responsibility on the menu.
Error message Already Logged In:
The error message Already Logged In appears if you use the same user ID with the same port number. If you try to connect to a different server from the MWA Dispatcher, the request may or may not be routed to the same port number. The error message does not appear if the request gets routed to a different port number.
Navigating in Mobile Supply Chain Applications
The various mobile devices used with Oracle Mobile Supply Chain Applications display different characteristics, but have common navigation patterns. You can navigate within the page displayed, enter data or select from a list of values, and use action buttons.
Some of the common characteristics are in the following list:
-
You select a menu option to perform a transaction or inquiry.
-
A page displays the fields applicable to that action.
-
Fields that allow data entry have an inverse background, display fields have no background.
-
The greater than symbol (>) at the end of a field name indicates the field uses a list of values for data validation.
-
The colon symbol (:) at the end of a field name indicates that data entry is used in this field and is not validated by a list of values.
Window List of Values Windows
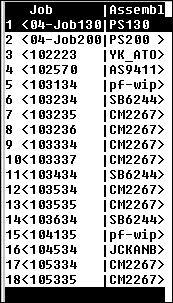
List of values window is available in prompts with greater than symbol (>) at the end of a field name. You can access the list of jobs and assemblies by:
-
Selecting the Enter key at the prompt.
-
Using the key combination Control > L. Optional fields are accessed only by this method.
-
Entering part of the value in the field, the List of Values window displays values limited to this criteria.
List of Values Window
Function Key and Action Button Mappings
Oracle Mobile Supply Chain Applications provides several commands that are accessed by function keys and action buttons. The function key default values used in Oracle Mobile Supply Chain Applications are listed in the following table. These key mappings are defaults delivered with your software and can be changed. For example, you may want to change a key mapping if your barcode scanner does not have one of the function keys listed here.
| Action | Description | Function Key | Action |
|---|---|---|---|
| Adding Information | Used to enter in more information for current transaction | More | |
| Cancel | Returns to the last menu and cancels any transaction that has not been saved | F2 | Cancel |
| Continue | Used to continue to next step of entering information for current transaction | Continue | |
| Delete | Clears the field you have entered data | Control > K | |
| Done | Return to the last menu and complete a transaction. | Done | |
| Error Messages | Displays full error message | Control > B | |
| Generate | Generates a new value for whatever field you are in. For example, if you are receiving a lot controlled item, selecting generate in the lot field creates a new lot number. | Control > G | |
| List of Values | Displays the list of values for the designated field | Control > L | Enter |
| Main Menu | Navigates to the primary menu of the transaction | Control > N | |
| Next Page | Navigates to next page of the transaction | F4 | Next |
| Page Up | Navigates to previous page | Control > D | |
| Page Down | Navigates to the next page | Control > C | |
| Previous Page | Navigates to previous page in the transaction | F3
Warning: This key is not applicable to all transactions. |
|
| Save, Next | Saves the transaction and enables you to perform another transaction | Save /Next | |
| Select Record | Selects a record | Control > S | |
| Show Key Mappings | Displays how your function keys are mapped | F1 |
Personalization
Oracle Mobile Supply Chain Applications enables you to personalize the user interface to suit your individual preferences. Personalization can be performed at the following levels:
-
Responsibility level
-
Organization level
-
Function level
Using Personalization enables you to:
-
Hide fields and buttons
-
Change the names of fields and buttons
-
Provide default values within fields
-
Copy and paste a value from one field into another
-
Change a field to read-only
-
Change a non-mandatory field to mandatory
-
Enable or disable the LPN descriptive flex field or set it as read-only
You can hide any field on a page provided the following is true:
-
The field is not required
-
The field is required and you have provided a default value
-
The field is display only
You can make fields read-only provided the following is true:
-
The field is not required
-
The field is required and you have provided a default value
Note: In the Personalization Field Properties page, when you set the field property Rendered to False, the field typically will not display on the mobile page. However, in some situations, the field appears on the mobile page even when the Rendered value is set to False. This occurs when a default value is assigned to the field which causes the WMS code to temporarily display the field (until you tab out of it).
For more information about personalizing the MSCA pages, see My Oracle Support Knowledge Document 469339.1, Oracle MWA Personalization Framework.