Setting Up
This chapter covers the following topics:
- Overview of Oracle Warehouse Management Setup
- Setting Up a Warehouse Organization
- Setting Up Subinventory Parameters
- Setting Up Locator Parameters
- Setting Up Locator Zones
- Material Setup
- Defining Shipping Parameters
- Implementing Profile Options
Overview of Oracle Warehouse Management Setup
Note: Oracle Warehouse Management System setup assumes that you have knowledge of Oracle Inventory, Oracle Bills of Material, Oracle Receiving, Oracle Order Management, Oracle Shipping, and Oracle Project Manufacturing.
This section provides an overview of the setup requirements for Oracle Warehouse Management system (WMS). For instructions, see the detailed setup instructions that are associated with each step.
Setting up Oracle WMS includes setting up related Oracle applications, such as Oracle Inventory and Oracle Bills of Material. Therefore, you might only need to make WMS modifications specific to existing data, like existing items. Check with your implementation team to determine which setup requirements have already been fulfilled.
Oracle Warehouse Management system requires that Oracle Inventory, Oracle Purchasing (Receiving), and Oracle Order Management (Shipping) are installed and set up.
Set up Oracle Inventory as described in Overview of Setting Up., Inventory User's Guide
Set up Oracle Bills of Material as described in, Overview of Setting Up, Oracle Bill of Material User's Guide
Set up Oracle Purchasing as described in Overview of Setting Up, Oracle Purchasing User's Guide.
Set up Oracle Cost Management as described in Overview of Setting Up, Oracle Cost Management User's Guide
Set up Oracle Quality as described in Overview of Setting Up, Oracle Quality User's Guide
Warehouse Setup
Warehouse configuration requires that you set up your warehouse as an inventory organization, and then select parameters that identify the organization as a warehouse. Warehouse configuration also includes defining the appropriate subinventories to represent the zones within your warehouse, as well as defining appropriate locators, and assigning dock doors to their related staging lanes.
Note: When you set up your organization parameters, you should specify a default cost group. Therefore, you should set up the default cost group before setting up the organization.
The following list provides the attributes in Oracle Inventory that you set up for warehouse related organizations:
-
Organization parameters
-
WMS enabled check box
-
Default cost group
-
Serial control generation
-
License Plate Number (LPN) information
-
Capacity weight and volume unit of measures
-
Crossdocking information
-
Time zone
-
Default cycle count header
-
Default picking rule
-
Default put away rule
-
Cartonization option
-
Default pick task type
-
Default replenishment task type
-
Default move order transfer task type
-
Default move order issue task type
-
Putaway tasks
-
Maximum clusters
-
Outbound consolidation plan
-
-
Subinventory attributes
-
Subinventory status
-
Default cost group
-
Cartonization option
-
LPN controlled option
-
Locator controlled option
-
Default locator status
-
Picking unit of measure (UOM)
-
Picking order (functionality change)
-
-
Locator attributes
-
Locator type
-
Locator status
-
Locator capacity
-
Pick UOM associated with the locator
-
Locator dimensions (length, width, and height)
-
Locator coordinates (X, Y, and Z)
-
-
Dock door to staging lane relationships
To set up a warehouse, set up an inventory organization and make modifications as described in the following instructions. For specific instructions on setting up organizations, see: Defining Default Inventory Parameters, Oracle Inventory User's Guide.
Setting Up a Warehouse Organization
The following section describes the process for setting up a warehouse organization.
-
Set up the warehouse organization (Organization window).
-
Set up the inventory parameters (Organization Parameters window).
-
Set up the other account parameters (Organization Parameters window).
-
Set up the warehouse parameters (Organization Parameters window).
-
Set up the warehouse task management parameters (Organization Parameters window).
To set up the warehouse organization
-
Navigate to the Organization window.
-
Set up your warehouse organization in the same way in which you set up a standard inventory organization. In the Organization window, make sure to specify an organization classification of Inventory Organization.
-
After you set up standard organization information, save your work, and then navigate to the Organization Parameters window. For more information about setting organization parameters see: Defining Default Inventory Parameters, Oracle Inventory User's Guide
Important: If a single organization is defined, it is the default organization for all transactions; however, if multiple organizations are defined, then you select the appropriate organization while using the various features of the Oracle Warehouse Management application.
To set up the inventory parameters (Organization Parameters window)
-
In addition to specifying the standard organization parameters, set up the following parameters for the Warehouse organization:
-
Select the WMS Enabled check box to specify this organization as a warehouse management organization.
Subinventories in a Oracle Warehouse Management enabled organization must be locator controlled even if only one locator exists in each subinventory. You must make all subinventories in your organization locator controlled before you can set the WMS Enabled flag in the Organization Parameters window for a preexisting, organization.
Because every item in a subinventory for organizations that do not have Oracle Warehouse Management enabled must have the same cost group, you cannot switch Oracle Warehouse Management enabled organizations with on-hand balances to a standard inventory organization without significant effort. Consequently, do not select the WMS Enabled parameter, until you decide to implement Oracle Warehouse Management methodologies in the organization.
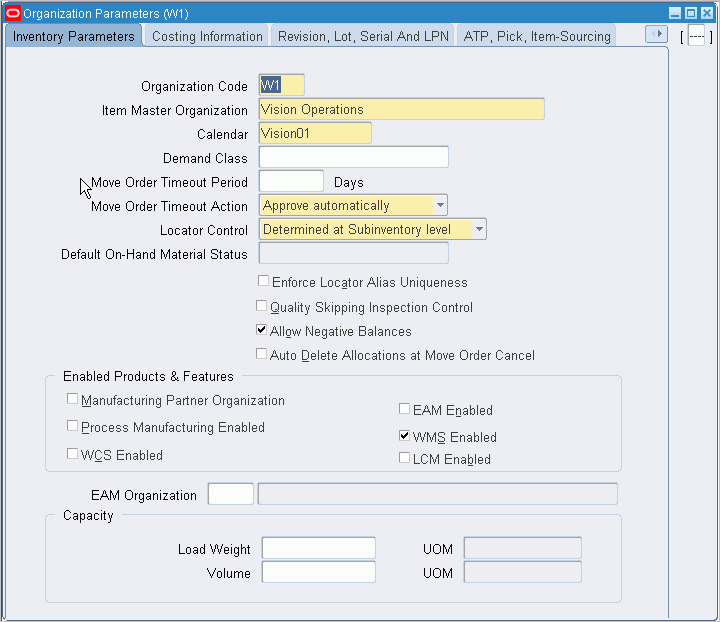
-
If you specify an organization as warehouse management enabled, you can use LPNs, task management, cost groups, rules, and other warehouse management functionality in this organization. If the organization is not warehouse management enabled, but you licensed and installed Oracle Warehouse Management, as a product, you can use material status, lot and serial attributes, and lot split and merge.
-
In an existing standard cost organization, do not enable warehouse management for the organization if transactions exist in a current open period. If you want to enable Oracle Warehouse Management for the organization, wait until the end of the current period, close the period, and enable Oracle Warehouse Management for the organization before transactions are posted for the new period.
-
-
Select WCS Enabled to enable the Warehouse Control System. The Warehouse Control System provides a bridge between Oracle Warehouse Management and the control level for device automation and configuration as well as coordination of Oracle Warehouse Management directed task execution.
To set up the other account parameters (Organization Parameters window)
On the Other Accounts tab, select the default receiving accounts, profit and loss accounts, and other accounts (such as the additional account for catch weight transactions).
For more information, see Oracle Inventory User's Guide, Defining Other Accounts Parameters.
To set up warehouse parameters (Organization Parameters window)
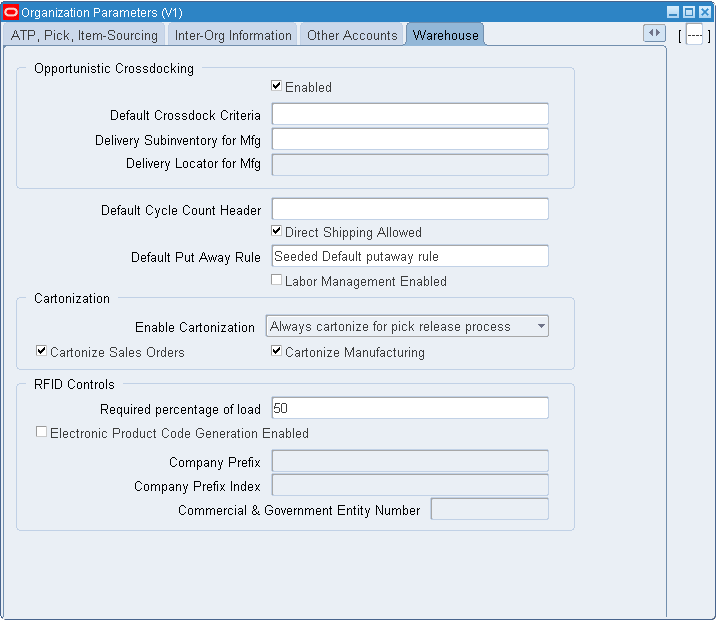
-
Select the Enabled check box in the Opportunistic Crossdocking region to indicate whether you want the system to direct the user to crossdock material to meet demand from a backordered order. If you select this check box, then you can create a default crossdocking rule for opportunistic crossdocking.
-
Enter a default crossdock criteria rule. This is the default opportunistic crossdock criteria for the organization. To use opportunistic crossdocking, you must set up valid opportunistic crossdock criteria. If you do not set up criteria in the rules workbench, and you do not define default criteria for the organization, opportunistic crossdocking does not function. For more information about crossdock criteria, see Crossdocking Criteria
-
Enter a Delivery Subinventory for Mfg and a Delivery Locator for Mfg if you enabled crossdocking for the organization. Though the system transfers crossdocked directly from receiving to WIP, it must record a purchase order receipt and WIP issue transaction for costing and other technical reasons. The subinventory and locator you enter here are where the system posts the transaction.
-
Optionally, enter the Default Cycle Count Header that is used to request cycle counts.
-
Select the Direct Shipping Allowed check box to allow direct shipping for the organization.
-
Select the appropriate put away rule. If the system cannot find a matching rule or strategy in the Rules Workbench, the system uses this rule to allocate space or materials.
-
Select the Labor Management Enabled check box to enable labor management reporting for the organization.
-
Select the Enforce Locator Alias Uniqueness check box to require that locator names be unique across subinventories within the organization.
-
In the Enable Cartonization field, select the default option to control cartonization during pick release or task release. (The cartonization process suggests the type of container to use during picking.) Select from the following options:
-
Always cartonize for pick release process: The system cartonizes pick released lines regardless from which inventory they were allocated.
-
Never cartonize: The system does not cartonize pick released lines.
-
Cartonize for pick release process at subinventory level: The system first evaluates the cartonization check box on the subinventory definition before cartonizing pick released lines.
-
Always cartonize for task release process.
-
Cartonize for task release process at subinventory level.
For information on how the task release options affect the task release process, see the Oracle Warehouse Management User's Guide, Setting Up Task Release Options, and Launch Task Release Concurrent Request.
-
-
Indicate whether cartonization is performed during sales order pick release or manufacturing component pick release. The system can use different pick methodologies for these different business flows.
Important: The concurrent program Launch Task Release does not support manufacturing (MFG) tasks releasing. It only supports the releases for outbound tasks.
-
In the RFID Controls region, enter the minimum percentage required for a complete LPN in the Required percentage of load field.
-
Select the Electronic Product Code Generation Enabled check box to enable electronic product code (EPC) for outbound documents.
-
Enter the company prefix. This field identifies the company prefix for EPC generation in 96 bit tags. This field is enabled only if you enable Electronic Product Code Generation Enabled.
-
Enter the company prefix index. This field identifies the company prefix for EPG generation in 64 bit tags. This field is enabled only if you enable Electronic Product Code Generation Enabled.
-
Enter the Commercial & Government Entity Number (CAGE). This field identifies the company CAGE number for RFID tag generation for Department of Defense (DoD) specification. This field is enabled only if you enable Electronic Product Code Generation Enabled.
Set up the warehouse task management parameters (Organization Parameters window)
-
On the Warehouse Task Management tab, in the Pick Task Type and Replenish Task Type, specify default picking and replenishment task types that are required for your warehouse. If no task type rule with the right system task type and all restrictions being met can be found, then this task type will be used for the task.
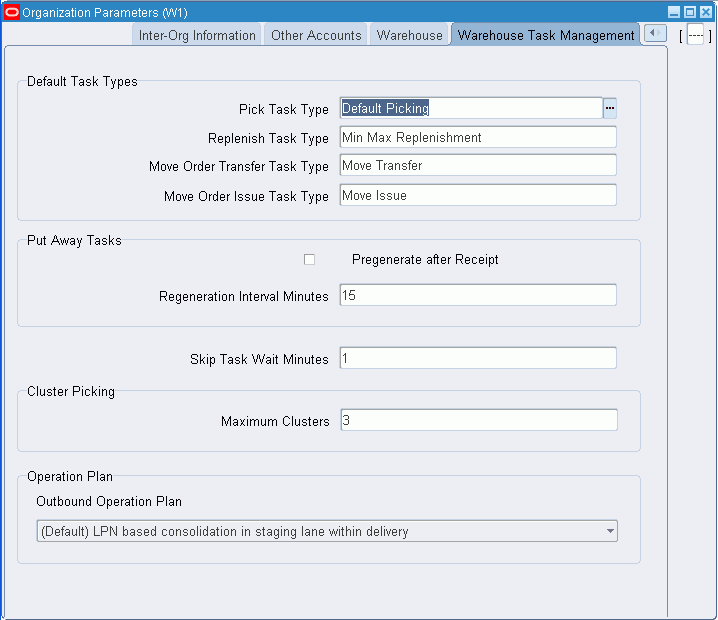
-
In the Move Order Transfer Task Type and Move Order Issue Task Type fields, specify the default move order transfer and move order issue task types. If no task type rule with the right system task type and all restrictions being met can be found, then this task type will be used for the task.
-
In the Put Away Tasks region, select the Pregenerate after Receipt check box to specify whether the system should allocate space for the material when items are initially received.
Important: The Pregenerate after Receipt check box must be selected for the Inbound Inspection operation plan to function correctly.
-
If you do not select the Pregenerate after Receipt check box, the system will allocate space only after the user initiates the put away process.
-
In the Put Away Tasks region, select the Dispatch Inbound Tasks check box to start a concurrent program that will specify the inbound tasks that can be dispatched. Selecting this check box filters the LPN LOV to display only the outermost LPN for inbound tasks; only the outermost LPN can be dispatched. A + (plus) sign in the Tasks window indicates that it is a parent task and includes child tasks.
-
With a value in the Regeneration Interval Minutes field, if you elected to pre generate put away tasks, these tasks/suggestions will get regenerated if the elapsed time between initial pre generation and actual put away exceeds the value given in the Regeneration Interval Minutes field. This is done so the suggested storage locations can be updated based on the latest space availability estimates.
-
Enter a value for Skip Task Wait Minutes. This is the number of minutes that a task skipped by a user will be held by the system before it is returned to the pool of pending tasks to be dispatched again.
-
In the Cluster Picking region, enter the maximum clusters for cluster picking. This is an optional field. Mobile users will see this as the default value in the Max Clusters field in the Cluster Picking mobile screen.
-
In the Consolidation region, enter the outbound consolidation plan. The outbound consolidation plan has three options:
-
LPN
If LPN based consolidation is selected, all picked material that has to be consolidated together are directed to be dropped into the same License Plate Number.
LPN based consolidation is the default option and ensures current system behavior is retained for existing customers who want to continue operating their facility as-is.
-
Locator
If Locator based consolidation is selected, picked material is consolidated into locators.
-
Locator and LPN
If Locator and LPN based consolidation is selected, picked material is consolidated into locators. In addition, consolidation LPN suggestions within the consolidation locator are provided.
-
-
Save your work.
Related Topics
Defining Costing Information, Oracle Inventory User's Guide
Defining Revision, Lot, Serial, LPN Parameters, Oracle Inventory User's Guide
Defining ATP, Pick, Item-Sourcing Parameters, Oracle Inventory User's Guide
Defining Inter-Organization Information, Oracle Inventory User's Guide
Defining Other Account Parameters, Oracle Inventory User's Guide
Defining Valuation and Other Accounts, Oracle Inventory User's Guide
Defining Inter-Organization Transfer Accounts, Oracle Inventory User's Guide
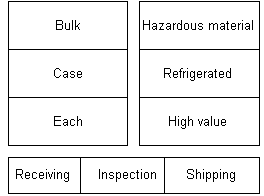
Setting Up Subinventory Parameters
In Oracle Warehouse Management, the subinventory represents the physical zones of a warehouse or facility.
You need to define at least one subinventory for each warehouse organization. The following figure illustrates subinventories that you might define for a warehouse.
Warehouse Zones
Note: Unlike Oracle Inventory, for warehouse subinventories, you do not need to set up or associate any accounts with the subinventory.
Oracle Warehouse Management extends the subinventory definition with the following additional parameters:
-
Material status
-
Default cost group
-
LPN controlled option
-
Cartonization flag
-
Pick UOM
-
Picking order
-
Dropping order
-
Default locator status
To define warehouse parameters (Warehouse tab)
The Warehouse tab on the Subinventories window is available only if Oracle Warehouse Management (WMS) is installed and enabled for your organization. (WMS is enabled when the WMS Enabled check box is selected in the Organization Parameters window.)
-
Navigate to the Subinventories window.
-
Select the Warehouse tab.
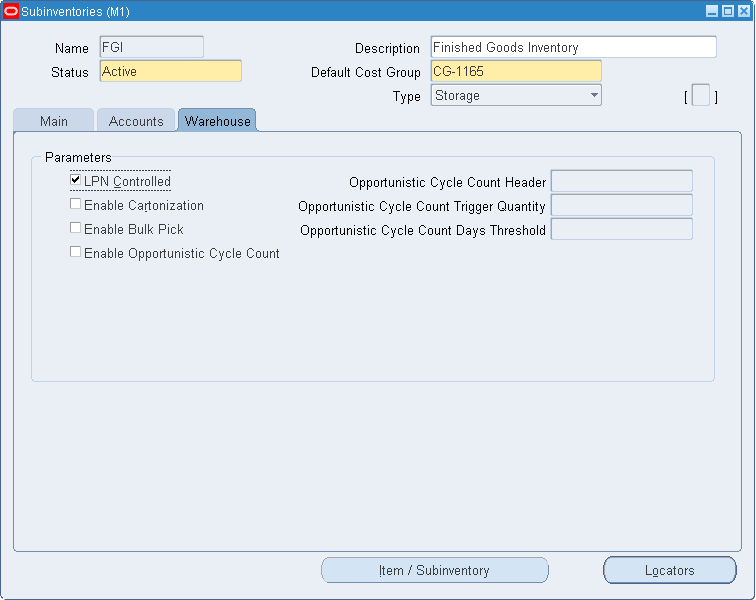
-
Enter the desired values:
Field Description LPN Controlled Select this option to enable LPN controlled material in the subinventory. Enable Cartonization Select this option to enable cartonization for this subinventory. Enable Bulk Pick Select this option to enable bulk pick for this subinventory. -
The following fields define the default controls for opportunistic cycle counting:
-
Enable Opportunistic Cycle Count
-
Opportunistic Cycle Count Header
-
Opportunistic Cycle Count Trigger Quantity
-
Opportunistic Cycle Count Days Threshold
For complete information on using these fields for opportunistic cycle counting, see Setting Up Opportunistic Cycle Counting.
-
Related Topics
For more information on subinventories, see Defining Subinventories, Inventory User's Guide.
Setting Up Locator Parameters
Locators identify physical areas within subinventories where you store items, such as rack/bin or aisle/row/bin locations. You set up storage locations, dock doors, staging lanes, consolidation locations, and packing stations as locators. For detailed instructions on how to set up locators, see:Defining Stock Locators, Inventory User's Guide .
Stock Locators in an Oracle Warehouse Management Enabled Project Manufacturing Organization
The same definition of stock locators used in Oracle Inventory is used in Oracle Warehouse Management, but it may not be feasible for Oracle Warehouse Management users to affix multiple location labels to the same physical warehouse shelf. If the material in the location is not labeled with the project and task, the user may inadvertently scan the wrong location label and pick material from an incorrect project. To alleviate this problem, Oracle Warehouse Management has removed the project and task segments from the locator field in all mobile user interfaces. Users will instead see or scan the project and task in separate fields on each page. The system will convert the physical locator scanned to the logical project and task locator behind the scenes. The transaction in Oracle Inventory will be posted with the appropriate project and task locator.
Oracle Warehouse Management differentiates the actual locator in Oracle Inventory from the locator that the user scans by using the term Logical Locator. Logical Locator is used to indicate the stock locator, including project and task. Physical Locator is used to indicate the stock locator without the project and task. One physical locator may have multiple corresponding logical locators if material for more than one project and task combination is stored in that location.
Defining Stock Locators with Project Manufacturing
You can define a Physical Stock Locator that you want to receive project material against. When the system performs a receipt for a project into inventory, a corresponding Logical Locator with project and task information will be created. Logical Locators can be viewed in the Stock Locator window.
The example above indicates the following:
-
The Physical Locator is B1.1.1
-
The Logical Locator is B1.1.1.lr-042202.2, where lr-042202 is the project number and 2 is the task
An unlimited number of project/task combinations can be associated to a single Physical Locator.
Setting Up Consolidation and Packing Station Locators
You set up consolidation and packing station locators the same as you do other subinventory locators. However, when you set them up, you specify a consolidation and packing station with locator types of Consolidation and Packing Station, respectively.
You can also enter a sequence number in the Dropping Order field, so the system can determine the locator sequence in which picked material should be dropped for consolidation. When a picked LPN is scanned for a consolidation drop, the consolidation logic determines the drop locator in ascending dropping order. If the dropping order is not set up, the system uses the existing picking order if it is defined. If neither are defined, drop locators are determined in a random fashion.
You set up consolidation locators exclusively for the purpose of consolidation. The consolidation locator provides a distinction between consolidation locators and other locators such as staging and stock. The consolidation locators and staging locators need to belong to the same subinventory.
-
Create a subinventory.
-
In the subinventory, create locators with locator type Staging to map to the actual physical staging lanes.
-
In the same subinventory, create locators with locator type Consolidation to map to the actual number of physical consolidation locators.
If Locator based or Locator and LPN based consolidation is desired, creation of consolidation locators is mandatory. If Locator based or Locator and LPN based consolidation is desired and consolidation locators are not set up, the system will only perform the default LPN based consolidation.
You can optionally set up packing station locators if you want to perform packing after consolidation and prior to staging. The packing station is physically located in the locator. This enables you to get a real time picture of where the material exists at any given instance. If packing needs to be performed, material/LPNs should be moved to the packing stations so the consolidation locators are free for other incoming material.
Setting Up Dock Door to Staging Lane Relationships
In Oracle Warehouse Management, dock doors and staging lanes are both defined as stock locators.
If you use Oracle Shipping Execution to plan trips for departures from your warehouse or facility, Oracle Warehouse Management enables you to schedule appointments for dock doors from which to load the LPNs for a specific trip.
The system can automatically select staging lanes near the scheduled dock door in which to stage the material prior to shipment. However, for the system to automatically select staging lanes, you must set up dock doors and staging lanes. After you set them up, you must define relationships between the dock doors and the staging lanes that service them.
Note: With Oracle Warehouse Management, whether or not you are using trips and dock door appointments, you must create at least one staging lane.
The following figure provides an example of staging lane, dock door, and shipping dock relationships.
Staging Lane and Dock Door Relationships
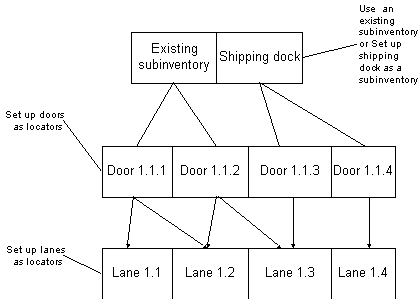
Note: You do not need to create a new subinventory just to define dock door and staging lane locators. You can define dock door and staging lane locators as part of another existing storage subinventory. However, defining a separate subinventory excludes the dock door-defined subinventory from cycle counts. This prevents a staged item, in the process of being loaded onto a vehicle, from being included in the cycle count. Also note that staging lanes should be assigned to a subinventory.
You set up staging lanes and dock doors the same as you do other subinventory locators. However, when you set them up, you specify a staging lanes and dock doors with locator types of Staging Lane and Dock Door, respectively.
Note: It is recommended that you do not set capacity constraints for staging lanes and dock doors, because material allocation processes might fail due to limited space in a staging lane.
Dock Door Integration with Oracle Transportation Management
Integrating Oracle Transportation Management with Oracle Warehouse Management can improve shipment processing and capacity usage by providing more accurate committed dock appointments and load sequencing information. To use the Oracle Transportation Management appointment and load sequencing features in Oracle Warehouse Management, you need to synchronize dock door information and organization location information with Oracle Transportation Management (OTM).
When Oracle Transportation Management is integrated with Oracle Warehouse Management, you can optimize dock door usage, ensure dock doors are synchronized with the transportation plan, and stage material accurately to the correct dock door. You can use Oracle Transportation Management to maintain all dock door appointments and send the trip-related appointments to Oracle Warehouse Management.
For more information, see the Oracle Transportation Management Integrating Oracle Transportation Management with Oracle E-Business Suite guide.
-
Navigate to the Associate Staging Lanes to Dock Door window.
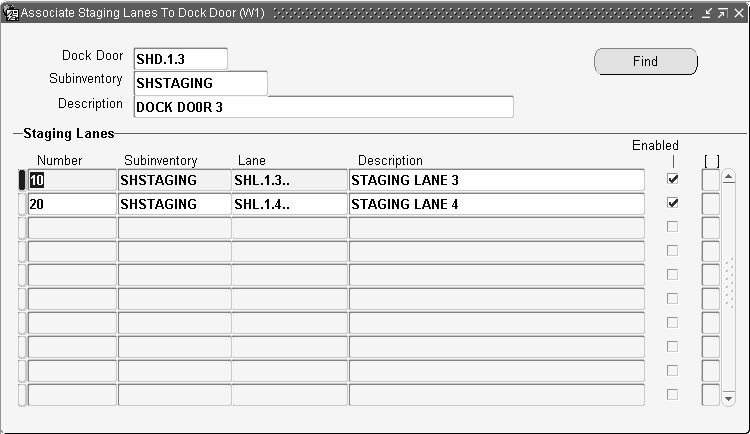
-
In the Dock Door field, use the list of values to select the dock door that you want to assign a staging lane.
The system automatically populates the Subinventory and Description fields.
-
In the Staging Lanes region, Number field, enter a sequence number that represents the proximity of the staging lane to the dock door.
When selecting a staging lane, Oracle Warehouse Management will select an available staging lane in the order of the sequence indicated here.
-
In the Staging Lanes region, Subinventory field, enter the subinventory and locator of the staging lane that serves the dock door.
-
Save your work.
Related Topics
Defining Stock Locators, Oracle Inventory User's Guide
Setting Up Locator Zones
A zone is a logical grouping of locators. A zone may represent a specific work area(s) such as a Packing station(s) or it may just indicate an area where material movement occurs. The locators for a zone may span one or more subinventories
You can specify a zone for an operation when you define the operation plan. This association determines the candidate set of locators where the particular operation is performed. You can use zones to define the path that material takes in the course of completing an activity. Defining zones is not mandatory especially if the warehouse is small and the operations are not complex where subinventories and/or locators could suffice.
Labor Planning Zone and Locator Restrictions
A locator that exists in one zone of type labor planning cannot exist in another zone of type labor planning. However, the locator may exist in one or more zones of type ATF (zones associated with Advanced Task Framework).
Consider the following example: a warehouse manager creates a zone named BULKlabor of type Labor Planning Zone for bulk picking employees and adds the following locators within the BULK subinventory: (B1.1.1, B1.1.2, B1.2.1, B1.2.2, B1.3.1, B1.3.2, B1.4.1, B1.4.2). The bulk area of the warehouse is quite large, so the warehouse manager creates two zones: one for picking and another for put away within the BULK subinventory. The warehouse manager creates the following two zones of type ATF Zone for picking and put away: BULKpick1 and BULKpick2 . The warehouse manager adds the following locators to each zone:
-
BULKpick1: B1.1.1, B1.1.2, and B1.2.1
-
BULKpick2: B1.2.2, B1.3.1, and B1.3.2
Because BULKpick1 and BULKpick2 are of zone type ATF Zone, the warehouse manager can add the locators to those zones. However, this would not be possible for zones of type labor planning zone.
To set up locator zones
-
Navigate to the Zones Summary window.
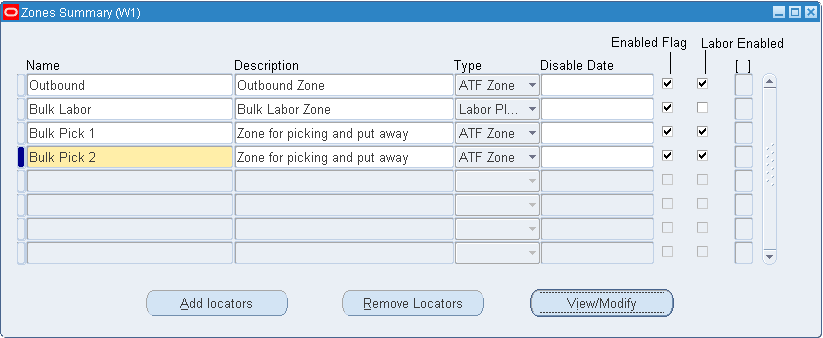
-
Enter the name of the zone in the Name field.
-
Optionally, enter a description of the zone in the Description field.
-
Select the type of zone:
-
ATF Zone (zones associated with Advanced Task Framework): This is the default value for existing customers who use zones. You can add locators to multiple ATF zones so that a locator in one ATF zone can exist in many ATF zones.
-
Labor Planning Zone: Select this zone to enable labor planning calculations for wave planning.
Important: A locator that exists in one zone of type labor planning cannot exist in another zone of type labor planning. However, a locator may exist in one or more zones of type ATF (zones associated with Advanced Task Framework).
-
-
Optionally, select a Disable Date from the list of values. If you enter a date in this field, the zone is disabled on this date.
-
Select the Enabled Flag to enable the zone.
-
Select the Labor Enabled check box to enable labor planning for the zone. However, if Labor Planning Zone is selected as the zone, then the Labor Enabled check box is disabled for the row.
-
Save your work.
-
Choose View/Modify to open the View Modify Locators window.
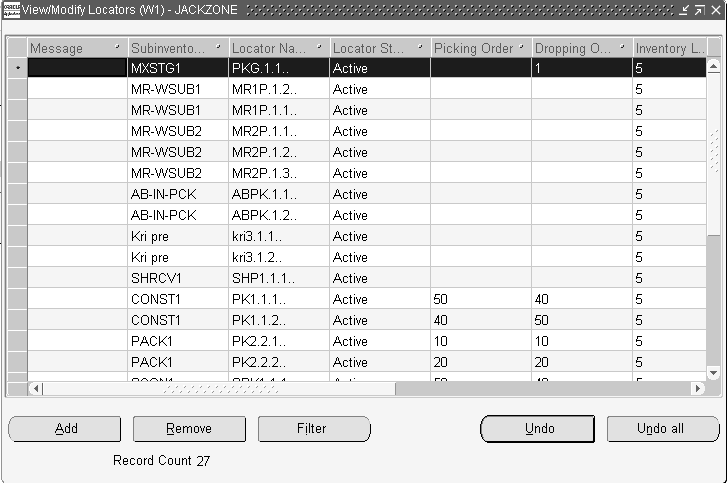
The locators window contains the following fields:
-
Message
-
Subinventory
-
Locator Name
-
Locator Status
-
Picking Order
-
Dropping Order
-
Inventory Location Type
-
Locator Disable Date
-
Locator Type Meaning
-
Subinventory Status
-
Subinventory Type
To sort the locator information by a particular field, select the field name in the header row.
-
To Filter Locators
-
Navigate to the Locators window.
-
Choose Filter
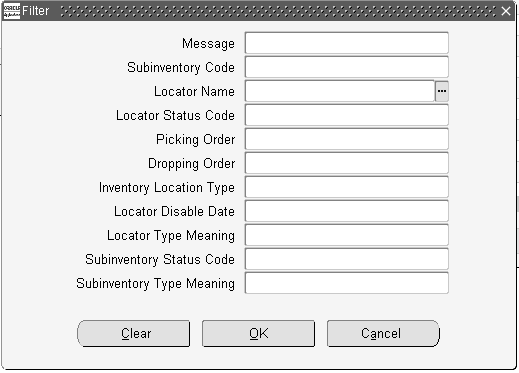
-
Choose the filter criteria. The criteria are as follows:
-
Message
-
Subinventory Code
-
Locator Name
-
Locator Status Code
-
Picking Order
-
Dropping Order
-
Inventory Location Type
-
Locator Disable Type
-
Locator Type Meaning
-
Subinventory Status Code
-
Subinventory Type Meaning
-
-
Choose Ok to add apply the filters, choose Clear to clear the fields, or choose Cancel to cancel the locator additions.
To Refresh the Locators Window
-
To refresh the locators window to view the most current information, choose Refresh.
To Add Locators to a Zone
-
Choose Add from the Zones Summary window.
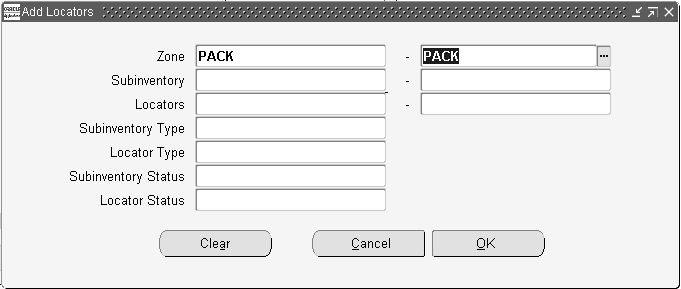
-
Optionally, select a zone, or range of zones from the list of values to create zones within a zone.
Note: If you choose to select a zone or range of zones, you cannot select a subinventory or locator.
-
Optionally, select a subinventory, or a range of subinventories from the list of values. If the subinventory, or subinventory range does not contain any locators, you cannot enter and locators in the Locators field.
-
Optionally, select a locator or range of locators from the list of values. You also have the option to select All locators within the subinventory or subinventories.
-
Optionally, enter the subinventory type the available types are Storage and Receiving. See: Defining Subinventories, Oracle Inventory User's Guide.
-
Optionally, enter the locator type, the available types are: Consolidation Locator, Dock Door, Inspection Station, Packing Station, Receiving, Staging Lane, and Storage Locator. For more information see: Defining Stock Locators, Oracle Inventory User's Guide .
-
Optionally, select the Subinventory Status from the list of values.
-
Optionally, select the Locator Status from the list of values.
-
Choose Ok to add the Locators to the zone, choose Clear to clear the fields, or choose Cancel to cancel the locator additions.
-
To add more locators to the zone repeat the procedure.
-
Save your work.
To Remove Locators from a Zone
-
Navigate to the Zone Summary window.
-
Choose Remove Locators.
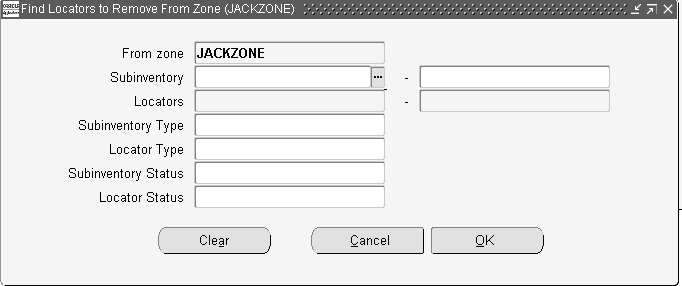
-
Enter the locators to remove from the zone.
-
Choose OK, to remove the locators, Clear, to clear the information from the window, or Cancel to cancel.
Related Topics
Set Up Operation Plans, Oracle Warehouse Management User's Guide
Defining Stock Locators, Oracle Inventory User's Guide
Defining Subinventories, Oracle Inventory User's Guide
Material Setup
In addition to setting up Oracle Warehouse Management related item attributes, you use the same item setup steps that you do for setting up items in Oracle Inventory. For instructions on how to set up inventory items, see: Defining Items, Oracle Inventory User's Guide.
Oracle Warehouse Management enables you to enter an item's dimensions. The system uses these dimensions to calculate space availability when generating put away suggestions, and to determine the appropriate container size when making cartonization suggestions.
Note: To make put away and cartonization suggestions, you must make sure that the units of measure used to indicate weight, volume, and dimensions of the item can be converted into the unit of measure that is used to indicate the locator capacity and container item capacity.
Note: To use item dimensions for cartonization, set up the length, width, height, and unit of measure of both the item being packed and the containers which are available to be packed. The fields are optional, and if they are not entered, cartonization will not use them. Specifically, if one of the values is blank for an item being packed, it will be assumed to be 0. If one of the values is blank for a container that is available to be packed, it will be assumed to be infinite.
Defining Shipping Parameters
Use the Shipping Parameters window, which is part of the Oracle Shipping Execution, to enter the shipping parameters for your warehouse. See: Defining Shipping Parameters, Oracle Order Management Suite Implementation Guide for more information.
Implementing Profile Options
During implementation, you set a value for each user profile option to specify how Oracle Warehouse Management controls access to and processes data.
The table below indicates whether you (the user) can view or update the profile option and at which System Administrator levels the profile options can be updated: at the user, responsibility, application, or site levels. The second column, User, references the user, while the next four columns, User, Resp, App, and Site, reference the System Administrator. The last two columns, Required and Default Value, reference requirements.
A required profile option requires you to provide a value. An optional profile option already provides a default value, so you only need to change it if you do not want to accept the default.
| Profile Option | User | Sys Admin User | Sys Admin Resp | Sys Admin App | Sys Admin Site | Req'd | Default Value |
|---|---|---|---|---|---|---|---|
| WMS: Allow Mixed Statuses in an LPN | -- | Yes | Yes | Yes | Yes | -- | -- |
| WMS: Assign Task Types | Y | Y | Y | Y | Y | Y | Yes |
| WMS: Barcode Font Name | Y | N | N | N | Y | N | Sales Order |
| WMS: Barcode Type | Y | N | N | N | Y | N | - |
| WMS: Default Source Type for Control Board | Y | Y | Y | Y | Y | N | - |
| WMS: Deployment Mode | N | N | N | N | Y | N | N |
| WMS: EPC ASN LPN import column | N | N | N | N | Y | N | EPC |
| WMS: EPC ASN Serial import column | N | N | N | N | Y | N | ATTRIBUTE1 |
| WMS: EPC Generation Encoding | N | N | N | N | Y | N | Hex |
| WMS: Express Returns | Y | Y | Y | Y | Y | N | - |
| WMS: Ignore Equipment | N | N | N | N | Y | N | - |
| WMS: Item/Revision Delimiter | Y | N | Y | N | Y | N | - |
| WMS: Label Print Mode | Y | Y | Y | Y | Y | Y | Asynchronous |
| WMS: Label Printing for Cycle Count | Y | Y | Y | Y | Y | Y | At Approval |
| WMS: Label file prefix | Y | Y | Y | Y | Y | Y | LBL |
| WMS: Label output directory | Y | Y | Y | Y | Y | Y | /dbfiles/applcsf/outbound |
| WMS: PO Number/Line Delimiter | Y | N | Y | N | Y | N | - |
| WMS: RFID User | N | N | N | N | Y | N | - |
| WMS: Sequence Picks Across Waves | Y | Y | Y | N | Y | Y | No |
| WMS: Subinventory/Locator Delimiter | Y | N | Y | N | Y | N | - |
| WMS: Synchronous TCP/IP label request delay | Y | Y | Y | Y | Y | N | 0 |
| WMS: Verify Own Picks | Y | N | N | N | N | N | - |
Y = You can update the profile option value.
N = You can view the profile option value but you cannot change it.
WMS: Allow Mixed Statuses in an LPN
Controls whether material of different material statuses can be packed in to the same LPN. It has the following values:
-
No: You cannot pack material with different material statuses into the same LPN.
-
Yes: You can pack material with different material statuses into the same LPN. The LPN status will then appear as mixed and the on-hand stock within the LPN will retain its individual statuses.
Note: To allow mixed statuses within an LPN you must enable on-hand material status for the organization.
WMS: Assign Task Types
This profile option indicates if task type stamping, cartonization, task consolidation and task splitting occur during pick release. The default value for this profile option is Yes. If you select yes, task type stamping, cartonization and task consolidation occurs. If you select No, task type stamping, cartonization and task consolidation does not occur. This profile is changeable at all levels.
WMS: Barcode Font Name
This profile is used for the Shipment Schedule report. This report supports barcodes. You indicate the barcode font you want to use.
WMS: Barcode Type
This profile is used for the Shipment Schedule report. This report supports barcodes. You indicate the barcode type you want to use.
WMS: Default Source Type for Control Board
This profile option determines the default task source for the warehouse control board query. It has the following values:
-
Cycle Count
-
Internal Order
-
Internal Requisition
-
Job or Schedule
-
Move Order
-
Purchase Order
-
RMA
-
Sales Order
This profile option is updateable at all levels.
WMS: Deployment Mode
This profile option determines the deployment option for the instance. The available options are:
-
Integrated Instance: This is the integrated enterprise resource planning (ERP) instance.
-
Distributed Deployment: This is the distributed Oracle Warehouse Management (WMS) instance that enables WMS to be deployed in a distributed manner, that is, independent of the ERP instance.
-
LSP: This provides multi-client support for the logistics service provider (LSP) industry.
This profile option can be updated only at the site level.
WMS: EPC ASN LPN import column
This profile option specifies which column is populated for EPC for the LPN in the wms_lpn_interface table
This profile option is updateable only at the site level.
WMS: EPC ASN Serial import column
This profile option specifies which column is populated EPC for the serial in the mtl_serial_numbers_interface table.
This profile option is updateable only at the site level.
WMS: EPC Generation Encoding
This profile option specifies the number system in which EPC provides information to labels. The available values are binary, hex, and decimal.
This profile option is updateable only at the site level.
WMS: Express Returns
Oracle Warehouse Management offers a one step or a two step process for returns. This option is determined by the WMS: Express Returns profile option. By disabling this option, you can perform a two step return process where, for example, a manager can initiate the return (step 1) and a picker can retrieve the material and deliver it to shipping (step 2). Otherwise, the return transaction is initiated and completed in one step.
WMS: Ignore Equipment
This profile option determines the meaning of a blank equipment field on the task sign-on page. The available values are Yes and No.
WMS: Item/Revision Delimiter
This profile can be set at the site level and is applicable to both the Oracle Mobile Supply Chain Application and Oracle Warehouse Management. The character defined in this profile option will be interpreted as a carriage return enabling a single scan to populate two different fields on the mobile device.
Additional Information: The delimiter feature is applicable only for revision-controlled items. However, because the system does not differentiate between revision and non-revision controlled items, it is important that the value entered for the profile option is not used as part of an item number (segment) for any other non-revision controlled items. If this setup occurs, the item number may become truncated, and the system displays an error message No result found.
For example, if the profile option WMS: Item/Revision Delimiter is set to P, then errors may occur when a transaction such as a purchase order receipt or miscellaneous receipt occurs forDoc 34986654 - DOC BUG: ADD FORMAT LEVEL TO WMS GUIDE FOR PRINTER HIERARCHY ASSIGNMENT an item whose name contains the letter P (for example, items SHP-1001, SBP-1001).
WMS: Label Print Mode
This profile determines the label print mode for the integration. The choices for this profile are Synchronous - Generic, Asynchronous, and Synchronous TCP/IP. Depending on the setting of this profile, the label print request will be processed. If you deploy EBS on Oracle Autonomous Database, then set the profile to Synchronous - Generic to print labels.
WMS: Label Printing for Cycle Count
This profile determines when you print labels for cycle counting. It has the following values:
-
At Entry: Prints a label at cycle count entry.
-
At Approval: Prints a label at cycle count approval.
-
At Entry and Approval: Prints a label at both cycle count entry and cycle count approval.
WMS: Label file prefix
This profile is only used if the Label Print Mode selected is Asynchronous. The profile determines the prefix for the XML files that will be written to the output directory. Label print file names are generated according to the following format: PPPNNN.xml where PPP is the prefix specified in this profile and NNN is a sequential integer generated for each new label print request. It is possible to distinguish the user who generated a particular print request by setting this profile at the user level uniquely for each user.
WMS: Label output directory
This profile is only used if the Label Print Mode selected is Asynchronous. It determines the directory that the XML files are written to for the 3rd Party software to pick up and process. The directory specified here must be a directory that is accessible with read/write privileges to both the Oracle database and the 3rd Party printing software.
WMS: PO Number/Line Delimiter
This profile can be set at the site level and is applicable to both the Oracle Mobile Supply Chain Application and Oracle Warehouse Management. The character indicated by this profile option will be interpreted as a carriage return, enabling a single scan to populate two different fields on the mobile device.
WMS: RFID User
This profile is used to determine which user's context is to be used when processing transactions triggered by RFID events. Since RFID transactions are not done through the normal user-interface, there is no user logging into application to perform an RFID transaction, we need to register the transaction as having taken place in the context of a valid user. The values for this profile option are any valid user registered in the application. You can change this profile option at the Site level only.
WMS: Sequence Picks Across Waves
This profile option determines whether tasks across waves can be sequenced together or not. This can be set at the site, responsibility, and user level. If the profile option is set to Yes, the tasks are sequenced based on the picking order across waves and not on the move order header id. If the profile option is set to No, the tasks are sequenced using the picking order within a wave only and based on the Move Order Header id. The default value is No.
WMS: Subinventory/Locator Delimiter
This profile can be set at the site level and is applicable to both the Oracle Mobile Supply Chain Application and Oracle Warehouse Management. The character indicated by this profile option will be interpreted as a carriage return, enabling a single scan to populate two different fields on the mobile device.
WMS: Synchronous TCP/IP Label Request Delay
You use this profile option to indicate a time delay, in milliseconds, for every request that you send to the print server in Synchronous TCP/IP printing. This profile option takes a default value of zero and any positive integer as user value.
WMS: Verify Own Picks
You can use this profile option to verify material at the time of picking. To allow a user to verify the material that they have picked, set the profile option user value to Yes.