Returns Portal
This chapter covers the following topics:
Overview
The Returns Portal provides an effective and efficient way to enable customers to return products. Customers may exchange or return products for service, testing, take-back, calibration or trade-in credit. The Returns Portal allows customers, business partners, retail associates and distributors to request returns directly via a web portal.
Use the Returns Portal to perform the following:
-
Register: Businesses performing warranty service must know their customer. As a customer, you are required to identify yourself to the web portal before transacting returns. The standard iSupport registration and login frameworks fulfill this requirement, or a business can use their own custom website customer registration process.
-
Request return: You can request a return online without direct interaction with a business representative. The lucid online system enables you to understand the steps required to submit the request successfully.
-
Request one or more services for returned item: The online portal enables you to specify one or more services of a specific type required for the returned item without direct interaction with a business representative.
-
Request end-of-life take-back of product: The portal enables customers to return retired products to the producer at end of life. The customer enters the item information and the system provides instructions on shipping or collection of the item.
-
Validate and display warranty status of return items: The online portal provides you with real-time information about the warranty status of the item for which you are requesting return. The system informs you whether the item is in-warranty, out-of-warranty or any other designation the producer assigns to the item.
-
Provide estimated cost for performing return service: You can view the estimated cost for the return service being provided. This estimate factors in warranty entitlements and advanced pricing rules.
Note: For more information on Advanced Pricing features supported by Oracle Depot Repair see the Advanced Pricing section in Integration with Other Oracle Modules.
-
Approve estimated costs online: The portal enables you to approve the estimated costs before returning an item. After an explicit approval the return is authorized.
-
Capture and authorize credit card information: Provide credit card information online for authorizing the return of items. The system allows you to enter credit card information securely and in compliance with privacy and security laws. The credit card is automatically authorized for the estimated amount of the service. Oracle Depot Repair will not store any credit card information in its tables.
-
View all returns: You can view all your returns on a single page as well as the service order status, scheduled arrival date and scheduled ship date for the repair items in the Returns Portal.
Note: If multiple ship lines are linked to the same service order, the latest scheduled arrival date and latest scheduled ship date will display in the Returns Portal.
Interacting with the Returns Portal
The Returns Portal uses the Oracle iSupport application's existing user registration and login features. You can navigate to the Returns Portal from the iSupport home page, or can access the Portal directly from the Oracle Applications Navigation page.
The Returns Portal enables you to enter one or more return requests. This automatically creates a service request and service orders. Based on the return service selected and the service contract entitlements, the system calculates the cost for your specific item and service. Service Contracts entitlement checks and Advanced Pricing rules are triggered in the same way as in the Depot Workbench Estimate tab. Additionally, the Depot Returns Portal pages allow you to enter credit card information to authorize payment on the estimated costs. This is accomplished through integration with the EBusiness Suite Oracle Payments application. The Depot pages only perform authorization, not payment processing.
Using the Returns Portal
-
Navigate to the Manage Returns page using the Oracle Applications Navigation or, optionally, the iSupport page.
-
Use the Advanced Search page to find a service order.

-
You can perform a search on the following:
-
Item Name
-
Waybill Number
-
Serial Number
-
Service Request
Click Add to have additional search criteria.
-
-
Click Go.
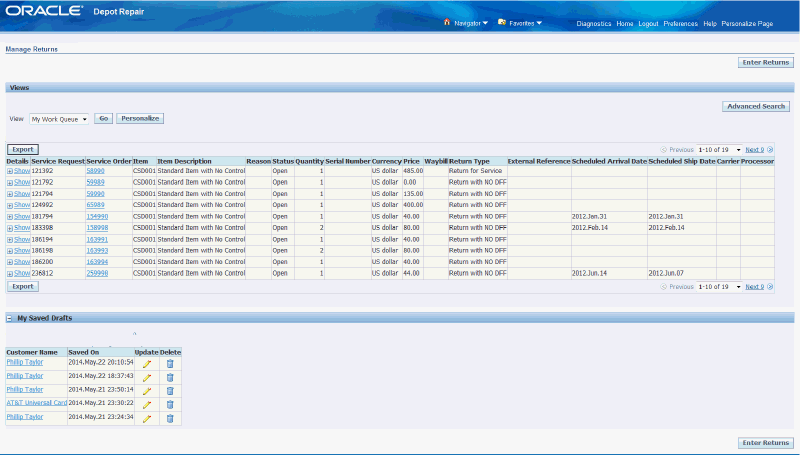
An end-consumer can view the service orders they own, while a service agent using the Returns Portal in the store mode can view service orders logged by other agents. The profile option CSD: Returns Portal Mode can be set to limit a user in store mode to seeing only those orders they themselves logged. This can be a useful security control when allowing carriers, processors and other partners access to the Portal in store mode. See: Oracle Depot Repair Implementation Guide.
-
Click the Service Order hyperlinks to view details of a service order.
Use the Service Order Details page to view and update service orders.
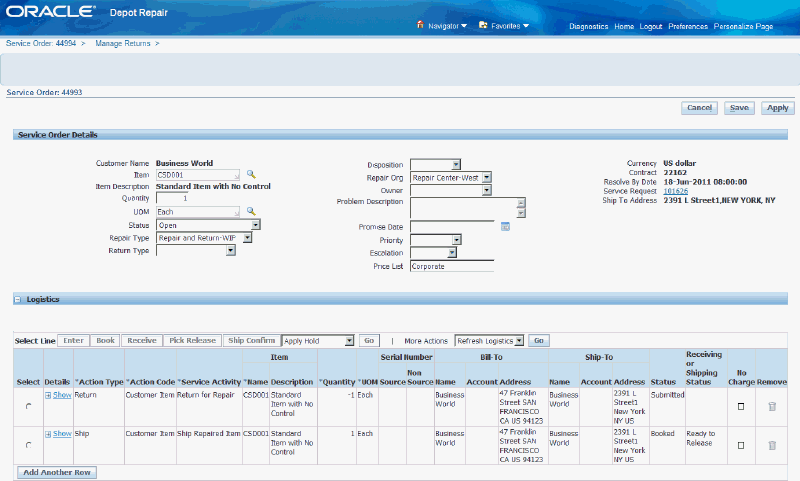
Use the Logistics region in the Service Order Details page to:
-
View logistics lines.
-
Enter, Book, Ship Confirm, Pick Release selected logistics lines.
-
Cancel orders.
-
View project details.
-
Create, update, and delete product transactions.
-
Apply/Release Holds.
-
Refresh Logistics to update the shipping or receiving information.
Note: Order numbers cannot be changed, and profiles need to be set specifying the ability to add to the order.
When using the Logistics region in the Service Order Details page to apply or release a hold, you can set the profile option CSD: Mode for Sales Orders to launch the preferred Order Management user interface.
Click a service order with booked logistics lines, and select a logistics line in the Logistics region. Depending on the value set in the CSD: Mode for Sales Orders profile option, when you apply or release a hold you can launch the:
-
Order Management Sales Order Form.
-
Order Management Quick Sales Order form.
-
Sales Order Details read-only HTML page.
-
Sales Order Details updatable HTML page.
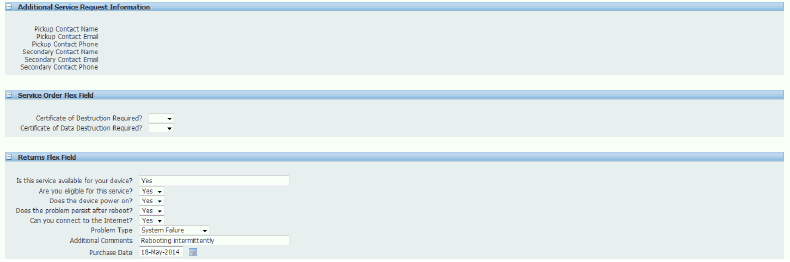
The Service Order Details page also displays the Additional Service Request Information region and flexfields set up to capture additional information using the Descriptive Flexfield Setups.
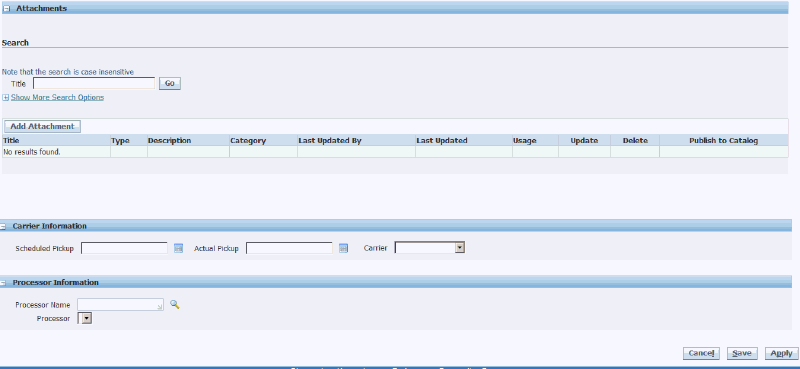
Use the Attachments region to view or add attachments, and the Carrier Information region to enter the carrier, as well as dates for scheduled and actual pick up dates.
An end consumer can view service order details on the Service Order Details page. A service agent using the Returns Portal in store mode will have the option to update data fields on this screen. Third party partners using this portal in store mode may also have permission to update certain fields; for example, a carrier could update carrier- specific data and a processor could update processor specific data.
Click Save to save changes to the service order. Click Apply to save changes and return to the Manage Returns search page.
Click Cancel to return to the Manage Returns search page without saving any changes.
-
-
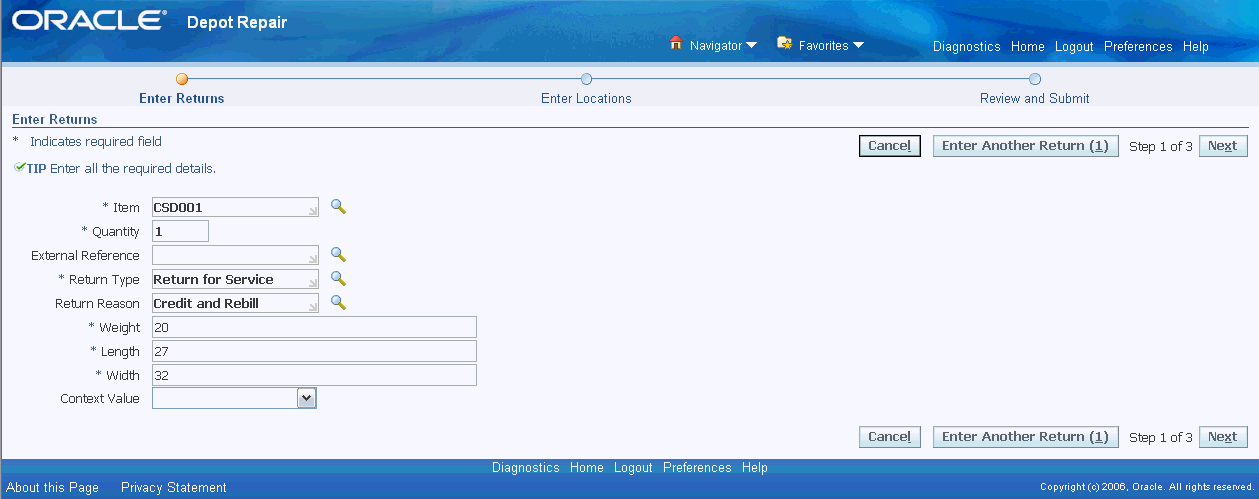
Click Enter Returns in the Manage Returns page to enter the details of the item(s) that you want to return or exchange in the Enter Returns page.
-
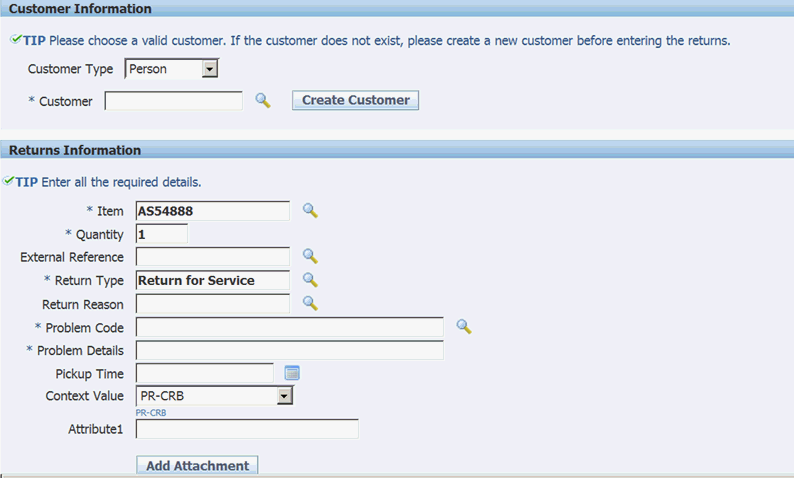
Store mode users of the Returns Portal can use the Customer Information region to select and search for existing customer using the Customer Type and Customer fields. Use the Create Customer button to create a new customer. This region will not display for end consumers, as end consumers will always see their own return orders.
-
Enter Returns Information.
Enter the following information on the Enter Returns page:
-
Item
-
Quantity
-
Return Type
-
Return Reason
The Return Type may be linked to a DFF which uses the Return Type as the DFF Context. This allows the system to display and capture additional attributes specific to the Return Type selected. Once the Return Type is entered, the system performs a partial page refresh to display any DFF attributes linked to that Return Type context. If the Return Type is Upgrade, the screen displays the Upgrade to Item list of values.
After the user enters Item, the system will determine if that item is serialized or not, and if so, will perform a partial page refresh to display the serial number to be captured.
Note: Users can search for an item by entering a free form description of the item in the Item Description field. This field, hidden by default, can be enabled using Personalization.
-
-
You can add attachments to the returns using the Add Attachment button.
-
Use the Enter Another Return button to enter additional return lines. This allows you to return multiple items in the same return transaction. This button displays once you select the Return Type field. When you select Enter Another Return button, the items you entered first appears in a side bin on the Enter Returns page.
-
Click the Next button to navigate to the Enter Locations page.
-
Enter Locations
Enter ship to, bill to and email information. You can create a new email, ship to and new bill to or choose an existing one.
Note: The primary bill to, ship to and email addresses linked to the logged in user will default.
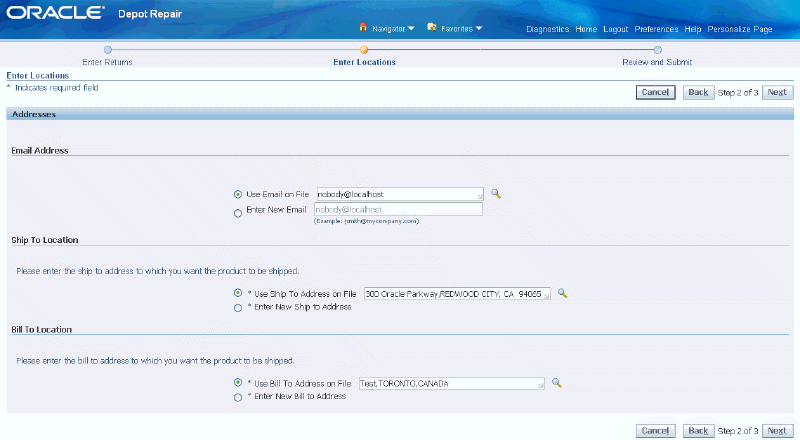
-
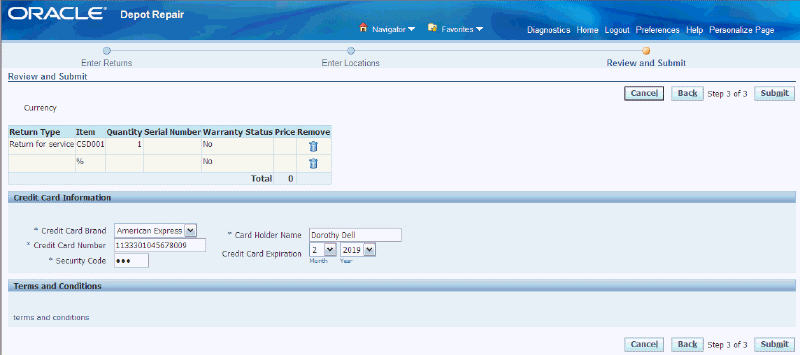
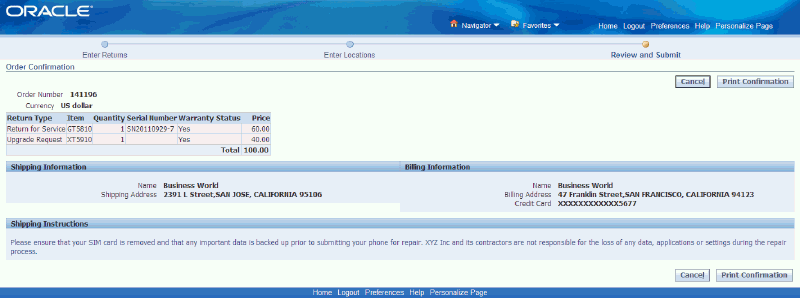
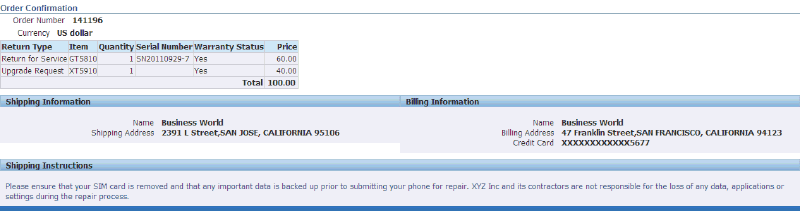
Click the Next button to navigate to the Review and Submit page. Use this page to review the items entered for return. The page displays the return items together with warranty status and total price. Prices are displayed based on customer contract entitlement and advanced pricing rules.
-
You have the option to remove any return line on the summary table by clicking the trash icon.
-
Enter Credit Card information
Enter valid credit card information, if required, to authorize the payment. The credit card authorization includes validation of the bill to address as entered on the Enter Locations page. In the event of any mismatch, you will be directed to the Enter Locations page to update the information.
-
Approve Estimate and Submit Return Request
Click the Submit button. The Order Confirmation page opens. The Submit Order action triggers the creation of Service Request, Service Order and Logistic lines, including applying any Depot Defaulting Rules and/or Order Management Defaulting Rules.
-
The Order Confirmation page includes the ship to instructions for the returned item. The ship to address comes from the Logistics lines created with the Service Order.
-
The Order Confirmation table displays Order Number, Return Type, Item, Quantity, Serial Number, Warranty Status, and Price. Each returned item must have its own line on the Order Confirmation table.
-
This page also displays Shipping and Billing Information.
-
-
Click the Print Confirmation button to print a custom confirmation document of the order.
-
Click the Home link to navigate back to the main page.