Oracle iSupplier Portal Setup
This chapter covers the following topics:
- Chapter Overview
- Implementation Prerequisites
- Responsibilities
- Setup Steps
- Assign Responsibilities to Internal Users
- Apply Securing Attributes to Custom Responsibilities
- Enable Function Security
- Enable Profile Options
- Enable E-Signature Functionality
- Enable Manage Deliverables Functionality
- Set up Barcode for ASN Shipment Number
- Set Up Supplier Broker
Chapter Overview
This chapter describes the implementation steps specific to Oracle iSupplier Portal and includes the following topics:
-
Implementation Prerequisites on page 2-1
-
Responsibilities on page 2-1
-
Setup Steps on page 2-2
Implementation Prerequisites
The only implementation prerequisite for Oracle iSupplier Portal is that Oracle Purchasing has been licensed and fully implemented.
For detailed information on implementing Oracle Purchasing, see the Oracle Purchasing User's Guide.
Responsibilities
Oracle iSupplier Portal is shipped with the following seeded responsibilities:
| Responsibility Name | Description |
|---|---|
| iSupplier Portal Full Access | Used to access supplier facing functionality for the business flows pertaining to Oracle Purchasing |
| Procure to Pay Supplier View | Used to access supplier facing functionality for the business flows pertaining to Oracle Purchasing |
| Plan to Pay Supplier View | Used to access supplier facing functionality for the business flows pertaining to Oracle Purchasing and Oracle Supply Chain Planning. |
| Source to Pay Supplier View | Used to access Supplier facing functionality for the business flows pertaining to Oracle Purchasing and Oracle Sourcing. |
| Supplier User Administrator | Used by buyer administrators to set up and maintain supplier user accounts |
| Supplier Profile Administrator | Used by buyer administrators to review prospective vendor registration requests and to administer supplier profiles. |
| Supplier Profile Manager | Used to give supplier users access to only their profile details |
| Source, Plan, Pay Supplier View | Used to access Supplier facing functionality for the business flows pertaining to Oracle Purchasing, Oracle Supply Chain Planning and Oracle Sourcing. |
| iSupplier Portal Internal View | Used by internal users of the buying company (including buyers) to access the functionality exposed by Oracle iSupplier Portal. |
Internal (buying company) users must have the iSupplier Portal Internal View responsibility assigned to them.
For more information on assigning responsibilities to users, see Chapter 3.
Setup Steps
You must complete the following setup steps to use the full range of features available in Oracle iSupplier Portal:
| Step | Required or Optional |
|---|---|
| Assign Responsibilities to Internal Users | Optional |
| Apply Securing Attributes to Custom Responsibilities | Optional |
| Enable Function Security | Optional |
| Enable Profile Options | Optional |
| Enable E-Signature Functionality | Optional |
| Enable Manage Deliverables Functionality | Optional |
| Flag External Responsibilities | Required |
| Set Default Application Responsibilities | Required for Invitation |
| Set Up Web Server URLs | Required for Invitations |
| Create Customized Responsibilities for Supplier User Administrators | Optional |
| Assign Responsibilities for Buyer Administrators of Supplier Users | Required |
| Plan Supplier Management Groups | Required |
| Create Supplier Management Groups | Required |
| Create and Assign Customized Responsibilities for Buyer Approvers | Required |
| Install FPI Patchset | Required |
| Flag Default Application Responsibilities | Required |
| Create Striped Registration Pages | Required |
| Define Business Classifications List of Values | Optional |
| Set Up Products and Services Classifications | Optional |
| Create Address Books for Existing Suppliers | Required |
| Create Contact Directory for Existing Suppliers | Required |
| Migrate Account Assignments for Existing Supplier Bank Accounts | Required |
| Assign Supplier Profile Manager Responsibility to Appropriate Supplier Users | Required |
| Set up Barcode for ASN Shipment Number | Optional |
Note: Securing attributes are applied during supplier registration. For more information on supplier registration, see Chapter 3.
Assign Responsibilities to Internal Users
If you would like to utilize the internal user functionality of Oracle iSupplier Portal, you must assign the iSupplier Portal Internal View responsibility to users.
To assign the iSupplier Portal Internal View responsibility to users:
-
From the Oracle System Administrator menu, select Security > User > Define.
-
Enter the name of the user to whom you wish to grant the responsibility.
-
In the Direct Responsibilities section, enter iSupplier Portal Internal View in the Responsibility text box.
-
Click Save.
Apply Securing Attributes to Custom Responsibilities
If you have created custom responsibilities that will be assigned to supplier users, securing attributes must be included in your custom responsibility definition
There are three securing attributes that can be used to control access. These attributes are all seeded with the pre-defined Oracle iSupplier Portal responsibilities that are released with the product:
-
ICX_SUPPLIER_ORG_ID - Identifier for the supplier.
-
ICX_SUPPLIER_SITE_ID - Identifier for the supplier site.
-
ICX_SUPPLIER_CONTACT_ID - Identifier for the supplier contact.
Note: The securing attributes discussed in this section apply only to the supplier facing custom responsibilities. The Internal User View responsibility uses the document security setup done as part of Oracle Purchasing setup.
Note: No securing attribute setup is required for the iSupplier Portal Internal View responsibility.
To add the securing attributes to a custom responsibility:
-
From the Oracle System Administrator menu, select Security > Responsibility > Define.
-
In the responsibility form, search for the name of the custom responsibility you would like to modify.
-
In Securing Attributes region, search for the three securing attributes that have to be applied to this responsibility.
-
When you have identified all the attributes to apply to this responsibility, click Save.
The various securing attributes enable the supplier user access to be restricted as follows:
| Desired Access Restriction | ICX_SUPPLIER_ID | ICX_SUPPLIER_SITE_ID | ICX_SUPPLIER_CONTACT_ID | Comments |
|---|---|---|---|---|
| Limit user access to supplier specific information. | Responsibility defined with securing attribute. The securing attribute on User definition is assigned the supplier_id value. |
N/A | N/A | Users who sign into the defined responsibility will only have access to the supplier information defined in the user definition. |
| Limit user access to information for specific supplier sites. | Responsibility defined with securing attribute The securing attribute on User definition is assigned the supplier_id value. |
Responsibility defined with securing attribute. The securing attribute on User definition is assigned the supplier_site_id value. |
N/A | Users who sign into the defined responsibility will only have access to the supplier and site information defined in the user definition. |
| Limit user access to information from purchasing documents with a specific supplier contact defined. . | Responsibility defined with securing attribute. The securing attribute on User definition is assigned the supplier_id value. |
Responsibility defined with securing attribute. The securing attribute on User definition is assigned the supplier_site_id value. |
Responsibility defined with securing attribute. The securing attribute on User definition is assigned the supplier_contact_id value. |
Users who sign into the defined responsibility will only have access to purchasing documents that have the specific supplier contact defined. |
Enable Function Security
When a responsibility is first created, by default, access to all functions and standard pages is granted. Therefore, function security is assigned to exclude or restrict users from certain menus (tabs) or functions (sub-tabs).
In addition to limiting access to sets of pages whose associated functions or menus have been excluded, function security will also cause exclusion of associated regions and links for these functions on the Oracle iSuppier Portal Home page
There are two types of function security exclusions:
-
Menu Exclusions - used to prevent access to the main tabs (therefore the appropriate sub-tabs).
-
Function Exclusions - used to prevent access to sub-tabs and other functionality.
Menu and Function Exclusions
Below is a list of menus, sub-menus and the available menu/function exclusion.
Note: The menus and functions listed in the tables below pertain to the iSupplier Portal Full Access (Procure to Pay Supplier View) and iSupplier Portal Internal View responsibilities.
| Tab | Sub Tab | Other Functionality | Function/Menu Exclusion |
|---|---|---|---|
| Orders | N/A | N/A | Orders |
| Orders | Purchase Orders | N/A | Maintain Purchase Orders |
| Orders | Work Orders | N/A | Maintain Work Orders |
| Orders | Agreements | N/A | View Agreements |
| Orders | Purchase History | N/A | Purchase History |
| Orders | RFQ | N/A | RFQ |
| Orders | Deliverables | N/A | Manage Deliverables |
| Orders | Timecards | N/A | Timecards Search Page |
| Orders | N/A | Change Purchase Order | Change Purchase ORder |
| Orders | N/A | Cancel Purchase Order | Cancel Purchase Order |
| Orders | N/A | Sign Purchase Order | Sign Purchase Order |
| Shipments | N/A | N/A | Shipments |
| Shipments | Delivery Schedules | N/A | Delivery Schedules |
| Shipments | Shipment Notices | N/A | View/Create ASN |
| Shipments | Shipment Schedules | N/A | Shipment Schedules |
| Shipments | Receipts | N/A | @@View Receipts |
| Shipments | Returns | N/A | Shipment Returns |
| Shipments | Overdue Receipts | N/A | Overdue Receipts |
| Shipments | On-Time Performance | N/A | Delivery Performance |
| Shipments | Quality | N/A | Quality |
| Shipments | N/A | Cancel ASN | Cancel ASN |
| Shipments | N/A | Create Routing Request | Create Routing Request |
| Shipments | N/A | View Routing Request | View Routing Request |
| Planning | N/A | N/A | ISP Planning |
| Planning | VMI | N/A | SCE Inbound Consigned Inventory Status |
| Planning | Forecast | N/A | Planning Schedules |
| Account | N/A | N/A | Account |
| Account | Create Invoices | N/A | Review Page |
| Account | View Invoices | N/A | Invoice Details |
| Account | View Payments | N/A | Payment Details |
| Product | N/A | N/A | Product Information |
| Product | Supplier Items | N/A | Supplier Item Summary |
| Product | Order Modifiers | N/A | Order Modifiers |
| Product | Maintain Capacity | N/A | Update Capacity |
| Product | Quality | N/A | Quality |
| Product | Consigned Inventory (menu) | N/A | Consigned Inventory (menu) |
| Tab | Sub Tab | Other Functionality | Function/Menu Exclusion |
|---|---|---|---|
| Orders | N/A | N/A | Orders Internal Information |
| Orders | Purchase Orders | N/A | Maintain Purchase Orders |
| Orders | Agreements | N/A | View Agreements |
| Orders | Purchase History | N/A | Purchase History |
| Orders | Pending Changes | N/A | Pending Change Requests |
| Orders | Work Confirmations | N/A | Supplier: Buyer View: Allow Work Confirmation Correction |
| Shipments | N/A | N/A | Shipments Internal Information |
| Shipments | Shipment Notices | N/A | View ASN |
| Shipments | Receipts | N/A | @@View Receipts |
| Account | N/A | N/A | Account |
| Account | View Invoices | N/A | Invoice Details |
| Account | View Payments | N/A | Payment Details |
| Product | N/A | N/A | Product Internal Information |
| Product | Consigned Inventory | N/A | Consigned Inventory |
When a particular sub-tab is excluded, access to that function is also restricted on the Oracle iSupplier Portal Home page. For example, applying the View-Create ASN function security exclusion will not only restrict users to the Shipment Notices page under the Shipment tab, it will also restrict users to the Shipments at a Glance view, ASN search capability, and the Shipment Notices hypertext from the process flow.
To add function security for a given menu or function:
-
From the Oracle System Administrator menu, select Security > Responsibility > Define.
-
Query the responsibility you are would like to restrict.
-
In the Function and Menu exclusions region, for the Type column, select Menu or Functionalistic depending on what you are excluding).
-
From the list of values available in the Function and Menu exclusions region, select the appropriate function or menu.
-
Click Save.
Control the Ability to Change the Supplier Name
Supplier administrators can update the supplier's name on the Organization page of a supplier's profile because by default, the Supplier Management Administrator responsibility allows administrators to configure supplier registration and supplier profile.
To restrict a supplier management administrator from changing the supplier's name, a system administrator must add the "Supplier Name Restriction" (POS_RES_SUPP_NAME) function to the menu associated with the relevant Supplier Management Administrator responsibility. Administrators assigned this function cannot update the supplier's name as the Supplier Name field on the Organization page becomes read-only. Only administrators who are not assigned this function can update the supplier's name.
Enable Profile Options
The following table explains profile options set by the system administrator that impact Oracle iSupplier Portal:
| Profile Option | Value | Description |
|---|---|---|
| RCV: Fail All ASN Lines if One Line Fails | Yes or No Default: No |
Indicates whether the creation of ASN/ASBNs in Oracle Internet Supplier Portal will fail all ASN lines if one line fails. |
| POS: Limit invoice to single PO | No/Yes Default: No |
Indicates whether an invoice created in Internet Supplier Portal will be limited to the shipments belonging to a single purchase order |
| EDR: E-Records and E-Signatures | Yes or No | Indicates whether E-Signature functionality has been enabled |
| POS: ASL planning attribute updates from supplier approved by | -Buyer's Approval Required Planner's Approval Required No Approval Required |
Indicates the person whose approval is required when supplier submits changes via Order Modifiers and Maintain Capacity functionality |
| POS:External Responsibility Flag | Yes or No | Indicates that a particular responsibility is available for granting to newly registered supplier users |
| POS: Default Responsibility for Newly Registered Supplier Users | Responsibility name | Responsibility that will be assigned to new users that are created when a supplier company registers using the Prospective Vendor Registration feature |
| POS:External URL | valid http/https address | URL of the external web server used to enable supplier user access to iSP |
| POS:Internal URL | valid http/https address | URL of the internal web server used to enable internal user access to iSP |
| HR: Security Profile | Security profile name | Indicates the default operating unit group that will be associated to any buyer administrator responsibility that does not have a Security Profile assigned to it |
| Personalize Self-Service Defn | Yes or No Default: No |
Displays the dispute resolution attributes in the View Invoice Details page via iSupplier Portal. If this profile option is controlled by personalization, you need to set the following profile options:
Note: You must set the Personalize Self-Service Defn to No for iSupplier Portal Full access or any other custom iSupplier responsibility that is assigned to external users. For more information on setting personalization profile options, refer to Oracle Application Framework Personalization Guide. |
| POS: Display AP AR Netting Information | Yes or No Default: No |
Displays the netting information attributes in the View Invoice Details page via iSupplier Portal. |
| Business Classification Re-Certification Period | User defined (No. of Days) Default Value: 0 You can enter a value ranging from 1 to 366. |
Determines periodicity of the re-certification. |
| Business Classification Re-Certification Notification Reminder Days | User defined (No. of Days) Default Value: 0 You can enter a value ranging from 1 to 30. |
Determines days before due date when supplier will be reminded to re-certify the business classification. |
| POS: Supplier Registration UDA Page Display Layout | Flow and Tabbed (Default) | Determines the display layout for user defined attributes (UDAs) in the prospective supplier registration train navigation flow. Supplier administrators can set this profile option to select the display option for the user defined attributes (UDAs) under the train node called Additional Information. They can select one of the display options as the profile option value:
|
| POS: Use Approval Date for Work Confirmation Processing | Yes or No Default: No |
Determines the date that the application will use to process work confirmations
Note: You can set this profile option only at Site level. |
| POS: Enable Contact Purpose Based Notifications | Yes or No Default: No | To use the purpose based notifications feature, set this profile option to Yes at site level. If no specific contact is mentioned on the PO, then to notify the supplier contact associated with an order:
These steps ensure that the application sends purchase order creation and update notification upon approval only to the contact user who is identified as the Purchase Order Fulfillment Administrator. |
Enable E-Signature Functionality
The following setup is required to enable use of the E-Signature functionality in Oracle iSupplier Portal:
-
Set the value of profile EDR: E-Records and E-Signatures to Yes.
-
Ensure that the function Sign Purchase Order is not excluded from the responsibility.
Enable Manage Deliverables Functionality
The following setup is required to enable use of manage deliverables functionality in Oracle iSupplier Portal
-
Ensure that the function “Manage Deliverables” is not excluded from the responsibility.
Set up Barcode for ASN Shipment Number
The ASN Number is printed as a barcode when the user clicks Print in the ASN details page. In order to set up barcode printing for the ASN Number, please implement the following steps:
-
Associate the template to the rtf file.
-
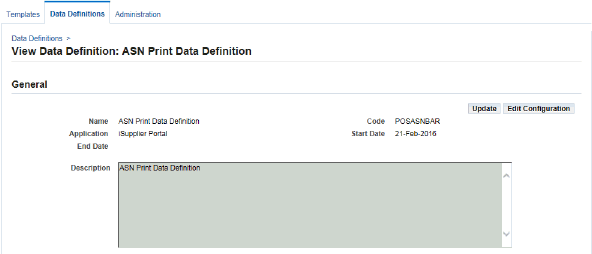
The Barcode enhancement patch is shipped along with the ASN Data Print Template and the ASN Print Data Definition.
-
Copy the POSASNBAR.rtf file from $POS_TOP/patch/115/publisher/templates/US/ to your desktop or local folder.
-
Using the XML Publisher Administrator responsibility, navigate to the Templates page.
-
Search for ASN Data Print Template.
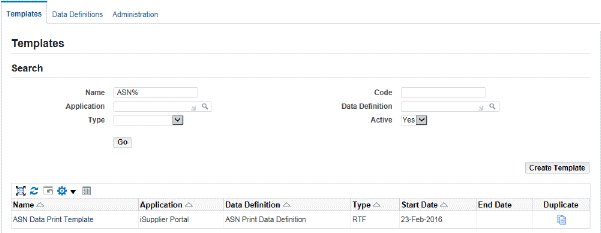
-
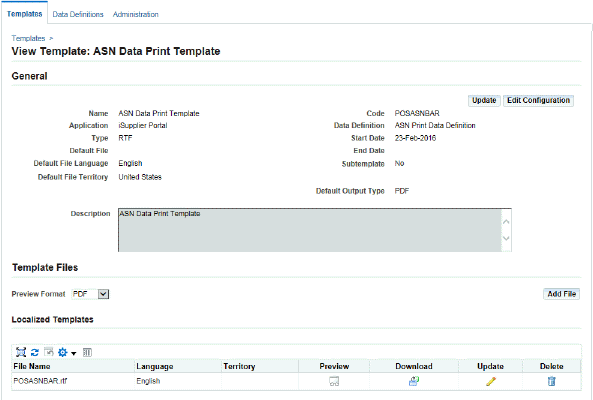
When the ASN Data Print Template shows in the search results table, click the ASN Data Print Template link to open the View Template page.
-
Click Add File to associate the POSASNBAR.rtf with the ASN Data Print Template. Select English as the Language and United States as Territory.
-
Click Apply to complete the template setup.
-
-
Complete the Font related setup steps.
-
Barcodes are generated using different fonts. The example font used in these setup steps is BC 3of9. For this font to work, download corresponding .TTF file (In this case B39R00.TTF) to your desktop to upload it to XML Publisher.
-
Navigate to the Administration tab. Click the Font Files sub-tab and then click Create Font Files.
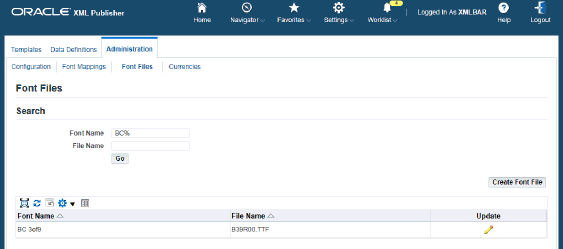
-
Provide the Font Name (for example, BC 3of9, and select the font file (.TTF file).
Note: The font name should match the name of the font as is found in MS Word documents.
-
Click Apply.
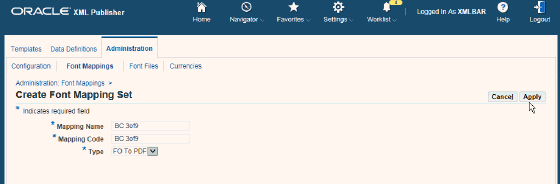
-
Next, click Font Mappings sub-tab and search for your font. Click Create Font Mapping Set, enter and verify the information, and click Apply.
-
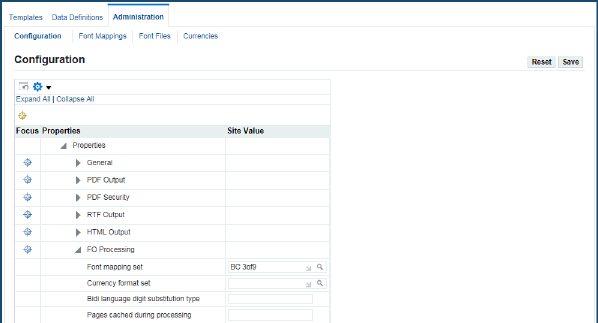
Click the Configuration tab in order to associate this font mapping set.
-
Click FO Processing and associate Font Mapping Set BC 3of9. Click Save.
-
The data definition details are as follows:
Set Up Supplier Broker
To set up Supplier Brokers in the system:
-
Enable supplier brokers in the system by setting the profile option POS: Enable Supplier Broker Functionality to Yes at the site level.
Important: If you add a custom responsibility that is similar to the iSupplier Portal Broker Access responsibility, ensure that you set this profile option to Yes for that responsibility.
-
Enable the Manage Supplier Broker page by assigning the Manage Supplier Broker function to a supplier management administrator or a supplier user administrator.
-
Log in as System Administrator, then navigate to Application > Menus. The Menus window appears.
-
Click in the User Menu Name field and query the menu Suppliers: Supplier User Management SideBar.
-
In a new row, enter a unique sequence number.
-
In the Prompt field, enter Manage Supplier Broker.
-
In the Function field, use the list of values to search for the function Manage Supplier Broker (POS_MNG_BRK_USR). Select the function.
-
Save your work and close the window.
The Manage Supplier Broker page now appears in the Supplier User Management tab. To view the newly added menu item, navigate to Supplier Management Administrator, then to Supplier Home and Supplier User Management.
-
-
Enable the Supplier Administration page by assigning the Supplier Broker function to a supplier profile and to the User Manager responsibility.
-
Log in as System Administrator and navigate to Application > Menus.
The Menus window appears.
-
Click in the User Menu Name field and query the menu Supplier HTML: Supplier View: Tab.
-
In a new row, enter a unique sequence number.
-
In the Function field, click the LOV indicator and search for the function Assign Supplier Broker (POS_ASGN_BRK_USR). Select the function.
-
Save your work and exit the window.
-
In the Prompt field, enter Manage Supplier Broker.
The Manage Supplier Broker tab now appears next to the Profile Management subtab. To view the newly added menu item, navigate to Supplier Profile & User Manager and then to Manage Supplier Broker.
-