Administering Sales Territories
This chapter covers the following topics:
- Named Account Creation Flow
- Adding Named Accounts
- Mapping Customer Name and Postal Code Matching Attribute
- Named Account Spreadsheet
- Monitoring the Named Account Setup Process
- Sales (Non-Named Account) Creation Flow
- Non-Named Account Territory Spreadsheet
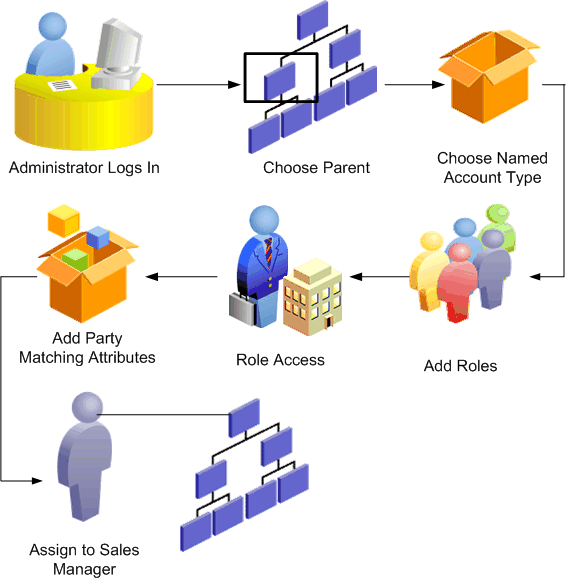
Named Account Creation Flow
A named account territory is a group of named accounts. You designate sales roles for each territory and define what access each sales role has to accounts, leads, opportunities, quotes, and proposals. Use this procedure to create a territory and designate specific organizations as named accounts within the territory.
Create a Named Account Territory
You use the same pages to update information about the territory.
Prerequisites
- A territory must exist in one of the top 5 levels of the hierarchy to be used as the parent territory.
Steps
-
Navigate to Territories.
Select a parent territory and click Create.
-
Select the Named Account territory type.
-
Enter a name for the territory and other details. The number of winners is inherited from the parent. The default start is today and the end date is a year from today. You can enter future dates for planning purposes or to prepare territories ahead of time, such as prior to the start of the fiscal year. Named account territories are available for self-service distribution by managers to their sales teams.
-
Select one or more roles who will be assigned to this territory. For each role, you can specify access to each transaction type.
For example, the sales manager role has full access to all transaction types. The TeleSales Agent role has full access to leads and accounts, view only access to opportunities, and no access to quotes and proposals.
-
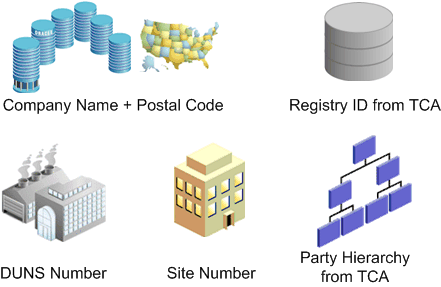
Select the party matching attribute criteria to use for your name account territory. Following are your options.
Party Matching Attributes
-
Select Registry ID in order to use this identifier from Oracle Trading Community Architecture. You can use registry ID whether or not you have Dun & Bradstreet information. It is a very precise rule so it works best if your data is accurate with few duplicate records.
-
Select DUNS Number if you want the precise matching it provides. It is a very precise rule so it works best if your data is accurate with few duplicate records.
-
Select Site Number if you want to match by the identifier for a party location.
-
Select Customer Name and Postal Code to capture a range of business names and postal codes. This choice will pick up the duplicate records in your database where users entered multiple instances of the same customer name.
If you select Customer Name and Postal Code, then you can additionally choose the resource from the LOV to assign to a catch all territory and enter the name of a workflow for catch all transactions.
-
Select any of the party hierarchy names that have been set up in Trading Community Architecture. The top of the hierarchy becomes the named account. All subsidiaries of the named account are dynamically assigned to the sales team for the named account, without the need to maintain each subsidiary as a separate named account. If the sales manager changes the sales team for the named account (top of the hierarchy), then all subsidiaries are affected by the change.
You can also define any additional matching attributes that were in the territory type used.
You can add any party-related matching attributes that have been enabled and define them.
-
-
Choose the name, group, and role for the top of the sales management hierarchy for this territory. That manager in turn can assign accounts to sales organizations or salespeople in his sales hierarchy.
-
At this point you can choose to wait to add named accounts later or do it now. Continue with the next step when you are ready to add named accounts.
Add Named Accounts
-
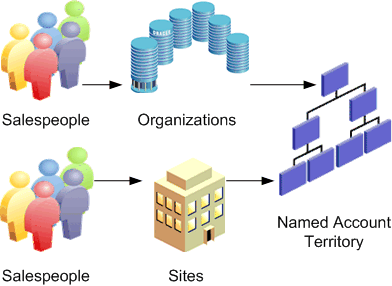
Enter search criteria to find the organizations you want to add to the territory and click Export.
Note: Make sure to close all instances of the Excel application on your computer before clicking Export.
If Identifying Addresses Only is selected, then only the primary address for each organization is included in the export. If it is deselected, then all site addresses are included and you can select a particular site to include it as a named account for the territory. In this way, you can assign different sites to different named account territories.
The organizations are exported to your Microsoft Excel spreadsheet.
-
Enter a territory name in the To Territory field. You can type in the name, copy and paste from another cell, or double-click to use the LOV.
-
Optionally, select one or more salespeople using the LOVs. Be sure you assign salesperson, group, and role. You can only assign salespeople who have group and role access that is defined for the territory. The application automatically assigns the owners of the territory as Salespeople for the named account.
-
In Excel, select Upload from the Oracle menu. Make sure you select Pre-Validate when uploading.
The Territory page displays the list of territories and the number of named accounts in each territory reflects the changes you made. The organizations you selected become named accounts.
The LOVs in the spreadsheet are not as restrictive as when you update information in the application. Therefore, any errors are caught during the upload process and error messages displayed in a column of the spreadsheet. The LOVs are not available when you work remotely.
You no longer have access to a self-service geographic territory after you create it. Only the assigned sales manager can modify it or add child territories to it.
Adding Named Accounts
Export organizations to spreadsheet and then assign them to existing named account territories. This action promotes the organizations to named accounts within the assigned territories.
Prerequisites
- Named account territories must exist
- You must use Microsoft Internet Explorer as your browser.
- Microsoft Excel must be closed before you click Export.
Steps
-
From the dashboard, click Add Named Accounts.
-
Enter your search criteria.
-
Click Export.
The organizations appear in your spreadsheet.
-
Enter a territory name in the To Territory field. You can type in the name, copy and paste from another cell, or double-click to use the LOV.
-
Optionally, select one or more salespeople using the LOVs. Be sure you assign salesperson, group, and role. You can only assign salespeople who have group and role access that is defined for the territory. The application automatically assigns the owners of the territory as Salespeople for the named account.
-
In Excel, select Upload from the Oracle menu. Make sure you select Pre-Validate when uploading.
The LOVs in the spreadsheet are not as restrictive as when you update information in the HTML user interface. Therefore, any errors are caught during the upload process and error messages displayed in a column of the spreadsheet. The LOVs are not available when you work remotely.
When a salesperson assigned to a territory is removed from a sales group or role, you need to update the territory definition to the new group or role.
Mapping Customer Name and Postal Code Matching Attribute
When named accounts are identified by party name and postal code, territory administrators map a range of customer keynames and postal codes to ensure that any records that fall within those rules are identified with a named account. This procedure is optional.
Steps
-
On the Territory Search page, select Named Account from the Type field.
-
In the Select column, select one named account to map.
-
In the Map column, click the Update Mapping icon to define assignment rules.
-
Enter a customer keyname. The keyname is the matching attribute used to search for accounts in the database that belong in the territory with the named account. When you first map a named account the default is the business name followed by the trade name. After the first time, you must manually change the customer keyname.
-
If you want to enter more than one keyname qualifier, then click Add New Row and repeat step 4.
-
Enter a range of postal codes to further qualify the accounts that match the keyname.
-
If you want to enter more than one postal code qualifier, then click Add New Row and repeat step 6.
-
To prevent overlapping named account territories, ensure there are no conflicts by performing the following steps:
-
Click Select All and click Show Conflicts.
The Map page lists conflicting named accounts and their overlapping matching attribute rules.
-
If conflicts appear, then tighten or loosen the named account matching attribute rules to avoid conflicts.
-
Return to the definition page.
-
-
Click Apply.
-
If you want to preview what organizations match your matching attributes, then click Mapped Organizations. Return to the definition page.
The concurrent program Synchronize Territory Assignment Rules must be run for your territory changes to be effective. After the concurrent program is run, leads, opportunities, or accounts that fall within the named account assignment rules you created will be assigned to the named account and the related territory.
Named Account Spreadsheet
You can manage named account territories by exporting a territory to spreadsheet and then making your changes in the spreadsheet. Following are some of the changes you can make. Use the Oracle: Upload menu option to load your changes back to the database. (Be sure to have Pre-Validate selected when you upload.)
-
To remove a named account from the territory, select Yes in the Delete From Territory column.
-
To move a named account to a new territory, select or enter the territory name in the To Territory column. The current territory name is in the From Territory column.
-
Add or delete salespeople for one or more named accounts. Be sure to include the name, group, and role for each salesperson. You can double-click to use the LOV to select a salesperson.
When a salesperson assigned to a territory is removed from a sales group or role, you need to update the territory definition to the new group or role.
Monitoring the Named Account Setup Process
Use this procedure to check the status of named accounts.
Steps
-
Select the Dashboard subtab.
The dashboard lists the territories, the number of named accounts in each territory, and the percentage of named accounts that are mapped and the percentage that are assigned to salespeople. It also provides a count of the number of accounts, leads, and opportunities that are in the catch alls.
The Named Account Post Processing concurrent program refreshes the dashboard information.
-
If you want to review named accounts that are not mapped, then go to the Territories tab and perform a search.
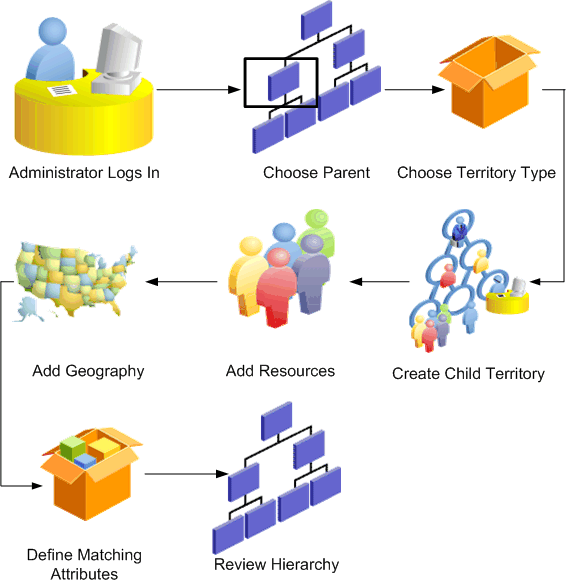
Sales (Non-Named Account) Creation Flow
Sales territory administrators create territories that are not named accounts, many of them based on geography. The following diagram shows the process flow.
Sales (Non Named Account) Creation Flow
To create a territory
-
The Sales Territory Administrator navigates to Territories.
-
If you have access to more than one operating unit, then select the operating unit.
-
Select the Sales usage if you are the administrator for more than one usage.
-
Search for the territory that will be the parent to the one you are creating. You can choose to view only territories active on a selected date. It is possible to create a territory hierarchy for a future date, such as for the next fiscal year. This prevents delays because you switch to the new hierarchy on the specified date. The resources assigned must also be active for the specified future date.
-
Click Go to view the existing territories.
-
You can expand the hierarchies to obtain a thorough view of the existing hierarchy and determine where your new territory should be placed.
-
Select the parent territory.
-
Select the territory type. The application provides a geography territory type. Administrators can create additional territory types as needed.
-
Enter the territory name and other details. The number of winners is inherited from the parent unless you specify a number. The default effective dates start with today and end at a year from today. You can create territories that become active at a future date.
If you select Available to Self Service, then the sales manager you assign to the territory can in turn create child territories and assign sales resources to them. The administrator cannot then modify the child territories.
-
Select the resource type and resource. You can select an individual resource or a sales role. The resource start date defaults to the later date of either the territory start date or the resource start date in Resource Manager. The resource end date defaults to the earlier date of either the territory end date or the resource end date.
For a self-service territory, you must add both the sales manager role and an individual sales manager.
-
For each resource, define the access for the resource to each transaction type, such as Full Access or View Only.
-
If the territory type contained a geographic matching attribute, then you can define the values of each matching attribute, add others, or delete one or more matching attributes.
For example, the territory type includes State. You can add State = California.
-
Enter the definition values for any other matching attributes included in the territory type.
-
Review the territory hierarchy and you will see your new territory.
You can review and edit or delete your new territory. It does not become active until the concurrent program is run.
Non-Named Account Territory Spreadsheet
You can export territories to make changes and then upload them back to the application.
Steps
-
Click the Export icon next to the territory you want to export.
-
Choose whether you want to export the single territory, the territory plus its immediate children, or the territory including all of its children.
-
If the territory includes a geographic matching attribute, then you additionally can choose to export only the territory definition, only unassigned geographies, or both. If you selected to export geographies, select the geography type to export, such as postal codes or cities.
-
Make your changes in the spreadsheet. You can add territory definition information, add or change resources, and delete information. Your changes are validated when you upload back to the database.
-
When your changes are complete, go to the Oracle menu and choose Upload. Make sure you select Pre-Validate when uploading.
Related Topics