Customization Support for the Oracle Mobile Field Service Store and Forward Applications
Overview
This appendix describes the customization support for the Oracle Mobile Field Service Store and Forward applications. This appendix is intended for system integrators and implementation consultants who want to develop custom extensions for these applications.
The Oracle Mobile Field Service Store and Forward applications provide rich functionality built into the standard product. In addition, you can customize the application to suit your business process.
The following are the means by which you can customize the Oracle Mobile Field Service Store and Forward applications:
-
Flexfield support for additional data fields.
-
Label modification.
-
Attachment support.
-
New custom screen creation in the Oracle Mobile Field Service Store and Forward applications to enable new features or extend additional features.
Depending on your business needs, you may need to use one or more of the above means of customization.
What is not supported is modification to existing screens (adding/removing/hiding fields) or changing the navigation between the standard screens.
Flexfield Support
Descriptive flexfields can be used to display and capture additional information. Users can also use context-sensitive flexfields when the information stored by the application depends on other values users enter in other parts of the screen. Table-validated flexfields are not supported by the Oracle Mobile Field Service Store and Forward applications.
The following table describes the types of flexfields you can find in the Oracle Mobile Field Service Store and Forward applications:
| Flexfield | Multiplatform |
| Service request | read/write |
| Task | read/write |
| Debrief header | read/write |
| Debrief line | read/write |
| Customer | read |
Steps for Setting Up Flexfields
Complete the following steps to set up the descriptive flexfields in Oracle Applications that are specific to an Oracle Mobile Field Service Store and Forward application:
-
Log in to Oracle Applications as a system administrator and select the System Administrator responsibility.
-
Navigate to
Application > Flexfield > Descriptive > Segments -
Click the Application field and search for Oracle Service.
-
Click the Title field and search for the component for which the flexfield(s) should be created.
-
The Freeze Flexfield Definition check box indicates whether or not flexfields can be defined or updated. Make sure it is deselected so new flexfields can be defined.
-
Click Segments to display the Segments Summary form.
-
Click New to create a new flexfield definition or click Open to open an existing flexfield definition.
-
Enter the segment name in the Name field.
-
Click the button next to the Column field and select an attribute column from the Column list of values.
-
Enter a description in the Description field and a number in the Number field.
-
Click the search button in the Value Sets field and select a value set (this is the data type of the flexfield) from the list of values. The Description field will be automatically populated.
You can also select a default type from the Default Type list of values to indicate a default value in the Default Value field. Select or deselect the Required check box to specify whether a value is required or not.
-
Specify the flexfield size information in the Sizes section of the form.
-
Optionally, specify prompt information in the Prompts section of the form.
For example, prompts could be used when displaying a window that requests data input for the flexfield.
-
Optionally, click ValueSet to open the form where you can define new value sets or update existing value sets.
-
Click Save to save the new flexfield definition and close the Segments form.
-
Review the Segments Summary form shown and then close it.
-
If no more updates are needed, select the Freeze Flexfield Definition check box.
-
Click Compile.
Viewing the Flexfields
The flexfields are downloaded and displayed in the Oracle Mobile Field Service Store and Forward application after synchronization.
Label Modification
The Oracle Mobile Field Service Store and Forward Multiplatform application supports label changes. Newly defined labels are visible to the end user.
For Oracle Mobile Field Service Store and Forward Multiplatform, all labels are stored in the FND_ NEW_MESSAGES table. Use the application developer responsibility to change labels.
Steps
Complete the following steps to customize the labels and messages seeded in FND_NEW_MESSAGES:
-
Log on to the enterprise system.
-
Select the Application Developer responsibility
-
Select
Application > Messages Function. -
Search for messages starting with the CSM5 prefix.
-
Message text can then be replaced for corresponding message.
User Interface Customization
The Oracle Mobile Field Service Store and Forward Multiplatform application supports user interface customization and validation. There are pre-defined hooks/methods. Users can define and implement these hooks in the custom files and upload to the EBS server. The custom code will be downloaded to the device/client and will be loaded within a container inside the MFS app. At runtime, the MFS file will detect the hooks/methods and if present they will be invoked. MFS app will wait for hook to complete the execution and return the control back to MFS. Custom code returns parameters to MFS app after completion.
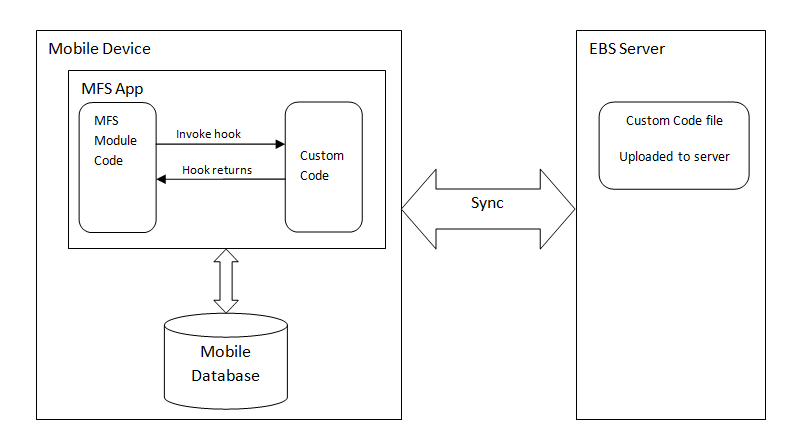
The screens that can be customized are described below.
Task Details Screen
The hooks/methods in the task details screen are as follows:
-
onTaskDetailsLoadHook(successCb)
This 'On-load' method is called when the task details screen is loaded. This method allows to set show/hide and/or read-only to the fields of the task details screen. There will be one parameter to this method.
- successCb – This is the method that needs to be called by custom code with JSON object.
Custom code should prepare a JSON object of fields and the attributes readOnly, display. Once JSON object is prepared success callback method should be called with the JSON object as parameter. All the IDs of the fields on the screens are mentioned in the Constants section of this chapter.
Below is the example of the JSON object to be passed to the success callback method.
var taskObj = {TASK_DETAILS:[{ID:TASK_DETAILS_SUBJECT,readOnly:true,display:'show'}]};  executeCustomFeatureJS(successCb,["S@"+JSON.stringify(taskObj)]);

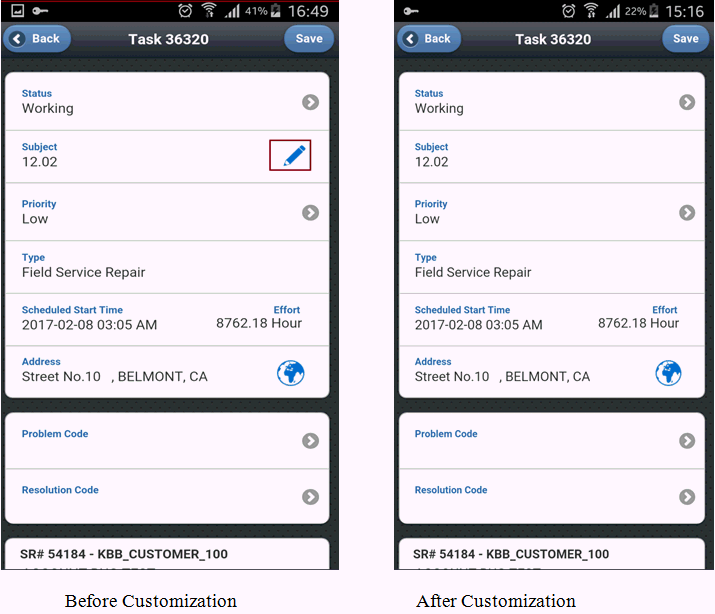
Example  of onTaskDetailsLoadHook, - This sets the field Subject to display as readonly field.
function onTaskDetailsLoadHook(successCb)
{
//This will make task subject as read-only
 var taskObj = {TASK_DETAILS:[{ID:TASK_DETAILS_SUBJECT,readOnly:true,display:'show'}]};
//Call the success callback with the prepared JSON object.
  executeCustomFeatureJS(successCb,["S@"+JSON.stringify(taskObj)]);
}
To hide task priority and make subject as read-only from the details.
var taskObj = {TASK_DETAILS:[{ID:TASK_DETAILS_SUBJECT,readOnly:true,display:'show'},{ID:TASK_DETAILS_PRIORITY,readOnly:false,display:'hide'}]};
  executeCustomFeatureJS(successCb,["S@"+JSON.stringify(taskObj)]);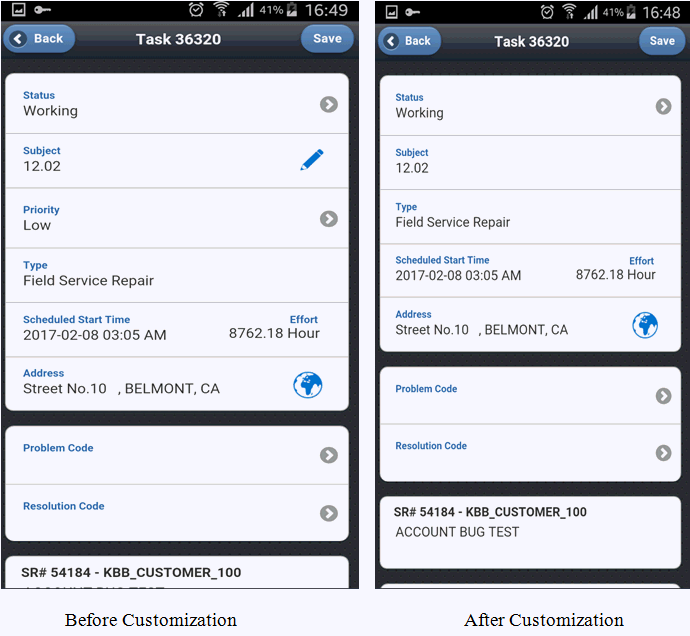
-
onTaskDetailsPreSaveHook (taskObj,successCb)
This 'pre-save' method/hook is called when the user clicks on the Save button in the task details screen. There will be two parameters to this method.
- JSON object – This will have all the fields with their values on the UI
- successCb – This is the method which should be called from custom code with the parameters as true/false and error message.
Custom code can read all the values from JSON object and do validations. On completion call the successCb method with true / false. If true is passed the save operation will continue. If false is passed save will not proceed.
In case of failure:
successCb (false, “Duplicate problem code.")
In case of success:
successCb (true)
Data can be accessed as mentioned below:
taskObj. TASK_DETAILS_STATUS
taskObj. TASK_DETAILS_SUBJECT
Example of onTaskDetailsPreSaveHook, - This example validates and does not allow the system to close a task if install and return count are not matching.
function onTaskDetailsPreSaveHook(taskObj,successCb)
{
  //on a particular task status , if we want to add some validation we can make use of this method.
  if (taskObj. TASK_DETAILS_STATUS == “CLOSED”) {
   //Check the install and return parts count, if they do not match then we call pass the error
   message.
     if(installCount <> returnCount)
              successCb (false, “Installed parts  is not matching the returned parts.");
      else
successCb (true);

 }
 else{
successCb (true);
  }
}
Debrief Material Return Screen
Following are examples of customizing the Debrief Material Return screen.
-
onReturnPartsLoadHook(successCb)
This 'pre-save' method/hook is called when the debrief material return screen is loaded. This method allows users to set show/hide and/or read-only properties to the fields of the debrief material return screen. There will be one parameter to this method.
- successCb – This is the method that needs to be called by custom code with JSON object.
Custom code should prepare a JSON object of fields and the attributes readOnly, display. Once JSON object is prepared success callback method should be called with the JSON object as parameter.
Example of onReturnPartsLoadHook, This hides the field return disposition.
function onReturnPartsLoadHook(successCb) { //if we want to hide the return disposition... var retObj = {RETURN :[{ID: RETURN_DISPOSITION,readOnly:false,display:'hide'}]}; successCb(retObj); } -
onReturnPartsPreSaveHook(returnObj,successCb)
This 'pre-save' method/hook is called on click of save button in debrief material return screen. There will be two parameters to this method.
- JSON object – This will have all the fields with their values on the UI.
- successCb – This is the method which should be called from custom code with the parameters as true/false and error message.
Custom code can read all the values from JSON object and perform validations. On completion, call the successCb method with true/false. If true is passed the save operation will continue. If false is passed save will not proceed.
In case of failure:
successCb (false, “Duplicate bill.")
In case of success
successCb (true)
Data can be accessed as mentioned below:
returnObj.RETURN_SHIPMENT
returnObj.RETURN_DEBRIEF_LINE_ID
Example of onReturnPartsPreSaveHook, This doesn't allow to enter duplicate shipment number.
function onReturnPartsPreSaveHook(returnObj,successCb)
{
  //To check if the shipment no is duplicate..
//Search for shipment no “returnObj.RETURN_SHIPMENT” in the list of shipment numbers in the client.
if(found(returnObj.RETURN_SHIPMENT ))
executeCustomFeatureJS(successCb,["E@Shipment Number is already present.Please enter a different one."]);
}else executeCustomFeatureJS(successCb,["S@"]);
Labor Details Screen
Below are hooks/methods in labour details screens.
-
onLaborDetailsLoadHook (successCb)
This 'On-load' method is called when the labor details screen is loaded, This method allows to set show/hide and/or read-only properties for the fields of the labor details screen. There will be one parameter to this method.
- successCb – This is the method that needs to be called by custom code with JSON object.
Custom code should prepare a JSON object of fields and the attributes readOnly, display. Once JSON object is prepared success callback method should be called with the JSON object as parameter.
Below is the example of the JSON object to be passed to success callback method.
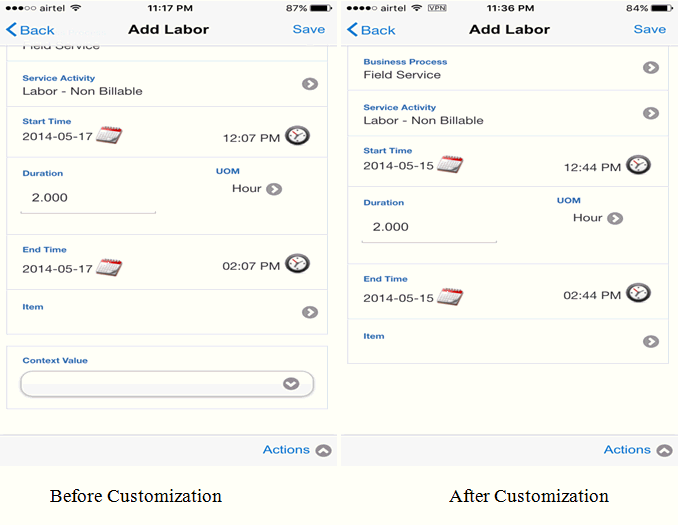
var laborObj = {LABOR_DETAILS:[{ID:LABOR_FLEX_FIELD,readOnly:false,display:'hide'}]};executeCustomFeatureJS(successCb,["S@"+JSON.stringify(laborObj)]);Example of onLaborDetailsLoadHook, - This hides Labor Flex Field from the details.
-
onLaborDetailsPreSaveHook (laborObj,successCb)
This 'pre-save' method/hook is called on click of save button in labor details screen. There will be two parameters to this method.
- JSON object – This will have all the fields with their values on the UI
- successCb – This is the method which should be called from custom code with the parameters as true/false and error message.
Custom code can read all the values from JSON object and do validations. On completion, call the successCb method with true / false. If true is passed the save operation will continue. If false is passed save will not proceed.
Example: In case of failure:
successCb (false, “Duplicate problem code.")
In case of success:
successCb (true)
SR Details Screen
Below are the hooks/methods in SR Details screen.
-
onSRDetailsLoadHook (successCb)
This 'On-load' method is called when the SR details screen is loaded. This method allows to set show/hide and/or read-only properties to the fields of the SR Details screen. There will be one parameter to this method.
- successCb – This is the method that needs to be called by custom code with JSON object.
Custom code should prepare a JSON object of fields and the attributes readOnly, display. Once JSON object is prepared success callback method should be called with the JSON object as parameter.
Below is the example of the JSON object to be passed to success callback method.
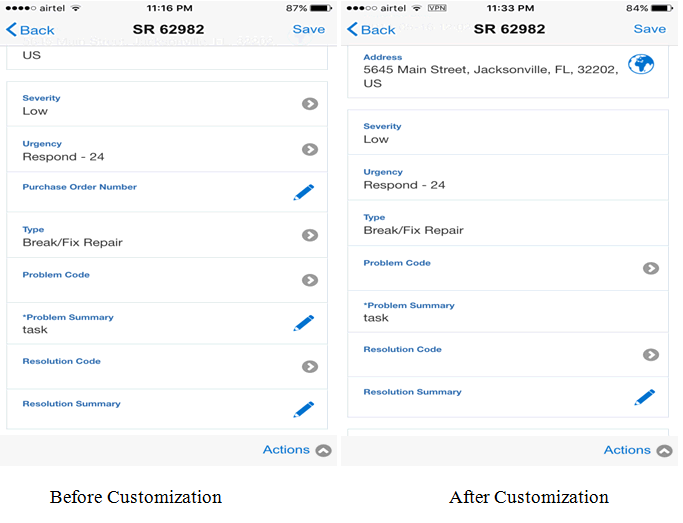
var srObj = {SR_DETAILS:[{ID:SR_DETAILS_SEVERITY,readOnly:true,display:'show'},{ID:SR_DETAILS_URGENCY,readOnly:true,display:'show'},{ID:SR_DETAILS_PURCHASEORDER_NUMBER,readOnly:false,display:'hide'},{ID:SR_DETAILS_TYPE,readOnly:true,display:'show'},{ID:SR_DETAILS_PROBLEM_SUMMARY,readOnly:true,display:'show'}]};
  executeCustomFeatureJS(successCb,["S@"+JSON.stringify(srObj)]);
Example of onSRDetailsLoadHook, - This hides SR details purchase order number and set SR Details severity, SR Details Urgency, SR details type, SR Details Problem Summary to read only.
-
onSRDetailsPreSaveHook (srObj,successCb)
This 'pre-save' method/hook is called when the user clicks the save button in sr details screen. There will be two parameters to this method.
- JSON object – This will have all the fields with their values on the UI.
- successCb – This is the method which should be called from custom code with the parameters as true/false and error message
Custom code can read all the values from JSON object and do validations. On completion call the successCb method with true / false. If true is passed the save operation will continue. If false is passed save will not proceed.
In case of failure:
successCb (false, “Duplicate problem code.")
In case of success
successCb (true)
Install Screen
Below are the hooks/methods in the Install screen.
-
onInstallPartsLoadHook (successCb)
This 'On-load' method is called when the Install part screen loads.
-
onInstallPartsPreSaveHook(res, successCb)
This 'pre-save' method/hook is called when the user clicks on the save button in Install part screen.
-
onInstallPartsListLoadHook(res,successCb)
This 'On-load' method is called when the Install part list screen loads.
Task List Screen
Below are the hooks/methods in the Task List screen.
-
onTaskListLoadHook(successCb)
This 'On-load' method is called when the task list screen loads. This method allows to enable the table dependent DFF, Location tracking.
- successCb – This is the method that needs to be called by custom code with JSON object.
Custom code should prepare a JSON object of fields and the attributes enable. Once JSON object is prepared success callback method should be called with the JSON object as parameter.
Below is the example of the JSON object to be passed to success callback method.
var initObj = {TASK_LIST : [{ID : ENABLE_TABLE_DEPENDENT_DFF,enable: true}]};
executeCustomFeatureJS(successCb,["S@"+JSON.stringify(initObj)]);
Example of onTaskDetailsLoadHook, - This enables table validated DFF.
function onTaskListLoadHook(successCb)
{
var initObj = {TASK_LIST : [{ID : ENABLE_TABLE_DEPENDENT_DFF,enable : true}]};
//Call the success callback with the prepared JSON object.
  executeCustomFeatureJS(successCb,["S@"+JSON.stringify(initObj)]);
}
Custom Action From Task Details onTaskDetailsCustAction1Hook
This method is called on from Custom Action link click on Task Details screen. This link can be enabled by passing TASK_DETAILS_CUST_ACTION1 in the onTaskDetailsLoadHook.
Table Validated DFF
-
onTableDependentDFFClicked(custObj,successCb)
This method is called on clicking any of the table dependent DFF fields. There will be two parameters to this method.
- JSON object – This will have all the fields with their values and screen id on the UI.
- successCb – This is the method that needs to be called by custom code with JSON object.
Custom code should prepare a JSON object of DFF attribute and lov values. Once JSON object is prepared success callback method should be called with the JSON object as parameter.
Below is the example of the JSON object to be passed to success callback method.
var dffObj = {DFF_DETAILS : [{ID : dffID,lovValues : items,defaultValue : items[0].lovlineid}]};
executeCustomFeatureJS(successCb, ["S@" + JSON.stringify(dffObj)]);
Example of onTableDependentDFFClicked
function onTableDependentDFFClicked (custObj,successCb) { doDBOperation("createGenericLov", "Select ATTRIBUTE2 as ID,ATTRIBUTE6 as NAME from CSM_CUSTOM_4 where ATTRIBUTE3 = 'CSF_LABOR_REASON' ", [], function (items) { var dffObj = { DFF_DETAILS : [{ ID : dffID, lovValues : items, defaultValue : items[0].lovlineid } ] }; executeCustomFeatureJS(successCb, ["S@" + JSON.stringify(dffObj)]); }); } -
getTableDependentFlexFieldDesc(dffID, successCb)
This method is called while loading the table dependent DFF fields into the UI. This method is used to fetch the description of the DFF and display in the UI. There will be two parameters to this method.
- JSON object – This will have screen id and DFF attribute value ID.
- successCb – This is the method that needs to be called by custom code with JSON object.
Custom code should prepare a JSON object of DFF attribute and lovvalue. Once JSON object is prepared success callback method should be called with the JSON object as parameter.
Below is the example of the JSON object to be passed to success callback method.
var dffObj = {DFF_VAL : [{DFF_ID : dffID.DFF_ID,lovValue : items.item(0)['NAME']}]};
executeCustomFeatureJS(successCb, ["S@" + JSON.stringify(dffObj)]);
Example  of getTableDependentFlexFieldDesc
function getTableDependentFlexFieldDesc (custObj,successCb)
{
doDBOperation("createGenericLov", "SELECT cc1.ATTRIBUTE4 as NAME from CSM_CUSTOM_1 cc1 where cc1.ATTRIBUTE3 = 'CYCSI Debrief Subcategory Reasons' AND  cc1.ATTRIBUTE4 =? ",params, function (items) {
        var dffObj = {
                DFF_DETAILS : [{
                                ID : dffID,
                                lovValue : items.item(0)['NAME']
                        }
                ]
        };
executeCustomFeatureJS(successCb, ["S@" + JSON.stringify(dffObj)]);
});
           }
Custom UI in the mobile device
Below are the steps to add a custom UI in mobile application Add following code JS and custom HTML code to the custom file. Always keep the javascript code and html code separated by one line 'var dummy;'.
< Javascript code >
        var dummy;
      < HTML code >
//This is the method which should be called from the UI when user wants the control to be transferred back to the MFS application
function goBackFeatureCustom(){
 goToFeature('CSM');
 executeCustomFeatureJS(customReturnCallBackMethod ,["S@"]); //returns to MFS
}
//variable to hold the return callback method
var customReturnCallBackMethod;
//example of the custom action hook, where control is not returned immediately. Custom UI is invoked from custom code.
function onTaskDetailsCustAction1Hook (obj,successCb)
{
goToFeature('Customization');
customReturnCallBackMethod = successCb;
$.mobile.changePage('#laborfeedback'); //launch custom html UI
}
var dummy;
//sample HTML code
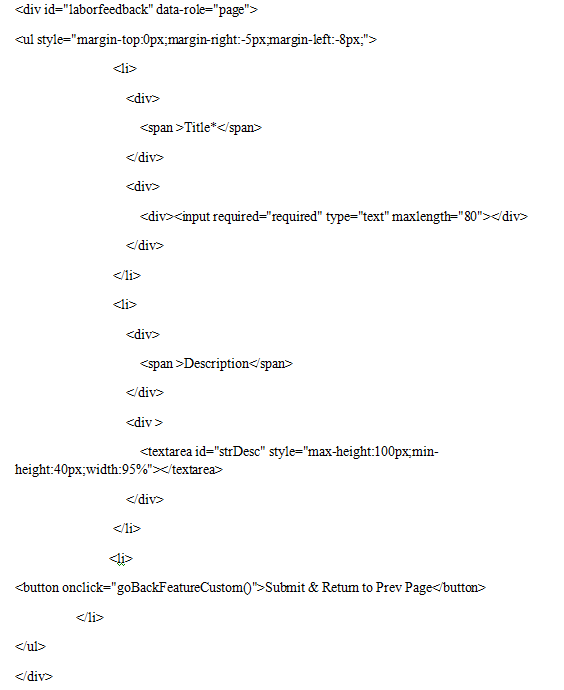
Example - Hook onTaskDetailsCustAction1Hook will invoke the UI and when the user clicks on the submit button, the control will come back to MFS.
function onTaskDetailsCustAction1Hook (obj,successCb)
        {
                goToFeature('Customization');  // navigate to custom UI
customReturnCallBackMethod = successCb; //store the callback method
$.mobile.changePage('#laborfeedback'); //navigate to laborFeedback UI.
}
Method goBackFeatureCustom() to be invoked from the Submit button of UI to return control to MFS.
function goBackFeatureCustom()
{
 goToFeature('CSM'); //navigate to MFS
 executeCustomFeatureJS(customReturnCallBackMethod ,["S@"]); //return
}
Server Side Setup of Custom Code File
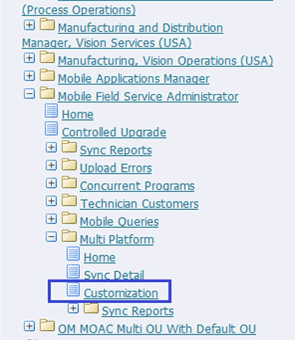
After implementing the event handler methods, user must upload the file EBS using the Mobile Field Service Administrator responsibility using the steps listed below:
-
Change the extension of the saved customized js file to '.txt'. This is to avoid any involuntary sanitizing of the file as per Note 1357849.1 - Security Configuration Mechanism in the Attachments Feature in Oracle E-Business Suite.
-
Login to EBS as a user who has access to the Mobile Field Service Administrator responsibility.
-
Access the Custom file Upload link.
-
Choose a responsibility that the customization should be available for. Oracle Mobile Field Service is the seeded responsibility. Other custom responsibilities defined for Mobile Field Service application will also be listed and a Site level option is available. When the Site level option is chosen, the customization will be available for those responsibilities without any customization.

-
Upload the customized file (with the .txt extension).
-
Save the changes.
-
Change responsibility to be able to run JTM Master Concurrent Program: Lookup concurrent program.
-
Run JTM Master Concurrent Program: Lookup concurrent program. Synchronize on the mobile device and verify that the customization is applied.
Constants
Following are the constants used by the Mobile Field Service application to pass/accept data to and from custom code.
Task Details Screen
-
TASK_DETAILS_STATUS – Task status
-
TASK_DETAILS_SUBJECT – Task subject
-
TASK_DETAILS_PRIORITY – Task priority
-
TASK_DETAILS_TYPE – Task type
-
TASK_DETAILS_SCHEDULED_START_TIME – Scheduled start time
-
TASK_DETAILS_SCHEDULED_END_TIME – Scheduled end time
-
TASK_DETAILS_PLANNED_START_TIME – Task planned start time
-
TASK_DETAILS_PLANNED_END_TIME – Task planned end time
-
TASK_DETAILS_PBM_CODE – Problem Code
-
TASK_DETAILS_RES_CODE – Resolution Code
-
TASK_DETAILS_PROBLEM_SUMMARY - Problem Summary
-
TASK_DETAILS_TAG - Tag
-
TASK_DETAILS_PARTS_SEARCH - Parts Search
-
TASK_DETAILS_RECIEVE_PARTS - Receive Parts
-
TASK_DETAILS_NOTES – Notes
-
TASK_DETAILS_ATTACHMENTS – Attachments
-
TASK_DETAILS_TRAVEL – Travel
-
TASK_DETAILS_LABOR – Labor
-
TASK_DETAILS_EXPENSE – Expense
-
TASK_DETAILS_MATERIAL_INSTALL - Material Install
-
TASK_DETAILS_MATERIAL_RETURN - Material Return
-
TASK_DETAILS_REPORT – Report
-
TASK_DETAILS_OPA – OPA (custom link)
-
TASK_DETAILS_KNOWLEDGE –Knowledge (custom link)
-
TASK_DETAILS_CUST_ACTION1 –Custom Action onTaskDetailsCustAction1Hook()
-
TASK_ID = Task Id
-
TASK_TYPE = Task Type
-
TASK_PRIORITY = Task Priority
Debrief Return Screen
-
RETURN_BUSINESS_PROCESS_ID – Return business process id
-
RETURN_SAC_ID – Return service activity ID
-
RETURN_INV_ITEM_ID – Return inventory item id
-
RETURN_SUB_INVENTORY_ID– Return sub inventory id
-
RETURN_ORG_ID –Return organization Id
-
RETURN_UOM_CODE – Return UOM
-
RETURN_QTY –Return item quantity
-
RETURN_SERIAL_NO – Return serial no
-
RETURN_RETURN_DATE – Return date
-
RETURN_REASON_CODE – Return reason code
-
RETURN_JUST_CODE – Return justification code
-
RETURN_SERVICE_DATE – Return service date
-
RETURN_INSTANCE_ID – Return instance id
-
RETURN_ITEM_NAME – Return item name
-
RETURN_DISPOSITION – Return disposition
-
RETURN_LOCATOR – Return locator
-
RETURN_LOT – Return LOT
-
RETURN_REVISION –Return revision
-
RETURN_DEST_ORG – Return destination organization
-
RETURN_DEST_SUBINV – Return destination Sub inventory
-
RETURN_SHIPPING_ADDR – Return shipping address
-
RETURN_CARRIER – Return carrier
-
RETURN_SHIP_METHOD – Return ship to method
-
RETURN_SHIPMENT – Return shipment
-
RETURN_WAYBILL –Return waybill
-
RETURN_DEBRIEF_LINE_ID –Return debrief line id
Debrief Labor Screen
-
LABOR_BUSINESS_PROCESS_ID
-
LABOR_SAC_ID
-
LABOR_REASON
-
LABOR_INV_ITEM_
-
LABOR_FLEX_FIELD
-
LABOR_START_TIME
-
LABOR_END_TIME
-
LABOR_DURATION
-
LABOR_UOM
-
DFF_DEFAULT_CONTEXT
-
INSTALL_PARTS_CUSTOM_BTN
-
SYNC_BEFORE="SYNC_BEFORE",
-
SYNC_AFTER="SYNC_AFTER",
-
MQ="MQ",
-
CURRENT_TASK_ASSGISNMENT_ID
-
SHOW_TABLE_VALIDATED_DFF
-
LABOR_FLEX_FIELD
Install Part Screen
-
INSTALL_BUSINESS_PROCESS_ID = "Business Process ID",
-
INSTALL_SAC_ID = "Service Acttivity ID",
-
INSTALL_INV_ITEM_ID = "Install Inventory Item Id",
-
INSTALL_SUB_INVENTORY = "Install Source Sub Inventory",
-
INSTALL_SUB_INVENTORY_ID = "Install Sub Inventory Id",
-
INSTALL_UOM_CODE = "Install UOM Code",
-
INSTALL_SERIAL_NO = "Serial Number ",
-
INSTALL_QTY = "Quantity",
-
INSTALL_RETURN_DATE = "return date",
-
INSTALL_REASON_CODE = "Reason code",
-
INSTALL_JUST_CODE = "Justification Code",
-
INSTALL_SERVICE_DATE = "service date",
-
INSTALL_INSTANCE_ID = "Item Instance No",
-
INSTALL_ITEM_NAME = "ItemName",
-
INSTALL_DISPOSITION = "Disposition code",
-
INSTALL_LOCATOR = "Locator",
-
INSTALL_LOT = "LOTNo",
-
INSTALL_REVISION = "Revision",
-
INSTALL_REC_INSTANCE = "Recovered Instance Field",
-
INSTALL_REC_SERIAL = "Recovered Serial Field",
-
INSTALL_PARENT_INSTANCE = "Parent Instance Field",
-
INSTALL_PARENT_SERIAL = "Parent Serial Field",
-
INSTALL_DEST_ORG = "Destination Org",
-
INSTALL_DEST_SUBINV = " Destination SubInventory",
-
INSTALL_SHIPPING_ADDR = "Shipping Address",
-
INSTALL_CARRIER = "carrier",
-
INSTALL_SHIP_METHOD = " shipment method",
-
INSTALL_SHIPMENT = "shipment",
-
INSTALL_WAYBILL = "waybill",
-
INSTALL_DFF_ATTRIBUTE_CATEGORY = " ATTRIBUTE_CATEGORY",
-
INSTALL_DFF_ATTRIBUTE1 = " ATTRIBUTE1",
-
INSTALL_DFF_ATTRIBUTE2 = " ATTRIBUTE2",
-
INSTALL_DFF_ATTRIBUTE3 = " ATTRIBUTE3",
-
INSTALL_DFF_ATTRIBUTE4 = " ATTRIBUTE4",
-
INSTALL_DFF_ATTRIBUTE5 = " ATTRIBUTE5",
-
INSTALL_DFF_ATTRIBUTE6 = " ATTRIBUTE6",
-
INSTALL_DFF_ATTRIBUTE7 = " ATTRIBUTE7",
-
INSTALL_DFF_ATTRIBUTE8 = " ATTRIBUTE8",
-
INSTALL_DFF_ATTRIBUTE9 = " ATTRIBUTE9",
-
INSTALL_DFF_ATTRIBUTE10 = " ATTRIBUTE10",
-
INSTALL_DFF_ATTRIBUTE11 = " ATTRIBUTE11",
-
INSTALL_DFF_ATTRIBUTE12 = " ATTRIBUTE12",
-
INSTALL_ITEM_NAME = "Item Name"
Install part list screen:
-
INSTALL_PARTS_CUSTOM_BTN=Custom button
-
SYNC_BEFORE=Sync Before
-
SYNC_AFTER=Sync After
-
MQ=MQ
SR Details Screen
-
SR_DETAILS_SEVERITY –SR Severity
-
SR_DETAILS_URGENCY –SR Urgency
-
SR_DETAILS_PURCHASEORDER_NUMBER –SR Purchase Order Number
-
SR_DETAILS_TYPE –SR Type
-
SR_DETAILS_PROBLEM_SUMMARY –SR Problem Summary
Miscellaneous
-
MODULE = Module
-
LABOR = Labor Screen ID
-
EXPENSE = Expense Screen ID
-
TRAVEL = Travel Screen ID
-
INSTALL = Install Screen ID
-
RETURN = Return Screen ID
-
SR = SR Screen ID
-
TASK = Task Screen ID
-
DFF_ATTR= Dff Attribute
-
DFF_DEFAULT_CONTEXT = Dff Default Context
-
CURRENT_TASK_ASSGISNMENT_ID = Current Task Assignment Id
-
SHOW_TABLE_VALIDATED_DFF = Show Table Validated Dff
-
ATTRIBUTE1 = ATTRIBUTE1
-
ATTRIBUTE2 = ATTRIBUTE2
-
ATTRIBUTE3 = ATTRIBUTE3
-
ATTRIBUTE4 = ATTRIBUTE4
-
ATTRIBUTE5 = ATTRIBUTE5
-
ATTRIBUTE6 = ATTRIBUTE6
-
ATTRIBUTE7 = ATTRIBUTE7
-
ATTRIBUTE8 = ATTRIBUTE8
-
ATTRIBUTE9 = ATTRIBUTE9
-
ATTRIBUTE10 ="ATTRIBUTE10
-
ATTRIBUTE11 =ATTRIBUTE11
-
ATTRIBUTE12 =ATTRIBUTE12
-
LOCATION_CAPTURE = Location Capture
-
ENABLE_TABLE_DEPENDENT_DFF = Enable Table Dependent Dff
-
SORT_BY = Sort By
-
INCIDENT_DATE=Incident Date
-
EXPECTED_RESOLUTION_DATE=Expected Resolution Date
-
INC_RESPONDED_BY_DATE=Inc Responded By Date
-
INCIDENT_RESOLVED_DATE=Incident Resolved Date
-
INCIDENT_OCCURRED_DATE=Incident Occurred Date
-
PLANNED_START_DATE=Planned Start Date
-
PLANNED_END_DATE=Planned End Date
-
SCHEDULED_START_DATE=Scheduled Start Date
-
SCHEDULED_END_DATE=Scheduled End Date
Generic Attachment Support
Attachments can be used for a variety of purposes, such as maps, driving directions, and product reference images.
Attachment Support
The Oracle Mobile Field Service Store and Forward applications support the download and display of attachments at a particular entity level.
The following entities have attachment-download. Multiple attachments are allowed on each entity.
-
Service Request
-
Task
The CSM: Maximum Attachment Size profile controls the maximum amount of attachment data to be downloaded.
The maximum attachment size in mega bytes is specified by the profile value.
If a single file exceeds the profile value, it will not be downloaded. For multiple files, the first n files, which are altogether less than the profile value, will be downloaded.
Steps
Complete the following steps to download the attachment:
-
In the enterprise system, create an attachment on a service request or task.
-
Run JTM Concurrent Program: Lookup.
-
Synchronize.
Run the lookup program each time an attachment is added or changed. The new attachment will come down if attached after the last run of the lookup program.
Attachment Display for Oracle Mobile Field Service Store and Forward
There is a button on the service request and task screens that opens a list of attachments.
Click the attachment link to retrieve the data from the attachments table and to save it on the file system with the appropriate file name and extension. Clicking this link will also open the file in the browser.