Using Oracle Mobile Field Service Store and Forward – Multiplatform
Overview
Oracle Mobile Field Service (Store and Forward) application (MFS) mobilizes Enterprise Field Service data on various mobile platforms using secure framework. Its offline capability allows technicians to update tasks, capture materials, time, and expenses, access inventory levels, request parts in offline mode and synchronize when they are online. The application runs in hybrid mode and leverages native device features (Camera, Voice) and touch screen capabilities thereby providing intuitive and user friendly interfaces. The application supports iOS and Android based smart phones and tablets and Windows based laptops.
Oracle Mobile Field Service (Store and Forward) application enables you to perform the following key tasks:
-
View customer
-
Create service request and task
-
Create personal task
-
View your task list using various task views
-
Create or view task notes
-
Create or view attachments
-
Get driving directions
-
Debrief task (material, labor, travel, and expense)
-
Field service report and get signature
-
Search and order parts
-
Receive parts
-
Messages
-
View trunk
-
Automatic synchronization
For information on Installation, Setup, and Implementation, see Oracle Mobile Field Service Implementation Guide.
The multi-platform Store & Forward Application, built once, can then be deployed on multiple devices and platforms. The application and functionality offered is the same across devices, whether it is on a smartphone, tablet, or laptop.
Tablets have more screen space and hence more robust screen rendering in order to leverage the bigger form factor.
The laptop edition of the multiplatform application provides flexibility such that it can be used by a single user doing their break fix job independently or by multiple users who belong to the same group and share the same device to access their data.
This section describes the basic field service features offered by the multiplatform application. The navigation and user interface on the tablets is described in the section Oracle Mobile Field Service (S&F) Multiplatform - Tablet Edition. Setting up a multi-user environment and leveraging some additional capabilities such as the Administrator Dashboard are further described in the section Oracle Mobile Field Service (S&F) Multiplatform - Laptop Edition.
Springboard/Home Screen
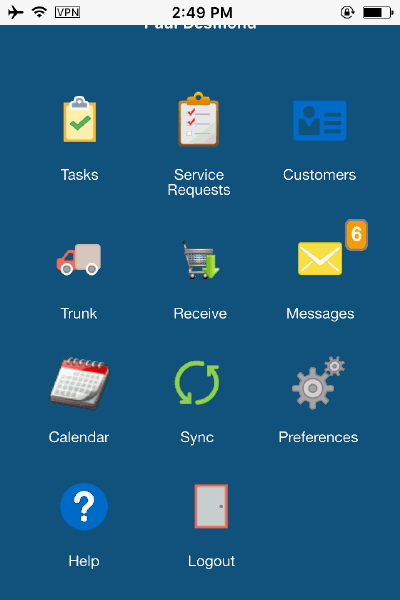
Oracle Mobile Field Service Store and Forward – Multiple Platforms application provides various global functions in its Home screen.
-
User Name: Displays the name and the picture of the logged user
-
Task: Allows you to view list of tasks assigned to you
-
Service Requests: Allows you to view list of service request assigned to you
-
Customer: Allows you to view list of customers
-
Trunk: Allows you to view your trunk stock
-
Receive: Allows you to view all parts orders that are ready to receive to your Subinventory
-
Messages: Allows you to view all deferred error messages
-
Sync: Allows you to synchronizes Mobile Field Service client with the enterprise system
-
Preferences: Allows you to view the current settings and allows to change those preferred settings
-
Help: Allows you to view the client version. Also it allows you to enable to Diagnostic log files
-
Logout
Setting Preferences
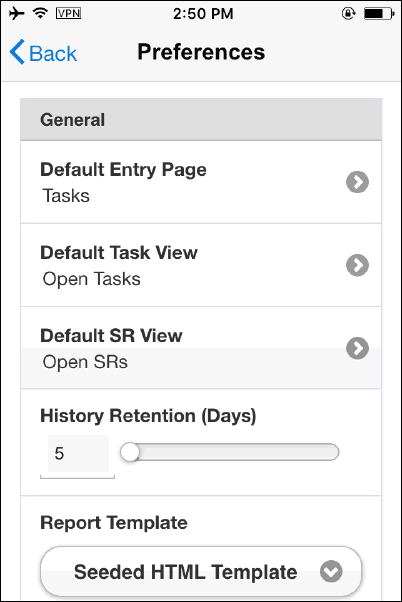
You may use preferences screen to set either the Task List screen or the Home screen as your default landing page. You may also set views as their default task view. For example, Today's Tasks view displays all tasks that are scheduled for that day.
To set preferences:
-
Navigate to the Home page and tap the Preferences icon.
-
Default Entry Page allows you to set the default landing page. Options are: Home Page, Message, Service Requests, and Tasks.
-
Default task view determines which task view should be used when you navigate to Task list screen every time. You may override this by selecting the task views from Filter present in task list screen. The choices are :
-
Today's Tasks
-
Open Tasks
-
Today's Open Tasks
-
Tasks For Date
-
-
Default SR view determines which SR list view should be used when you navigate to SR list screen every time. You may override this by selecting the SR view when you are inside the SR list screen. The choices are :
-
Today's SRs
-
Open SRs
-
Today's Open SRs
-
SRs For Date
-
-
History Retention (Days): This setting determines how long the task will be retained in the client after closing the task.
-
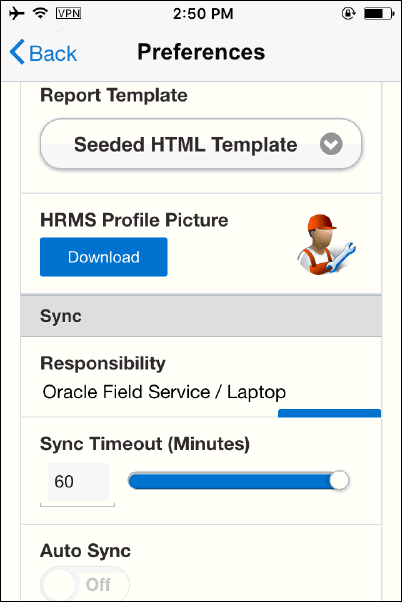
Report Template. This setting determines what format to be used while generating reports.
-
Seeded HTML Template
-
Seeded PDF Template
-
-
HRMS Profile Picture: This option allows you to attach your profile picture. During the initial install, the profile picture will be downloaded from HRMS (if you attach picture while setting up the resource). Later you may change the picture using your photo album from your device.
-
Sync Timeout (Minutes): This settings determines how long to try sync before the timeout.
-
Auto Sync: This setting shows whether Automatic Synchronization is enabled or not. Refer Synchronization section to learn more about the details.
Getting Help
Help screen allows you to view the activity logs, Diagnostics, and view the installed version of the application.
-
Navigate to Home, tap Help.
-
Tap any of the following:
-
Activity Log – to view the log of all system activities.
-
About – to view product details such as release, End user License Agreement, and Oracle Privacy policy.
-
Diagnostics – to enable or disable diagnostics which allows you to troubleshoot the application.
-
Viewing Messages
The Message screen displays details of deferred transactions that help technicians to troubleshoot issues encountered during synchronization. You can also view, compose messages, reply, forward, and delete messages from the Inbox.
Viewing Technician's Task List
A task list provides a quick summary of the tasks assigned to the field service technicians and can be accessed via the Tasks icon on the Home screen of the multiplatform application. The Task list gets refreshed and display new tasks (if any) when you synchronize the device with the enterprise server. By default, the Task screen displays the list of Open tasks assigned to the client. See screenshots below.
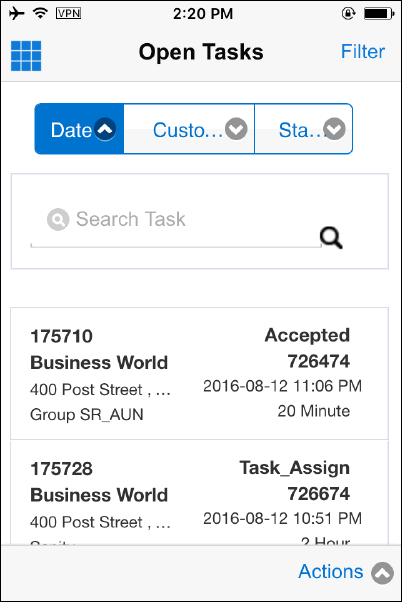
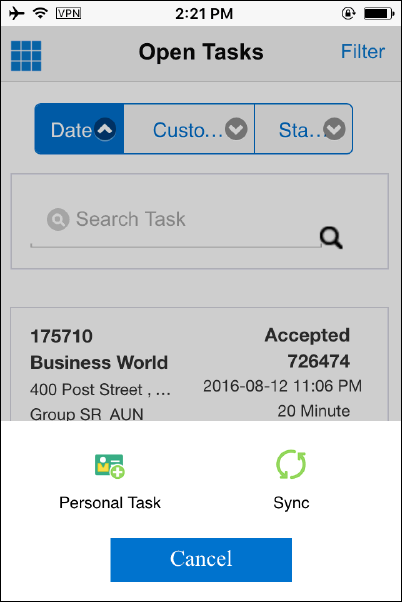
A task view has the following components: Home, Filter, Sort fields, Task list, and Actions. Note: In Android devices, Actions menu can be accessed by device menu.
-
Home icon that launches the Home screen or springboard which provides the technician with options to view customers, create new service requests, view their trunk stock, receive parts assigned to them, view messages, set default preferences, check the current client version, enable database logging using debug options, etc.
-
Task Filter that allows you to either view tasks that are assigned for that day or all tasks irrespective of the scheduled date. Additionally, it allows you to search all open tasks using a date range. Note: You may set the default task view using Preferences screen.
-
The sort fields allow you to sort the task display based on Scheduled Date, Customer, or Status. The sort icon toggles between ascending or descending order each time when you tap the icon.
-
Task list section is a multi row section which displays tasks. Each task record consists of following fields: Task Number, Status, Service Request, Customer Name, Customer Address, Task Scheduled Date, Task Subject, and Planned Effort. You can view additional tasks (if any) by scrolling down by simply swiping up or down. By default 20 tasks are shown at a time. You can open the task by tapping any task record.
-
The Action button launches the Actions menu. The actions menu is present in various screens throughout the app and provides context sensitive options for the user to select. In Task list, this action menu allows you to initiate manual synchronization or create personal task.
Viewing and Opening Tasks
You can tap any task record to open the task details screen to view more details. This screen provides complete details about the job that needs to be performed. Complete the following steps from the Task list screen to access a task:
-
Navigate to the Task list screen.
-
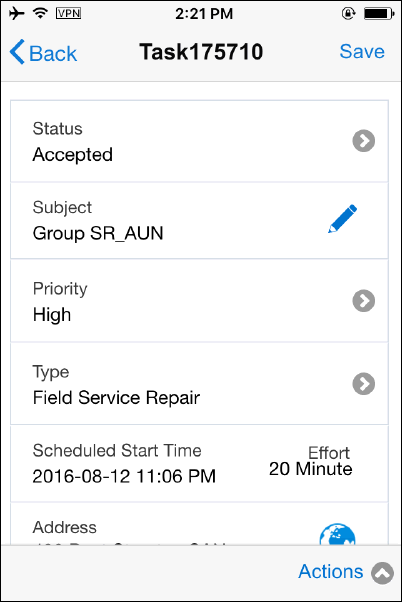
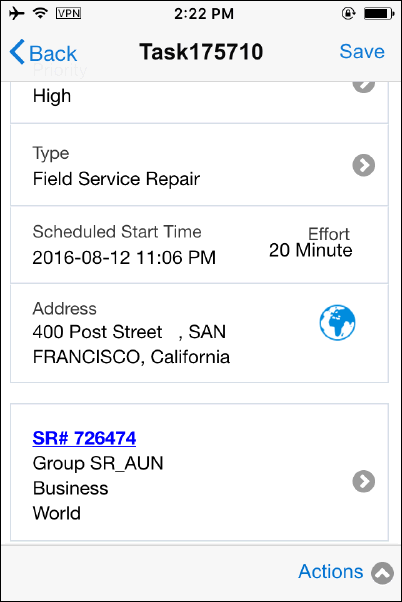
Tap the selected task. The Task screen launches with the following information:
-
Status - displays the current task assignment status of the task. Technicians will be able to change the status using task assignment status LOV. Task assignment status LOV will display only the next status based on the status transition rule. This status transition plays a role in defaulting both travel and labor lines automatically.
-
Subject - Editable field that displays the brief description of the task.
-
Priority - Displays the task priority and you may change the value using drop down if needed.
-
Type - Displays the task type which generally represents field service tasks.
-
Scheduled Start Time- Displays schedule Start Date/Time.
-
Effort - Read-only field that displays the effort for the task.
-
Address - Displays the location of the task. Tap the map icon located in the address region to launch Google map which is the default map integrated to MFS. It gives you step by step directions and voice assisted driving directions.
-
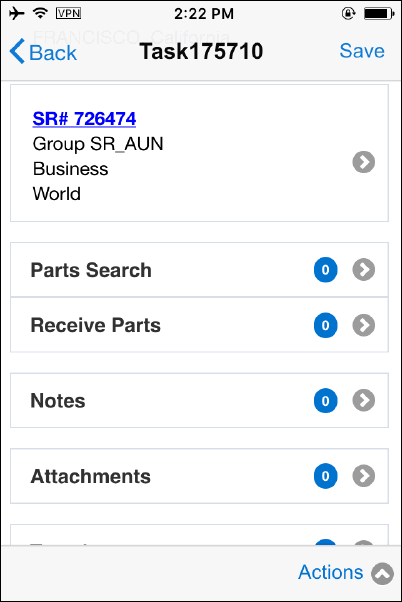
SR region - Displays service request number and Customer Name associated with the task. You can view more details about the service request by tapping the service request number hyperlink.
-
Parts Search - Provides the ability to find parts availability across various warehouses and trunk stocks of other technicians, and all sub-inventories assigned to you. You may create order from the search results.
-
Receive Parts - provides the ability to receive all shipped orders into your trunk.
-
Note - Allows you to view various action plans attached to your task. Generally, call center agents create such notes during task creation. Additionally, you can create your own note and upload to the server.
-
Attachment - Provides the ability to view/download/upload various types of attachments. Refer attachment section for more details.
-
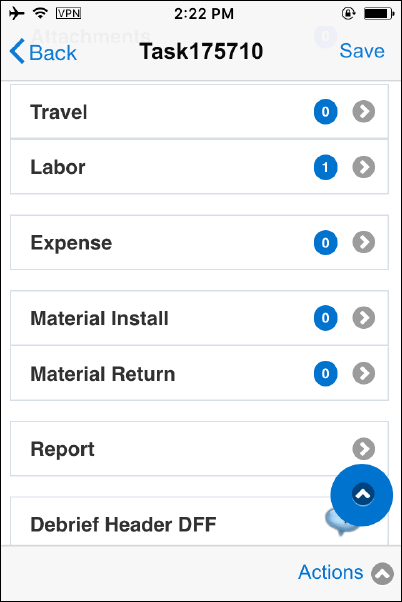
Field service technicians use the next few fields to capture Travel and Labor related information, and report on material (Material Install and Material Return), and Expense for their individual task assignments. Data gathered is used for generating customer invoices, updating the installed base, and maintaining the service vehicle trunk stock.
-
Report - Allows you to generate field service report, get customer signature, and send via various mode such as email and Print.
-
Debrief Header DFF - Descriptive flexfield to capture any additional debrief information.
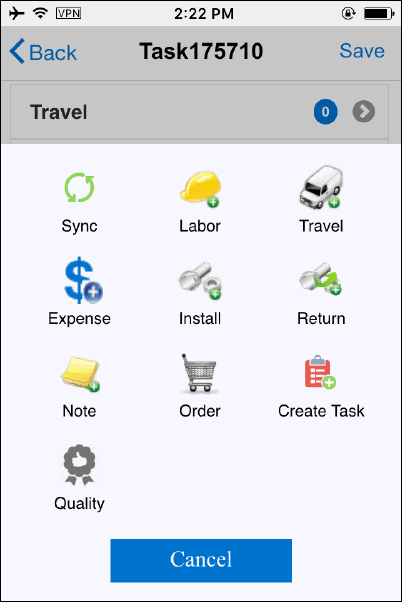
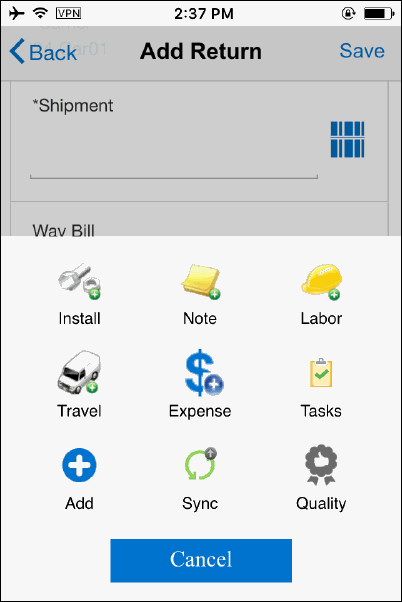
Actions menu present in the Task screen provides context sensitive actions for the technician. See the following screenshots.
-
Performing Debrief
As a technician, you have the ability to debrief the task after you perform the job at customer site. MFS application allows you to add Travel, Labor, Material (Install and Return), and Expense lines to the task.
Adding Travel Debrief
You create a Travel line to report how much travel time was involved during the completion of a task. MFS application enables you to add travel lines during the case progression.
Complete the following steps to add travel debrief lines to a task.
-
Navigate to the Task Details screen by tapping the desired task.
-
Navigate to the Travel Summary screen by tapping the Travel menu present in the Task Details screen. This screen allows you to view/edit existing Travel lines. You can create a new Travel line by tapping the Add Travel menu. If there is no travel debrief exists, Add Travel screen opens directly.
-
Tap Add Travel to add a new travel debrief or tap an existing travel line to open the Travel screen in the edit mode. In case of completed tasks, the debrief lines will be displayed in read-only mode.
-
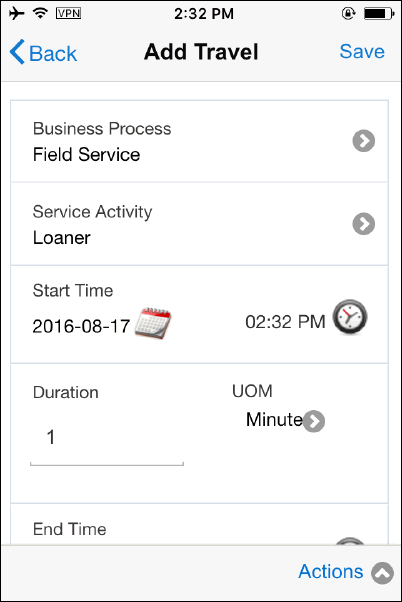
Business Process and Service Activity Code will be defaulted. You may change these values by selecting appropriate dropdown using caret symbol.
-
Start Time: The default start date and time is displayed based on the CSF: Default Labor Debrief Date/Time profile option. You may edit the date and time using the date and time picker widget.
-
Duration: Gets defaulted from the Task Type setup.
-
UOM: The default Unit of Measure defaults from the Task Type setup.
-
End Time: Gets calculated from Start Time and the Duration. You may edit the date and Time using the date and time picker widget.
-
Travel Item: You can choose appropriate travel item using the Item lov.
-
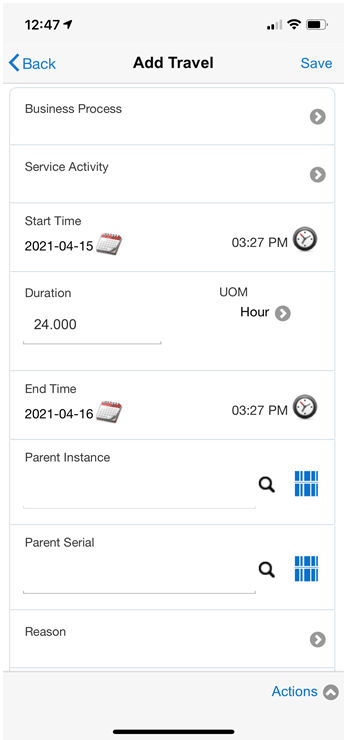
If the service request has multiple products, you will see the Parent Instance and Parent Serial fields.
-
There are two ways in which you can select the product for debrief:
-
You can enter the instance number and serial number manually. You can also scan the barcode of the instance number or serial number.
-
You can use search and select from the list of values.
-
-
For travel debrief lines, the default value is the primary product. You can select other non-primary products.
-
Tap Save icon to save the Travel debrief line.
-
Tap Back icon to go to the Travel Summary screen without saving the line.
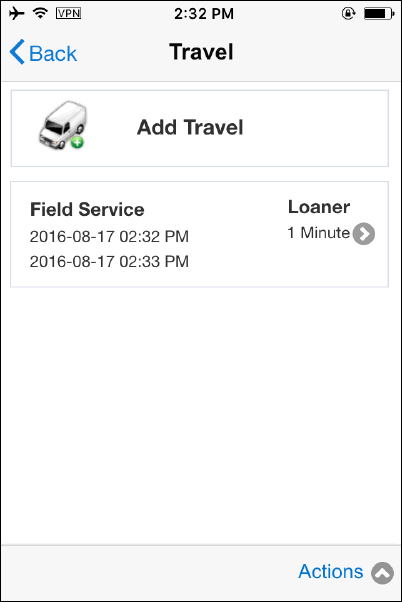
-
You may delete the saved debrief lines by tapping Delete icon. Delete option is available in the Action menu. Delete is not allowed once the task is completed.
Note: If the profile CSF: Default Labor Debrief Date/Time is set to Status Change, travel line will be automatically created upon status transition.
Actions menu provides additional context sensitive actions.
Adding Labor Debrief
You may create a labor line to report how much labor time involved in the completion of the task. MFS application enables you to add labor lines during the case progression. Additionally, you can enforce mandatory labor debrief by adding business rules that restricts users to close the task until you create a labor line.
Complete the following steps to add labor debrief lines to a task:
-
Navigate to the Task Details screen by tapping the desired task.
-
Navigate to the Labor Summary screen by tapping the Labor menu present in the Task Details screen. This screen allows you to view and edit existing Labor lines. You can create new labor line by tapping the Add Labor option.
-
Labor Summary page opens if you created a labor debrief earlier. If no Labor debrief exists, Add Labor screen opens directly.
-
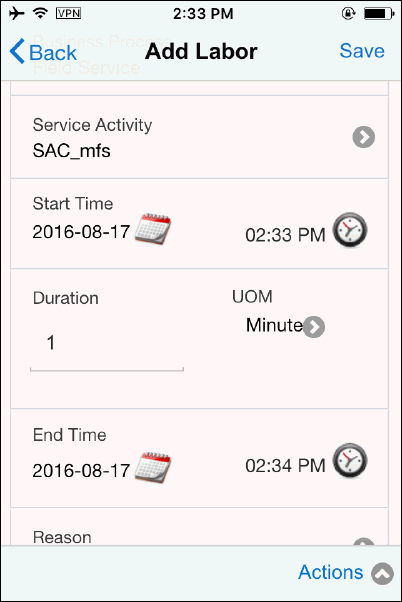
Tap Add Labor to add a new labor debrief or tap an existing labor line to open the Labor screen in the edit mode. In case of tasks that have been completed, the debrief lines display in a read-only mode.
-
Business Process and Service Activity Code will be defaulted. You may change the values by selecting appropriate dropdown using caret symbol.
-
Start Time: The default start date and time is displayed based on the CSF: Default Labor Debrief Date/Time profile option. You can edit the date and time using the date and time picker widget.
-
Duration: Gets defaults from the Task Type setup.
-
UOM: The default Unit of Measure defaults from the Task Type setup.
-
End Time: Gets calculated from Start Time and the Duration. You can edit the date and Time using the date and time picker widget.
-
Labor Item: You can choose the appropriate labor item using the LOV.
-
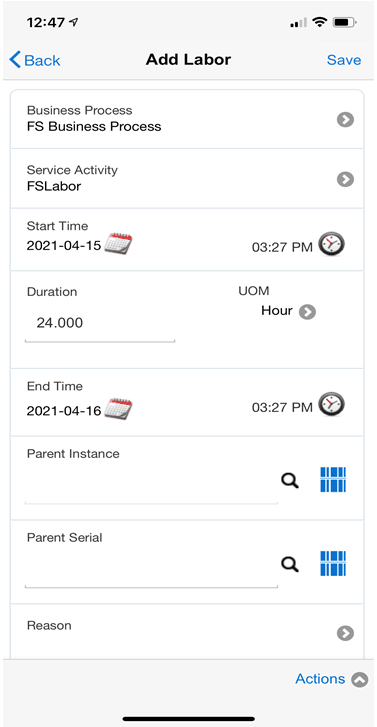
If the service request has multiple products, you will see the Parent Instance and Parent Serial fields.
-
There are two ways in which you can select the product for debrief:
-
You can enter the instance number and serial number manually. You can also scan the barcode of the instance number or serial number.
-
You can use search and select from the list of values.
-
-
No default value is displayed for labor debrief. You must choose from the available products.
-
Tap Save icon to save Labor debrief line.
-
Tap Back icon to go to Labor Summary screen without saving the line.
-
You may delete the saved debrief lines by tapping Delete icon. Delete option is available in the Action menu. Delete is not allowed once the task is completed.
Note: If the profile CSF: Default Labor Debrief Date/Time is set to Status Change, travel line will be automatically created upon status transition.
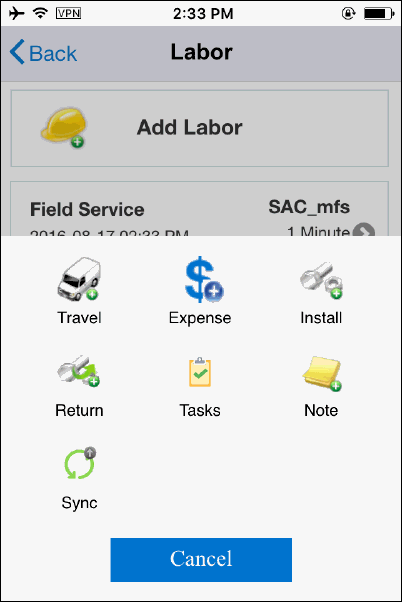
Actions menu provides additional context sensitive actions.
Adding Material Install Debrief
You may report on installed material using Material Install. Reporting of items installed and recovered is necessary to plan for the supply of service parts, to maintain the installed base, and to generate an invoice for material used. Material information is entered is used to update Oracle Inventory, Install Base, and Charges. You may create multiple material lines for a given task assignment. You cannot modify material lines that have been submitted to Charges. You can however, add new material lines. If the service request has multiple products, you can create debrief for the primary as well as the non-primary products.
Prerequisites
You must have Oracle Spares Management fully implemented.
Complete the following steps to add material install debrief lines to a task:
-
Navigate to the Material Install Debrief Summary screen by tapping Install menu present in the Task Details screen. This screen allows you to view and edit existing material lines. You may create new material install line by tapping the Add Install option.
-
Tap Add Material to create a new material debrief line. Tap any existing material line (if any) to open the Material Install screen in the edit mode. In case of tasks that have been completed, the debrief lines display in a read-only mode.
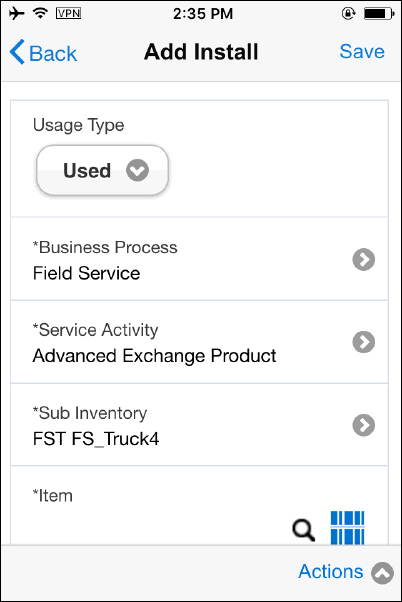
-
Select one of the following Usage Types using the usage type drop downs:
-
Defective On Arrival (DOA): Select this option if you find the item defective upon arrival and needs to be shipped back to a defective warehouse.
-
Unused: Select this option if the item is not used during debrief and must be shipped back to the Usable warehouse.
-
Used: Select this option to install the Item at customer location.
For DOA and Unused types, Business Process and Service Activity Code will not be rendered. Additionally, fields such as Destination Organization, Destination Subinventory, ship to address, carrier, shipment number (mandatory only if the transaction is of Inter Org transfer type), and waybill number are displayed. This information is essential in order to route the item to the appropriate destination.
Note: You need to setup return routing rules in spares management module in order to create accurate routing transactions for Defective On Arrival and Unused item. Additionally, you have to enable CSF: Enable Return Routing profile. Refer Spares Management implementation guide to learn more details on how to setup return routing rules.
-
-
Business Process, Service Activity Code, and the default Subinventory will be defaulted once you choose Usage Type “Used”. You may change the values by selecting appropriate dropdown lov using caret symbol.
-
Enter or select the item number. Once you select the item number, Item Description, Disposition status, Quantity, and UOM will be defaulted. In case of Non Serial item, you can change the quantity.
-
Additionally, On-hand Quantity and Available Quantity will also be defaulted.
-
Return Debrief checkbox is used to check whether Return debrief lines should be created after saving the install line. If this flag is checked, Return screen will be launched after you save the install debrief record. This helps you to create Return lines quickly.
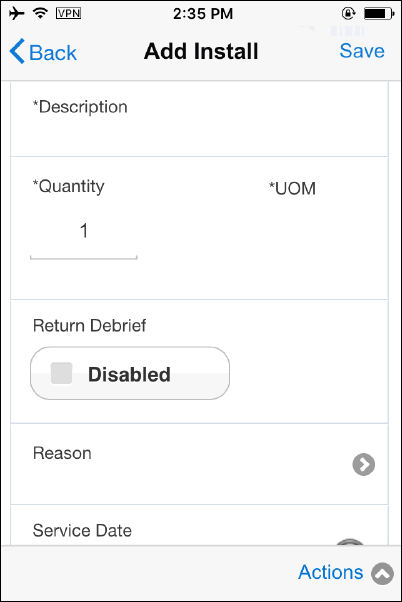
-
If the item is Serial Controlled, you can capture serial number using Search and Find Icon or by using the bar code scanner. Instance Number will be backfilled when you select the Serial Number.
-
If the item is not Serial Controlled, you may capture Instance Number by using Search and Find Icon or by using the bar code scanner. Serial Number field will not be rendered if the item is not Serial Controlled.
-
Additionally, you may capture fields such as Recovered Instance, Recovered Serial, Parent Instance, and Parent Serial, in order to complete the transaction. If the service request is created with Install Base instance details, Parent Instance and Parent Serial fields will be pre populated.
-
If you select DOA or Unused as your Usage Type, you need to enter additional information such as:
-
Destination Organization and the Destination Sub Inventory fields will be pre populated
-
Enter Ship To Address and Carrier
-
Enter Shipment Number and Waybill.
-
-
Select Revision if the item is revision controlled.
-
Select Locator if the item is locator controlled.
-
If the service request has multiple products, you will see the Parent Instance and Parent Serial fields.
-
There are two ways in which you can select the product for debrief:
-
You can enter the instance number and serial number manually. You can also scan the barcode of the instance number or serial number.
-
You can use search and select from the list of values.
-
-
When the service request has multiple products, no default value is displayed for material debrief. You must choose from the available products.
-
Tap Save icon to save the material debrief line.
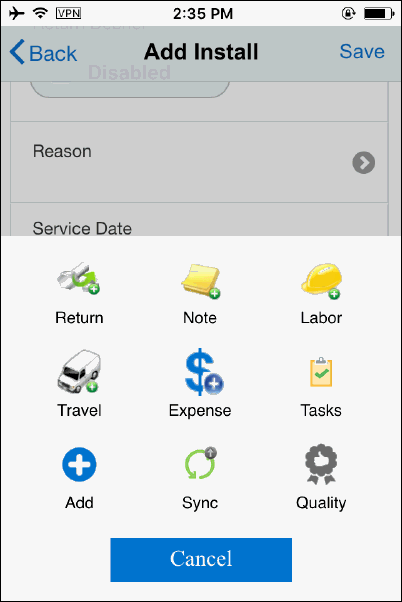
-
Tap Back icon to go to the Material Summary screen without saving the line.
-
You may delete the saved debrief lines by tapping Delete icon. Delete option is available in the Action menu. Delete is not allowed once the task is completed.
Actions menu present in the Task screen provides context sensitive actions for the technician.
Adding Material Return Debrief
Material Return screen is used to capture debrief lines when items are removed from the customer site. For example, if a part installed at the customer site has to be retired because it is worn out, the technician enters the details of the worn out part in the Material Return section.
Prerequisites
You must have Oracle Spares Management fully implemented.
Complete the following steps to return parts:
-
Navigate to the Material Return Summary screen by tapping the Return menu present in the Task Details screen. This screen allows you to view and edit existing material lines. You can create a new material return line by tapping the Add Return menu.
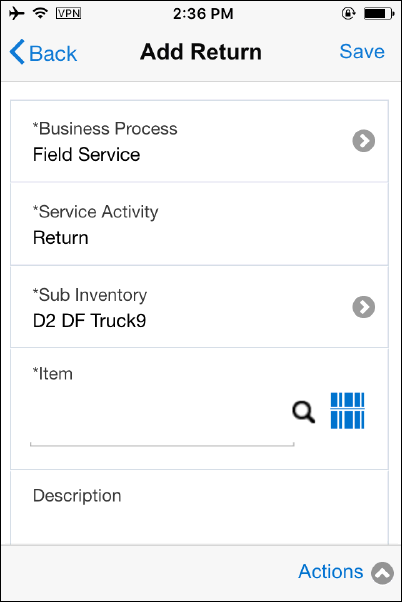
-
Business Process, Service Activity Code, and the default defective Subinventory will be defaulted. You can change the values by selecting appropriate dropdown using caret symbol.
-
You can enter or choose one of the following option to select the item:
-
Search and Find icon allows to search the item
-
Bar Code scan icon allows you to scan the item using scan the Item Number. Bar Code scan icon launches native device camera that allows you to scan the bar code scan.
-
-
Once you enter the Item Number, it gets validated against the local database. If the validation fails, it checks whether the Item details are available in the server (if the device is online) and downloads the Item details to the local device and you can create a return debrief.
Due to the offline nature, an additional business rule has been implemented to restrict the number of items download when you install the client application for the first time. Following logic depicts how Server side concurrent program JTM: Master Concurrent program (with INV parameter) downloads items during the initial sync:
-
Item instance specified in the service requests along with its descendants (up to two levels) is downloaded.
-
Most frequent items that are returned from all customer locations globally are downloaded based on the combination of following two profile options.
-
CSM: Maximum Number of Items: This profile determines the maximum number of items to be downloaded. This profile must be set at the responsibility level. The default value is 500.
-
CSM: Return Activity Duration: This profile sets the duration of the return activity. For example, if this profile is set to 90 days, concurrent program:
- First fetches items that are returned from various customer sites during the past 90 days
- Creates a list of most frequently returned items from above list
-
This profile must be set at the responsibility level. The default value is 90 days.
-
The concurrent program does not download any supersession or substitute items associated with the most frequently downloaded items.
-
-
-
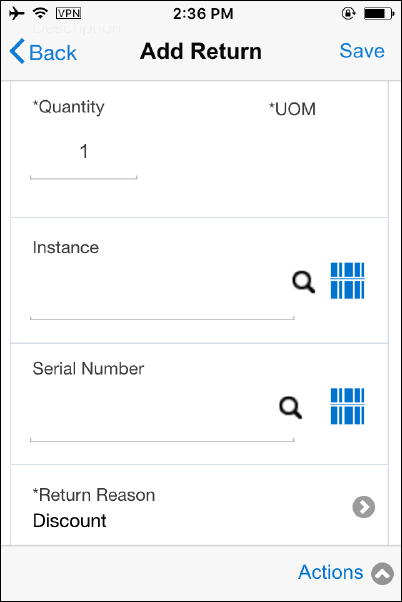
Enter Quantity if the item is Non Serial Controlled. In case of Serial item, Quantity field will be defaulted to one.
-
Enter Instance or Serial Number in the respective field. These fields are bar code enabled.
-
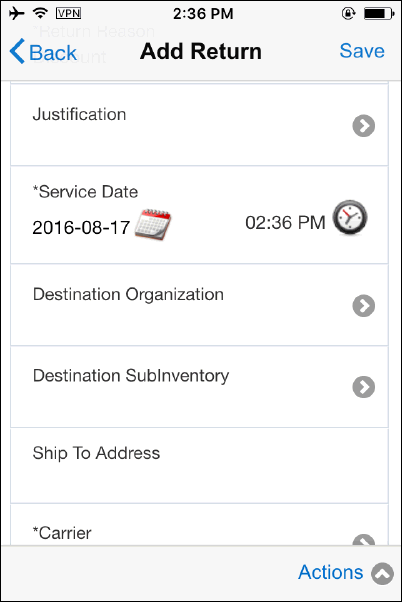
Confirm Destination Organization, and Destination Sub-Inventory. These fields are defaulted based on your return routing rule setup.
-
You may enter additional fields such as Carrier, Shipping Method, Way Bill, Shipment Number.
-
If the line level flexfields are enabled, you may enter this information also.
-
Select Revision if the item is revision controlled.
-
Select Locator if the item is locator controlled.
-
Tap Save icon to save the Return debrief summary screen.
-
Tap Back icon to go to the Return Summary screen without saving the line.
-
You may delete the saved debrief lines by tapping Delete icon. Delete option is available in the Action menu. Delete is not allowed once the task is completed.
Actions menu present in the Task screen provides context sensitive actions for the technician.
Adding Expense Debrief
Material Expense screen is used to capture all expenses during the task. Expenses can be your travel expenses, Hotel accommodation, and other miscellaneous expenses that you incur during the case progression.
You may create multiple expense lines for the task. As a technician, you cannot modify expense lines that have been submitted to Charges. Technicians can however, add new expense lines for the task as long as the task assignment status is not 'Closed'.
Complete the following steps to create expense line parts:
-
Navigate to the Task Details screen by tapping the desired task.
-
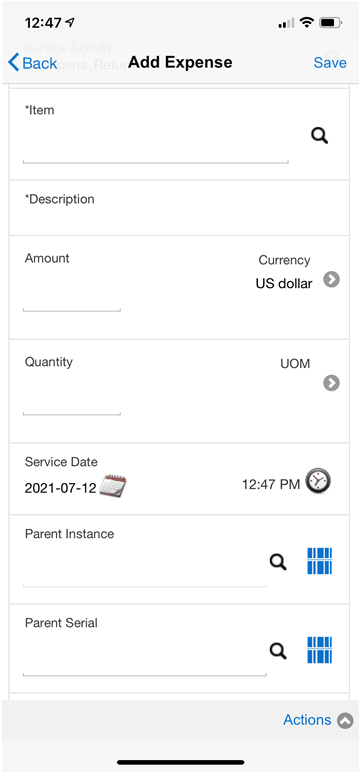
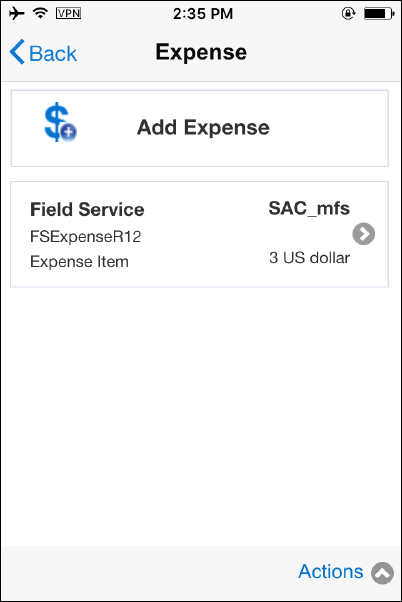
Navigate to the Expense Summary screen by tapping the Expense menu present in the Task Details screen. This screen allows you to view and edit existing expense lines. You can create a new expense line by tapping the Add Expense option.
-
Expense Summary page opens if you created an expense debrief earlier. If no expense debrief exists, Add Expense screen opens directly.
-
Enter your expense Item or choose the Item using Search and Find icon.
-
Once you enter the Item Number, Description will be automatically populates in respective field.
-
Enter expense amount.
-
The Currency field default value is based on the currency set for the profile option: JTF_PROFILE_DEFAULT_CURRENCY. You can change the value if necessary.
-
Select a Service Date from the date list of values. The system date appears by default.
-
If the service request has multiple products, you will see the Parent Instance and Parent Serial fields.
-
There are two ways in which you can select the product for debrief:
-
You can enter the instance number and serial number manually. You can also scan the barcode of the instance number or serial number.
-
You can use search and select from the list of values.
-
-
The primary product is displayed by default. You can choose from the available products.
-
Tap Save icon to save the Expense line. Newly created Expense line displays in the Expense summary screen.
-
Tap Back icon to go to the Expense Summary screen without saving the line.
-
You may delete the saved debrief lines by tapping Delete icon. Delete option is available in the Action menu. Delete is not allowed once the task is completed.
Actions menu present in the Task screen provides context sensitive actions for the technician.
Related Topics
Record Counter Readings
Optionally, you can record counter readings. Counter readings can only be recorded for customer products defined in the installed base that have a counter assigned to them. When no counter is associated with the product, the counters region does not display.
MFS display an alert if you failed to capture reading for a counter enabled install base item. MFS application raises this alert when the task assignment status is changed to either 'Completed' or 'Closed'.
Viewing Service Request Details
To view the details of the service request associated with the task:
-
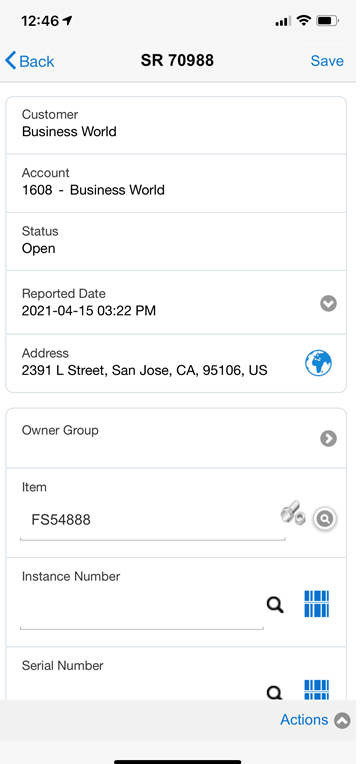
Navigate to the Task Details screen and click on the service request link. Alternatively, you can navigate to the springboard by tapping on Home and then tap Service Requests. This opens the SR list. Select any service request to go to the SR Details screen.
-
In the SR Details screen, you can see all the details about the service request.
-
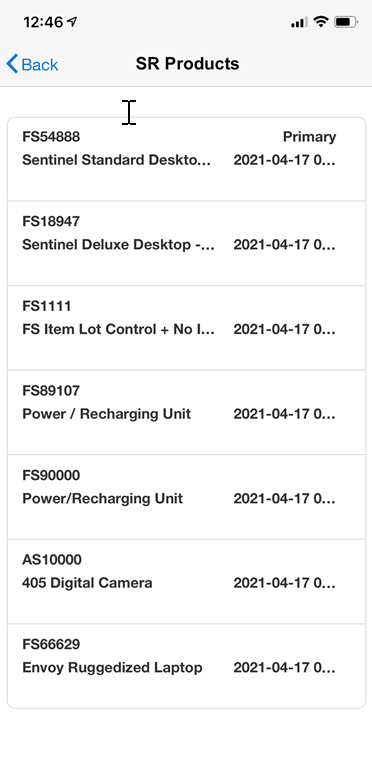
Scroll to the Item details. If there are multiple products linked to the service request, you will see an icon in this Item region.
-
Click this icon to open the SR Products screen where you will see a list of all the products that are associated with this service request. The primary product is the product on the service request header. All other products are non-primary products. You can view the following attributes for each item:
-
item name
-
item description
-
instance number
-
serial number
-
external reference/TAG
-
Viewing Customer Information
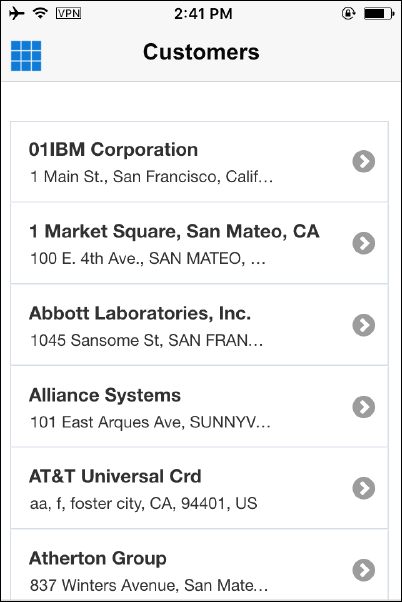
Customer screen displays list of all customers with active tasks assigned to the technician.
You can create Service Request by tapping any one of the attribute displayed in the screen. For example, you can create a new service request by tapping customer's account number.
Complete the following steps to view customer information:
-
Navigate to the Springboard.
-
Tap customer icon to launch Customers screen. This screen displays a list of customers that has active task assigned to you.
-
You may tap customer record to launch Customer Details screen to view more details about the customer.
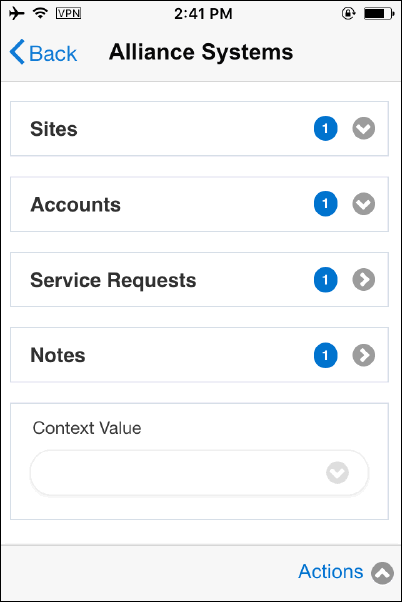
-
Customer Details screen displays Site, Accounts Service Requests, and Notes. The badge icon displays number of records available for that attribute. For example, Site field badge shows numeric one which means there is only one Site details downloaded for the customer. The badge 3 against Service Request represents the number of active service requests assigned to you from this customer.
Creating and Viewing Task Notes
You may create Notes for a number of reasons. For example, Dispatcher may want to add troubleshooting tips or actions plans that may assist field technicians when they are at the customer site. Additionally, as a field technician, you may create additional notes as feedback/comments about the work done for the task.
Note feature is supported at both Service Request level and at Task level.
Complete the following steps to create or view the Notes:
-
Navigate to the Task Details screen by tapping the appropriate task.
-
Navigate to the Note Summary screen by tapping the Note menu present in the Task Details screen. This screen allows you to view existing Note(s) if there is a note already downloaded from the server or created earlier.
-
Tap Add Note to create a new note.
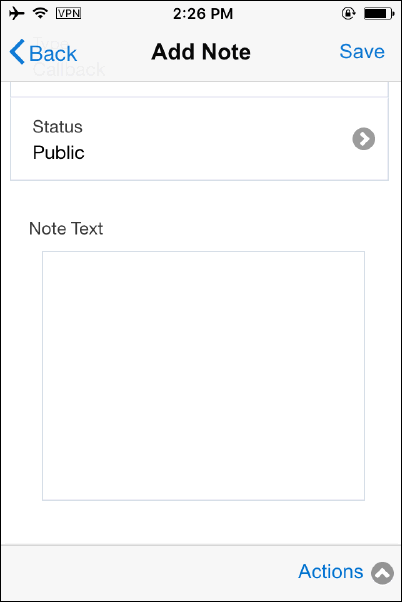
-
Select the type of the note from the Type or you can choose the defaulted value.
-
You can set the visibility by setting an appropriate Status. For example, if you want to set the note to be visible to everyone, you may set the status to Publish. Other available statuses are public and private.
-
Enter the note text in the Note Text field. You can enter up to 2 GB data in this field.
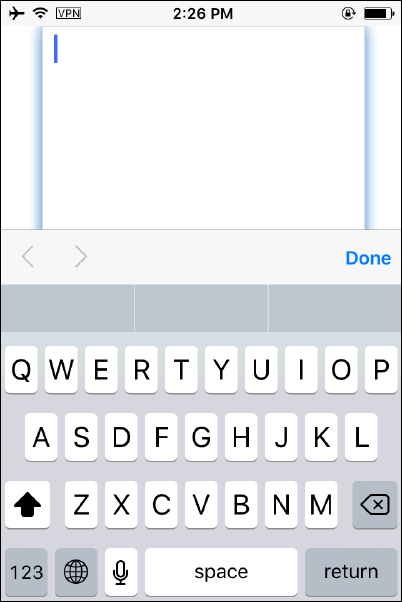
-
Tap Save to save the line and go back to Note Summary screen. Newly created note displays in the Note summary screen. This Note is added to the task in context.
-
The Edit/View icon toggles between Edit and View each time when you tap the icon. You may bring the window to edit mode in order to edit the text.
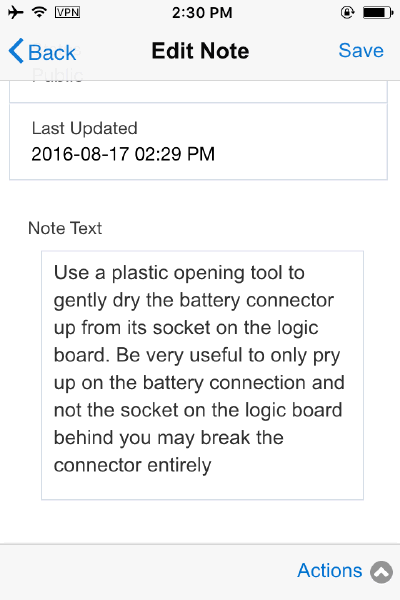
-
Tap Back to go back to the Note Summary screen without saving the line.
-
Toggle button (Edit/View) present displayed on the screen allows you to edit the note.
Creating an AI-assisted Note
You can enter simple text into a note and use the Generate Field Service Notes action to create an enhanced note using AI. After the AI-generated note appears you can accept, reject, or regenerate the suggestions. AI creates notes by leveraging a Large Language Model (LLM). The LLM is configured in the EBS Large Language Model REST Service.
-
Navigate to the Task Details screen by tapping the appropriate task.
-
Navigate to the Note Summary screen by tapping the Note menu present in the Task Details screen. This screen lets you view existing note(s) if a note has already been downloaded from the server or created earlier.
-
Tap Add Note to create a new note.
-
Enter some initial text in the Note Text field.
Add Note
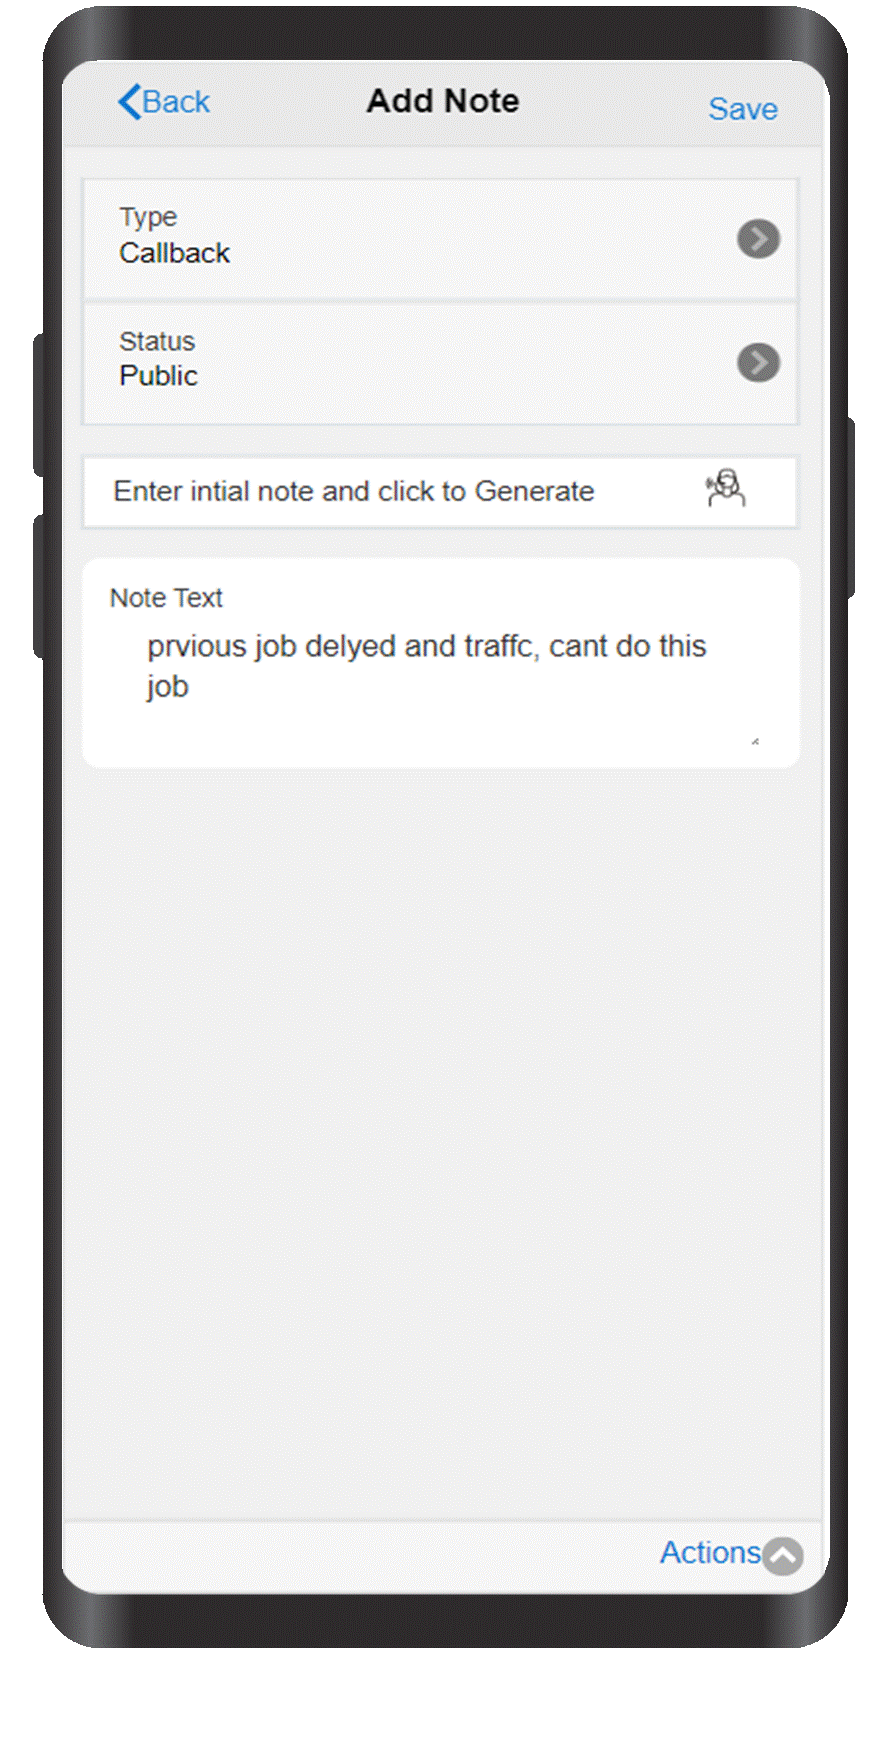
-
Click the Generate icon. This submits the request to the EBS server, which generates a note using the Generative AI service.
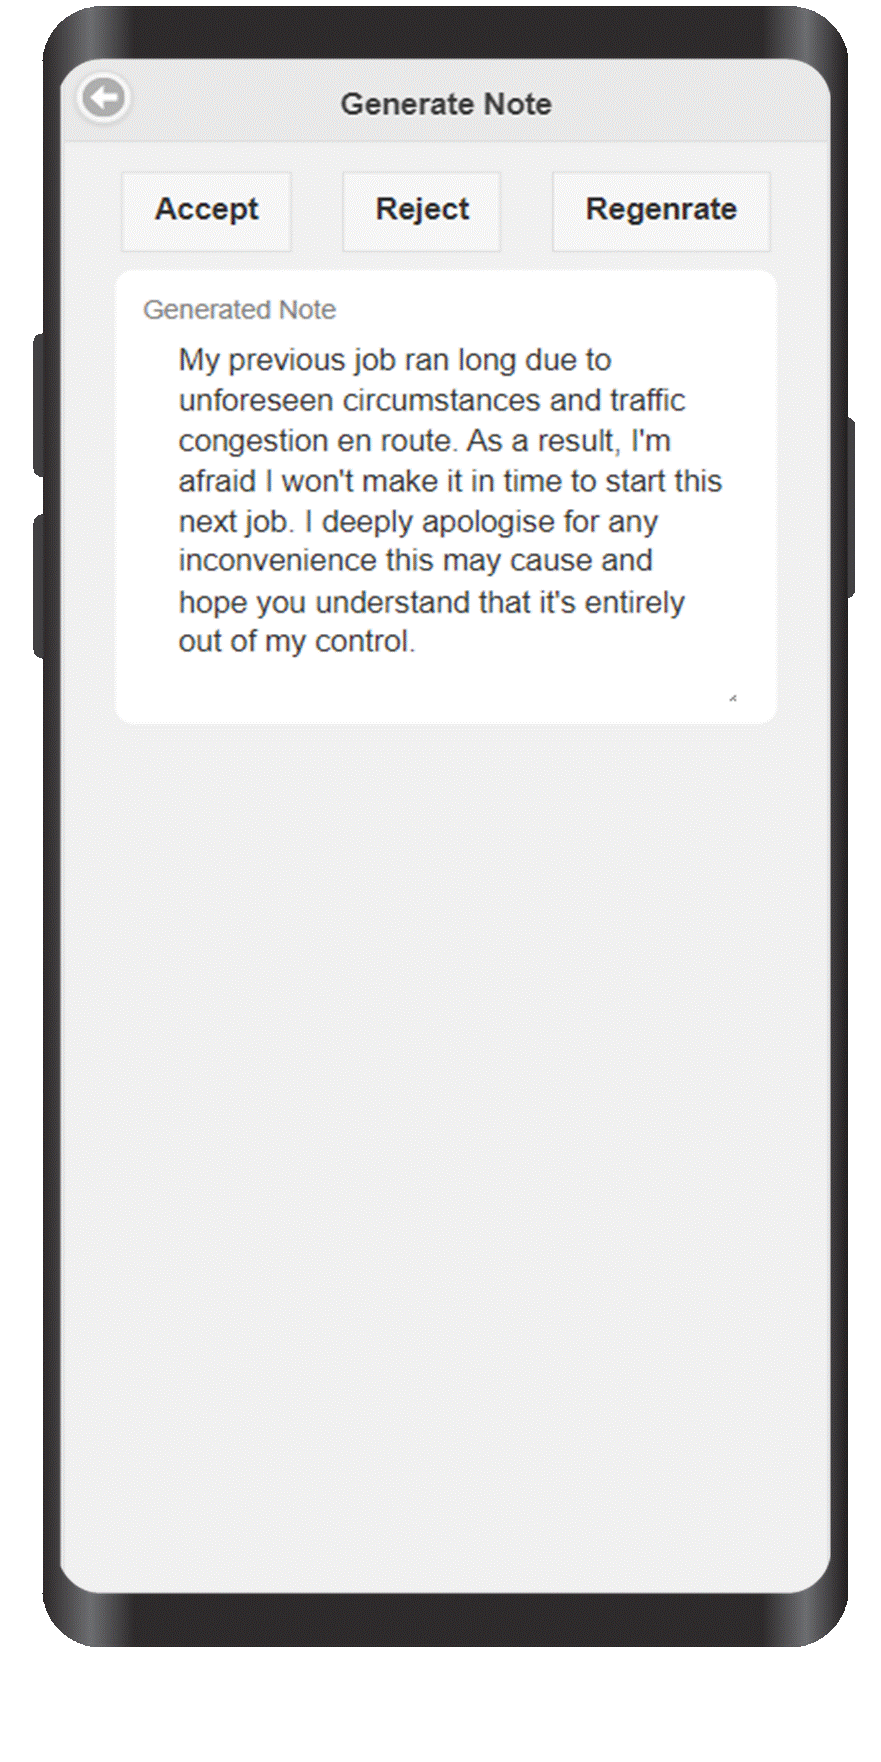
Generate Note
-
Review the response in the MFS application.
-
Select Accept, Reject, or Regenerate.
-
Accept: Generated text populates the Note field so that you can review and save it.
-
Reject: Generated text is rejected and you're returned to the Note screen.
-
Regenerate: Note is generated again, and the newly generated text appears.
-
-
Save.
Creating and Viewing Attachments
Field Service technicians have the ability to upload service request attachments, such as photos, drawings, and diagnostic data from their mobile devices. Attachments can be added at the task level or at the service request level. These attachments will be uploaded to the server during the next synchronization and expert technicians can analyze the problem remotely and provide accurate troubleshooting guidance to the onsite technician.
Complete the following steps to add a new attachment to a task:
-
Navigate to the Task Details screen by tapping the desired task.
-
Navigate to the Attachment Summary screen by tapping the Attachment menu item from the Task Details screen. This screen allows you to view existing attachments if there are any attachments downloaded from the server.
-
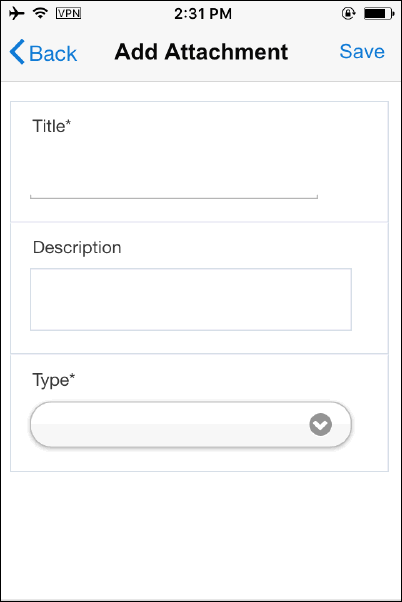
You can create new attachments by tapping the Add Attachments menu.
-
Enter Title and a brief description about your attachment.
-
Choose appropriate File type. You can attach photo, video, short text file, web links, or files. In case of photos/videos, the app allows you to either capture them using device camera or add existing photos/videos from the photo library.
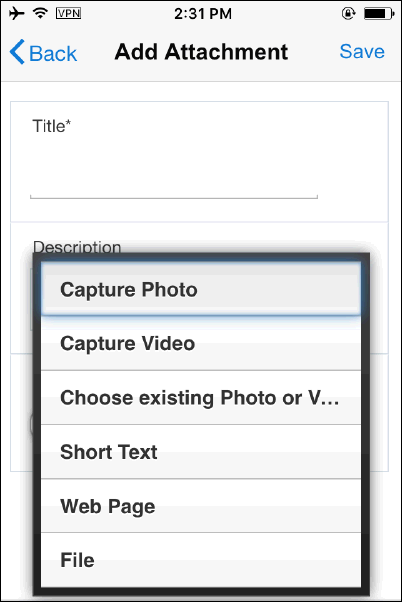
Note: Attachment functionality differs from iOS to Android platforms. This functionality is much more restricted in iOS. In Android, besides Photos/Videos etc any file present on the mobile device can be attached.
-
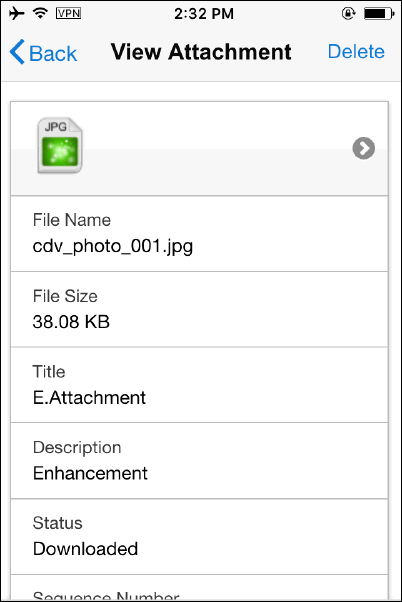
Once you attach the object successfully, you can view the metadata regarding the attached objects such as name, file size, status, content type, etc.
-
Tap Save icon to save the line and go back to Attachment Summary screen. Attachment is added to the task in context.
-
Tap Back icon to go back to the Attachment Summary screen without saving the line.
Note: The CSM: Maximum Attachment Size profile controls the maximum size of attachment to be downloaded or uploaded. The attachment size must be specified in mega bytes.
The file will not be uploaded or downloaded if it exceeds the size mentioned in the profile. In case of multiple attachments, the first n files, whose combined size less than the size mentioned in the profile value, will be uploaded or downloaded.
Accessing Map and Driving Directions
Map provides the ability to view the task location in the map. As a Field technician, you may view driving directions between your current location and the task address by tapping the map icon present in the Task Details screen. By default, MFS integrates with Google map.
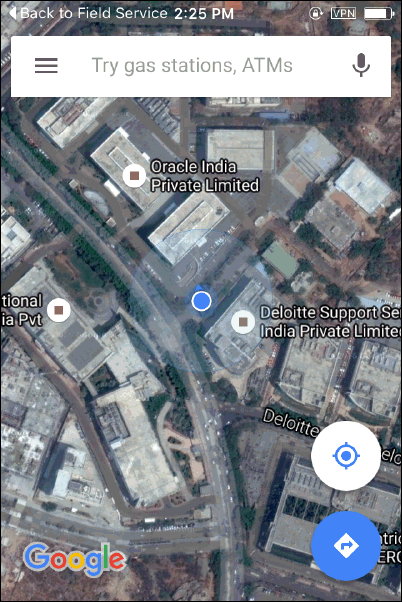
When you install the application for the first time, you may grant location access for MFS app when prompted in order to find current location. If you choose not to enable the Location finder, the app uses the technicians' primary address stored in Oracle Spares Management as the current location.
Complete the following steps to find the directions:
-
Tap Map icon displayed in the Address region.
-
Map is launched in a separate browser. Depending on the type of map, you may choose the appropriate function to find the direction. In case of Google map, you may tap the small map region to get the direction.
The map provides step by step direction as well as voice assisted direction. Oracle Store and forward Multiplatform Application integrates with Google map.
Creating Follow Up Task
For a variety of reasons, such as time constraints, shortage of parts, or not having enough skills to address the task immediately, you may not be able to complete the work by yourselves. In these cases, you can create a follow-up task and let the Dispatcher assigns the task to the next available resource.
Prerequisites
A task must be assigned to the resource.
Complete the following steps to create follow up tasks:
-
Navigate to the Task Details screen by tapping one of the tasks present in the Task List screen.
-
Tap Action to launch Action menu.
-
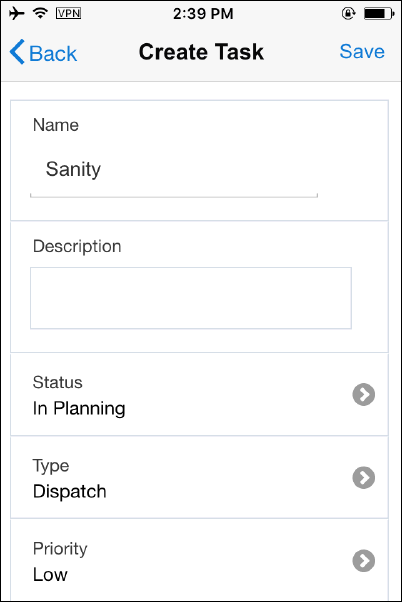
Tap Follow-Up menu. Create Task screen will be launched.
-
Enter Name for the task.
-
Enter a brief Description for the task.
-
Default Status will be displayed. In general, implementers prefers to have is In Planning status. You may set your preferred status using the profile setup in the server.
-
Task Type also is defaulted based on your configuration. You may change the effort if necessary.
-
Select appropriate Priority for your task.
-
Planned Effort defaults from selected Task Type. However, you may change the effort if necessary.
-
Planned Start Time defaults from the parent task. However, you may change the effort if necessary.
-
Planned End Time will be calculated from Planned Start Time and Planned Effort.
-
Tap Save icon to save the Follow Up task. Following business rules will come into play when you save a follow up task:
-
Upon saving the task and if the task assignment status is “In Planning” (default based on your profile settings), a decision prompt “This task is currently not assigned to you. Do you want to continue? “will be displayed.
-
If you choose Yes, task will be uploaded to the server during the next sync (without having an assignee) and gets picked up by Dispatcher or Autonomous scheduler.
-
If you choose No, control stays back in Create Task screen.
-
-
Upon saving the task and if the task assignment status is “Assigned” (field technician manually changes the status using status lov), a decision prompt “This task will be assigned to you. Do you want to continue? “Will be displayed.
-
If you choose Yes, task will be assigned to you.
-
If you choose No, the control stays back in Create Task screen.
-
-
-
Tap Back icon to go to previous task screen without saving the line.
-
You may delete the saved debrief lines by tapping Delete icon. Delete option is available in the Action menu. Delete is not allowed once the task is completed.
Creating a New Service Request
MFS application offers the ability to create follow-up work orders in those situations when a technician recognizes additional work at customer site. As a field service technician, you can also create a new service request while you are at a customer site if you found a new issue that you need to work on.
Complete the following steps to create a new Service Request:
-
From the Spring Board, tap Customers icon. Customer Summary screen will be displayed.
-
Customer Summary Screen displays the list of customers which has open task assigned to the technician. Additional customer details can be viewed by tapping any one of the customer records. It displays following: Sites, Accounts, Customer Products, Service Request, Notes.
-
Tape of the attribute. For example, tap Accounts and all accounts will be displayed inline.
-
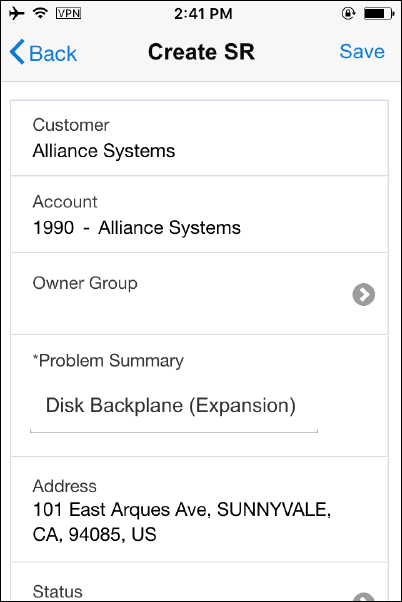
Tap + icon to launch Create Service Request screen.
-
Information such as Customer, Account, and Address is defaulted.
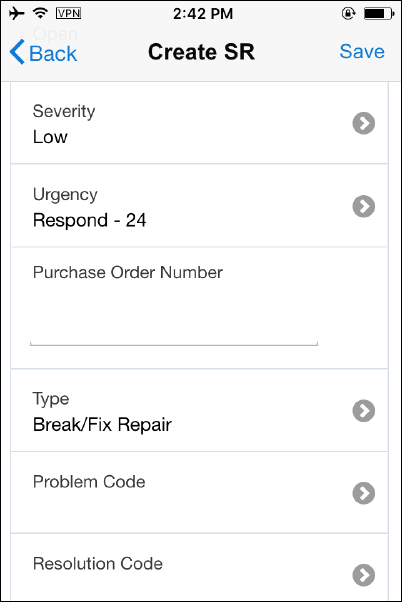
-
Additionally, Status, Severity, Urgency, and Service Request Type is defaulted based on your settings.
-
Enter Problem Summary (Mandatory).
-
Enter Item (Optional). You can also choose item using Search and Find icon.
-
Enter Instance Number (Optional). You can also choose item using Search and Find icon. Also, you can scan the instance number by tapping bar code scanner.
-
Enter Serial Number (Optional). You can also choose Serial Number using Search and Find icon. Also, you can scan the Serial Number by tapping bar code scanner.
-
Enter Purchase Order Number (optional).
-
Enter Problem Code (Optional).
-
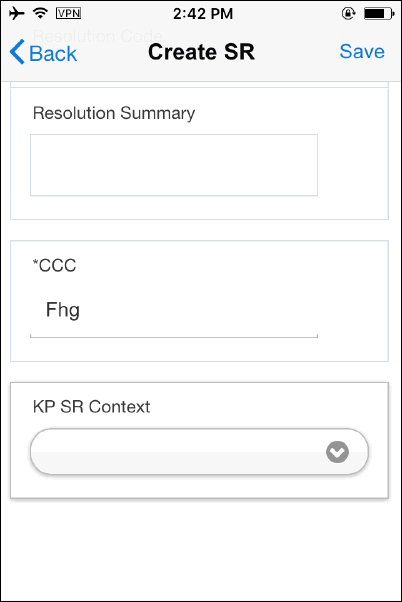
Flex field segments will be rendered in the screen if you enable Service Request level Flexfield.
-
Tap Save icon to save the Service Request. Newly created Service Request will be displayed in the SR list screen.
-
Tap Back icon to navigate back to the previous screen without saving the line.
Opening Service Requests
-
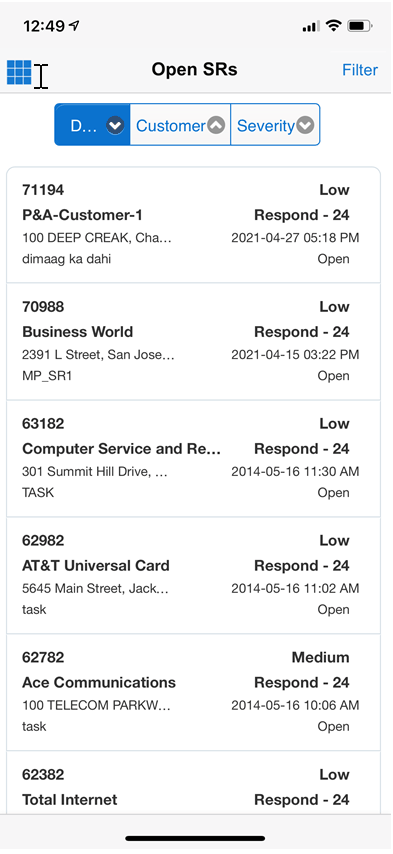
On the springboard, click on the Service Requests icon.
-
You will see the list of open service requests assigned to you.
-
Click any record to view the details of the service request.
Creating a New Task
After you create a new Service Request, you may proceed with task creation flow.
Prerequisites
A new service request must be created or an existing service request must be selected from the SR list screen.
Complete the following steps to create task:
-
Navigate to the SR list screen by tapping one of the service request record.
-
Tap Action menu.
-
Tap Task from the menu. Create Task screen is launched.
-
Enter Name for the task.
-
Enter a brief Description for the task.
-
Default Status will be displayed. In general, implementers prefers to have is In Planning status. You may set your preferred status using the profile setup in the server.
-
Task Type also is defaulted based on your configuration. You may change the effort if necessary.
-
Select appropriate Priority for your task.
-
Planned Effort defaults from selected Task Type. However, you may change the effort if necessary.
-
Planned Start Time defaults from the parent task. However, you may change the effort if necessary.
-
Planned End Time will be calculated from Planned Start Time and Planned Effort.
-
The Resource_ID and Type are picked from the values set for the profile options:
-
Service: Default Service Request Task Owner
-
Service: Default Service Request Task Owner type
If these profile options are not set, the values default to the current user resource ID/RS_EMPLOYEE.
-
-
Tap Save icon to save the task. Following business rules will come into play when you save a task:
-
Upon saving the task and if the task assignment status is “In Planning” (default based on your profile settings), a decision prompt “This task is currently not assigned to you. Do you want to continue? “will be displayed.
-
If you choose Yes, task will be uploaded to the server during the next sync (without having an assignee) and gets picked up by Dispatcher or Autonomous scheduler.
-
If you choose No, control stays back in Create Task screen.
-
-
Upon saving the task and if the task assignment status is “Assigned” (field technician manually changes the status using status lov), a decision prompt “This task will be assigned to you. Do you want to continue? “Will be displayed.
-
If you choose Yes, task will be assigned to you.
-
If you choose No, the control stays back in Create Task screen.
-
-
-
Tap Back icon to go to previous task screen without saving the line.
-
You may delete the saved debrief lines by tapping Delete icon. Delete option is available in the Action menu. Delete is not allowed once the task is completed.
Creating Personal Task
Many people like to keep work projects and personal projects separate — just as they might separate work email and personal email. With Personal Task, you can keep a distinction between work and personal while still having access to both types of tasks in one place, without having to sign in to multiple accounts, and manage your time more efficiently.
Additionally, Personal task feature allows you to block a time slot to notify the dispatcher that you will not be available for a particular period. A personal task cannot be dispatched or tied to any service request, therefore making it different from a field service task that is downloaded to your device. For example, if you need to go to the dentist next week, you may create personal task with the details for that period. By knowing your availability, the dispatcher can schedule the technicians more effectively.
Complete the following steps to create task:
-
Navigate to the Task List screen.
-
Tap Action menu.
-
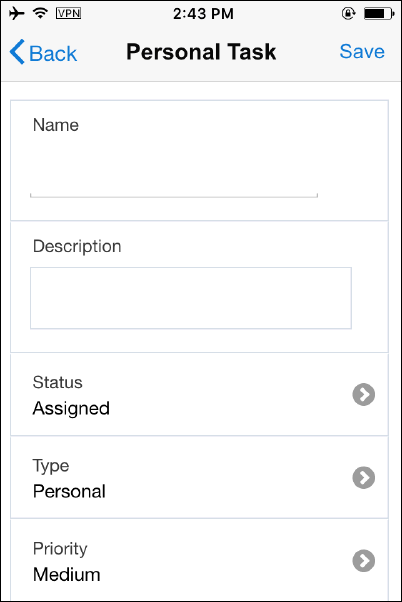
Tap Personal Task from the menu. Personal Task screen is launched.
-
Enter Name for the task.
-
Enter a brief Description for the task.
-
Select Status from the Status lov. This field will be defaulted.
-
Select Task Type. This field will be defaulted.
-
Select Priority for the personal task. This field will be defaulted.
-
In the Effort field, enter the duration of the Personal Task. Effort will be defaulted from the task setup ui.
-
Select Scheduled Start Date, Time, Scheduled End Date and Time using calendar widget.
-
Task location will be defaulted from your technician address. You may enter a new address using One-Time Address button.
-
Click Apply to save the personal task.
-
Tap Back icon to go to previous task screen without saving the line.
Generating Field Service Report and Capturing Customer Signature
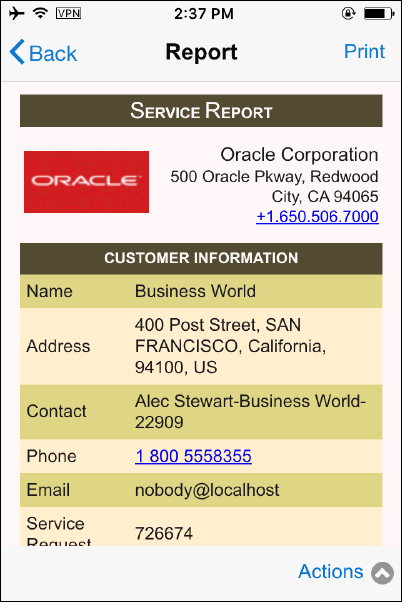
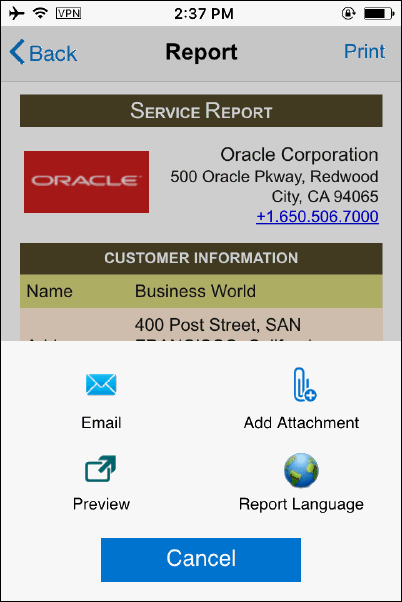
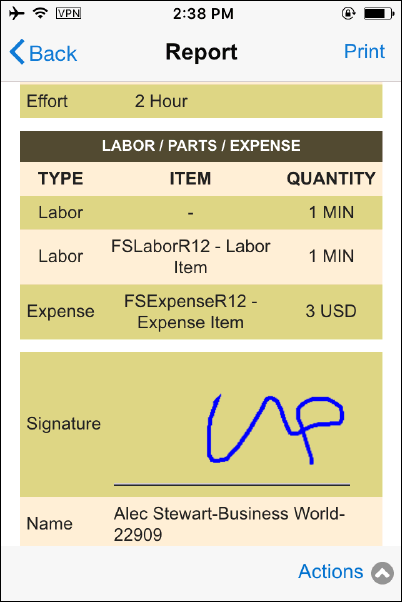
After capturing all the required details for the task, you may review your action summary using Field Service Report. Field Service Report provides a high level action summary that helps you to make sure that you have captured all required information before presenting to the report customer for a signature. Customer representative reviews and signs the report. Then you may generate a PDF (portable document format) report. You can print this report if you configured a printer (Wi-Fi/Bluetooth printers available in the market) or email the report to the customer.
Complete the following steps to view the report:
-
Navigate to Task Detail screen and tap Report menu present in the Task Details screen. Report screen displays your action summary.
-
You review the task summary and present the report to the customer to get their signature.
-
Final report shows action summary with the customer signature.
-
If you install wireless a printer, you can print the report.
Customize Your Report
You may customize the report based on your requirement. For example, you can change the Oracle logo displayed on the report to your preferred logo. Refer the MOS note 1924062.1 for more details on how to customize your report.
Creating an AI-generated Field Service Report Summary
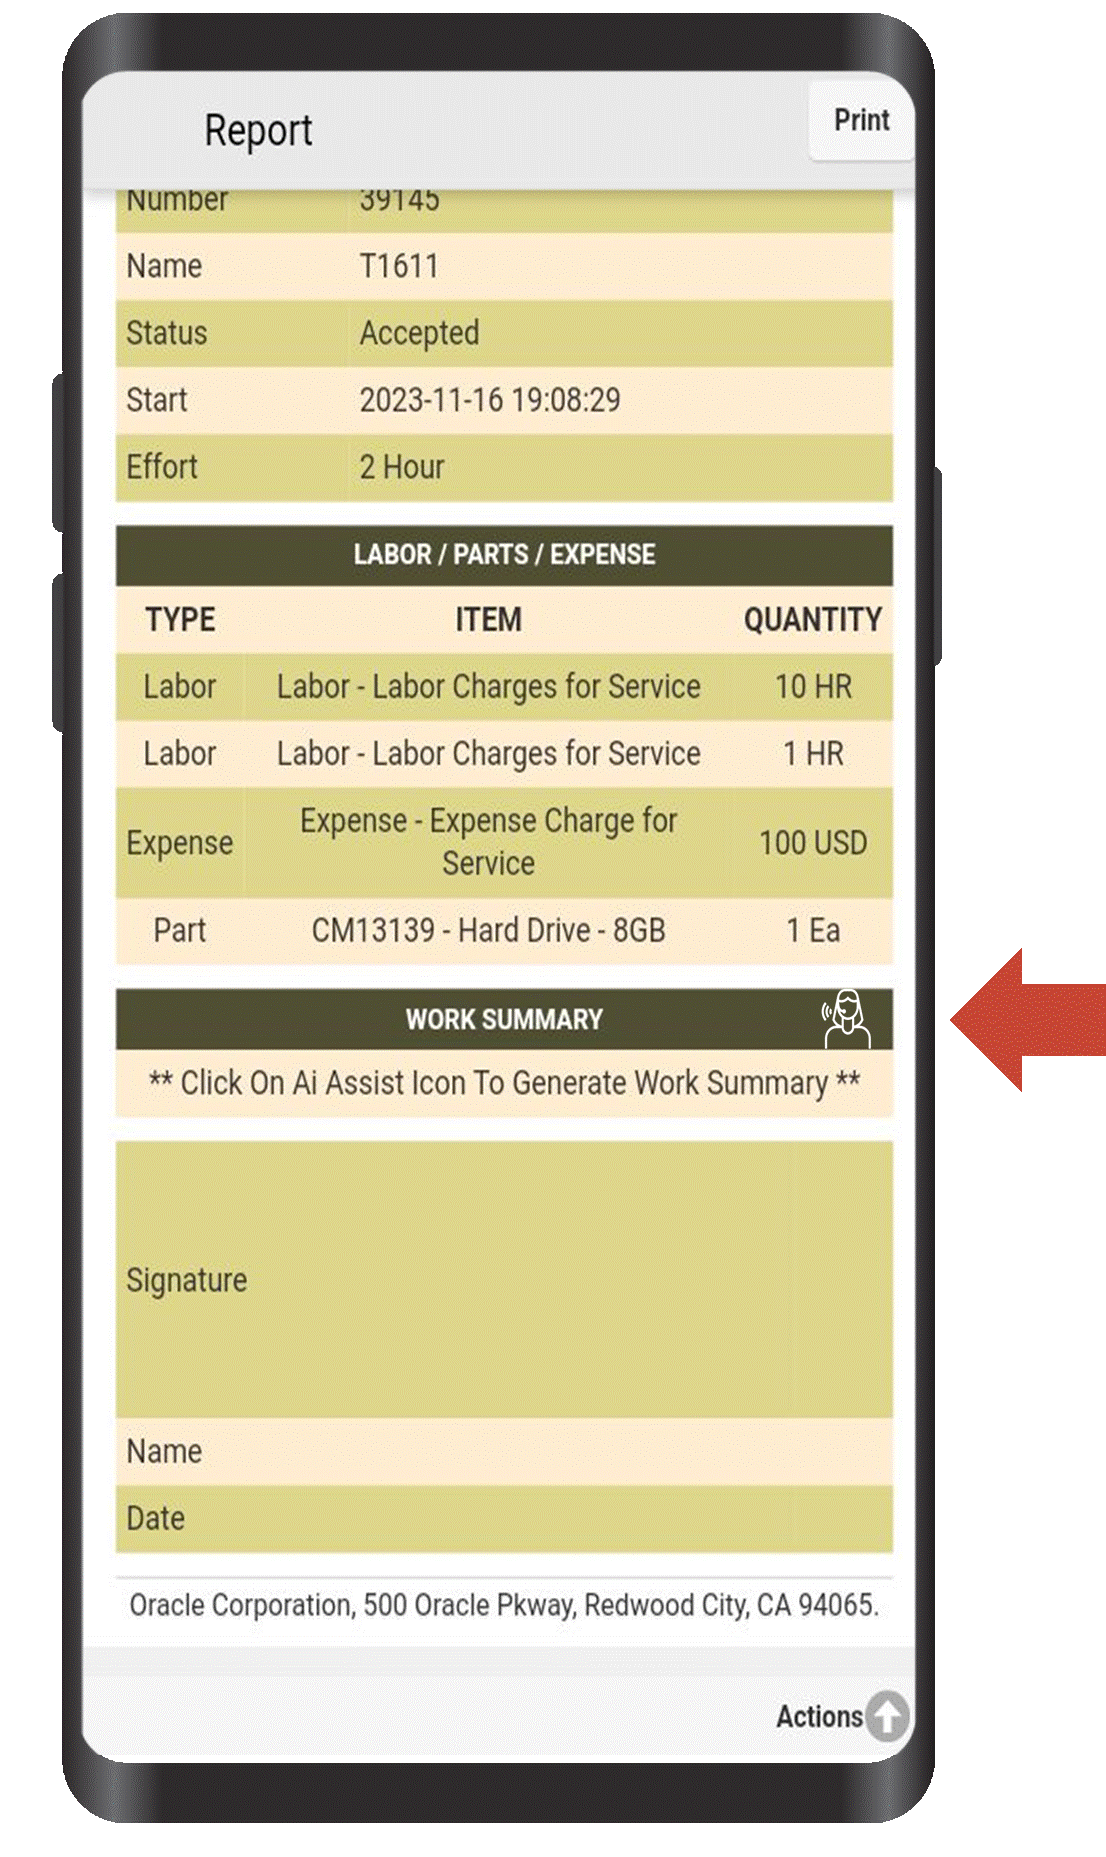
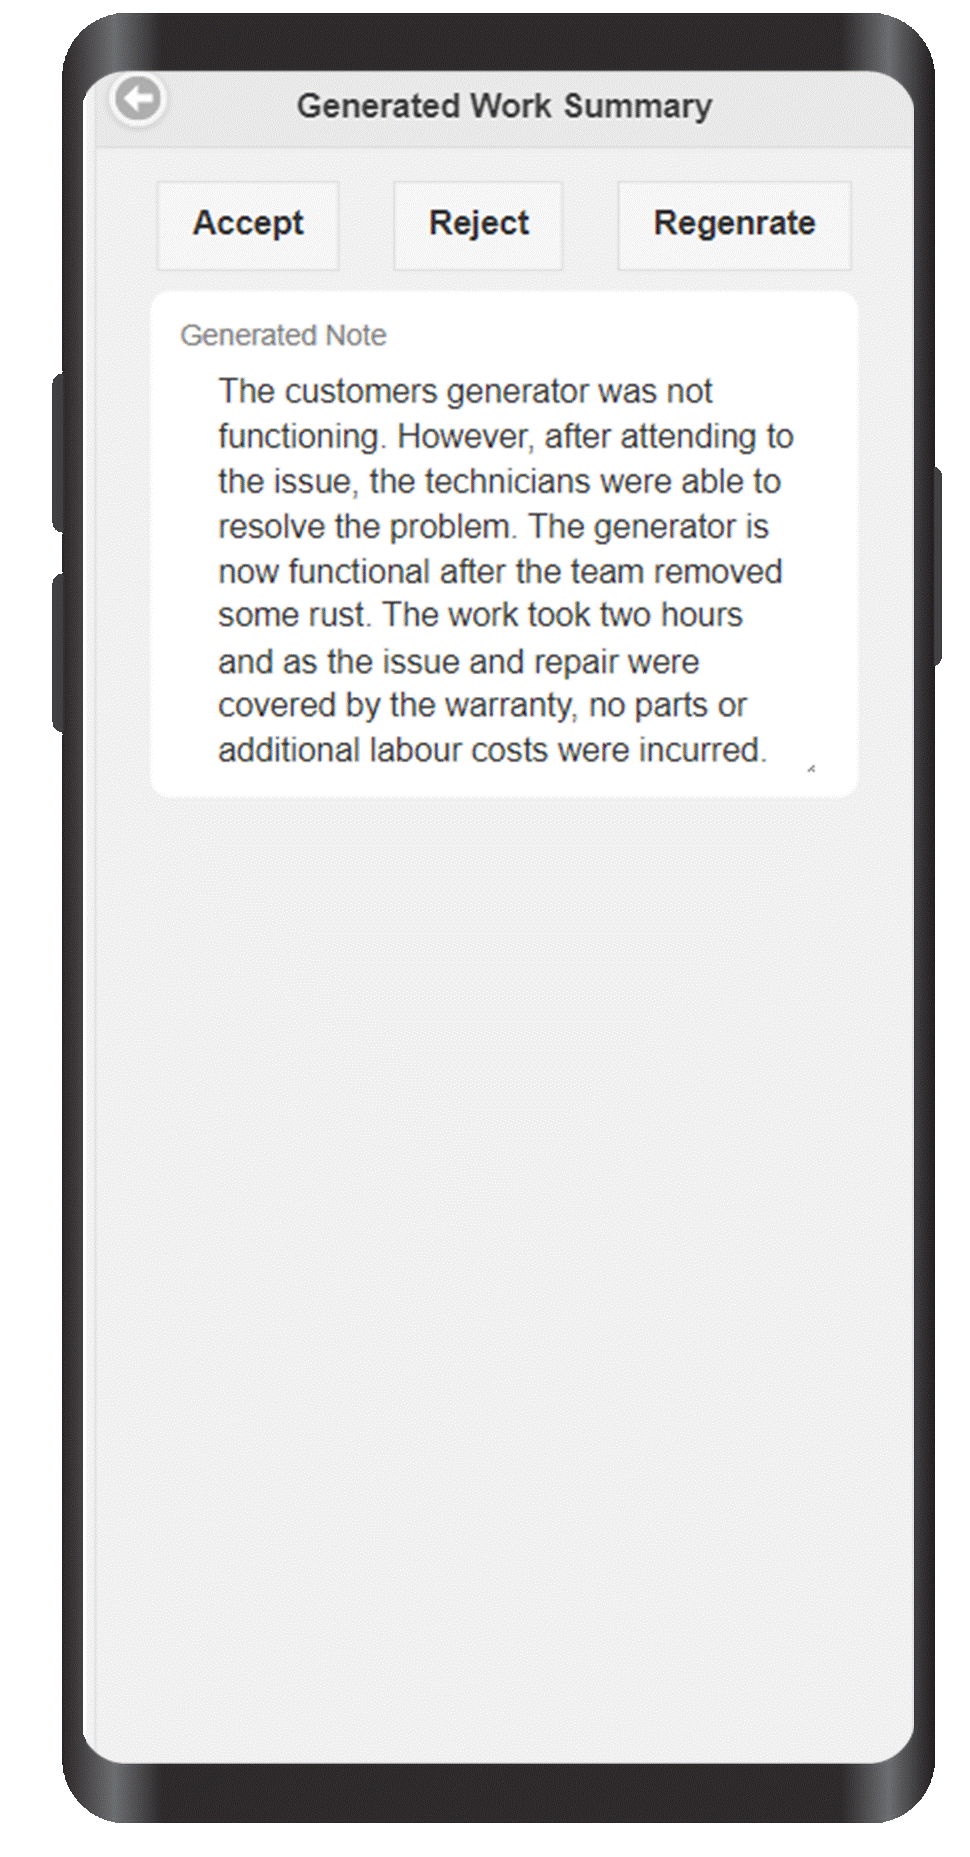
You can use the Generate Field Service Report Summary action to generate a field service report summary for your customer using AI. AI creates a report summary by analyzing key attributes of the service provided such as labor, spare parts used, and warranty coverage by leveraging a Large Language Model (LLM). The LLM is configured in the EBS Large Language Model REST Service.
-
Navigate to Task Detail screen and tap the Report menu in the Task Details screen. The Report screen displays your work summary.
-
Click the Generate icon from the report. This submits the request to the EBS server, which generates a report using the Generative AI service. The generated text appears on the MFS Work Summary field and the response is shown in MFS application.
Generate Work Summary
-
Review the response in the MFS application.
-
Select Accept, Reject, or Regenerate.
-
Accept: Generated text populates to the Work Summary field so that you can review and save it.
-
Reject: Generated report is rejected and you're returned to the MFS report summary screen.
-
Regenerate: Text is generated again, and the newly generated report summary appears.
Generated Work Summary
-
-
Review the task summary and present the report to the customer to get their signature.
-
Confirm the final report shows the action summary with the customer signature.
-
If you install a wireless printer, you can print the report.
Closing the Task
Task completion is next logical step in the case progression. Complete the following steps to return parts:
-
Navigate to Task Details screen by tapping appropriate task record from the Task list.
-
Once you finish all associated work, change the assignment status to “Completed” (or any custom status with completed flag enabled). This mark the task as completed.
-
During the next synchronization, server side posting program creates charge lines for this task.
-
After the successful completion of the task and creation of charge lines, task objects such as Labor, Material Install, Material Return, and Expense becomes read-only. However, you can create new debrief lines when the status is “Completed” (or any custom status with completed flag enabled).
-
You may change the status to “Closed” (or any custom status with closed flag enabled).
Managing Trunk Stock
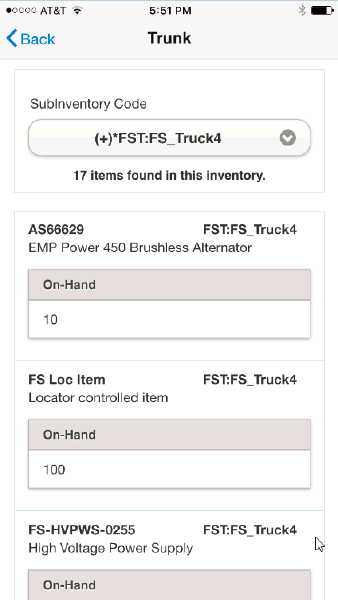
Trunk Stock feature allows you to view the inventory balances for every Sub inventory associated with you. Additionally, it shows available quantity and reservation (if any), Locator, Revision and Lot if those attributes are enabled.
Complete the following steps to view your truck stock:
-
Navigate to the spring board / Home page.
-
Tap Trunk menu to open the truck stock.
-
Items present in your default usable Subinventory will be displayed.
-
You may change the Subinventory using the lov if you want to see items present in other usable or defective Subinventory.
-
The other details displayed are:
-
Item Number
-
Item Description
-
On-Hand
-
Searching and Ordering Parts
Parts Search and Ordering is one of the key features which helps field technicians to make sure that the required parts are available in their Subinventory or being shipped directly to the customer site before they reach customer site. MFS application enables you to search and order parts in warehouses and Subinventories.
Parts search and Order feature consists of two-steps. First you locate the parts needed to fulfill your order, either through your sub-inventories, Coworker's sub-inventory, or a warehouse. Once you have located the parts, the next step would be to create parts requirement and an order.
Prerequisites
The desired part must be defined as orderable in Oracle Inventory. Refer Spares Management user guide to learn more about how to setup shipping networks for your organization.
Search Parts
Complete the following steps to create parts requirement:
-
Navigate to the Task Details screen.
-
Tap Parts Search menu to launch Parts Search screen. Parts Search screen displays parts requirement if parts requirement and order already created for your task.
-
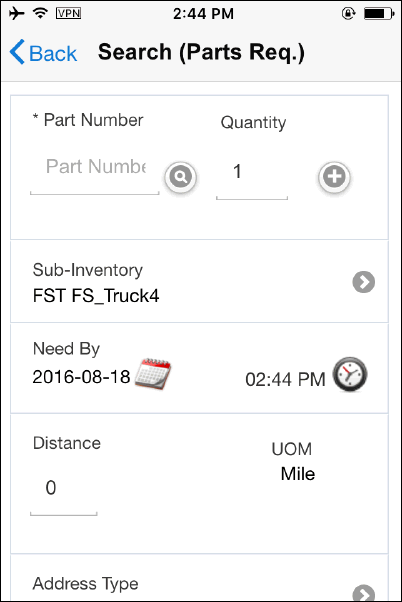
Tap Add Order button to launch Search (Parts Req) screen.
-
Enter a Part Number and tap Search and Find (flash icon). Part Number will be validated against server. You need to be connected to online.
-
Enter the required quantity.
-
You may use + (Plus) icon available in the screen to add more parts.
-
Your default usable Subinventory will be defaulted. However, you may change the default value using lov if you have more than one Subinventory.
-
Choose Need By (date and time) using Calendar widget.
-
Entering a distance (optional) helps to limit scope of your search.
-
Default UOM for the distance will be defaulted.
-
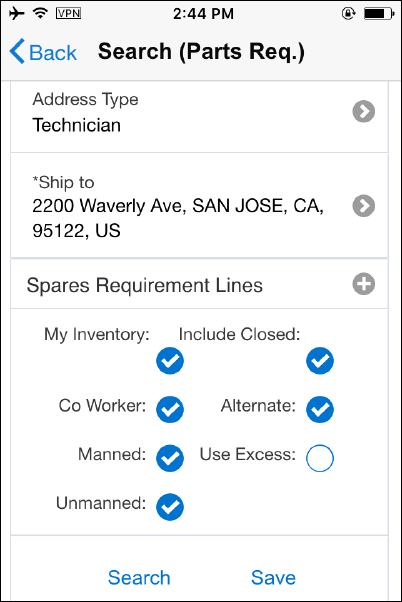
Address Type: You may choose one of the following address types for creating parts requirement. The options are:
-
Customer: You may choose appropriate customer address using drop down lov.
-
Third Party: Third party addresses are the common drop ship points where orders are shipped and technician can collect the shipment. Refer Spares management user guide to learn more about this topic.
-
Technician: You may choose Technician addresses using dropdown lov. The address lov displays all valid addresses defined in Spares Management.
-
Special: Free Form address format allows you to enter address based on country of your choice. Address segments will be rendered based on the selected country. You need to have connectivity in order enter Special Address.
-
Task: You can choose Task address using drop down lov.
-
-
Ship To will be populated based on the address type selection in the Address Type field.
-
Source region allows you to select one more sourcing option. You can set the following search parameters:
-
My Inventory: This should be checked if you want to search your Sub inventory assigned to you.
-
Co Worker: This should be checked if you want to search other technician's Sub inventories.
-
Manned: This should be checked if you want to include manned warehouses that are open based on the calendar assigned in the Site Attributes tab of the Planner's Desktop.
-
Unmanned Warehouse: This should be checked to include search parts from unmanned warehouses in your parts search.
-
Include Closed: This should be checked to include closed Warehouses in your parts search.
-
Alternate: This should be checked to include parts supersession and substitutes in your parts search.
-
User Excess: This should be checked to include parts from the excess list in your parts search.
-
Tap Search button to initiate search. Make sure that you have connectivity.
-
Refer next section to learn how to create Parts Requirement.
Additional Information: Refer Spares Parts Search: Business Logic and Required Setups for Enhanced Functionality in 12.1.3+ (Doc ID 1396161.1)
-
Creating Parts Requirement and Parts Order
Complete the following steps to create parts requirement:
-
Tapping Search button (mentioned in the previous section) will initiate the parts search and the results will be displayed sorted in ascending order based on cost.
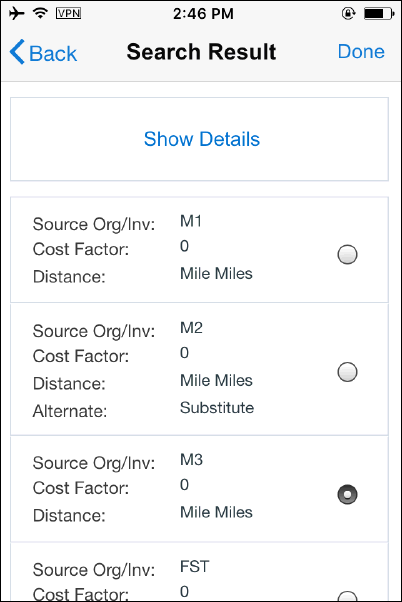
-
Each row consist of Sourcing organization, Cost factor, and the Distance (distance will be calculated between your current location and the warehouse address).
-
The radio button allows you to choose the appropriate source organization. System provides a recommendation (winner) and the radio button will be checked for this recommendation.
-
You can accept the recommendation or you may pick other sourcing option from the list by checking the appropriate source.
-
Show Details/Hide Details button toggles between short list and long list. If you tap Show Details, long list will be displayed and it allows you to pick and choose part and quantity from various source organizations if there isn't enough quantity in one organization.
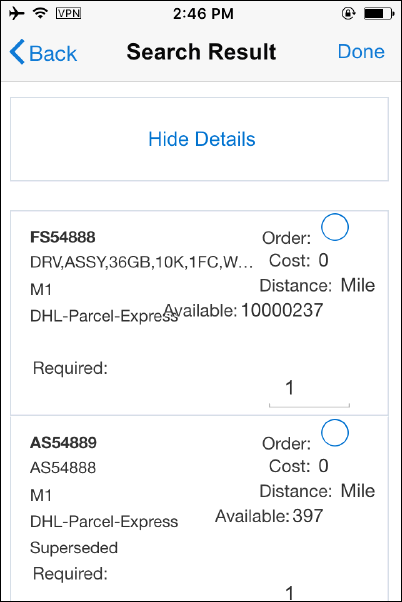
-
You may tap Done button and the Order Confirm screen will be launched.
-
Order Confirm screen display your order summary.
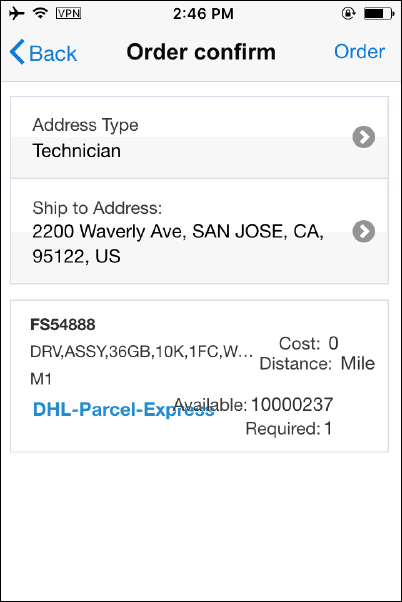
-
Once you verify you order details, you may tap Order button. This initiate Parts Requirement creation.
-
You will get a confirmation message if the parts requirement is successfully created.
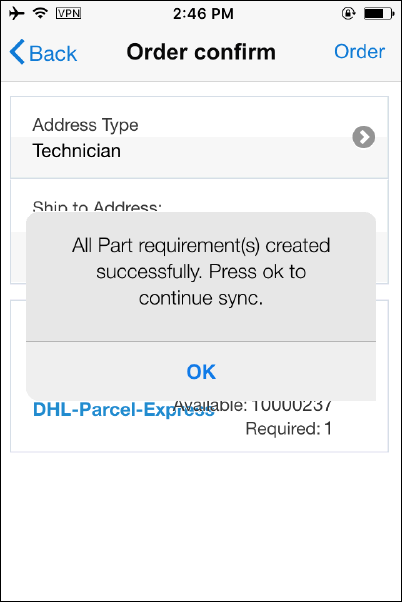
-
Newly created Parts Requirement will be uploaded immediately to the server and a Parts Order creation flow will be initiated at the server.
Receiving Parts
Once parts order Entered, Booked, and Shipped from the respective warehouse, order will be eligible to receive and the details will be downloaded to the client. You initiate the receiving process in the Task screen.
Complete the following steps to create parts requirement:
-
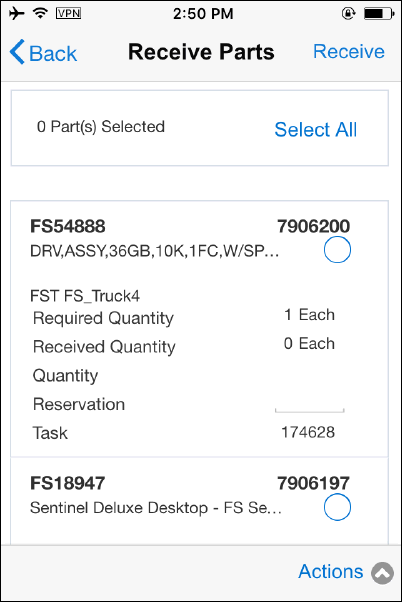
Navigate to the Task screen and tap Receive Parts menu.
-
Receive Parts displays the following information:
-
Task Number
-
Item Number
-
Item Description
-
Order Number
-
Required Quantity
-
Received Quantity
-
Reserved Quantity
-
Locator
-
-
You may check the box to select all quantity if you prefer to receive all orders at once. If you want to receive partial order, you may enter quantity in the quantity box.
-
Tap Receive to initiate the receipt process.
-
Back button allows you to navigate back to Task Details screen.
Synchronizing with Enterprise Server
Synchronization is the key component of the MFS application. Synchronization allows technicians to download new data that has been assigned to technicians such as new tasks assignments, parts requirements, and attachments.etc from the enterprise server. Also, it uploads the changes such as; new debrief lines and updating task statuses back to the enterprise server. There are two modes of synchronization: Manual and Automatic.
Manual Synchronization
This mode allows you to synchronize your device with the enterprise system when you tap the sync button present in the Actions mention available in every screen.
Complete the following steps to launch and synchronize MFS application after the installation:
-
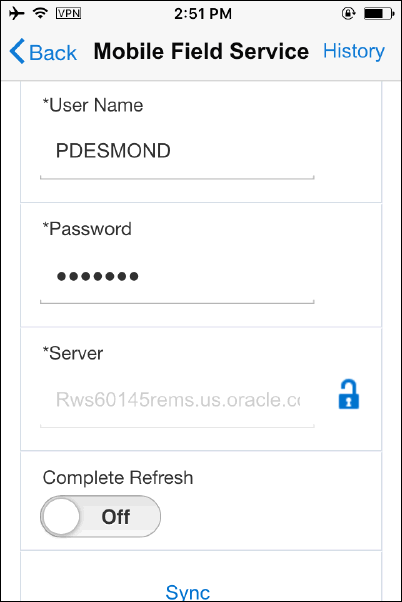
Navigate to Home, and then tap Sync. The Sync screen is displayed. Additionally, you can access the Sync screen from Actions menu present in every screen.
-
Enter a valid User Name. Refer the implementation guide to learn how to create a Mobile Users.
-
Enter Password.
-
Enter Server details. Make sure you are logged into VPN if required.
-
If you are using Secured Socket Layer type of authentication (SSL), you should tap the lock icon.
-
You can enable or disable the Complete Refresh option. By default, this is turned off. After the initial synchronization, application always does an incremental synchronization. You shouldn't change this setting unless advised because data on mobile device will be refreshed with the current data on server after the pending updates from mobile device (if any) are uploaded.
-
Tap Sync to initiate sync.
Automatic Synchronization (Pull)
This allows application to synchronize automatically with the enterprise system without any manual intervention. It requires the application to be running either in foreground ie on the mobile device's screen or in background. If the application is stopped then automatic synchronization happens the next time user logs into the app.
Refer the implementation guide to learn more details about the Automatic Synchronization. Follow the steps to configure Automatic Sync after the installation.
You may set the following profiles at user, Responsibility, Application or at Site level.
-
CSM: Enable Auto Sync. This profile should be set to “Yes”.
-
CSM: Automatic Synchronization Interval for Data Upload. You may set this profile to 0 or any positive integer.
If you set the profile to Zero, Synchronization becomes instantaneous. In this case, any data change in the client triggers an immediate sync.
If you set the profile to a positive integer, Synchronization becomes interval based. In this case, synchronization will be initiated at the interval specified in minutes.
Preference Screen (present in the client) displays the settings accordingly (refer the figure).
-
If the profile CSM: Enable Auto Sync is turned off, Auto Sync setting in the device will be disabled.
-
If the profile CSM: Enable Auto Sync is turn on and the profile CSM: Automatic Synchronization Interval for Data Upload is set to zero (instantaneous), the Auto Sync setting in the device will be enabled and displays additional information such as Auto Sync Mode and Auto Sync Error Alert (Minutes).
-
If the profile CSM: Enable Auto Sync is turn on and the profile CSM: Automatic Synchronization Interval for Data Upload is set to a positive integer (interval), the Auto Sync setting in the device will be enabled and display additional options such as Auto Sync Mode and Auto Sync Error Alert (Minutes).
-
Viewing Synchronization History
-
After the synchronization is complete, you can view the details from the Sync History screen. This screen displays the following details: Sync Type, Session ID, Start Date, End Date, Refreshed, and Status.
Using Descriptive Flexfields
Descriptive Flexfields can be used to display and capture additional information. Currently, MFS application supports Descriptive Flexfields at various levels including:
-
Service Request
-
Task
-
Debrief lines
-
Customer
Table-validated Flexfields are not supported by MFS applications. The Flexfields are downloaded and displayed in the MFS application after synchronization.
Refer Oracle Mobile Field Service Implementation guide to learn more about how to set up descriptive Flexfields.
Using the Calendar
Oracle Mobile Field service integrates with the calendar application on smartphones to retrieve task related information for field service personnel.
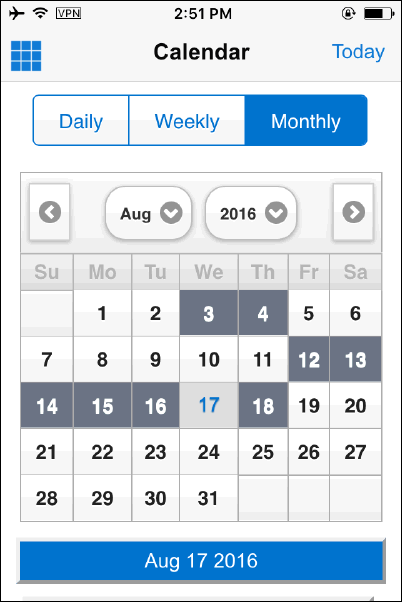
This integration ensures that all task information is stored locally in read only format and is accessible even when there is no coverage in the area. This will allow the technician to always know where the next task is, when it is scheduled and what the work is about. It also helps them to identify any empty slot during the working hours for a day and put missing information into the system as well as create time entries.
Prerequisites
- Users must have Android or iPhone/iPad devices with native calendar application which supports iCalendar. iCalendar is a file format which enables computer applications to send Calendar Event and Task details over internet.
- Android users must register the iCalendar URL at Google Calendar. Users therefore must have a valid Google Calendar account in order to register the iCalendar URL.
To use the Calendar tool to view tasks and events
-
Register the iCalendar url on your device.
-
In IOS devices, navigate to the Preferences UI and click on the iCalendar link to register the phone/tablet.
-
For android devices, user must copy the link and register it on the Google Calendar manually.
-
-
Sync the device to fetch all the task details.
-
Users can use the calendar to do the following:
-
display future Field Service Tasks on device calendar application based on scheduled start and end dates
-
display past Field Service Tasks on device calendar application based on actual start and end dates
-
display future and past personal tasks on device calendar application based on schedule start and end dates
-
navigate to the Mobile Field Service Wireless application's Task detail UI from the calendar details screen when there is network connectivity
-
set reminder alerts on the calendar events using Field Service Alerts and Notification feature. Notification is enabled for new task assignment, schedule start/end time updates, as well as cancellation of assignment.
Additional Information: - The 'Field Service Alerts and Notification' feature must be enabled in order to get notifications from the device calendar application
-
on IOS devices only:
-
if the task's service request has customer contact information, an event attachment of VCF format is linked to the event which the users can download on their device
-
users are notified when it is time to start travel based on the event start time, distance between event location and user's current location and time needed to reach the location. For example, if user is at location A and the event is scheduled at 9am at location B, and the travel time to reach location B from A is 30 minutes, then the device will show a notification at 8.30 am. In android devices, reminder time is added for the event based on the Google Calendar settings.
-
-