Updating Counters and Correcting Maintenance Record History
This chapter covers the following topics:
- Using Oracle Installed Base Counters with Unit Configurations
- Viewing and Adding IB Counter Readings to a Unit Configuration
- Adding Absolute IB Counter Readings
- Correcting IB Counter Readings for Unit Configurations
- Counter Updates: Dependencies, Interactions, Implementation Tips and Best Practices
- Managing Counter Corrections for Part Removal and Installation
- Performing Part Changes
- Understanding Part Changes and Maintenance History
- Overview of Maintenance History Audits
- Performing a Maintenance Record Audit
Using Oracle Installed Base Counters with Unit Configurations
You can enter new Oracle Installed Base (IB) counter readings for CMRO managed unit configurations. You can also view and make corrections to historical counter readings for a unit configuration and applicable sub-configurations (installed components).
This feature includes the ability to create and update historical counter readings in Installed Base. Therefore, the 'snapshot' readings for the maintenance requirement (MR) accomplishment history are not directly updated.
This functionality includes support for counter corrections and near real-time maintenance history correction ability in the Unit Maintenance Plan (UMP) such as:
-
The Build Unit Effectivities (BUE) program considers the Installed Base counters rather than the MR accomplishment history counter snapshots.
This provides an immediate recalculation of the Unit Maintenance Plan (UMP) based on the latest Installed Base counter readings.
-
Exception: Initial accomplishment records will continue to utilize the MR accomplishment records.
-
A concurrent program (Synchronize Accomplishment Counter Readings) is run to update the MR accomplishment history.
Important: Oracle recommends that this program be run at a frequency that will correspond to the manual counter correction entry, such as on a daily or weekly basis.
Note: The User Permission access control must be enabled to allow users to correct counter readings and accomplishments.
Limitations and Best Practices
Note the following limitations and best practices associated with this functionality:
-
Archiving of historical counter records must consider that the BUE utilizes the latest counter readings for the recalculation of due dates in the UMP.
Important: Missing readings due to archiving will cause calculation issues in the UMP.
-
It is recommended that all counter adjustments occur in a single transaction to ensure the consistent, precise date/time to the minute and second.
-
MR accomplishment history counter snapshots will be updated using the synchronization (concurrent) program.
-
Time-based counters are available for entry using the Update Counters page.
Important: If you are running the Time Based Counters Engine concurrent program; you should not update these counters using this page. This concurrent program automatically increments time-based counters by an amount of 1.
-
New Readings
You can enter new incremental (delta) counter readings by unit of measure (UOM) for a unit configuration. This includes Change and Absolute type counters.
For Change type counters, these new readings include both the most recent reading in history, as well as readings in the past between existing counter readings. For Absolute type counters, readings may only be created after the last reading.
You can also enter a counter reading comment, if necessary.
The readings will be automatically cascaded to all the components which were installed in the configuration as of the reading date and time. This includes both currently installed and previously removed components.
-
Counter Reading Corrections
You can correct a historical counter reading for Change type counters.
Important: You cannot correct a counter with an Absolute type.
You can search and select a historical counter reading for correction and then submit a new reading value based on the UOM. The historical readings for that date and time will be disabled and recreated for the new reading value. You can also enter a counter correction reading comment, if necessary.
The sub-configuration components, as-installed on the correction date and time, will be identified and all items will have their applicable counters adjusted. This includes both currently installed and previously removed components.
An exception page is presented if the historical corrections include parts installed after or removed before the exception date. You can use this exception page to verify maintenance history changes due to counter corrections. You can also launch the Build Unit Effectivities program for a unit configuration to update the Unit Maintenance Plan, based on the recently updated counter values.
Viewing and Adding IB Counter Readings to a Unit Configuration
Use the Unit Configuration Counter Update page to view, add or correct CMRO-IB counter readings.
Perform the following steps to view existing counter readings or add an IB counter reading to a UC.
-
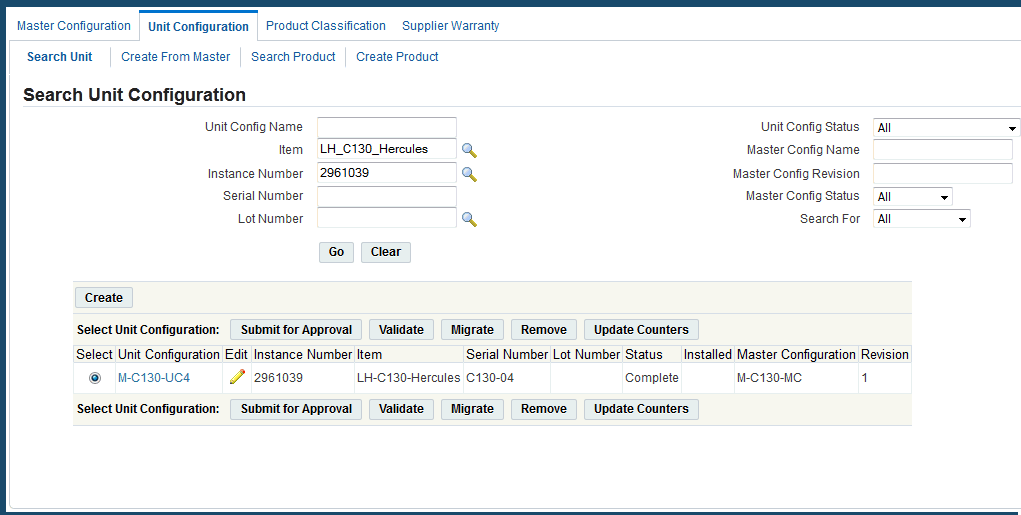
Navigate to the Search Unit Configuration page (CMRO Super User > Configuration > Unit Configuration).
-
Search for a unit configuration, entering values in the Item, Instance Number and other fields to narrow your search.
-
Select the radio button for the item instance.
-
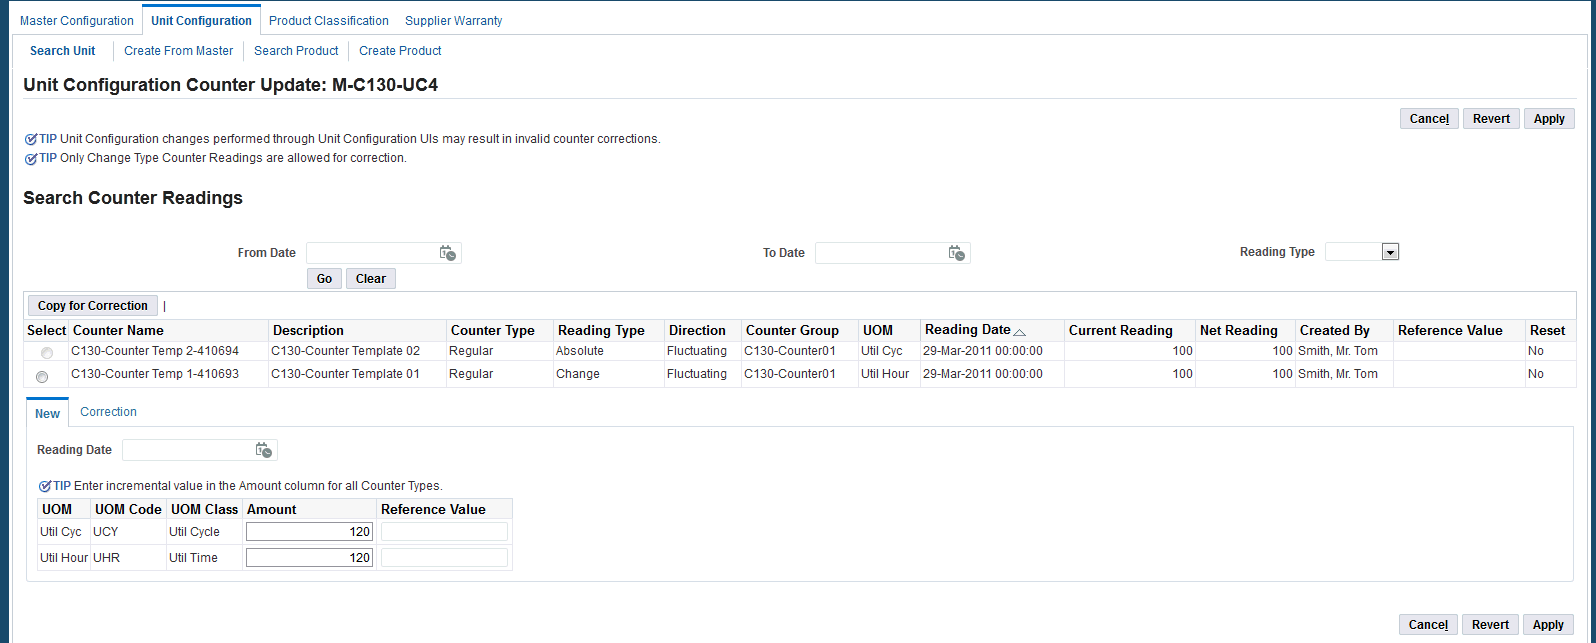
Click the Update Counters button, and the Update Configuration Counter Update page appears.
-
Click the Go button or enter values in the From Date and To Date fields to narrow your search.
-
View any existing counter readings and associated information such:
-
Reading Date: The date and time that the reading was recorded in the application.
The following should be noted:
-
This value can be in the past or equal to the sysdate and time.
-
Reading dates cannot be in the future.
-
Value is time-zone controlled.
-
Value cannot be equal to an existing counter reading date and time. If there is a duplication, an error message is displayed.
-
-
Created By: Field indicates if a system transaction (API call) or a user created the counter readings.
-
Current Reading and Net Reading: Readings can be reviewed to see values and impacts of counter readings.
-
Reference Value: Field used to record notes against counter readings.
Enter a comment that describes the nature of the counter reading, for example, if this reading is in reference to another transaction such as a flight or mission record, work order for recording, and so on.
-
Reset: Value indicates if a system or manual Installed Base counter reset was accomplished.
-
-
Click the Go button or enter values in the From Date and To Date fields to narrow your search.
-
Enter new counter readings based on the appropriate UOM on the New tab.
You can enter values for one or more UOMs during a transaction.
Note: You can add new readings for Change and Absolute type counters.
-
Amount: This value represents the delta of the counter readings.
This value is used in the Cascade API that applies this value to all the sub-configuration positions.
Note: Do not enter the Net Reading as this field is automatically calculated.
For Absolute counters, the system uses the following formula:
Amount + last reading = New Absolute reading -
Reference (optional)
-
-
Click the Apply button.
Important: The UOM will be applied to each matching counter of the same UOM, regardless of the originating counter group for each item in the unit configuration hierarchy.
-
View the updated counter readings by refreshing the search area results.
Adding Absolute IB Counter Readings
Use the Unit Configuration Counter Update page to add Absolute IB counter readings.
-
Search for the unit configuration and item instance to which you want to add Absolute counter readings.
-
View the existing counter readings.
-
Click the New tab.
-
Enter new counter readings based on the appropriate UOM on the New tab.
You can enter values for one or more UOMs during a transaction.
-
Amount: This value represents the delta of the counter readings.
This value is used in the Cascade API that applies this value to all the sub-configuration positions.
Note: Do not enter the Net Reading as this field is automatically calculated.
For Absolute counters, the system uses the following formula:
Amount + last reading = New Absolute reading -
Reference (optional)
-
-
Click the Apply button.
A confirmation message displays that all changes have been saved.
Important: The UOM will be applied to each matching counter of the same UOM, regardless of the originating counter group for each item in the unit configuration hierarchy.
-
View the updated counter readings by refreshing the search area results.
Best Practices for Absolute Counters
It is recommended that you do not use Absolute counters if the following scenarios exist:
-
If you plan to update configurations using parts changes in work orders and need to make a historical correction to a configuration.
In this scenario, Absolute counters will not be considered for adjustment during past dated part removals in work orders. Only Change counters will be adjusted.
-
Users will not be able to enter past dated counter corrections for Absolute counters in the Update Counters UI.
Correcting IB Counter Readings for Unit Configurations
You can correct historical IB (Change) counter readings for unit configurations.
-
Search for the unit configuration and item instance to which you want to correct the Change counter readings.
-
View the existing counter readings.
-
Select the radio button for the Change counter reading that you want to correct.
-
Click the Copy for Correction button, and the Reading Date information is populated on the page.
By selecting an individual counter reading, this action will set the context date/time for the correction. However, the correction will impact all Change Type counter readings for each UOM Amount entered for the same date and time. Each counter reading will be disabled and recreated in Oracle Installed Base.
Important: The selected counter reading row and all the related counter readings (for Change Type counters) for each UOM will be impacted.
Select a single row to ensure that the user is performing the correction at the exact minute and second. Otherwise, the user could accidentally enter a new counter reading if the time was a single second different.
-
Enter the corrected Amount for the counter readings based on the appropriate UOM on the Correction tab.
You can enter values for one or more UOMs during a transaction.
Note: The Correction tab is access-controlled and it may be unavailable for use. Users must have User Permission Access Control which controls access through the function, "User permission to correct counter reading and accomplishment."
The amount entered is for the replacement value for the incorrect reading at that date and time for the Change type counters. When the system applies the change, each existing reading will be disabled and then recreated with the newly entered amount reading.
The Net Reading value is calculated within Oracle Installed Base based on the Reading date/time forward to the sysdate/time.
-
Amount: This value represents the delta of the counter readings.
This value is used in the Cascade API that applies this value to all the sub-configuration positions.
Important: You must enter the new delta reading for the counter correction. Therefore, you may need to manually calculate the delta reading before entering an Amount reading.
Note: Do not enter the Net Reading as this field is automatically calculated.
-
Reference (optional)
Any UOM Amount readings that are left with a value of Null (blank) will not be processed, meaning that no corrections will be made.
It is recommended that all counter adjustments occur in a single transaction to ensure consistent dates and times down to the second.
If you enter a zero (0) for a UOM Amount reading, then this value will be entered as the delta reading. Therefore, if you decide to create a new counter reading with a value of zero or if you want to enter a null (blank value), the system will skip these UOMs and will not create new counter readings for the UOMs.
Important: If there are historical counter readings, they should be replaced by zero values and the system will recalculate the net reading value of the counter.
-
-
Click the Apply button. A confirmation message appears that changes have been saved.
-
Upon save, the system disables all the counter readings for the same UOM for the selected date and time for the top node and all the subcomponents (children) that were installed at this reading date and time.
-
The system creates new readings to replace those which have been disabled.
Note: The Exceptions page will appear if there are any counter correction exceptions.
-
-
View the updated counter readings by refreshing the search area results.
The Accomplishment History will be updated by the synchronize concurrent program.
Counter Updates: Dependencies, Interactions, Implementation Tips and Best Practices
This section includes dependencies, interactions, implementation tips and best practices for counter updates.
Dependencies and Interactions
Counter Cascade API
The Counter Cascade API has been enhanced to ignore formula counters of the same UOM from being updated in the sub configurations. This will allow the formulas to create the correct readings based on the counter entry reading entered at the top node.
Counter Update UI
You may choose to build an extension or customization to directly call this UI. This enables you to restrict access to the Search Unit Configuration UI. The UI can be called directly by passing the Unit Configuration reference to the UI.
Unit Configuration Changes Using the Part Change Functionality in a CMRO Work Order
-
This is the supported method to control the removal and installation of position based components on a configuration.
-
All transactions are tracked and can be validated by the counter correction program.
Unit Configuration Changes Using the Edit Unit Configuration UI
-
This is not the supported method for controlling the removal and installation of position based components on a configuration.
-
Transactions are not tracked and cannot be validated by the counter correction program. Maintenance history is compromised by this method.
-
This method is typically used for setup or major adjustments where the unit configuration is not active, nor is it receiving counter history updates.
Implementation Tips and Best Practices
-
It is important to fully understand the counter group setup and behavior of Oracle Installed Base before utilizing the counter correction UIs:
-
Counter setup should follow cMRO recommendations, use of Change Type.
-
External integrations for counter creation should be reviewed as an alternative to the manual entry of counters in cMRO.
The volume, frequency and data integrity requirements should be key drivers in deciding if an external integration is required.
-
CMRO APIs support these integrations and provide near real-time updates of top node and sub-configurations.
See the Oracle Integration Repository regarding API information located in the Service Suite, cMRO APIs.
-
-
User access to the counter corrections of historical counter readings should be restricted to Super Users, thereby reducing potential regulatory exposure.
-
Counter entry and corrections are performed at the UOM level.
Therefore, these updates will cascade to all matching counters, with a matching UOM, at the sub-configuration levels of current or previously installed components. The following should be considered:
-
During the counter template setup for sub-configuration items, it should be understood that the sub-configuration components will inherit reading amounts during the application of the Counter Cascade API.
-
There may be requirements for different UOMs in sub-configurations.
Therefore the counter entry and corrections may need to be accomplished both at the top node and at the lower level nodes as well. This can be done using external integrations or manually through the cMRO UIs.
-
Formula and position ratio counters can also be utilized for similar UOMs, but there is not a direct 1:1 update of the counter reading amounts.
-
-
Corrections performed directly in Oracle Installed Base are for the instance in context only, and do not automatically cascade the changes to the sub-configuration.
-
Therefore, it is recommended to use CMRO UIs for counter changes to the Unit Configuration top nodes.
-
Sub-configuration component updates may be directly updated in native Installed Base UIs, but maintenance history records may be impacted because there is no corresponding adjustment to maintenance history records.
-
Therefore, it is important to correct sub-configuration components using the install and removal transactions in the context of a work order.
-
-
The Unit Configuration Counters Update UI can be called directly through a customer created extension:
-
This is an alternative to using the Search Unit Configurations UI.
-
Customers can use JAVA and OAF Extensions to call the Counter Correction page from within an OAF or JTT framework based UI.
-
Customers may choose to either create a custom Search Unit Configurations UI or create a clickable Button or Action Drop down from an existing OAF UI where the Unit Configuration is known or in context.
-
Managing Counter Corrections for Part Removal and Installation
Overview
Oracle cMRO enables you to enter part removal and installation dates in the past, and to correctly adjust counter readings and maintenance accomplishment history.
Important: Oracle recommends that you continue to perform remove and install transactions that follow a sequential process to ensure correct part change history.
When counter corrections are entered, all counter readings are disabled for the removed component, based on the from removal date/time until the sysdate and time. The system will then create new counters readings from the install date until the sysdate/time for the installed component. The new counter readings will be based on the top node unit configuration for which the part has been installed.
Users will be notified during the removal transaction if a component has maintenance accomplishments during the period from the removal date/time until the sysdate and time. The user will then be required to review the parts change and accomplishment history to determine if any transactions were incorrectly recorded against the wrong component serial number, due to the removal transaction not being performed before the next counter readings or accomplishment was transacted.
This functionality relates to part changes that were accomplished through a work order on a cMRO unit configuration:
-
Part removals, installation and replacements are recorded for a user-defined date and time component, including both past dated and real-time transactions.
-
Counter corrections automatically performed, if applicable, for past dated parts changes to ensure correct counter history.
The Override Counter Correction Updates during Parts Change profile option controls the sequential part change check and related errors when the counter correction logic finds two installations or two removals in a row in a Unit's history. See Setting Up Visit Work Package, Oracle Complex Maintenance, Repair and Overhaul Implementation Guide for more information.
Counter Corrections During Part Removals and Replacements
This functionality provides the following:
-
Part removals will be against the “as-installed” configurations for the date and time entered.
-
Utilization that was incorrectly accrued after the post removal date will be corrected by disabling the applicable Installed Base counter records at the item level, thereby correcting the additional utilization history that was recorded.
-
If the removed item is a sub-configuration, then counter corrections will also be made to all the applicable instance and child instances that were installed as of the removal date and time.
Counter Corrections During Part Installation and Replacements
Counter corrections during part installation and replacement are handled as follows:
-
Part installations will be against the “as-installed” configurations for the date and time entered.
-
Utilization that was incorrectly accrued post installation date will be corrected by creating the applicable install base counter records at the item level, thereby correcting any missing utilization history that was not recorded.
-
If the installed item is a sub-configuration, then counter creations will also be made to all the applicable instance and child instances that were installed as of the installation date and time.
Part Change, System and Record Integrity - Considerations
-
Removal transactions (installation, replacement) must continue to be performed sequentially. The counter update functionality is aimed at only reviewing and updating the most current part change transaction.
-
Counter corrections during these transactions will be based on the current values for the current top node unit configuration for the date and time of the part change transaction.
Important: Any counter updates to the top node unit configuration, along with any cascade programs, must be accomplished prior to performing any part change transactions.
Part Changes: Maintenance History - Considerations
For items removed with a past date and time, there is a potential for the incorrect accrual of utilization, and for the incorrect recording of maintenance program accomplishments against the wrong item and serial number.
Such scenarios will be flagged using an exception flow highlighted by an extended delay or error in failing to correct transact part changes.
Users will receive an alert and will be able to navigate to part change and maintenance accomplishment history pages during part removal transactions. Users can search transactions and confirm that maintenance history transactions were created against the correct item or serial numbered item.
This functionality enables users who are making historical corrections of part changes to reflect an incorrectly installed part due to a data entry mistake.
Performing Part Changes
Follow these steps to perform part changes:
-
Navigate to the Update Work Order page (Execution >Production Planning >Work Orders).
-
Search for a work order and click Go.
-
Select the radiobutton for the work order, select Update Work Order value from the Select Work Order drop-down.
Click Go, and the Work Order Operations page appears.
-
Select one of the following values from the drop-down list:
-
Perform Parts Removal/Install
-
Perform Bulk Part Removal
-
Perform Part Installation
-
Perform Disposition
Note: Use the Parts Removal/Install UI if you want to remove one position at a time. Use the Bulk options for multiple items.
Click the Go button, and the Unit Configuration Part Changes page appears.
If a unit configuration contains maintenance requirements controlled by software updates, the Software Update field appears on the page.
Note: The Parts Removal/Install UI is used to install or remove bulk parts.
-
-
Click the unit configuration on the left section of the page to drill into the unit configuration position and sub-positions.
Select the part positions.
-
Select Visit Configuration or Work Order Configuration in the Refresh Configuration drop-down to change the context to an Installed Base work order instance.
-
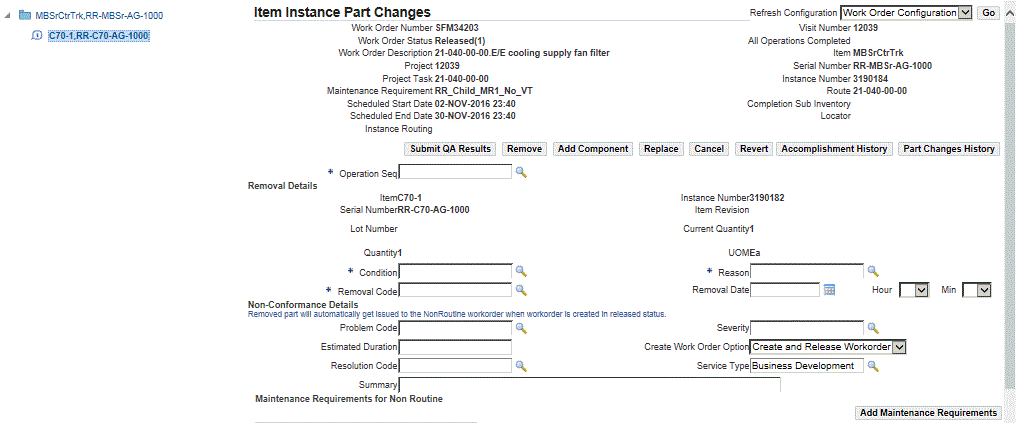
Click the Go button, and the Item Instance Part Changes page appears.

-
Select a value in the Operation Seq (sequence) field; this is a required field.
-
Select an Instance Number.
-
Select an Item, if necessary.
-
For a non-routine, select the Stage Name to indicate the stage that the change is to be performed
-
Select a value in the Immediate Disposition field.
-
Click the Remove button, and enter the removal details.
The new hour and minute level of details are added to the removal date.
During the Parts Change process, if the hardware has a software position reference in as As-Maintained configuration, a notification containing the following information is sent:
-
Title: Parts Change for Software Configuration
-
Unit details
-
MR and Work Order details
-
Software Reference
-
On part details
-
Off part details
-
Maintenance History Validations
After you click the Remove button, you may receive a warning message if there are maintenance accomplishments that have been recorded after the removal date. This message is generated because the system is searching for the maintenance history, and assumes that signoffs that occurred after a removal may need to be reviewed. These signoffs should be confirmed before clicking Yes in the message.
If you click No and stop the transaction, you can review the maintenance history before committing a removal transaction. You can do research in the areas of:
-
Parts Change History: Enables the search for the sequential parts change for a component.
Users can then confirm the dates and times of the new transaction in the context of all previous transactions.
-
Accomplishment History: Enables the search for the historical maintenance signoff records.
Users can then confirm that the removal date and time of the new transaction are correct in the context of all the maintenance signoffs.
Performing Bulk Part Removals
When you perform a bulk part removal, the system creates a non-route maintenance requirement.
-
Navigate to the Update Work Order page (Execution > Production Planning > Work Orders).
-
Search for a work order and click Go.
-
Select the Update Work Order value from the Select Work Order drop-down.
Click Go, and the Work Order Operations page appears.
-
Select Perform Bulk Part Removal from the drop-down list in the upper right-hand side of the page.
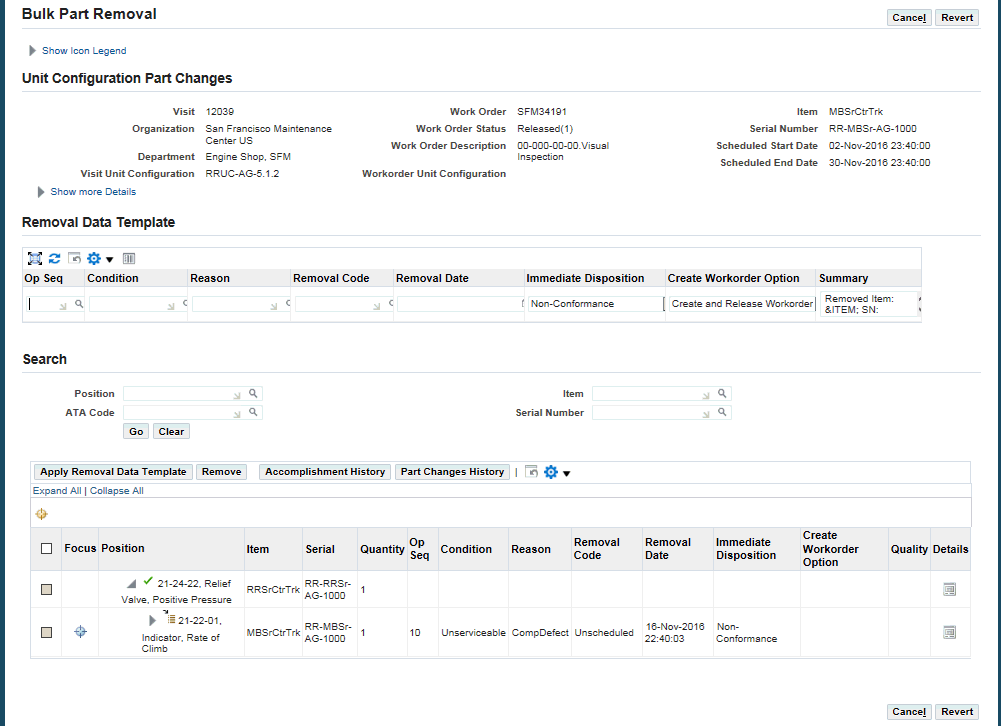
The Part Removal page appears.
-
Enter values in the Removal Data Template region:
-
Op Seq
-
Condition
-
Reason
-
Removal Code
-
Removal Date
-
Immediate Disposition
-
Create Workorder Option:
-
Create Unreleased Workorder
-
Create and Release Workorder
-
Do not create Non-Routine
-
Do not create Workorder
-
-
Summary (required): The default value for this field is “Removed Item: ITEM; SN: SERIAL; From Position: POSITION; Work Order: WORKORDER. However, this value can be edited. In addition, the size of text box can be adjusted.
If you are removing multiple (bulk) items, the Summary text appears for each part being removed. However, the Summary text can be changed for each part by using the Details UI.
-
-
Select the check box for the positions where the bulk part removals will occur.
-
Optionally click the Apply Removal Data Template button to apply the removal details to multiple positions (rows).
-
Click the Remove button.
The system validates the transaction based on the removal date and time:
-
If there are any counters recorded between the removal date and time and the system date and time, those counters will be disabled.
-
If there are any maintenance history records recorded between the removal date and time and sysdate and time, then the system will alert the user that the maintenance history must be reviewed.
A message appears that indicates that the parts have been successfully removed.
-
Understanding Part Changes and Maintenance History
This section includes tips and best practices relating to part changes and maintenance history corrections.
-
The parts change functionality in a work order includes a validation of the removal or installation date against maintenance history.
The system will notify the user if the transaction could be in conflict with existing history records.
-
Maintenance history transactions must be manually verified for any discrepancies or adjustments to the maintenance history records.
-
It is recommended that counter updates be synchronized with maintenance transactions to ensure historical accuracy.
-
Sequential processing of part changes must be maintained.
Part changes should be processed as close to the real-time (actual) part change as possible.
-
Any corrections, updates or cancellations to a maintenance history record may affect the calculations and due dates and times of the Unit Maintenance Plan.
Note: It is recommended that users evaluate the requirement to re-run the Build Unit Effectivities (BUE) program after changes to history records to accurately evaluate any impact to the maintenance forecast.
Overview of Maintenance History Audits
By using the maintenance history auditing function, you can:
-
Review and audit maintenance history during parts changes and records correction activities.
-
Identify potential inconsistencies with part changes relating to historical recording dates and times.
-
Search part change and maintenance record history and evaluate the impact of a record correction before committing the actual change.
-
Correct data entry mistakes and part change errors in a unit configuration.
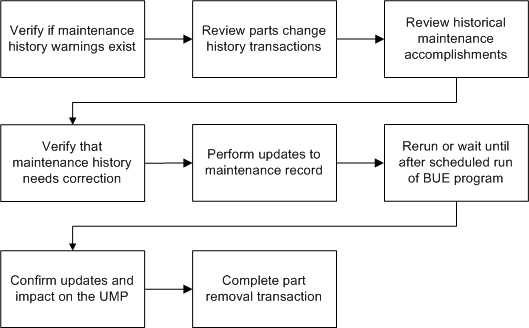
Maintenance History Auditing - Business Process Flow
The following diagram outlines the major tasks involved in the auditing of maintenance records history for part changes:
Performing a Maintenance Record Audit
Follow these steps to access the parts change and maintenance accomplishment history.
-
Navigate to the Part Changes page (Administration > Reliability > Part Changes).
-
Enter search criteria for the Serial Number, Unit Configuration, Item and so on to narrow your search.
Click Go.
-
Click the icon in the Accomplishment Details column for the item.
The Search Maintenance Requirements page appears. The default item and serial information from the part removal/install or parts changes, but you can edit these fields.
Note: Accomplishment history can be edited if the corresponding visit has a Closed status.
-
You must manually query for the maintenance requirements with a status of Signed Off.
-
Select an accomplishment row to view and edit the history record.
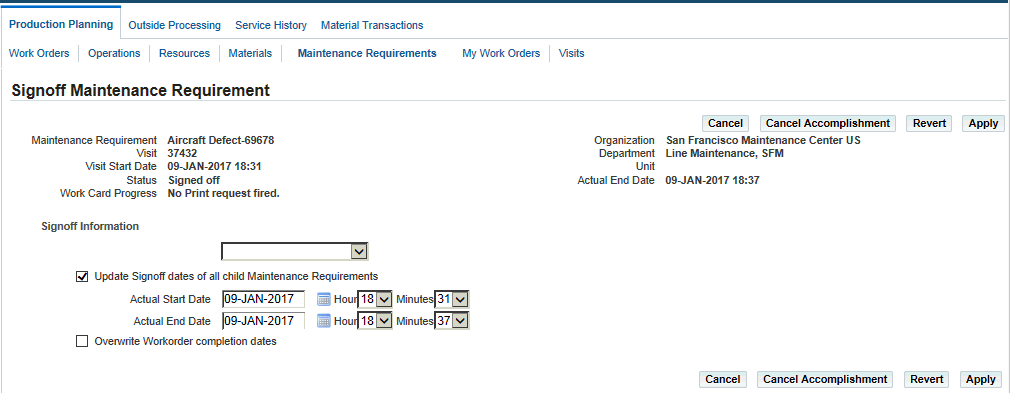
Important: You must have the appropriate security access to access the Signoff Maintenance Requirements page.
If an MR is part of a parent-child relationship, then the parent must be signed off in order for the child MR can be edited.
Note: A child requirement can be canceled without the parent being signed off. However, it cannot be edited.
-
You can perform one of these options:
-
Cancel Accomplishment: There will be no association to another instance.
You may need to cancel an accomplishment, and then create a new accomplishment in another visit to correct maintenance history.
-
Change the associated instance of an existing accomplishment. Entering revised information corrects a historical maintenance accomplishment record. This correction will be reflected in the forecasting of the UMP.
-
During a parts change, if a warning message appears that there are maintenance accomplishments which have been recorded after the part removal date. The user should navigate to the Accomplishment history page and review each signoff record. It is important to note that signoffs of accomplishments can be recorded after the part removal date as part of the normal post maintenance business practice of data entry. Therefore, the accomplishment records can be easily verified as correct and the warning message can be disregarded.
