Manufacturing Execution Systems for Process Manufacturing in Oracle Mobile Supply Chain Applications
This chapter covers the following topics:
- Using Manufacturing Execution Systems for Process Manufacturing
- Recording Ingredient Usage in Production Batches
- Returning Ingredients
- Completing Products for a Production Batch
- Returning Products
- Creating Pending Product Lots for a Production Batch
- Updating Pending Product Lots
- Performing Incremental Backflushing for a Production Batch
- Performing LPN Transactions
- Using the Product Completion Window
- Using Product Completion with Directed Drop
- Using Product Completion with Load
- Using Product Completion with Manual Drop
- Updating Resource Usage
- Recording the Start of Resource Usage
- Recording the End of Resource Usage
- Releasing a Batch Step
- Completing a Batch Step
Using Manufacturing Execution Systems for Process Manufacturing
Oracle Process Mobile Manufacturing enables you to perform Manufacturing Execution Systems (MES) for Process Manufacturing transactions on mobile device hardware.
To log into the MES for Process Manufacturing responsibility
-
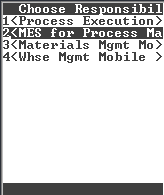
Log onto the Oracle Mobile Supply Chain application.
-
Choose
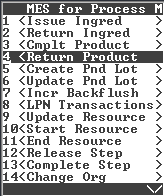
< MES for Process Manufacturing>. The MES for Process Manufacturing window appears.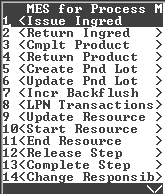
-
Choose one of the following:
-
<Issue Ingred>to record ingredient issue for production batches -
<Return Ingred>to record the return of ingredients to inventory from the batches -
<Cmplt Product>to yield products, byproducts, or co-products of production batches into lots -
<Return Product>to record the return of products of production batches to inventory or a correction made to a material yield transaction -
<Create Pnd Lot>to create pending product and by-product lots for a production batch -
<Update Pnd Lot>to update the pending product lots for a production batch -
<Incr Backflushing>to incrementally backflush an item in a production batch -
<LPN Transactions>to perform LPN transactions for a production batch -
<Update Resource>to update resource usage -
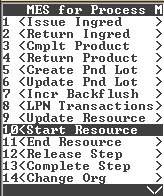
<Start Resource>to record the start date and time of usage for a resource -
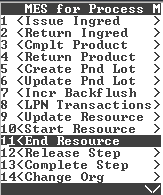
<End Resource>to record the end date and time of usage for a resource -
<Release Step>to release a batch step -
<Complete Step>to complete a batch step
-
-
<Change Responsibility>to access a different mobile application responsibility. -
<Logout>to exit the mobile application.
Recording Ingredient Usage in Production Batches
The Ingredient Issue function supports the issue of ingredients for production batches. When you issue ingredients, the application creates WIP Issue transactions. Ingredient issues do not affect existing reservations and are only used to record additional usage. Using the GME_MOB_ING_ISSUE or Issue Ingred, function you can either create new transactions for ingredient consumption or transact existing reservations for ingredients. You must set the TXN_MODE parameter in the Application Developer responsibility to transact existing ingredient reservations.
Set the parameter to:
-
NEW_ONLY to create only new transactions.
-
RES_ONLY to transact existing reservations.
-
BOTH to create new transactions and transact the existing reservations.
To record ingredient consumption in a production batch using the Issue Ingred window
-
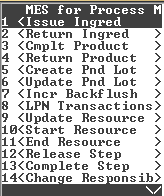
Navigate to the MES for Process Manufacturing window.
-
Select
<Issue Ingred>. The Choose Organization window appears.Note: The Choose Organization window appears when you log onto the Mobile Supply Chain application, and select an MES for Process Manufacturing function.
-
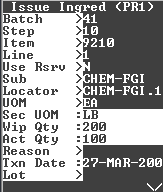
Enter the Organization code. The Issue Ingred window appears.
-
In the Batch field, enter, select, or scan the document number assigned to the batch. You can only access WIP batches. You cannot access Completed, Closed or Canceled batches. Required.
Note: Lot, Locator, Dual UOM, Revision, Status, and Qty fields display dynamically based on item controls set in the inventory application.
-
In the Step field, enter or select the batch step number. If you enter a step number, then only items that are associated to the step display in the Item and Line fields.
-
In the Item field, enter or select the item number for the ingredient. When you enter the line number, this field defaults to the item code for the line entered.
-
In the Line field, enter, select, or scan the batch line number. This field appears if the item is not entered or if the item entered is used in multiple batch lines.
-
In the Use Rsrv field, select the reservation for the material line. The LOV for this field displays all high and detailed level reservations for the selected material line. If you select a detailed level reservation, then the Revision, Subinventory, Locator, Lot, and Lot Qty fields default to the values entered in the reservation. If you also reserved serial numbers, the SN list opens. Select a serial number. A Processed message appears. Continue selecting and processing each serial number until there is no longer a Remaining quantity. This field is enabled based on the TXN_MODE function parameter setting as follows:
-
If the TXN_MODE is NEW, then the Use Rsrv field is not enabled.
-
If the TXN_MODE is RES_ONLY, or BOTH, then the Use Rsrv field is enabled.
-
-
In the Rev field, enter or select the item revision.
-
In the Subinventory field, enter or select the line item subinventory.
-
In the Locator field, enter or select the locator for the item in the subinventory.
-
The following fields appear:
-
UOM is the unit of measure for the selected item as on the material line.
-
Sec UOM is the unit of measure in which the secondary quantity is expressed.
-
WIP Qty is the Work-In-Process Planned Quantity for the ingredient on the batch line.
-
Act Qty is the Actual Quantity of the ingredient already consumed in batch production.
-
-
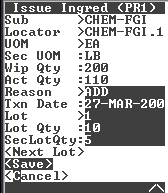
In the Qty field, enter the quantity of the ingredient to consume apart from the quantity already consumed in batch production. If you enter a value in the Qty field, then the Sec Qty field is updated. If the item is Default UOM controlled, then this field is optional and you can enter a value in the Sec Qty field.
-
In the Reason field, you can optionally enter a reason for the ingredient consumption transaction.
-
In the Txn Date field, verify the default transaction date and time. The default is the system date.
-
If the item is lot controlled, then in the Lot field, enter, select, or scan the lot number to use for consumption.
-
In the Lot Qty field, enter the quantity of the item to consume from the lot. You can choose to consume from one or more lots. Consumptions from lot quantities add up to the actual quantity. As lot quantities are issued, the system automatically updates the Act Qty field. This option is available only if the TXN_MODE is set to New or Both.
-
The Remaining field shows the ingredient quantity remaining to be consumed. Remaining = Qty - Act Qty.
-
In the Sec Qty field, enter the quantity of the ingredient to consume in the item's secondary UOM. You can choose to enter Sec Qty or Qty. If you enter a value in the Sec Qty, then the Qty field is updated.
-
Choose one of the following:
-
<Next Lot>to save the transaction and proceed to the next lot to record the next ingredient consumption for the batch. This option is available only if TNX_MODE is set to New or Both. -
<Save>to save the completed transaction and return to the MES for Process Manufacturing window -
<Cancel>to return to the MES for Process Manufacturing window
-
Returning Ingredients
The Ingredient Return function enables you to return ingredients from production batches to inventory. For example, when you unrelease a batch, consumed ingredients are returned to inventory. WIP Returns reverse WIP Issues. You can return an ingredient only to the lot from which it was issued. The quantity returned can be less than or equal to the quantity issued.
To return ingredients from a production batch to inventory
-
Navigate to the MES for Process Manufacturing window.
-
Choose
< Return Ingred >. The Return Ingred window appears.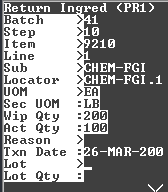
Note: Lot, Locator, Dual UOM, Revision, Status, and Qty fields appear dynamically based on item controls set in the inventory application.
-
In the Batch field, enter, select, or scan the document number of the batch from which you want to return ingredients (required). You can access only WIP and Completed batches.
-
In the Step field, enter or select the step number of the batch from which you want to return an ingredient.
-
In the Item field, enter or select the item to return to inventory. The LOV displays items associated to the selected step. If no step is selected, then all items display.
-
In the Rev field, enter or select the item revision.
-
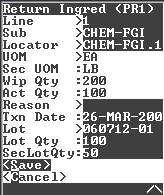
The Line field defaults to the line number of the item. If no step is selected, then the LOV displays all ingredient lines. If a step is selected then, the LOV displays the lines associated with the step.
-
In the Subinventory field, enter or select the line item subinventory.
-
In the Locator field, enter or select the locator for the item in the subinventory.
-
UOM is the unit of measure for the selected ingredient as expressed on the material line.
-
Sec UOM is the unit of measure in which the secondary quantity is expressed.
-
WIP Qty is the Work-In-Process Planned Quantity for the ingredient on the batch line.
-
Act Qty is the Actual Quantity of the ingredient already issued to the batch.
-
In the Reason field, enter a reason for the return ingredient transaction.
-
In the Txn Date field, verify the default transaction date and time. The default is the system date.
-
If the item is lot-controlled, then in the Lot field, enter, select or scan the lot to which the item belongs.
-
In the Lot Qty field, enter the quantity of the ingredient to return to the lot.
-
Sec Lot Qty is the secondary quantity of material to be returned, if the item is dual unit of measure controlled.
-
If the item is serial-controlled, then in the SN field, enter, select or scan the serial number returned. If the serial numbers are sequential and the From SN and To SN fields appear, enter the range of serial numbers to return.
After the serial number or serial number range is processed, repeat this step until you finish returning serial numbers.
-
Choose one of the following:
-
Choose
<Save>to save changes to the return ingredient transactions and enter another transaction. -
Optionally, choose
<Cancel>to navigate to the MES for Process Manufacturing window.
-
Completing Products for a Production Batch
The Complete Product function enables you to yield products, byproducts, or co-products of a production batch into lots. Use the Complt Product window to enter the details of product completion for WIP and Completed batches. Using the Complt Product or GME_MOBILE_CMPLT_PROD function you can either create new transactions for product completion or transact into existing pending lots for products, byproducts, and co-products. You must set the TXN_MODE parameter using the Application Developer responsibility to transact existing pending product lots.
Set the parameter to:
-
NEW to create only new transactions
-
PEND_LOT_ONLY to transact the existing pending lots
-
BOTH to create new transactions and transact the existing pending product lots
Refer to Setting Up, Oracle Process Manufacturing Process Execution User's Guide for more information.
To yield products of a production batch
-
Navigate to the MES for Process Manufacturing window.
-
Select
<Complt Product>. The Complt Product window appears.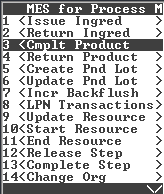
-
In the Batch field, enter, select, or scan the document number of the batch for which you want to record product yield. If you set the TXN_MODE parameter to PND_LOT, then you can access only WIP batches. Required.
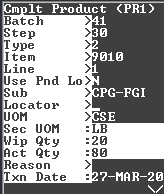
Note: Lot, Locator, Dual UOM, Revision, Status, and Qty fields display dynamically based on item controls set in the inventory application.
-
In the Step field, enter or select the batch step number.
-
In the Type field, enter or select the type as Product or Byproduct. Default value is Product.
-
In the Item field, enter or select the item number for the product. If you select a step number, then only items associated to the step display. When you enter the line number, this field defaults to the item code for the line entered.
-
The Line field defaults to the line number of the item. The LOV displays all the products of the batch if no step is selected. If a step is selected then, the LOV displays the product associated to the step.
-
In the Use Pnd Lot field, select any of the existing pending product lots. The pending product lot LOV displays all the pending lots for the selected item. Alternatively, enter the complete lot name or narrow the list of lots by entering a partial lot name and % (the wild card character). You can only transact the existing pending lots. If you select a pending lot, then the Lot, Lot qty, and UOM display by default. Use Pnd Lot field is enabled based on the TXN_MODE function parameter setting as follows:
-
If the TXN_MODE is NEW, then the Use Pnd Lot field is not enabled.
-
If the TXN_MODE is PEND_LOT_ONLY, or BOTH, then the Use Pnd Lot field is enabled.
-
-
In the Revision field, enter or select the item revision.
-
In the Subinventory field, enter or select the line item subinventory. If the item subinventory is specified on the material line, then this field displays that subinventory.
-
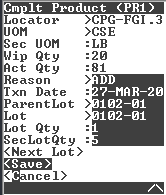
In the Locator field, enter or select the locator for the item in the subinventory. If the locator is specified on the material line, then this field displays that locator.
-
The Following fields appear:
-
UOM is the unit of measure for the selected item as expressed on the material line.
-
Sec UOM is the unit of measure in which the secondary quantity is expressed.
-
WIP Qty is the Work-In-Process Planned Quantity for the product on the batch line.
-
Act Qty is the Actual Quantity of the product yielded from the batch.
-
-
In the Qty field, enter the quantity of the product to issue apart from the quantity already issued from the batch. If the item is Default UOM controlled, then Qty field is optional, and the quantity consumed is entered in the Sec Qty field.
-
In the Reason field, enter or select a reason code for the transaction.
-
In the Txn Date field, verify the default transaction date and time. The default is the system date.
-
Optionally, in the Parent Lot field, enter the parent lot number.
-
In the Lot field, enter or select the lot into which you want to yield the product.
-
In the Lot Qty field, enter the quantity of the product to yield to the lot. If the PND_LOT option is set to New or Both, then you can choose to yield the product to more than one lot. You can either enter Lot Qty or SecLot Qty. If you enter Lot Qty, then SecLot Qty is updated.
-
In the SecLot Qty field, enter the quantity of the product to yield to the lot in the secondary UOM. If you enter SecLot Qty, then Lot Qty is updated.
-
If the item is serial-controlled, then in the SN field, enter, select or scan the serial number completed. If the serial numbers are sequential and the From SN and To SN fields appear, enter the range of serial numbers to complete.
After the serial number or serial number range is processed, repeat this step until you finish completing serial numbers.
-
Choose one of the following
-
<Save>to save the completed transaction and return to the MES for Process Manufacturing window. -
<Next Lot>to save the transaction and proceed to the next lot to issue product from the batch. This option is available only if the PND_LOT option is set to New or Both. -
<Cancel>to return to the MES for Process Manufacturing window.
-
Returning Products
The Return Product function enables you to make corrections to recorded product yield. Inventory is adjusted according to the corrections made. For example, if you accidentally complete a batch and revert back to WIP, then the inventory returns the products.
To return a product
-
Navigate to the MES for Process Manufacturing window.
-
Choose
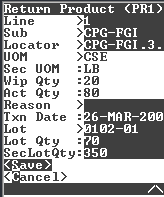
<Return Product>. The Return Product window appears.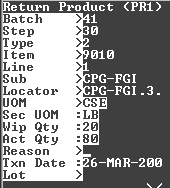
-
In the Batch field, enter, select or scan the document number of the batch from which you want to return products. You can access only WIP and Completed batches. Required.
Note: Lot, Locator, Dual UOM, Revision, Status, and Qty fields display dynamically based on item controls set in the inventory application.
-
In the Step field, enter or select the step number of the batch from which you want to return a product.
-
In the Type field, enter or select the type as Product or Byproduct. Default value is Product.
-
In the Item field, enter or select the item to return to inventory. The LOV displays items associated to the selected step. If no step is selected, then all items display.
-
The Line field defaults to the line number of the item. The LOV displays all ingredient lines if no step is selected. If a step is selected then, the LOV displays the lines associated to the step.
-
In the Subinventory field, enter or select the line item subinventory.
-
In the Locator field, enter or select the locator for the item in the subinventory.
-
The following fields appear:
-
UOM is the unit of measure for the selected item as expressed on the material line.
-
Sec UOM is the unit of measure in which the secondary quantity is expressed.
-
WIP Qty is the Work-In-Process Planned Quantity for the product on the batch line.
-
Act Qty is the Actual Quantity of the product already completed and issued from the batch.
-
-
In the Reason field, enter or select a reason for the transaction.
-
In the Txn Date field, verify the default transaction date and time. The default is the system date.
-
In the Lot field, enter or select the Lot from which you want to return the product.
-
In the Lot Qty field, enter the quantity of product you want to return from inventory. This defaults to the actual quantity. You can edit this field. The quantity returned can be equal or less than the actual quantity yielded from the batch.
-
SecLot Qty is the Lot Qty expressed in the secondary UOM of the item.
-
If the item is serial-controlled, then in the SN field, enter, select or scan the serial number returned. If the serial numbers are sequential and the From SN and To SN fields appear, enter the range of serial numbers to return.
After the serial number or serial number range is processed, repeat this step until you finish returning serial numbers.
-
Choose one of the following:
-
<Save>to save the product return transaction and return to the MES for Process Manufacturing window. -
<Cancel>to return to the MES for Process Manufacturing window
-
Creating Pending Product Lots for a Production Batch
The Create Pnd Lot function enables you to create pending product and by-product lots for a production batch. You can specify the product and the lots to yield the product after production.
To create pending product lots for a batch
-
Navigate to the MES for Process Manufacturing window.
-
Choose
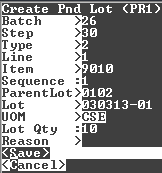
<Create Pnd Lot>.The Create Pnd Lot window appears.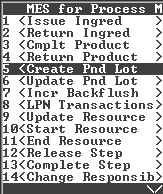
-
In the Batch field, enter or select the batch number for which you want to create pending product lots. Required.
Note: Lot, Locator, Dual UOM, Revision, Status, and Qty fields appear dynamically based on item controls set in the inventory application.
-
In the Step field, enter or select the step that yields the product for which you want to create pending product lots.
-
In the Type field, enter or select the line type. Valid values are Product and Byproduct. Product displays by default. You can edit this field.
-
In the Line field, enter or select the batch line number.
-
The Item field defaults from the batch line number in cases where there is only one product. For lines with more than one product, you can enter or select from the list of values that displays for the field.
-
Revision displays the item revision for the material line.
-
In the Sequence field, enter a sequence as the order in which the lots are to be yielded.
-
In the Parent Lot field, enter the parent lot number. This is the parent lot to which a new lot is associated. The lot has default attributes derived from this parent lot during creation. This field does not display if the item is not child lot-controlled.
-
In the Lot field, enter the lot number.
-
The following fields appear:
-
The UOM field displays the unit of measure for the material. This defaults to the UOM specified on the material line.
-
Sec UOM is the unit of measure in which the secondary quantity is expressed.
-
Sec Qty is the quantity of material to be yielded into the lot, if the item is dual unit of measure controlled.
-
-
In the Lot Qty, enter the quantity to yield into the lot.
-
In the Reason field, enter a reason code to associate with the transaction.
-
Choose one of the following:
-
<Save>to save the pending product lot. -
<Next>to save the pending product lot and refresh the window to create more pending lots. -
<Cancel>to cancel the current transaction and navigate to the MES for Process Manufacturing window.
-
Updating Pending Product Lots
The Update Pnd Lot function enables you to update the pending product lots for a production batch.
To update pending product lots
-
Navigate to the MES for Process Manufacturing window.
-
Choose
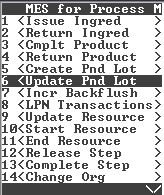
<Update Pnd Lot>. The Query Lot window appears.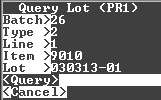
-
In the Batch field, enter or select the batch to update the pending product lots. Required.
-
In the Type field, enter or select the line type. Valid values are Product and Byproduct. Product displays by default. You can edit this field.
-
In the Line field, enter or select the batch line number.
-
The Item field defaults from the batch line number in cases where there is only one product. For lines with more than one product, you can enter or select from the list of values that displays for the field.
-
In the Lot field, enter or select the item lot number.
-
Click
<Query>. The Update Pnd Lot window appears.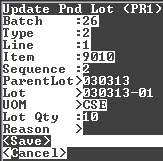
-
The following fields display:
-
Batch is the batch document number.
-
Line Type is the line type of the batch item.
-
Line is the batch line number.
-
Item is the item code that defaults from the batch line number.
-
Revision is the item revision.
-
Sequence specifies the order in which the lots are to be yielded. You can edit this field.
-
Lot is the item lot number.
-
UOM is the unit of measure for the material. This defaults to the UOM specified on the material line.
-
Sec UOM is the unit of measure in which the secondary quantity is expressed.
-
-
Lot Qty is the quantity of material to be yielded into the lot, specified when the pending lot is created. You can edit this field. Enter a new lot quantity.
-
Sec Qty is the quantity of material to be yielded into the lot, if the item is dual unit of measure controlled. This is updated when you edit the value in Qty field. When you change the Qty, then the following message displays:
“Apply converted quantity to Secondary quantity?” Select Yes to apply converted quantity to Secondary Quantity. If you update the Sec Qty, then the Qty field is updated.
-
In the Reason field, enter a reason code to associate with the transaction.
-
Choose one of the following:
-
<Save>to save the changes to the pending product lot and navigate to the next record that displays based on the criteria you entered in the Query Lot window. -
<Next>to view the next record based on the query criteria. -
<Cancel>to cancel the changes and navigate to the MES for Process Manufacturing menu .
-
Performing Incremental Backflushing for a Production Batch
The Incr Backflush window enables you to perform incremental backflushing for an item in a production batch and enables you to record production output or yield incrementally as it occurs prior to batch completion. The application calculates the ingredient usage by backflushing the ingredients based on product yield and WIP planned quantities. You can enter incremental quantities, a new actual quantity, or a new percent of planned quantity for an item.
To incrementally backflush a batch
-
Navigate to the MES for Process Manufacturing window.
-
Choose
<Incr Backflush>. The Incr Backflush window appears.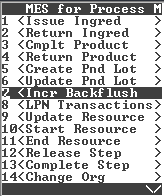
-
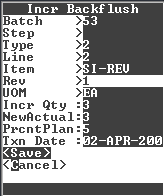
In the Batch field, enter or select the batch for which you want to perform incremental backflushing. You can only access WIP and Completed batches. Required.
-
In the Step field, enter or select the batch step.
-
In the Type field, enter or select the line type. Valid values are 1 for product, 2 for byproduct, and 3 for ingredient.
-
In the Line field, enter or select the batch line number.
-
In the Item field, enter or select the item that you want to backflush.
-
In the Rev field, enter or select the item revision for a revision-controlled item.
-
The UOM field displays the unit of measure for the item. This defaults to the UOM specified on the material line.
-
To backflush an item, enter any one of the following:
-
In the Incr Qty field, enter an incremental quantity.
-
In the New Actual field, enter a new actual quantity.
-
In the Percent Plan field, enter a new percent of the planned quantity. Enter the percent as a whole number. For example, enter five percent as 5.
Based on the field you enter, the application calculates the values for the other fields. For example, if you enter a new actual quantity, then the values are calculated for the incremental quantity and percent of planned quantity.
-
-
In the Txn Date field, enter a transaction date. The default value for this field is the system date. To override the entry of the default system date and time for the incremental backflushing operation, enter the Txn Date as the actual date on which incremental backflushing is performed.
-
Choose one of the following:
-
<Save>to save the incremental backflush transaction. -
<Cancel>to cancel the incremental backflush transaction.
Note: The profile option WMS: Item/Rev Delimiter = "*" does not support the incremental back flush transactions form.
For more information, seeUnderstanding Incremental Backflushing, Oracle Process Manufacturing Process Execution User's Guide.
-
Performing LPN Transactions
The Product Completion function enables you to record batch output into an LPN. This function is enabled only for WMS-enabled organizations. The following options are available:
-
Product Completion
-
Product Completion with Directed Drop
-
Product Completion with Load
-
Product Completion with Manual Drop
Using the Product Completion Window
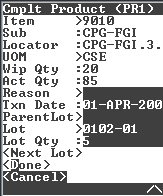
Use the Product Completion window to yield a product directly to an LPN. When you yield a product using the Product Completion window, a putaway task is generated in the application, but the product is not delivered into inventory until you transact the task. This transaction can be used in a scenario, where a production operative records the batch yield, but material is putaway by inventory workers who will perform the putaway task depending on their workload. Thus, the increase in inventory may occur some time after production is recorded. The LPN status is In WIP.
To yield a product into an LPN
-
Navigate to the MES for Process Manufacturing window.
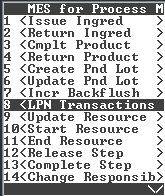
-
Choose
<LPN Transactions>. The LPN Transactions window appears.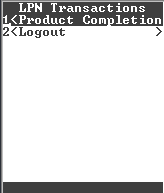
-
Choose
<Product Completion>. The Product Completion window appears.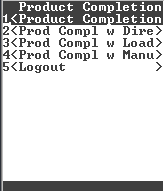
Note: Lot, Locator, Dual UOM, Revision, Status, and Qty fields appear dynamically based on item controls set in the inventory application.
-
Choose
<Product Completion>. The Complt Product window appears.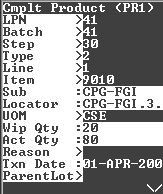
-
In the LPN field, enter the LPN to which you want to yield the product. Press CTRL+G to create a new LPN.
-
In the Batch field, enter, select, or scan the document number of the batch from which you want to issue products (required). You can access only WIP and Completed batches.
-
In the Step field, enter or select the batch step number.
-
In the Type field, enter or select the type as Product or Byproduct. Default value is Product.
-
In the Item field, enter or select the item number for the product. When you enter the line number, this field defaults to the item code for the line entered.
-
Line field defaults to the line number of the item. The LOV displays all the products of the batch if no step is selected. If a step is selected then, the LOV displays the product associated to the step.
-
In the Revision field, enter or select the item revision.
-
In the Subinventory field, enter or select the line item subinventory.
-
In the Locator field, enter or select the locator for the item in the subinventory.
-
The following fields appear:
-
UOM is the default unit of measure for the selected item.
-
Sec UOM is the unit of measure in which the secondary quantity is expressed.
-
WIP Qty displays the Work-In-Process Planned Quantity for the product on the batch line.
-
Act Qty displays the Actual Quantity of the product issued from the batch.
-
-
In the Qty field, enter the quantity of the product to issue apart from the quantity already issued from the batch. If the item is Default UOM controlled, then this field is optional and the quantity consumed is entered in the Sec Qty.
-
The Remaining field displays the product quantity remaining to be issued into a lot. This defaults to the Qty entered and is updated as Qty is entered for a lot.
-
In the Reason field, enter or select a reason code for the transaction.
-
In the Txn Date field, verify the default transaction date and time. The default is the system date.
-
In the Parent Lot field, enter the parent lot number.
-
In the Lot field, enter or select the lot into which you want to issue the product. Press CTRL+G to create a new lot.
-
In the Lot Qty field, enter the quantity of the product to issue to the lot. You can choose to issue the product to more than one lot.
-
In the SecLot Qty field, enter the quantity of the product to yield to the lot in the secondary UOM. If you enter in this field, then the Lot Qty field is updated.
-
Choose one of the following
-
<Next Lot>to enter a transaction for the next lot -
<Done>to complete the transaction and go to the MES for Process Manufacturing window -
<Cancel>to return to the MES for Process Manufacturing window
-
Using Product Completion with Directed Drop
Use the Product Completion with Directed Drop window to record production and also transfer the product to its defined inventory location. When you enter the details into the Product Completion with Directed Drop window, the Drop LPN window displays and lets you drop the product into its inventory location. The Drop LPN page displays the storage location based on putaway rules defined for the organization.
To yield a product into an LPN and drop it to its inventory location
-
Navigate to the MES for Process Manufacturing window.
-
Choose
<LPN Transactions>. The Product Completion window appears.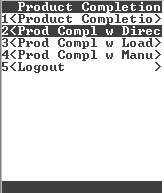
-
Choose
<Product Completion w Directed Drop>.The Complt Product window appears.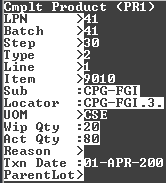
-
In the LPN field, enter the LPN to which you want to yield the product.
Note: Lot, Locator, Dual UOM, Revision, Status, and Qty fields appear dynamically based on item controls set in the inventory application.
-
In the Batch field, enter, select, or scan the document number of the batch from which you want to issue products. You can access only WIP and Completed batches. Required.
-
In the Step field, enter or select the batch step number.
-
In the Type field, enter or select the type as Product or Byproduct. Default value is Product.
-
The Line field defaults to the line number of the item. The LOV displays all the products of the batch if no step is selected. If a step is selected then, the LOV displays the product associated to the step.
-
In the Item field, enter or select the item number for the product. When you enter the line number, this field defaults to the item code for the line entered.
-
In the Revision field, enter or select the item revision.
-
In the Subinventory field, enter, scan, or select the item subinventory.
-
In the Locator field, enter, scan, or select the item locator.
-
The following fields appear:
-
UOM is the default unit of measure for the selected item.
-
Sec UOM is the unit of measure in which the secondary quantity is expressed.
-
WIP Qty displays the Work-In-Process Planned Quantity for the product on the batch line.
-
Act Qty displays the Actual Quantity of the product issued from the batch.
-
-
In the Qty field, enter the quantity of the product to issue apart from the quantity already issued from the batch. If the item is Default UOM controlled, then this field is optional and the quantity consumed is entered in the Sec Qty.
-
The Remaining field displays the product quantity remaining to be issued into a lot. This defaults to the Qty entered and is updated as Qty is entered for a lot.
-
In the Reason field, enter or select a reason code for the transaction.
-
In the Txn Date field, verify the default transaction date and time. The default is the system date.
-
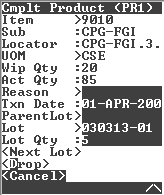
In the Parent Lot field, enter the parent lot number.
-
In the Lot field, enter or select the lot into which you want to yield the product.
-
In the Lot Qty field, enter the quantity of the product to issue to the lot. You can choose to issue the product to more than one lot. You can enter Lot Qty or SecLot Qty for dual UOM controlled items. If you enter Lot Qty, then the SecLot Qty field is updated.
-
In the SecLot Qty field, enter the quantity of the product to issue to the lot in the secondary UOM. If you enter SecLot Qty, then the Lot Qty field is updated.
-
Choose one of the following:
-
<Next Lot>to enter a transaction for the next Lot -
<Drop>to complete the transaction and access the Drop LPN window. The Drop LPN window enables you to transfer the product to the specified inventory location. -
<Cancel>to return to the MES for Process Manufacturing window
Refer to "Explaining Directed Drops" in the Oracle Warehouse Management User's Guide for more information.
-
Using Product Completion with Load
Use the Product Completion w Load window to record production and load an LPN with the product quantity. The on-hand inventory quantity for the product increases after the LPN is dropped to a storage location.
To use the Product Completion w Load window
-
Navigate to the MES for Process Manufacturing window.
-
Choose
<LPN Transactions>. The Product Completion window appears.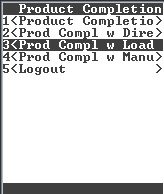
-
Choose
<Product Completion w Load>. The Complt Product window appears.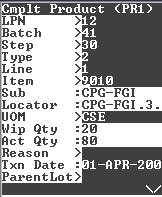
-
In the LPN field, enter the LPN to which you want to yield the product.
Note: Lot, Locator, Dual UOM, Revision, Status, and Qty fields appear dynamically based on item controls set in the inventory application.
-
In the Batch field, enter, select, or scan the document number of the batch from which you want to issue products. You can access only WIP and Completed batches. Required.
-
In the Step field, enter or select the batch step number.
-
In the Type field, enter or select the type as Product or Byproduct. Default value is Product.
-
The Line field defaults to the line number of the item. The LOV displays all the products of the batch if no step is selected. If a step is selected then, the LOV displays the product associated to the step.
-
In the Item field, enter or select the item number for the product. When you enter the line number, this field defaults to the item code for the line entered.
-
In the Revision field, enter or select the item revision.
-
In the Subinventory field, enter or select the line item subinventory.
-
In the Locator field, enter or select the item locator.
-
The following fields appear:
-
UOM is the default unit of measure for the selected item.
-
Sec UOM is the unit of measure in which the secondary quantity is expressed.
-
WIP Qty displays the Work-In-Process Planned Quantity for the product on the batch line.
-
Act Qty displays the Actual Quantity of the product issued from the batch.
-
-
In the Qty field, enter the quantity of the product to issue apart from the quantity already issued from the batch. If the item is Default UOM controlled, then this field is optional and the quantity consumed is entered in the Sec Qty field.
-
The Remaining field displays the product quantity remaining to be issued into a lot. This defaults to the Qty entered and is updated as Qty is entered for a lot.
-
In the Reason field, enter or select a reason code for the transaction.
-
In the Txn Date field, verify the default transaction date and time. The default is the system date.
-
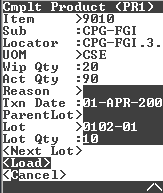
In the Parent Lot field, enter the parent lot number.
-
In the Lot field, enter or select the lot into which you want to issue the product.
-
In the Lot Qty field, enter the quantity of the product to issue to the lot. You can choose to issue the product to more than one lot. You can enter Lot Qty or SecLot Qty for dual UOM controlled items. If you enter Lot Qty, then the SecLot Qty field is updated.
-
In the SecLot Qty field, enter the quantity of the product to issue to the lot in the secondary UOM. If you enter in this field, then the Lot Qty field is updated.
-
Choose one of the following:
-
<Next Lot>to enter a transaction for the next lot -
<Load>to load the product and complete the transaction using the Manual Load window. The on-hand quantity for the product is increased only after it is dropped to a storage location. -
<Cancel>to cancel the present transaction and return to the MES for Process Manufacturing window
Refer to "Explaining Manual Loads" in the Oracle Warehouse Management User's Guide for more information.
-
Using Product Completion with Manual Drop
Use the Product Completion w Manual Drop window to yield a product into an LPN and also transfer the product to the inventory using the Manual Drop window. The Manual Drop window displays the product storage subinventory and location. You can edit the storage subinventory and location details and are not defined by putaway rules.
To use the Product Completion w Manual Drop window
-
Navigate to the MES for Process Manufacturing window.
-
Choose
<LPN Transactions>. The Product Completion window appears.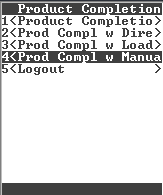
-
Choose
<Product Completion w ManualDrop>. The Cmplt Product window appears.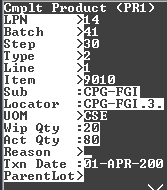
-
In the LPN field, enter the LPN to which you want to yield the product.
Note: Lot, Locator, Dual UOM, Revision, Status, and Qty fields appear dynamically based on item controls set in the inventory application.
-
In the Batch field, enter, select, or scan the document number of the batch from which you want to issue products. You can access only WIP and Completed batches. Required.
-
In the Step field, enter or select the batch step number.
-
In the Type field, enter or select the type as Product or Byproduct. Default value is Product.
-
The Line field defaults to the line number of the item. The LOV displays all the products of the batch if no step is selected. If a step is selected then, the LOV displays the product associated to the step.
-
In the Item field, enter or select the item number for the product. When you enter the line number, this field defaults to the item code for the line entered.
-
In the Revision field, enter or select the item revision.
-
The following fields appear:
-
UOM is the default unit of measure for the selected item.
-
Sec UOM is the unit of measure in which the secondary quantity is expressed.
-
WIP Qty displays the Work-In-Process Planned Quantity for the product on the batch line.
-
Act Qty displays the Actual Quantity of the product issued from the batch.
-
-
In the Qty field, enter the quantity of the product to issue apart from the quantity already issued from the batch. If the item is Default UOM controlled, then this field is optional and the quantity consumed is entered in the Sec Qty field.
-
The Remaining field displays the product quantity remaining to be issued into a lot. This defaults to the Qty entered and is updated as Qty is entered for a lot.
-
In the Reason field, enter or select a reason code for the transaction.
-
In the Parent Lot field, enter the parent lot number.
-
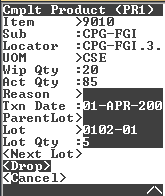
In the Lot field, enter or select the lot into which you want to issue the product.
-
In the Lot Qty field, enter the quantity of the product to issue to the lot. You can choose to issue the product to more than one lot. You can enter Lot Qty or SecLot Qty for dual UOM controlled items. If you enter Lot Qty, then the SecLot Qty field is updated.
-
In the SecLot Qty field, enter the quantity of the product to issue to the lot in the secondary UOM. If you enter in this field, then the Lot Qty field is updated.
-
In the Txn Date field, verify the default transaction date and time. The default is the system date.
-
Choose one of the following:
-
<Next Lot>to enter a transaction for the next lot -
<Drop>to drop the product and complete the transaction using the Manual Drop window -
<Cancel>to cancel the present transaction and return to the MES for Process Manufacturing window
Refer to "Explaining Manual Drops" in the Oracle Warehouse Management User's Guide for more information.
-
Updating Resource Usage
You can update resource usage for a batch, batch steps, and activities. The batch must have a status of WIP or Completed. You cannot access Closed or Canceled batches.
To update resource usage for a production batch
-
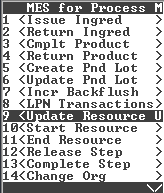
Navigate to the MES for Process Manufacturing responsibility.
-
Choose
<Update Resource Usage>. The Query Resource window appears.
-
In the Batch field, enter, select, or scan the document number assigned to the batch. Required.
-
In the Step field, enter, select, or scan the Step containing the resources to edit.
-
In the Activity field, enter, select or scan the activity containing the resources to edit. Note that if the Activity field is left blank, then all resources for all activities in the step are retrieved.
-
In the Resource field, enter, select, or scan the resource to update. Note that If the Resource field is left blank, then all resources for the Activity are retrieved.
-
Choose
<Query>. The Batch Resources window appears.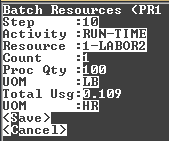
-
In the Count field, enter, select or scan the number of resources needed for this activity.
-
In the Proc Qty field, enter, select or scan the quantity of material processed by the resource displayed. This value combined with the total usage (Total Usg) defines the usage rate.
-
In the Total Usg field, enter, select or scan the actual total usage for the resource displayed.
-
Choose
<Save>to save the updates to the resource. -
Optionally, choose
<Cancel>to cancel the updates to the resource.
Recording the Start of Resource Usage
The Start Resource window enables you to record the start date and time of usage for a resource.
To record the start of resource usage
-
Navigate to the MES for Process Manufacturing window.
-
Choose
<Start Resource>. The Choose Organization window appears. -
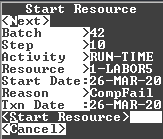
Enter the Organization code. The Start Resource window appears.
-
In the Batch field, enter, select, or scan the document number assigned to the batch. You can only access WIP or Completed batches with routings. Required.
-
In the Step field, enter or select the batch step associated with the resource to record the start of usage. You can only select steps with a status of WIP or Completed.
-
In the Activity field, enter or select scan the activity.
-
In the Resource field, enter, select, or scan the resource. The list of values (LOV) for this field displays the following information so you can select the required resource:
-
Resource Code is the code for the resource.
-
Start Date is the planned start date for a step in WIP status or the actual start date for a step in Completed status.
-
Optionally, in the Instance field, enter, select, or scan the instance of the resource to record the start of usage. This field displays if there are more than one instances of the resource used in the batch.
-
In the Start Date field, enter or scan the start date and time for the resource usage. The default is the system date. Edit this field by entering a start date that is greater than or equal to the resource actual start date and less than or equal to the resource actual end date. If you enter a start date, then it cannot be greater than the system date.
-
Optionally, in the Reason field, enter, select, or scan the reason code.
-
In the Txn Date field, verify the default transaction date and time. The default is the system date. You can also enter a transaction date. If you enter a transaction date, then it must be in an open period. If you enter a Start Date, then this field defaults to the Start Date.
-
Select
<Start Resource>to save the transaction. -
Select
<Next>to navigate to another batch step to record the start of resource usage or select<Cancel>to cancel the process and return to the MES for Process Manufacturing window.
Recording the End of Resource Usage
The End Resource window lets enables you to record the end date and time of usage for a resource.
To record the end of resource usage
-
Navigate to the MES for Process Manufacturing window.
-
Choose
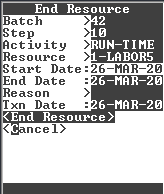
<End Resource>. The End Resource window appears.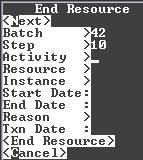
-
In the Batch field, enter, select, or scan the document number assigned to the batch (required). You can only access WIP or Completed batches with routings.
-
In the Step field, enter, select, or scan the batch step associated with the resource to record the end of usage. You can only select steps with a status of WIP or Completed.
-
In the Activity field, enter, select, or scan the activity.
-
In the Resource field, enter, select, or scan the resource. Only resources with existing transactions display. The LOV for this field displays the following information so you can select the required resource:
-
Optionally, in the Instance field, enter, select, or scan the instance of the resource to record the end of usage. This field displays if there are more than one instances of the resource used in the batch.
-
Start Date field displays the start date of resource usage entered on the Start Resource window.
-
In the End Date field, enter or scan the end date and time for the resource usage. The default is the system date. Edit this field by entering an end date that is greater than or equal to the resource transaction start date and less than or equal to the resource actual end date. If you enter an end date, then it cannot be greater than the system date.
-
In the Reason field, verify the reason code. This defaults to the reason code entered for the resource on the Start Resource window. You can edit this field.
-
In the Txn Date field, verify the default transaction date and time. This defaults to the transaction date entered for the resource on the Start Resource window. You can also enter a transaction date. If you enter a transaction date, then it must be in an open period. You can only enter a date that is greater than or equal to the resource actual start date and less than or equal to the resource actual end date. If you enter a transaction date, then it cannot be greater than the system date.
-
Choose any one of the following:
-
<End Resource>to save the transaction -
<Next>to navigate to the next resource transaction. This displays only for resources with multiple transactions. -
<Cancel>to cancel the process and return to the MES for Process Manufacturing window
-
Releasing a Batch Step
The Step Release window enables you to release a batch step. If an ingredient associated to a step has a consumption type of Automatic by Step, then that ingredient line is consumed when you release the step. The application enforces the Step Controls Batch Status parameter. The combinations of step release type and step dependency enforcement are also considered.
Refer to Setting Up, Oracle Process Manufacturing Process Execution User's Guide for more information.
To release a batch step
-
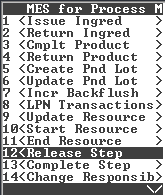
Navigate to the MES for Process Manufacturing window.
-
Choose
<Release Step>. The Choose Organization window appears. -
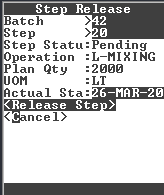
Enter the Organization code. The Step Release window appears.
-
In the Batch field, enter, select, or scan the document number assigned to the batch. You can only access pending or WIP batches. Required.
-
In the Step field, enter, select, or scan the batch step to release. You can only select steps with a status of pending.
-
The following fields appear:
-
Step Status is the step status. You can only select steps with a status of pending.
-
Operation is the operation name.
-
Plan Qty is the planned quantity for the step process.
-
UOM is the unit of measure for the planned step quantity.
-
-
Actual Start Dt is the actual start date for the batch step. This defaults to the system date if not entered. You can edit this field with a new start date.
-
Choose
<Release Step>to release the step. -
Select another step to release or choose
<Cancel>to cancel the release process and return to the MES for Process Manufacturing window.
Completing a Batch Step
The Step Complete window enables you to complete a batch step. If a product associated to a step has a yield type of Automatic by Step, then that product is yielded when you complete the step. If you complete the last step in a batch and the OPM Process Execution parameter, Step Controls Batch Status profile option is set to Yes, then the batch is completed. The combinations of step release type and step dependency enforcement are also considered.
Refer to Setting Up, Oracle Process Manufacturing Process Execution User's Guide for more information.
To complete a batch step
-
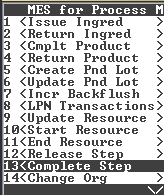
Navigate to the MES for Process Manufacturing window.
-
Choose
<Complete Step>. The Step Complete window appears.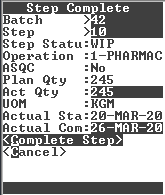
-
In the Batch field, enter, select, or scan the document number assigned to the batch. You can only access pending or WIP batches. Required.
-
In the Step field, enter, select, or scan the batch step to release. You can only select steps with a status of WIP.
-
The following fields appear:
-
Step Status is the step status. You can only select steps with a status of Pending.
-
Operation is the operation name.
-
ASQC indicates if the automatic step quantity calculation feature is enabled for the batch.
-
If the automatic step quantity calculation is off, then the planned numbers for Pending steps are scaled, and WIP and Completed steps are not changed.
-
If the automatic step quantity calculation is on, then the step quantities and resource usage are not changed, since none of the material quantities used were changed. Once the steps are completed, the automatic step quantity calculation selects the appropriate actual quantities to use in calculations.
-
Plan Qty is the planned quantity for the step process.
-
UOM is the unit of measure for the planned step quantity.
-
Actual Qty is the actual quantity for the step process and defaults to the actual step quantity entered on the Batch Steps window. If the actual step quantity is not entered on the Batch Steps window, then it defaults to the planned step quantity. You cannot edit this field.
-
Actual Start Dt is the actual start date for the batch step as entered on the Step Release window.
-
-
Actual Comp Dt is the actual completion date of the batch step. This defaults to the system date if not entered. You can edit this field with a new completion date.
-
Choose
<Complete Step>to complete the step. -
Select another step to complete or choose
<Cancel>to cancel the completion process and return to the MES for Process Manufacturing window.