Process Planning Reports
The topic describes the Process Planning reports.
This chapter covers the following topics:
- Running the Planning Detail Report
- Running the Resource Dispatch Report
- Running the MPS Bucketed Material Report
- Running the MPS Unbucketed Material Report
- Running the Reorder Point Report
Running the Planning Detail Report
The Planning Detail Report provide the option to generate a combination of reports or individual reports, with an option to change the format of the final output report.
To print the Planning Detail Report
-
Navigate to the GMP Planning Detail Report window.
Parameters
-
Select an Organization. You can either select a single organization or "All". If you select "All", then all the organizations in the plan are considered in the report.
-
Enter the Report Start Date. Default is the Plan Start Date. It is the day from which the data must be displayed in the report.
-
Enter the Days, Weeks, and Periods. Default values are copied from the Plan. The report displays the data for the number of days as mentioned in the "Days" parameter. Then the data displays in weeks according to the parameter passed. After the weeks, the data is grouped in periods and the data for the number of periods mentioned in the parameters displays.
-
Enter the first, second, and third sort. This defines the way to sort the output.
-
Enter an Exception Type that corresponds to the display of exceptions in the report.
-
Enter the range of planner (Planner From/To).
-
Enter the range of the buyer (Buyer From/To).
-
Enter the item range (Item From/To).
-
Enter the Category Set.
-
Enter the range of categories (Categories From/To) in the mentioned category set.
-
Enter the ABC Assignment Group.
-
Enter the ABC Class based on the ABC assignment group.
-
Enter the Horizontal Display Factor by which all the data must be scaled down in case of horizontal display.
-
Enter Yes or No to Include Items With No Activity in the calculation.
-
Enter Yes or No to Include Phantom Items in the calculation.
-
Enter Yes or No to Include Completed Jobs in the calculation.
-
Enter the Cutoff Date till which the transactions must be considered to calculate the reporting data. This is different from the end reporting date, which is calculated based on the report start date and total reporting period as mentioned in the days, weeks, period parameters.
-
Select Combined PDR:
-
Yes: The LOV for Combined PDR gets enabled. You can select the XML template for combined PDR. You must individually select "Yes" for the various components such as Horizontal, Vertical, Action, and Exception. A single report displays the selected components.
-
No: The LOV for Combined PDR gets disabled. You must individually select "Yes" for the various components such as Horizontal, Vertical, Action, and Exception and also the corresponding XML templates. Single/multiple reports display for each selected component.
-
-
Click Submit Request.
To submit another request, select Yes. If you are submitting a request set, then a Request ID is assigned to the set and to each request in the set.
To register a new template
You must select a corresponding RTF template for getting a PDF output in the desired format. You have the option to register new templates in RTF format if you want the report in new format.
-
Create a new template with .RTF extension and save it in the local machine. For example, c:\PDR_NEW.rtf.
-
Navigate to the XML Publisher Administrator responsibility from the E-Business Suite Homepage.
-
Select Templates.
-
Click Create Template.
-
Enter a Name for the template.
-
Enter a Code for the template. This code is utilized if the template is used within some other template as a sub template.
-
Select the Application as Process Manufacturing Process Planning.
-
Select the Data Definition name as PDR_PDF.
-
Select Type as RTF.
-
Select Start Date and End Date for the period in which the template must be active for publishing the report.
Leave the End Date blank in case the template must not be obsoleted in future. You can add an End Date later if the template is to be obsoleted.
-
Select Sub template for generating vertical report, horizontal report, action messages, and the exception messages report. For Overall PDR report template, do not select Sub template.
-
Write a suitable Description for the template.
-
Browse for the new template file in the Template File region. In the present example, it is c:\ PDR_NEW.rtf.
-
Select a Language and Territory for the template.
The templates to choose from are filtered on the basis of language and territory at the time of final request submission.
-
Click Apply.
Running the Resource Dispatch Report
The Resource Dispatch Report is used on the shop floor to provide the latest information on the resource usages for existing batches. This report is also used to schedule the resource usage based on the suggestions from the APS planning engine. You can print the report to include both the planned and actual resource usage or the planned resource usage only. The report displays the material consumed and yielded from the resource.
The Resource Dispatch Report is generated from the concurrent request submission window. The parameters include From Organization, To Organization, From Resource, To Resource, From Date, and To Date.
If you are generating the Resource Dispatch Report for planned data, you must also include the Plan Name and Instance Code parameters.
Running the MPS Bucketed Material Report
Like the MPS Material Activity report, this report lists pending transaction information for a single item in one or more warehouses. However, the previous report listed individual pending transactions for the item in chronological order.
The MPS Bucketed Material report shows aggregate supply and demand information for the item, grouped into categories (such as purchase order receipts and planned production). The aggregate supply and demand for the item in each category is listed, rather than the individual transactions. For example, if you plan for an item used in 50 formulas and in 30 batches per day, the Bucketed Material Report can show you the total demand for the item by day, by week, and so forth.
Also, while the MPS Material Activity report lists transactions in chronological order, the MPS Bucketed Material report is generated on a time bucket-based format. OPM lists all pending supply and demand for an item, aggregated by day, week, or whatever buckets you defined on your schedule. OPM can thereby list net safety stock requirements for any point in time.
The time buckets are the ones you established for the schedule on the MPS Schedule window. In the time buckets you established, OPM compiles all sources of supply and demand.
You must associate a Planning Class to your user and to each item you wish to have print on a report. If no associations are made the reports will not print any data.
To print the MPS Bucketed Material Activity Report
-
Navigate to the Bucketed Material window.
-
Organization displays the default organization assigned to the user (planner). If you have planning interests in more than one organization, you may override this default with another organization code (that is, one that has been linked to the Planner on the User Organization window, also in the System application).
-
Schedule is the default schedule parameters code assigned to the current user displays, along with the corresponding schedule parameters description. You may enter a different schedule parameters code, as necessary. The organization code and the schedule parameters code are both required to identify the schedule parameters that were used to generate the MRP run for which you are inquiring on material activity.
-
Enter the Planning Class code associated to the schedule for which you ran MRP.
-
Enter the Buyer/Planner: code associated to the schedule.
-
Enter Item code for which you want to review material activity. Required.
-
Enter the For Organization organization. A schedule can have multiple organizations linked to it. Enter the specific organization for which you want to see MPS Bucketed Material Activity.
-
Select the Critical Item box if you want to flag critical items.
Demand Components
-
Select Independent to indicate that sales orders and sales forecasts (imported from systems outside of OPM) are the independent demand components.
-
Select Dependent to indicate that the scheduled ingredient (Sched Ingred) demand comes from batch tickets, and firm ingredient (Firm Ingred) demand comes from firm-planned orders.
-
Total indicates the combination of all independent and dependent demand.
Supply Components
-
Open Purchase Orders represents purchase order receipt quantities (PO Receipts) are created by open purchase orders.
-
Req Receipts indicate that the required receipts.
-
Firm Scheduled indicates that the scheduled supply (Sched Firm) of the item from batch tickets.
-
Planned Production represents the pending supply of the item from both firm-planned orders and MRP-planned orders (Plnd Prod).
-
Submit the report.
The information entered here will also print on the cover page.
MPS Bucketed Material Report - Balances and Safety Stock Requirements
At the end of each time bucket, OPM refers to the opening balance of the item, then uses the supply and demand information to produce an ending balance (Ending Bal) for the time bucket. OPM then compares the ending balance to the safety stock level for the item to determine the net safety stock requirements (Net SS Reqmt).
Running the MPS Unbucketed Material Report
This report lists (in chronological order) pending inventory transaction activity for an item in a subinventory, or all subinventories over which you (as the planner) have authority. Pending inventory transactions include sales orders, purchase orders, firm-planned orders, or anything else that has an anticipated effect on stock balances (as opposed to an actual, completed stock transaction, such as a move of inventory between warehouses). By listing anticipated consumption against receipts (purchase receipts, planned order receipts), production and purchasing planners can view the effects of pending transactions on inventory balances. For buyer/planners, the report can help them decide which requisitions and MRP-suggested purchases should be approved. The report may also indicate situations where smaller purchases can be grouped into a single, large purchase, possibly allowing the buyer to receive a volume discount. The report may help production planners to decide when to convert firm-planned orders to batches. It may also indicate when batches should be rescheduled, resized, consolidated, or canceled. You must associate a Planning Class to your user and to each item you wish to have print on a report. If no associations are made the reports will not print any data. The MPS Material Activity Report lists the details from the aggregate supply/demand information listed on the Bucketed Activity report.
To submit the MPS Unbucketed Material Activity Report
-
Navigate to the Submit Request window.
-
Select MPS Unbucketed Material Report in the Name field. The Parameters window displays.
-
Enter the following parameters:
-
Schedule: The default schedule parameters code assigned to the current user displays, along with the corresponding schedule parameters description. You may enter a different schedule parameters code, as necessary. The organization code and the schedule parameters code are both required to identify the schedule parameters that were used to generate the MRP run for which you are inquiring on material activity.
-
Category Set
-
Category Structure
-
Category From and To
-
Buyer From and To: Enter the codes associated with the buyers to limit your items to report by a single buyer or range of buyers associated to the schedule for which you run MRP.
-
Planner From and To: Enter the codes associated with the planners to limit your items to report by a single planner or range of planner associated to the schedule for which you run MRP.
-
Inventory Organization From and To: Enter the specific organization or a range or organizations for which you want to see MRP Material Activity.
-
Item From and To: Enter the item code (product) or a range of item codes to limit your items to report by a single or range of items for which you want to review material activity.
-
Start Date: Provide a start date to initiate the report.
-
Critical Indicator: Select this check box if you want to flag critical items.
-
Template
-
Template Locale
-
-
Click Submit and note the Request ID.
-
Navigate to the Find Requests window and search for the report run using the Request ID.
-
Click Find.
-
Select View Output. The following details display on the report:
-
Organization is the organization code associated to the buyer/planner which you entered in the dialog box.
-
Schedule is the schedule associated to the MRP run which you entered in the dialog box.
-
Buyer/Planner is the code for the buyer or planner for whom you are listing item transactions and suggestions.
-
Planning Class is the planning class for which you are listing item transactions.
-
Item is the item code for which transactions are listed.
-
Start Date is the start date for which the report was initiated.
-
MRP Last Run is the date of the most recent MRP run, upon which suggested MRP transactions have been based.
-
Warehouse is the warehouse in which the item transactions. occur.
-
Qty On-hand is the total item quantity actually in the warehouse, with the unit of measure in which the quantity is expressed (as it is stocked). An asterisk (*) indicates that this item is critical, that is, there are negative balances below safety stock requirements.
-
Date is the date the transaction occurred, or will occur. For MRP suggestions, this is the suggested date of the transaction.
-
Doc Type is the type of document that triggered the transaction (for example, PPUR forpurchase order, FPO for firm-planned order). For suggestions, this is the type of transaction that MRP recommends you make.
-
Orgn Code is the ID code for the organization for which the transaction occurred, or will occur.
-
Document No is the number of the document (sales order, purchase order, and so on) that triggered the transaction or suggestion for a transaction.
-
Trans Qty is the transaction quantity, or the transaction quantity suggested by MRP. Balance The total item balance for this item after the transaction occurs. For MRP-suggested transactions, this is the projected balance.
-
Customer/Vendor: For sales order transactions, the customer number from the sales order is printed. The vendor number appears from the purchase order if this is a real or suggested purchasing transaction.
-
Running the Reorder Point Report
Use this report to see which items have reached the reorder point. You can also view the onhand inventory and the item's EOQ (Economic Order Quantity). These parameters are set in the Warehouse Rules window. The report can be generated for all or a range of warehouses and items.
To submit the Reorder Point Report
-
Navigate to the Reorder Point Planning Parameters page.
The Reorder Point Planning value appears in the Report Name field, and the Parameters page appears.
Reorder Point Planning Parameters
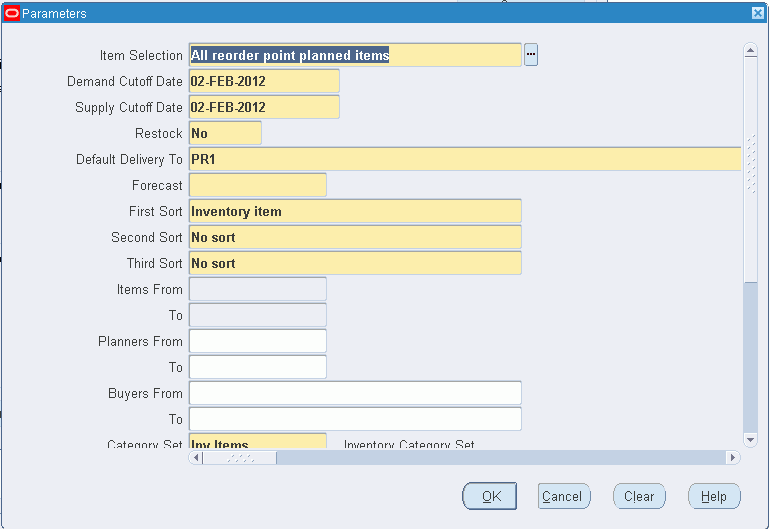
-
Enter or select values in any of the following fields:
-
Item Selection: Indicate whether to report all items that are identified as reorder point planned or only items with on-hand balances and on-order balances that fall below their reorder point.
Displaying all reorder point planned items (regardless of their balances) enables you to see where item balances are in relation to the specified order point.
-
Demand Cutoff Date: The report includes demand on or before this date.
-
Supply Cutoff Date: The calculation includes open supply orders with expected receipt dates on or before this date.
-
Restock: Select Yes or No to indicate whether to restock.
If you have set the Planning Level to Organization, the report generates requisitions or jobs according to the item's Make/Buy flag.
If you have set the Planning Level to Subinventory, the report generates requisitions only.
Note: For Oracle Shop Floor Management work orders: When restock is selected and the Reorder Point Report is run, you can create work orders for Oracle Shop Floor Management.
-
Default Delivery To: Accept the default delivery location or enter the delivery location in this field that you want to appear on the requisition.
-
Sort: Enter the sorting criterion for the report. You can choose to sort by Inventory Item, Category, Planner, or Buyer. If you choose Category, enter the category set.
-
Report: Indicate whether to prepare a full or partial report. If you choose Partial, specify the range of items, categories, planners, or buyers you want to include.
-
-
Click OK.
-
Click Submit Request to generate the report.
Reorder Point Report Output
-
From the Requests window, select the report and click View Output.
-
The following information displays on the Reorder Point report output:
-
Schedule: Displays the schedule used to generate the report.
-
Item: Displays the item code range used to generate the report.
-
Warehouse: Displays the warehouse code range used to generate the report.
Detail
-
Item: Displays the item code for the detail row.
-
Description: Displays the description for the item.
-
Whse: Displays the warehouse for the detail row.
-
Onhand: Displays the inventory balance for the item in the warehouse.
-
Reorder Point: Displays the reorder point for the item which was defined in Inventory Warehouse Rules.
-
EOQ: Ddisplays the Economic Order Quantity for the item which was defined in the Warehouse Rules window.
-
UOM: Indicates the item's primary unit of measure for the row.
-