Adding Installation Steps for ODI 12.2.1
This chapter covers the following topics:
- Certified Components
- Installing the Middle Tier Components
- Setting Up the JDE Shared Folders
- Creating Database Schema's
- Setting Up Property Files
- Creating and Importing ODI Repositories
- Testing ODI Topology Connections
- Setting up the ODI Domain/Agent
- Updating ODI Variables
- Deploying the VCP Web Service
- Configuring the VCP Web Service
- Testing the VCP Web Service
- Updating VCP Profiles
- Setting Up the VCP Timeout Value in ODI
Certified Components
| Component | Release |
|---|---|
| Weblogic | WebLogic Server 12.2.1.0.0 |
| SOA | Oracle SOA Server version 12.2.1.0.0 |
| Oracle Database | 12.1.0 |
| Oracle Data Integrator | 12.2.1.0.0 |
| Value Chain Planning | 12.2.6 |
| Demantra | 12.2.6 |
| JD Edwards | 9.2 |
Installing the Middle Tier Components
For installing the following components, use the following links for complete instructions.
Weblogic 12.2.1:
http://www.oracle.com/technetwork/middleware/weblogic/documentation/index.html
SOA 12.2.1:
http://www.oracle.com/technetwork/middleware/soasuite/documentation/index.html
Oracle Database 12.1.0:
http://www.oracle.com/technetwork/database/enterprise-edition/documentation/index.html
Oracle Data Integrator 12.2.1.0.0:
http://www.oracle.com/technetwork/middleware/data-integrator/documentation/index.html
Oracle Data Integrator EE Agent:
http://www.oracle.com/technetwork/middleware/data-integrator/documentation/index.html
Setting Up the JDE Shared Folders
The VCP Base Pack integration uses multiple applications, so files are often generated in one application and imported into another application. Files are written to different directories according to application. Each application has an input directory and an output directory. Input files are placed in the input directory according to application. Generated or extract files are placed in the output directory.
For example, files generated by the ERP system extracts are written to the JDE E1 Output directory and files which are loaded into the ERP system and stored in the JDE E1 Input directory.
Note: The section contains references to JDE E1, and E1. These directories apply to both JDE E1 and PeopleSoft users.
JDE E1 Output Directory
Files extracted from the ERP system and user-defined integration data files are written to the JDE E1 Output directory. ODI takes files from this directory, transforms them to the correct format if necessary, and loads the data into staging tables. In a shared directory environment, the ODI server and the ERP server must be able to access this directory.
The files written to the JDE E1 Output directory include:
| File Name | Target Application | Source |
|---|---|---|
| Parameters.txt | VCP staging tables | User-defined |
| TranslationTable.txt | VCP staging tables | User-defined |
| ShiftInformation.txt | VCP staging tables | User-defined |
| ShiftInformationDetails.txt | VCP staging tables | User-defined |
| ResourceGroups.txt | VCP staging tables | User-defined |
| ResourceGroupDetails.txt | VCP staging tables | User-defined |
| ForecastDesignators.txt | VCP staging tables | User-defined |
| SetupDefinitions.txt | VCP staging tables | User-defined |
| SetupTransitions.txt | VCP staging tables | User-defined |
| StandardOperationResources.txt | VCP staging tables | User-defined |
| StandardUOMConversions.txt | VCP staging tables | User-defined |
| Calendar.txt | VCP staging tables | ERP extract |
| Supplier.xml | VCP staging tables | ERP extract |
| Customer.xml | VCP staging tables | ERP extract |
| Base.xml | VCP staging tables | ERP extract |
| Manufacturing.xml | VCP staging tables | ERP extract |
| BeginningInventory.xml | VCP staging tables | ERP extract |
| Distribution.xml | VCP staging tables | ERP extract |
| PurchaseOrders.xml | VCP staging tables | ERP extract |
| WorkOrders.xml | VCP staging tables | ERP extract |
| SalesOrders.xml | VCP staging tables | ERP extract |
| TransferOrders.xml | VCP staging tables | ERP extract |
| TimeSeries.xml | VCP staging tables | ERP extract |
| SalesOrderHistory.txt | Demantra | ERP extract |
| ListPrice.txt | Demantra | ERP extract |
| ItemCost.txt | Demantra | ERP extract |
| PriceHistory.txt | Demantra | ERP extract |
| APConfirm.txt | Demantra | ERP extract |
| Deductions.txt | Demantra | ERP extract |
The specific files used in this integration depend on the set of VCP applications you are using.
Note: Even if they are not used, all XML files in The following table (depending on the implemented VCP applications) must be present in the JDE E1 Output Directory.
All unused XML files must be created with the same names as in the above table and must contain the following content:
<?xml version="1.0" encoding="UTF-8"?><scbm-extract version='3.0'>
</scbm-extract>
As an example, for a customer implementing only Demantra Demand Management, the integration uses only Base.xml and Customers.xml from the list of XML files. However, the other XML files such as PurchaseOrders.xml and WorkOrders.xml need to be created in the JDE E1 Output Directory.
JDE E1 Input Directory
Files imported into the ERP system are written to the JDE E1 Input Directory. In a shared directory environment, the ODI and ERP servers must be able to access this directory.
The files written to the JDE E1 Input directory include:
| File Name | Target Application | Extract Information |
|---|---|---|
| PurchasePlan.xml | JDE E1 | VCP extract |
| DeploymentPlan.xml | JDE E1 | VCP extract |
| DetailedProductionPlan.xml | JDE E1 | VCP extract |
| forecast.txt | JDE E1/PeopleSoft | Demantra (transformed file) |
| PromotionPricing.txt | JDE E1 | Demantra (transformed file) |
| Delete_PromoPricing.txt | JDE E1 | A copied file of a Demantra extract |
| DeductionDispositions.txt | JDE E1 | A copied file of a Demantra extract |
| Claim.txt | JDE E1 | A copied file of a Demantra extract |
APS Input Directory
DemHistory.dat is the only flat-file written to the APS Input directory. ODI takes SalesOrderHistory.txt files from the JDE E1 Output directory, transforms the file to the correct format, and creates the DemHistory.dat file. In a shared directory environment the ODI and VCP servers must be able to access this directory.
| File Name | Target Application | Source |
|---|---|---|
| DemHistory.dat | Demantra | ERP transformed file |
Demantra Input Directory
Input files for Demantra, PTP, and DSM are written to the Demantra Input directory. ODI reads files from the JDE E1 Output directory, transforms them if necessary, and writes them in this directory. In a shared directory environment the ODI server and the Demantra database server must be able to access this directory.
The files stored in this directory include:
| File Name | Target Application | Description |
|---|---|---|
| ListPrice.txt | Demantra | JDE E1 transformed file |
| PriceHistory.txt | Demantra | JDE E1 transformed file |
| ItemCost.txt | Demantra | JDE E1 transformed file |
| APConfirm.txt | Demantra | A copied file of an JDE E1 extract |
| Deductions.txt | Demantra | A copied file of an JDE E1 extract |
Demantra Output Directory
Outbound files from Demantra are written to the Demantra Output directory. ODI transforms the files if necessary and stores them in the JDE E1 Input directory before they are imported into JD Edwards EnterpriseOne. In a shared directory environment the ODI server and the Demantra database server must be able to access this directory.
The files stored in this directory include:
| File Name | Target Application | Description |
|---|---|---|
| forecast.txt | ERP | Demantra transformed file |
| PromotionPricing.txt | JDE E1 | Demantra transformed file |
| Delete_PromoPricing.txt | JDE E1 | A copied file of a Demantra extract |
| DeductionDispositions.txt | JDE E1 | A copied file of a Demantra extract |
| claim.txt | JDE E1 | A copied file of a Demantra extract |
Mappings Between Directories and ODI Variables
The following table summarizes the mappings between directories and their associated ODI variables:
| Directory | ODI Variable |
|---|---|
| E1InputDir | PVV_E1_INPUT_DIR |
| E1OutputDir | PVV_E1_OUTPUT_DIR |
| APSInputDir | PVV_APS_INPUT_DIR |
| APSOutputDir | PVV_APS_OUTPUT_DIR |
| Demantra Input Directory | PVV_DEM_INPUT_DIR |
| Demantra Output Directory | PVV_DEM_OUTPUT_DIR |
Steps to be Completed
Create the following directory structures on the ODI Host:
-
E1InputDir
-
E1OutputDir
-
Copy the E1 Extract files mentioned under “JDE E1 Output directory” to this folder • APSInputDir
-
-
APSInputDir
-
APSOutputDir
-
DemInputDir
-
DemOutputDir
-
LogDir
Creating Database Schema's
Master/Work Repository Schema
Creating Master and Work Repositories
-
Set the JAVA_HOME.
For Linux set the Java Home with the following command:
setenv JAVA_HOME /home/Oracle/Java/<jdkversion>
For Windows set up the Java Home under
MyComputer > Properties > Advanced System Settings
-
Navigate to ORACLE_HOME/oracle_common/bin folder to launch RCU.
For Windows: start rcu.bat
For Linux: start rcu.sh
-
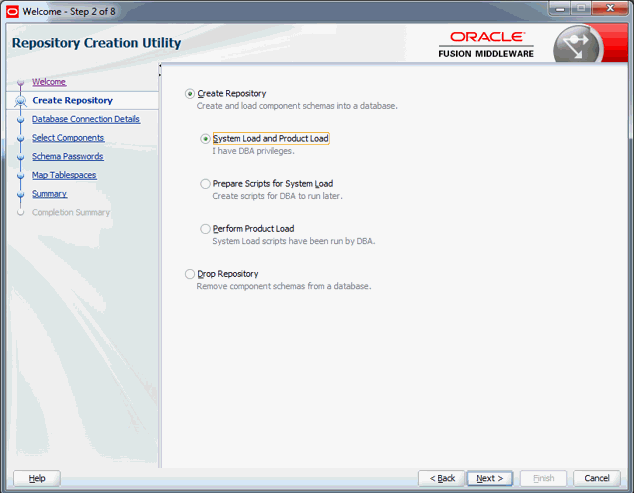
Navigate through the RCU screens to create the Schemas.
-
Select Next and then select 'Create Repository' and 'System Load and Product Load'.
Note: Ensure that you have DBA privileges to select this option.
-
Select Next to grant Database Connection Details for the following:
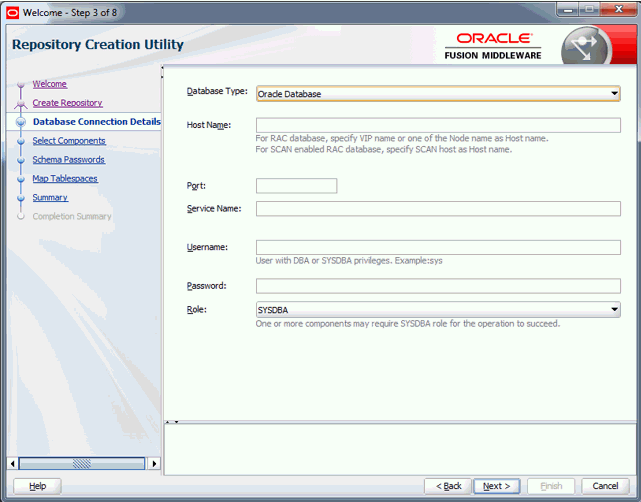
Hostname: <Database hostname>
Port: <Database Port number>
Service Name: <SID/SeviceName of the database>
Username: <System/SYSDBA User name>
Password: <System/SYSDBA Password>
Role: Normal -
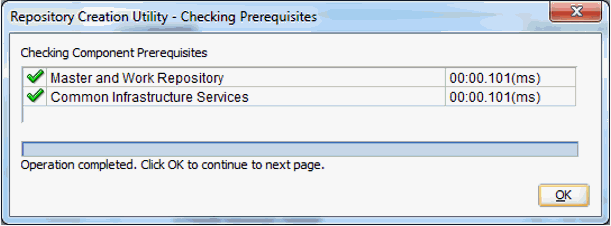
Click 'Next' for Prerequisites check.
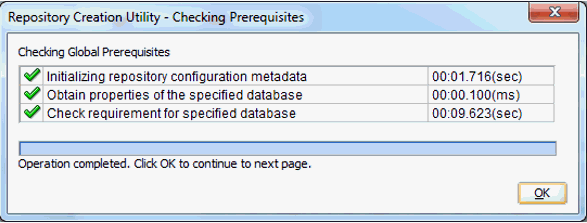
-
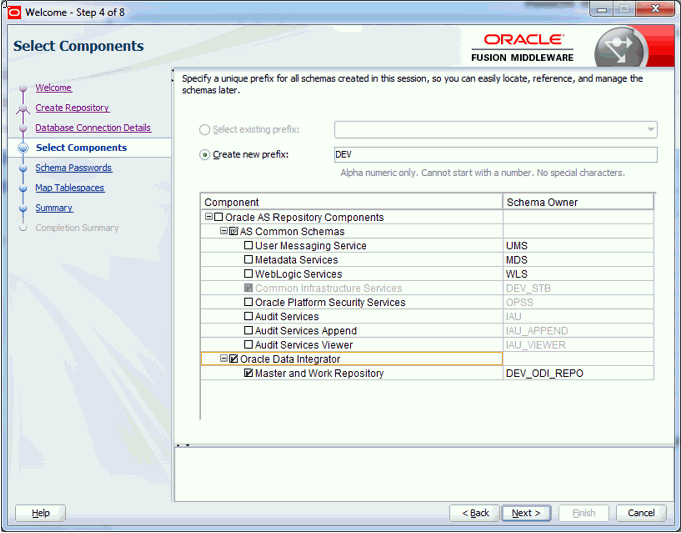
Select OK. In the next window, select Oracle Data Integrator and also select Master and Work Repository. You can change the Prefix or leave it as Default 'DEV'. Select Next.
-
Select OK after Prerequisites check completes.
-
Enter passwords for the schema users. Select 'Use same Passwords for all schemas' if you want to keep everything the same.

Note: If you want to use different passwords for repositories and other common services, then select 'Specify different passwords for all schemas'. Enter passwords in the following window:
-
Select Next to enter values for custom variables.
Supervisor Password: <Supervisor Password>
Confirm Supervisor Password: <Give the same password given above>
Work Repository Type: D
Work Repository Name: <Work repository name or use Default “WORKREP”>
Work Repository Password: <Work Repository Password>
Confirm Work Repository Password: <Enter the same Work Repository Password given above>
Encryption Algorithm: <Use Default>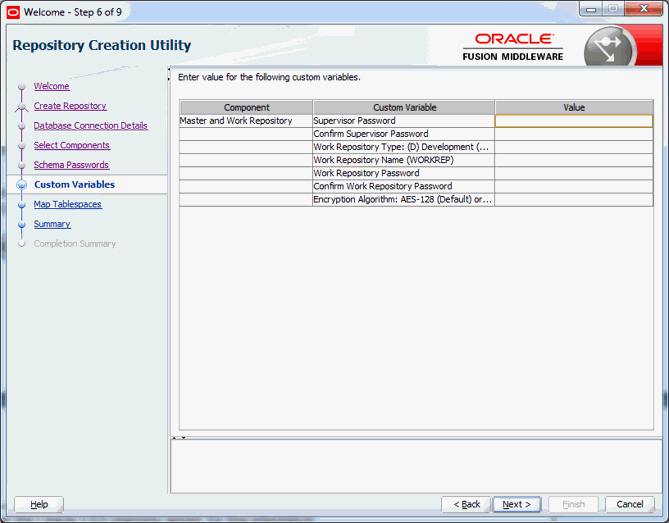
-
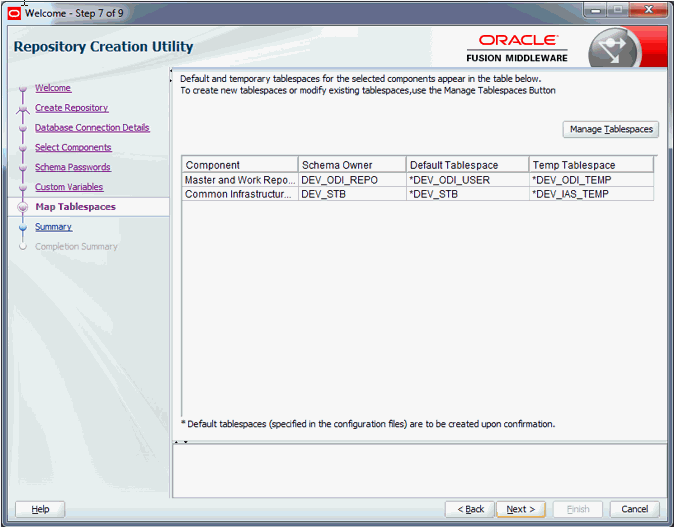
Select Next for the Default Tablespaces. Change the default table spaces by selecting 'Manage Tablespaces' or use the default tablespaces.
-
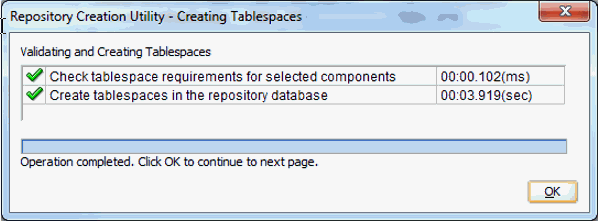
Select Next and confirm OK for the following message.
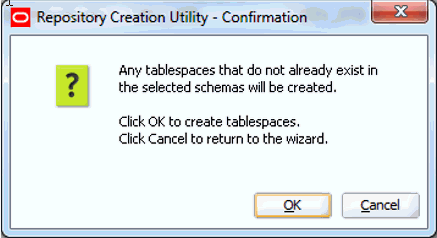
-
Select OK when the following window appears after tablespaces are created.
-
Select Create after reviewing the details in the Summary screen and wait for the complete summary screen for Status of the Repositories created. Select Close to exit RCU. Connect 12c Database as sysdba user and run the following command to check that the repository was created:
SQL > select * from dba_users
External Database Schema
Create schema under ODI database to store xml files data in database tables. Use the following sql queries to create the schema/user:
 SQL > CREATE USER <Username> IDENTIFIED BY <Password>;
     GRANT RESOURCE, CONNECT, DBA TO <Username>;
     GRANT CREATE SESSION TO <Username>;
Creating Database Links
The following database links must be created for the Integration:
-
On ODI Server DB pointing to VCP Environment
-
Create Database link in ODI database with work repository details pointing to VCP Environment
-
Login to ODI server Database with work repository details
-
Create database pointing to VCP environment with help of below example query
Example:
create database link VCPENV connect to <username> identified by <Password> using '(DESCRIPTION=(ADDRESS=(PROTOCOL=tcp)(HOST=<Hostname>)(PORT=<Port>))(CONNECT_DATA=(SID=Port>))(CONNECT_DATA=(SID=VCP ENV>)))';
-
-
On VCP Environment DB pointing to ODI Work Repository user
-
Create Database link in VCP Environment database pointing to ODI Host User
-
Login to VCP environment Database
-
Create database link using VCP Host DB pointing to ODI Work Repository User
Example:
create database link ODIUSER connect to <ODI username> identified by <Password> using '(DESCRIPTION=(ADDRESS=(PROTOCOL=tcp)(HOST=<ODI Hostname>)(PORT=<Port>))(CONNECT_DATA=(SID=<SID ODI MACHINE>)))';
-
Setting Up Property Files
-
Base.properties
-
Instance.properties
-
msc_e1aps_odi-config.properties
-
Encoding Passwords
Base.properties
Create base.properties file under $ODI_Home/Middleware/odi/studio/bin folder on the ODI Host Place the following contents in the file after modifying the details for and save.
-
Url: Format “jdbc:oracle:thin:@<odi_db_host>:<odi_db_port>:<odi_db_sid>”
-
User: Name of the user created for the external database schema above.
-
Password: Encrypted Password of the external database schema.
-
Schema: Schema name of the external Database created above.
# Please configure the Oracle JDBC Type 4 Driver in the Classpath.
| driver=oracle.jdbc.driver.OracleDriver url=<URL> user=<Username> password=<Password> schema=<Schema name> drop_on_connect=Y create_tables=AUTO create_indexes=Y truncate_before_load=Y ids_in_db=Y drop_tables_on_drop_schema=N use_prepared_statements=Y use_batch_update=Y batch_update_size=20000 commit_periodically=Y num_inserts_before_commit=20000 reserve_chars_for_column=3 reserve_chars_for_table=3 |
Copy the same base.properties file in $ODI_HOME/agent/lib directory
Note: See the Encoding Passwords section for encoding the passwords.
Instance.properties
Ensure that the instance.properties file is available at two paths:
-
$ODI_Home/Agent Directory
-
/Middleware/user_projects/domains/ODI_Domain/config/fmwconfig/components/ODI/OracleDIAgent Directory
Update the details in the instance.properties file at both locations for one parameter as follows:
ODI_SECU_WORK_REP=<Work Repository Name>
The following should be the contents of the file at both locations:
PROTOCOL=http
ODI_SECU_WORK_REP=<Work Repository Name>
JMXPORT=
JMXPROTOCOL=rmi
ODI_MASTER_TIMESTAMP=
ODI_KEYSTORE_ENCODED_PASS=
ODI_KEY_ENCODED_PASS=
ODI_TRUST_STORE_ENCODED_PASS=
ODI_CONNECTION_RETRY_COUNT=0
ODI_CONNECTION_RETRY_DELAY=7000
ProductHome=_product_home_on_target_domain_
DomainHome=_target_domain_home_
ODI_EXCLUDED_CIPHERS=
Note: Refer to the Encoding Passwords section for encoding passwords.
msc_e1aps_odi-config.properties
Create msc_e1aps_odi-config.properties file in $ODI_HOME/agent/lib
| ODIUSER=<Supervisor Username> ODIPASSWORD=<Supervisor Password> WORKREP=<Work Repository Name> HOSTNAME=<ODI Host name> PORT=Agent Port No> JDBCDSNAME=odiMasterRepository |
Note: Refer to the Encoding Passwords section for encoding passwords .
Encoding Passwords
-
For the Base.Properties file and the Instance.properties file, encode the passwords using the encode.sh script available at $ODI_HOME/agent/bin directory.
Syntax: ./encode.sh <password>
-
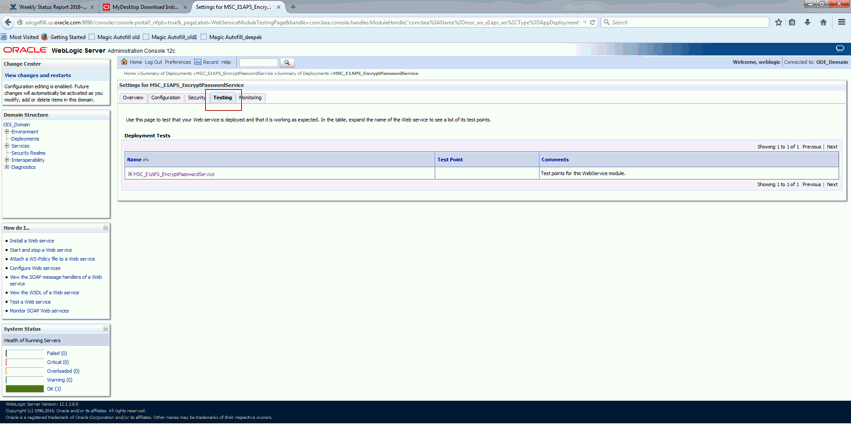
For msc_e1aps_odi-config.properties file, the password should be encrypted through WLS. Login to WLS > Go to Deployments > msc_ws_e1aps_ws > MSC_E1APS_EncryptPasswordService
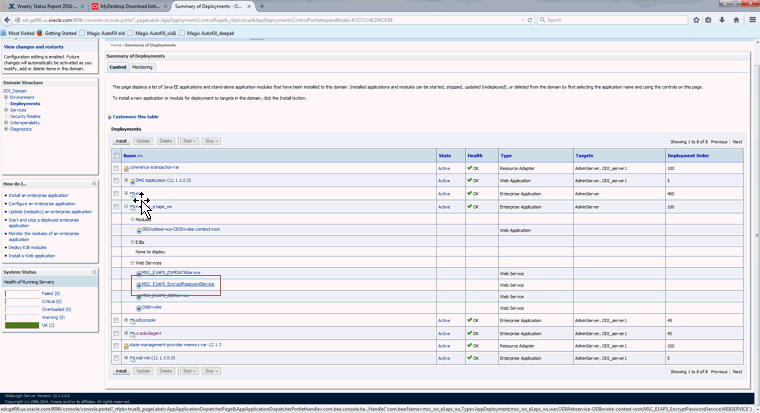
Select the Testing Tab.
Expand MSC_E1APS_EncryptPasswordService.
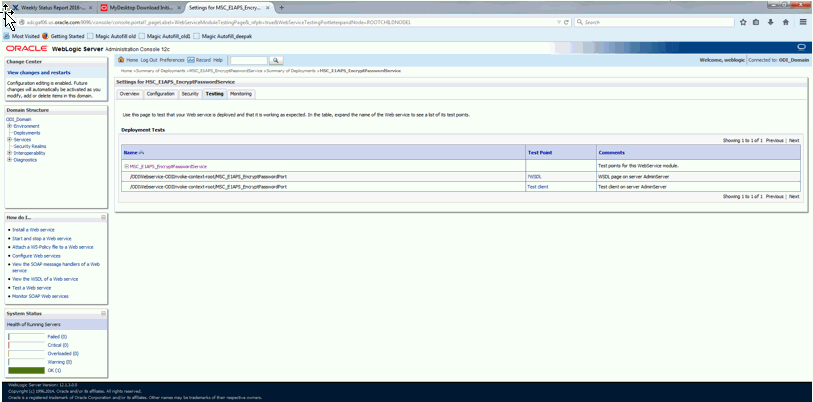
Select Test Client.
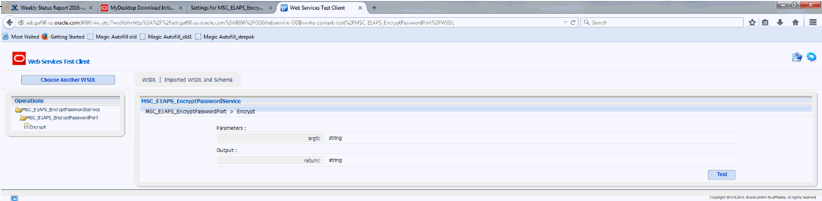
Select Test.
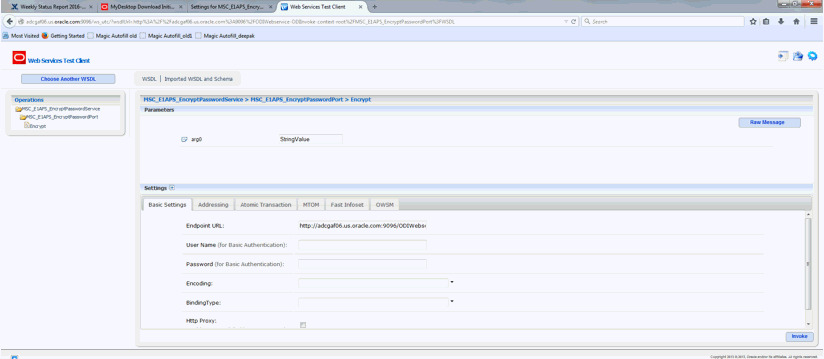
Enter the Password in place of StringValue and select Invoke.
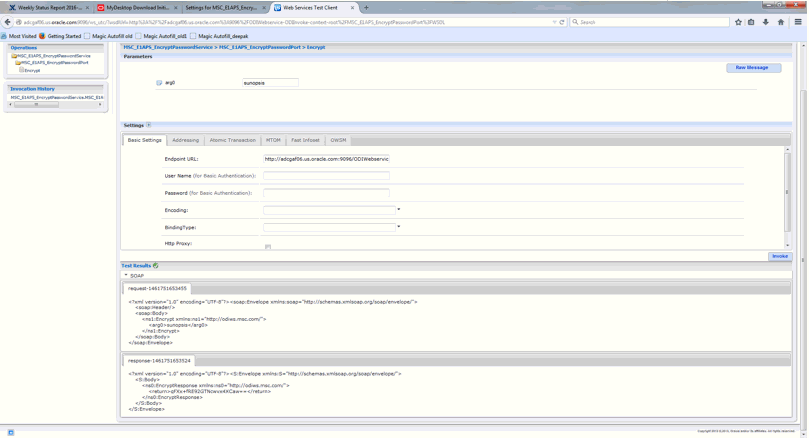
The encrypted password will be available in the Response section as shown in the image.
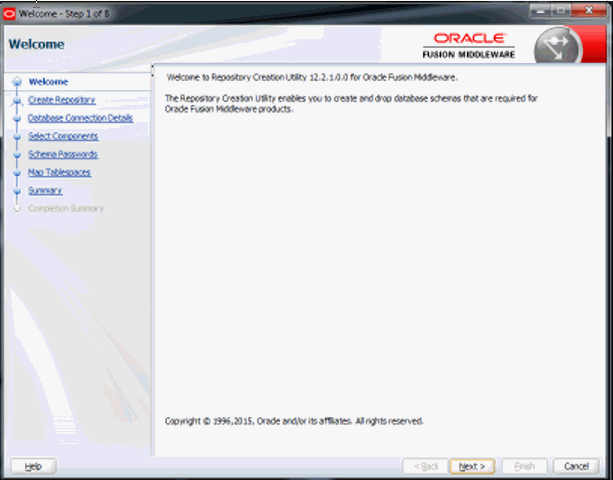
Creating and Importing ODI Repositories
Downloading PIP Patch
-
Download JDEVCP Integration PIP patch # and ftp it to the Host where ODI is installed
-
Unzip the PIP patch after download
-
CD to the PIP Patch folder
-
Install the PIP Patch files by following the instructions in the Readme.txt of the PIP Patch
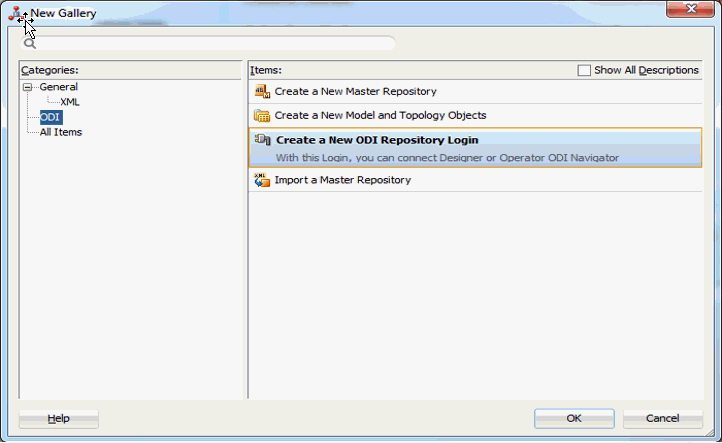
Creating a Login for the Repository
-
For the repository created with RCU, create a new login in ODI studio.
Navigate to <ODI_HOME>/studio folder
Run the following command to launch ODI Studio:
./odi.sh <for Linux>
odi.cmd <for windows>
-
Select File > New > Create a New ODI Repository Login
-
Enter Repository Connection Information provided during RCU Repository creation.
Oracle Data Integrator Connection
Login Name: <Login Name for the connection>
User: < Supervisor User name>
Password: <Supervisor Password>Database Connection (Master Repository)
User: <Master Repository User name>
Password: <Master Repository Password>
Driver List: Oracle JDBC Driver
URL: jdbc:oracle:thin:@<host>:<port/ServiceName>Work Repository
Select the Work Repository Radio button and select the Work Repository Name.
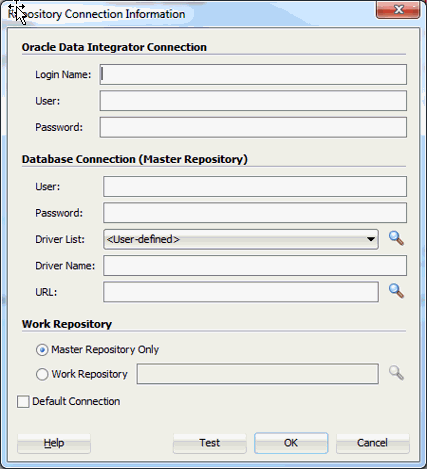
-
Test the connection and select OK to login to the ODI Studio.
Importing Master Repository Files
-
Open the ODI Studio and log in to the repository connection created above.
-
Go to the Topology Tab and select the Navigator and then Select Import.
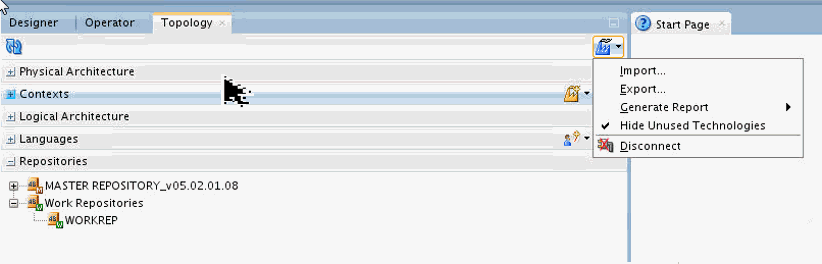
-
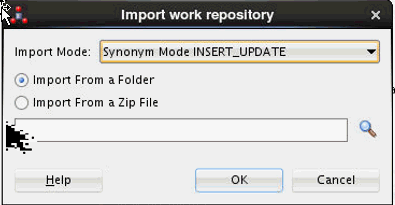
Select Import the Master Repository.
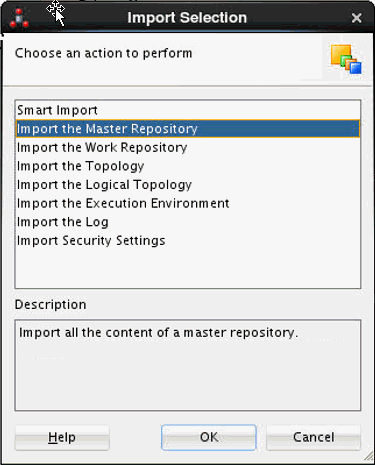
-
Select Import_Update as Import Mode and select the location of the Master Repository from the downloaded PIP Patch folder.
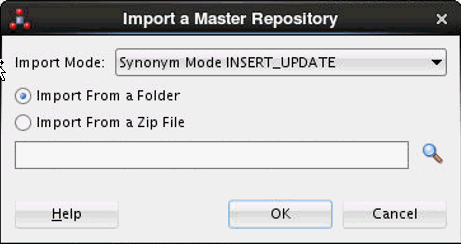
-
Select OK to start the import. Ensure all files are imported and then close the summary window.
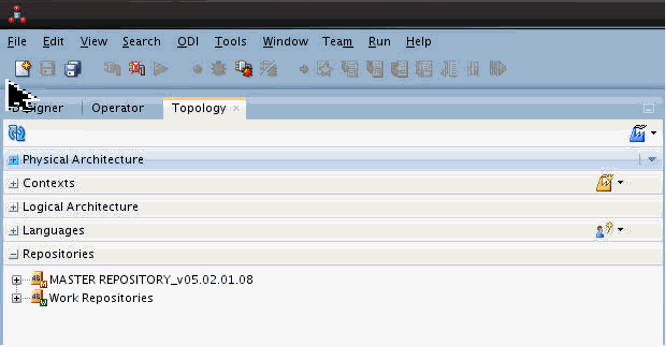
Importing Work Repository Files
-
Expand the Repositories tab in the Topology page.
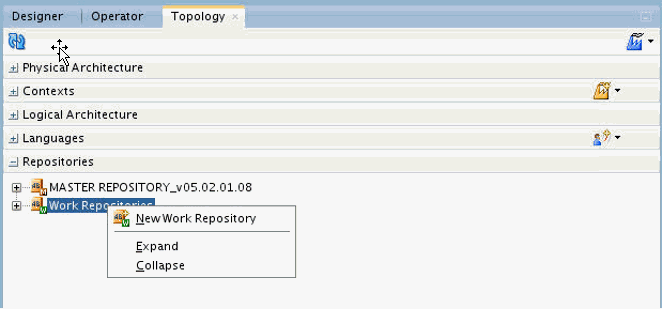
-
Right click on Work Repositories and select New Work Repository.
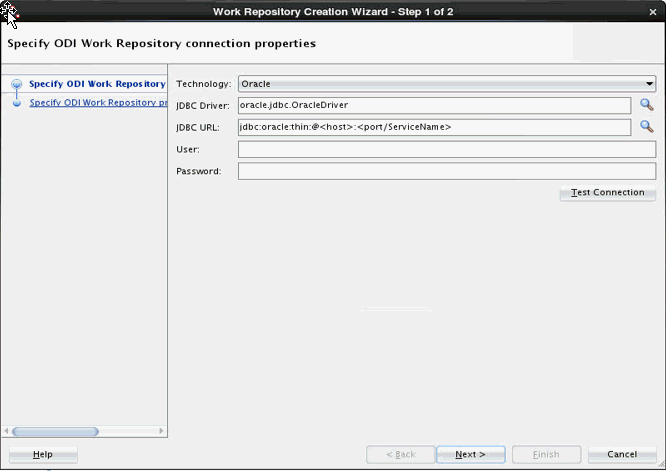
-
Specify Repository details and test the connection for success. Select Next.
-
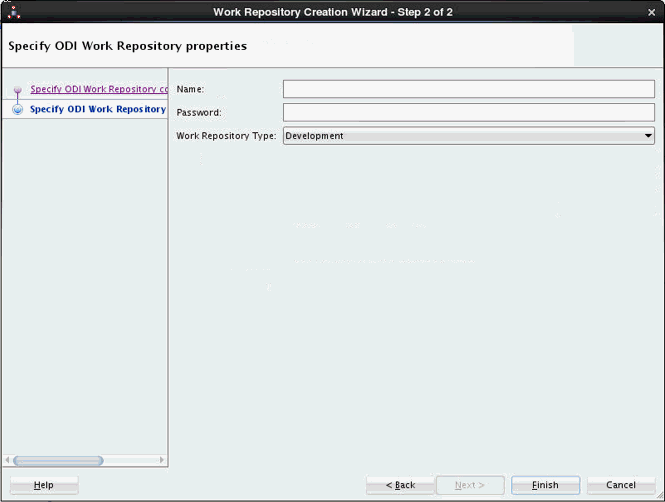
Specify the Work Repository Name and Password if it is different from the default and select Finish to start the repository creation.
-
Select No when prompted for New login creation.

-
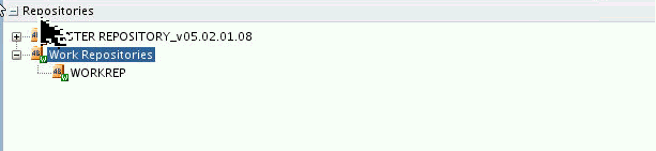
Expand the Work Repository to find the Repository attached.
-
Select the Designer tab to Import the Work Repository files.
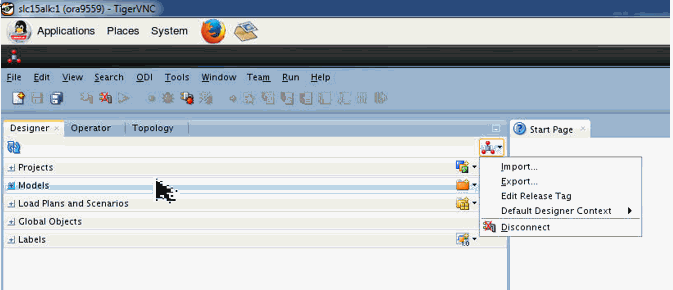
-
Select Import and then select Import the Work Repository.
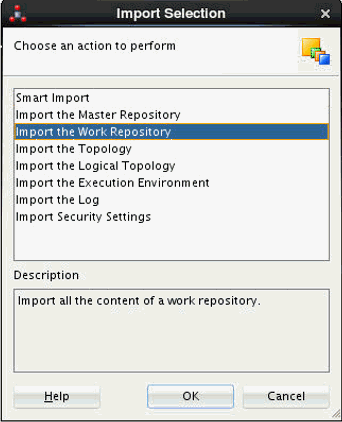
-
Select Insert_update Mode and specify the path of the Work Repository folder in the downloaded PIP Patch location.
-
Select OK to start the import. Ensure all files are imported and then close the summary window.
Testing ODI Topology Connections
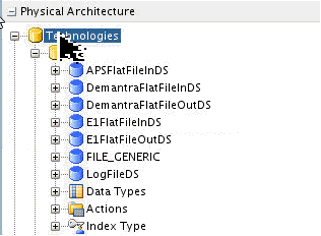
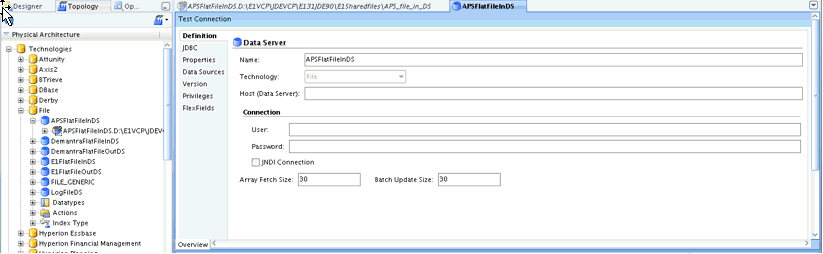
Select the Topology Tab to test the following connections. Expand Physical Architecture.
Testing Shared Folder Connections
-
Expand the Technologies > File.
-
Expand each datastore to check and modify the E1SharedFile folder path details, if required.
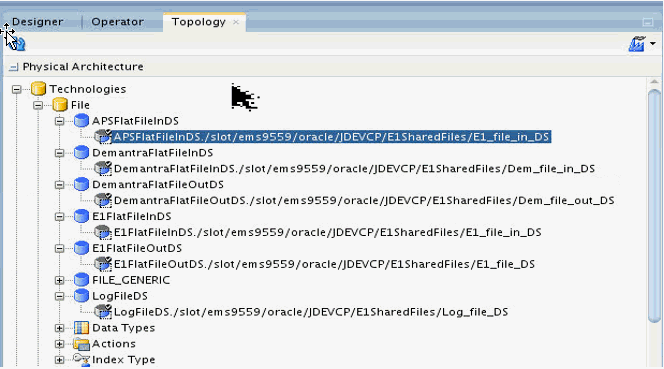
-
Double click on the Child DS with the Connection details.
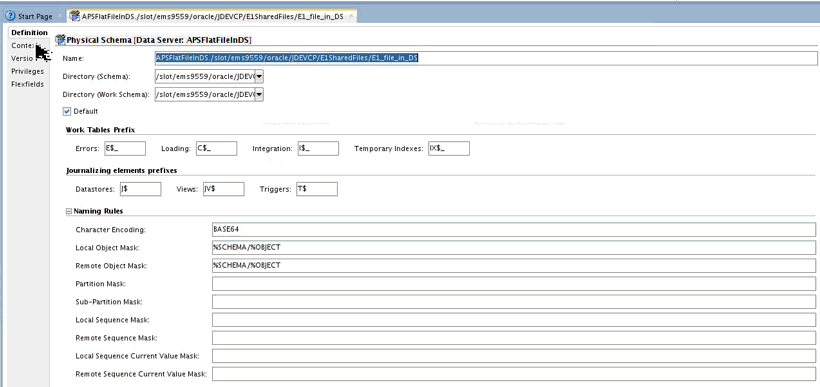
The Directory location for both Schema and Work Schema will show details from the source setup of the Import repository. (See example window)
-
Change both schema details for your local setup directory structure.
Note: Change only the path to the DS and not the DS folder name: For example: APS_file_in_DS. Keep the remaining as the default. Save your changes.
Double click on the Parent DS on the Left under Technologies > File. For example: APSFlatFileInDS.
-
Test the connection to ensure changes are valid.
Use the Local Agent to test all connections from within the ODI Studio (see example page).
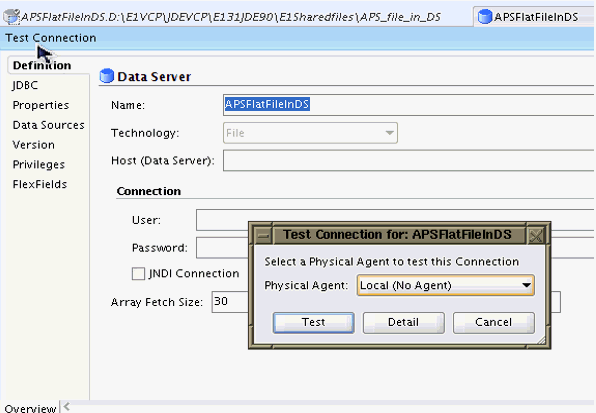
-
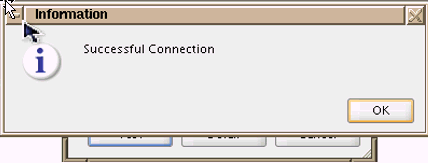
Select Test to check for a successful connection.
-
Repeat the process to modify and test the connections for the following:
-
DemantraFlatFileInDS
-
DemantraFlatFileOutDS
-
E1FlatFileInDS
-
E1FlatFileOutDS
-
LogFileDS
-
Testing Database Connections
-
Expand Technologies > Oracle Check
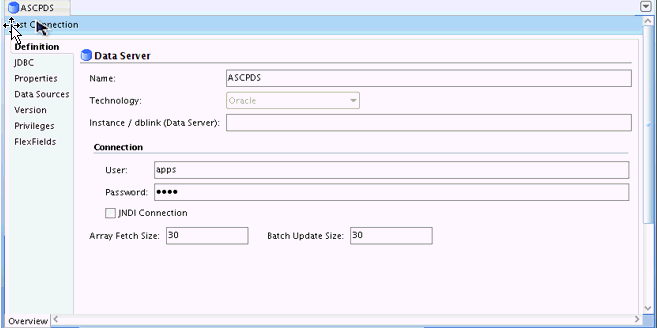
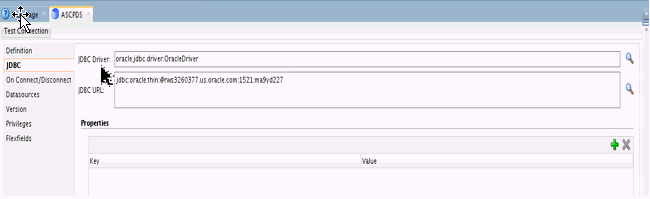
ASCPDS and WorkRepoDS for connection success. Both are used by ODI for establishing DB connectivity.
ASCPDS:
Connection details w.r.t EBS env
Double Click on ASCPDS to modify the JDBC details to point to the correct EBS Env
Password can be changed under Definition
Host details can be changed under JDBC
In Instance/Db link (Server) provide the DB link created with the name VCPENV
Save and test the connection.
(See example page below)
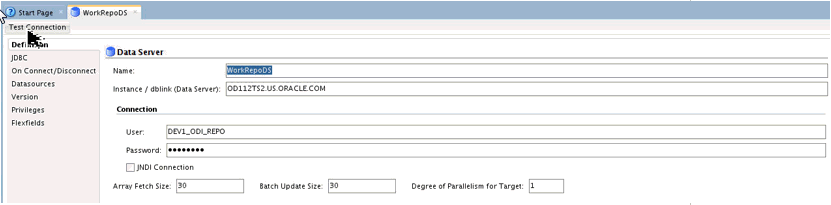
WorkRepoDS:
-
Work Repository Connection Details.
-
If Master and Work Repositories point to the same schema, then enter Master Repository Schema login details.
-
If Master and Work Repositories point to different schemas, then enter Work Repository schema Login details.
-
Double Click on WorkRepoDS to modify the JDBC details to point to the correct Repository Schema.
-
Password can be changed under definition.
-
Host details can be changed under JDBC.
-
In Instance/Db link (Server), provide the DB link created with the name ODIUSER.
Save and test the connection. (See example pages below)

-
-
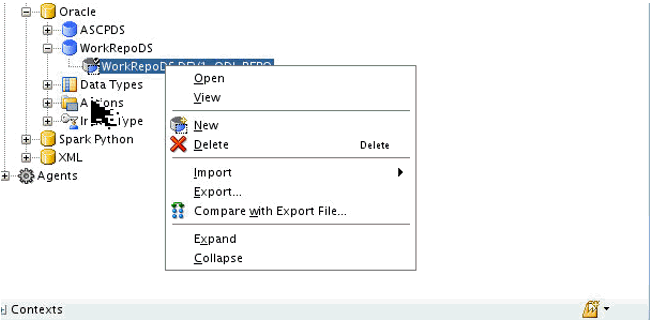
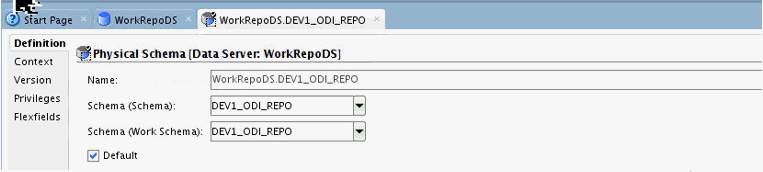
Expand WorkRepoDS and open the DS under it.
-
Modify the Schema and Work Schema names for the DS (see example page below). Select from the LOV schema DEV_ODI_REPO for both Schema and Work Schema and leave the remaining unchanged. Save and test the connection.
Testing XML Connections
-
Expand Technologies > XML.
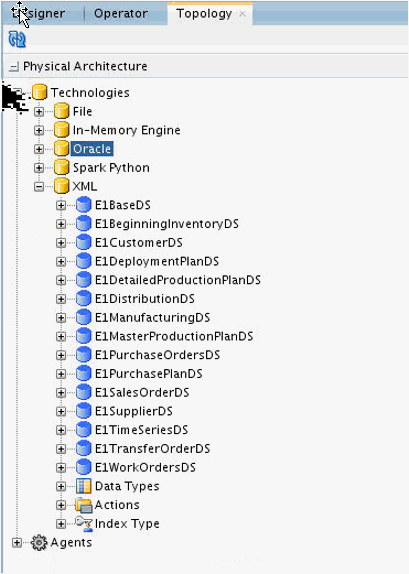
Connections fail if the xml file is not present under E1SharedFile/E1_file_DS folder or the JDBC is not pointing to the correct E1SharedFile path.
Check External Database Schema for tables created after testing E1BaseDS, E1ManufacturingDS and E1WorkOrdersDS XML Datastore connections. Before testing the 3 connections there should be no tables under External DB schema.
For the other XML's no tables will be created in the External DB schema.
Successful connection creates tables for:
-
Base with BASE_<table-name>
-
Manufacturing with MANUF_<table-name>
-
WorkOrders with WORKO_<table-name>
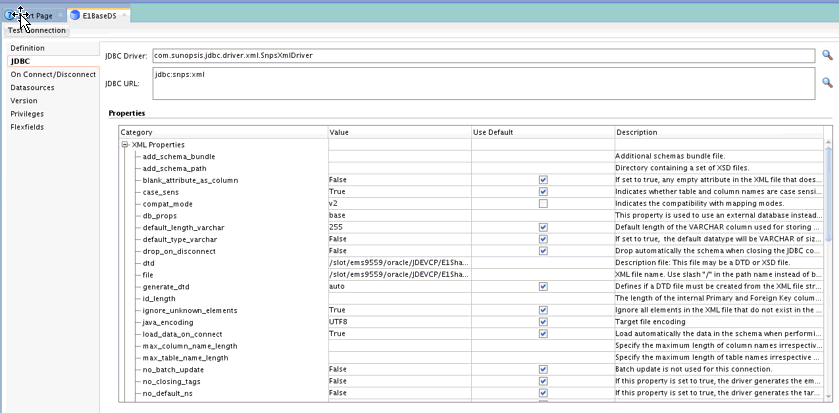
Double click on each Datastore. Select JDBC to ensure the E1SharedFile path is correct. If not, then modify the path for both File and DTD wherever applicable, similar to changes to File under Technologies earlier.
For Base, Manufacturing, and WorkOrders DS, the JDBC must be set to db_props=base at the end which points to the base.properties for DB details.
dtd = <Complete Path to the dtd file location>
file = <Complete path to the xml file location>
For Base, Manufacturing, and WorkOrders DS, the JDBC properties must be set to the following: db_props=base
After changes have been entered, save and test the connection to check for success.
-
-
Check using the following query after connecting to External DB Schema using SQLDeveloper or any other tool.SQL > select * from tabs;
SQL > select * from tabs;
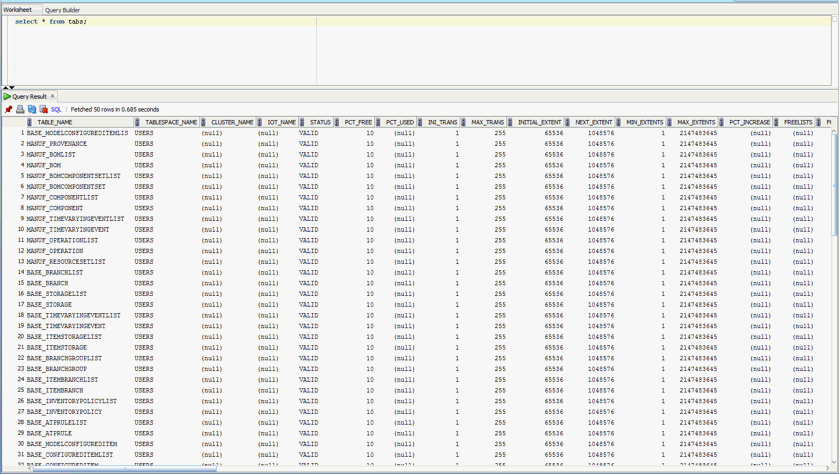
Tables will be created in the external DB schema after successful testing with the following names for the 3 datastores:
-
E1BaseDS: BASE_<tablename>
-
E1ManufacturingDS: <MANUF_<tablename>
-
E1WorkOrdersDS: <WORKO_<tablename>
-
Setting up the ODI Domain/Agent
Creating the ODI Domain/Deploy Agent
-
Configure the Weblogic Domain for the Java EE Agent.
Go to <ORACLE_HOME>/oracle_common/common/bin folder and start config.sh file
cd <ORACLE_HOME>/oracle_common/common/bin./config.sh
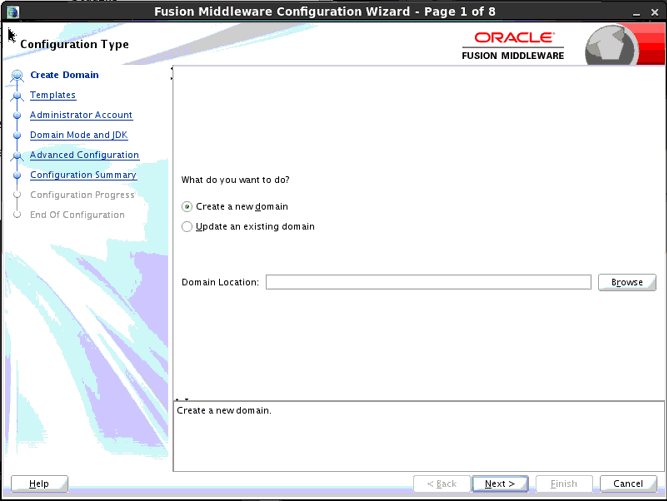
-
Select Update an exisiting domain if you already have a DOMAIN created, or select Create a new domain and enter the path to the $ORACLE_HOME/user_projects/domains/<new_domain_folder> for the domain location.
Select Next.
-
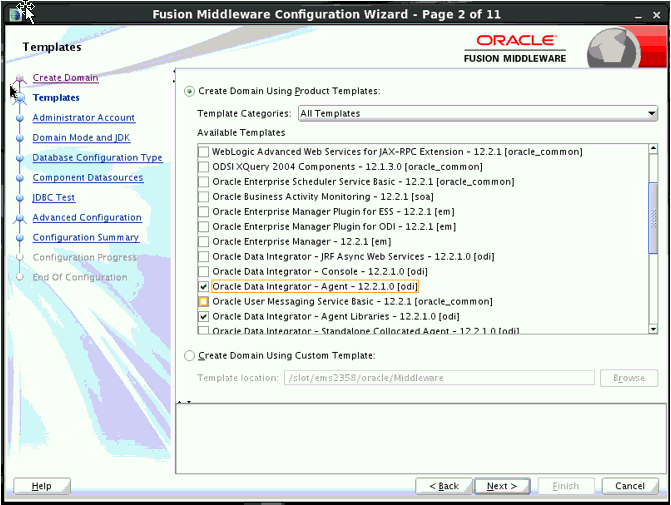
Select 'Oracle Data Integrator Agent' from the available templates and select Next.
-
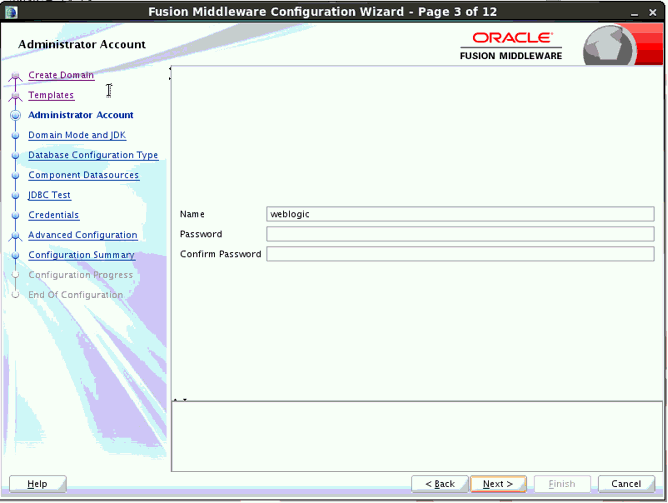
Enter the Administative account (weblogic) login details and select Next.
-
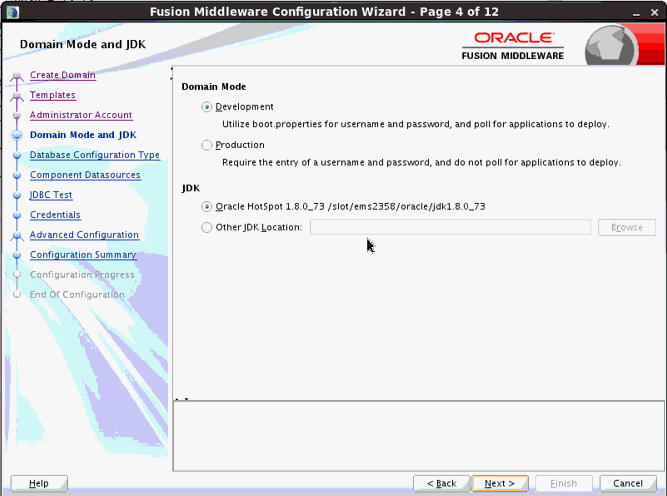
Select the Domain Mode and JDK Home details and select Next.
-
Enter the configuration details and select Next.
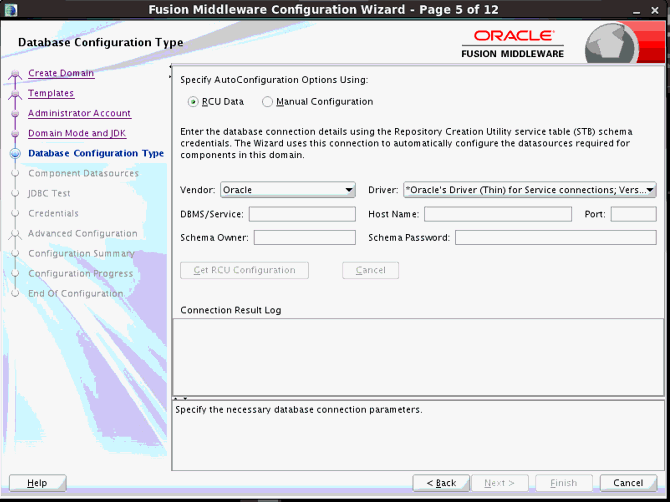
Vendor: Oracle
Driver: <Select the Oracle Driver>
DBMS/Service: <Database SID/Service Name of the Master Repository>
Host Name: <ODI Host name>
Port: <Oracle Database Port>
Schema Name: <Enter the Master repository Schema name>
Schema Password: <Enter Master Repository Schema Password> -
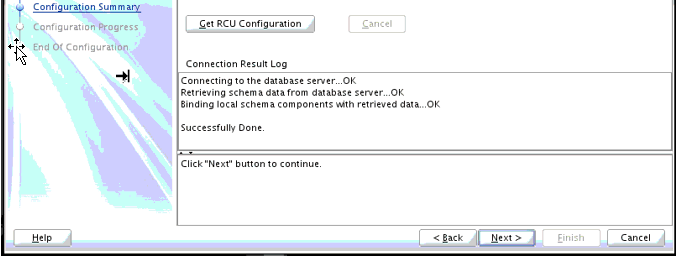
Select 'Get RCU Connfugration' to test the connection and then select Next.
-
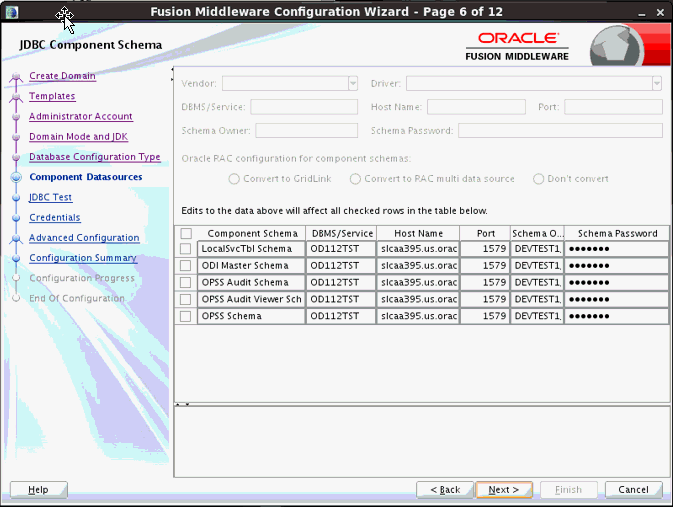
Ensure all component schemas are listed and select Next.
-
Test all connections if not automatically tested
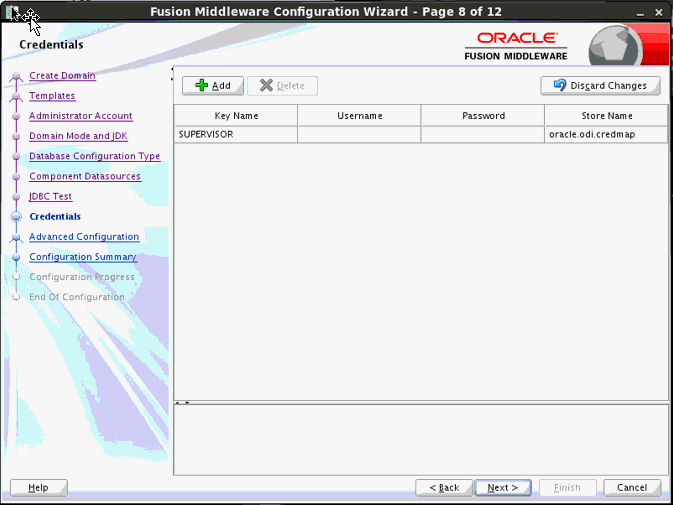
Enter credentials for SUPERVISOR and select Next when finished.
-
Select all check boxes in the Advanced Configuration page and select Next.

-
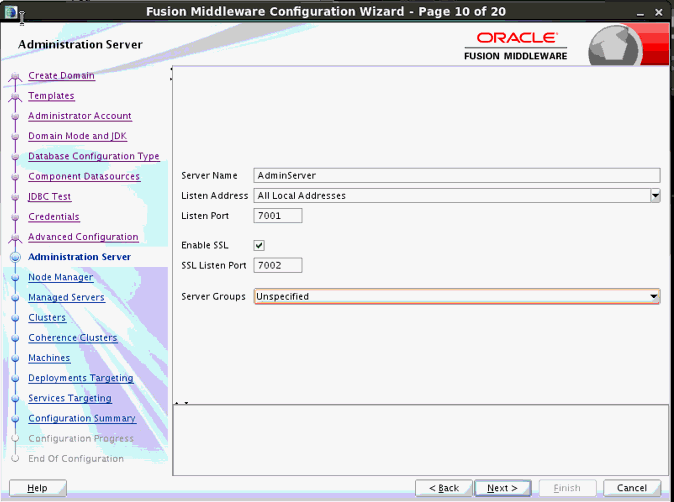
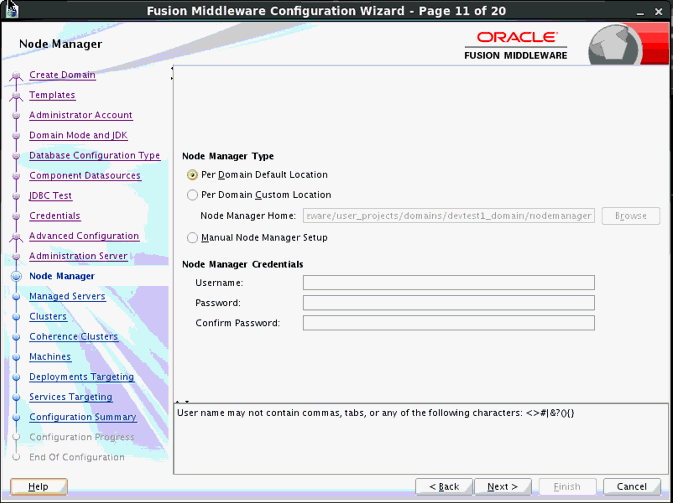
Enable SSL and make a note of the Listener Ports that display for AdminServer and SSL Port. Select Next and choose the Node Manager type based on the following notes.
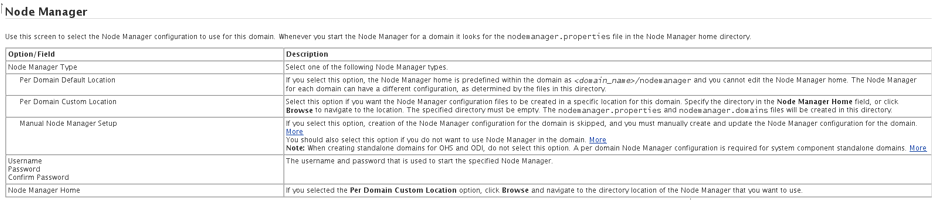
-
Enter the Node Manager Credentials to be used. Select Next.
-
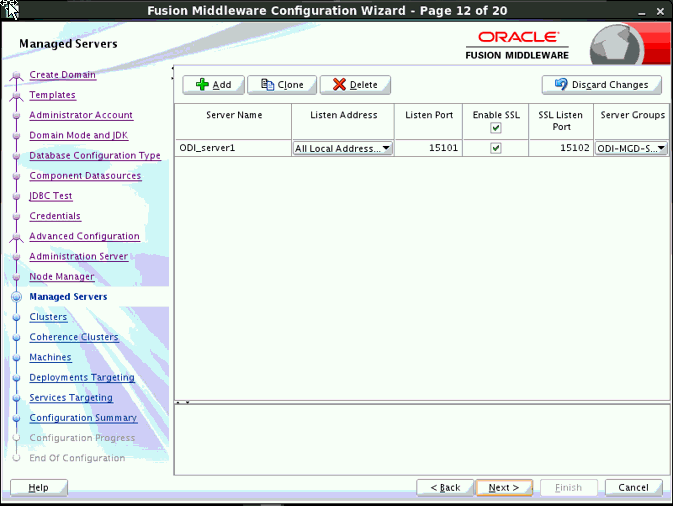
For the ODI managed server screen, enable SSL and retain the remaining default details. You can add additional managed servers here. Select Next.
-
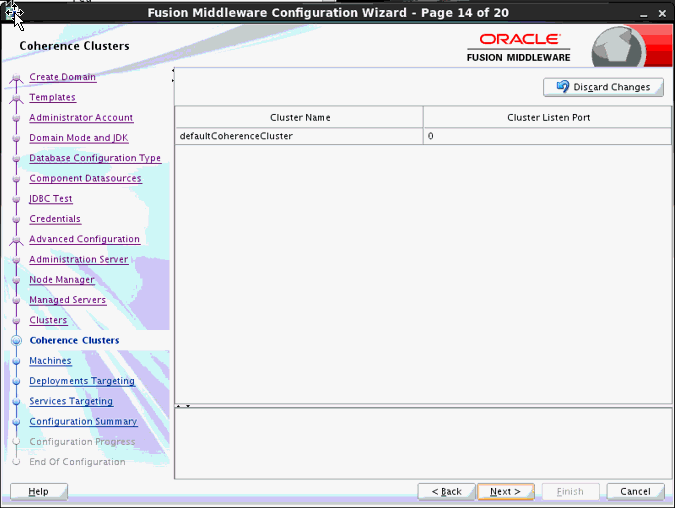
Add any clusters if your managed servers are to be placed under a cluster. Select next.
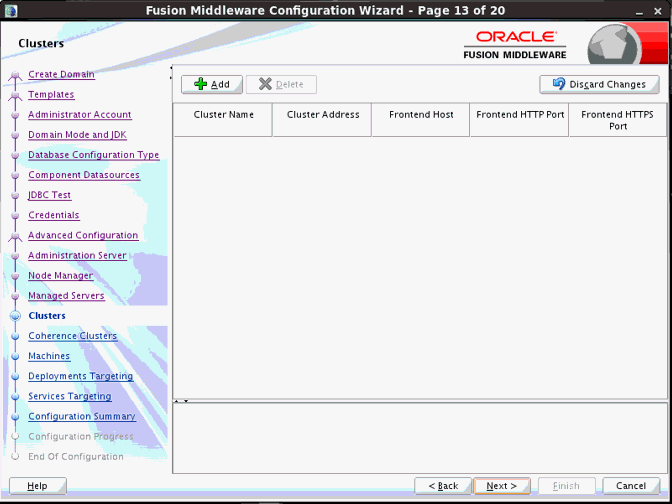
-
If no clusters are added, then it displays the default cluster. Select Next.
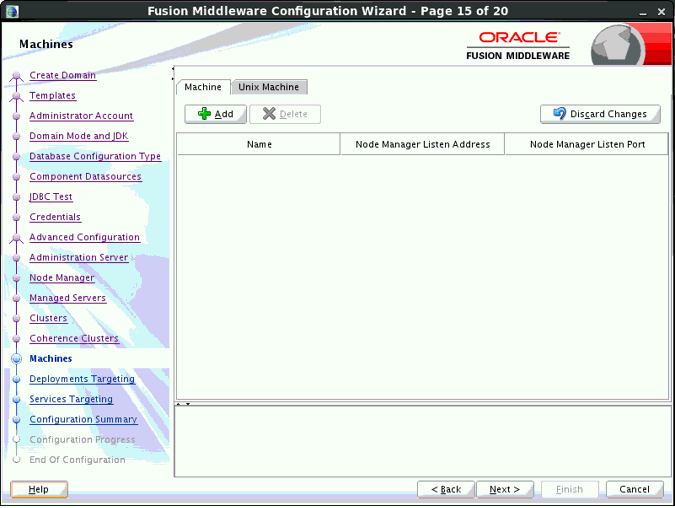
-
Select Next to move out of the Machines page. Check documentation Help if you need to configure any machines to the weblogic domain.
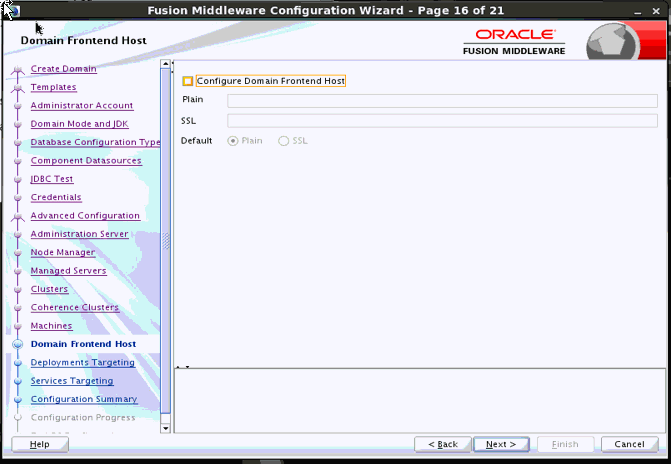
-
Uncheck the Configure Domain Frontend Host checkbox and select Next.
-
Ensure that oraclediagent is available in the right pane under ODI server. If present, then select Next. If not present, then move it from the left pane under ODI Server. Select Next.
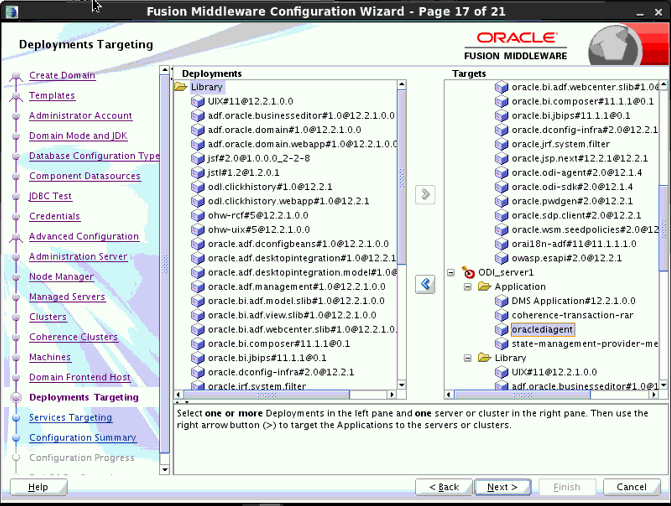
-
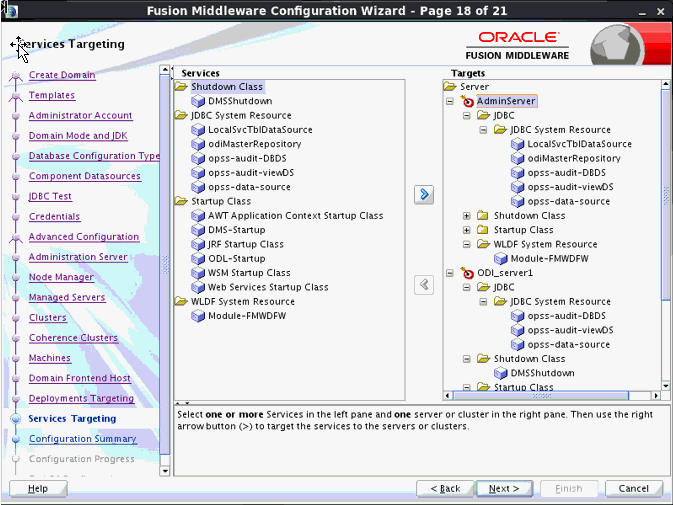
Under Services in the left pane, select odiMasterRepository and move it under the ODI_Server.
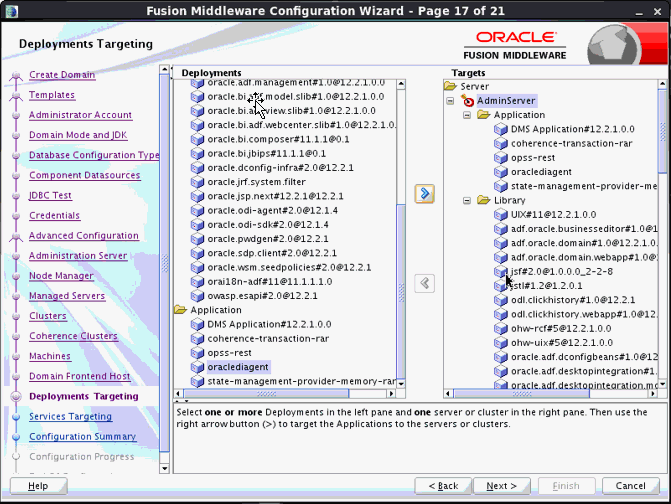
-
In the Deployments targeting page, ensure 'odiMasterRepository' is available.
-
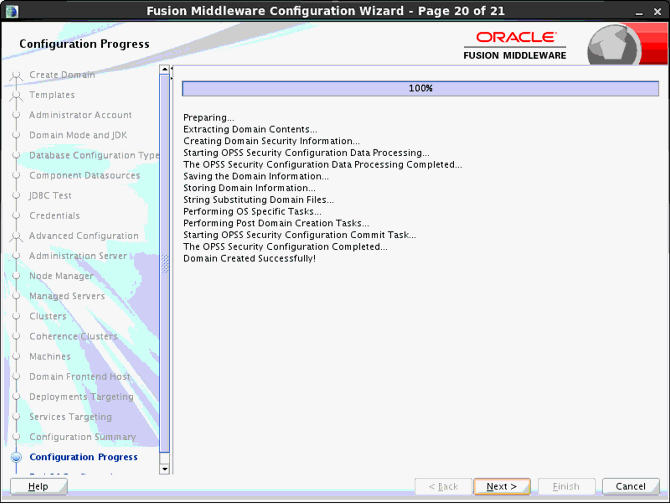
Select Next and then select Create to create the domain. Check for Domain creation Success.
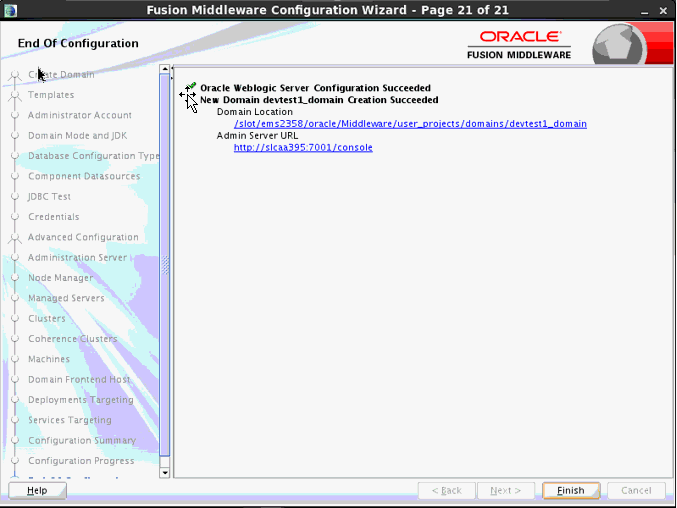
-
Select Next and note the configuration details. Note the Admin Server URL.
The Port number in the Admin server URL will be the Agent Port number.
-
Select Finish to complete.
Check Domain and Agent folders
-
In the Middleware folder should be a domain created, and should have configured with agent.
Example: <ORACLE_HOME>/Middleware/user_projects/domains/<ODI_Domain>/bin
Here the domain is ODI_Domain
-
The domain should have agent configured in it's sub directories. The agent name should be same as the agent deployed in wls in point #2.2.
Example: <ORACLE_HOME>/Middleware/user_projects/domains/ODI_Domain/config/fmwconfig/components/ODI/OracleDIAgent
-
Ensure that the OracleDIAgent folder/directory has an instance.properties file available.
Example: <ORACLE_HOME>/Middleware/user_projects/domains/ODI_Domain/config/fmwconfig/components/ODI/OracleDIAgent/instance.properties
-
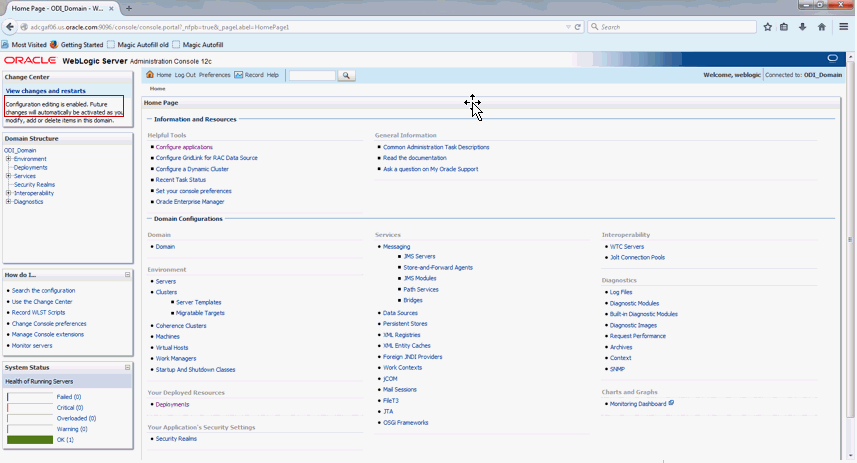
Checking Weblogic Console for Agent Deployment
-
Ensure ODI Agent oracleDIAgent is installed/deployed in WLS.
-
The ODI Agent should be deployed WLS and should be up and running.
-
Logon to the WLS URL given in section Weblogic 12.1.3 in the environment page.
-
-
Select Deployments.
-
Expand OracleDIAGent displayed in Name section.
The health should be OK and the state should be Active.
Enabling Webservice Test Page to Get Test Client Option
-
Login to WLS and select the odi_domain.
-
Expand the Advanced Options and select the 'Enable Web Service Test Page' checkbox.
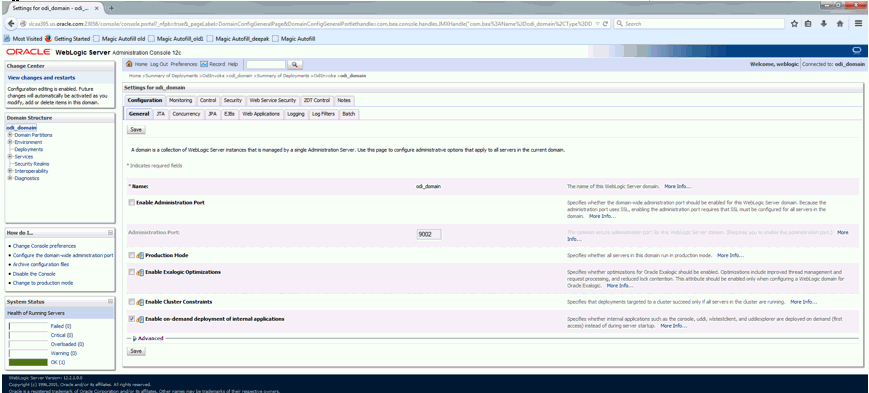
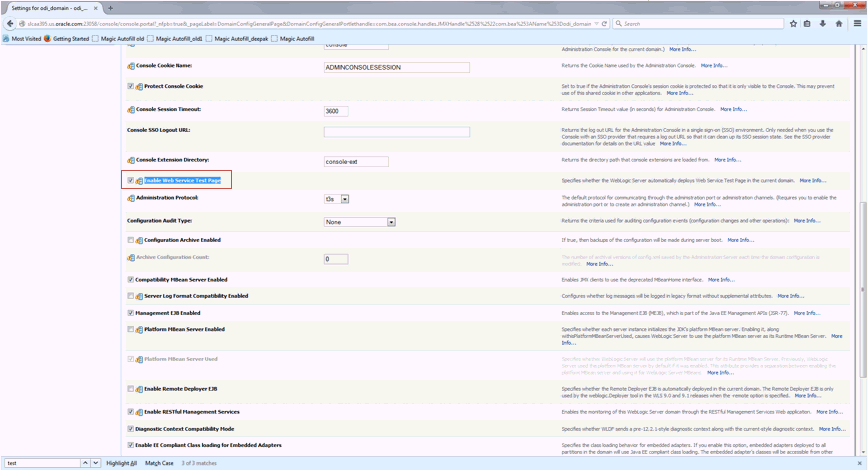
-
Select the save button available at the bottom of the page.
Updating SetDomain.env file
Edit file setDomainEnv.sh in directory <ORACLE_HOME>/Middleware/user_projects/domains/<ODI_Domain>/bin
Go to end of file and add the following commands according to your ODI environment directories created. Save the file.
CLASSPATH=${CLASSPATH}${CLASSPATHSEP}/slot/ems15395/oracle/Middleware/odi/agent/lib export CLASSPATH
Updating msc_e1aps_odi-config.properties file
Update the e1aps_odi-config.properties file with the Port number obtained from the domain creation. The Port number is the number in the Admin server URL.
Update the encrypted Supervisor password using the steps in the above section.
Creating and Testing Agents in ODI
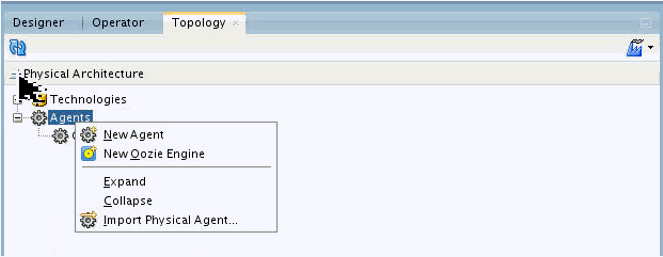
Define Agent in ODI Topology. Navigate to the Topology tab > Agent.
Right click to create a New Agent or Open an existing agent if it exists.
-
Create a new Agent.
-
You can also update an existing Agent.
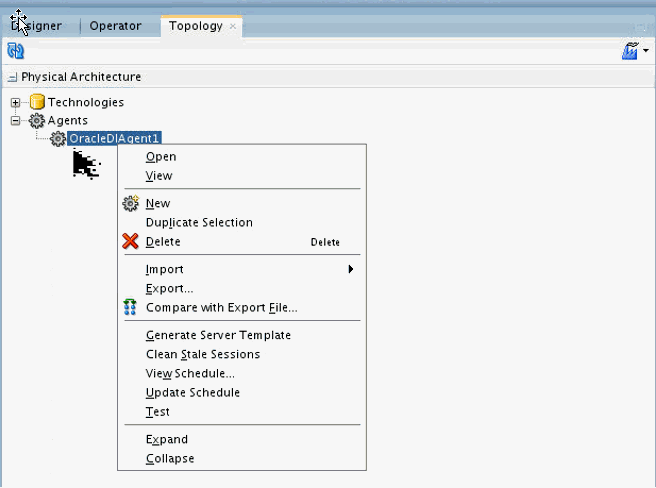
Enter details for the agent and Save.
Name: <Agent Name from the Domain folder>
Host: <WLS host>
Port: <Port number from the Admin Server URL>Save your changes and bounce the WLS Middle Tier.
Updating ODI Variables
Open the ODI Designer and select Variables.
Select a variable and enter the appropriate information in the Default Value field.
FTP Activation Variables
To enable an FTP connection and use a remote server for staging, set the following variables:
| Variable | Description |
|---|---|
| PVV_APS_FTP_FLAG | In the Default Value field, enter Y. |
| PVV_DEM_FTP_FLAG | In the Default Value field, enter Y. |
VCP FTP Variables
To enable an FTP connection and use a remote server for staging, set the following variables:
| Variable | Description |
|---|---|
| PVV_APS_HOST_NAME | In the Default Value field, enter the VCP server host' name. |
| PVV_APS_HOST_USER | In the Default Value field, enter the VCP server user name. |
| PVV_APS_HOST_PWD | In the Default Value field, enter the VCP server password. |
| PVV_APS_TARGET_DIR | In the Default, enter the target directory on the VCP server. |
Demantra FTP Variables
To enable an FTP connection and use a remote server for staging, set the following variables:
| Variable | Description |
|---|---|
| PVV_DEM_HOST_NAME | In the Default Value field, enter the Demantra server host' name. |
| PVV_DEM_HOST_USER | In the Default Value field, enter the Demantra server user name. |
| PVV_DEM_HOST_PWD | In the Default Value field, enter the Demantra server password. |
| PVV_DEM_TARGET_DIR | In the Default, enter the target directory on the Demantra server. |
| PVV_DEM_SOURCE_DIR | In the Default, enter the source directory on the Demantra server. |
Execution Log Variables
To have the execution log files sent to an email address, set the following variables:
| Variable | Description |
|---|---|
| PVV_MAIL_CC | In the Default Value field, enter the email CC address. |
| PVV_MAIL_TO | In the Default Value field, enter the email notification address. |
| PVV_MAIL_SERVER | In the Default Value field, enter the name of the email server. |
| PVV_MAIL_SENDER | In the Default, email address of the sender. |
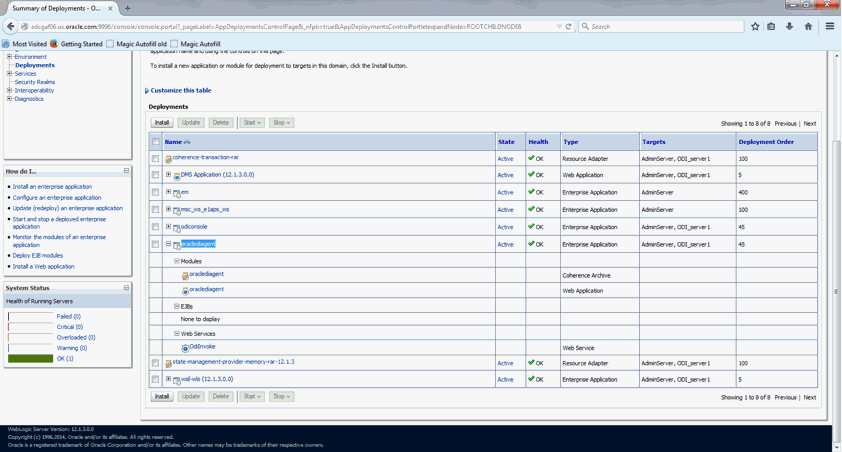
Deploying the VCP Web Service
To run ODI scenarios, the ODI Web Service is invoked from within the collections concurrent programs. This Web Service must be deployed in the weblogic server (WLS).
To deploy the VCP web service
-
Copy the msc_ws_e1aps_ws.ear file to a local directory in the host where WLS is running.
This EAR file is available in the VCP 12.2 patch.
-
Log in to the WLS Admin Server console for the domain where you will deploy the web service.
-
Go to the Summary of Deployments window.
-
Select the Install button.
-
Specify the path to the location of msc_ws_e1aps_ws.ear.
-
Select the Next button.
-
Select the Finish button to deploy the Web service.
-
Retain all default values. These default values should be deployed on the Admin Server.
When the VCP web service is deployed, msc_ws_e1aps_ws is displayed in the list of deployed applications. Its state should be Active and its Health should be OK.
Configuring the VCP Web Service
To configure the VCP web service
-
Select the msc_ws_e1aps_ws link.
-
Select the Configuration tab.
-
In the Session Timeout field, enter 36000.
This value is in seconds.
-
Select Save.
-
Select OK.
The deployment plan is saved.
Testing the VCP Web Service
To test the VCP JDE web service
-
In the Deployments window select msc_ws_e1aps_ws link.
-
Select the Testing tab.
-
Select the TestClient link of MSC_E1APS_ODIService
-
Enter the following values:
arg0: LOADPARAMETERSDATATOWORKREPPKG
arg1: 001
-
Select the ExecuteScenario button.
-
A valid ODI session number is displayed in the Service Response section, indicating that the web service has run successfully.
For example: <return>209811#</return>
This session number should match the session number displayed in the Operator window of the ODI client.
Updating VCP Profiles
To update VCP profiles
-
Copy the VCP JDE web service URL from the Weblogic Test client window.
Ensure that you copy up to and including the ? character
-
In the VCP system, update the following profile values with the copied web service URL:
-
MSC: E1 APS FC URL
-
MSC: E1 APS ODI URL
-
Setting Up the VCP Timeout Value in ODI
The Oracle Data Integrator Timeout parameter should be updated to the maximum value. In the ODI client, select the ODI menu and set up the timeout value in the User Parameters tab.